
AI Summary
Want to let your website visitors send you files without the hassle of email attachments?
If you’re collecting resumes, design proofs, cat photos (no judgment), or any other kind of file, adding a file upload form to your WordPress site makes life easier for everyone.
No email chains, no lost files, and no “Oops, forgot the attachment!” moments. And you don’t need to touch a single line of code to make it happen. Common uses include:
- Job applications: Resumes, cover letters, and portfolios
- Client projects: Design briefs, spreadsheets, and spec documents
- Support tickets: Screenshots, error logs, and screencasts
- Content submissions: Guest posts, images, and audio clips
- Order forms: Signed contracts, proofs, and custom files
Create Your File Upload Form Now! 🙂
In this article, I’ll show you the easiest way to create a WordPress file upload form using WPForms. Your visitors can send you exactly what you need, and you can stay organized without breaking a sweat.
How to Create a File Upload Form in WordPress
Prefer to watch and learn? The video above will walk you through the entire process, or check out the steps below for the most up-to-date information.
- Step 1: Install the WPForms Plugin
- Step 2: Choose a File Upload Form Template
- Step 3: Customize the WordPress File Upload Form
- Step 4: Configure Form Notifications & Confirmations
- Step 5: Add Your File Upload Form to Your Website
- Step 6: View the Uploaded Files in WordPress
- Bonus: Advanced WordPress File Upload Features
Step 1: Install the WPForms Plugin
To start, you’ll need to install WPForms. As the best form builder plugin, you can easily create a file upload form with WPForms, thanks to its drag-and-drop interface. It even has a dedicated File Upload field, which we’ll use in this tutorial.

WPForms comes with 2,100+ form templates that you can use as-is or modify to make them your own. That includes several file upload form templates to help you create your form quickly and accept attachments, such as:
- Documents (.doc, .xls, .ppt, and .pdf)
- Images, (.png, .gif, and .jpg)
- Videos (.mpg, .mov, and .wmv)
- Audio files (.wav, .mp3, and .mp4)
- And more.
If you need help installing WPForms, learn how to install and activate a WordPress plugin. Remember, you’ll need a paid license to use the File Upload field.
Step 2: Choose a File Upload Form Template
Go to your WordPress dashboard and click on WPForms » Add New in the left-hand menu to add a new form.
We’ll use one of WPForms’ 2,100+ form templates to make our file upload form and kick things off!
Scroll down and type “file upload form” in the template search field. When this template appears in the results, move your cursor over it and click Use Template.
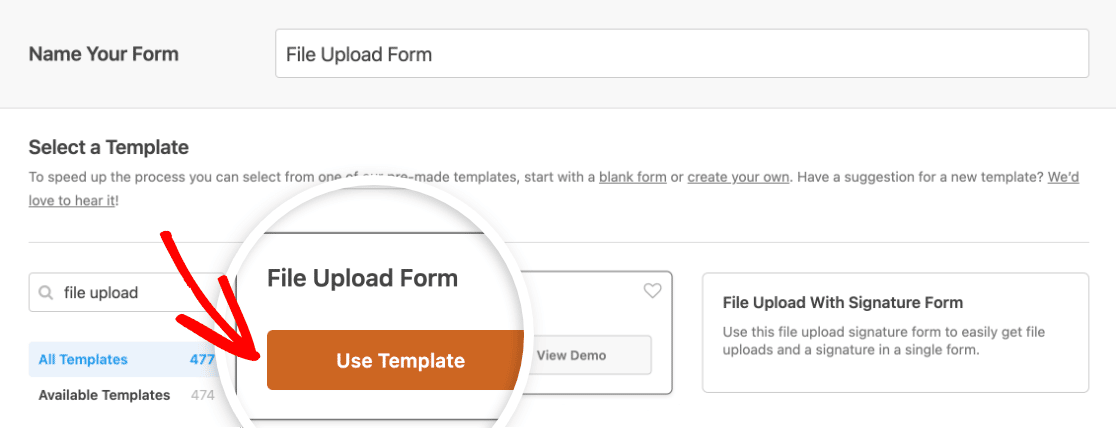
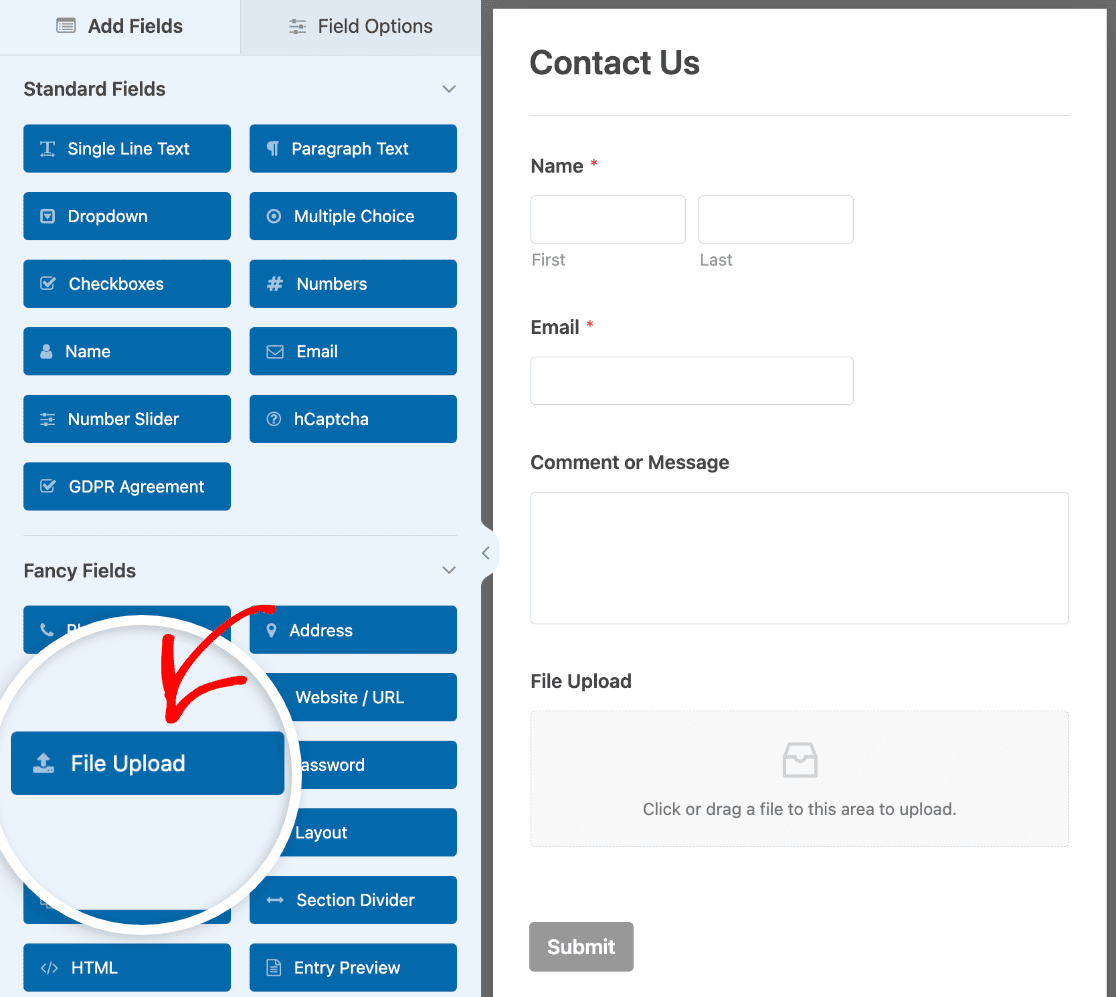
Then WPForms will populate a pre-built File Upload Form, where you can Add Fields via drag-and-drop functionality to the form preview on the right side.

Now we can customize our WordPress file upload form to make it relevant to our website and the customers that will be using it.
Remember that you can add extra fields or move your file upload field to a different spot just by dragging and dropping.
Step 3: Customize the WordPress File Upload Form
With the File Upload Form template, you’ll already have the Name, Email, Phone, File Upload, and Additional Comments fields.
Click on any of the form fields to make changes to its Label, Description, and other settings like setting up Smart Logic.

If we talk about the File Upload field, you’ll notice that it comes with a list of different options for you to customize. These include:
- Allowed File Extensions — If you want to restrict the types of files that can be uploaded to your WordPress form, put them here, each separated by a comma.
- Max File Size — Specify, in megabytes, the max size file you’ll allow users to upload. If you leave this blank, WPForms will default to the maximum file size limit that’s allowed by your web host. If you need to increase it, see this tutorial on how to change the maximum file upload size in WordPress.
- Max File Uploads — If you’ve chosen the Modern style (see below), you can specify how many files users can upload to your form.
- Required — If you want to require that users upload documents to WordPress before they can submit their form, select this checkbox.
In the Advanced tab of the field options panel, you have the following options:
- Style — You can switch between the default Modern style (recommended) and the Classic style. Only the Modern style allows for users to upload more than 1 file at a time.
- Store file in WordPress Media Library — Save files uploaded to this field in your site’s WordPress Media Library.
- Enable File Access Restrictions — Restrict access to file uploads using user role restriction or password protection.
- Enable Camera — Allow users to capture photos or videos directly through the form.
The File Access Restrictions option is worth highlighting. When enabled, you can restrict who can view uploaded files based on WordPress user roles or protect them with a password. This is useful if you’re collecting sensitive documents like contracts, medical records, or financial files. Only users with the right role or password will be able to access the uploads.
The Camera option is another feature I like. It lets visitors on mobile devices take a photo or record a video directly from the form without leaving the page. So if someone needs to submit a photo of a damaged product for a warranty claim or capture their ID for verification, they can do it right on the spot.
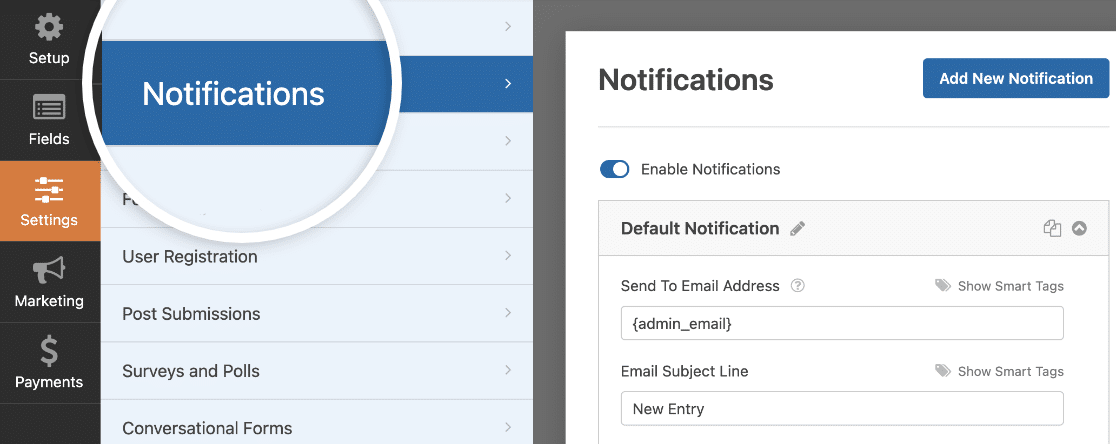
Step 4: Configure Form Notifications & Confirmations
Notifications are an excellent way to know when someone submits one of your file upload forms. All forms in WPForms have notifications enabled by default.
- To get an email message when someone completes your form, you’ll need to set up form notifications in WordPress and provide your email address.
- You can also send a notification to the respondent if you’d like to let them know that their entry has been successfully submitted. For more on this, check out our step-by-step guide on how to send multiple form notifications in WordPress.
There are 2 ways you can include your form’s uploaded file(s) in the email notification. The recommended option is to use Smart Tags to add a link to the body of the email.
Using Smart Tags means the image itself is not included in the email. That can help to avoid emails being tagged as spam.
If you’d like to include the image as an attachment, can scroll down to the Advanced settings for the notification and Enable File Upload Attachments.
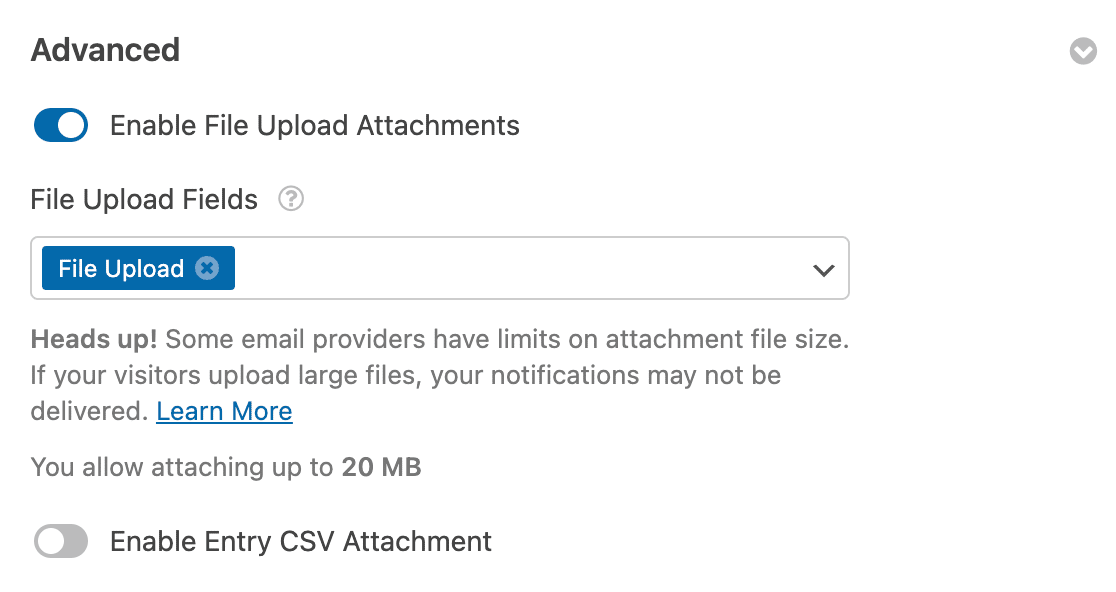
Keep in mind that email providers may have limits on the size of the attachments you can send from your site, so it’s best to test your form when you launch it.
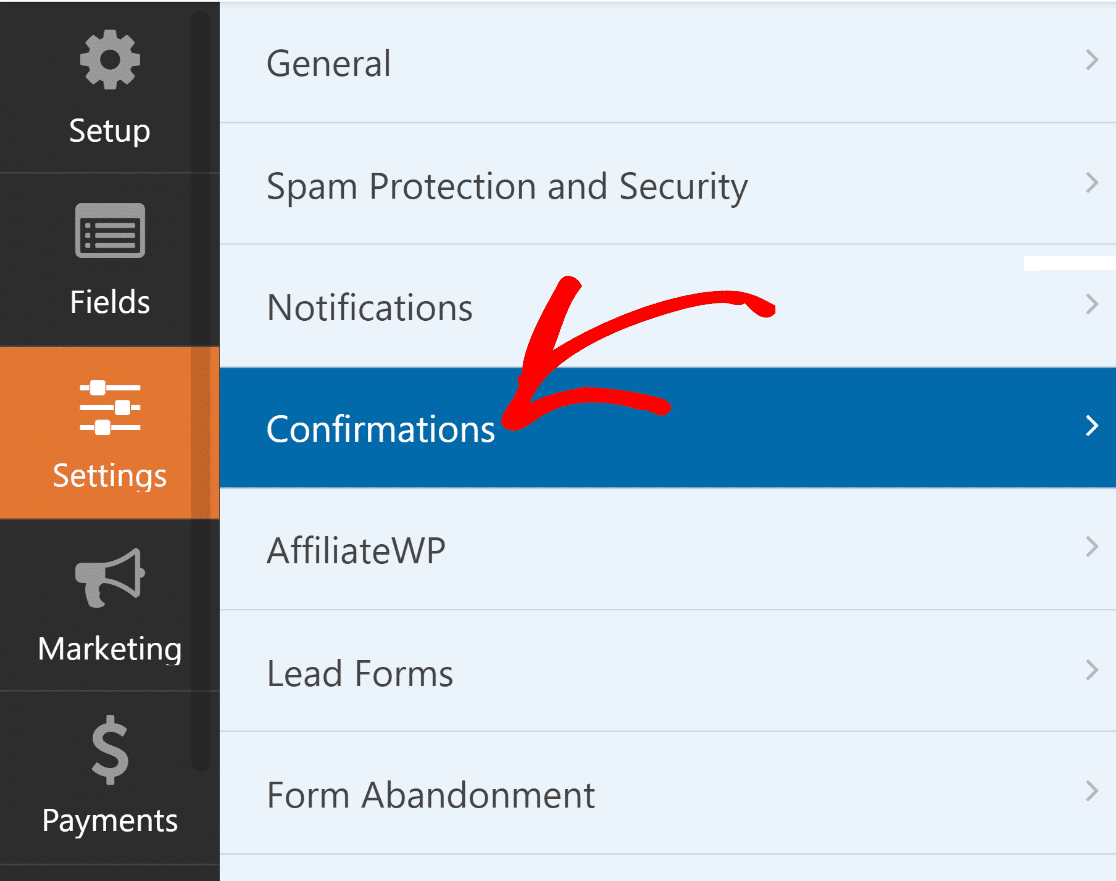
Once you’ve set up the form notification, you can go ahead and check out our tutorial on how to set up form confirmations. To start, click on the Confirmations tab in the Form Editor under Settings.
There are 3 different kinds of confirmations in WPForms:
- Message — This is the default confirmation type. It displays a message after someone hits submit on your form, and is customizable.
- Display Page — Automatically sends users to any post or page on your site like a thank you page.
- Redirect — Useful if you want to take the user to a different website or specialized URL for more complex development.
Select the type of confirmation type you’d like to create. For this example, we’ll select Message and add a basic confirmation message.
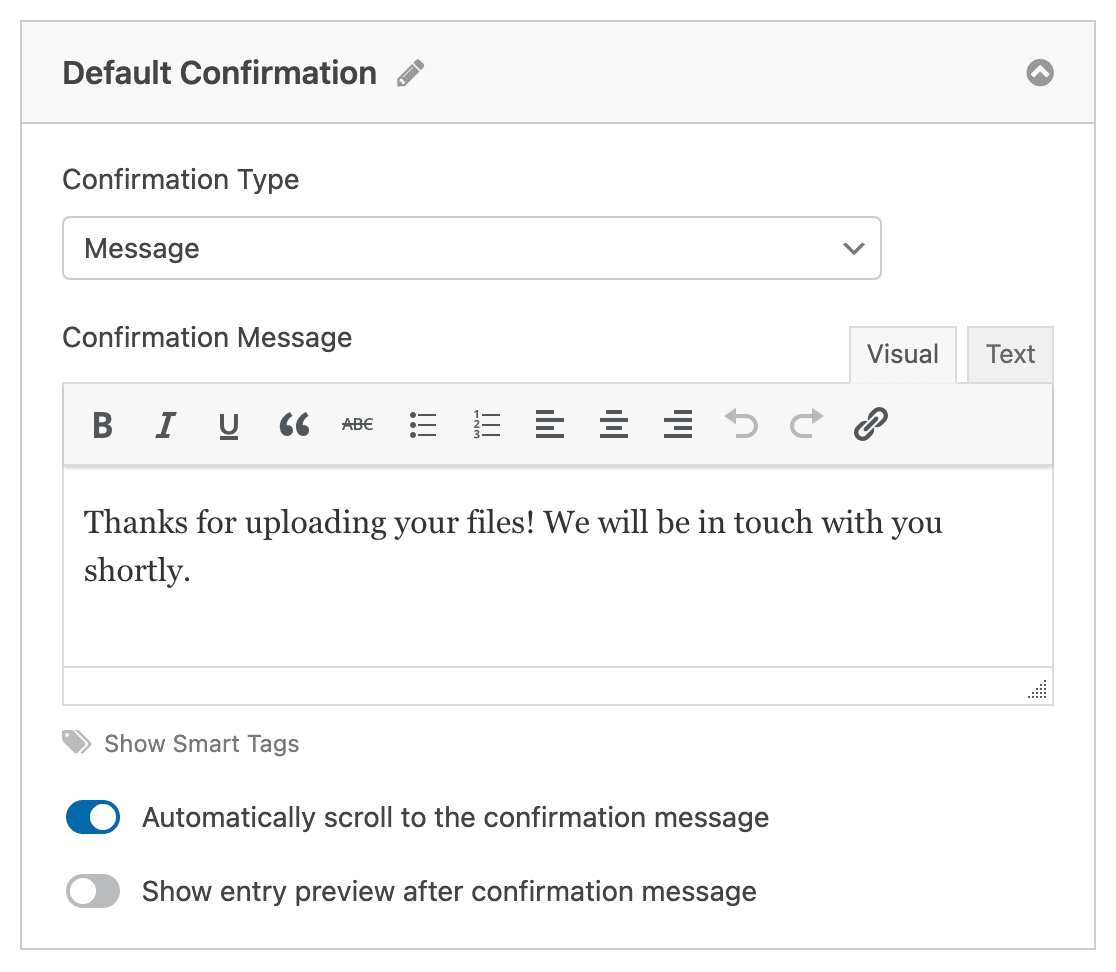
Feel free to customize the confirmation message to your liking and click Save when you’re done. Now you’re ready to add your form to your website.
Step 5: Add Your File Upload Form to Your Website
After you’ve created your form, you need to add it to your WordPress site.
And WPForms lets you add your forms to multiple places on your WordPress website including your pages, blog posts, and sidebar widgets.
To begin to embed your file upload form, create a new page or post in WordPress, or go to the update settings on an existing one.
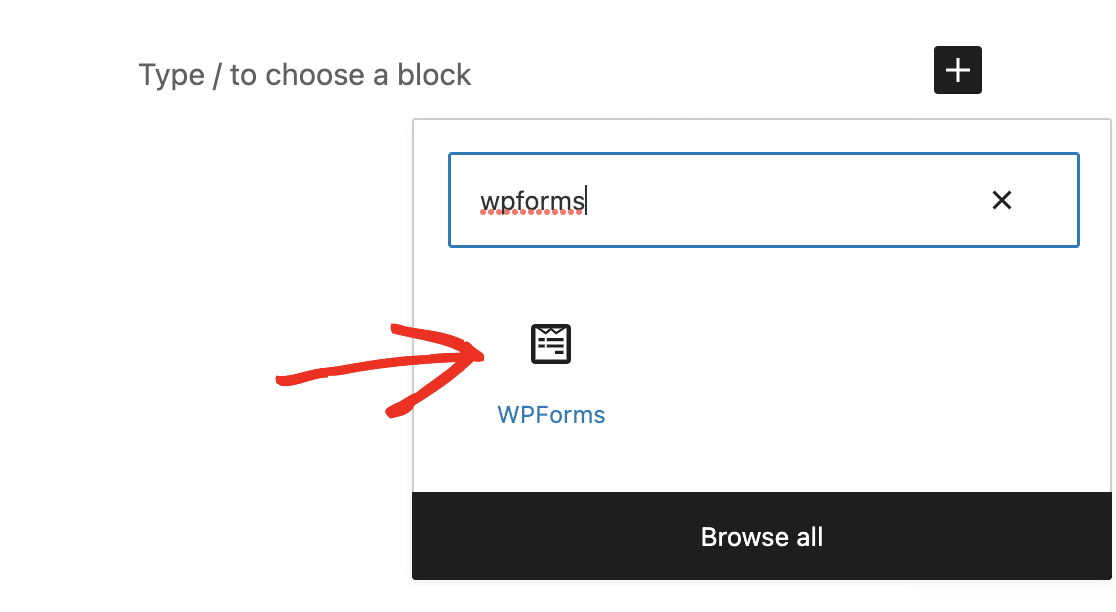
After that, add a new block and select the WPForms icon to proceed and add your form to the page/post.
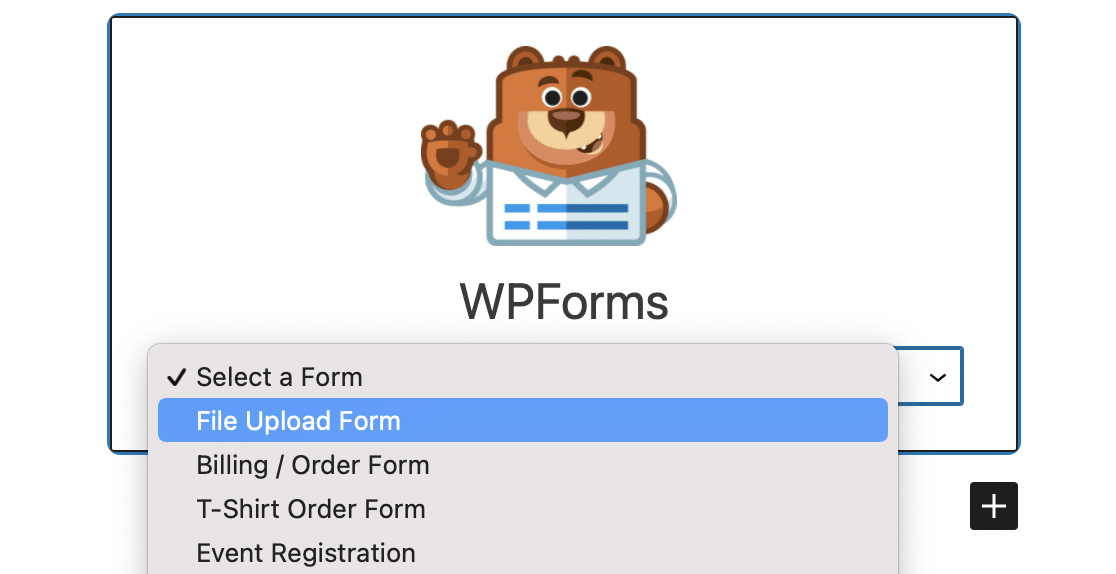
Click on the WPForms dropdown and pick the form you’ve already created that you want to insert into your page. So select your file upload form.
Next, click on the blue button in the top right that says either Publish or Update, so your form will appear on your website.
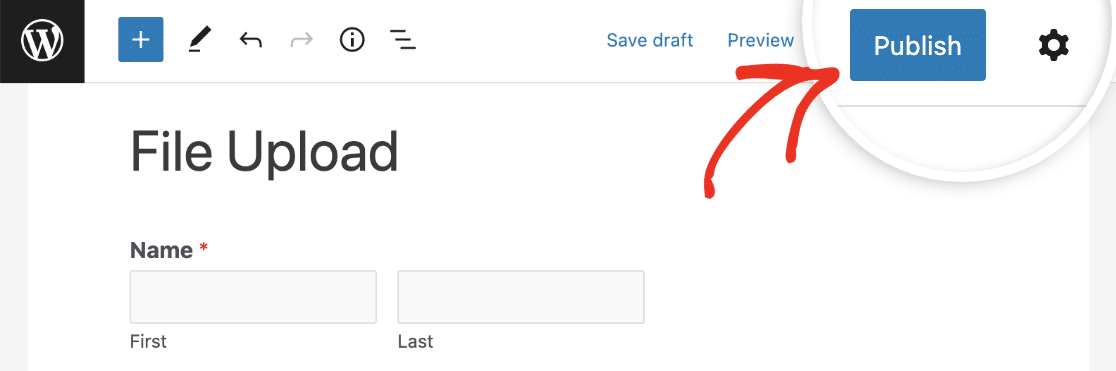
That’s it! Your file upload form is now live on your website and ready to start accepting attachments from your users.
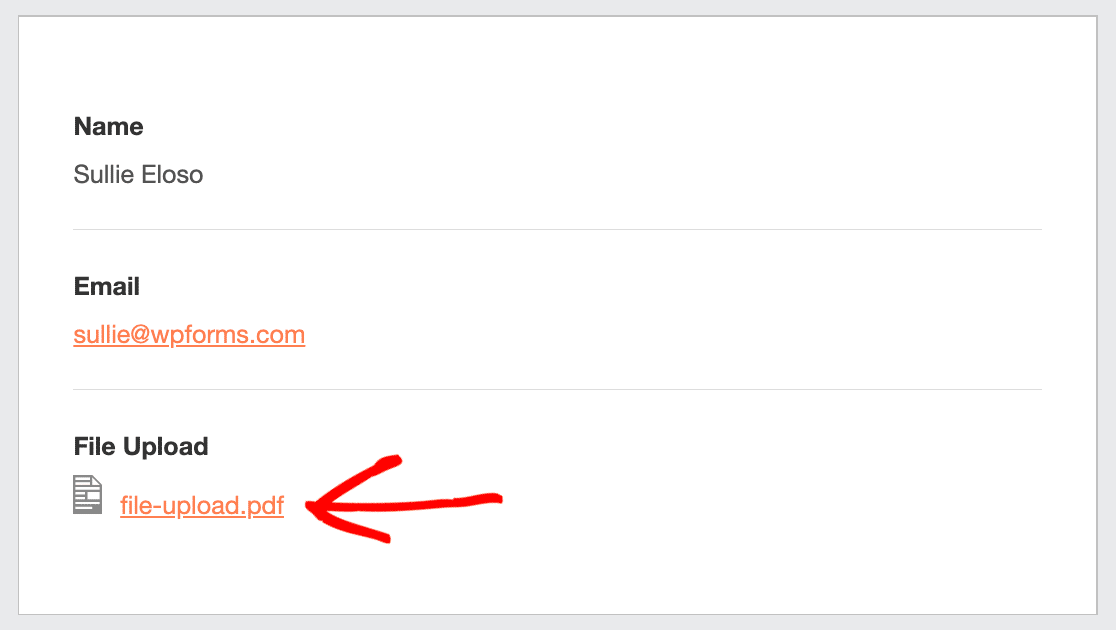
Step 6: View the Uploaded Files in WordPress
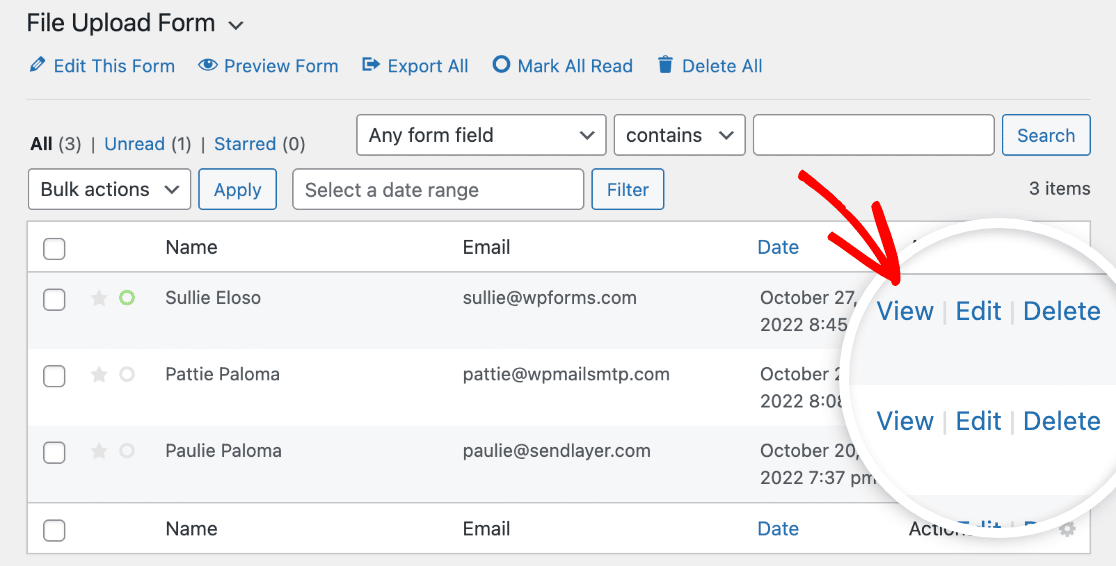
WPForms stores each form submission as an entry. To view uploaded files, go to WPForms » Entries.
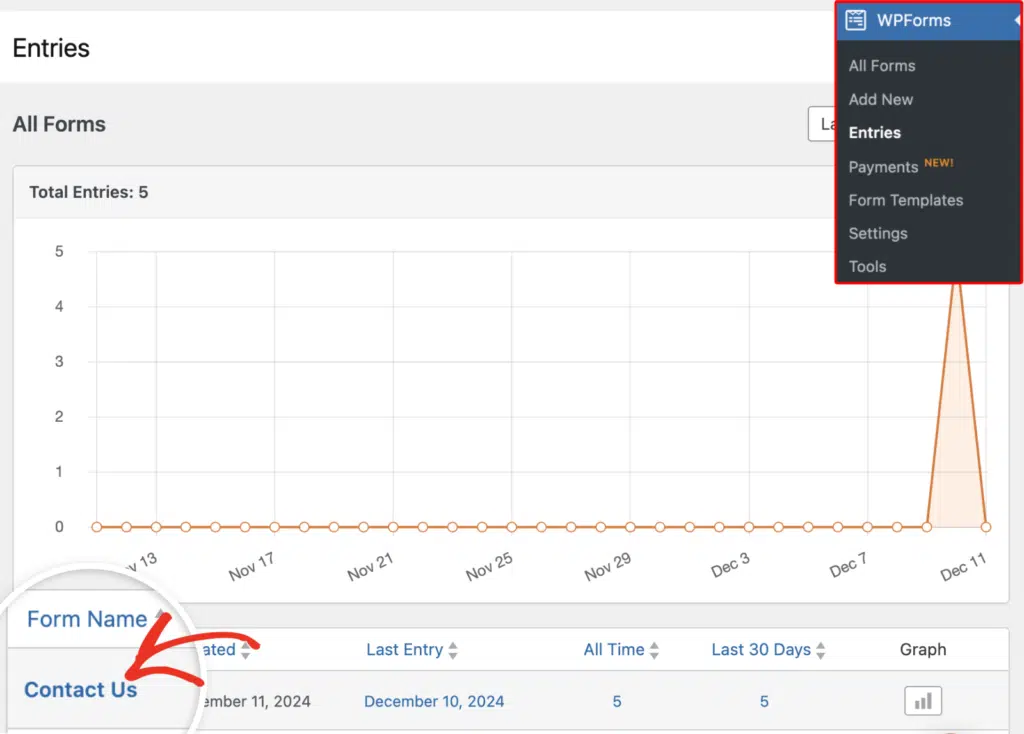
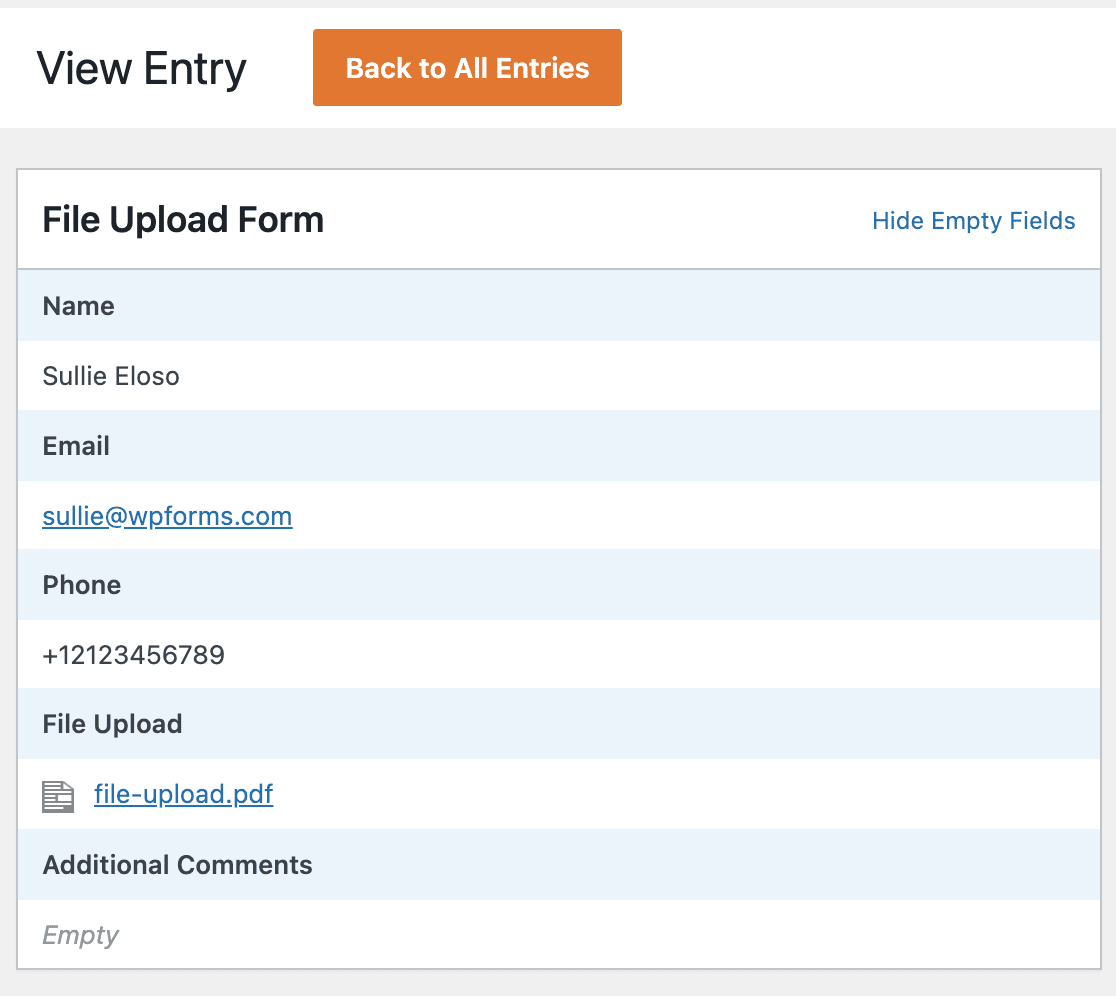
And from there, select the right form from the list and click on View to view details and attachments related to the specific entry.
Next, right-click the file to download the file, or click to view it in your browser, the choice is up to you!
Better yet, the WPForms WordPress plugin has tons of addons you can install so you can do more with your files.
For example, you can use our Zapier addon to automatically save all file uploads to different services, such as:
- Google Drive
- Dropbox
- And many other cloud storage services
Create Your File Upload Form Now
Bonus: Advanced WordPress File Upload Features
Once your file upload form is live, there are a few extra features worth knowing about. These can help you stay organized, keep files secure, and handle more complex workflows.
Auto-Sync Uploads to Cloud Storage
Instead of downloading files from your WordPress dashboard manually, you can automatically send uploads to the cloud service you already use. WPForms integrates with:
- Google Drive — Automatically save uploaded files to specific Drive folders
- Dropbox — Route file submissions directly to Dropbox
- Amazon S3 — Store uploads in S3 buckets for large-scale file handling
This is especially useful if your team works in Google Workspace or manages files across multiple projects. Files land where they need to go without extra steps.
File Upload Security
Accepting file uploads means you need to think about security. A few things to keep in mind:
- Use the Allowed File Extensions field to restrict uploads to only the file types you actually need
- Set a Max File Size to prevent oversized uploads from eating through your hosting storage
- Enable File Access Restrictions (covered in Step 3) to lock down who can view submitted files
- Consider using reCAPTCHA or Turnstile on your form to block spam submissions
For a deeper look at protecting your forms, check out our guide on file upload security best practices.
Multiple File Uploads
If you need visitors to send more than one file at a time, the Modern upload style supports multiple file uploads in a single field.
You can set the exact number of files allowed using the Max File Uploads setting in the field options. For a full walkthrough, see our tutorial on how to create a contact form with multiple file uploads.
FAQs About WordPress File Upload Forms
File upload forms are one of the most popular topics among our readers. Here are answers to the most common questions about creating and managing WordPress file upload forms.
Why Use a File Upload Field on My Forms?
You might need to add a file upload field to your WordPress forms so users can upload documents to WordPress as well as other types of files and media as they submit their forms to you.
What Kinds of Forms Can I Create?
One of the most common uses of a file upload field is in job application forms so applicants can attach their resume files and other important documents. However, there are countless other scenarios where a WordPress file upload form can come in handy, such as:
- User-submitted content forms so users can attach a blog post or image they want to share
- Client services forms so clients can attach their spreadsheets or project spec documents
- Customer support forms so customers can attach screenshots or screencasts of their issue
- A CSV file upload form so visitors can send you orders or timesheets
- Order forms where you want to require payment with the file upload
What File Formats Does WPForms Accept?
When you create an image upload form, WPForms uses the same defaults as WordPress:
- Images (.png, .gif, and .jpg)
- Documents (.doc, .xls, .ppt, and .pdf)
- Video (.mpg, .mov, and .wmv)
- Audio (.wav, .mp3, and .mp4)
Sometimes you’ll want to accept file uploads that WordPress doesn’t allow by default. There’s an easy way to do that. Here’s how to allow additional file upload types to your forms using a free plugin. It lets you specify the file format and MIME type for each additional file extension.
If you’d like to increase the maximum upload image size for your site, check out this tutorial on increasing the maximum file upload size in WordPress.
How Do I Increase the File Upload Size Limit in WordPress?
By default, most WordPress hosts set the maximum file upload size between 2MB and 64MB. If you need to accept larger files, you can increase this limit in a few ways: editing your php.ini file, adding a line to your .htaccess file, or contacting your hosting provider to adjust the setting. For a full walkthrough, check out our guide on how to change the maximum file upload size in WordPress.
Can Visitors Upload Multiple Files at Once?
Yes. When you use the Modern upload style in WPForms (which is the default), visitors can drag and drop multiple files into a single upload field.
You control the maximum number of files through the Max File Uploads setting in the field options. For step-by-step instructions, see our tutorial on creating a contact form with multiple file uploads.
How Do I Keep File Uploads Secure?
WPForms gives you several tools to protect uploaded files. You can restrict allowed file extensions, set size limits, and enable File Access Restrictions to limit who can view uploads by user role or password.
Adding reCAPTCHA or Cloudflare Turnstile to your form also helps block spam and malicious submissions. For more tips, read our guide on file upload security for online forms.
Can I Automatically Save Uploads to Google Drive or Dropbox?
Yes. WPForms has dedicated addons for Google Drive, Dropbox, and Amazon S3 that automatically sync file uploads to your cloud storage.
You can also use the Zapier addon to connect with hundreds of other cloud services. Files are saved to the folder you specify, so your team can access them without logging into WordPress.
Is It Possible to Accept File Uploads Without a Plugin?
Technically, you can code a custom file upload handler using WordPress hooks and PHP, but it requires significant development work and opens up security risks if not done carefully.
A form builder plugin like WPForms handles file validation, size limits, storage, spam protection, and access restrictions out of the box. For most sites, using a plugin is faster, safer, and far easier to maintain.
Next, Create a File Upload Widget in WordPress
If you want to allow site visitors to upload files directly to your website using a widget, be sure to check out our helpful guide on how to create a WordPress file upload widget and make it easier to collect the information you need!
Create Your File Upload Form Now
Ready to build your form? Get started today with the easiest WordPress form builder plugin. WPForms Pro includes lots of free templates and offers a 14-day money-back guarantee.
If this article helped you out, please follow us on Facebook and Twitter for more free WordPress tutorials and guides.


I am not rattling good with English but I find this really leisurely to read .
Hi Parker, thanks for your feedback!
We are glad that you find it helpful.
Have a good one 🙂
some truly nice and useful info on this internet site, too I conceive the design and style contains great features.
Hi Hai!
Thanks, for your feedback, we are glad that you like it!
Have a good one 🙂
Hello,
how can a change the text “click or drag a file to this area to upload” (to Dutch) ?
regards,
Marcel
Hi Marcel!
Thanks for your question.
This can be changed with “Loco Translate” plugin.
If you will have difficulties with it, please contact our support team. If you have a WPForms license, you have access to our email support, so please submit a support ticket.
Otherwise, we provide limited complimentary support in the WPForms Lite WordPress.org support forum.
I hope this helps.
Have a good one 🙂
How can this be used to allow users to upload multiple files and have them all linked to the submitted post?
Hi Hiren, thanks for the question!
In the Post Submission form, you can only use individual File Upload fields, as you will have to add custom fields to your posts and there is no custom field type to store multiple files. However, if you will upload images only, then you can use the Image Gallery custom field and use multiple Upload Files field in your post submission form.
In case it helps, we have a great tutorial on how to create a post submission form in WPForms.
I hope this helps.
Have a good one 🙂
If i wanted to use this form builder to take their name ,contact and mailing address along with submitted customer pictures and text to sell My POD merchandise. How Can i link this to my paypal acct and autoresponder account? To take their order?
Hi Steve,
In order to connect WPforms with PayPal and add the PayPal payment options to your form, you can use our PayPal addon, which is available with the Pro license level or higher. I’m not aware of the Autoresponder service that you have mentioned, but you can check if it’s available in Zapier – the connection service, then you should be able to integrate it with WPforms through our Zapier addon.
I hope this helps!
Have a good one 🙂
Hi, thank you for you plugin, I am using basic plan.
How I can send attachment with entry confirmation to manager? It forwards only text fields, but not an attachment.
This is an issue when using staging / live environments at hosting, as during I am preparing updates on staging there are a lot of submissions at live version and then, after pushing staging to live all attachments are lost.
Thank you.
Hi Volodymyr.
WPForms doesn’t support including attaching files to emails currently. The reason is that it can often hurt email deliverability. Different email providers have different limits on the type and size of files they can accept. Sending files that don’t pass these rules most often means the email won’t get delivered or will bounce.
I hope this makes sense.
Have a good one 🙂
Hi, what is the maximum file size allowed in the forms? Could this make the WP site slower?
Hey Jana – The file upload size limitation in your forms defaults to the maximum that your web host allows. You can lower this limit from the form settings though. In general, having high file size won’t affect overall site speed but it will take more time to upload big files and users need to wait for a longer time to submit the form, Also your server should have sufficient space to store big files.
I hope this info helps!
can i share the attach file in google drive sheet ?
Hey Mauro – Yes, you can send the form data to Google sheet using our Zapier addon(available with Pro license or higher). Here is a tutorial on how to connect your form to Google sheet.
I hope this helps!
how can change or edit file upload
Hey Tim — I apologize, but I’m not sure I understand your question. When you get a chance, could you please share more details, or possibly an example of what you’re looking to do? Thanks!
Hi there, Thanks for this article.
Using the Modern Style, how can I upload an image and display it in the same box after it has been uploaded; i.e. after clicking the submit button?
Thanks
Hey Noel – I am afraid this can’t be done at the moment. We will keep it on our roadmap for the future. Thanks for the suggestion!
Have a good one 🙂
How to get the link to view an uploaded file in a different page of wordpress?
Hey Debajyoti – If you’d like to include uploaded files on a WordPress page/post, then I’d recommend setting up the File Upload field to send files to the WordPress Media Library (you can check out more details on that setting here). This will let you easily access those files as you’re using the WordPress page/post editor.
I hope this helps! If you have more questions about this, or if I’ve misunderstood your question in any way, please contact our support team. We’d be happy to help more from there! 🙂
when uploading a audio file, it does not post to the blog but the title and info does but not the audio player. how do I get the audio player or video player to appear on the blogpost with submitted post?
Hey Joe,
I am sorry as currently, we don’t have an inbuilt feature to embed the uploaded audio/ video into their respective audio/video player in the blog post. I’ve made a note of the feature request and we’ll keep it on our radar as we plan out our roadmap for the future.
I apologize for the inconvenience!
Is there a chance to combine it with some sort of double-opt-in?
Otherwise I have to rely on third party stuff like borlabs or the like.
Hey Till – I am afraid we currently don’t have a built-in double optin feature in the form. If it helps we have addons for various email marketing services and most of these services have double optin features which you can use via WPForms. For example, we have addons for most of the email marketing services mentioned here. Please take a look at the pricing page to know which addon is available with which license.
I hope this helps!
Where to find this filein file manager
Hey Hardik- Good question!
By default, the user-uploaded files are stored in the WPForms folder inside the Uploads directory of your site. (wp-content/uploads/wpforms)
I hope this helps! If you have any questions, please feel free to get in touch with our team.
Thanks, and have a good one 🙂
FILE UPLOAD IS NO LONGER FREE IN WPFORMS!
I just lost abou an hour creating a form e when I got to the file upload part, I just couldn’t make it. So frustrating. please, update your post.
Hi Lucas, I’m sorry to hear that you’re having some issues with the File Upload field on your form. The File Upload field is only available with any of our Pro (paid) versions of WPForms as mentioned in the article. Our Lite (free) version does not include the File Upload field. If you’re having issues with the File Upload field with one of our Pro versions, please contact us if you have an active subscription.
If you do not, don’t hesitate to drop us some questions in our support forums.
How can I download files collectively?
People send me about 300 photos and I want to download it faster than clicking every link.
Is it possible?
Thank you.
Hi Martin! We don’t have any options that would enable you to download all the files at once, as the entries are stored in their own post within your site’s database. You could download files in batches if you access your site’s server via FTP, or the File Manager in your hosting dashboards cPanel. By default, the user-uploaded files are stored in the Uploads directory of your site, inside the WPForms folder. More details about our File Upload field can be found in this article.
I hope this helps to clarify 🙂 If you have any further questions about this, please contact us if you have an active subscription. If you do not, don’t hesitate to drop us some questions in our support forums.
Is it possible to let users upload mp4 files, videos from their iphone or other device?
Hi Joris- Great Question!!
With the File Upload field, you can absolutely allow the users to upload media files by defining the file types in “Allowed File Extension Field”
Also, for other Additional File types, please refer to this guide.
Hope this helps 🙂
Is it possible to rename files while uploading with the username in it?
thanks
Hey Theirry- Great question. File upload names are preserved, but we add a unique hash to the end of the file name as you probably noticed (eg: my-logo-570543445db74.png). This is done for security purposes, to prevent users from trying to “snoop” for the files on your server after they have uploaded them, which is common when someone is trying to be nefarious.
By default, WPForms (and WordPress) will not allow any files to be uploaded that could be harmful to your website or that could be exploited. However, we add the hash to the file so that malicious users couldn’t easily open up a bunch of files that have been uploaded to your site.
Customizing the File Name with the respective user name can be possible. However, I apologize as we aren’t able to provide support for this degree of customization.
In case you’d like to look into custom development options, we highly recommend using Codeable. Codeable screens all developers for you to make sure that they’re highly skilled and communicative, and then also helps guide the entire process of connecting and communicating with a best-fit developer.
Here’s our tutorial on using Codeable, which provides more details on how this process works.
Thanks!! 🙂
Are all of these uploaded files searchable by keywords? I’m trying to do something like there where I can have users upload files and fill in keywords in the upload form. And then other users can search via keyword for those files.
Hi John. Thanks for reaching out to us.
The File upload names are preserved, but we add a unique hash to the end of the file name as you probably noticed (eg: my-logo-570543445db74.png). This is done for security purposes, to prevent users from trying to “snoop” for the files on your server after they have uploaded them, which is common when someone is trying to be nefarious. It should be possible to search through your file depending on the File name. However, we don’t have a native feature to achieve this at the moment.
As a workaround, you can display the entries on the front end using this custom code and for further customization of integrating a search feature, we suggest you codeable or WPBuff.
Thanks and have a good one!
Instead of saving upload url in database, is it possible to save attachment id against the field value while using upload field?
Hey Sandeep, that should be possible to do that by hooking into the wpforms_process_complete action and modifying the ready-for DB file upload values shown here.
With that said, to achieve what you are looking for, you will need some custom implementation and we suggest using codeable or WPBuff.
I hope this helps!
Would it be possible to trigger a webhook when an upload is done and if so, can the payload contain a URL to the uploaded file?
Hello Erik – When you get a chance, please drop us a line with more details about your requirements in support so we can assist further.
If you have a WPForms license, you have access to our email support, so please submit a support ticket.
Otherwise, we provide limited complimentary support in the WPForms Lite WordPress.org support forum.
Thanks 🙂