AI Summary
Would you like to allow your users to make payments directly through your WordPress forms? WPForms makes it easy to accept payments on your website through PayPal Standard, PayPal Commerce, Stripe, Square, or Authorize.Net.
This tutorial will show you how to create a payment form using WPForms.
Requirements: You will need a Pro license or higher to use the Stripe Pro, Square, PayPal Standard, and PayPal Commerce addons. To use the Authorize.Net addon, you will need an Elite license.
To get started, you’ll first need to ensure WPForms is installed and activated on your WordPress site and that you’ve verified your license.
Choosing a Payment Integration
WPForms currently offers integrations with PayPal Standard, PayPal Commerce, Stripe, Square, and Authorize.Net. Before you continue, choose which of these payment options you’d like to add to your forms.
If you’d like, you can offer multiple payment methods and let users choose which one they want to use to complete their purchases.
Once you’ve chosen the payment method(s) you’d like to offer, install and activate the corresponding WPForms addon(s).
Note: If you’re using the PayPal Commerce, Stripe, Square, or Authorize.Net addons, you’ll need to connect your account to WPForms before you move on to the next step in this tutorial.
See the corresponding guide for your chosen payment method(s) for more details:
For our example, we’ll walk through how to set up a payment form using the Stripe addon. However, the steps are similar regardless of which payment method you use.
Creating Your Form
Next, you’ll need to either create a new form or edit an existing one.
If you’re creating a brand-new form, you may want to consider using our Billing/Order Form template.

Note: For payment form examples, check out our Billing/Order Form Template and Payment Form Template, or see our tutorial on using templates in WPForms for more details.
In the form builder, be sure to add a payment field to your form if you haven’t already. Just click on it in the list to the left or drag and drop it into the preview area to include it. For our example, we’ll use the Multiple Items field.

Additionally, if you’d like to use the Authorize.Net, Stripe, or Square payment methods, be sure to add the corresponding credit card field to your form.

When setting up your payment form, you can activate quantity selection for Single Item and Dropdown Items fields, enabling users to order multiple quantities of a specific product on your form.
Note: For a comprehensive guide on enabling and customizing quantity selections, check out our detailed tutorial on adding quantity to payment items.
Don’t forget to configure your field options for any new fields you add to your form.
Allowing Coupons/Discounts for a Form (Optional)
With the Coupon field, you can allow customers to use personalized or automatically generated coupon codes.
Customers can apply these codes for discounts when filling out your payment form. This could encourage more users to complete their purchases.

Note: For more information on creating coupons and adding them to your forms, check out our Coupons addon tutorial.
Using the Total Field
We recommend adding the Total field to your form. This field is helpful as it automatically calculates the total cost of items users pick.
It also includes an option for the order summary that details purchased items, quantities, costs, and any applied coupons, making the transaction clearer for the user.
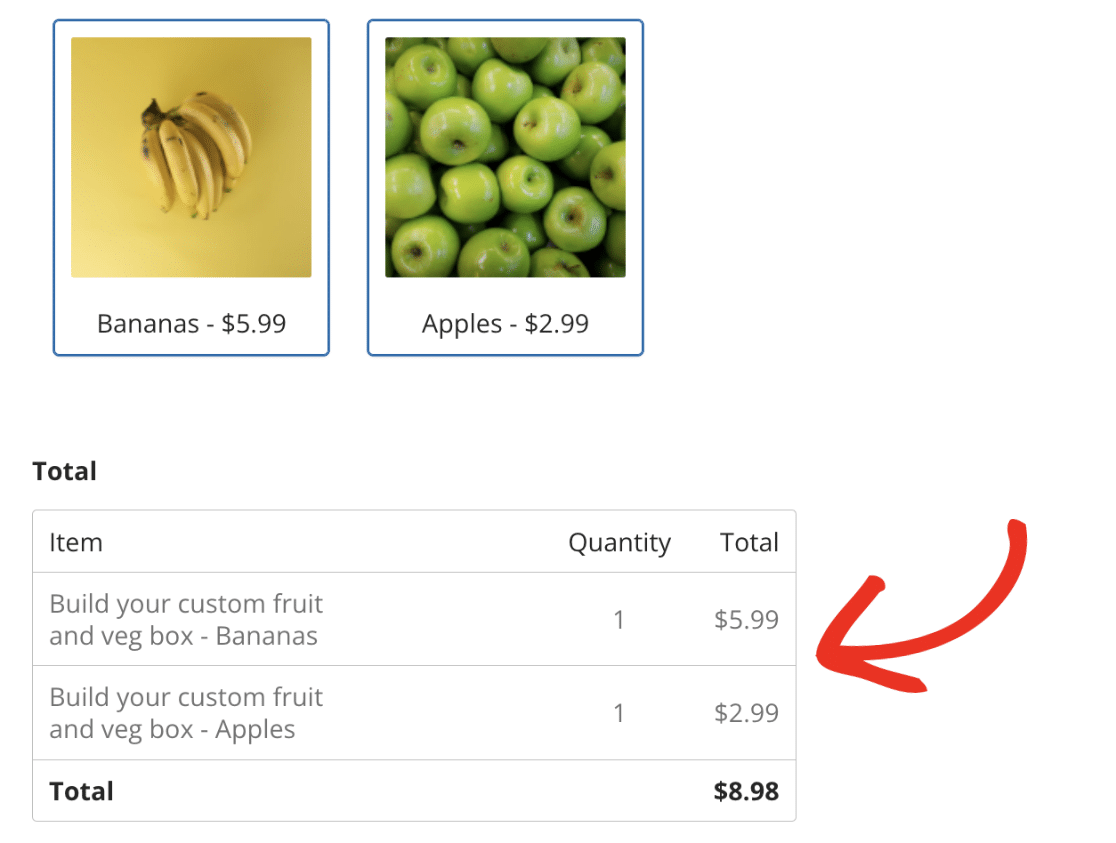
Note: For more information on how the Total field works, refer to our guide on using the Total field for detailed instructions.
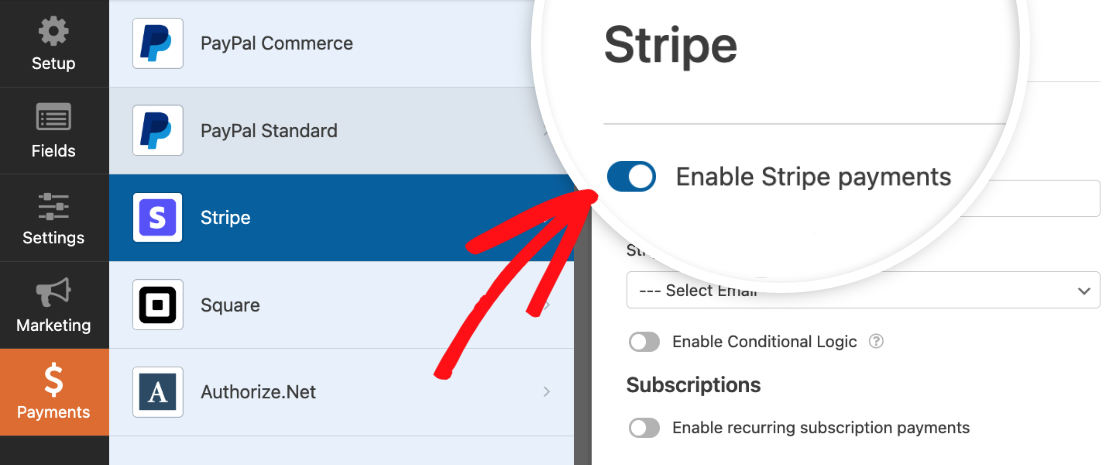
Enabling Payments for a Form
To enable payments for your form, navigate to the Payments tab and select the payment integration you’ve configured. For our example, we’ll go to Payments » Stripe to open up the Stripe settings.
Here, we’ll select the Enable Stripe payments option to enable Stripe payments for our form.
Once you’ve enabled payments for your form, go ahead and customize the other settings for this connection however you’d like. Remember to save your form before you leave the builder.
Note: For the full details on how to set up your specific payment addon, be sure to check out our PayPal Standard, PayPal Commerce, Stripe, Square, and Authorize.Net tutorials.
Testing Your Form
Once your form is all set, we recommend one last step: testing. Testing your forms is super useful because it lets you understand how your users experience your forms. It also allows you to ensure that everything looks and works exactly as you’d like.
For more details on how to test your specific payment integration, be sure to check out our tutorials on:
- PayPal Standard Integration: Learn how to test your PayPal Standard forms.
- PayPal Commerce Setup: Get guidance on testing your PayPal Commerce forms.
- Stripe Payment Processing: Steps to test your Stripe forms.
- Square Payment Solution: Instructions for testing your Square forms.
- Authorize.Net Gateway: How to test your Authorize.Net forms.
For more general details about testing your forms, please check out our pre-launch form checklist.
That’s it! You’re ready to start accepting payments through your WordPress forms.
Next, would you like to record which pages on your site your users visit before filling out your forms? Be sure to check out our tutorial on how to install and use the User Journey addon for more information.