AI Summary
Would you like to use PayPal Commerce to manage payments on your WordPress site? The PayPal Commerce addon for WPForms makes it easy to process credit card and PayPal payments through your forms.
This tutorial will show you how to install and use the PayPal Commerce Pro addon for WPForms.
Requirements: To use the PayPal Commerce Pro addon for WPForms, you’ll need:
- A Pro license level or higher
- A PayPal Business account
- To install the latest version of WPForms to meet the minimum required version for the PayPal Commerce addon
Before getting started, you’ll first need to make sure WPForms is installed and activated on your WordPress site. Once you’ve verified your license, you can install and activate the PayPal Commerce Pro addon.
Note: Be sure to disable the PayPal Standard addon if you have it installed. Both PayPal addons can’t be used at the same time.
Connecting to PayPal Commerce
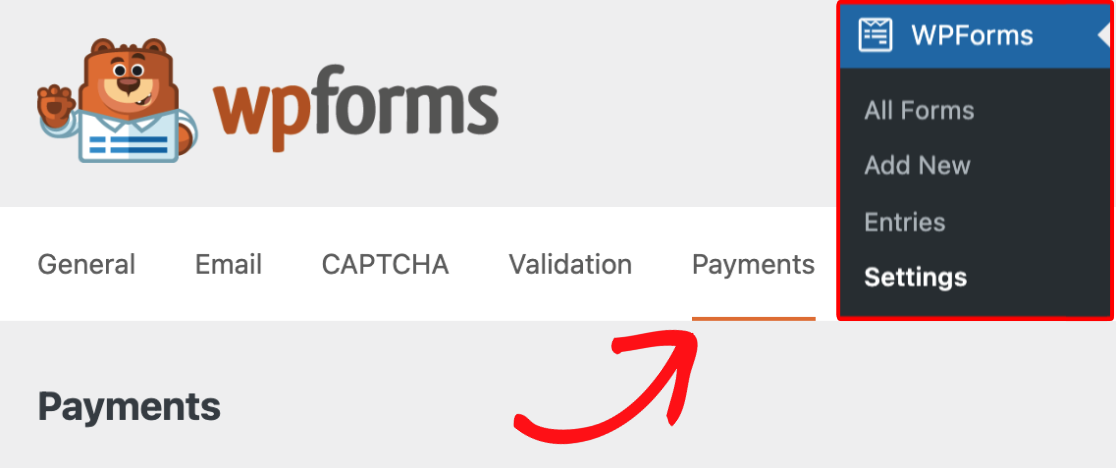
WPForms makes it easy to connect to PayPal Commerce in just a few steps. When you’re ready to connect, in the WordPress dashboard, go to WPForms » Settings and click the Payments tab to access your payment settings.
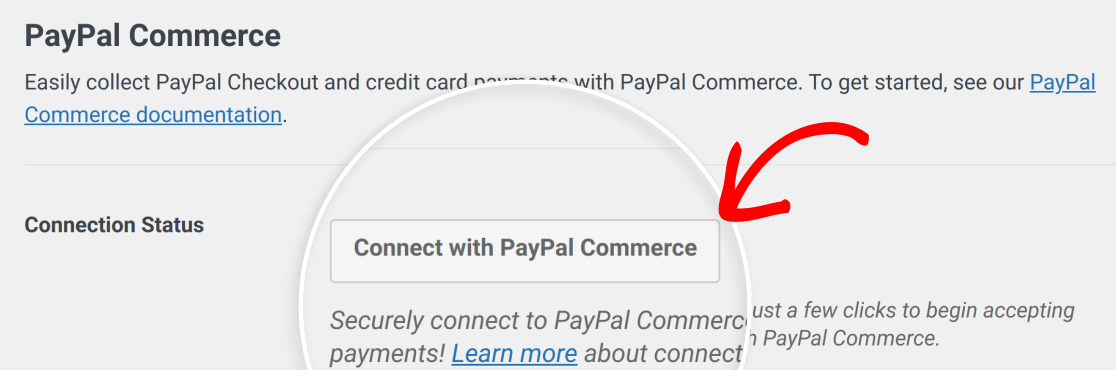
Next, scroll to the PayPal Commerce section and click Connect with PayPal Commerce to open the login window.
Note: A PayPal Business account is required to connect your site to PayPal Commerce.
Enter the email address associated with your PayPal Business account in the email field.

Then, choose your country or region from the dropdown list.

Note: PayPal Commerce is currently unavailable to users in Switzerland. You won’t be able to connect your PayPal account to PayPal Commerce from this region.
Once you’ve entered your email and location, click Next to continue.

In the next login screen, enter your password in the password field.

Once you’ve completed the setup process, your settings will show that your site is connected in Production mode.

Note: If you’d like to test payment transactions on your site, you’ll need to enable Test Mode. For more information, see our comprehensive guide to testing payments with PayPal Commerce.
Setting Up PayPal Commerce Webhooks
Webhooks allow WPForms to receive real-time updates from PayPal Commerce when a payment or subscription status changes. With webhooks enabled, WPForms can keep your payment records in sync when payments are completed, refunded, canceled, or updated.

Webhooks are automatically configured for WPForms version 1.10.0 or higher when you connect your PayPal Commerce account. However, if they aren’t configured automatically for your site, you can manually set them up by following our guide on setting up PayPal Commerce webhooks.
Handling Payments
PayPal Commerce offers a wide range of features for handling payments. This section will detail the setup process, supported payment methods, and how to view and manage payments on your WordPress site.
Note: Want to learn more about using payment forms? Our guide to setting up payment forms has extensive information to help you on your way.
Setting Up Payments
Once your site is connected to PayPal Commerce, you can add this integration to any of your forms. To do this, either create a new form or edit an existing form to access the form builder.
If you’d like, you can use a form template or start with a blank form and add your customizations however you’d like.
Next, click or drag the PayPal Commerce field to the preview area.

Note: Once you’ve added the PayPal Commerce field to your form, you may want to customize its appearance to better fit your site’s design. Be sure to check out our tutorial on customizing the PayPal Commerce field for more details.
After adding the PayPal Commerce field, you’ll see a popup telling you to enable PayPal Commerce payments.

Click the OK button to dismiss the dialog.

In the sidebar, click Payments to access the payment integration settings.

Next, click on PayPal Commerce to configure this integration.

Payment Frequencies
On the next screen, you’ll see 2 different payment frequency options: One-Time Payments and Recurring Payments. You’ll need to choose at least 1 to allow your form to process payments.
Both payment frequencies can be enabled simultaneously if conditional logic is enabled. When your form is submitted, only 1 of either payment frequency will be used, depending on the rules you’ve set up in your conditional logic.
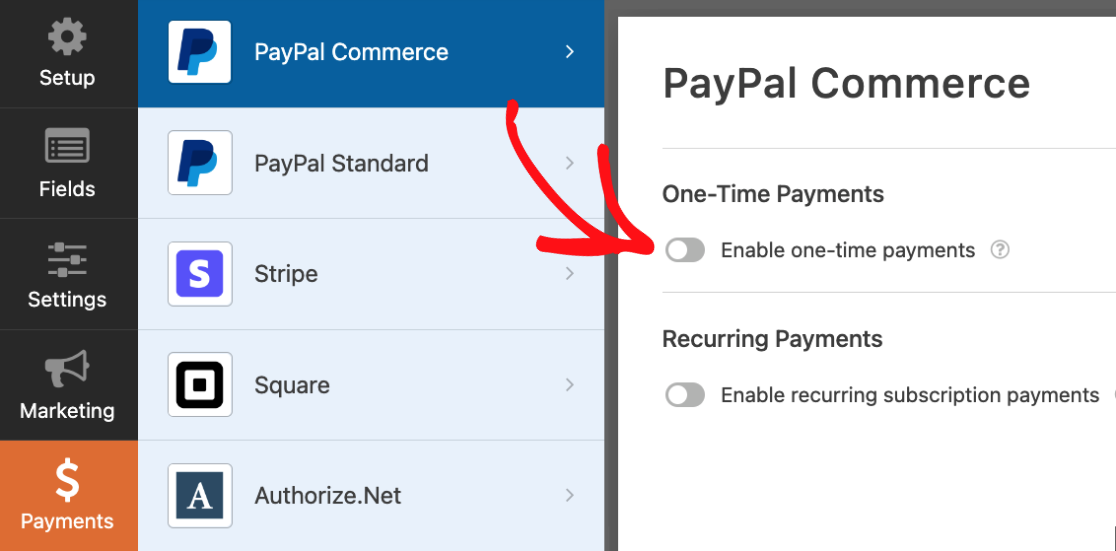
One-Time Payments
Customers can make non-recurring payments for products and services with one-time payments. To enable one-time payments, set the Enable one-time payments toggle to the on position.
After this setting is enabled, some additional settings will become available. These are optional, and pass the corresponding information from your form to PayPal Commerce.
Among them, the following fields are available:
- Billing Address
- Shipping Address
- Name (only shown when the Card Holder Name field is disabled from the field options)
When selected, each of these fields is mapped to a corresponding field in your form. For example, you’ll need an Address field in your form to set up a value for the Billing Address option.
Note: Selecting a value for each field is optional. To leave a specific field blank, leave the value in its dropdown list as unset.
Billing Address
With this field, the customer’s mailing address can be mapped from a field in your form. Select a field to map to the Billing Address in PayPal, and select any Address field from your form using the Billing Address dropdown list.

This field is not shown to the customer on the frontend but will be visible in your PayPal dashboard.
Shipping Address
This field pulls the customer’s shipping address from your form and passes it through to PayPal. To select a field from which to map the shipping address, choose a corresponding field from the Shipping Address dropdown list.

If left blank, no shipping address is requested.
Payment Description
With this option, you can add additional details about each one-time payment. The description should be entered in the Payment Description field.

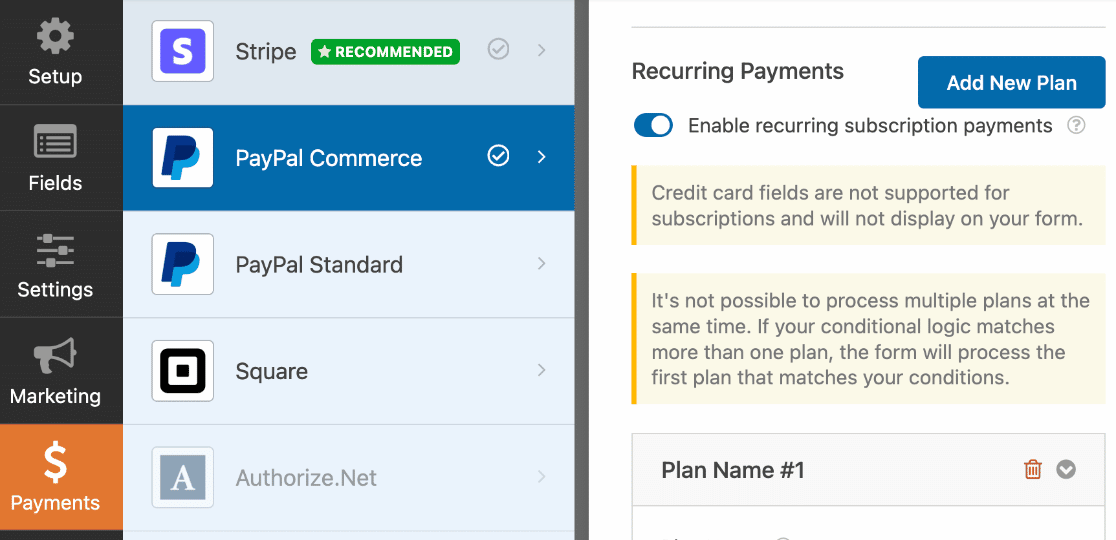
Recurring Payments
Recurring payments, also called subscriptions, are set up and stored as individual plans. Your form can have as many plans as you’d like, but only 1 plan can be processed at a time.
Note: Credit card fields are not supported for subscriptions.
To enable recurring payments from the form builder, go to Payments » PayPal Commerce and toggle on the Enable recurring subscription payments option.

By default, a single plan is created for you. If you need additional plans, click the Add New Plan button.

In the dialog, give the new plan a name, then click the OK button to continue.

If you’d like to remove a plan, click the red trash can icon in the top right corner of the relevant plan.

Configuring Recurring Payment Plans
Several parameters are available for configuration for each plan, including:
Note: After saving your form, you won’t be able to edit the Plan Name, Product Type, or Recurring Times for an existing plan.
If you’d like to change these parameters, you’ll need to remove the existing plan and add a new plan.
Plan Name
Every subscription plan requires a name. For example, the default plan is called Plan Name #1.

Replace the text in the Plan Name field to rename any plan before saving your form.

You won’t be able to change this value in existing plans after saving your form.
Product Type
This option allows you to choose the type of product you are selling. There are 3 product types available:
- Digital
- Physical
- Service
Go ahead and select your product type from the Product Type dropdown list.

Note: The product type is only displayed in the PayPal dashboard and not in your WPForms entries.
Recurring Times
This option allows you to choose how often customers will be charged for each subscription. The available intervals include:
- Weekly
- Monthly
- Quarterly
- Semi-Yearly
- Yearly
To select an interval, click the Recurring Times dropdown list and choose the interval you want to use for your plan.

Total Cycles
This option allows you to choose how long a subscription should last by setting a maximum number of payment cycles. For example, if you select a value of 5, the subscription will last for 5 recurring payments.
To select a value for this field, choose a number between 1 and 99 from the Total Cycles dropdown list. Alternatively, use the default value of Infinite if you need to set up an indefinite subscription.

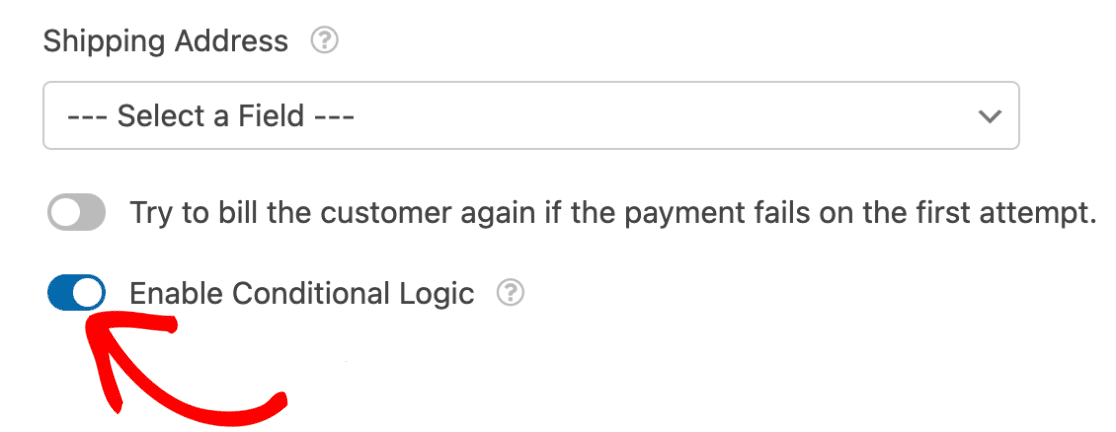
Shipping Address
If set, this field grabs the customer’s shipping address from your form and conveys it to PayPal. A corresponding Address field is needed to map this information from your form.
To set this up, select the appropriate Address field from the Shipping Address dropdown list.
If this field is left blank in your payment plan’s settings, no shipping address is assigned.
Additional Options
There are 2 other options associated with recurring payment plans. Each can be enabled by setting the associated toggle switches to the on position.
- Try to bill the customer again if the payment fails on the 1st attempt: When this option is enabled, PayPal will attempt to bill the customer again upon failing to complete the 1st payment.
- Enable Conditional Logic: This option allows you to tap into the WPForms conditional logic system for fine-grained control over payments.
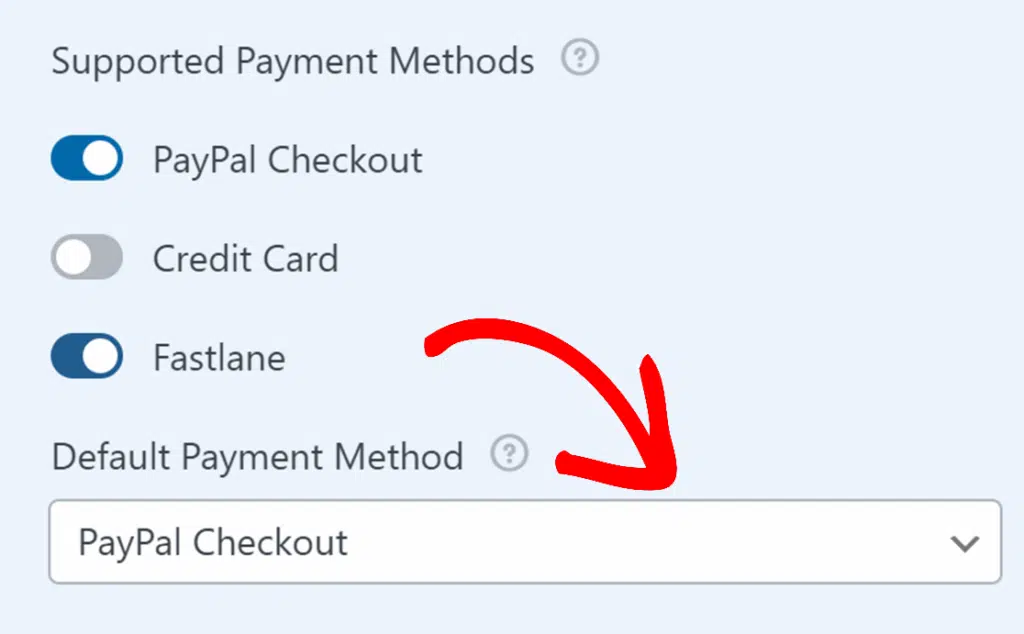
Supported Payment Methods
To be able to utilize the PayPal Commerce field, you’ll need to select at least 1 of the 3 supported payment methods:
To access payment settings, select the PayPal Commerce field and go to Field Options in the sidebar.

By default, available payment methods are enabled and shown to customers. If you’d like to disable either option, set its toggle to the off position.

Credit Card Payments
This method allows customers to use credit cards from supported and enabled providers. You can choose which cards your site accepts by toggling their options on or off as needed.

PayPal Checkout
This method allows customers to make payments using any payment method they’ve set up in their PayPal account.
Note: When using this payment method, your form’s submit button will be replaced with a PayPal button.
Fastlane
Fastlane by PayPal lets returning customers check out faster by using their saved payment and contact details. When enabled, the PayPal Commerce field displays an email field and a Continue button on the frontend.

In the field options panel, you’ll also see the Fastlane Labels settings. These options let you customize the placeholder text for the email field and the Continue button.

Note: If the Credit Card payment method is enabled, turning on Fastlane displays a notice because these payment methods can’t be enabled at the same time. To continue using Fastlane, disable the Credit Card option first.
Choosing the Default Payment Method
To choose the default payment method, click on the Default Payment Method dropdown list and select PayPal Checkout.
Once you’ve configured your payment methods, be sure to save your form.
Enabling Conditional Logic
The PayPal Commerce Pro addon supports conditional logic to control payment methods and plans further. You can enable conditional logic for one-time payments and recurring payments.
Note: If you’re using conditional logic with multiple recurring payment plans, only 1 plan can be processed at a time. If multiple plans match your conditional logic, only the 1st to match your conditions will be processed.
One-Time Payments
To enable conditional logic for one-time payments, set the Enable Conditional Logic toggle to the on position.

With conditional logic enabled, payments are only processed if the right conditions are met. For example, we’ll demonstrate how to prevent payments from processing if the customer has not agreed to your terms and conditions.
In this example, we’ve added 1 Checkboxes field with a single option.

We’ll use a conditional logic rule to prevent customers from purchasing if they haven’t agreed to the terms and conditions. We’ve set the logic to say: Process this charge if the Terms and Conditions field is not empty.

If more complex logic is needed, additional rules can be added by clicking the And button.

If you need to add alternative options to your logic, click the Add New Group button.

This will add a separate set of rules, which will apply if the 1st set of rules does not.

Recurring Payments
If you’d like, you can also set conditional logic for recurring payments. This can be useful if you’d like to allow users to choose between one-time or recurring payments before completing their payment.
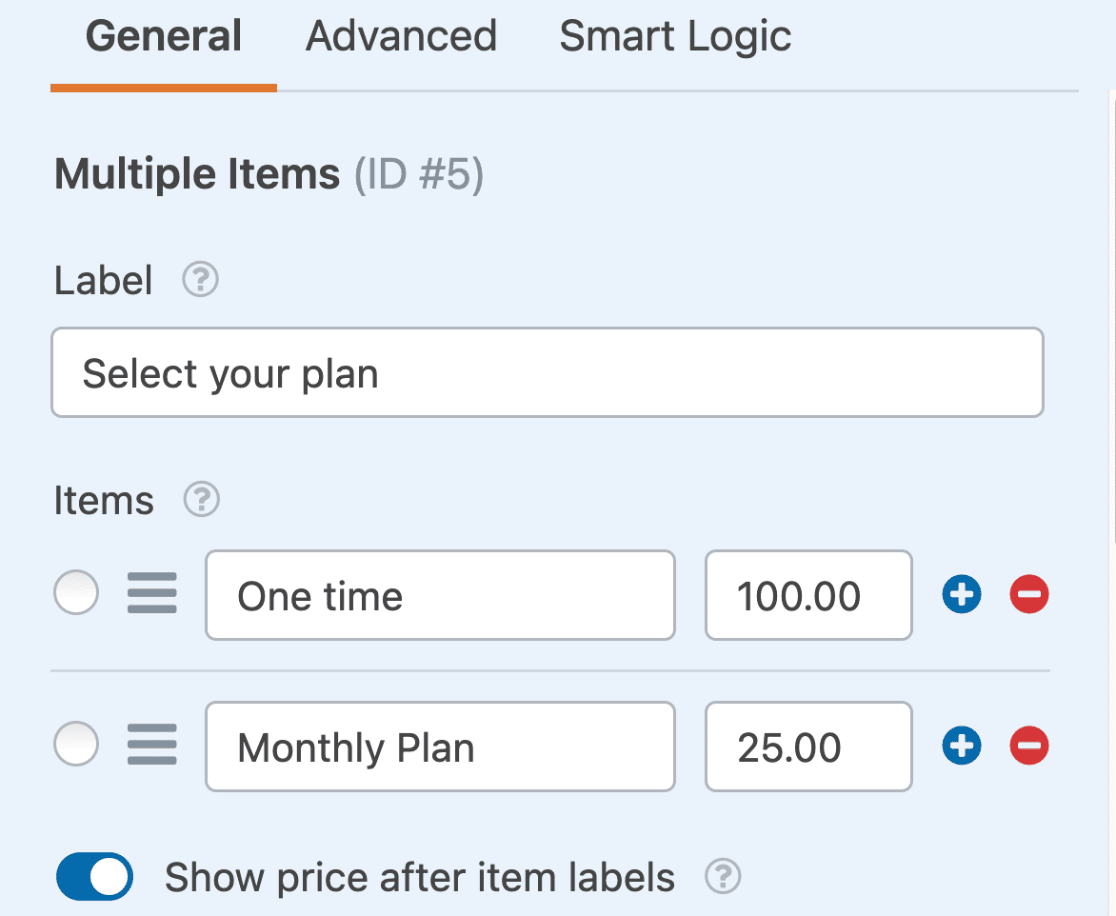
For this example, we’ll add a Checkbox Items field to the form builder.
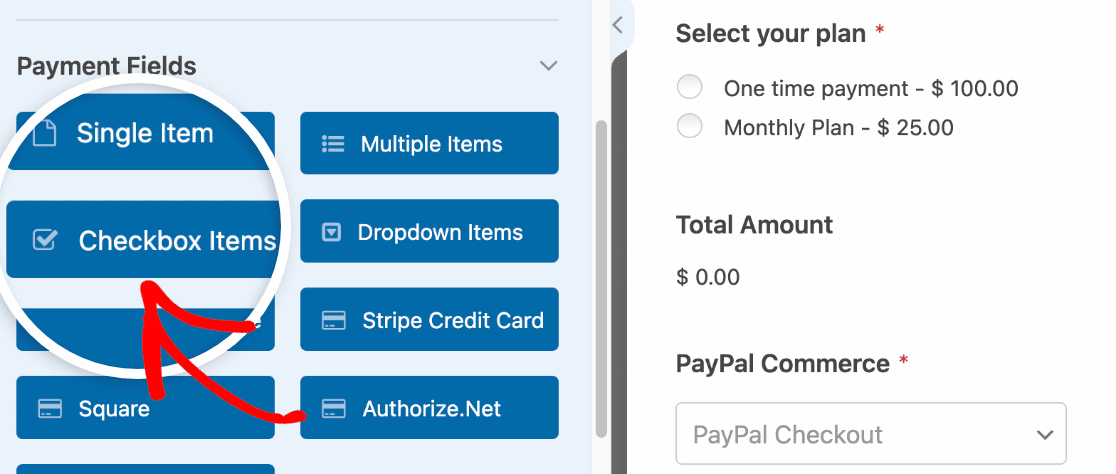
Next, configure the Label and Items for the field to allow users to choose between One time and Monthly Plan.
After configuring the Checkbox Items field, head back to Payments » PayPal Commerce and scroll to the Recurring Payments section.
Once there, scroll down and set the Enable Conditional Logic option to the on position.
We’ll use conditional logic to allow users to choose whether to make a one-time payment or subscribe to monthly payments. We’ve set the logic to say: Process this charge if Select your plan is set to Monthly Plan.
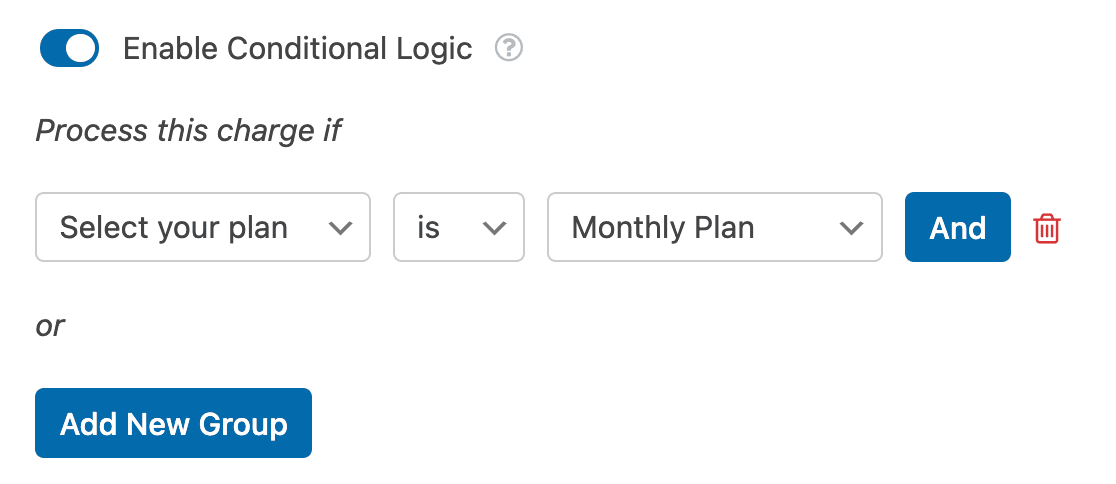
If the user selects the Monthly Plan option when filling out the form, they’ll be subscribed to the recurring payments plan.
Note: Conditional logic for WPForms offers far more than we’ve demonstrated in this simple example. To learn more about what conditional logic can do, check out our full guide to using conditional logic in WPForms.
Frequently Asked Questions
Below are some of the top questions we receive about using PayPal Commerce with WPForms.
What’s the difference between PayPal Commerce in WPForms Lite and the PayPal Commerce Pro addon?
PayPal Commerce is available in WPForms Lite, so you can accept payments without installing the PayPal Commerce Pro addon. However, the PayPal Commerce Pro addon removes the additional 3% platform fee on one-time payments and gives you more control over how payments work in your forms.
With WPForms Lite, you can:
- Accept one-time payments
- Accept subscriptions with a single recurring plan
- Use available PayPal Commerce payment methods
With the PayPal Commerce Pro addon, you can also:
- Remove the additional 3% platform fee on PayPal Commerce payments
- Use conditional logic with PayPal Commerce payments
- Choose between one-time and recurring payments in the same form
- Add multiple recurrring payment plans to a form
- Configure advanced payment notification workflows
- View and manage payments from the WordPress admin area
- Handle refunds and cancellations with more flexibility
I’m getting this error saying my connection is invalid. Why am I seeing this?
Your PayPal Commerce connection is not valid. Please reconnect your PayPal Commerce account.
If you’re seeing this error, your account is likely missing PayPal Complete Payments Product (PPCP) support. If you’re getting this error, please contact PayPal support to enable PPCP.
Why am I unable to log in to my PayPal sandbox account?
If you are having difficulties connecting to your PayPal sandbox account, please ensure that you’ve enabled Test Mode in WPForms » Settings » Payments.
You may still encounter login issues using an older sandbox account. In the event this occurs, please generate a new PayPal sandbox account. To do this, go to your Sandbox Accounts on the PayPal Developer site and click on Create account.

In the popup that appears, choose Account Type and location, then click Create.
Note: Be sure to choose Business (Merchant Account) as the Account Type because this is necessary for connecting your site to PayPal Commerce.
Why are the card fields not rendering for my country, even though PayPal Commerce is available?
If you’re experiencing issues with card fields not appearing on your forms, it could be due to regional restrictions on certain PayPal Commerce features. Specifically, the integration of custom card fields through WPForms requires the features PPCP_CUSTOM and PPCP_STANDARD. These features, however, are only available in select countries.
To verify if your country supports these features, please check the PayPal feature eligibility list. If your country does not meet the eligibility requirements for PPCP_CUSTOM and PPCP_STANDARD, you will not be able to utilize these card field features in your WPForms PayPal Commerce integration.
Why am I seeing a notice to verify my domain registration for Apple Pay?
If you’re seeing a notice asking you to verify your domain registration, it means Apple Pay hasn’t been fully set up for your site in PayPal yet. Apple Pay requires your domain to be registered before it can work properly, and it won’t work on local sites.
To fix this, log in to the PayPal Business account connected to your site. Then go to Account Settings and open the Payment Methods section.
From there, locate Apple Pay, click Manage Apple Pay.

If your domain is already registered, you’ll see it listed under Domains registered with Apple Pay.
If your domain isn’t listed yet, click Add Domain.

Next, enter your public domain name in the field provided.

To complete the setup, download the domain association file from PayPal and host it at the exact .well-known URL shown in your PayPal account. After the file is available at that location, return to PayPal and complete the domain registration.
Once your domain has been registered, test Apple Pay again on your live site. If you’re testing in sandbox mode, be sure you’re also using an Apple sandbox account on a supported Apple device.
That’s it! Now you know how to install and use the PayPal Commerce addon for WPForms.
Next, are you interested in tracking your PayPal Commerce transactions? Be sure to check out our tutorial on viewing and managing PayPal Commerce payments to learn how.