AI Summary
Would you like to test PayPal Commerce payments before accepting real payments on your site? Creating a PayPal Business sandbox account allows you to test your forms and ensure the payment process functions correctly.
This tutorial will show you how to set up a sandbox account to test PayPal Commerce payments with your forms.

Before getting started, you’ll first need to make sure WPForms is installed and activated on your WordPress site and that you’ve verified your license. Then, be sure to activate and install the PayPal Commerce addon.
Setting Up a Sandbox Account in PayPal
To get started, you’ll need to create a PayPal Business account if you don’t have one already.
Once you have access to a PayPal Business account, head over to the PayPal Developer site and log in with your PayPal Business account credentials.
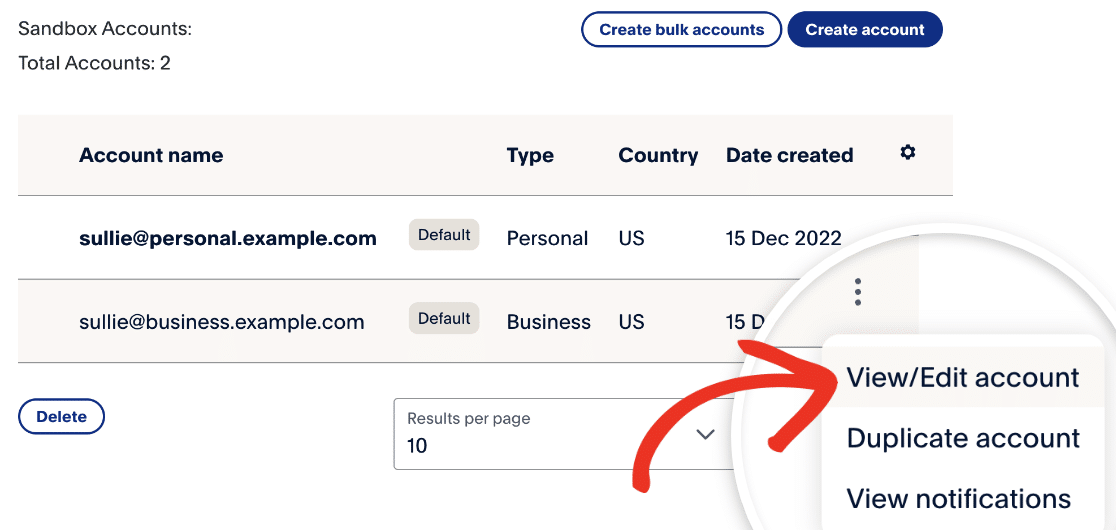
After logging in, click the Testing Tools dropdown menu and select Sandbox Accounts.

On the next page, you’ll see that PayPal has created both a Personal and a Business sandbox account for you by default.

From here, you’ll need to set up a password for your Business Sandbox account, allowing you to log in with this account later to make test payments. PayPal does generate a password for you by default. However, we recommend changing it to something you’ll remember easily.
To create your password, click the 3 vertical dots under the settings icon column for the Business test email. Then, click on View/Edit account.
Next, a modal window will appear with your sandbox account details. From here, click on the Change password link to change your password.

Go ahead and enter your new password and click Save.

After changing your password, feel free to close the modal window. However, we recommend keeping the PayPal Developer site open as you’ll need to refer back to it while connecting PayPal Commerce to WPForms.
Enabling PayPal Commerce Test Mode
Now that your sandbox account is set up, you’ll need to enable Test Mode to prevent PayPal Commerce from processing live transactions. To do this, go to WPForms » Settings in your WordPress dashboard and click on the Payments tab.

After that, scroll to the PayPal Commerce section and check the box next to Test Mode.

Connecting With PayPal Commerce
Now that you’ve enabled Test Mode, you’ll need to connect with PayPal Commerce by clicking the Connect with PayPal Commerce button.

Next, a modal window will appear where you’ll need to enter your sandbox account details.

Go ahead and switch back to your PayPal Developer dashboard and copy the sandbox Business account email address.

Now, head back to your WPForms payment settings and paste the Business account email address into the Email field.

After that, select your country or region from the dropdown.

When you’re ready, click Next to proceed to the next step.

In the next modal window, enter the password you created when you set up a sandbox account and click Log In.

A new modal window will appear asking you to “Allow PayPal to connect your account with Test Store.” Go ahead and click the Agree and Connect button.

Once you’ve successfully connected your PayPal sandbox account, you’ll see the connection status change to Connected to PayPal in Sandbox mode.

In the next section, we’ll cover how to create a simple payment form to test your PayPal Commerce transactions.
Creating a Form to Test PayPal Commerce Payments
Now that you’ve set up your sandbox account for testing, you’ll need a form you can use to test PayPal Commerce transactions. To do this, create a new form or edit an existing one to open the form builder.
Feel free to customize the form however you’d like, but be sure to include a PayPal Commerce field. You can add this field by simply clicking on it on the left side of the form builder or by dragging and dropping it into the preview area.

The PayPal Commerce field lets you test available PayPal Commerce payment methods in your form, including PayPal Checkout, credit card payments, and Fastlane when enabled.
If you’d like to test credit card payments, you’ll need to log in to the PayPal Developer dashboard and use the test credit card generator.

If you’d like to test Fastlane, click the PayPal Commerce field in the form builder preview area and enable the Fastlane option under Supported Payment Methods in the field options panel.
To complete a Fastlane test transaction, use a PayPal sandbox account during checkout. After entering the sandbox email address in the Fastlane field and continuing, complete the authentication step using 111111 as the one-time password.
Enabling PayPal Commerce Payments in Your Form
Next, you’ll need to enable PayPal Commerce payments for the form you’ll be using to test transactions. In the form builder, go to Payments » PayPal Commerce and toggle on the Enable one-time payments option.

After enabling this option, additional settings will appear that aren’t required for testing your PayPal Commerce transactions. However, we recommend adding a description to the Payment Description field to help you identify your test transactions in your sandbox account dashboard later on.

Now that you’ve enabled PayPal Commerce payments, go ahead and save your form.
Publishing and Testing Your Form
Once you’ve set up your form, you’re ready to test PayPal Commerce transactions on the frontend of your site. To test your form without publishing it to a live page on your site, you can use the WPForms form preview option or create a private page or post.
Then, go ahead and complete a test transaction by submitting a test entry for your form. Keep in mind that when you complete the test transaction, you’ll want to use the email address and password associated with the Personal sandbox account that PayPal has created for you.
You can find your Personal sandbox account credentials in the PayPal Developer dashboard by going to Testing Tools » Sandbox Accounts.

If you’d like to test the credit card payment, you can use any of PayPal’s Sandbox test card details.
There is also a test credit card associated with your Personal sandbox account that can be used for testing purposes.
To access the credit card, click the 3 vertical dots under the settings icon column and select View/Edit account.

In the overlay that appears, navigate to the Funding tab. Here, you’ll see your Personal sandbox card details under the Credit Card section.

Note: You’ll need to use a different account than the Business sandbox account you’ve used to connect PayPal Commerce to WPForms. If you attempt to complete a test transaction with your Business Sandbox account, PayPal will decline the transaction.
Viewing Test Transactions in WPForms
To view and manage all test transactions and their details, simply go to WPForms » Payments and turn on the Test Data option.

For full details on viewing test and live payment information, understanding transaction trends, adjusting for different currencies, and more, check out our guide to viewing and managing payments.
Note: Looking to offer discounts to your customers through coupon codes? Check out our Coupons addon tutorial for all the details.
Viewing Test Transactions in Your PayPal Sandbox Account
After you submit a test payment, you can view the transaction in your PayPal Business sandbox account by clicking on the Transaction ID in your test entry.
Alternatively, you can log in to your PayPal Business sandbox account with the same sandbox business email and password you used to connect your account to WPForms.
Note: When you’re viewing test transactions, be sure not to use your personal PayPal Business account to log in to your Sandbox account. You’ll need to use the same sandbox Business email address and password you used to connect with PayPal Commerce.
Once you’ve logged in to your PayPal Business sandbox account, click the Activity tab at the top of your account dashboard.

Then, click All Transactions to view your transactions.

You should now see your test transaction(s) listed in a table on the following screen.

Note: When you’re done testing PayPal Commerce payments, remember to disconnect your test account in WPForms » Settings » Payments, turn off Test Mode, and connect your live PayPal Business account so you can process users’ transactions.
That’s it! Now you know how to test PayPal Commerce payments in WPForms.
Next, would you like to perform a full form test before you publish it on your site? Our complete form testing checklist walks you through the process step by step.