Would you like to collect payments using your WordPress forms? With our Stripe Pro addon, you can provide an easy way for users to submit one-time payments, or even recurring subscription payments, without ever leaving your site.
This tutorial will show you how to install and set up the Stripe Pro addon with WPForms.
Requirements:
- You will need a Pro license level or higher to access the Stripe Pro addon
- Ensure that you’ve installed the latest version of WPForms to meet the minimum required version for the Stripe Pro addon
- Stripe requires your site to have SSL (HTTPS) enabled on the page where you’re adding a live payment form, as this allows you to securely send credit card data to Stripe. For setup details, please see WPBeginner’s guide to adding SSL and HTTPS in WordPress
- Regulations for online payments can vary significantly by country. Please review Stripe’s country-specific requirements to ensure your payment forms are compliant with local laws
Before you get started, be sure to install WPForms on your WordPress site and verify your license. Then install and activate the Stripe Pro addon.
Note: Stripe’s processing fee starts at 2.9% + 30¢ per successful card charge, as outlined on Stripe’s pricing page. If your WPForms license is inactive, an additional 3% processing fee is applied by WPForms to each transaction.
Connecting Stripe to Your Site
Once the Stripe Pro addon is ready to go, you’ll need to open WPForms » Settings in the left menu of your WordPress site. From there, click on the Payments tab.
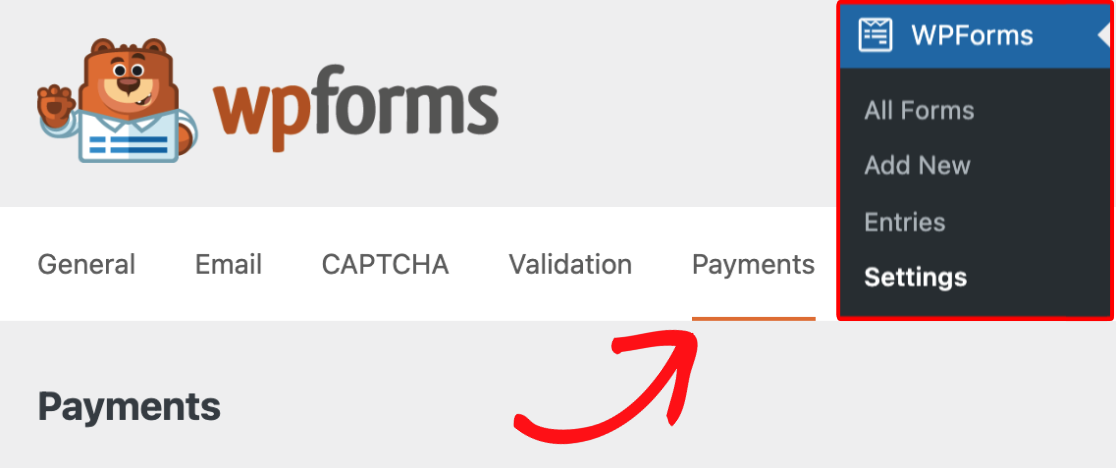
If you’d like to adjust the currency your site uses, go ahead and select the option you need from the Currency dropdown before proceeding.

When you’re ready, scroll down to the Stripe section. Here, click the blue Connect with Stripe button.
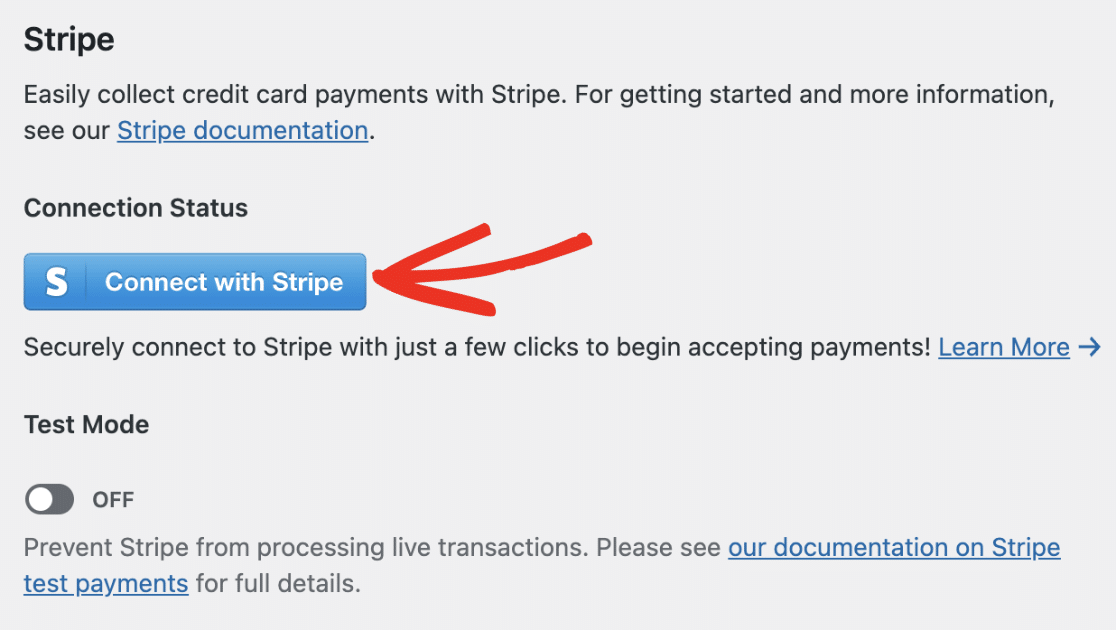
Note: Test and Live modes must be connected separately. If you’re currently using Test Mode, please be sure to repeat this connection process with the Test Mode option turned off so that you’re ready to launch your forms.
Next, you’ll be asked to authorize the connection between your forms and Stripe. The exact content you see on this page will vary based on whether your Stripe account is already activated.
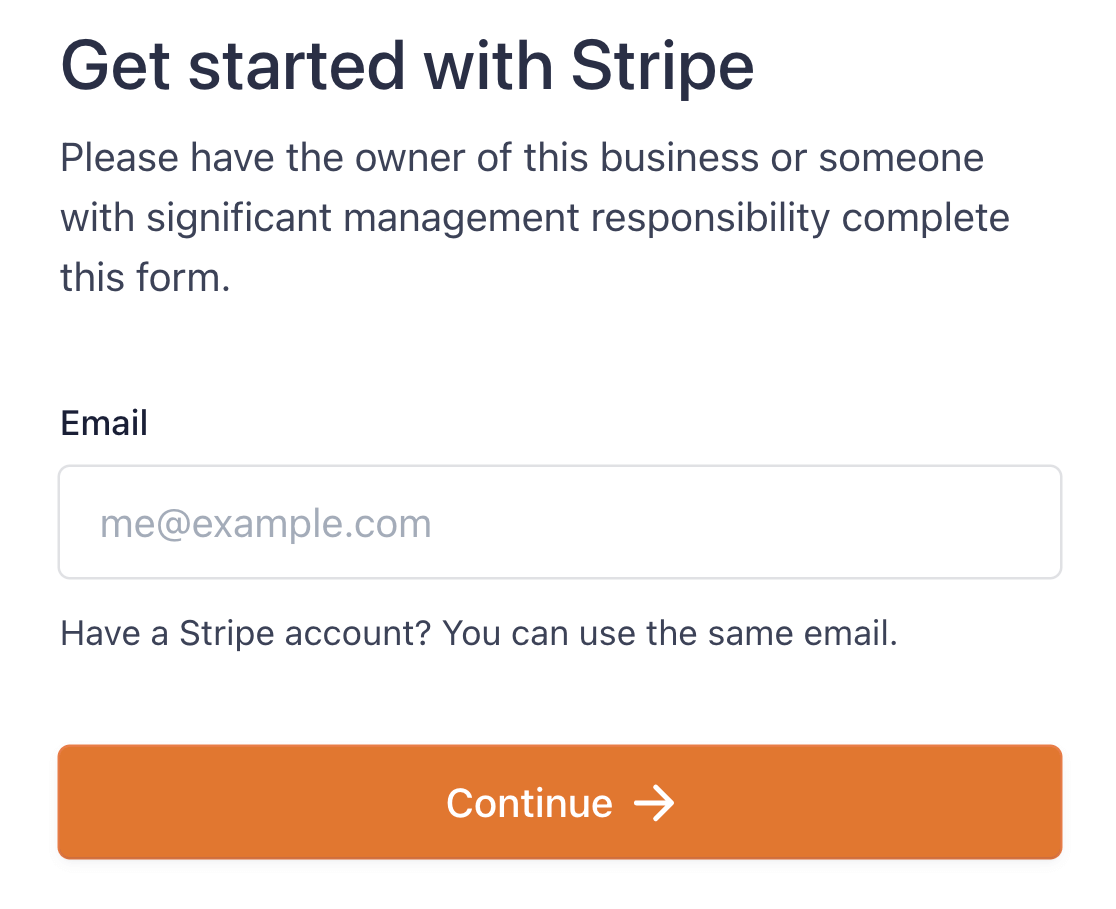
Once you’ve followed all the steps in the Stripe Connect wizard, you’ll be redirected back to your site’s admin area. Here, you should see a green checkmark next to Connection Status.

Setting Up Stripe Webhooks
Stripe uses webhooks to synchronize events that occur in your Stripe account from an external source.
Configuring Stripe webhooks in WPForms lets you view real-time updates from your payment forms in the WordPress admin area.
You can manage your subscriptions and process refunds from the Payments Overview page in WPForms.
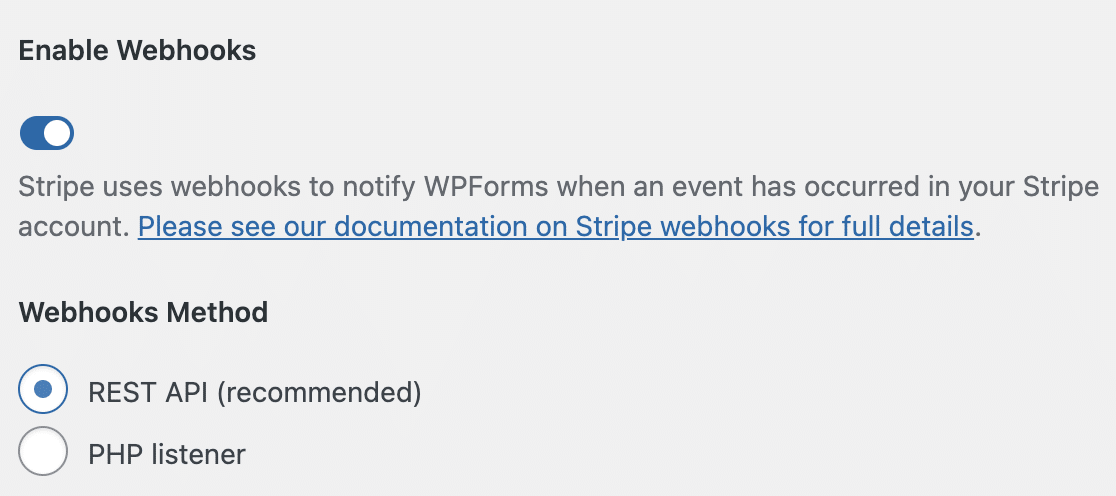
Webhooks are automatically configured for WPForms version 1.8.4 or higher when you connect your Stripe account. However, in some cases, the autoconfiguration may not work for your account.
If that is the case, you can manually set it up for your account. For more details, see our guide on setting up Stripe webhooks.
Selecting a Credit Card Field Mode
After you’ve connected Stripe to your WordPress site, scroll to the Credit Card Field Modes section.
You can choose between two Credit Card Field Mode options:
- Card Element
- Payment Element

We’ll explain the different field modes in more detail below.
Note: You won’t see the Credit Card Field Mode option if you just installed WPForms version 1.8.2 or higher. If you’ve chosen the Payment Element option before updating to WPForms version 1.8.2, you won’t see the option as well.
Card Element
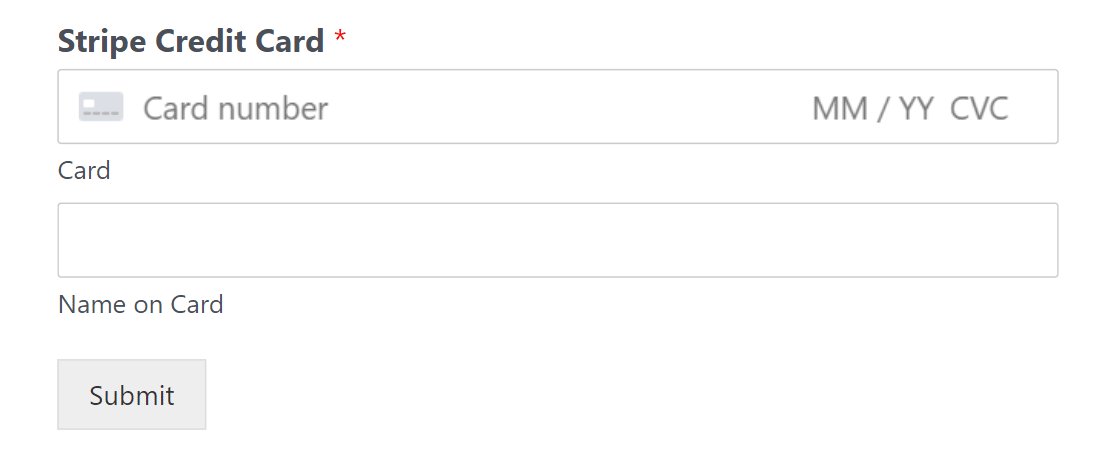
The Card Element option allows you to effortlessly collect card information using prebuilt components to validate the card number, ZIP code, and expiration date. With this option, the form is simplified, and the number of required fields is minimized.
Payment Element
The Payment Element option enables you to accept multiple payment methods through a single integration. It also automatically adjusts the input fields to collect the necessary information based on the payment method and country, simplifying the checkout process.
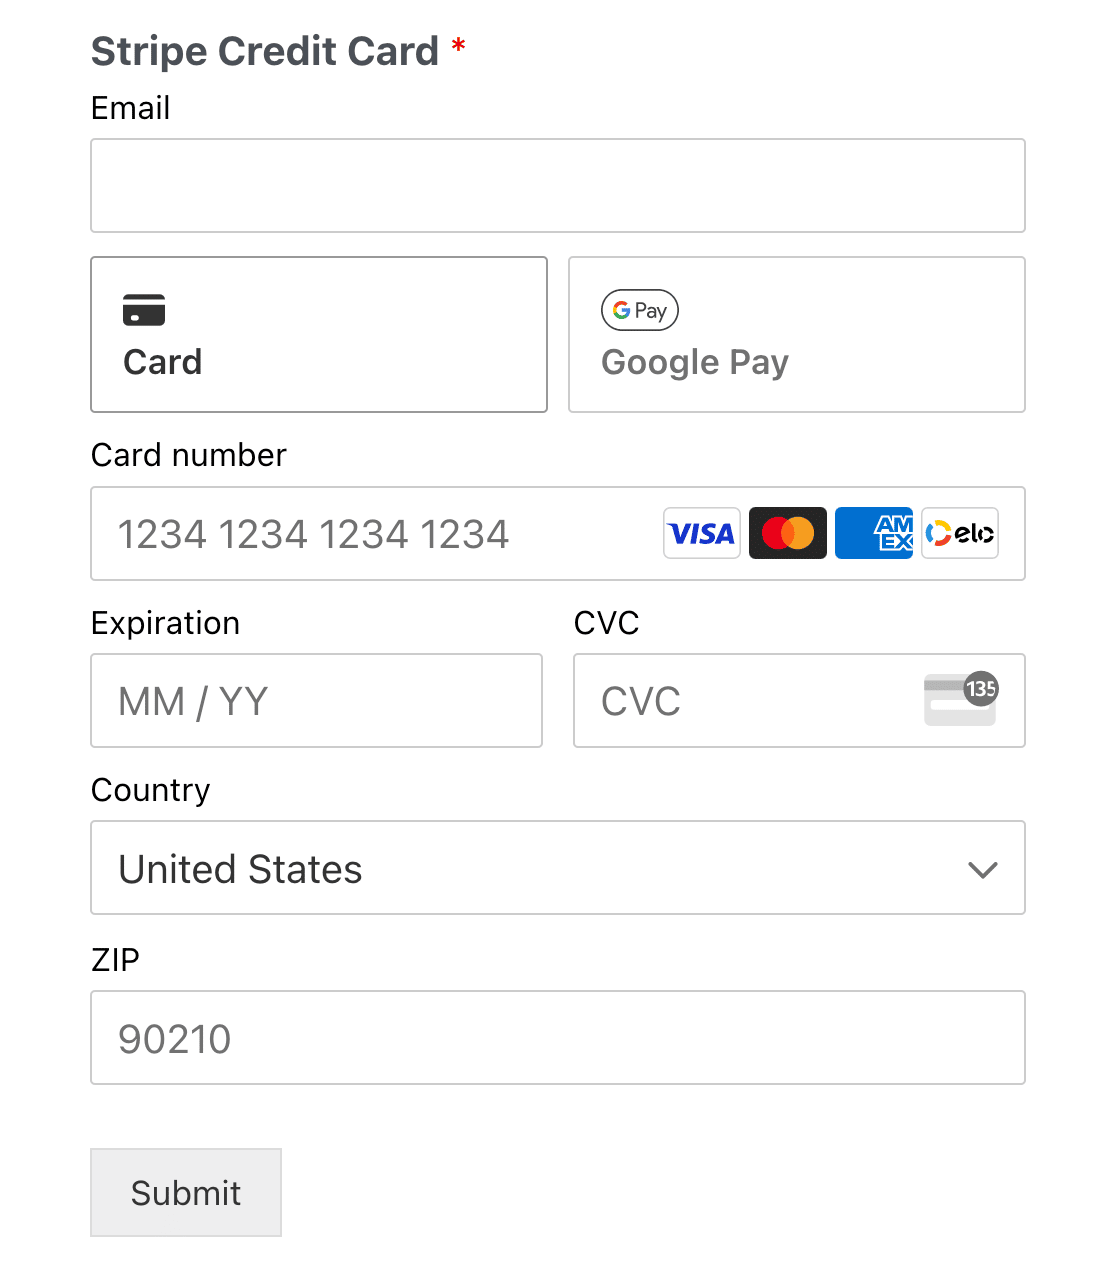
You’ll only see the payment options that Stripe detects on your specific device and browser.
Note: Users will only see options to pay with Google Pay and Apple Pay if they meet Stripe’s requirements for using these payment options. See Stripe’s documentation to learn more about the requirements.
Check Out With Link
If you choose to use the Payment Element mode, you won’t need to enter all of your card information during checkout. Link gives you the option to save your card information with your email address.
This way, all of your card information will be automatically filled in for you when you enter your email address.
Setting this up is easy! The first time you use it, simply enter your email address in the Email field during checkout.
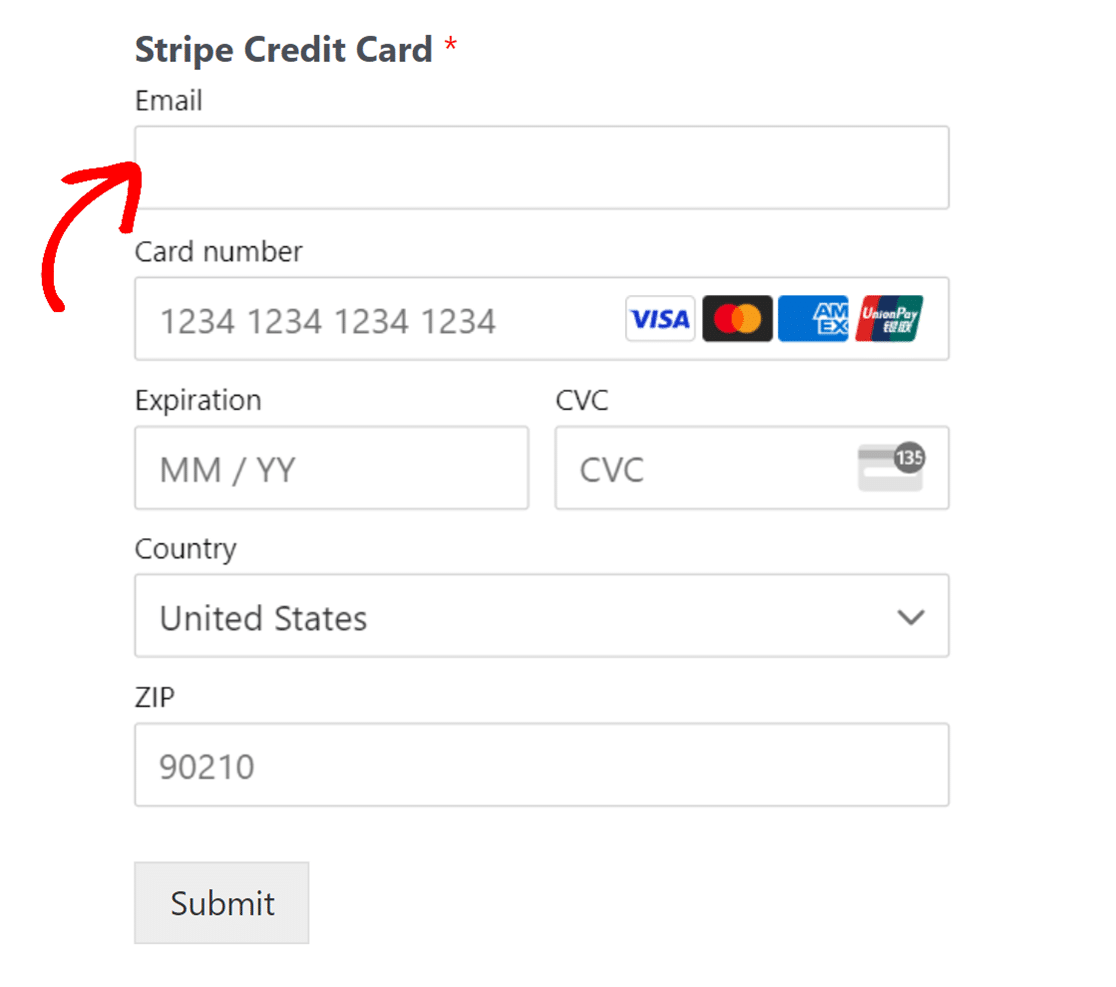
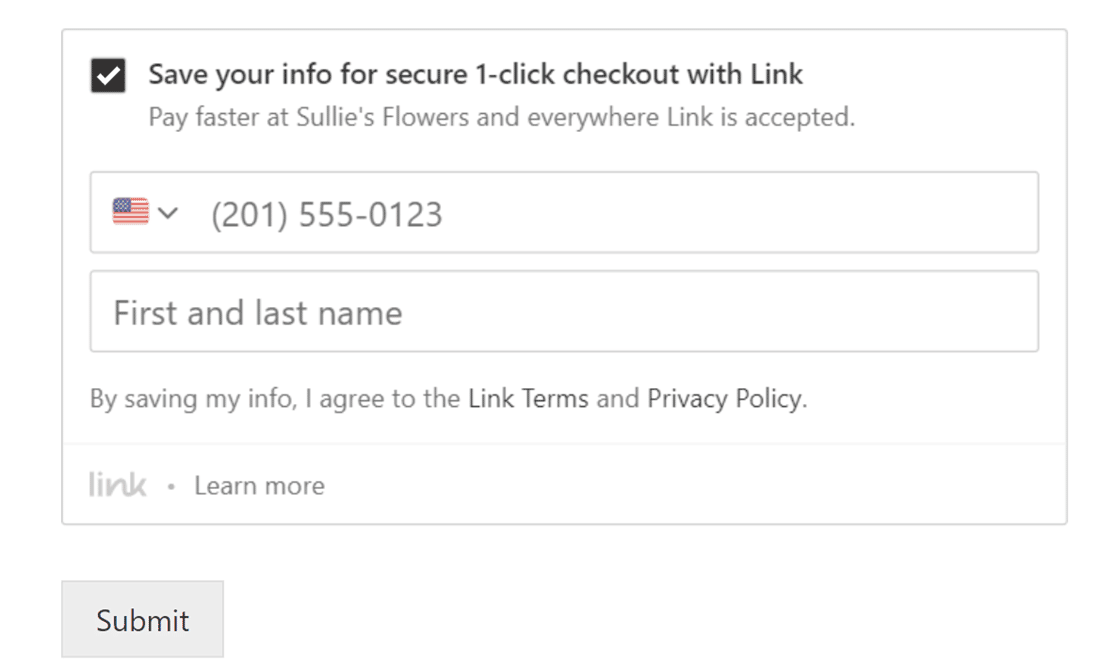
You’ll then be given a new option to save your information.
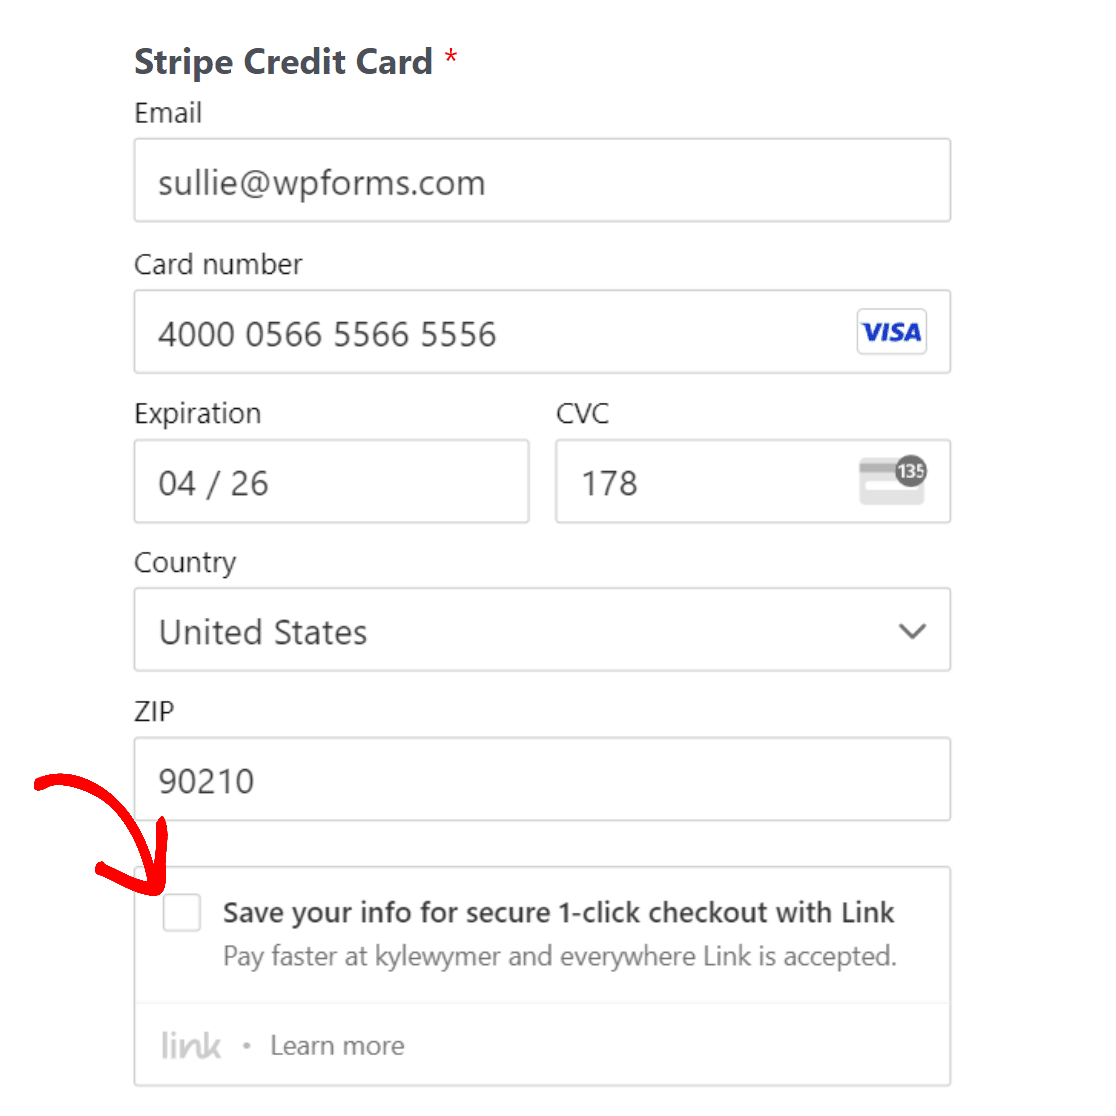
Check the box labeled Save your info for secure 1-click checkout with Link after you’ve filled out your card information.
Next, enter your phone number and name, and submit the form.
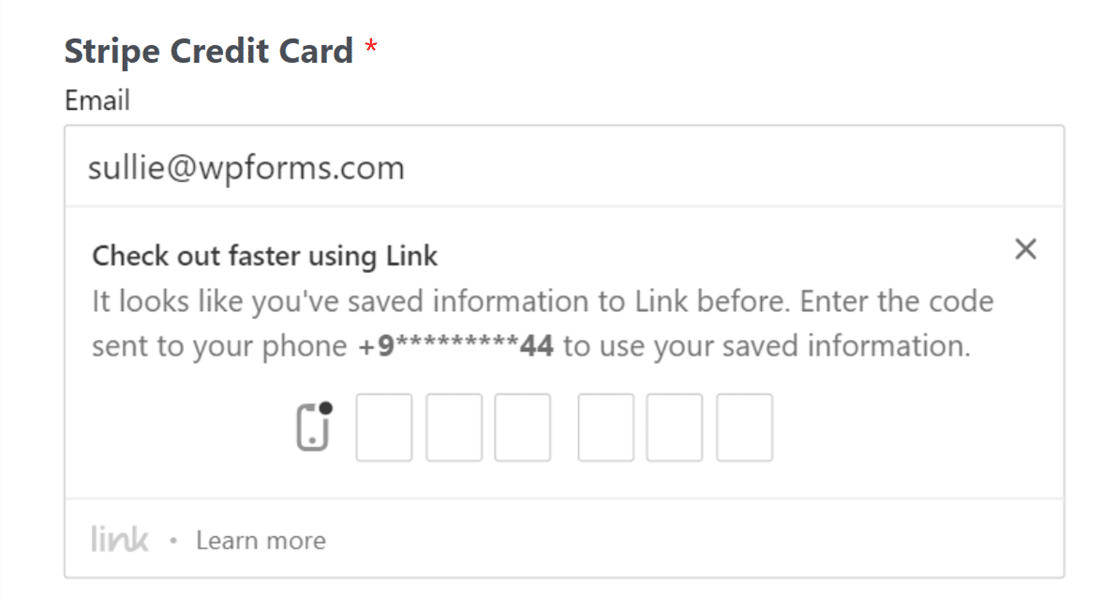
For your next checkout, simply enter your email address in the form’s Email field. Then, enter the verification code received on your phone to auto-fill your card information.
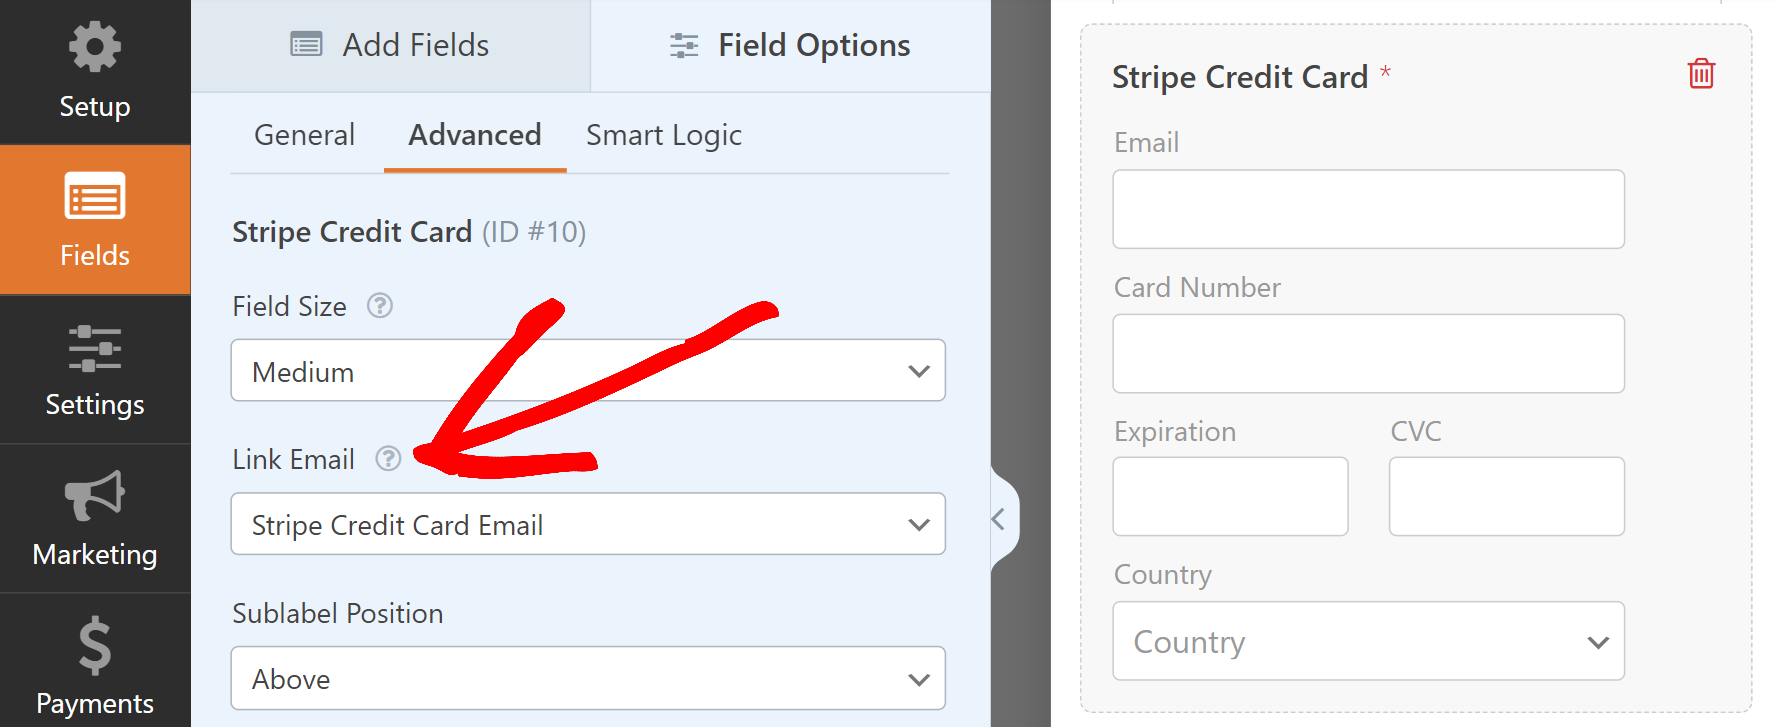
When checking out with Link, you can choose to automatically fill in the user’s info from a separate email field or get it from the email field you already filled out.
To change these settings, click on the Stripe Credit Card field and go to the Advanced tab. Then, click on the Link Email dropdown and select the appropriate option.
Adding Stripe to Your Forms
After you’ve selected the Credit Card Field Mode, you can start enabling Stripe payments for your forms.
First, you’ll need to create a new form or open an existing one for editing. You can customize your form however you like, but in order for it to work with Stripe, you’ll need to include the following:
- An Email field
- A payment items field (Single Item, Multiple Items, Checkbox Items, or Dropdown Items)
- A Stripe Credit Card field
For our example, we’ll create a simple order form that includes Name, Email, Dropdown Items, Total, and a Stripe Credit Card field.
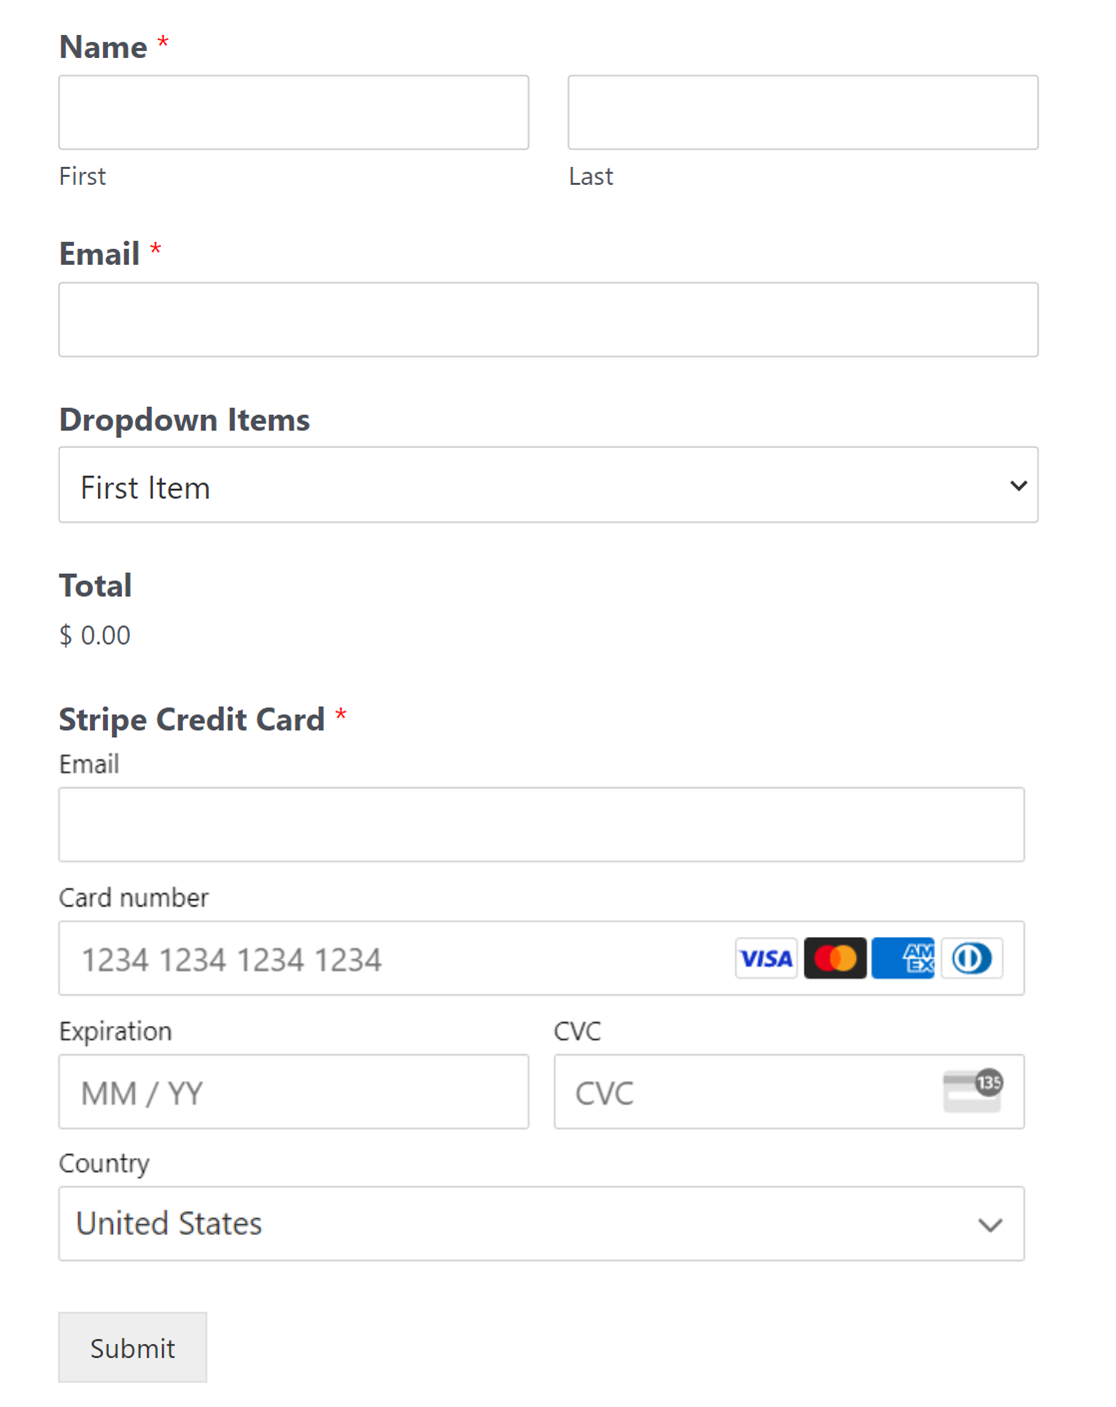
Note: A Total field is not required for Stripe to work. However, it’s often helpful for users to easily see an order summary of the items selected and their quantities in a tabular form. This shows the user the exact amount they’ll be charged. See our guide on using the Total field for more details.
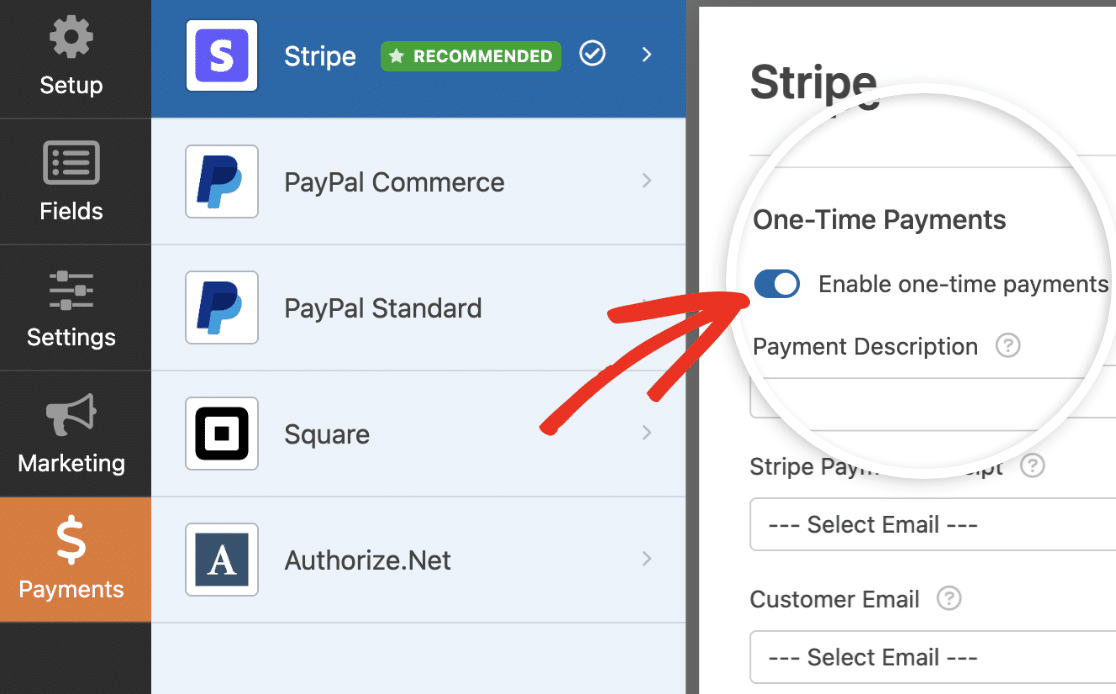
Once you’ve added any fields you’d like to include in the form builder, you’ll need to go to Payments » Stripe. In the right panel, toggle the Enable one-time payments option to the on position.
Note: In order for the Stripe Pro addon to function correctly, be sure to also enable AJAX form submissions before continuing.
Once you’ve enabled Stripe payments for this form, enter a short Payment Description. This text will appear on users’ credit card statements to help them identify payments made on your site.

Next, under Stripe Payment Receipt, choose the Email field from your form. This enables Stripe to send users receipts for their payments.

Lastly, under Customer Email, pick the Email field from your form which contains the customer’s email address.

You’ll also see options to map additional customer details, including Customer Name, Customer Phone, Customer Address, and the Shipping Address. These details will appear in the corresponding sections of your Stripe dashboard.
Sending Custom Metadata to Stripe
The Custom Meta section lets you pass additional data from your form to Stripe as metadata.
Each row includes:
- Object Type: Choose whether to send the data to the Payment or Customer object in Stripe
- Meta Key: Enter a custom label which will appear as the metadata key in Stripe
- Meta Value: Select a supported form field whose value should be sent
You can include multiple custom metadata rows. All values will appear in the Metadata section of your Stripe dashboard.

If you’re using your form to collect one-time payments, you can now save your form and move on to the next step. For recurring payments, such as subscriptions, you’ll need to fill out a few more settings.
Note: After setting up Stripe on your forms, you can monitor and manage these transactions directly from your WordPress dashboard. Be sure to check out our guide to viewing and managing Stripe payments for more details.
Enabling Recurring Subscription Payments
If you would like to charge users on a recurring basis, you can enable subscriptions for your payment form.
Under the Recurring Payments section, toggle the Enable recurring subscription payments option to the on position.

Once you’ve enabled this option, you’ll need to complete the other fields in this section, which include:
- Plan Name: Enter a title for the subscription. This will appear in the transactions for this form in your Stripe account.
- Recurring Period: Choose how often the recurring payments should occur. Options are Daily, Weekly, Monthly, Quarterly, Semi-Yearly, or Yearly.
- Customer Email: Select the Email field from your form so the customer can be contacted. This is required to create a subscription for a customer in Stripe.
You’ll also see options to map additional customer details, including Customer Name, Customer Phone, Customer Address, and the Custom Meta fields.
Note: If you’d like to manage your subscriptions on your Stripe dashboard, you’ll need to do so from the Billing » Subscriptions menu. The Plan Name currently isn’t visible when viewing transactions from the Payments menu on Stripe dashboard.
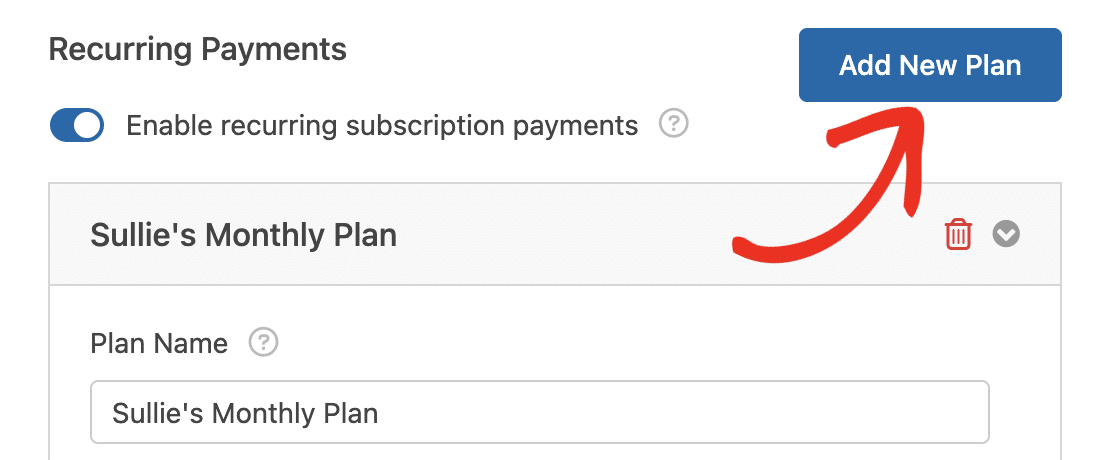
If you’d like to create an additional subscription plan, click the Add New Plan button.
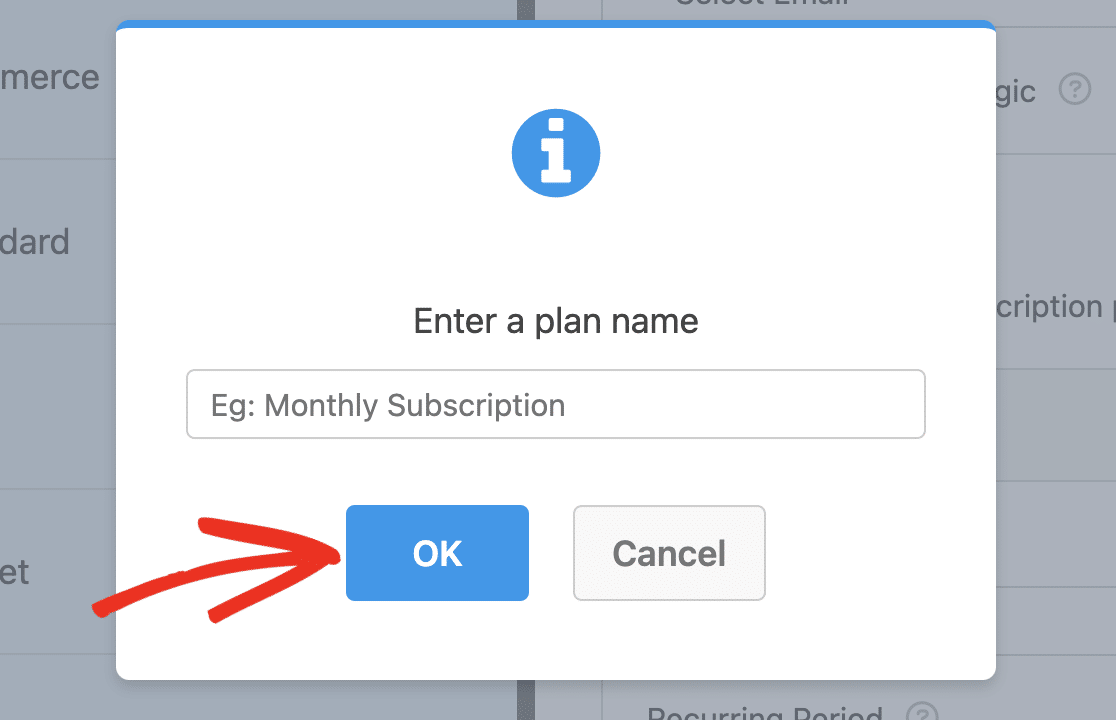
In the overlay that appears, enter a name for your plan and click OK to continue.
Note: You’ll see a warning informing you that multiple recurring payments cannot be processed simultaneously. The first plan to match your conditions will be processed if your conditional logic rule matches multiple plans.
After that, scroll to the new plan you created and configure the options similar to how you did the first plan.
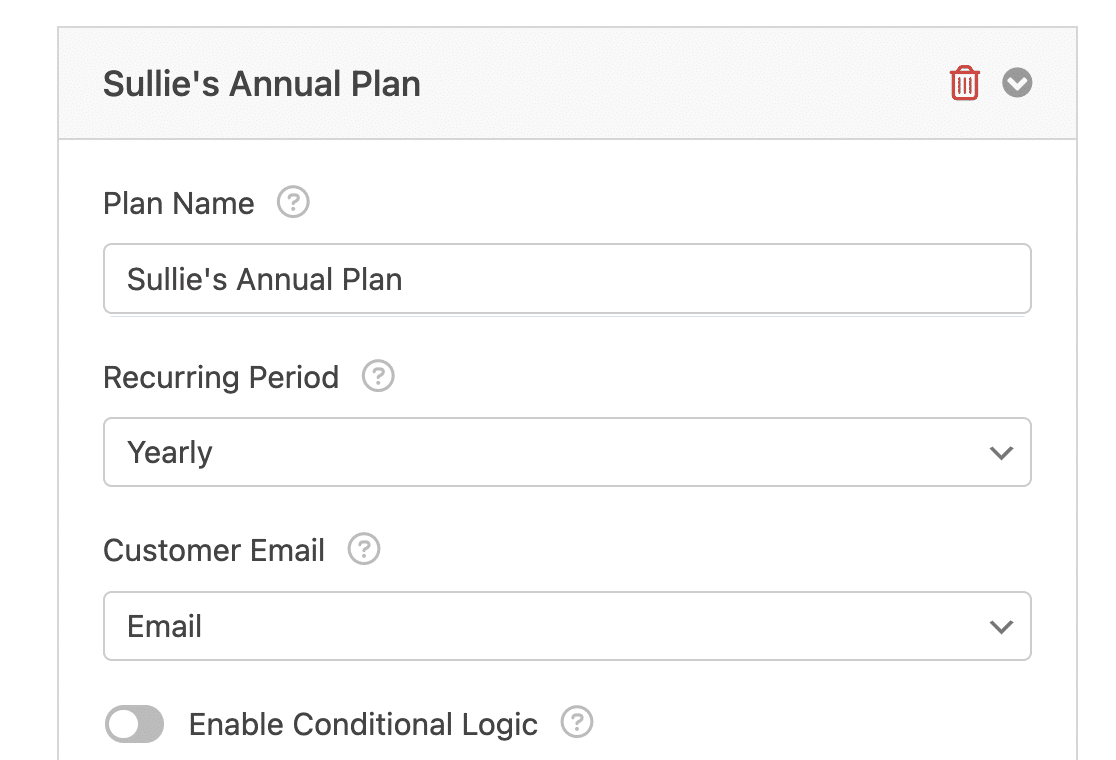
Note: You can add as many subscription plans as you need for your payment form.
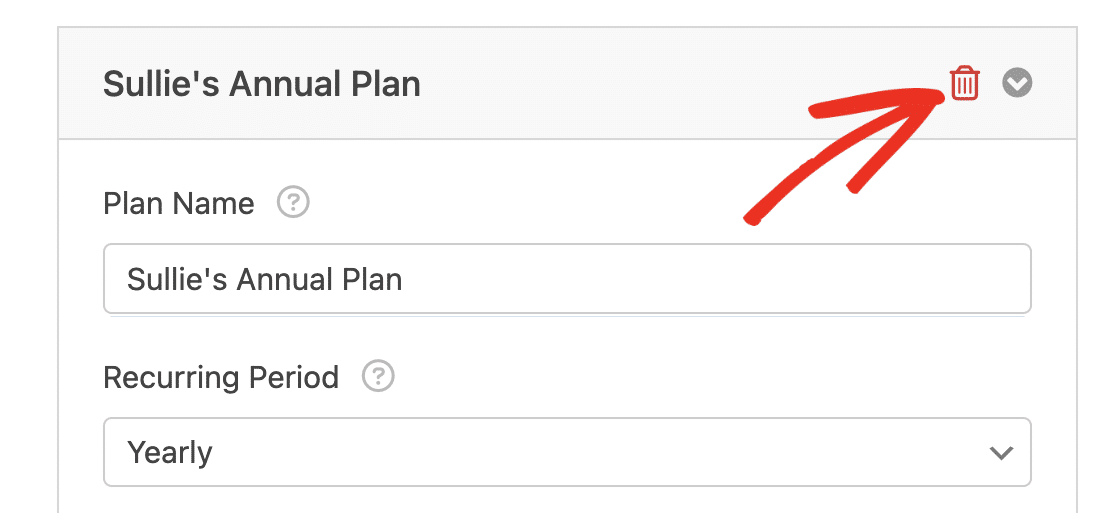
If you’d like to delete an additional plan you created, click the trash icon next to the plan’s name.
Once you’re done configuring your payment settings, be sure to save your form to update your settings. Before launching your payment form, we recommend testing Stripe payments.
Note: To further customize your payment forms and provide even more flexibility to your users, explore how to use conditional logic with Stripe payments.
Frequently Asked Questions
These are some of the most common questions we receive about using the Stripe Pro addon.
I’ve been using WPForms for a while. Why does this tutorial look different from what I see on my site?
We’ve updated our Stripe integration so that it’s even more secure and SCA (Strong Customer Authentication) compliant.
To see these new options, you’ll need to complete two steps:
- Check that your site is updated to the latest version of WPForms.
- Then, follow the steps from the Connecting Stripe to Your Site section of this guide.
Why isn’t the Connect with Stripe button working for me?
Stripe will only allow owners or administrators to connect an account using Stripe Connect. If you don’t seem to be able to complete the process, please check your Stripe user role to make sure it meets these requirements.
How can I switch to a different Stripe account within my site?
If you’d like to switch over to a different Stripe account for your site, you can do this by navigating to WPForms » Settings » Payments and scrolling to the Stripe section.
From there, click the Switch Accounts link to change which Stripe account your site is using.

How do I test Stripe payments in my forms?
The best way to test out your forms is to submit an entry and follow the same steps as your users. We recommend setting up Stripe’s Test Mode before adding your form to a live page, which allows you to test transactions before accepting actual payments.
Does WPForms store my payment data?
WPForms only stores the last 4 digits of your credit card. This is used to identify the payment method used for each entry.
In fact, our forms don’t even store sensitive credit card data on your site. Instead, our Stripe integration ensures that any sensitive information is communicated securely and directly to Stripe, without ever touching your server. This protects both you and your users from the potential risks associated with storing credit card details.
Will I be charged any fees for using Stripe in my forms?
WPForms does not charge a fee for using Stripe in your forms when your license is active. However, if your WPForms license is inactive, a 3% processing fee is applied to each payment. This fee is separate from Stripe’s own processing fee, which starts at 2.9% + 30¢ per successful card charge, as outlined on Stripe’s pricing page.
Is there a way to customize the appearance of the Stripe elements in my form?
Absolutely! You have the flexibility to style Stripe elements to match the look and feel of our forms.
To modify the styling of the Stripe Credit Card field placeholder, refer to our developer guide on changing the styling of the Stripe credit card placeholder.
For broader customization options, including colors, fonts, and more, explore our developer documentation on customizing Stripe styling.
What is Stripe Link and how can I remove it from the payment process in WPForms?
Stripe Link is a feature from Stripe that automatically saves and fills in payment and shipping information for your customers, simplifying the checkout process. This feature is automatically enabled when you select the Payment Element option in WPForms. However, if you wish to disable this feature and require customers to manually enter their details for each transaction, you can do so through your Stripe dashboard settings.
For detailed guidance on how to turn off Stripe Link for your specific setup, please refer to the Stripe documentation on disabling Link.
What kind of form fields can I send to Stripe as custom metadata?
You can send the values of certain supported form fields to Stripe using the Meta Value dropdown. This is useful when you’d like to store extra information with the transaction, such as a referral code or user ID.
For example, if you have a Single Line Text field labeled “Referral Code” in your form, you could pass its value to Stripe with the meta key referral_code.

Supported field types include:
- Single Line Text
- Paragraph Text
- Checkbox
- Radio
- Dropdown
- Number
- Rating
- Number Slider
- Payment fields (Single Item, Multiple Items, Dropdown Items, Checkbox Items, Total)
That’s it! You can now set up one-time and subscription payments for your forms with the WPForms Stripe Pro addon.
Next, are you interested in tracking your Stripe transactions? Be sure to check out our tutorial on viewing and managing Stripe payments to learn how.
