AI Summary
Do you want to test your Authorize.Net connection before accepting real payments through your WordPress forms? Testing your connection lets you ensure that it’s working properly and gives you the chance to fix any errors before going live.
This tutorial will show you how to perform Authorize.Net test transactions with WPForms.

Requirements: You’ll need an Elite license level to access the Authorize.Net Addon.
Additionally, you’ll need to have an SSL connection on your site to perform transactions through your forms. In most cases, your hosting provider can help you get an SSL certificate set up on your site.
Before you get started, make sure you’ve installed and activated the WPForms plugin, as well as the Authorize.Net Addon.
Enabling Authorize.Net Test Mode
To enable test mode for your Authorize.Net integration, go to WPForms » Settings » Payments.

Here, scroll down to the Authorize.Net section and check the Test Mode option to enable Test Mode.

This will open up two additional fields you’ll need to fill out: Test API Login ID and Test Transaction Key.

Generating Test Keys
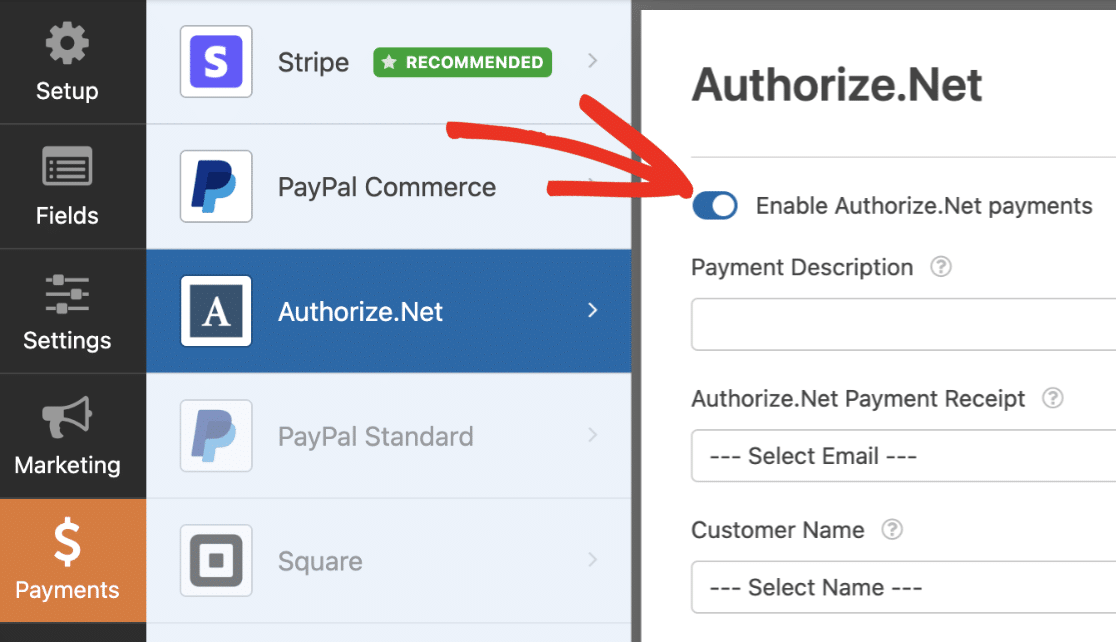
To generate a Test API Login ID and a Test Transaction Key, you’ll first need to log in to your Authorize.Net Sandbox account. If you don’t already have one, go ahead and After ensuring that your Sandbox account is in Live mode, exit out of the overlay by clicking the Remind Me Later option. Then, in the left sidebar, click on Settings. From here, click on API Credentials and Keys. On the next page, copy the value next to API Login ID. Back in your WPForms Payments settings, paste the copied value into the Test API Login ID field. Once you’ve added your Test API Login ID, you’ll need to generate a Transaction Key in your Authorize.Net Sandbox account. To do so, switch back over to the page with your Sandbox account settings and look for the section labeled Create New Key(s). Next to Obtain, select New Transaction Key. Then click the Submit button. Immediately after submitting, you should see an overlay asking you to verify your identity. Click the Request PIN button to start this verification process. After submitting the request, check your email for the PIN. Be sure to enter the value from your email in your Authorize.Net Sandbox account, then click the Verify PIN button. Once you’ve verified your identity, Authorize.Net will display your Transaction Key. Click the Copy to Clipboard button. Flip back over to the browser tab or window with your WPForms Payments settings. Paste the key into the Test Transaction Key field, then click Save Settings. Next, you need a form you can use to make test payments. You may create a new form or edit an existing one. If you’re starting from scratch, you may want to consider using our Billing / Order Form template. Note: Want to learn more about the Billing / Order Form template? See our tutorial on using templates in WPForms for all the details. Regardless of whether you choose to create a new form or edit an existing one, make sure you’ve added an Authorize.Net field to it. This will add a credit card field that will allow your users to make payments directly in your form. Once you’ve set up your form, you’ll need to enable Authorize.Net payments. To do so, go to Payments » Authorize.Net in the form builder. Then toggle the Enable Authorize.Net payments option to the on position. This will open up additional settings for you to fill out. However, none of these fields are required for testing purposes, so feel free to leave them blank if you want to. After you’ve set everything up, be sure to save your form. Once your form is set up, you can test payments out on the frontend of your site. To do so without publishing your form to a live page, you can use the form preview option in WPForms, or you can add your form to a private page or post. Then go ahead and submit a test entry of your form. Note: While Authorize.Net is in test mode, you will not be able to use real credit card details in your test form. Instead, you’ll need to enter a special test card number provided by Authorize.Net. To find a list of test credit card numbers and CCV codes, be sure to check out Authorize.Net’s testing guide. To view and manage all test transactions and their details, simply go to WPForms » Payments and turn on the Test Data option. For full details on viewing test and live payment information, understanding transaction trends, adjusting for different currencies, and more, check out our guide to viewing and managing payments. Note: Looking to offer discounts to your customers through coupon codes? Check out our Coupons addon tutorial for all the details. By default, Authorize.Net will send you a receipt via email for test transactions. However, if you’d also like to view your test transaction in your Sandbox account, click on Unsettled Transactions in the lefthand sidebar to view recent transactions. In this section, you’ll be able to see the test transaction you submitted. To view more details about the transaction, click on the Transaction ID number for a specific entry. After you’ve confirmed that your Authorize.Net payments are working as they should, you’re ready to switch your connection to Live mode. To do so, simply head over to your Authorize.Net settings in WPForms and uncheck the box labeled Test Mode. Note: If you haven’t already, you’ll need to generate keys for Live Mode in your Authorize.Net Merchant account. Once you’ve unchecked this box, be sure to click the Save Settings button. That’s it! Now you can test out your Authorize.Net connection in WPForms. Next, would you like to allow users to choose which payment method they use during checkout? See our tutorial on allowing users to choose a payment method in your forms for more details.


Creating a Form to Test Payments


Enabling Authorize.Net Payments
Publishing Your Form and Performing a Test
Viewing Test Transactions in WPForms

Viewing Test Transactions in Authorize.Net


Switching to Live Mode
