
AI Summary
Do you want to create a custom WordPress user registration form without the hassle? You’re in the right place.
You might be building a membership site, managing contributors, or just want to give your users a smooth sign-up experience. If so, a custom registration form is the way to go.
I help lots of WordPress users set up user-friendly forms that not only look great but also work exactly the way they need. And I’ll show you how, too!
In this post, I’ll walk you through the easiest way to create a user registration form in WordPress, no coding required. You’ll have new users registering on your site in just a few clicks.
Create Your User Registration Form Now
Why Use a Custom Form Instead of WordPress’s Default Registration?
WordPress actually comes with a basic registration system built in. You can switch it on under Settings » General by checking Anyone can register, and new visitors get the standard WordPress signup page.
The trouble is that default page is pretty bare. You can’t add your own fields, it doesn’t match your site’s design, there’s no real spam protection, and you don’t get to choose what role new users land on or add them to your email list.
A custom registration form fixes all of that, as you pick the fields you want, the form matches your theme, you stay in control of user roles and activation, and you can hook signups up to your marketing tools or even collect payments.
How to Create a WordPress User Registration Form
Ready to let your users register in WordPress and simplify user management? Creating a WordPress user registration form is super easy with WPForms.
- 1. Install the WPForms Plugin
- 2. Activate the User Registration Addon
- 3. Create WordPress User Registration Form
- 4. Customize User Registration Form Fields
- 5. Configure WordPress User Registration Form Settings
- 6. Add the User Registration Form to Your Site
- 7. Add Your Registration Page to Your Website's Menu
1. Install the WPForms Plugin
WPForms is the best contact form builder for creating WordPress sign-up forms quickly and easily. The free version allows you to create simple contact forms, but WPForms Pro comes with premium addons that enable more complex functionalities like user registration.
The best thing is that you don’t need to know HTML, PHP, or CSS to build your own WordPress registration form with WPForms. It’s a simple drag-and-drop form builder that anybody can use.
To get started, the first thing you’ll need is to install and activate the WPForms plugin. It’s very simple for beginners to install this form plugin.
Make sure to purchase the WPForms Pro plan because this includes the User Registration addon that we’ll be using to create registration forms.
2. Activate the User Registration Addon
When you’ve installed WPForms on your site, the next step is to install and activate the User Registration addon. To get this addon, head over to WPForms » Addons from your WordPress admin area.
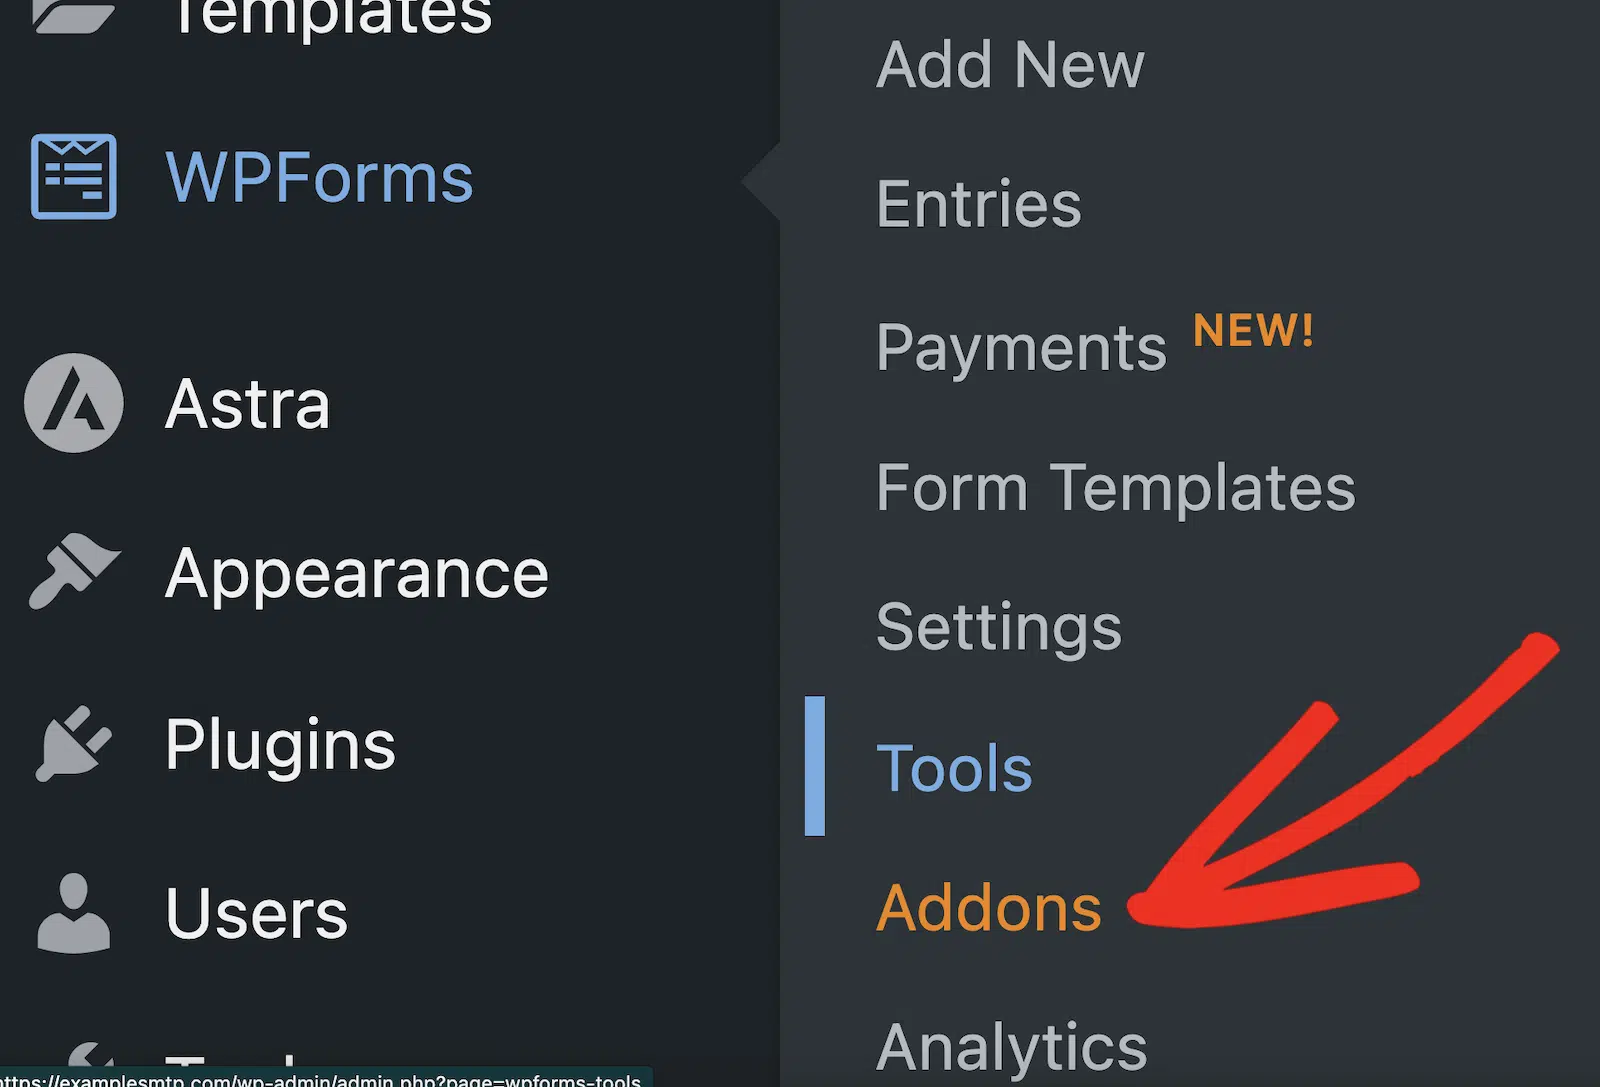
This will open the WPForms Addons page. You can scroll through the list of addons or just type in “user registration” in the search field to find the User Registration addon. Click on Install Addon to begin the installation.

The status under the User Registration addon will now read Active. Great job! Now that the User Registration addon is ready, we can start creating WordPress user registration forms using WPForms.
3. Create WordPress User Registration Form
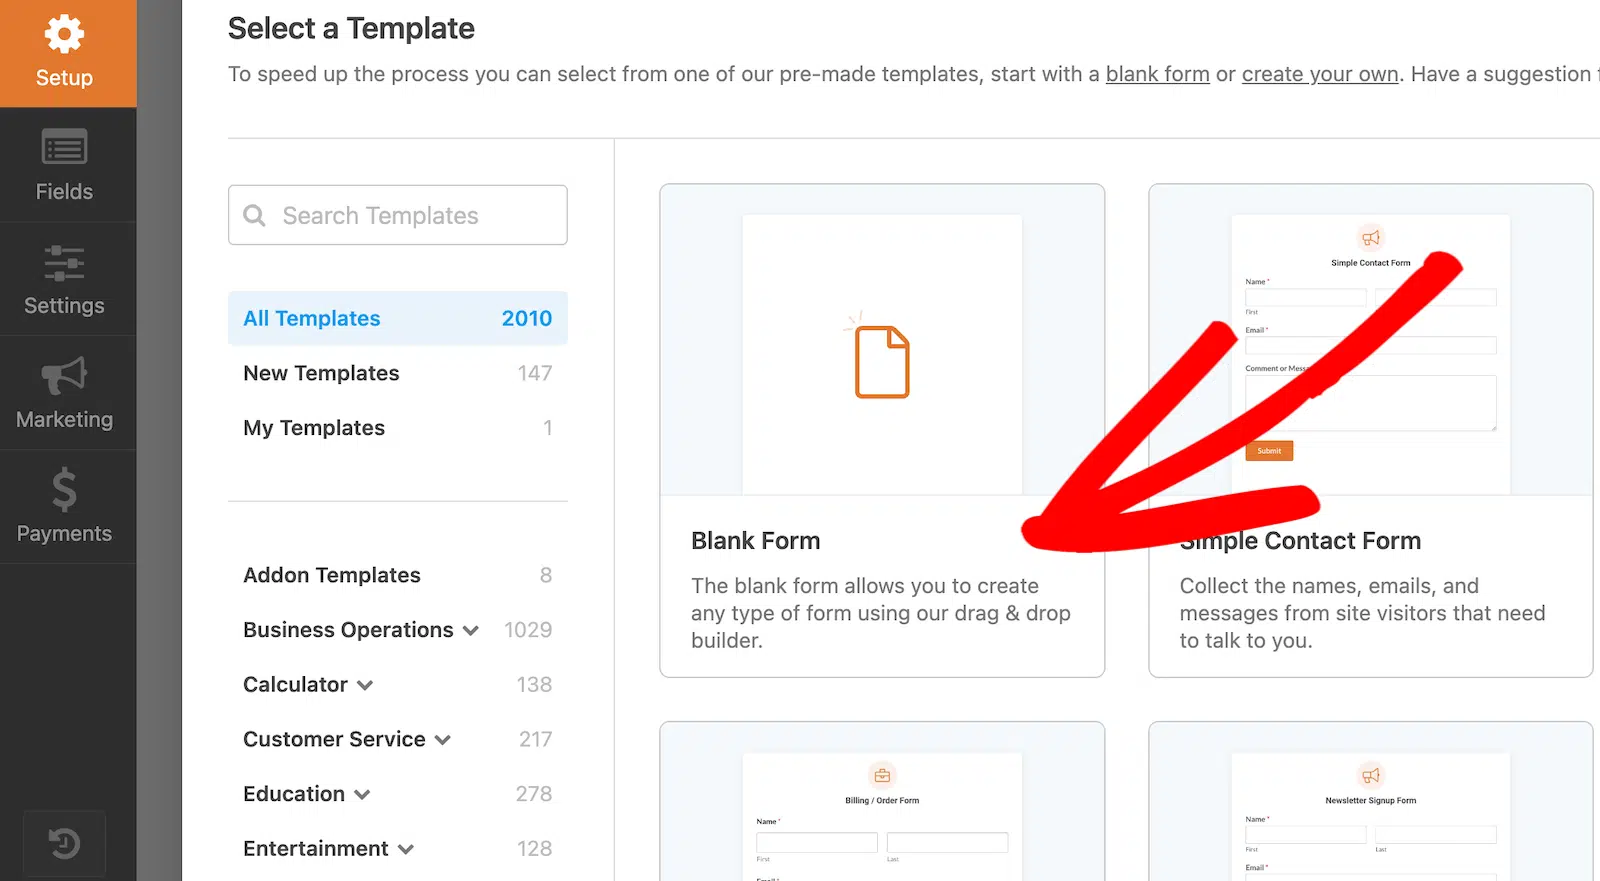
To create a new registration form, click on WPForms » Add New. You’ll now see the form setup screen where you can name your form and select a template.

If you want to do this even more quickly, you can create a user registration form from a template. In this example, however, we’ll create the WordPress sign-up form from scratch, which is also really easy.
This will give you some good practice with building forms, as well. Now, click on the Create Blank Form.
You should now see the form builder screen. At this point, the form will be empty since we chose to create a new form using the Blank Form option.
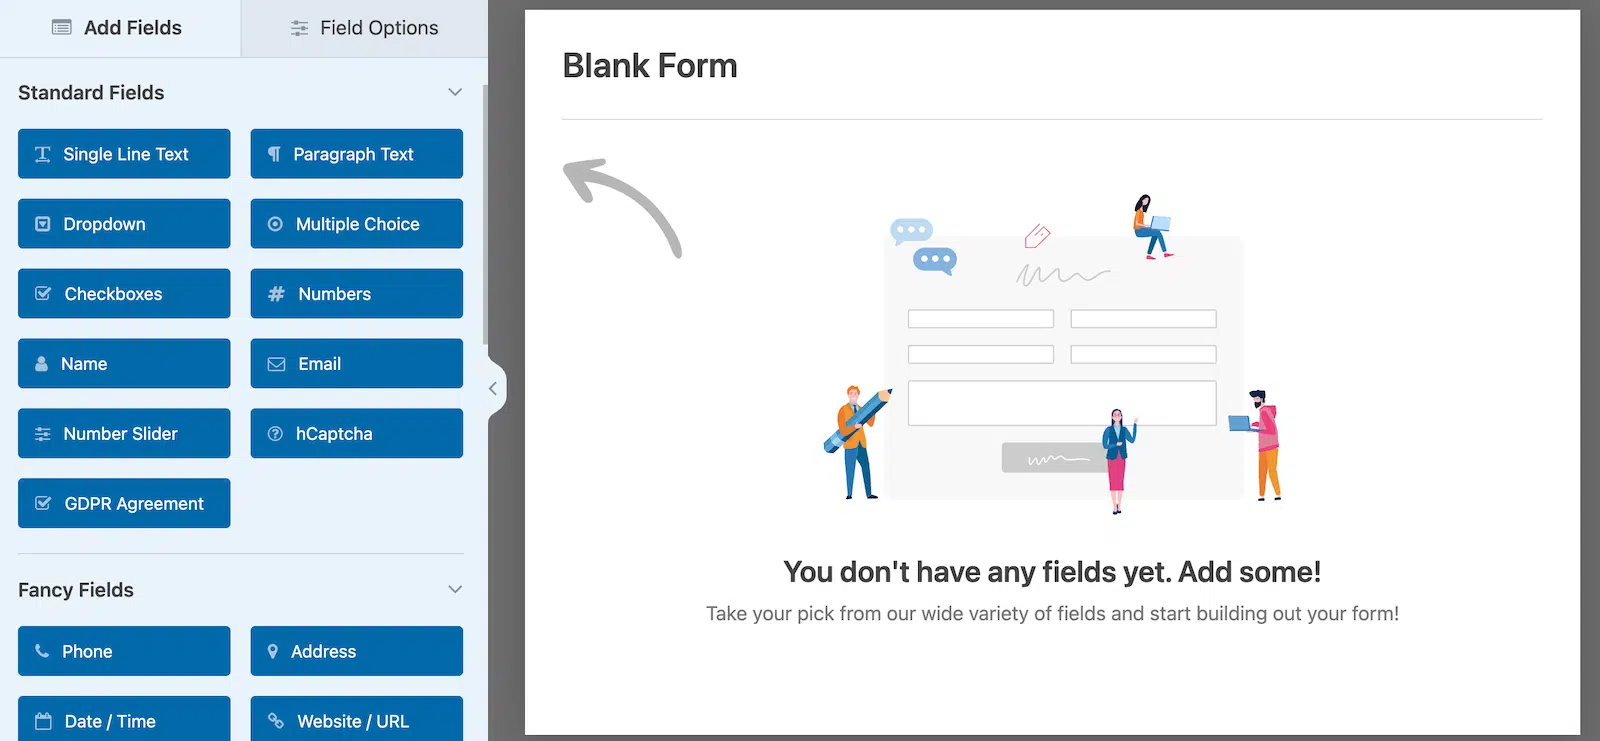
WPForms is extremely customizable and includes lots of custom fields that you can add if needed. We’ll take advantage of its various registration features in the next steps.
4. Customize User Registration Form Fields
We’ll create a really simple registration form, adding only the most important fields to collect user information. This is to keep the registration process short and sweet for users.
Longer forms have a much greater chance of being abandoned by users, but you can still capture leads using WPForms’ Form Abandonment addon.
Now, let’s add some fields using the simple drag-and-drop form builder. All you need to do is select a field from the left-hand pane and drag and drop it onto your form on the right.
Repeat this process until you’ve added all the desired fields. For our form, we added the following fields:
- Name
- Single Line Text (for username input)
- Password
You can easily customize options for your form fields. For instance, we changed the name of Single Line Text field to read Username, set a maximum character limit, and added an input mask to control allowed characters for the username.
To customize any field, click on the field to open the Field Options. Under the General tab within Field Options, you can change the field’s label, add a description, and choose whether you want the field to be required.

Normally, usernames only contain alphanumeric characters and no special characters. You can enforce this requirement so that the Username field only accepts letters or alphabets.
To do this, click on the Advanced tab under Field Options for the Username field. Then, scroll down to find the Input Mask option.
WPForms uses formulas to create Input Mask rules. In our example, we wanted to create a Username field that accepts numbers, uppercase letters and lowercase letters, and a character length between 4 to 15.
To define these WordPress username rules, the formula for the custom input mask is: ****[*{0,11}]

For more information about input masks, see our doc guide on using custom input masks in WPForms. You can set down your own WordPress username rules using custom input masks.
Similarly, we customized the Password field in the Field Options to enable the Password Confirmation and Password Strength options.

These options are exceptionally handy if you’d like to make sure your users sign up with strong credentials and prevent the risk of hacking. The interactive password strength meter also helps enhance the user experience.
WPForms also adds an extra layer of security by using anti-spam techniques to prevent brute force attacks and spambots. You can even connect WPForms with Google reCAPTCHA, as explained in this guide on stopping WordPress form spam.
Also, you might want to change the label of the Submit button at the bottom of the form so that it reads Register instead.
To do this, click on the Setting button on the menu on the left and then click General. From here, simply edit the text under the Submit Button Text field.

Once you’re done customizing your form, click Save.
5. Configure WordPress User Registration Form Settings
In this step, we’ll map our form fields to the WordPress user profile and assign a user role to new users. To start, click on Settings » User Registration.

Now, click on the button next to Enable User Registration to enable it.

On this page, you can do the following:
- Map each form field
- Select default user roles
- Enable notifications
- Select which confirmation page to redirect users to
- Enable profile updates for existing users
For field mapping, simply use the dropdowns to select a field from your form that corresponds to the user profile field.

Scroll down to the User Roles section to assign one of your WordPress site’s predefined user roles to new users.

By default, you’ll assign a single role to all new registrants. However, if you need more flexibility, you can learn how to assign user roles conditionally based on input from another field.
In the next step, we’ll configure the user activation method.
5.1. Pick a User Activation Method
If you scroll down from the User Roles section, you should see User Activation & Logins section. We recommend toggling on the Enable User Activation button if you want to prevent spam signups and control user activations.

WPForms gives you two user activation methods:
- User Email
- Manual Approval
The User Email method is more convenient if there are lots of people signing up to your site every day.
Plus, it will help prevent spam user registrations and require all new users to complete their registration using a special link sent to their provided email address.
You can customize the email subject, message, and select a User Activation Confirmation Page to display when a user clicks the activation URL in their email.

If you select the Manual Approval method, site admins will need to approve each user on the backend to confirm registration. This can be time-consuming.
Once you’re done configuring the user registration settings, click Save to store your changes.
5.2. Change the New User Registration Settings
Scrolling down further from the settings in the above section, you should now find the Email Notifications section.
This gives you the ability to change the new user registration notifications. The available options include:
- Send email to the admin when a new user registers.
- Send email to the user with the account information they entered during signup.
- Send email to the user once their account has been activated.

If you want to edit the header and content of these emails, you can simply click on the Edit Template button next to each notification type.
For any issues with email delivery, you can see this guide on fixing user registration emails in WordPress.
5.3. Edit On Page Registration Form Confirmation
Apart from the notification emails, WPForms also displays a confirmation message to the user when they submit the form. WPForms has three confirmation types to choose from:
- Message. This is the default confirmation type. When a user completes your registration form, a simple message confirmation will appear letting them know their form was processed. Look here for some great success messages to help boost customer happiness.
- Show Page. This confirmation type takes users to a specific web page on your site thanking them for registering. For help with this step, check out our tutorial on redirecting customers to a thank you page. In addition, be sure to check out our article on creating effective Thank You pages for boosting customer loyalty.
- Go to URL (Redirect). This option is used when you want to send customers to a different website, such as an eCommerce site you’re an affiliate for.
You can customize confirmations by clicking on Settings » Confirmations. In this example, we used the default Confirmation Type (Message), but we edited the message to include instructions for the user.

If you want to automatically log new users into their newly created WordPress account rather than show them a thank you message after registering on your website, check out this article on how to set up WordPress registration redirects.
Don’t forget to Save your changes. Next, we’ll embed and publish the form on your site.
5.4. Configure User Registration Marketing and Payments (Optional)
It’s really easy to combine your site’s user registration forms with our email marketing addons like Mailchimp, AWeber, Campaign Monitor, MailerLite, and GetResponse.
This allows you to add all registered users to your email marketing list automatically. You can even add them to various marketing automation sequences from there.
For instance, you can add a checkbox field that lets users sign up for your newsletter while registering.
With WPForm’s marketing integrations, you can then send new signups to your mailing list automatically. In addition, you can create a WordPress registration form with payment options using WPForm.

The Stripe integration is available for all license levels (including the free version of WPForms), and it’s perfect for collecting credit cards, Google Pay, Apple Pay, and payments from tons of other popular methods.
In the Pro plan, you can also configure your user registration forms to accept payments using other payment integrations like PayPal, Square, and Authorize.net (Elite plan only).
5.5 Allow Profile Updates
In the form builder, go to Settings » User Registration and switch on the option to let existing users update their profile via this form.

Then, maap only the fields you want to allow users to change (name, email, password, custom meta, etc). For security, we recommend limiting this form to logged-in users and showing only the fields they should edit.
6. Add the User Registration Form to Your Site
After you’ve created your WordPress user form user registration and login form, you need to add it to your WordPress website.
You can embed any WPForms form using 3 easy methods. The simplest one is the WPForms embed tool. Click on the Embed button on the top-right of the form builder screen.

Now, select Create New Page.

Give your new page a name, and then click Let’s Go.

WPForms will now take you to your WordPress editor with your new registration form already embedded within.
When you’re ready, click on Publish. With WPForms, this is all you need to do to add a registration page to your WordPress site.

You might want to redirect your default WordPress registration URL to your new custom login page.
The default WordPress login page is too plain, and it doesn’t match your site’s WordPress theme, so it can feel out of place to use the standard login page in WordPress.
See our article on how to add login and registration redirects in WordPress for details. You can also embed the registration form in the sidebar widget on your site.
Now, users can register on your site using your custom registration form. Once they register, you can then change their roles or other settings from the default WordPress profile page for each user.
7. Add Your Registration Page to Your Website’s Menu
After you publish your new user registration form, it will be ready to use. However, visitors have to be able to find it if they want to sign up.
The easiest way to make your registration page accessible is to add it to the main menu of your WordPress site.
You can do this by going to Appearance » Menus and choosing your new registration page from the options listed on the left.

Depending on which WordPress theme you have, you might also need to remove your old registration page from your site’s menu. You can also add a separate menu link for your ‘Edit Profile’ page if you’re offering profile updates. Don’t forget to save your changes!
If you need help with this, we recommend checking out this WordPress menu tutorial. And that’s it! You now know how to make a WordPress registration form to enable an easy signup process for new users on your site.
Create Login and Password Reset Forms Too
Registration is only half the picture, since once people sign up, they’ll need a way to log back in, and at some point someone is going to forget their password.
The good news is that the same User Registration addon handles both. You can build a custom login form and drop it anywhere on your site, and you can set up a branded password reset form so the whole flow matches your design instead of the plain WordPress defaults.
Here’s how to display login and registration forms on any page and how to create a custom WordPress password reset form.
FAQs about WordPress User Registrations
User registrations in WordPress are a popular topic of interest among our readers. Here are answers to some common questions about it.
Why create a User Registration form in WordPress?
There are various benefits to creating a user registration form on your website to accept new users:
- Organization: When you let visitors create a WordPress account and make their own user profiles on your site, you’ll have a recorded entry of all their important details needed to automatically add their account.
- Security: By requiring new users to submit a form with activation requirements, you will keep your WordPress site secure and stop user registration spam.
- Permissions: You can control the level of access different users have on your site based on their registered WordPress roles, such as author, contributor, subscriber, and more. If you’re a WooCommerce store, you can even require users to register first before purchasing from you online.
- Membership Sites: You can create a membership site using one of the best WordPress membership and member plugins on the market and require people to register as a member using a registration form.
- Ease of Use: Once users register for your site and log in via WordPress user login, they’ll be able to view their own user account page and edit their profile within their WordPress dashboard.
Can users register in WordPress?
Yes, users can register in WordPress. This feature allows visitors to become members of your site, contributing by writing posts, leaving comments, or even administering the site if given the right permissions.
To enable this feature, simply go to your WordPress dashboard, navigate to ‘Settings,’ then ‘General,’ and check the box next to ‘Anyone can register.’ You can assign the default user role, from subscriber to administrator, based on what activities you want your users to perform.
What does new user registration on WordPress mean?
New user registration on WordPress refers to the process where visitors to your WordPress site sign up to become members. Upon registration, users are given a username and password, which they can use to log in to the site.
This process is particularly useful for creating a community or allowing users to access restricted content, post comments, or manage site content, depending on user roles. It’s a way of effectively personalizing the user experience and managing user permissions.
How do I create a user registration in WordPress?
To create an experience where a user enters your website and wants to become a member, consider using a plugin like WPForms Pro with the User Registration Addon.
This will allow you to create custom registration forms, send user notification emails, and even set up conditional logic for user submissions.
Install WPForms Pro, activate the User Registration Addon, and create personalized registration forms with drag-and-drop ease.
Can users update their WordPress profile with a form?
Yes. With the User Registration addon, you can enable profile updates so logged-in users can submit a form to change their account details.
Turn this on in Settings » User Registration, map the fields you want to allow, and embed the form on a members-only page.
Next, Run a Successful Giveaway
Now that you’re getting new registered users on your site, it might be a good idea to further increase your followers by running an Instagram giveaway. Check out these tips for running an Instagram giveaway to launch a successful competition.
Create Your User Registration Form Now
Ready to build your form? Get started today with the easiest WordPress form builder plugin. WPForms Pro includes lots of free templates and offers a 14-day money-back guarantee.
If this article helped you out, please follow us on Facebook and Twitter for more free WordPress tutorials and guides.


I want to create a User Registration Form but it’s going to be 2 different forms also I want to be able to add a signature/date on the form
and space /director of sport on the form then enable a pdf download.is it possible??
Hey Falana- you can make use of the User Registration addon and Signature addon – These addons are availble with Pro and higher license levels only.
However, we do not have the ability to generate a PDF automatically for submitted entries. I do agree it would be super helpful, though. I’ve made a note of the feature request and we’ll keep it on our radar as we plan out our roadmap for the future.
In the meantime, there are a couple of options you could consider, depending on your particular goals:
1) You could set up form notification emails to send an email with the content of the submitted entry. Most browsers will then let you save an email as a PDF (here’s an example for Chrome). In case it helps, here’s our tutorial on setting up notification emails.
2) You could manually create PDFs of each entry. Here’s our tutorial with all the details.
Hope this helps 🙂
Hello
Is it possible for each subscriber get assigned membership ID using your solution.?
Thanks
Hey Adeniyi – The User Registration addon does not provide an interface to manage or edit existing users and focuses solely on the account creation process.
I would recommend you consider looking at full blown membership/profile solutions. Specifically, check out Ultimate Member or MemberPress, both of which we’ve seen lots of users have good luck with.
Please know that plugins like these are going to give you all the “bells and whistles” for your users, as well as more robust membership/user management tools for you.
I hope this helps!
Hello
Is it possible to have users assigned to a specific membership group using a hidden field?
Hey Jules – The User Registration addon does not provide an interface to manage or edit existing users and focuses solely on the account creation process.
I would recommend you consider looking at full blown membership/profile solutions. Specifically, check out Ultimate Member or MemberPress, both of which we’ve seen lots of users have good luck with.
Please know that plugins like these are going to give you all the “bells and whistles” for your users, as well as more robust membership/user management tools for you.
I hope this helps!
Hello,
Is this possible with your forms?
My store will be for regular customers and 4 different user role prices (for this i’m using User Role Pricing Plugin)
So I need:
1. for regular customers – regular registration with auto-approving
2. for 4 different user roles – 4 different registration forms, but manual approve
3. for regular customers the ability for upgrading account to another user role using one of
those 4 different registration forms.
Hey Sergey, in order to make sure we answer your question as thoroughly as possible and avoid any confusion. Please allow us to response via the email support. Thanks.
It seems that I can only have the subscribers have the ability to edit all submissions vs just theirs. How do you have a user register to be able to complete a membership application?
Hey Earle, for this, I would recommend taking a look at our great guide on how to create a membership site.
I hope this helps and in case you run into any issue,we recommend that reach out to our support team with additional details so that we can help on the same.
Thanks.
can i make a registration form with feedback respond to the register in a downloadable pdf ?
HI ALdi,
Did you get a chance to check this article?
Hey Lukman, we are sorry for any trouble. In order to make sure we answer your question as thoroughly as possible and avoid any confusion.
Would you mind reaching out to us with additional details so that we can help you further on this case?
Thanks.
I am trying to create a registration form but with the appointments are a one time selection.
So if user #1 selects the time slot, it should be gone from the list or show as unavailable for user #2. Is this possible?
Hey Ray – Currently we do not have an inbuilt feature to reserve appointments and block available slots as you’ve described. I do agree it would be super helpful, though.
I’ve made a note of the feature request and we’ll keep it on our radar as we plan out our roadmap for the future. Thanks.
Halo kak, mau tanya. Saya ingin membuat form pendaftaran. Dan akan mengambil nama dan no hp untuk akses login. Kira² agar data nama dan no hp bisa otomatis masuk ke user subcriber wordpress kira² bagaimana caranya ya kak? Terima kasih
Hey Nia – You can consider using our User Registration addon to create the registration form which will also users to login using username/email address and Password. However, if you’re looking that users should be able to login using Phone Number, I apologize, we currently don’t have the feature in the plugin, and I’ll add this into our feature request tracker so that it’s on the radar of our developers.
Hello,
We have WPForm Pro Version
We having a problem With a new Account where the User Address is Not saved in the user Details
Actually, Before 3 Months ago, It was Perfect Work
Hey Devisoft – I am so sorry to hear about the trouble. When you get a chance, please drop us a line in support so we can assist and take a closer look.
If you have a WPForms license, you have access to our email support, so please submit a support ticket.
Otherwise, we provide limited complimentary support in the WPForms Lite WordPress.org support forum.
Thanks 🙂