


AI Summary
A WordPress membership form is the front door to your membership site. It’s how visitors become members, get their own accounts, and unlock the content you’ve set aside for them. Nail the signup experience and everything else about running a membership site gets easier.
The rest is about protecting your premium content and collecting payments, and you can set all of it up without writing a single line of code.
In this guide, I’ll show you two ways to do it. You’ll learn how to create a WordPress membership form with WPForms for simple member registration, and how to build a complete membership site with MemberPress when you need tiers, recurring payments, and courses.
How to Create a Membership Site with WordPress
To create a membership site with WordPress, you need a WordPress website with hosting, a membership form so visitors can sign up, and a way to restrict your premium content to members. A form plugin like WPForms covers member registration on its own, while a dedicated membership plugin like MemberPress runs the whole business with tiers, recurring billing, and courses. The full setup takes about an afternoon, and none of it requires code.
Before diving into setup, decide what type of membership site you’re building. This affects which tools you’ll need:
- Method 1, simple member registration (free or single-tier access): Use the WPForms User Registration addon if you only need basic user accounts with optional content restriction.
- Method 2, full membership business (multiple tiers, recurring billing, course delivery): Use MemberPress when you need subscription management, payment processing, drip content, and advanced access controls.
I’ll walk through both methods below, starting with the quicker one.
- Method 1: Create a WordPress Membership Form with WPForms
- Method 2: Build a Full Membership Site with MemberPress
- Step 1: Set Up a WordPress Membership Site
- Step 2: Install a Membership Plugin
- Step 3: Configure MemberPress
- Step 4: Set Up Your Payment Methods
- Step 5: Establish Membership Levels
- Step 6: Set Up Access Rules
- Step 7: Create Members-Only Content
- Step 8: Create a Pricing Page
- Step 9: Add Sign Up and Login Forms
Method 1: Create a WordPress Membership Form with WPForms
Use this when you need member accounts and a signup form without recurring billing or multiple tiers. It’s the right fit for free communities, single-tier access, and sites where you simply want people to register and log in.
Step 1: Install the WPForms Pro Plugin
WPForms is the easiest WordPress form builder, and it comes with 2,100+ form templates, including ready-made registration and signup forms. The user registration and login forms feature lets visitors create accounts on your site through a form you fully control.
What I like most about WPForms for membership signups is the control you get over new accounts. You decide whether members activate through an email link or wait for your manual approval, so spam registrations never sneak into your member list.
You’ll need a Pro license or higher for this method because the User Registration addon unlocks at the Pro tier.
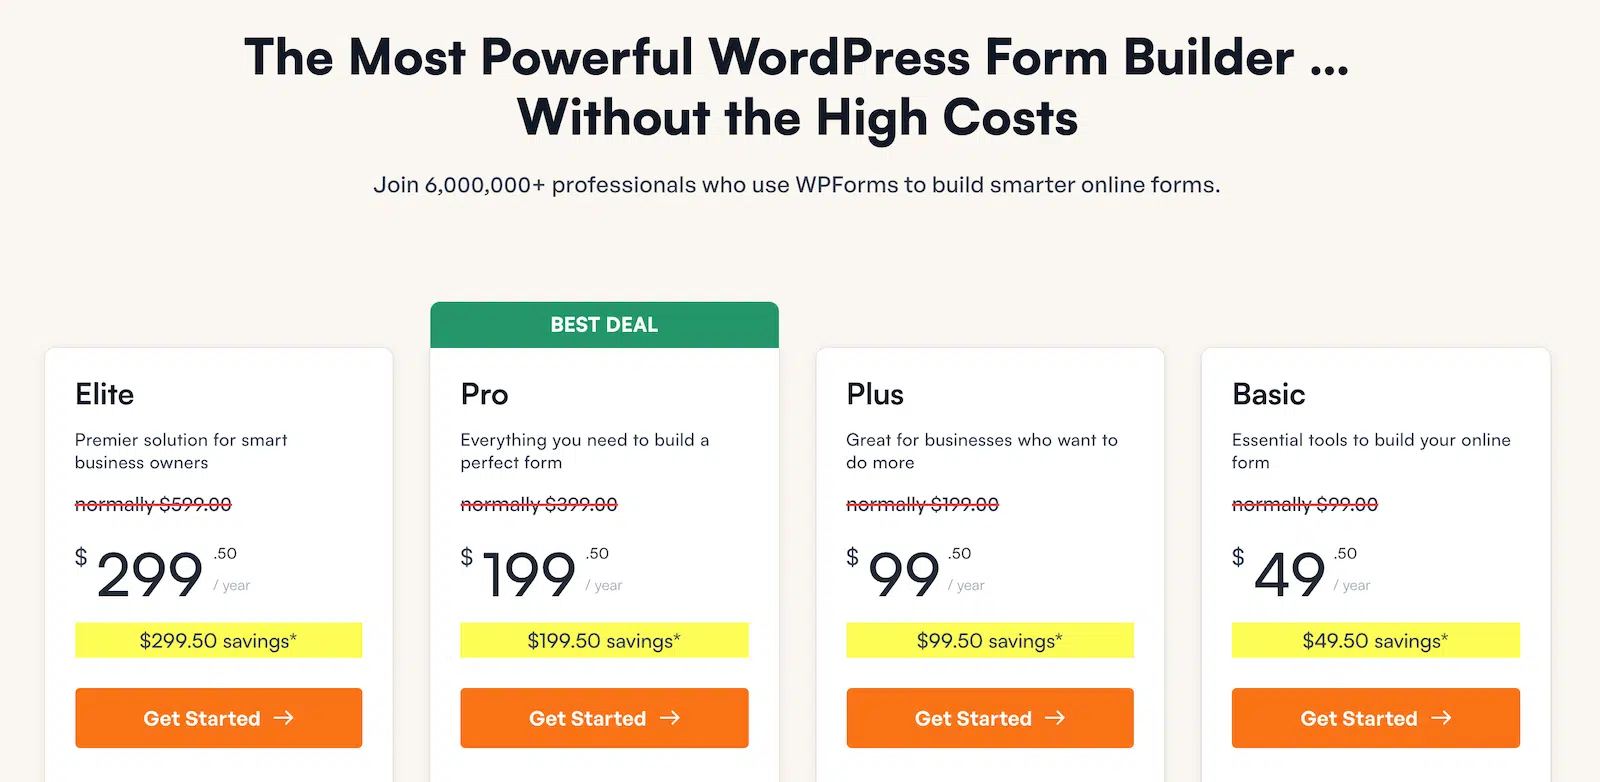
To get started, grab WPForms Pro and install it on your website. The whole process takes just a few minutes.
Step 2: Create Your Membership Form
Once WPForms is active, go to WPForms » Addons and install the User Registration addon. Then head to WPForms » Add New to create your form.
Search the template library for the User Registration Form template and select it. The template comes with the fields a membership form needs, like name, username, email, and password. You can drag in extra fields if you want to collect more from new members, such as a phone number or a short bio.
If you get stuck on any option, the guide on setting up the User Registration addon walks through every setting in detail.
Step 3: Set Up User Activation and Member Roles
Now you can control what happens after someone submits your membership form. The User Registration addon lets you enable user activation, so new members either confirm their account through an email link or wait until you approve them manually.
You can also choose which WordPress user role new members receive. Assigning a dedicated role like Subscriber keeps your access rules clean later on. And if you want a smoother experience, turn on auto-login so new members land in their account right after signing up.
Step 4: Add Your Signup and Login Forms to Your Site
With the form ready, embed it on a dedicated signup page. You can use the embed button right inside the form builder or add the WPForms block to any page or post.
The User Registration addon also creates login and password reset forms the same way. Add the login form to a page called Member Login and put that page in your main navigation menu so returning members can always find it.
Step 5: Restrict Your Members-Only Content
Registration is only half of a membership site. You’ll also want some content locked to members. The simplest option with WPForms is to restrict forms to logged-in users, which works well for member surveys, requests, and exclusive downloads.
For page-level restriction, WordPress lets you make individual posts private or password protected. That works for a handful of pages, but it doesn’t scale to tiered pricing or drip content.
If your membership grows into a paid product with multiple levels, that’s your cue to move to Method 2. You won’t have to throw away your forms either, since WPForms works alongside MemberPress for signups, surveys, and member feedback.
Method 2: Build a Full Membership Site with MemberPress
Use this when you’re running membership as a business. That means multiple pricing tiers, recurring payments, drip content, and courses. Most profitable membership sites work this way because tiered pricing and recurring billing create predictable income, which is why the rest of this guide focuses on MemberPress.
The 9 steps below take you from an empty site to a working membership business.
Step 1: Set Up a WordPress Membership Site
First things first, you’re going to need a website that you have full control over. For that, you’ll need a powerful CMS like the self-hosted WordPress.org.
But before you can launch your WordPress membership site on the web, you’ll need a WordPress hosting service. We recommend using Bluehost.

It’s the most affordable WordPress hosting solution because you’ll get a free domain name and a massive discount off their hosting plans available exclusively for WPForms users.
What makes Bluehost really convenient is that WordPress comes pre-installed with it. Just sign up with Bluehost, and your new WordPress site will be ready!
Get Bluehost Exclusive Discount
Now, we just need to turn your new site into a full-fledged membership site now as we show in the next few steps.
Pro Tip:
Membership sites generate more server load than regular blogs because members log in frequently, access restricted content, and trigger payment processes.
Choose a hosting plan that can handle at least 25,000 monthly visits if you’re planning to grow beyond 100 active members.
Bluehost’s WordPress plans are optimized for this type of traffic and include automatic backups, critical when you’re storing member data and payment information.
Step 2: Install a Membership Plugin
There are a lot of great membership plugins available for WordPress. If you’re looking for a simple membership site where users can register from the frontend, the WPForms User Registration addon covered in Method 1 above has you covered.
However, if you’re looking for a more comprehensive membership website plugin, you should use MemberPress.
This is what you need when monetizing your content through multiple membership tiers, accepting recurring payments, and delivering courses or premium content over time.
I recommend it because it’s easy to use and has all the features you need to run a full-fledged membership site.
After purchasing a suitable MemberPress license, make sure to install it on your site. If you don’t know how, check out this guide on installing a WordPress plugin.
Pro Tip:
Don’t overwhelm yourself by creating five membership levels on day one. Launch with a single paid tier at your target price point ($27-$97/month is common for content-based memberships). Test your offering, gather member feedback, and validate that people will pay before building out additional tiers.
Step 3: Configure MemberPress
As soon as MemberPress is installed on your WordPress site, you can begin configuring it. From your WordPress dashboard, navigate to MemberPress » Settings.
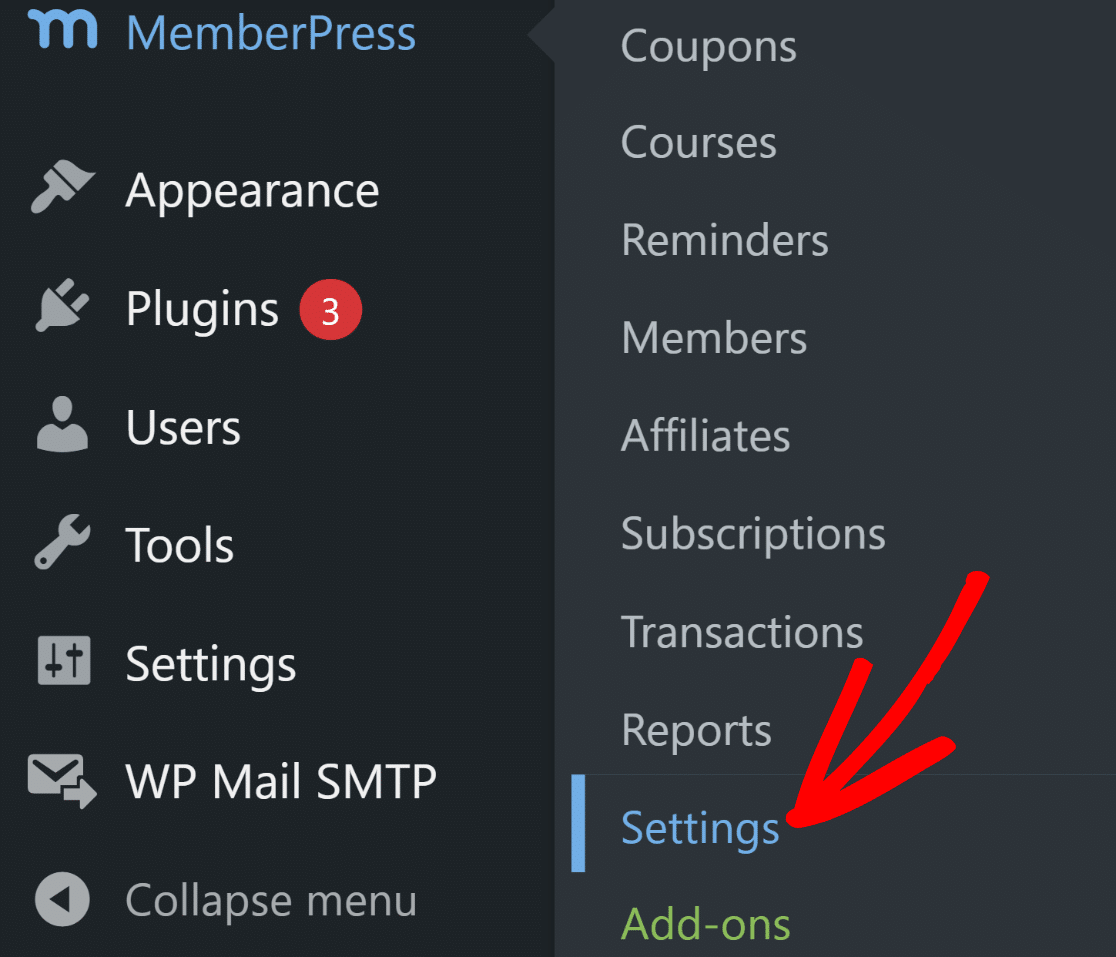
By default, this will take you to the License settings, where you can enter the license key you’d have obtained after purchasing MemberPress.
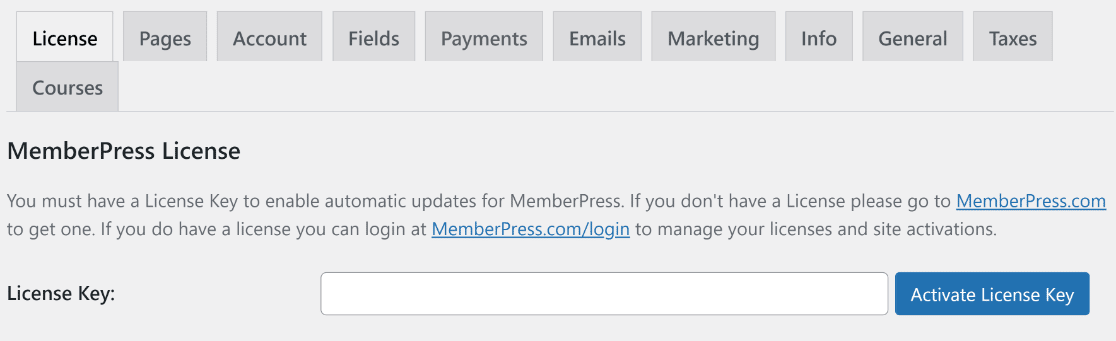
Once your license is activated, you can get full access to all MemberPress features. Next, we’re going to set up payment methods.
Pro Tip:
Before going further, create a simple “Welcome” page that members see after joining. Go to Pages » Add New and write a brief message confirming their membership, explaining how to access content, and where to get help.
Save this page. You’ll link it in MemberPress settings under the “Thank You” page option ( Settings » General tab). Include links to your member area, support email, and any getting-started resources. This prevents confusion when your first members sign up.
Step 4: Set Up Your Payment Methods
A membership site needs an efficient payment system to allow new users to become paid members of your site.
To add a payment method, visit the Settings page as before and click on the Payments tab in the horizontal bar. Then click on the Add Payment Method button.
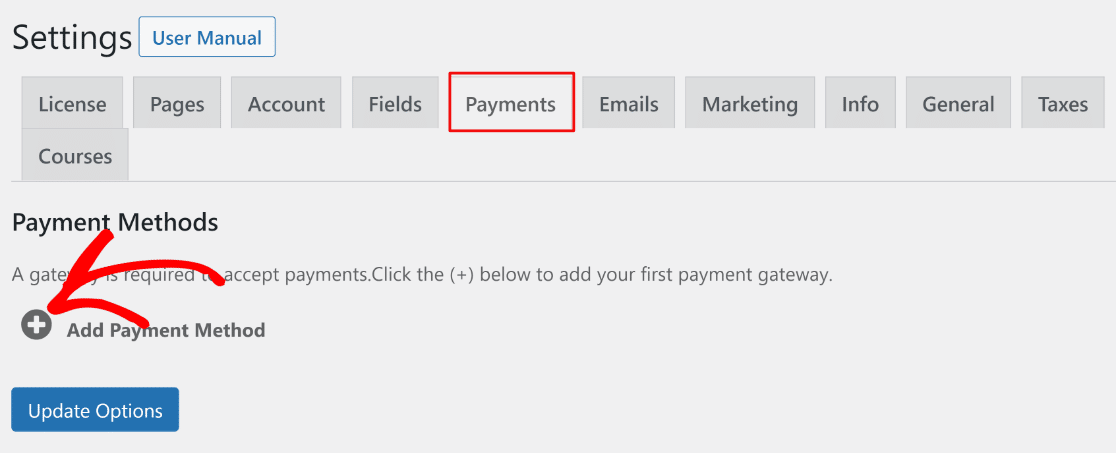
MemberPress lets you accept payments with Stripe, PayPal, and Authorize.net as your payment gateway. Feel free to set up multiple payment gateways or just stick with one.
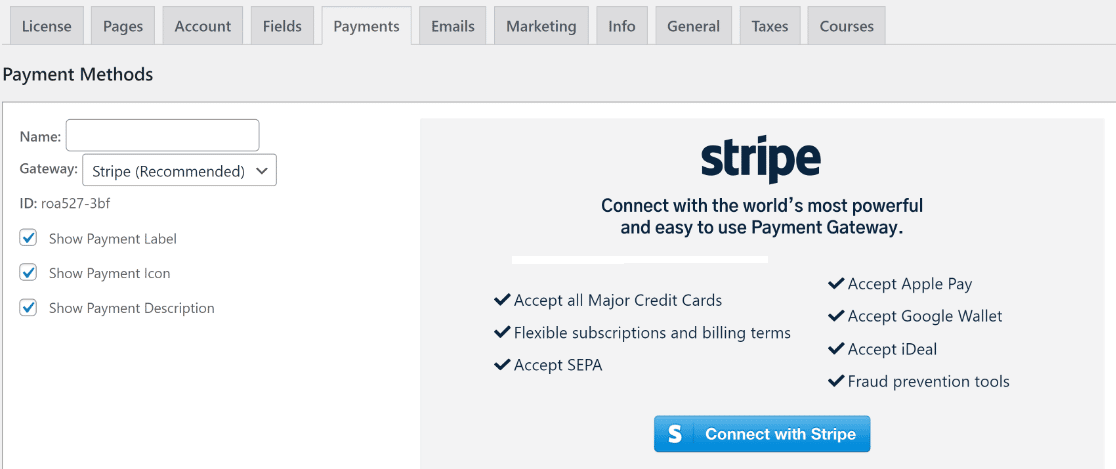
After adding your payment methods, make sure to press the Update Options button to save your settings. For an in-depth comparison of the 2 most popular options, check out our article Stripe vs Paypal.
Pro Tip:
If you’re choosing between Stripe and PayPal, my personal recommendation is to start with Stripe. Stripe deposits funds to your bank account in 2-7 days.
Meanwhile PayPal can hold funds for 21+ days for new accounts. Stripe also handles sales tax calculations automatically in most regions and provides better analytics for tracking your membership revenue.
Step 5: Establish Membership Levels
Now that your MemberPress settings are all configured, the next step is to create membership levels for visitors to purchase.
Each level can have different pricing, features, and content. Luckily, you can make unlimited membership levels with MemberPress.
To do this, go to MemberPress » Memberships from the left-hand Dashboard menu, and after that click on the Add New button.
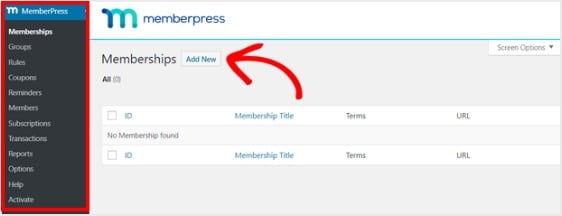
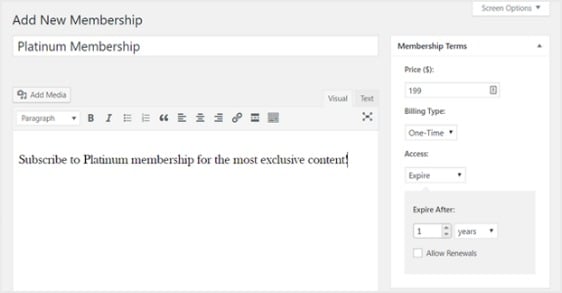
Next, enter a title and description for your membership level in the editor. Then, set the price, billing type, and access time from the Membership Terms section on the right.
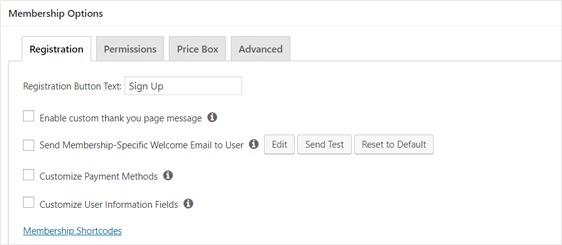
After that, you’ll want to scroll down to the Membership Options section to customize it the way you want it. And don’t forget to click on the other tabs to configure the Permissions and Price Box as well.
Pro Tip:
Don’t underprice your membership to attract more members. The $27-$97 monthly range is the sweet spot for content-based memberships. It’s high enough to filter out tire-kickers but accessible enough for serious members.
Test annual billing too (offer 2 months free for yearly payments). Members who pay annually have 5x lower churn rates than monthly subscribers. Start with one tier at your target price, validate demand, then add premium or budget tiers based on feedback.
Step 6: Set Up Access Rules
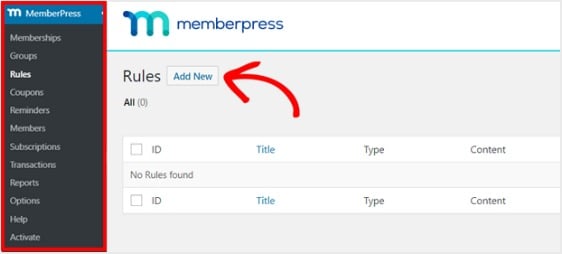
You’ll want to make sure you define where and to whom you want to restrict access on your membership website. To do this, you need to set up rules. Go to MemberPress » Rules in the left-hand panel and select Add New.
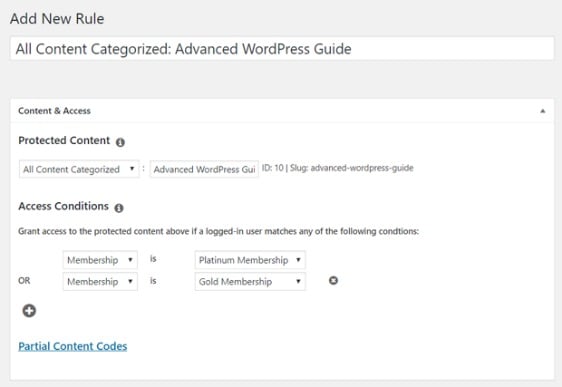
Now on the screen that appears, create a new rule to link your content to the membership levels you already created.
For instance, you can select all the content under a specific category be accessible only by users with the 2 most expensive membership plans. In this example, we selected the Advanced WordPress Guide category.
Next head to the Drip/Expiration settings. If you choose to enable the Drip option, this will let you gradually release content.
On the other hand, the Expiration option lets you choose the time when the content is no longer available.
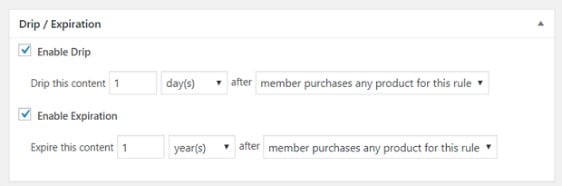
Once everything looks the way you want it to, save your rule. Now you can repeat this step to create more rules.
Pro Tip:
Instead of creating separate rules for every piece of content, organize your members-only content into WordPress categories (Beginner Lessons, Advanced Training, Member Resources, etc.), then restrict access by category.
This saves massive time as your library grows. New posts automatically inherit the access rules of their category. You can always override individual posts later if needed, but category-based rules give you a scalable content system from day one.
Step 7: Create Members-Only Content
Next, you’ll want to create members-only content so that you actually have premium content to offer people after they register for your membership site.
You can add content with a post or page. So for this example, we’ll create content to link to the access rule we created in the last step.
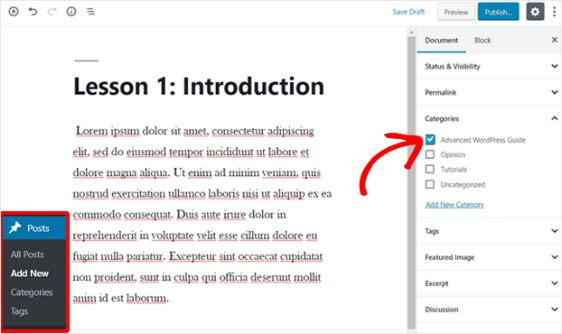
Create a new post and add the content you want to it. Next, select the Advanced WordPress Guide category.
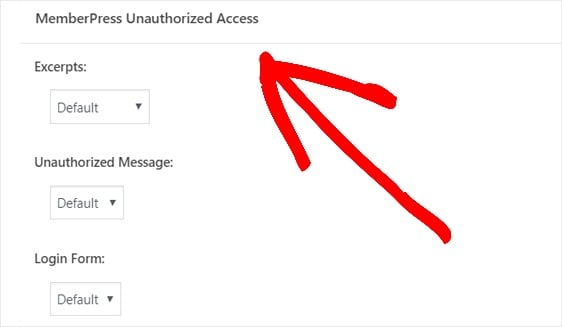
Next, scroll down to the MemberPress Unauthorized Access section. Here you can set up what non-members (non-registered users) will see when they try to access this content.
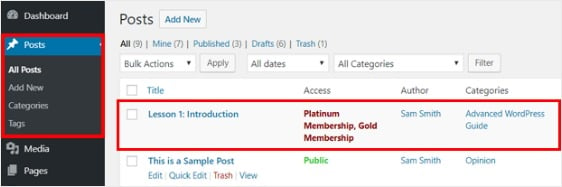
And when everything is configured the way you’d like it, publish your page. Then, you can head to Posts » All Posts to see which content access is restricted to certain membership levels.
You can also create online courses with the built-in Courses addon. Creating your course curriculum is easy with the visual course builder. It’s built on top of the WordPress block editor so it’s a similar process to the steps above.
Pro Tip:
Never launch a membership site with zero content. Create at least 3-5 pieces of premium content before accepting your first payment.
This gives new members immediate value and prevents buyer’s remorse. They’ll see you’re serious about delivering on your promise.
Schedule your next 4-6 pieces in advance so you maintain momentum during your first month. Consistency matters more than quantity when you’re starting out.
Step 8: Create a Pricing Page
In this next step, you’ll want to build a pricing page so your site visitors can see your different membership plans and sign up. MemberPress lets you do this easily from the Groups settings.
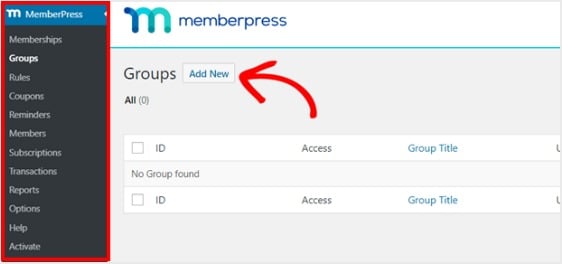
Go to the left-hand panel and select MemberPress » Groups. Next, click on the Add New button. Name your group something like ‘Pricing Plans’ so people know what the page is about.
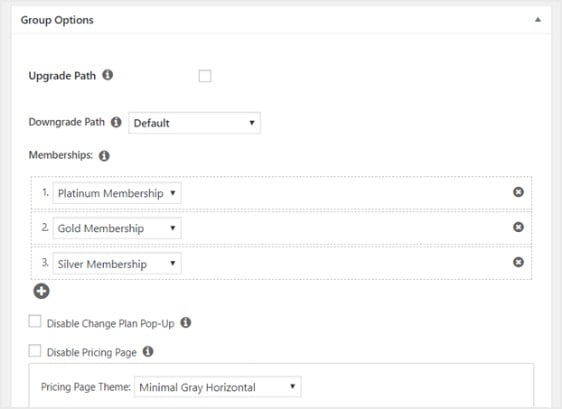
After that, scroll down to the Group Options section. Here, you can add the memberships you want to show on your pricing page. You can also change the pricing page theme on this page.
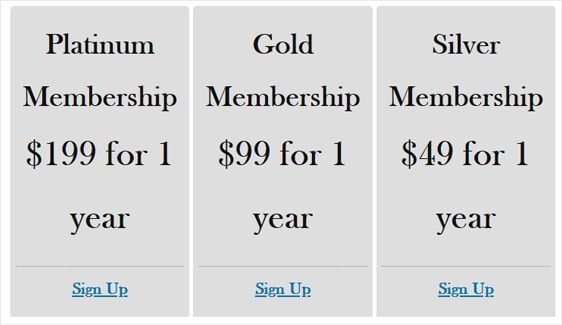
Now publish this page when you’re ready, and preview it to check it out. Here’s an example of how a simple pricing page can look:
Now to make sure your pricing page gets seen, you want to setup MemberPress to direct unregistered users to this page when they try and access members only content.
In other words, when someone who hasn’t paid to access your premium content tries to, they’ll be sent to a sales page. To do this, go back to MemberPress » Groups and copy the URL of the group.
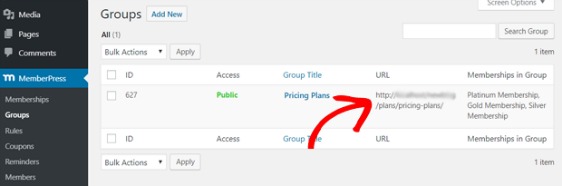
Next, head to MemberPress » Options and scroll down to the Unauthorized Access section. After that, check the box next to Redirect unauthorized visitors to a specific URL and paste the URL in the box below.
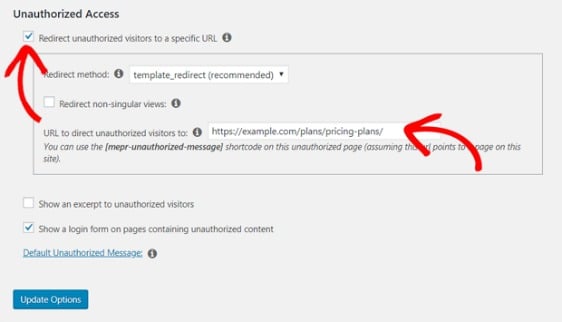
Finally, select the Update Options button to complete this step so unregistered users will be redirected.
Pro Tip:
Too many choices kill conversions. If you offer multiple membership levels, display only 2-3 tiers on your pricing page and mark one as “Most Popular” or “Best Value.” This guides decision-making.
The three-tier strategy works best: a budget option (30% take this), a mid-tier marked as most popular (50-60% choose this), and a premium tier (10-20% select this).
Step 9: Add Sign Up and Login Forms
Now everything is almost all set up. So the final step is to add sign up and login forms to your membership site so people can access them.
Let’s do this with a widget. Go to Appearance » Widgets from the left-hand panel and drag the MemberPress login widget to a widget-ready area of your choice.
If you’re using a block theme, you won’t see Appearance » Widgets in your dashboard. In that case, open the Site Editor through Appearance » Editor and add the login form to a template part like your sidebar or footer instead.
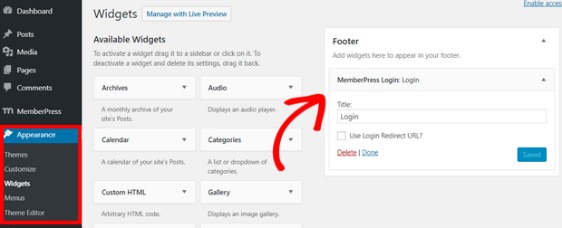
Next, you’ll need to add your pricing page URL to the navigation menu so people can actually sign up. So head to Appearance » Menus and create a new menu or choose an existing one.
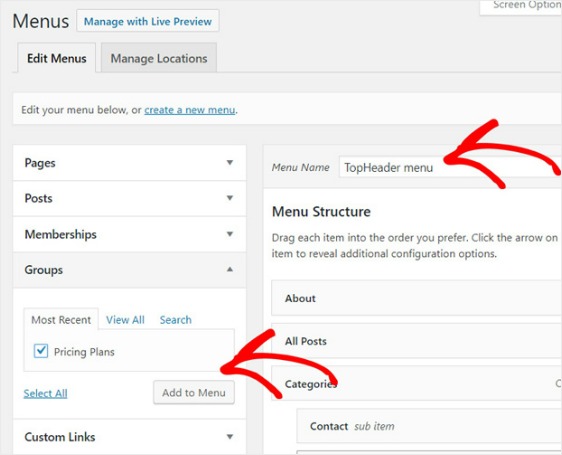
After that, select Pricing Plans from the left under Groups and click on the Add to Menu button. And when your pricing page shows up below the Menu Structure, drag it to rearrange it to where you want it and then click Save.
Pro Tip:
Don’t bury your member login in a widget or footer. Add a “Member Login” link to your main navigation menu (in the header) so existing members can access their account from any page.
For the signup process, your pricing page handles that. Just make sure your “Pricing” or “Join Now” button is also prominent in your main menu.
FAQs on Creating Membership Sites
The tutorial above explains how to create your membership site in WordPress. But if you’ve got additional questions on the subject, take a look below for some commonly asked questions.
What are the benefits of creating a WordPress membership site?
There are a lot of reasons why you may want to consider having your own members only area of your website. Here are some of the most popular benefits of creating a membership site:
- More Income. Membership websites use a recurring billing model, meaning you can generate a steady stream of income that grows every month when more and more visitors register. This can help boost your income, especially if you’re already using affiliate sales and advertising.
- Less Work. Membership sites are a fantastic way to grow your passive income by creating premium content once, and then adding to it only if you choose to. If you create a great membership site once, you don’t have to do much more to continue to grow it unless you decide to update your content or interact with your members.
- Establish Authority. When you restrict content to a membership plan, visitors will easily understand that your premium content is valuable and that you are a master of the subject.
- Grow Your Email List. When you add registered users to your email list, you’ll fill it with engaged visitors who are already familiar with your site and more likely to interact with your emails. This will help boost your email marketing efforts.
Can I create a WordPress membership form without a full membership plugin?
Yes. If you only need members to register, log in, and access basic member content, the WPForms User Registration addon handles the whole flow. You get a customizable membership form, email or manual account activation, automatic role assignment, and matching login and password reset forms.
The tradeoff is that a form plugin doesn’t manage subscriptions or tiered access on its own. When you’re ready to charge recurring fees or offer multiple membership levels, pair your forms with a membership plugin like MemberPress as shown in Method 2.
What strategies can I use to market and promote my membership site effectively?
It’s always a good idea to offer some free content on your website to generate interest and give your audience a taste of what you have to offer. Aim for 3-5 pieces that show the quality members can expect, and add a simple lead magnet like a free PDF or email course to build your list.
From there, nurture those subscribers with an engaging email newsletter that intelligently highlights the benefits of purchasing a full membership of your site, and complement it with social media promotions.
You can also use retargeting ads to reach people who visited your pricing page but didn’t join, and launch with an early-bird discount for your first members to create urgency and get initial testimonials.
What are some best practices for managing and retaining members in the long term?
Retaining members in the long-term is all about maintaining engagement. We recommend hosting Q&A sessions and encouraging discussions between members of your community.
Because your content is your product, it’s important to maintain a consistent posting schedule and release your content in episodes, rather than all at once.
With your email newsletter, you can also send value reminders and create a tight onboarding experience by highlighting how members can take full advantage of all the benefits your site has to offer for members.
Can I offer drip content or timed releases for members-only content?
Absolutely. MemberPress makes it really easy to create drip content, releasing it bit by bit over a defined period of time. This is an excellent strategy to keep people coming back to your site and sustain engagement levels in the long run.
However, the strategy can also backfire if your audience wants to complete a course ASAP and master it in a short period of time rather than waiting for you to release lessons gradually over time.
I advise considering the nature of your website, the content you’re selling, and your audience before deciding whether drip content would be ideal for you.
Can I create a membership site for free?
You can’t run a fully functional paid membership site for free because you need hosting and payment processing. However, if you only need basic user registration without payments, use free WordPress hosting and the free Simple Membership plugin.
This works for community sites or free content libraries. For paid memberships with recurring billing, you need premium tools. Trying to piece together free solutions creates security risks and payment processing problems that will cost you more in lost revenue than the tools cost.
Can I create a login page for members on WordPress?
MemberPress automatically creates member login functionality when you install it. Add the login form to your site by going to Appearance » Widgets and dragging the “MemberPress Login” widget to your sidebar or footer.
For a dedicated login page, create a new WordPress page and add the shortcode [mepr-login-form]. Link to this page from your main navigation menu so members can easily access their accounts. The login form includes password reset functionality built-in.
Next, Grow Your Business With Online Forms
Want to read about even more ways to boost your online income? Check out this article on WPForms power hacks to grow your business online.
Create Your Membership Form Now
Ready to build your form? Get started today with the easiest WordPress form builder plugin. WPForms Pro includes lots of free templates and offers a 14-day money-back guarantee.
If this article helped you out, please follow us on Facebook and Twitter for more free WordPress tutorials and guides.





Thanks for this article. I am currently using memberpress for my membership and I’m considering using wpforms for the sign ups instead of just the memberpress forms. Is it possible to integrate the payment methods, also the offline payment method memberpress offers, with the wpforms? And also integrate new users from wpforms and memberpress into the same Aweber Email list?
Hi Joanna,
We currently don’t have a way of integrating the payment methods from Memberpress with WPForms at this time so I apologize for the inconvenience. As for AWeber, we do offer an Aweber integration that will allow users to be added to your AWeber list once they submit a form. You should be able to integrate users from both WPForms and Memberpress into the same list.
I hope this helps!
Would this work if I need to have a WP page that has to unlock a new page every two weeks, but only that page? Page will have videos with text explanation that has to be mobile friendly.
– Another version of subscription would have access to all of the locked workout pages.
– Would also need a place to ask questions.
– Needs to be on regular site with a link on site page.
The article was really helpful. Thank you.
Hi Paul – I apologize, but I’m familiar enough with all of Memberpress’s features to be able to provide a full answer here. But if you’d be willing to reach out to the Memberpress team (https://memberpress.com/contact/), they’d definitely be able to help you out! 🙂
Hi There, is it possible for the registered member to post a custom post once they login. This is what I am looking for as each member can post a volunteer opportunity ( which is custom post) they will have and these posts they post can be visible on the website to everyone.
Thanks
Hi Praveen! Yes, with our Post Submission addon you can allow users to submit posts to your site.
If you would like to allow this for logged in users only, then you can also use our Form Locker addon, which can restrict access to a form for logged in users only.
I hope this helps.
Have a good one 🙂
Hi there, thank you for this article. It does simplifies the process nicely and gets the the important points nice and quick, but I am wondering of there is a way ( and how : ) to use WPForms for the registration forms rather then the base forms. I don’t need to have payment for this particular site, but would like to use some of the functions and the much nicer layout options within WPForms. I have seen something with another forms component but have always preferred WPForms 🙂 so thought I would ask. Please forgive me if there was info in this page, but I did read over and didn’t see anything.
Hi Michael!
Great question! You can absolutely create a registration form with WPForms and our User Registration addon, which is available with the Pro license level or higher.
I hope this helps.
Have a good one 🙂
Hi, does this membership site allow you to use your own online payment gateway, ie your own bank, thanks
Hi Rejane,
In WPForms we only have PayPal, Stripe and Authorize.net payment options. I’m not aware of the payment options provided in the membership plugins, but you can check this with the plugin’s support team.
I hope this helps.
Have a good one 🙂
Hello there, what are the steps to integrate MemberPress with wpforms? Can seem to find any information on there is a mention of it that it works with it but there is no Doc to how to accomplish this. Also what part does wpforms take care of and what part MemberPress handle? Especially collecting information from user / potential member and who will be handling payment? such as reoccurring payments ie monthly or yearly or give option to pay installment for yearly membership and also with the option if you have setup fee / registration fee also offering discount option to redue setup fee ie 50% disclount or a $ amount?
Hi Ezekiel!
We don’t have any direct integration with MemberPress. When you get a chance, could you please share more details, or possibly an example of what you’re looking to do?
With WPForms you can create a registration form using our User Registration addon.
Also, you can accept payments for the user registrations with the Stripe addon where you can set up recurring payments.
However, WPForms doesn’t allow users to edit their user profile, this can be done on the MemberPress side.
I hope this helps.
Have a good one 🙂
Hello, is it possible to have these set up and delegate access to certain premium contaents to certain members who satisfy certain requirements but not necessarily on-site payment? for example i have content i want specific group of people to see but these group of people are selected by certain criterias that does not include payment.
Hey Sokki – Great question! I am afraid you will need to contact the plugin support for such insights. Contacting them might help because even if they don’t have any such feature, they might be able to suggest some workaround.
Have a good one:)
Very helpful article. So I am looking for a solution for my membership site. I want to add affiliate program for my membership as well, can we integrate with any third party to execute this? Plus how to add the member’s email directly to the email list (I am using Mailerlite). Thanks
Hey Joy – I apologize, I am not fully aware if MemberPress allows integrating with some third party affiliate plugin and Mailerlite. I’d recommend reaching out to the Memberpress support team for further assistance regarding this.
Have a good one 🙂
Thankd for such a clear and useful article. I am looking for a suitable plugin for membership rgistration by which the members be able to fill in their namae, emaile, country and password so that only me be authorised to give members the password. Without my engaging should be impossible to see the content of my website. Would please help me to do this in WordPress? Thanks a lot,
Hey Ramaat – I apologize as you would need a full-blown membership site from the description. For a more comprehensive membership website plugin, you should use MemberPress.
I hope this helps!
hello
i need this type of activation page with unique codes
https://smws.com/activate
how can i do it ?
i do not need payment type membership. just need for all code owner can be join and open own page.
thank you
Hi Hakan, I apologize but our plugin doesn’t have the functionality that you’re looking for, nor are we aware of where you might be able to get it from. The website that you provided as an example though seems to be utilizing BigCommerce.
I’m sorry I wasn’t able to provide you with a direct answer, but I hope this helped!
Is there anyway to max out membership to 80 and have the rest be on a wait-list to be notified when there is a opening? Also I need to have where Members can book on a calendar. Thanks.
Hi there, thanks for reaching out to us.
Great question! However, I am afraid you will need to contact the plugin support for such insights. Contacting them might help because even if they don’t have any such feature, they might be able to suggest some workaround.
Thanks and have a good one!
HI Team,
Loved this tutorial and exactly what I was looking for.
Quick question, on the pricing table, how can you change the page type and the look and feel of it??
Many thanks
Hey Andy- Great question!
In this case, I’d recommend you to check out the article on creating better pricing table
Hope this helps!
any idea to do it for free
Hey there, I apologize as you would need the User Registration addon which is available with the Pro or higher license in order to create registration forms to let your visitors register for a WordPress account easily. However, for a more comprehensive membership website plugin, you should use MemberPress.
I hope this helps!
Hi there. How many members can this plugin take/ usual membership backend plugins take? i.e what is the limit?
Im building a MVP for a health-Tech app where users can login and upload their health data in basic excel, visuals and text.
My main query; Nameheros hosting said the limit for “EP” is 100
Hi Aly- I’d recommend you reach out to MemberPress Support for more insights on this.
Thanks 🙂
Sorry I pressed Enter too early in the previous comment
Names Aly, a amateur Product-UX/ mid level marketer .
TL DR: We’re building a Health Tech App (2 actually)
1 – Cosmetic Dentistry Service For Dentists- to log their 1% Premium cases, dental dashboard , follow up etc
But the key part is for Patients and Dentists to *login* and see their data (Patient seems their cosmetic treatment scans /details) and Dentists login to track their patients/ follow up etc.
What’s the best WordPress plugin/Elementor stack (or No Code Stack in this case via Zapier/Airtable etc?) to build this?
2- Similar to Apples My Health App but for Dentistry- for patients to login, upload their past /current treatment data and take control of their Dental Data . Graphics, text, function to upload their *Full* Dental Health history here (Scans/excel file
etc)
Integrated with a dental medical library (similar to My Fitness Pal) but for Dental health (A basic content library is fine for the MVP)
MVP – Need 100-500 logins and up to 1000 before any major development (bespoke) is done.
What WordPress Stack/No Code stack would you recommend?
I’ve posted this on indie hackers but really need urgent help.
And definitely will be using forms for sign ups so WPForms will be on that list for both Startup Projects.
Any help is much appreciated
Thank you awesome people
Hi Aly- I’d recommend you reach out to MemberPress Support for more insights on this.
Thanks.
Why combine WPForms and MemberPress on this page; when WPForms doesn’t integrate with MemberPress. It hasn’t since 2019, and and now in 2023, still isn’t.
Is the WPForms planning on integration?
Hi Harry,
Currently, we do not have any built-in integration with MemberPress. However, I agree it would be super helpful; I have gone ahead and added your vote to consider this as a feature request.
Thanks,
Thank you for the article very insightful. What is the best way to enable the members of the member portal to monitor their used and unused member benefits?
Hi Toni – I apologize, but I’m not familiar enough with all of MemberPress’s features to be able to provide the answer to your question. But if you’d be willing to reach out to the Memberpress team, they’d definitely be able to help you out! 🙂
Thanks.