AI Summary
Connecting WPForms with WooCommerce can make managing your online store easier than you’d expect, even if you don’t know a single line of code.
I’ve been there myself, wanting to simplify the checkout process, collect customer details, or add extra features to my WooCommerce store without the headache of complicated setups.
By integrating WPForms with WooCommerce, you can quickly set up custom forms for payments, product orders, and customer feedback, all while staying within WordPress.
In this guide, I’ll show you how to use the Uncanny Automator plugin to connect WPForms to WooCommerce in just a few minutes, with no code needed!
Connect WPForms with WooCommerce! 🙂
WPForms WooCommerce Integration
You can easily connect the two plugins with Uncanny Automator, which is one of my all-time favorite plugins and makes it quick and easy for you to connect plugins, apps, and websites without complicated code and APIs.

You’ll set up “triggers” in one plugin that will cause an action in the other plugin. For example, the trigger in WPForms could be a user submitting a cancellation form, and the action could be canceling their order in WooCommerce.
Let’s look at step-by-step instructions on setting up WPForms and WooCommerce and using Uncanny Automator to link them together to create an automated order cancellation form.
Step 1: Install and Activate the WPForms Plugin
If you haven’t yet installed the WPForms plugin, you can follow this guide on how to install and activate plugins in WordPress.

You can connect any version of WPForms to WooCommerce, including WPForms Lite. However, to access more advanced features, I recommend going premium!
Step 2: Get WooCommerce for WordPress
Now that you’ve installed WPForms, you can go ahead and install WooCommerce if it’s not already running on your site.
WooCommerce is a free plugin, and you can install it directly from within your WordPress dashboard. Follow the plugin installation guide if you’re unsure of the process.
Step 3: Create an Order Cancellation Form
In this example, I’ll create an order cancellation form in WPForms and connect it to WooCommerce so that the order status is automatically set to “cancelled” when the form is submitted.
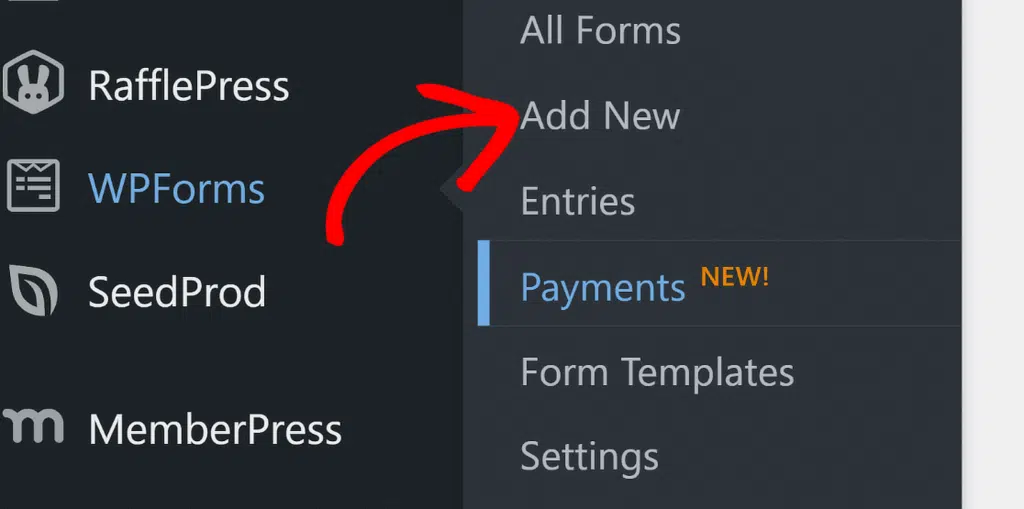
To get started, we need to create a basic order cancellation form. Go to WPForms » Add New and enter a name for your form—something like “Order Cancellation.”
As this will be a very simple form, we’ll start with a blank form instead of using a template. Click the Create Blank Form button.

To create your form, all you need to do is drag and drop form fields from the panel on the left. Start by dragging an Email field, followed by a Numbers field.

Click on the Numbers field and change the Label in the Field Options panel to “Order Number.”

Finally, let’s edit the confirmation message when a user submits the form. In the form builder, navigate to Settings » Confirmations.

Adjust the confirmation message to something like “Your order has been cancelled.” Check out this guide for more information on editing the confirmation for your form.

In this example, I’ve built a very basic order cancellation form, but if you want, you can add more fields and even use conditional logic (if you have WPForms Pro) to create a form with more functionality.
Now your form is built, you can publish it on your site. To make your form live, simply click on the Embed button in the form builder, which will launch a popup.

Here, you have two options: publish the form on an existing page or click the Create New Page to create a page for your form.

For this step, I’ll create a new page. This will prompt me to type a name for the page. Once done, click the Let’s Go! Button to create your page.

You can add some text and other elements to this page if you wish. When you’re happy, click the Publish button. You’ll be asked to double-check your settings.

It’s also a good idea to change the page’s visibility to Private or password-protected so you can test your form before making it public. Click the final Publish button to make your form live on your site.

Now your order cancellation form is ready to use, the next step is to install Uncanny Automator so you can send the form entries to WooCommerce.
Step 4: Install Uncanny Automator in WordPress
Uncanny Automator Pro includes over 1,000 triggers and actions, including additional triggers for WooCommerce, such as:
- A user adds a product to their cart
- A user reviews a product
- A user’s order status changes to a specific status
- A payment fails on an order
Some of the pro actions you can create in WooCommerce and WPForrns include:
- Create an order with a product
- Change the price of a product
- Set an order to a specific status
- Register a new user
For this example, I want to set a specific order to a specific status (“canceled”), so we need to install Uncanny Automator Pro.
Go to the Uncanny Automator pricing page and click the button to get your chosen plan.

Fill out your payment details and click the button to Complete checkout.
Once you’ve purchased the plugin, you can log in to your Uncanny Automator account and download it from the Downloads page.

You’ll also need the license key, which you can copy after clicking on Licenses in the menu.

Now, go back to your WordPress site and install the plugin.
Navigate to Plugins » Add New and click the Upload Plugin button.

Click the Choose file button and find the zip file you downloaded from Uncanny Automator.
Click the Install Now button to install the plugin. This should take just a few moments.

Finally, click the Activate Plugin button.

Make sure to activate the plugin by entering your license key. You can do this from your Uncanny Automator dashboard. Just go to Automator in your WordPress dashboard menu and click the Activate your license button.

Paste the license that you copied from the Uncanny Automator site and click the Activate license button.

You should see a confirmation message that your license is active.

Once you’ve installed and activated Uncanny Automator, you can go ahead with connecting WooCommerce and WPForms.
Step 5: Create an Uncanny Automator Recipe
To connect WPForms to WooCommerce, we need to create a workflow automation. This is called a recipe in Uncanny Automator. In your WordPress dashboard, go to Automator » Add new.

You will see an invitation to select a recipe type. If you choose Logged-in users, only users who are logged into your WordPress site can trigger the recipe.
Recipes for Everyone can be triggered by both logged-in users and general visitors. It’s important to choose the right option here, as you can’t change it later.
Recipes for everyone are only available in Uncanny Automator Pro. For the purposes of this tutorial, we’ll use Logged-in users.
This will also help to prevent spammers from submitting the form. However, if you’ve enabled Guest checkout in WooCommerce, you will need to create the recipe for everyone, as your customers won’t have an account on your site.
Choose Logged-in users and click the Confirm button to continue.

Enter a name for your recipe. In this example, we’ll be triggering an order status change from a form submission. I’ve called my recipe “Order Cancellation.” Then, click on WPForms to select a trigger.

Choose “A user submits a form” as your trigger.

Now, scroll through the dropdown to find the order cancellation form you created earlier. Select it and click the Save button.

Your trigger should now be live.

Scroll down to Actions and click the Add action button.

Scroll down to find the WooCommerce integration and click to select it.

Find the action “Set a specific order to a specific status” in the dropdown and select it.

Click on the asterisk icon next to the Order ID field.

In the dropdown that appears, scroll down to Triggers.
Click the arrow next to “A user submits Order Cancellation 1 time(s)” to choose the field of your form to link to the Order ID in WooCommerce.

Scroll down to find your Order Number field and click to select it.

Click the Save button and continue to choose the specific action you want to take.

In the dropdown, scroll down and select “Cancelled“.

Click the Save button to save your action.

Your action should now be Live.

Finally, don’t forget to toggle the status of your recipe from Draft to Live.

Let’s check if it works!
Step 6: Test WPForms WooCommerce Integration
You can create some dummy orders in WooCommerce for testing. An easy way to do this is by activating “Cash on delivery” as a payment method in your WooCommerce payment settings. You can then freely complete checkout and create an order with dummy data.
Make a note of your order number and the email address you entered at checkout, and check the order has gone through and is visible in your WordPress dashboard under WooCommerce » Orders.

Now go back to the front end of your site and navigate to your order cancellation page. Enter the email address and order number of the dummy order and submit the form.

You will see a confirmation message that your order has been cancelled. You should also receive a notification email informing you of the cancellation.

Now, go back to your WooCommerce orders in your WordPress dashboard and check the status of the order. If everything has been set up correctly, you should see the order status has switched to “Cancelled.”

Well done! You’ve successfully connected WPForms to WooCommerce and created an order cancellation form. Remember, this is just one example of an automation you can set up with Uncanny Automator.
In addition to connecting WPForms to WooCommerce, you can send data from your online forms to your CRM, email marketing platform, and Zapier to create almost unlimited integrations and automation.
See the full list of triggers and actions to get an idea of what else you can automate now you’ve mastered connecting plugins.
Connect WPForms with WooCommerce! 🙂
FAQs — WPForms WooCommerce Integration
Can I create an order form in WPForms?
You can easily create order forms and payment forms in WPForms with the drag-and-drop form builder. WPForms also comes with built-in Stripe integration, so you can allow users to pay for orders by credit card directly without the need for another eCommerce plugin.
How do I automatically create orders in WooCommerce?
You can automatically create orders in WooCommerce using the Uncanny Automator plugin. For example, if you want to send a free gift to users when they register on your site, you can connect WPForms to WooCommerce so that an order is automatically created when the registration form is submitted.
How can I create a custom WooCommerce registration form?
The WooCommerce user registration form is fairly basic. While you can customize it by editing the code, it’s much easier to use a form plugin like WPForms to build your own custom registration form. You can then connect this form to WooCommerce to automatically create a user when the form is submitted.
Is there an alternative to WooCommerce?
If you want to sell products on your WordPress website without installing WooCommerce, you should consider WPForms as an alternative. WPForms makes it easy to take orders and payments if you’re only selling a few products and don’t want the hassle of installing and maintaining a full eCommerce platform.
Does WPForms have a built-in WooCommerce integration?
WPForms doesn’t ship with a dedicated WooCommerce addon, but that doesn’t mean you’re stuck writing code. The no-code method in this guide uses Uncanny Automator to link the two plugins. You can also connect them through automation platforms like Zapier or Make using the WPForms addons. All three let you trigger a WooCommerce action from a form submission without editing your theme files.
Can I add a WPForms form to a WooCommerce product page?
Yes, you can embed a WPForms form on a WooCommerce product page. Once you’ve built your form, you can embed it on any page using the block editor or a shortcode. It’s handy for product customization requests, pre-order questions, or “notify me when it’s back in stock” sign-ups. If you want that submission to create or update an order in WooCommerce, connect the form with Uncanny Automator using the same trigger-and-action setup covered above.
Do I need Uncanny Automator Pro to connect WPForms and WooCommerce?
You can connect the two with the free version of Uncanny Automator, but the specific WooCommerce action used in this tutorial, setting an order to a specific status, is part of Uncanny Automator Pro. The free plan still covers a generous set of triggers and actions, so it’s worth installing first to see whether it does what you need before you upgrade. You’ll also need Pro if you want your recipe to run for logged-out visitors instead of only logged-in users.
Next, Install More WooCommerce Plugins to Improve Your Store
Now that you’ve had a little taste of how other WordPress plugins can improve the customer experience and make managing your store quicker and easier, you may want to consider some other options.
We’ve compiled a list of the best WooCommerce plugins to help you make the most of your online store. You can also learn about how to store WPForms entries in Google Sheets so you can keep track of your order cancellations.
Ready to build your form? Get started today with the easiest WordPress form builder plugin. WPForms Pro includes lots of free templates and offers a 14-day money-back guarantee.
If this article helped you out, please follow us on Facebook and Twitter for more free WordPress tutorials and guides.