
AI Summary
Running a small business means you probably wear many hats, including sales, support, fulfillment, and everything in between.
And when you’re ready to collect orders online, having a working order form can save you time and make things easier for your customers.
So, in this guide, I’ll walk you through the steps to create a WordPress order form using WPForms. You’ll learn how to set up your form, connect a payment gateway (Stripe, PayPal Commerce, or Square), customize notifications, and publish it on your site.
Create a WordPress Order Form Now! 🙂
- How to Create an Online Order Form in WordPress
- Step 1: Install and Activate WPForms Pro
- Step 2: Connect WPForms With Stripe
- Step 3: Create the Online Order Form Template
- Step 4: Enable Stripe Payments in Your Form
- Step 5: Customize Your Notifications & Confirmations
- Step 6: Add the Online Order Form to Your Site
- Order Form vs. WooCommerce: Which Do You Need?
How to Create an Online Order Form in WordPress
Firstly, you’re going to need a form builder plugin that enables you to easily create an order form. We’ve created a video that shows you how to create an order form in WordPress using WPForms.
If you would prefer to read the instructions for how to create an online order form, we’ll walk through the process in the steps below. Let’s jump into it.
Step 1: Install and Activate WPForms Pro
WPForms is perfect for creating order forms, contact forms, and tons of other commonly used forms. The best part is that you don’t need a paid WPForms license to accept payments for your order forms.
All WPForms plans (including Lite) support Stripe & PayPal integration (with 3% extra transactional fees) for accepting credit card payments in your forms.
And if you want to remove the extra fees, you can upgrade to WPForms Pro and unlock a wealth of advanced features at the same time. Pro also opens up Square and Authorize.Net as additional payment gateways.

I’ll use WPForms Pro for this tutorial (though you can still follow the same steps for WPForms Lite!) Once you’ve purchased your plan, go ahead and install WPForms on your WordPress site.
Step 2: Connect WPForms With Stripe
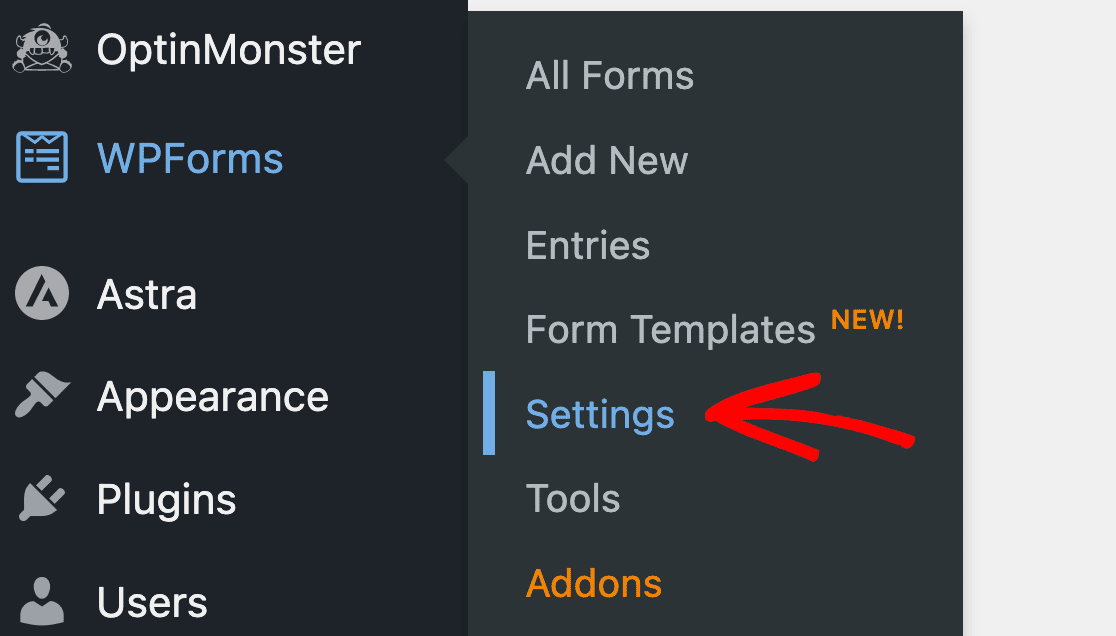
You can now immediately begin creating an order form and connect it with a payment gateway. While you’re inside your WordPress dashboard, go to WPForms » Settings.
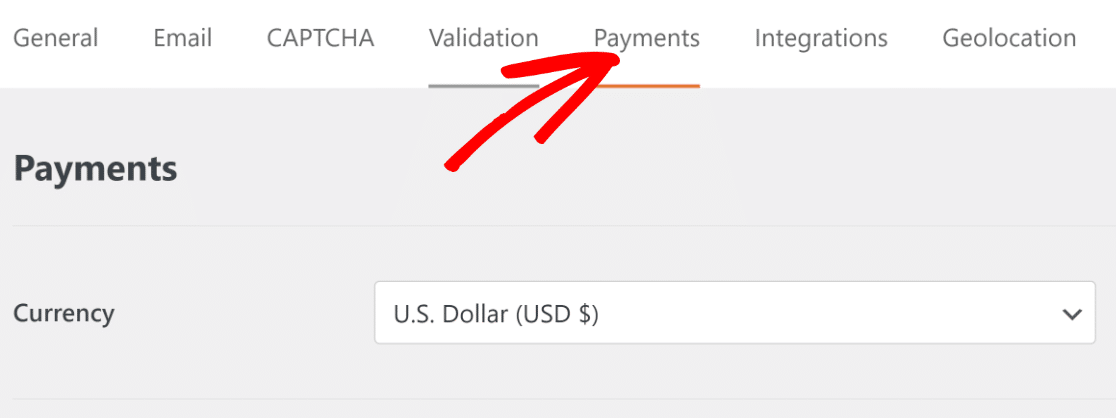
Next, click the Payments tab on the navigation bar.
If you scroll down, you should see a Connect With Stripe button here. Press the button to initiate your connection.
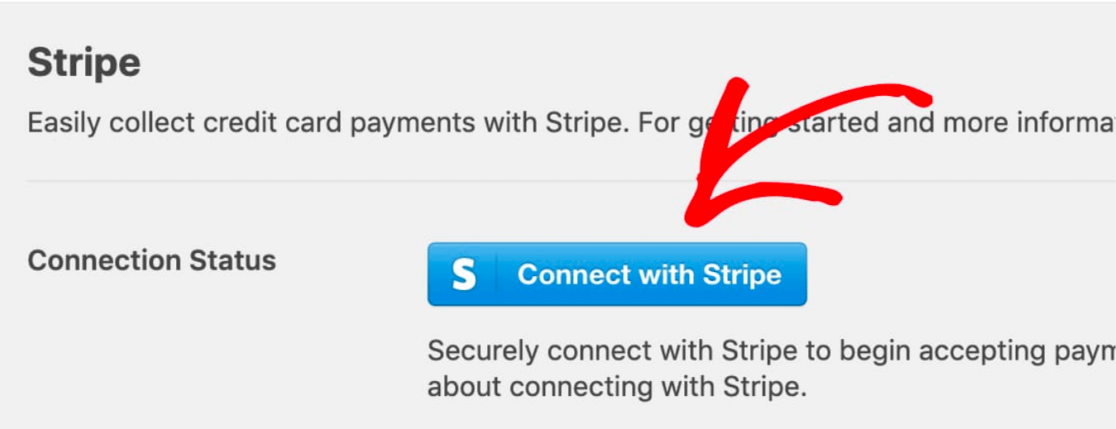
When you’ve done that, you’ll be redirected to the Stripe login screen. Enter your login details, and that should be it.

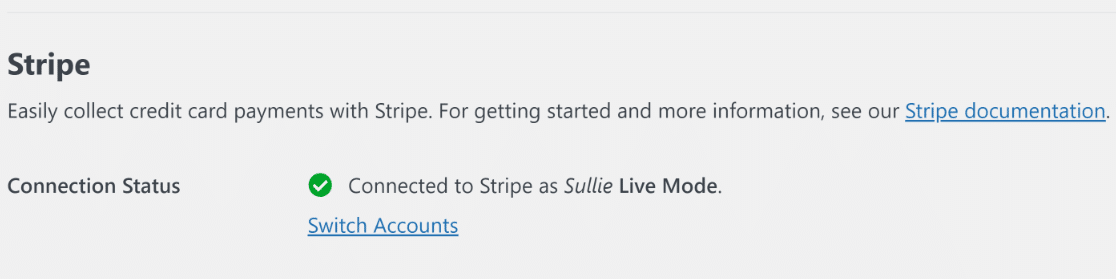
Come back to the Payments screen after logging in. Here, you can check the connection status to confirm if the integration with your Stripe account is successful.
Brilliant. You can now begin creating an order form using the drag-and-drop form builder.
| Gateway | Best For | Min. Tier |
|---|---|---|
| Stripe | Credit/debit cards, subscriptions | Lite (3% fee) / Pro (no fee) |
| PayPal | PayPal buyers + credit cards | Lite (3% fee) / Pro (no fee) |
| Square | If you already use Square POS | Pro |
| Authorize.Net | Enterprise/legacy payment systems | Elite |
Step 3: Create the Online Order Form Template
Once you’re connected with Stripe, go to WPForms » Add New from your WordPress dashboard to create a new form.

You’ll now be able to select a ready-made order form template to add to your WordPress site. Start by naming your order form (you’re free to give it any name you want).

Now, to make this task super easy and quick, we’ll select an order form template. WPForms has over 2,100 templates for you to choose from.
We’re going to use the simple order form template, which is perfect for small businesses. Search for “simple order form” and select the template to start loading it.

It will only take a few seconds to load the template. Once loaded, you’ll see the form builder, where you can make any changes to the template if you need to.

As you can see, this is the perfect online order form for small businesses. Let’s customize some of the fields in this template so they can be even more helpful for customers.
By default, the order form template has a Checkbox Items field that allows users to select one or more products from a list of choices.
To make the form specific to your products and services, you can add the actual names of your products and set a price for each. Click the Checkbox Items field to open its Field Options.

Here, you can change the label of the field and the names of the items to match your products.

To change the price, simply enter a number in the column next to each item.

If you want to add more items to this field or delete an existing item, simply use the plus (+) and minus (-) buttons next to each item.

You can add an image for each choice so people can see what they’re ordering. Click on the Use image choices toggle to enable this feature.

When enabled, this feature will reveal an image upload button for each product, which you can use to upload an image to go with your product on the order form.

It’s important to remember that the Checkbox Item field that’s added by default in this template lets users select more than one item at a time.
If you want to restrict your users to select just one product at a time, you can use the Multiple Items fields instead.Make sure to Save your changes when you’re done customizing your WordPress order form.
Step 4: Enable Stripe Payments in Your Form
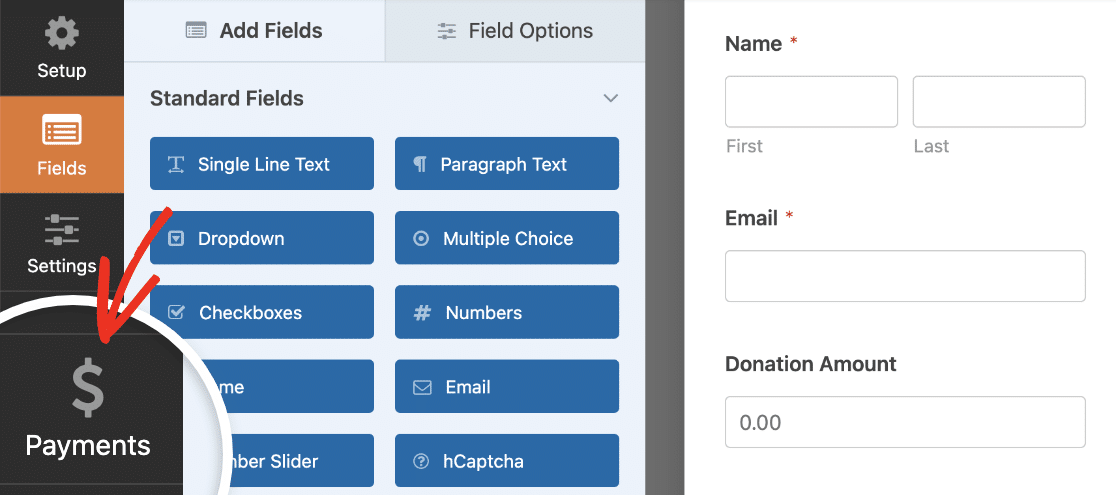
Now that our form is ready, we just need to configure how we want Stripe to process payments with this order form. On the form builder sidebar, click on Payments.
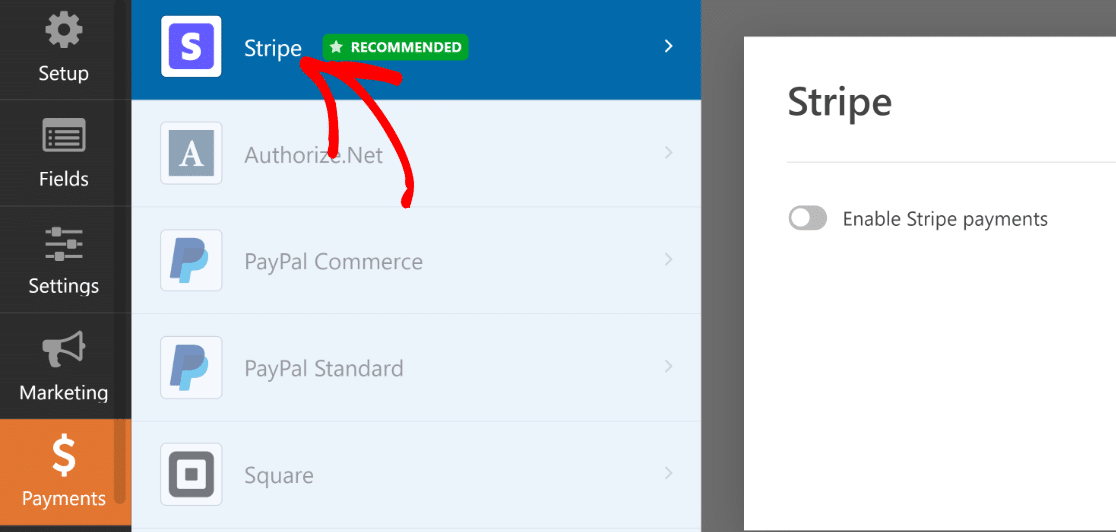
After that, click on Stripe on the list of payments.
On the right-hand panel, click on the Enable Stripe Payments toggle switch.
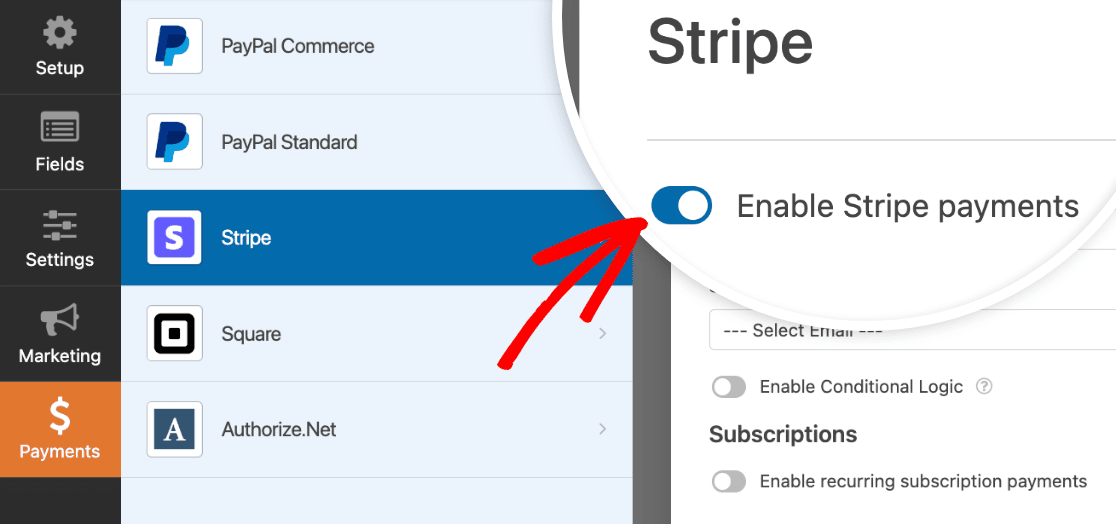
This will expand additional settings for Stripe, which allow you to
- Enter a payment description
- Select the customer email field to send a receipt from Stripe on form submission
- Select the customer email field to add to your Stripe account for record-keeping

These settings are optional but recommended. When you’re done with this step, make sure to press Save. And with Stripe, you can even offer customers useful features like recurring payments and one-click checkout.
You’re now ready to accept Stripe payments for your orders once this form is published.
Step 5: Customize Your Notifications & Confirmations
When a user submits an order form, WPForms will automatically send a notification to you (the admin) and a confirmation message.
Configure Your Online Order Form Notifications
You can customize the email notification so that it includes useful information.
This allows you to easily find order confirmation emails for each person who fills out your form.
Start by clicking on the Settings tab in the Form Builder and then click Notifications.

If you’d like to send a copy of the order email to multiple members of the team, you can add their email addresses separated by commas within the Send to Email Address field.

It’s also a good idea to use Smart Tags in the subject line so that every order email doesn’t look the same. One easy way to do that is by adding the Name Smart Tag in the email subject.
This means that each order email will have the name of the customer that filled the form. You can add Smart Tags by clicking on Show Smart Tags.

This will open a list of available fields that you can use as a Smart Tag. In this example, we’re going to use the Name field as our Smart Tag.

Now, every email notification you receive from this online order form will contain the name of the customer in the subject line. This is a great way of making it easier to track order emails by name.
In addition, if you use Smart Tags, you can even send a form notification to a customer to let them know their order has been received. This is a good idea, since utilizing email correspondence is a tried and true marketing strategy for small businesses.
To set up a separate notification for customers, click on the Add New Notification button on the top-right.

This will display a popup box where you’ll need to name your notification to distinguish it from the default notification.

Then, use the Smart Tags to include the email address of the person that filled out the online order form in Send To Email Address field. Click Show Smart Tags in the Send To Email Address field.

Then, select the Smart Tag for the Email field. This will allow WPForms to retrieve the email address provided by the customer in the order form and send them the notification to this email address.

Similarly, you can customize all the different parts of your WordPress order form email notifications using plain text and Smart Tags as you see fit.

For more help with smart tags, check out this tutorial on how to use Smart Tags in WPForms.
Notifications in WPForms are extremely flexible. You might want to check out this guide on how to create multiple form notifications in WPForms.
Customize Your Order Form Confirmations
Form confirmations are messages that display for customers once they submit an order form. There are three confirmation types you can choose from:
- Message
- Show Page
- Go to URL (Redirect)
Let’s see how to set up a simple form confirmation in WPForms so you can customize the message users will see after submitting their orders.
First, click on the Confirmations tab in the Form Editor under Settings.

Next, select the type of confirmation you’d like to create. For this example, we’ll select Message, which is the simplest way to display a confirmation.

Then, customize the confirmation message to your liking, and click Save when you’re done.
Excellent! We’re almost finished.
Step 6: Add the Online Order Form to Your Site
WPForms makes it super easy to embed your order form on your WordPress site. Click on the Embed button on the top.

To embed the WordPress order form in a new page, click Click New Page.

Now input a name for the new page and press Let’s Go.

You’ll now see your WordPress block editor with the block already added for the order form you just created within the page.
When you’re ready to launch, click on the Publish button.

Now you can view your published order form live on your site. Notice when you select items on your form the price changes automatically.

And there you have it! You now know how to create an order form in WordPress and accept online payments with it. Don’t want to process payments yet? Take a look at our tutorial on how to create an order form without payment.
As an additional, optional step, you may want to keep users on your website even after they make an order, increasing their chances of making extra orders.
Learn how to do this by redirecting users to another page on your website or another website after they submit a form. If you’re a nonprofit, you can follow similar steps as above to create a donation form for your nonprofit.
Create a WordPress Order Form Now! 🙂
Order Form vs. WooCommerce: Which Do You Need?
If you’re wondering whether you need a form-based order form or a full WooCommerce store, here’s the quick answer: use an order form when you have a handful of products or services and want a simple checkout process. Use WooCommerce when you need a full product catalog with inventory management, shipping zones, and cart functionality.
WPForms order forms are faster to set up and lighter on your site. They’re ideal for service providers, small businesses with a limited product line, and anyone who needs to collect orders without the overhead of a full e-commerce platform. You can always start with an order form and move to WooCommerce later if your product catalog grows.
FAQs on Creating WordPress Order Forms
Here are some of the frequently asked questions about creating WordPress order forms.
Can I create a WordPress order form for free?
Yes. WPForms Lite lets you create order forms and accept Stripe payments at no cost. The free version includes all essential fields, the drag-and-drop builder, and basic templates. Stripe payments in Lite come with a 3% WPForms processing fee on top of Stripe’s own fees. If you want to remove the extra fee or unlock PayPal Commerce and Square, WPForms Pro starts at $49.50/year.
How to make a dropdown order form on WordPress?
WPForms has a Dropdown field that you can include in your order form. To add the Dropdown field, simply click on it from the left hand pane in the form builder or drag and drop it where you need it on your form.
The dropdown menu provides the advantage of keeping your forms short and concise when there are a lot of options to choose from.
So if your list of available items is long, consider adding the Dropdown field to your form using WPForms’ easy drag and drop form interface.
How can I track form submissions and sales?
WPForms makes it easy to track your payment data from order forms. It has a dedicated Payments screen, and this is available in the FREE version as well as WPForms Pro.
With the WPForms Payments screen, you can track total transactions, revenue from sales, revenue from subscriptions, coupon usage, and more.
How do I customize the design and layout of my order form?
WPForms includes comprehensive form styling options that allow you to edit your field borders, labels, error messages, and buttons without any code.
You can use this to customize the design of your order form. This feature is available in all versions of WPForms including Lite.
If you also need to change the layout of your order form, you can either do that by using the very handy Layout field (available in paid plans only) or by custom CSS code.
How can I create a multi-step order form?
You can create a multi-step order form in WPForms by using the Page Break field between other fields to split them apart.
Alternatively, you can also use the WPForms Lead Forms addon which creates a highly interactive form-filling experience and adds multiple steps to minimize form fatigue.
Can I add multiple products to one form?
Yes, you can list several products in one order form using WPForms. Just drag and drop fields like Multiple Items, add each product, and include prices.
How do I set up tax and shipping calculations?
You can use the WPForms Calculations addon to add tax and shipping costs to your form automatically. It lets you do basic math right in the form so totals update based on what users select.
Is it possible to offer discounts or promo codes?
Yes, WPForms has a Coupons addon that lets you create discount codes. Just add a field for users to enter a code, and the form will apply the discount before checkout.
Do I need WooCommerce to create an order form in WordPress?
No. For simple product or service ordering, a form plugin like WPForms is faster and lighter than a full e-commerce platform.
WooCommerce is the better choice if you need a large product catalog, inventory tracking, or complex shipping rules. But for collecting orders for a handful of items or services, an order form is all you need.
Next, Make More Money from Your Website
Want to start making more money off your own website? You may want to check out our post on the best WordPress affiliate plugins.
Are your WordPress email settings configured the right way? Make sure to check out our guide on adjusting email settings in WordPress to make sure your outgoing emails are working properly.
Ready to build your form? Get started today with the easiest WordPress form builder plugin. WPForms Pro includes lots of free templates and offers a 14-day money-back guarantee.
If this article helped you out, please follow us on Facebook and Twitter for more free WordPress tutorials and guides.


Hello,
Is it possible to let the user choose between two currencies? Like CHF en EUR?
Thank you for your answer and help 😊
jm
Hi Jean- Marc,
I am sorry as currently, we do not have an inbuilt feature to choose different currencies. Current functionality only allows single currency. I have gone ahead and added your vote to consider this as a feature request for future enhancements.
Thanks,
Is it possible to have a selector to change the number ordered of each product?
Say i wanted to order 10 pcs. black shirts and 5 red shirts?
Also is it possible to make list of say numbers for unique products and let each number become unavialble once ordered.
I do run woocommerce stores and know what is possible there but I have clients with 4-5 products and little computer knowledge that could work better with wpforms.
Hey Troels – We currently don’t have feature to change the values based on the product quantity and setup number of products which would then be unavailable once the product is ordered. While we have a workaround here, I do agree this would be a great feature to have, and I’ll add this into our feature request tracker.
Is there any way to make an order form “pretty”? We want to be able to customize the page to be more inline with our brand and it’s just too plain. How would we go about doing this?
Hey Amber – To customize the style of the form, you can take a look at our documentation here and here.
In case you’d need some assistance, please drop us a line in support so we can assist.
If you have a WPForms license, you have access to our email support, so please submit a support ticket.
Otherwise, we provide limited complimentary support in the WPForms Lite WordPress.org support forum.
Thanks 🙂