
AI Summary
Raising funds for a nonprofit is no easy task, and creating a donation form that actually works can feel overwhelming, especially if you’re new to WordPress.
You might be wondering if it’s possible to build an effective donation form in WordPress without getting lost in technical details. I had the same concerns!
After going through the process, I realized that creating a nonprofit donation form in WordPress is much simpler than it seems. In this article, I’ll show you exactly how to use a template to create a donation form in WordPress.
Create Your Nonprofit Donation Form Now
How to Create a Donation Form in WordPress?
Here’s a video tutorial showing how you can make a WordPress donation form:
Need more detail? Let’s walk through it together, step by step.
Step 1: Install and Activate WPForms
To get started, install and activate the WPForms plugin, which we’ll be using for this tutorial.WPForms is among the highest-rated form builder plugins and works well for creating online donation pages.
Plus, it’s super user-friendly. You can check out our comparison on WPForms vs GiveWP to see how different plugins compare.
The free WPForms Lite plugin is enough to start accepting donations, so you can get up and running without paying a cent.
If you want to drop the platform fees and add features like recurring donations on the same form, you’ll want WPForms Pro, and I’ll point out exactly where that matters as we go.

Not sure how to install and activate a WordPress plugin? No sweat. See this step-by-step guide on how to install a plugin in WordPress.
Step 2: Activate Your Payment Gateways
Before creating our nonprofit donation form, let’s connect our payment gateways. This will allow donors to pay by credit card.
In all versions of WPForms, you can use Stripe to collect credit card payments. For other payment gateways, you need to first install an addon, and these are only available in Pro or above plans.
To integrate a payment gateway, open your WordPress dashboard. In the left sidebar menu, click on WPForms » Addons.

That will show you all of the available addons you can access. WPForms integrates with popular payment processors for nonprofits, including PayPal, Square, and Authorize.net.
Locate and activate the payment addon you wish to use. You can activate and use multiple payment gateways.

Next, click on WPForms » Settings in the left sidebar menu.

This will open the general settings for WPForms. Click on the Payments tab.

Now you can connect your accounts for the payment addons you selected.
For PayPal, you’ll just need to enter your PayPal account credentials and follow the on-screen instructions.
You’ll be connected in no time!

When you’re finished connecting your payment gateways, don’t forget to save your settings! Now we’re ready for the fun part: creating your form.
Step 3: Create Your Nonprofit Donation Form
After you’ve activated WPForms on your site and set up your payment methods, go to WPForms » Add New to create a new form.

Enter a name for your form at the top of the setup screen. You can use a generic name or the name of your fundraising campaign.

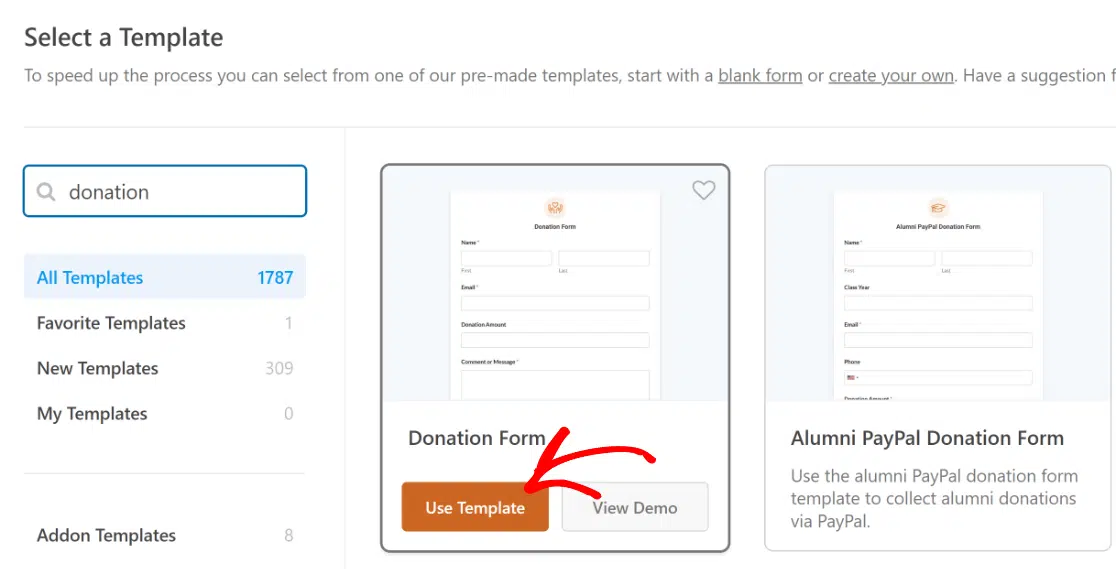
Just below that, you’ll see 2,100+ customizable form templates. You can browse these or easily search for the “donation form” template using the search bar.
There are several donation forms and nonprofit templates available, including a Buy Me a Coffee alternative template. Choose whichever best meets your needs. For our example, we’ll use the donation form template.
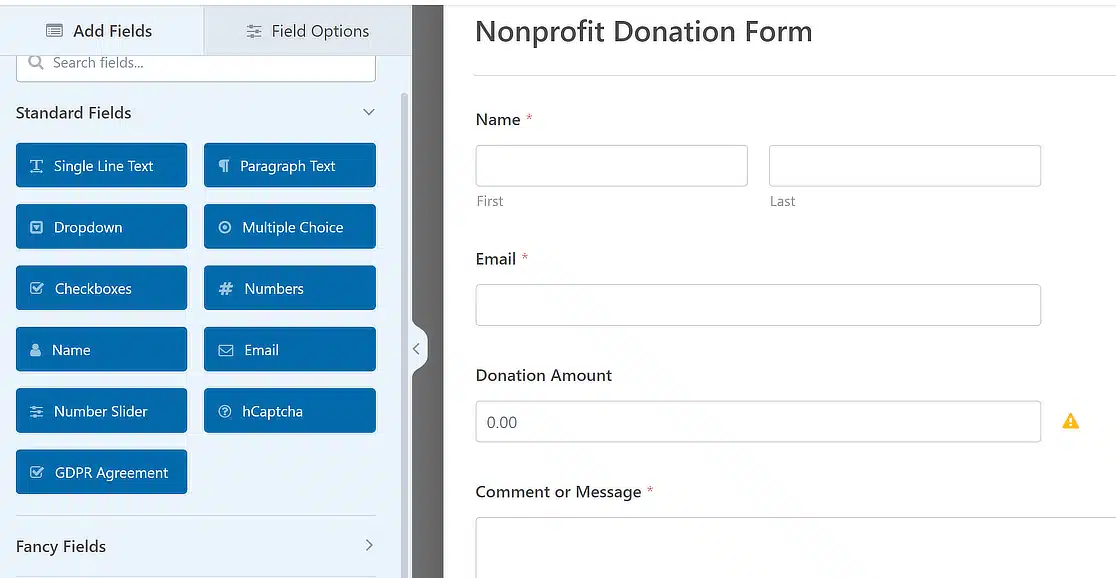
Once you select your template, the form builder will open with the template ready to use. You’ll notice the Donation Amount field, which is where the person filling out the form can input any amount they want to donate.
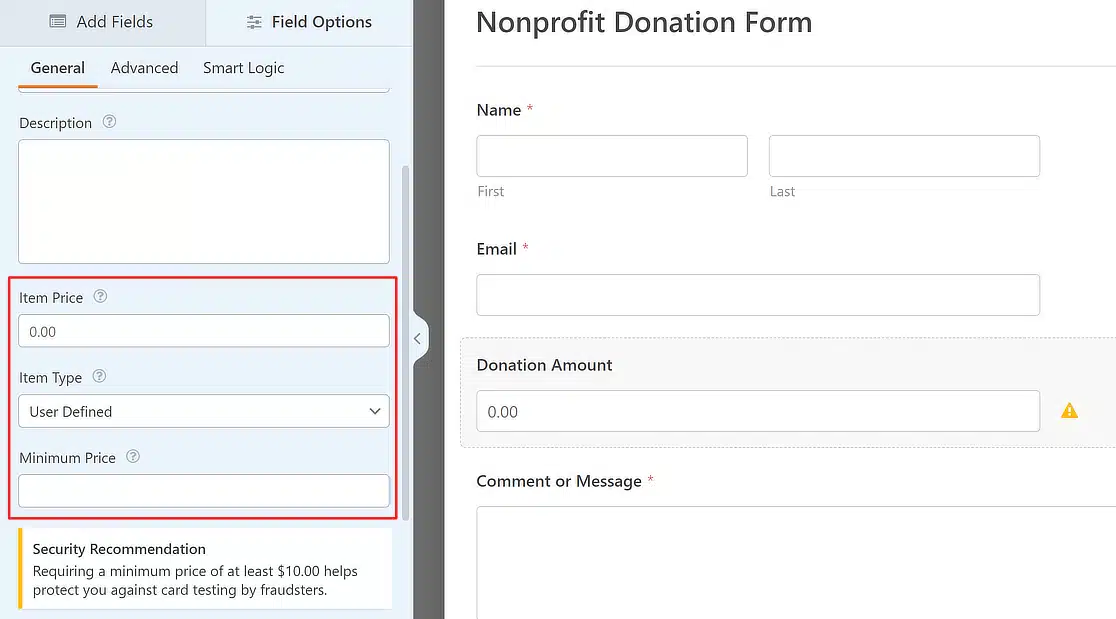
If you click on the Donation Amount field, the Field Options will open on the left-hand pane. There are a few really useful settings here, such as the ability to set a default item price and control whether you want the amount to be user defined or a fixed one.
In the template I’m using, this field is set to allow the donor to enter any donation amount that they can conveniently send your way. However, you can change this behavior if you want using the Item Type dropdown.
In addition, this template has a PayPal Commerce field already added that you’ll find if you scroll to the bottom. For the purposes of a donation form, you’re probably okay with the Donation Amount field that comes with the template.
If you want to add some other kind of payment options, you could easily do so with the multiple items, checkbox items, or dropdown items fields. You can also add additional form fields for any other information you want to collect.
So let’s take a look at how we add the payment field.
Get the Donation Form Template Now!
Step 4: Set Up the Payment Field for Donations
Because you already set up your payment addons in Step 1, adding the payment field now will be a breeze. Start by clicking the Payments option on the form builder menu on the left.

On that screen, you’ll be able to interact with any of the payment gateways that you previously activated in Step 1. Deactivated gateways will be grayed out.

Click on the payment gateway that matches the payment field you selected on your form. I decided to stick with PayPal Commerce as the payment solution as part of this template, so that’s what I’ll select.
If you’re accepting one-time donations, click on the Enable One-Time Payments toggle button.

You’ll see additional field mapping options appear once you click on the toggle button. These are optional but you can map values from your form to corresponding PayPal details including:
- Name
- Billing Address
- Shipping Address
After that, you can click back on Fields to return to your form.

If you want to do some testing, that’s a great idea. We have a few guides to help you with that process.
- How to Test PayPal Payments
- How to Test Stripe Payments
- How to Test Square Payments
- How to Test Authorize.net Payments
Step 5: Embed Your Nonprofit Donation Form
At this point, you’re ready to embed your form if you want. Save your form and click on the Embed button at the top right.

You can choose whether you want to embed your form on a new page or an existing page.

If you choose an existing page, you’ll get a dropdown menu with a list of pages on your site.

If you create a new page, you can set that up right from WPForms.

You’ll find yourself in the WordPress block editor, where the form will already be embedded in a block. You can use other content blocks to develop a complete page if you want.
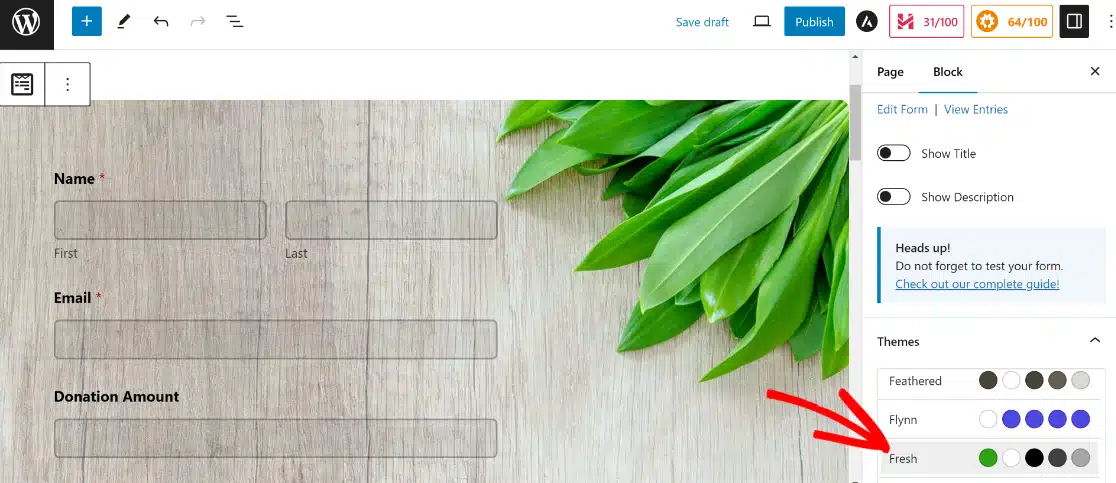
But even if you do nothing else, I strongly suggest adding a theme to your form. With WPForms Pro, this is incredibly easy because you get a bunch of ready-made design themes for your form.
To add a theme, simply click on the area around the form. This will open additional opens for the WPForms block on the right-hand panel. Scroll down to the Themes section and click on any theme.
The changes will happen instantly as you click a theme, so feel free to try different options until you’re satisfied.
When you’re satisfied, press the Publish button on the top to take your nonprofit donation form live.

Brilliant! Now that your form is live, you can go ahead and share your donation campaign and start collecting funds.

But wait… how are you going to track the money you’ve collected?
With WPForms, this is no problem. Simply navigate to WPForms » Payments from your WordPress dashboard.
Here, you can track your payments and exactly how much revenue or donation funds you’ve collected over a specific period of time with an easy-to-read chart.

And that’s it! You’ve built your online nonprofit donation form. Easy peasy, right?
Check out this complete guide to form entries to see how easy it is to view your donations in the WordPress dashboard.
Bonus: Customize Your Nonprofit Donation Form Template Fields
WPForms is a pretty powerful form builder, and the templates are 100% customizable. As a bonus, we’ll show you how to use WPForms’ tools to customize your form.
Conditional Logic
Applying conditional logic to online forms lets you show users only the information that’s relevant to them.
Instead of the single item field that comes with the donation form we used above, maybe you use a multiple items field instead and add suggested donation amounts with an ‘other’ option.

You can then set up a Single Item field like the one in our example above, allowing donors to enter their own donation amount. Apply conditional logic so the field only appears if ‘Other’ is selected on your form.

Want to add conditional logic to your forms? Check out this guide to using conditional logic in WPForms to learn how.
And if you need some ideas for how to use it in your forms, we have some suggestions for ways to use conditional logic to create killer forms.
Change Form Settings
You can change form settings anytime to rename your form, add tags, and more.
From inside the form builder, look on the left sidebar and navigate to Settings » General.
You’ll notice some other settings options based on your addons, but we’re just looking at the General settings here.

Here you can configure the following:
- Form Name — Rename your form
- Form Description — Add a description under the header
- Tags — Assign a tag to your form to group it with other similar forms
- Submit Button Text — Change the button text
- Submit Button Processing Text — Edit the text that appears after pressing submit button
Configure Your Notifications
Want to receive donation notifications? What about sending confirmation emails to donors?
Easy! From the settings menu, select Notifications.

Here you can determine who will receive a notification email. Maybe you want to send it to the donor and CC yourself so you both receive the donation receipt. Set the subject line, From Name and Email, and write the message you want to send.
Note that From Name will be your organization name and not typically an individual.
To get started with this feature, check out our documentation on how to set up form notifications in WordPress.
This guide to using smart tags will help you personalize your notifications.
If you want to send more than one email to one person, read this article on creating multiple form notifications in WordPress.
You can even use ChatGPT with WPForms to send AI-generated notifications.
Finally, to keep branding across your notification emails consistent, check out this guide on adding a custom header to your email template.

Configure Your Form Confirmations
Form confirmations are messages displayed to site visitors upon form submission. They give you the chance to let people know immediately that their donation was received and to offer them next steps.
WPForms has 3 confirmation types to choose from:
- Message — the default confirmation type in WPForms. When a site visitor makes a donation, a simple message confirmation will appear, letting them know it was received.
- Show Page —will take site visitors to a specific web page on your site, thanking them for their donation. For help doing this, check out our tutorial on redirecting customers to a thank you page.
- Go to URL (Redirect) — used when sending site visitors to a different website, such as your social media page.
To configure these, click on the Confirmation tab in the Form Editor under Settings.

Next, select the type of confirmation type you’d like to create. For this example, we’ll use the default Message.
Then you just customize the text in the box! When you’re done, click Save in the top right corner.
Need some more guidance? See our documentation on setting up form confirmations.
Keep in Touch With Donors
You can combine your donation forms to gather donor information with some popular email marketing services. For instance, you can connect WPForms with ConvertKit, or other platforms like:
- Constant Contact
- Brevo (formerly Sendinblue)
- Drip
- AWeber
- GetResponse
…and more.
This allows you to add donors to your email list and keep them informed about your charitable organization. It’s a good way to get recurring donors by keeping your organization front of mind.
And because your form is already live on your website, it’s easy to use the social sharing features in WordPress to get more traffic. Check out these awesome social media plugins to get some ideas.
For even more tips and recommendations, check out our round-up of the best free and low-cost tools for your nonprofit.
Ready to get started right away? We’ve got you covered with our online donation form template. Click the button to get started now!
Create Your Nonprofit Donation Form Now
WPForms Nonprofit Discount
Are you a nonprofit organization looking to save money while seeing your donations skyrocket?
WPForms Pro is available to qualified nonprofits at a major discount of 75% off.
You can use all of the advanced features in Pro to make sure your donors support your fundraising efforts long-term.
To apply, head to the WPForms Nonprofit Discount page and complete the request form. The team will review your application and be in touch.
Apply for Your WPForms Nonprofit Discount
FAQs on Creating a Nonprofit Donation Form
Got more questions about nonprofit donations? Here’s a compilation of some common questions our team is often asked by nonprofits aiming to set up fundraising forms.
Can I create a donation form for free?
Yes. The free WPForms Lite plugin lets you build a donation form and collect payments through Stripe or PayPal. You’ll pay a small WPForms platform fee on each donation (3% on PayPal), along with your payment processor’s standard fees. Upgrading to WPForms Pro removes the WPForms fee and adds options like recurring donations and Square.
What Makes a Good Donation Page?
Asking for charitable donations online is easy, but getting them to convert can be challenging. You need a smooth donation process.
Keep the donation page simple. If the page has too much going on, it distracts potential donors. If the page is simple to navigate and the form is clean and easy to use, that’s fewer barriers to donation.
And don’t forget to make it clear to visitors what donations are supporting. Is it a general fundraiser, or are you supporting a specific cause with these funds?
Can I track and manage donations within WordPress?
Yes, many donation plugins and form plugins like WPForms allow you to track donations. WPForms includes Payment charts that let you see the amount of funds you’ve raised and the number of donations.
Other dedicated donation plugins like WP Charitable offer more advanced donor management options.
How do I thank donors automatically after they make a donation?
WPForms lets you set up automatic notifications for the donor. You just have to set this up once. When you’ve done that, the donors will receive a thank-you message every time they’ve completed a donation using your form.
Can I customize the donation amounts and frequency options?
Yes, you can customize the donation amounts and frequency options with a lot of flexibility using WPForms. You’re free to allow custom donation amounts or accept predefined amounts (or choose from either option). For the payment frequency, you can create options for one-time donations or recurring donations (quarterly, monthly, yearly, and so on).
Next, Add Optional Payment Fields to Your Forms
You can even include donation requests while users fill out other WordPress forms on your site. That could help you to reach a fundraising goal faster and boost your conversion rate.
Read about how to add an optional payment to your WordPress forms. We also have a guide to super helpful Salesforce integrations that’ll be handy to add automation if you use Salesforce for Nonprofits.
Create Your Nonprofit Donation Form Now
Ready to build your form? Get started today with the easiest WordPress form builder plugin. WPForms Pro includes lots of free templates and offers a 14-day money-back guarantee.
If this article helped you out, please follow us on Facebook and Twitter for more free WordPress tutorials and guides.


Is there a way I can connect paypal payment to Paypal Giving account? There is paypal_donation button that works on a page or post, but it does not work within a WPForm. Wondering if it is possible? You might be best person to know this.
Hi Arvind!
Currently, WPForms does not support direct integration with PayPal Giving Fund accounts. The PayPal integration in WPForms works through the PayPal Commerce or PayPal Standard addons, which are designed for standard PayPal business or personal accounts.
For any workarounds or personalized advice, I’d recommend reaching out to our Trusted Advisors in the support team if you have a WPForms license. Please submit a support ticket and they will get back to you as soon as possible.