Do you want an easy way to set up WordPress recurring payments?
Recurring online payments help scale your sales or donations. You get predictable income without spending time chasing up payments.
Create Your Recurring Payment Form Now
In this article, we’ll show you how to set up recurring payments in WordPress using fully customizable forms.
In This Article
- Step 1: Install the WPForms Plugin
- Step 2: Get the Stripe Pro Addon
- Step 3. Connect WPForms with Stripe
- Step 4: Create Your Recurring Payment Form
- Step 5: Customize Your Payment Form Fields
- Step 6: Configure Recurring Payments With Stripe
- Step 7: One-Time or Recurring Payments (Optional)
- Step 8: Publish Your Recurring Payment Form
How to Accept Recurring Payments in WordPress
The easiest way to configure automatic recurring payments in WordPress is with WPForms. You can easily add a Stripe credit card field to any form and specify when you want the payment to recur. When your visitor submits the form, WPForms will trigger the first payment and repeat your set schedule.
You can watch the video above for a walkthrough of how to use recurring payments in WPForms. If you prefer reading instructions, follow the steps below.
Step 1: Install the WPForms Plugin
As the best form builder for WordPress, WPForms allows you to create forms configured to accept recurring payments on all license levels.
This means you can use the free or any paid version of WPForms to connect it with Stripe and take recurring payments.
However, if you opt for the Pro or Elite license levels, you get more advanced options like conditional payment logic and lesser transaction fees.
Now that you know about differences in WPForms license levels in terms of payment settings, go ahead and choose a plan.
Then, install and activate the WPForms plugin. If you need help, see this step-by-step guide on how to install a WordPress plugin.
Step 2: Get the Stripe Pro Addon
While this step is optional, we strongly recommend getting the Stripe Pro addon to access the full range of payment features for your forms.
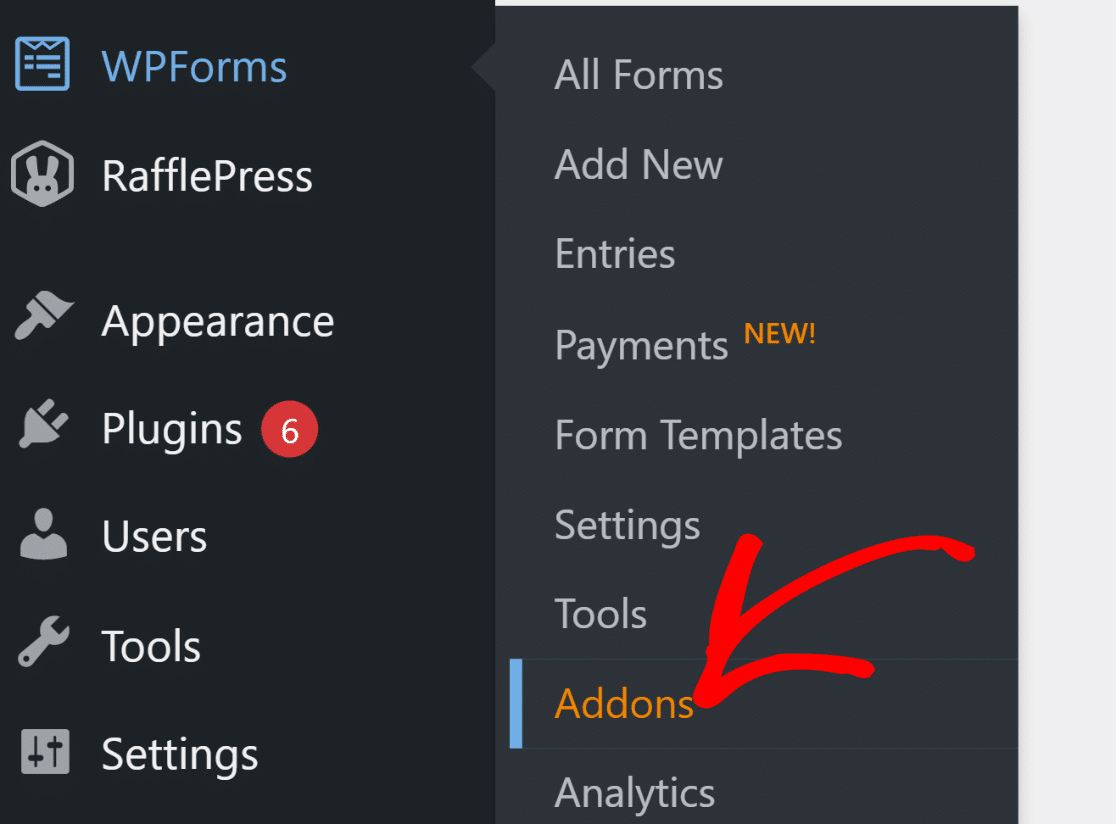
The Stripe Pro addon is available for Pro and above users. To install this addon, open your WordPress dashboard and go to WPForms » Addons.
On the Addons page, scroll down to the Stripe Pro Addon or search for it using the search bar. Press the Install Addon button under Stripe Pro Addon.
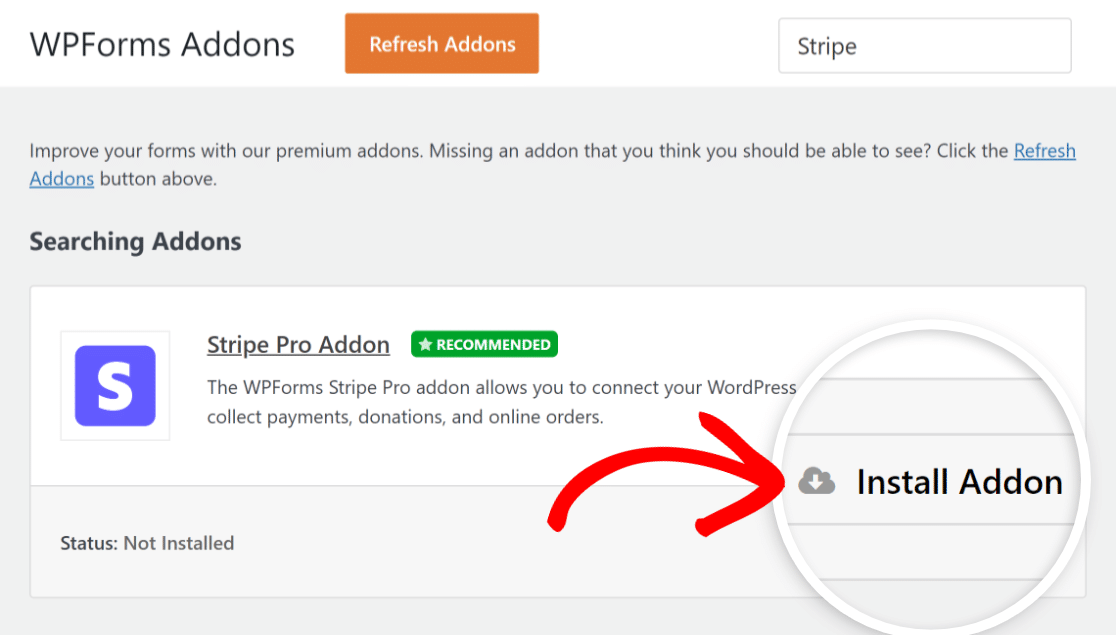
Once we’ve installed the addon, we’ll need to connect our Stripe account in the main WPForms settings area. This is super easy, and you’ll only have to do it once as we show in the next step.
Step 3. Connect WPForms with Stripe
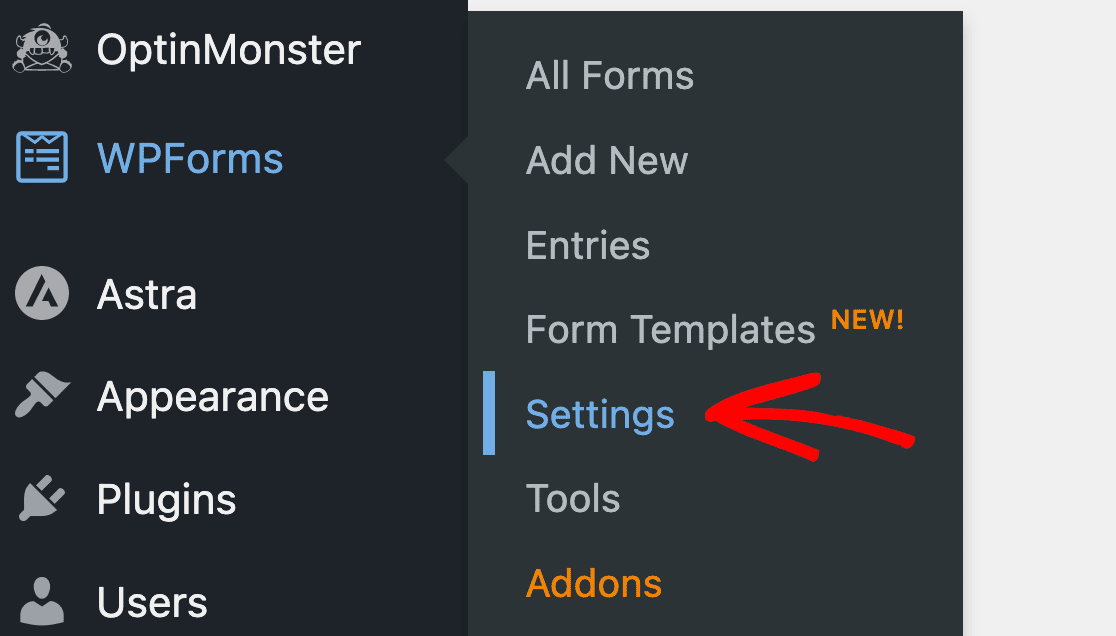
From the WordPress admin area, hover your cursor over WPForms in the sidebar and then click on Settings.
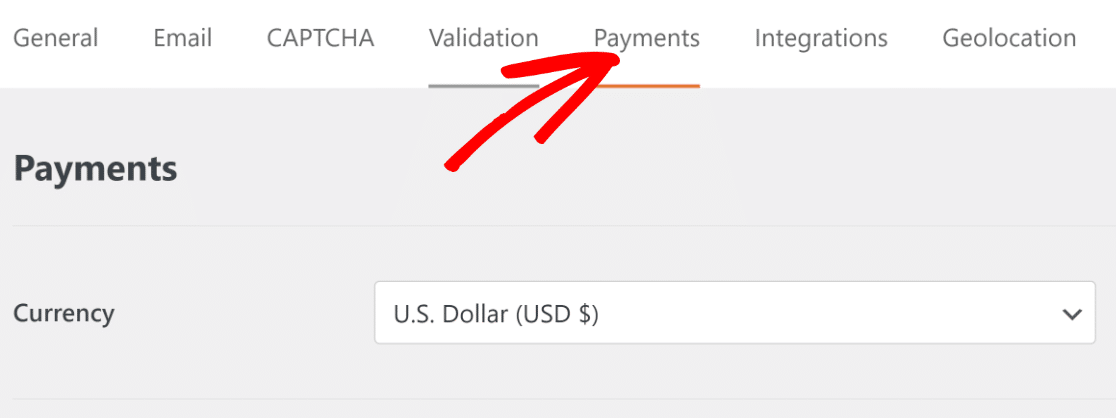
When the setting page opens, click on the Payments tab.
Now, scroll down to find the Stripe connection button. Click on Connect With Stripe to proceed.
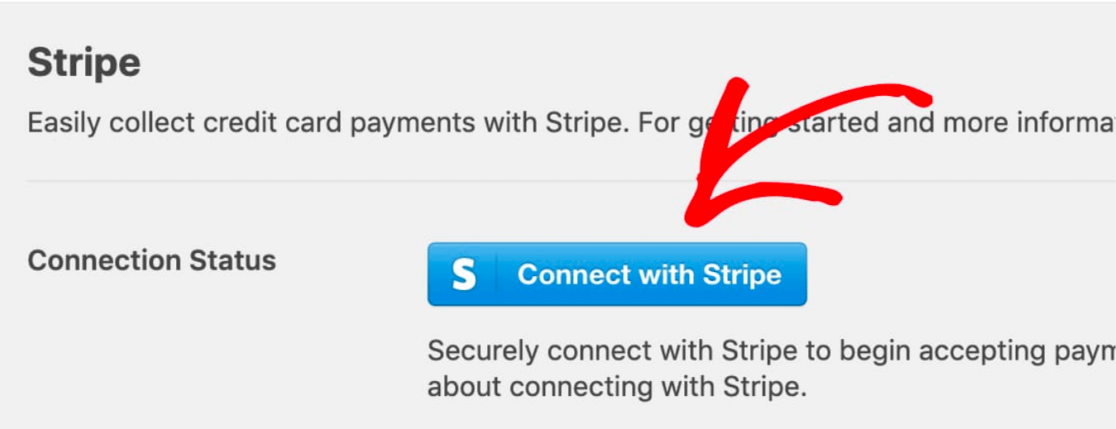
You’ll now find yourself on the Stripe login page. If you already have a Stripe account, you can simply enter your login details to connect with Stripe.
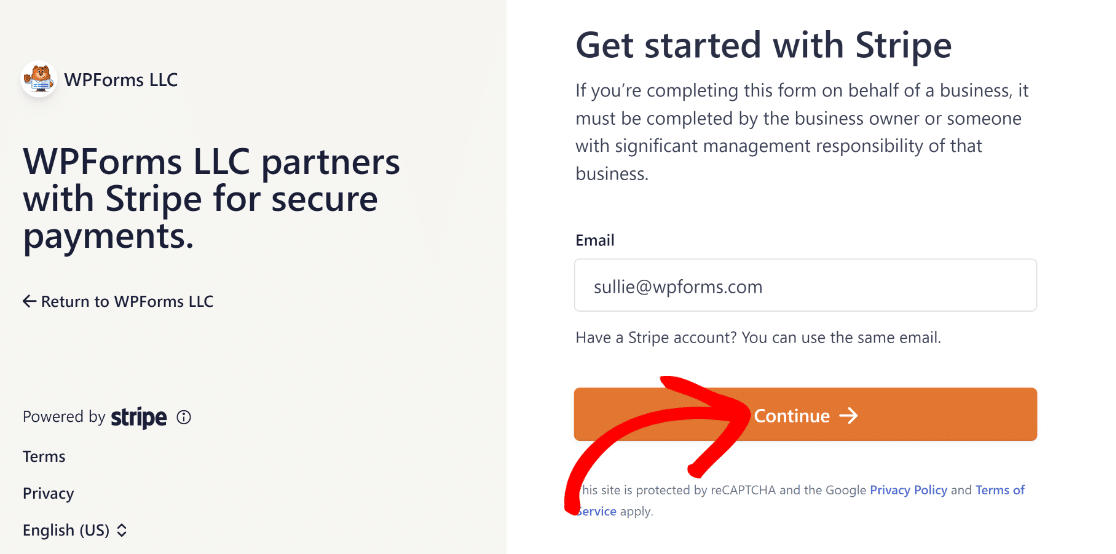
You can also create a new Stripe account here if you’d like. Once you’re connected, return to the WPForms payments screen.
At this point, you should see your Stripe Connection Status turn green to confirm that you’re connected.

If you want, you can use test mode first to run a few test payments and ensure everything works. You can simply use the Test Mode checkbox to toggle in and out of it.
Step 4: Create Your Recurring Payment Form
In this step, we’ll create a donation form that takes a recurring monthly payment, along with other basic configurations.
The steps are basically the same for any kind of order, subscription, or donation form. First, go to WPForms » Add New to create a new form.
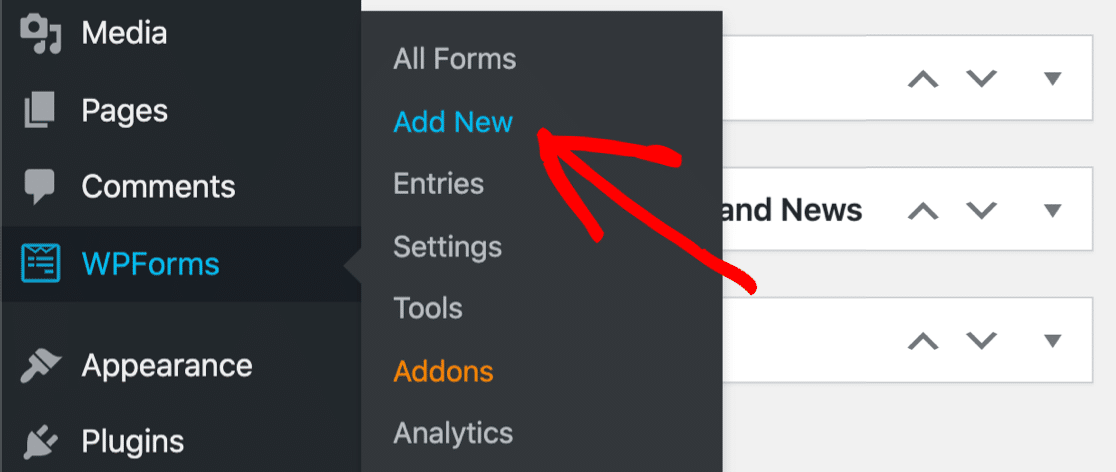
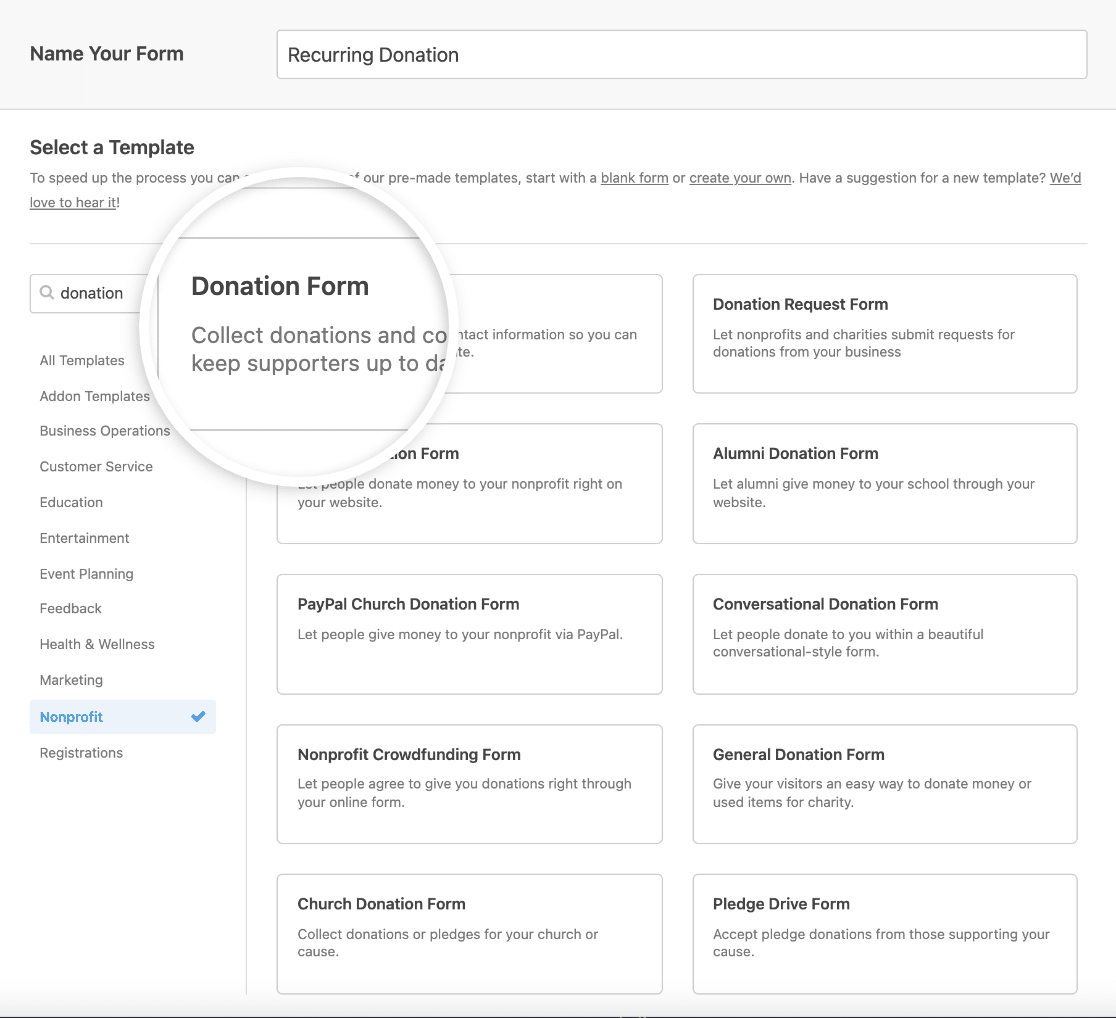
Type in a name for your form at the top. We’ll call our form Recurring Donation. Feel free to call your form anything you’d like.

Next, you can pick one of the 2,000+ templates included in WPForms Pro.
There are several donation templates to choose from, and you can use any of them to take recurring payments. For our example, we’ll use the regular Donation Form template.
This is what our donation form looks like before customizing any of the form fields.
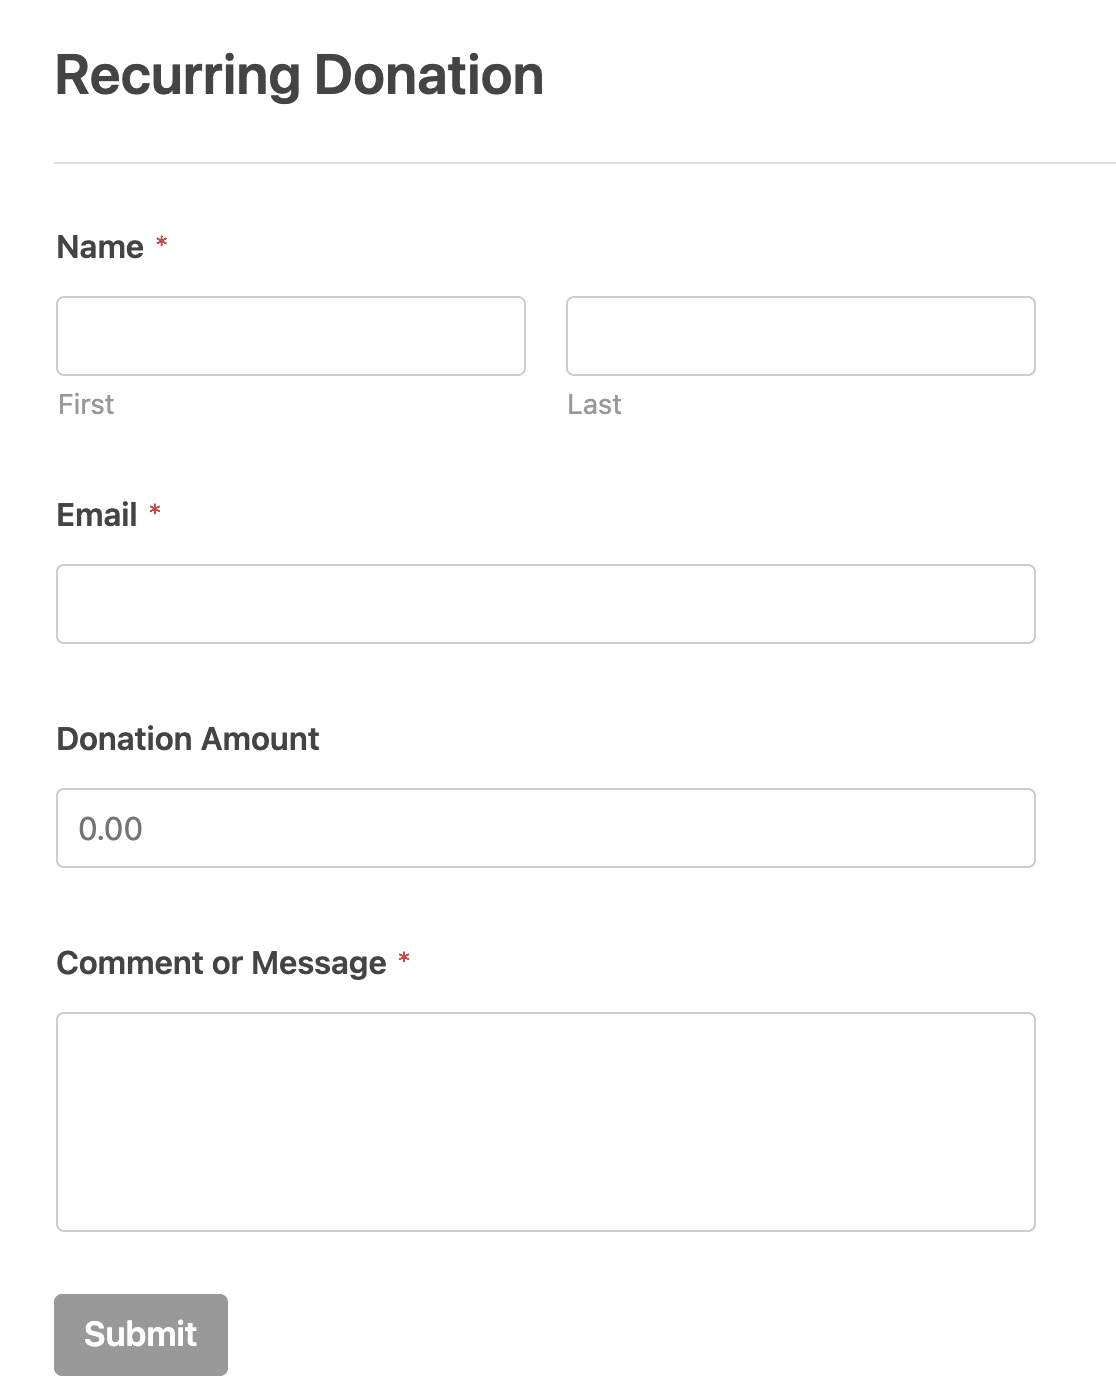
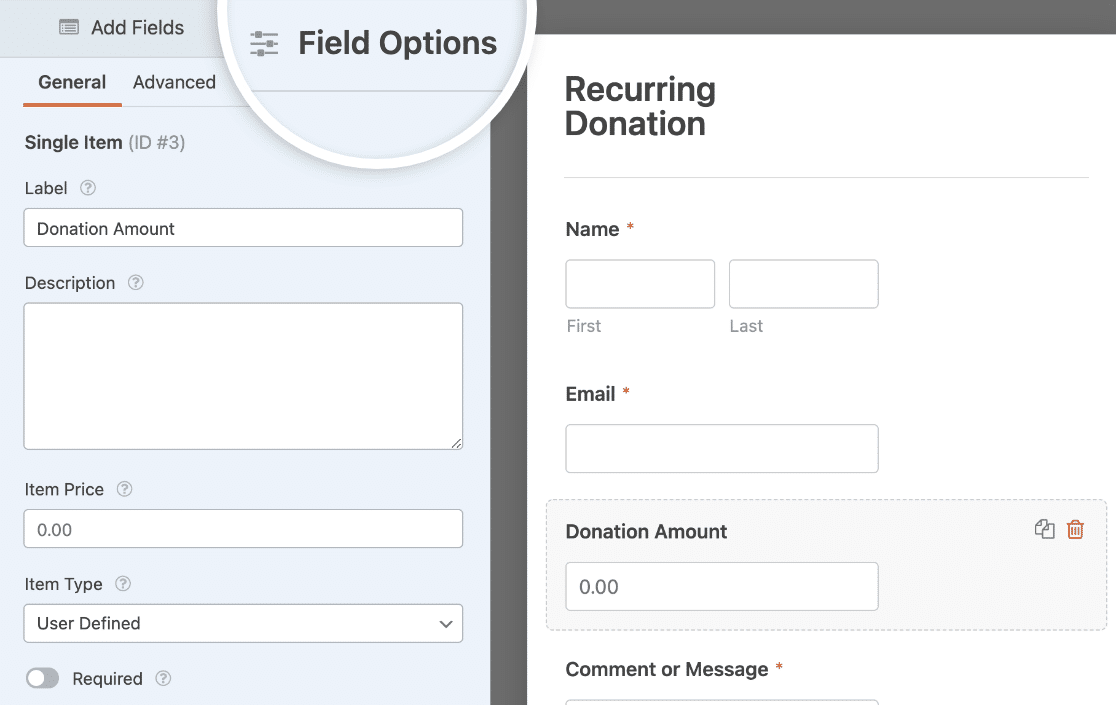
You can drag fields over from the left-hand panel to add them to your form. And if you want to customize a field, just click on it and edit the settings.
WPForms doubles as a powerful WordPress Stripe plugin because it lets you accept multiple payment methods, including credit cards, Google Pay, and Apple Pay with Stripe.
Go ahead and tweak your form until it works the way you want. For help with this, check out our full tutorial on creating a nonprofit donation form in WordPress.
Step 5: Customize Your Payment Form Fields
Now it’s time to add the payment fields for recurring billing in WordPress. WPForms makes this super easy. You’ll need to have:
- At least one ‘items’ field (Single Item, Multiple Items, or Dropdown Items)
- A Stripe Credit Card field.
And that’s it.
On our donation form, we already have a Donation Amount field, which is a Single Item field. But it still needs a Stripe Credit Card field to accept credit card details from visitors.
So we’ll drag and drop the Stripe Credit Card field located under the Payment Fields section.
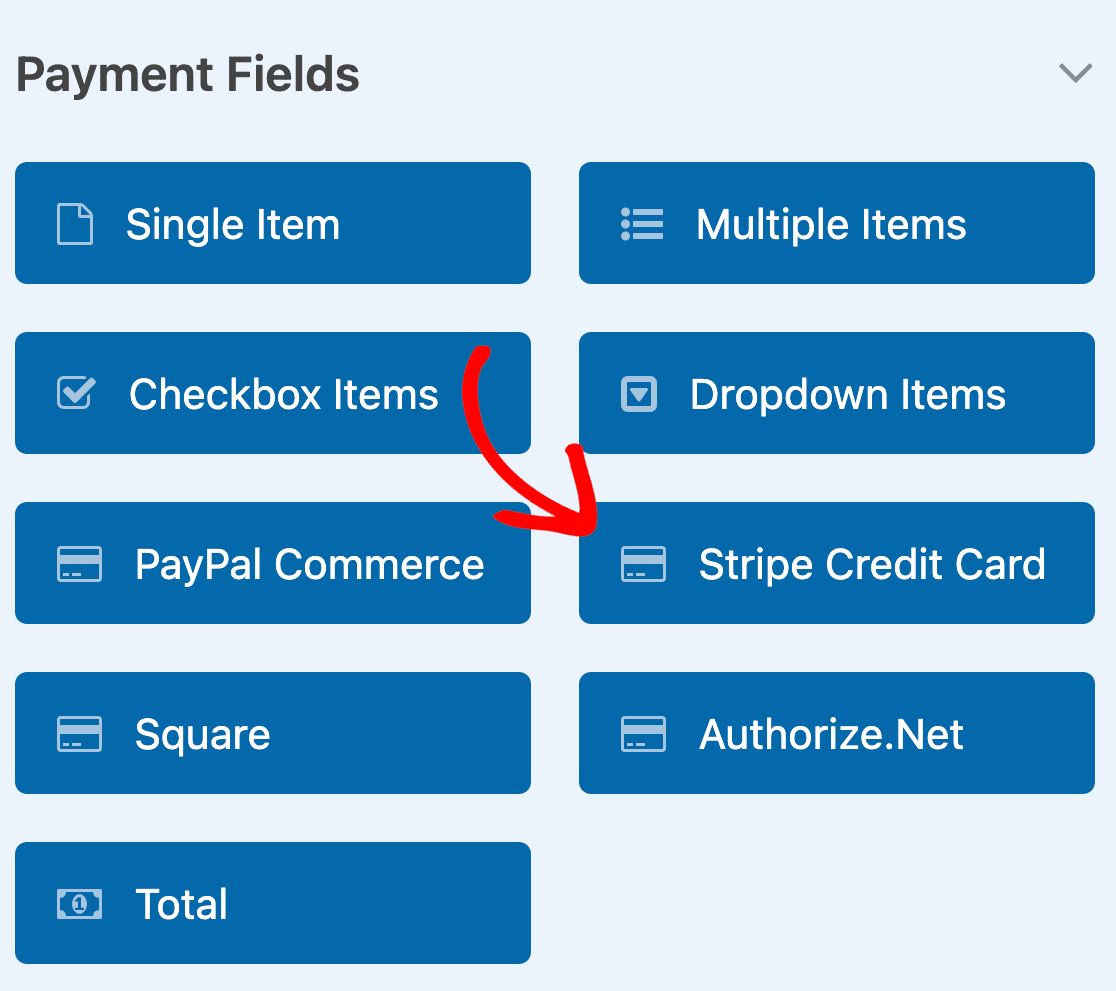
That’s all you need to do! Now your form has a credit card field for payments.
In the next step, you can use conditional logic in your Stripe payment settings to tell WPForms whether to process a one-time payment or a recurring payment depending on user selections.
Step 6: Configure Recurring Payments With Stripe
Now, let’s edit your form settings so that each entry creates a new subscription payment. In the form builder, click Payments to start.
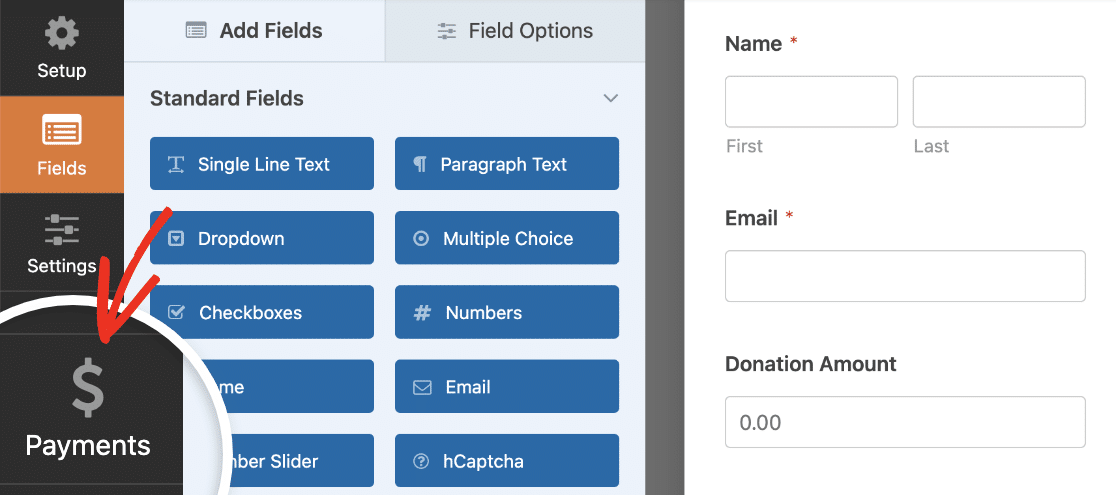
Next, click Stripe to open up the payment settings for your form.
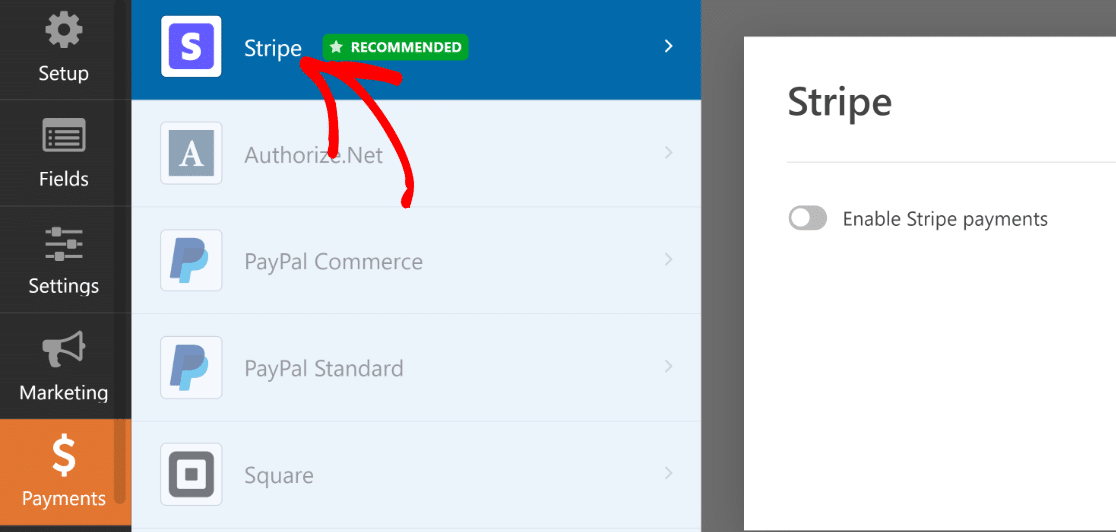
On the right-hand side, you’ll see the payment settings in the form builder. Let’s toggle on the option labeled Enable Stripe payments.
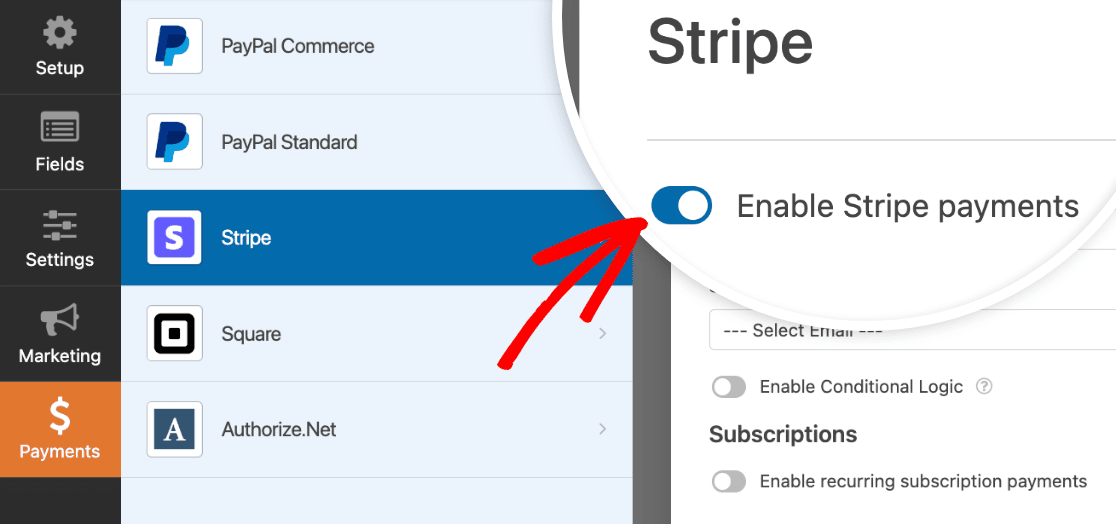
Next, let’s scroll down to Subscriptions and toggle on the option labeled Enable recurring subscription payments.

The settings underneath will apply to the recurring payments through Stripe:
- Plan Name: Type in a descriptive name that your customer will recognize.
- Recurring Period: Use the dropdown to choose how often people will be billed. You can choose a weekly, monthly, or yearly billing interval.
- Customer Email: Select the customer’s email address for the recurring payment notification emails.
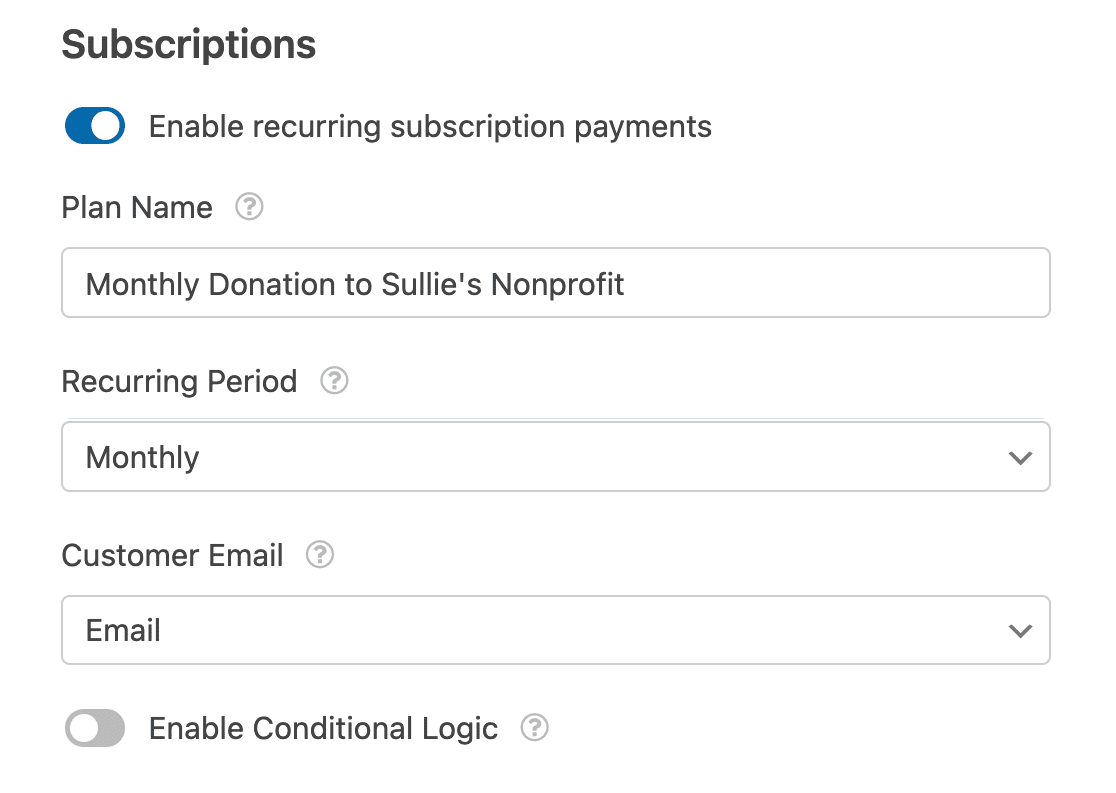
All set? Click Save at the top.
Step 7: One-Time or Recurring Payments (Optional)
If you’re a Pro user with the Stripe Pro addon activated, you can give users the extra freedom to choose between one-time or recurring payments through the same form.
This is totally optional but allows you to attract all kinds of donors and customers because they can set their own payment preferences.
To do this, you’ll want to add a dropdown field to your form with 2 different choices: one-time or recurring.
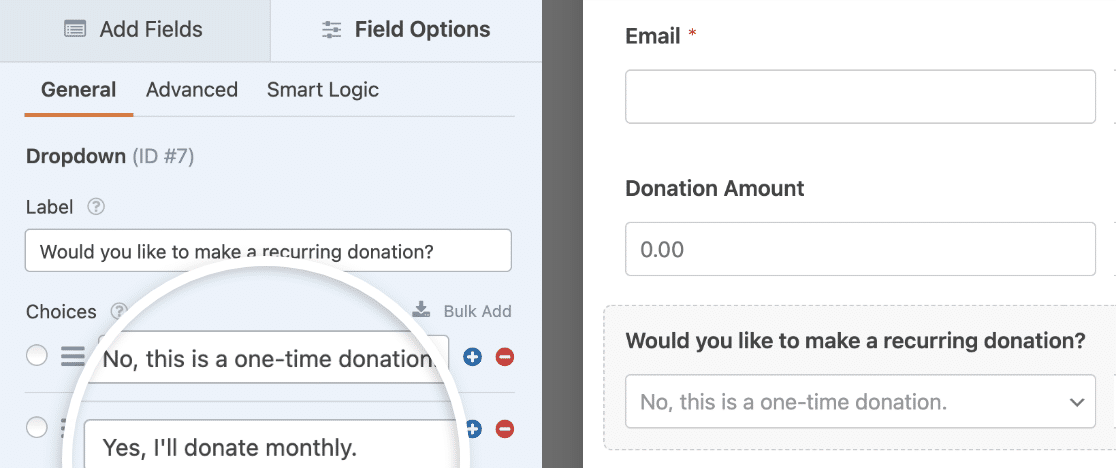
Then go back to Payments » Stripe. Under the Subscriptions settings, toggle on the Enable Conditional Logic option.
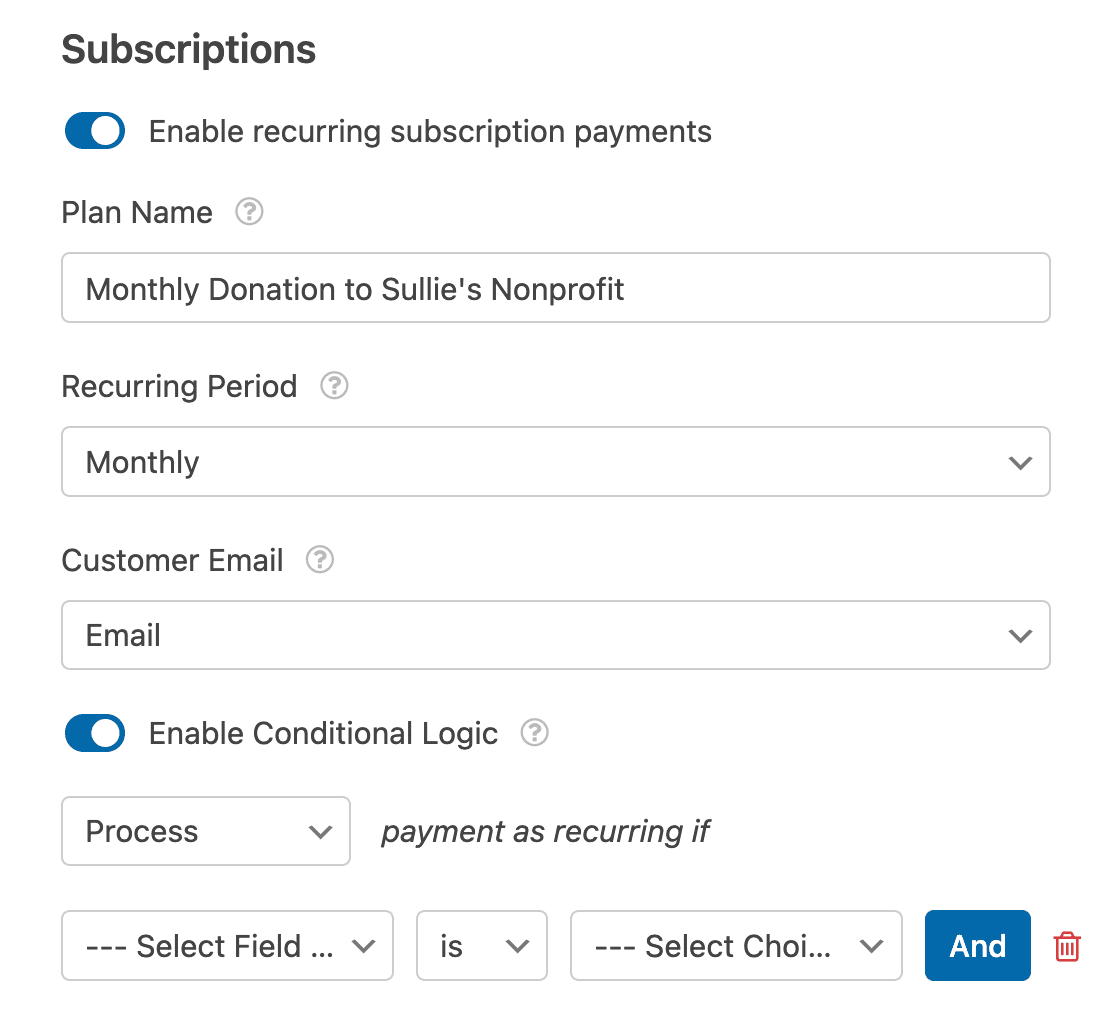
Then set up the dropdowns to read, Process this payment as recurring if “Would you like to make a recurring donation?” is “Yes, I’ll donate monthly.”

Now the payments made through this form will only be charged monthly if the user selects that option from the dropdown. Don’t forget to save your changes!
Remember: if you’re a Lite, Basic, or Plus user, you can only either accept recurring payments or one-time payments from the same form.
Step 8: Publish Your Recurring Payment Form
Before adding your donation form to your WordPress website, make sure to test it to make sure everything processes correctly.
For help with this, we have documentation walking you through how to test Stripe payments before accepting actual payments.
Now you can publish your form! To start, hit the Embed button at the top of the form builder.

Click Create New Page in the popup that appears.
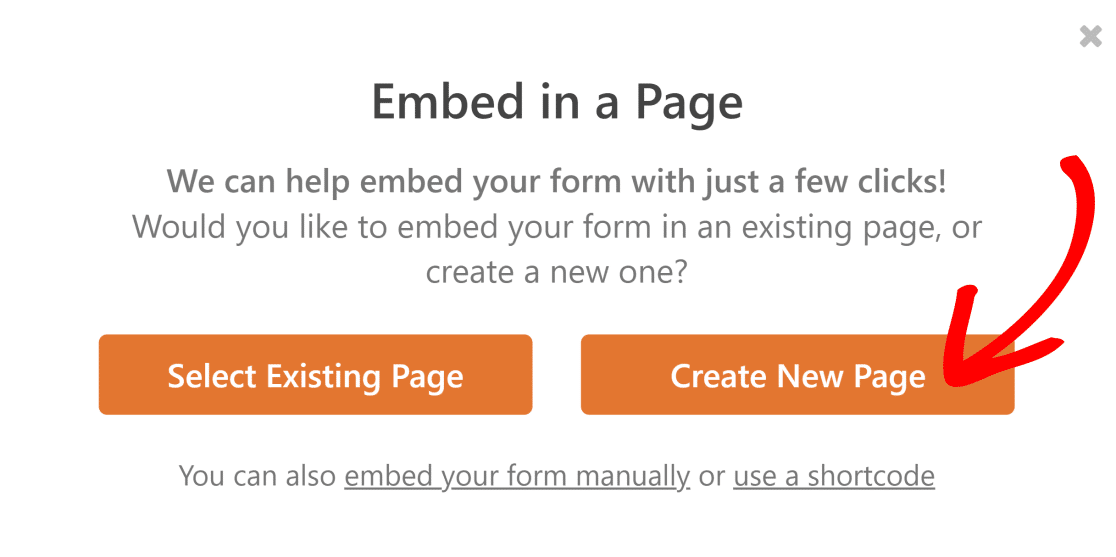
And finally, type in a name for your new WordPress page and click Let’s Go.

Check that your page is ready to go live, then hit the blue Publish button.
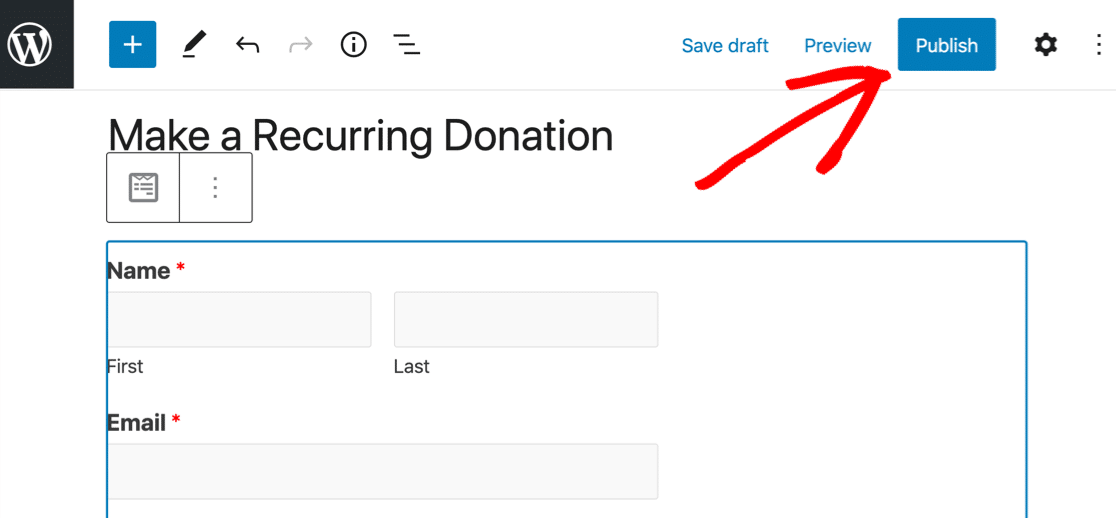
Now you’re ready to start taking payments for your subscription plans, services, or donations.
To view payments that you’ve collected in your WordPress dashboard, simply go to WPForms » Payments.
This screen gives you a complete summary of your payments allowing you to track your earnings or donations effortlessly.
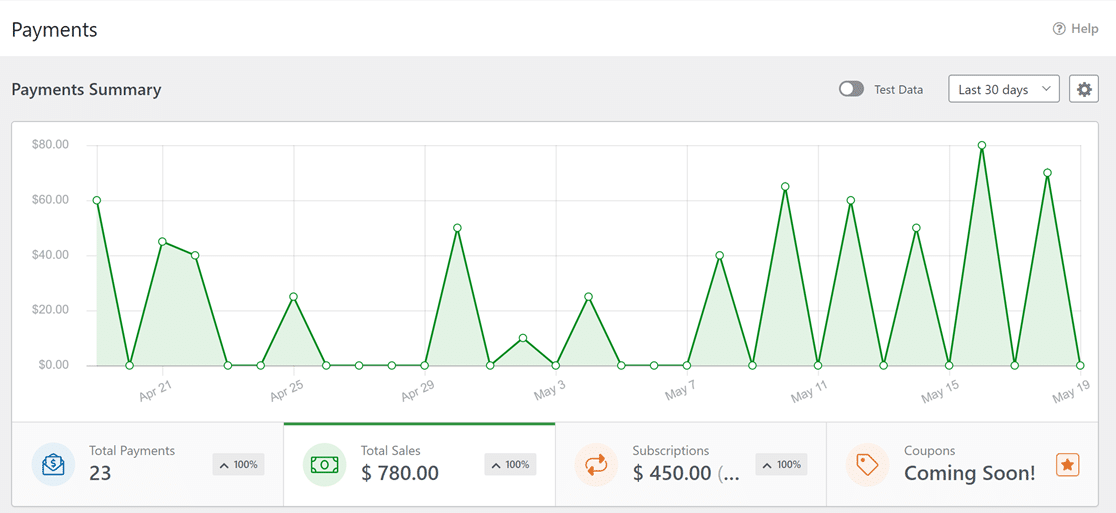
And that’s it! Now you can take recurring card payments in WordPress without any hassle.
Create Your Recurring Payment Form Now
FAQs about WordPress Recurring Payments
Looking for answers to your questions? Check out some of the most frequently asked questions we receive about WordPress recurring payments.
How do I set up recurring payments on WordPress?
Select a plugin that supports recurring payments, such as WPForms or WP Simple Pay. These plugins are user-friendly and integrate seamlessly with WordPress, allowing for easy setup, especially for small businesses that want to create a simple order form to ship products and receive payments.
Can WooCommerce do recurring payments?
Yes, WooCommerce can handle recurring payments, especially when paired with extensions like WooCommerce Subscriptions. This allows for the sale of subscription-based products and services, offering various billing schedules and automatic payment collection.
Is it better to use a third-party platform than WordPress to manage subscription payments?
You can use third-party platforms like Chargebee to manage recurring payments. However, if you’re already using WordPress, WPForms offers a more seamless and integrated solution for handling recurring payments directly on your site. If you’re still interested in exploring this option, you can take a look at this guide on how to set up Chargebee, but for most WordPress users, WPForms is the more streamlined choice.
Can you process payments on WordPress?
Yes, to process payments on WordPress, you can use plugins like WooCommerce, WPForms, or WP Simple Pay. These plugins support major payment gateways, providing a secure way to handle transactions directly on your site.
What is the best WordPress plugin for monthly payments?
For monthly payments, the best WordPress plugin is subjective and depends on your specific needs. WPForms and WP Simple Pay are excellent for straightforward payment setups.
For more complex subscription models, WooCommerce Subscriptions is a powerful option, offering flexibility and extensive features for managing recurring payments.
Next, Grow Your Online Store
While we’ve used Stripe in this example, you can easily set up recurring payments by setting up a PayPal WordPress form. If you decide to upgrade to a full eCommerce store, this article on how to start an online store will be super helpful.
Finally, if you want to accept recurring donations for your charity, be sure to check out all the ways WPForms can help your nonprofit, including the WPForms nonprofit discount and tips for increasing recurring donations.
Create Your Recurring Payment Form Now
Ready to build your form? Get started today with the easiest WordPress form builder plugin. WPForms Pro includes the Stripe addon and offers a 14-day money-back guarantee.
If this article helped you out, please follow us on Facebook and Twitter for more free WordPress tutorials and guides.




I purchased WP Forms Pro to create a membership application form for a non-profit association. There are several classes of membership, each with unique pricing and offered in a choice of annual (one-time) or monthly (recurring) payment plans. I have used conditional logic to achieve the relevant pricing total based on the user’s selections. Now I need the payment integration. We want to use PayPal, not Stripe. The tutorial here only shows how to do it with the Stripe add-on. is there a way to do it with PayPal instead? Thanks.
Hey Rene- Could you please try to integrate Paypal addon on your site referring to this guide?
If you have any questions or need help, please feel free to get in touch with our team.
Thanks! 🙂
I am looking for a plugin which does
take subscriptions with recurring payments
restrict content
payments should be multi currency. Dollars, Euros, Rupees etc. based on country they are living in.
Please help me achieve this.
Thanks
Hi Prasanna! Our forms would be able to process recurring payments, but what currency is charged to your customers would be dependent upon your payment processing (PayPal/Stripe/Authorize.Net) account’s settings. We do not have any features for restricting content. From what you’ve described it sounds like you’re looking for a full featured membership type of plugin such as Memberpress.
I hope this helps to clarify 🙂 If you have any further questions, please submit a support ticket if you have an active WPForms license.
If you don’t have an active license, we provide limited complimentary support in the WPForms Lite WordPress.org support forum.
How do I add the option to make it either a monthly or annual recurring donation?
Hi there– Currently, we do not have a built-in way to let users select the recurring payments with the annual and monthly options. I do agree it would be super helpful, though. I’ve made a note of the feature request and we’ll keep it on our radar as we plan out our roadmap for the future.
Thanks!
Thanks. So is there a work around for this through some sort of conditional logic? Such as ask “Choose: Annual or Monthly or Non-recurring” And if Monthly is selected a new form is show? Any other creative ways? Thanks!
The best workaround at the moment would be to have one form set up to let users select their monthly recurring period and another form for the annual recurring period. Then after they submit the form to select their recurring period, the user would then be redirected to the form with Stripe enabled for that recurring period.
In case it helps, here’s our guide on setting up conditional redirects with more details.
Hope this helps!
I’ve built just about everything with these forms, including full membership sites (with a little php functions help on page access permissions). There is almost always a work around. I have this same problem and the work around was to have the user complete the main form and then then redirect to a monthly, twice a year, or annual payment page based on their selection. Change the submit button to “Next” or “On To Payment” or whatever and it loads like it’s just the next step from the user’s perspective. Con: You have to check that they submitted both the registration and payment, but honestly I think we all check that we got the payment anyway, so it doesn’t really add that much work.
Hey Gordon- Thank you so much for sharing your workaround and feedback on it!
We appreciate it 🙂
İs there any option to let user knows end date for this recurring payments….i mean there should be an option when end date of recurring payments should be.
Hi Aqib- Currently, we do not have the option to notify the end date of the recurring payments. I’ve made a note of the feature request and we’ll keep it on our radar as we plan out our roadmap for the future.
Thanks!
can we add end date in payment form i want to create monthly recurring form for donation i want to give end date to visitor he can select the ending month of a payment. Please help me out
Hi Imran! I apologize, but currently it isn’t possible to set an “end date” for when the monthly recurring payments would stop. You would need to manually terminate the recurring payment from your Stripe account. I do agree it would be super helpful, though. I’ve made a note of the feature request and we’ll keep it on our radar as we plan out our roadmap for the future.
I hope this helps to clarify 🙂 If you have any further questions about this, please contact us if you have an active subscription. If you do not, don’t hesitate to drop us some questions in our support forums.
Don’t suppose this is possible as of today March 4th, 2022? I would really like to be able to set up installment plans of 2-4 equal payments using WPForms and Square as my payment processor.
Hey Cody, I apologize this is not possible at the moment. Unfortunately, we don’t have an ETA on when this feature will be implemented. However, I’ve noted your interest in this feature and added your email to our list to receive updates about this feature.
Thanks!
if i want first payment amount different than recurring payment than it is possible?
for example:
first time 99 USD then after 199 USD for each month.
is it possible with this plugin?
Hi Pm. thanks for reaching out to us.
Currently, we do not have a built-in way to allow users to pay a different amount on recurring payments. I do agree it would be super helpful, though. I’ve made a note of the feature request and we’ll keep it on our radar as we plan out our roadmap for the future.
Thanks and have a good one!
Mike has this been added yet for stripe?
Hey Will – I am sorry that this has not been implemented yet. However, I’ve made a note of the feature request and we’ll keep it on our radar as we plan out our roadmap for the future.
Thanks and have a good one!
Does anything on the “Roadmap for the future” actually get implemented? It seems like an automated response when the feature isn’t available.
I also, like many of these comments need a way to “end” payments or set up an installment/payment plan that is limited to only 2, 3, or 4 equal payments and that’s it (no continued monthly or yearly charges).
This article mentions “Installment/Payment” plans at the top but it is misleading as this isn’t possible.
Can this solution be custom coded by a developer? Does WP Forms allow for that?
Hey Cody, I apologize as we don’t have an ETA regarding our feature request implementation. Please know that we have it marked as a Feature request already and our concerned team does consider the feature reqquests based on various criteria to introduce a feature request.
For custom installment payment collection, you’ll need to integrate it using custom codes, we suggest using codeable or WPBuff.
I hope this helps!
Is there any other payment integration which can process recurring payments excluding stripe. We had some issues with stripe where some one time transactions we charged as recurring and they weren’t helpful to resolve it.
I wish I could do recurring payments with Paypal or Square
Hey Sai – we apologize for the trouble. Yes, with the Aurthorize.net addon which is available with Elite license level, you can be able to receive recurring payment as outlined in our great guide.
I hope this helps!
If we wanted to track or add recurring subscription members and bring their basic info over mailchimp is there a way to configure that?
Hey Larry – If you’re looking to transfer the data of members opting for subscription, you should be able to map the details like Name and email address with our Mailchimp addon. However, if in case you have any other questions or face any issues, please drop us a line in support so we can assist.
If you have a WPForms license, you have access to our email support, so please submit a support ticket.
Otherwise, we provide limited complimentary support in the WPForms Lite WordPress.org support forum.
Thanks 🙂
How do I cancel or edit a customer’s recurring payment??
Hey Natasha, I am sorry we don’t have an inbuilt feature within WPForms to cancel a recurring payment and as a workaround is to manually cancel the purchaser’s subscription after their last payment by removing memberships manually. To do so, please follow these steps.
Having said that, in order to make sure we answer your question as thoroughly as possible and avoid any confusion, could you please contact our team?
If you have a WPForms license, you have access to our email support, so please submit a support ticket. Otherwise, we provide limited complimentary support in the WPForms Lite WordPress.org support forum.
Thanks!
I think this is a functionality that is desperately needed.
Hey Josh, I am sorry that this has not been implemented yet. However, I’ve made a note of the feature request and we’ll keep it on our radar as we plan out our roadmap for the future.
Thanks and have a good one!
can you modify the plugin to accept by-weekly payments on a recurring basis? Currently it’s only has weekly, monthly, etc.
Hello Cristian,
Currently, we don’t have the feature to accept by-weekly recurring payments. I do agree it would be super helpful, and I’ll add this to our feature request tracker so that it’s on the radar of our developers.
To collect installment payments with specific customization requirements, you can integrate them by using custom codes. We recommend using services such as Codeable or WPBuff to assist with this integration.
Has there been any movement (now 2 years since my last comment) on allow customers to choose between a monthly or annual recurring option without being redirected to a new form?
Hey Ernest – I apologize for the delay, but the option to let customers choose between monthly or annual recurring payment is on the radar of our developers. While we’re unable to share an ETA, I’d suggest you to keep an eye on our changelog for product related announcements.
Hi
I would like to create a payment form where user should be able to choose between single or recurring payments with stripe payments on the same form. Also user should be able to choose number of payments for recurring.
Is it possible to do it with wpforms
Hi Taposh – You can surely do that by following this doc to choose single or recurring payments.
For recurring cycle, instead of using Stripe, you can check our PayPal Commerce addon as that has recurring cycle feature as outlined here. Recurring cycle for Stripe is a feature request and I will add a vote on be half of you for that feature.
Hope this helps. Thanks!