
AI Summary
Creating a booking form on your site can save you a ton of time, and it’s a great way to make it easy for customers to schedule appointments or services.
Whether you operate a salon, consultancy firm, or rental service, a straightforward booking form guarantees that everything stays organized without the back-and-forth annoyance of emails.
In this guide, I’ll walk you through how to set up a WordPress booking form using WPForms, a beginner-friendly plugin that makes the whole process really simple.
Make Your Appointment Booking Form Now 📅
How to Create a Booking Form in WordPress
Here’s a video that shows you the whole process of adding a booking form to WordPress using WPForms.
If you’d prefer to read the instructions, you can follow the steps below to create a booking form using WPForms!
- 1. Install and Activate the WPForms Plugin
- 2. Create an Appointment Booking Form (With a Template)
- 3. Configure Your Appointment Booking Form’s Settings
- 4. Customize the Notifications & Confirmations Settings
- 5. Add Your Appointment Booking Form to Your Website
- Bonus Tip: Send WPForms Entries to Google Calendar
- FAQs about Creating a WordPress Booking Form
1. Install and Activate the WPForms Plugin
As the world’s best form builder, WPForms comes with many features and functionalities that can help you manage and organize your business online.
This includes the ability to create appointment booking forms, reservation forms, and even calculator forms to attract new leads.

So, the first thing you’ll need to do to start taking booking requests online is install and activate the WPForms plugin. For more details, see this step-by-step guide on how to install a plugin in WordPress.
Make Your Appointment Booking Form Now 📅
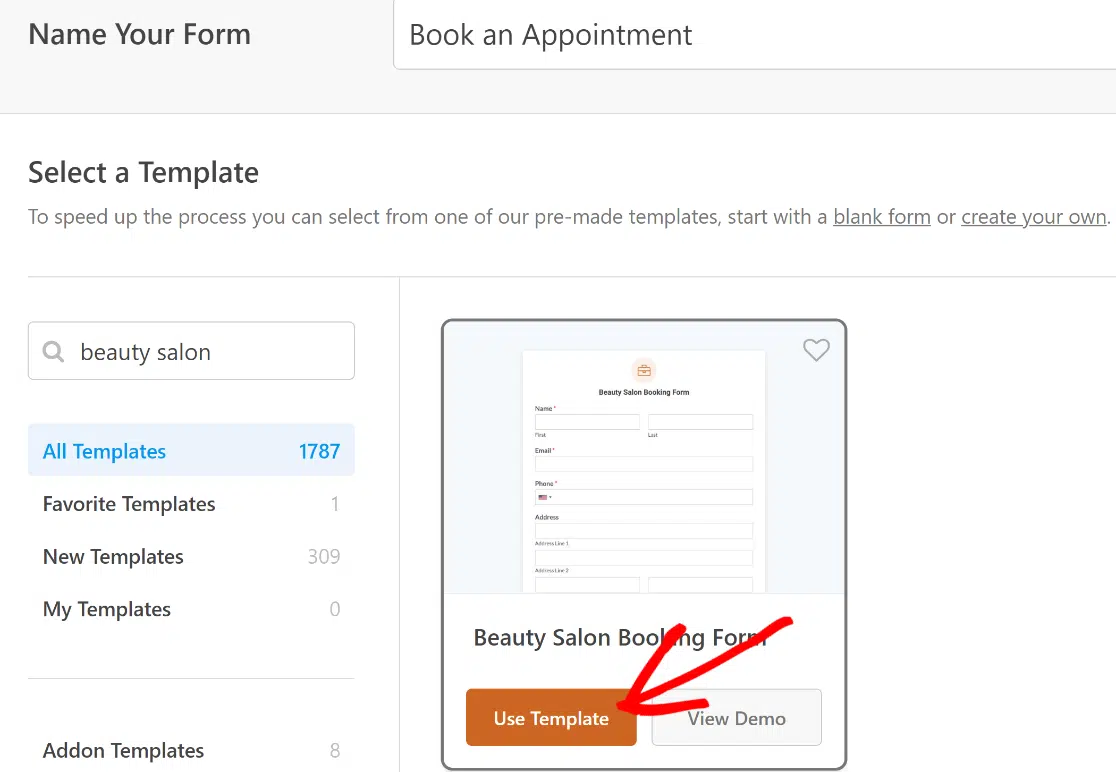
2. Create an Appointment Booking Form (With a Template)
Next, you’ll need to create a form inside your WordPress appointment plugin. To get started quickly, you can use one of our 2,100+ form templates.
There are multiple WordPress booking and reservation form templates to choose from, even veterinarian patient intake forms. You can also book virtual appointments with WPForms. For example, PushEngage uses WPForms to enable customers to schedule a software demo. For this tutorial, we’ll use the Beauty Salon Booking Form template.
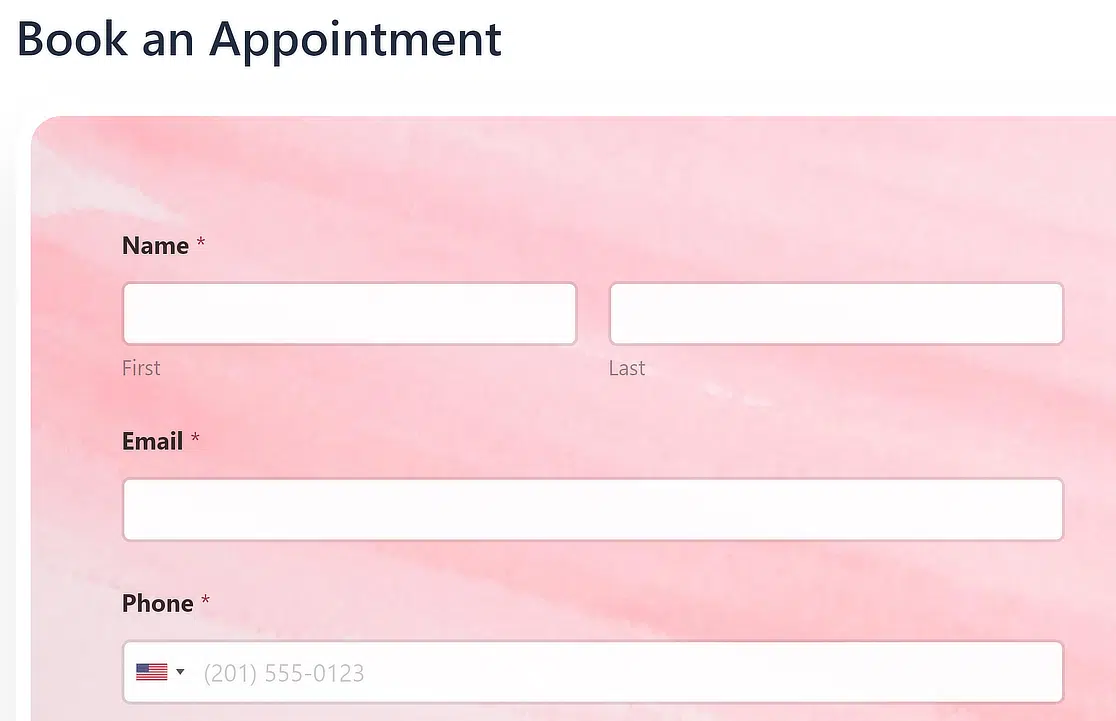
This template includes the following default form fields to gather personal details:
- Name
- Phone
- Address
- Date of Birth
- Checkboxes (Treatments you’d like to book)
- Date / Time
- Comment or Message
If you need more contact information or other personal information, you can add additional custom fields to your form by dragging them from the left-hand panel to the right-hand panel.
You can also remove any fields from the template that you don’t want by clicking the trash can icon. It’s completely customizable.

Let’s check the Date/Time field labeled “Preferred appointment date and time” in this template. Click on it to open the Field Options on the left-hand pane.
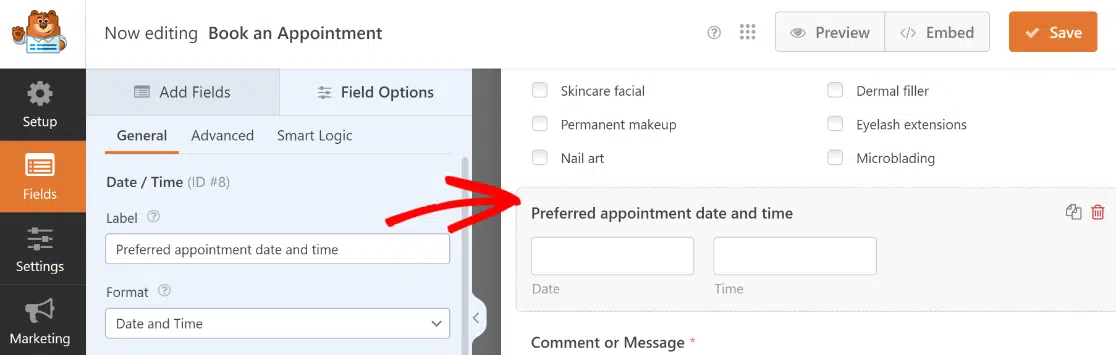
After that, go to the Advanced tab. Here, you can select the days of the week when you’re open for new appointments.
Plus, the Disable Past Dates toggle is already clicked, which is convenient because clients should only be able to select future dates for appointments.
You can also limit hours to ensure people only book appointments at times that match your availability.

Read our full guide on how to make a WordPress form with a datepicker if you need more help.
You can also click on a form field and drag it to rearrange the order on your appointment booking form. When all your form fields are customized to your liking, click Save.
Make Your Appointment Booking Form Now 📅
3. Configure Your Appointment Booking Form’s Settings
There are several settings to configure when creating a client booking form in WordPress. We’ll start with the general settings first. To start, go to Settings » General.

Here you can configure the following settings:
- Form Name — Change the name of your form here if you’d like.
- Form Description — Give your form a description.
- Tags — Add tags to organize your site’s forms.
- Submit Button Text — Customize the copy on the submit button.
- Submit Button Processing Text — Change the text that will be visible while your form is being submitted.
And you can also customize these advanced settings:
- Form CSS Classes — Add custom CSS to your form.
- Submit Button CSS Class — Add CSS to your submit button.
- Enable Prefill by URL — You can use this setting to auto-fill some fields in your form.
- Enable AJAX form submission — Enable AJAX settings with no page reload.
- Disable storing entry information in WordPress — You can disable the storing of entry information and user details, such as IP addresses and user agents, in an effort to comply with GDPR requirements. Check out our step-by-step instructions on how to add a GDPR agreement field to your form.
Once you finish setting up all of these options, move down to the Spam Protection and Security settings.

Here you can:
- Enable anti-spam protection — Stop contact form spam with the WPForms anti-spam token. The anti-spam setting is automatically enabled on all new forms.
- Enable Akismet anti-spam protection — If you use the Akismet plugin, you can connect it to your form to block spam submissions.
- Enable country filter — Block submissions from specified countries.
- Enable keyword filter — Prevent entries containing certain words or phrases.
Click Save.
4. Customize the Notifications & Confirmations Settings
All WPForms templates are configured to send form notifications to the admin by default.
Notifications are really handy to have in a booking form because you’ll know about new appointments as soon as a client completes a booking.
If you want to change anything about these notifications, you can simply go to Settings » Notifications inside the form builder.

And while you’re at it, how about setting up a second notification for your clients to let them know their appointment is confirmed?
With WPForms, it’s easy to create multiple notifications for site admins, different members of your team, and customers.
Next, let’s see how to set up a simple form confirmation in WPForms so you can customize the message site visitors will see when they book an appointment on your website.
To start, click on the Confirmations tab in the form editor under Settings.

You can choose different confirmation types. In the example above, I’ve used Message type. Once selected, simply customize the confirmation message to your liking and click Save when you’re done.
For help with other confirmation types, see our documentation on setting up form confirmations.
Also Read: Appointment Reminder Templates for Email and SMS
5. Add Your Appointment Booking Form to Your Website
After you’ve created your client booking form, you need to add it to your WordPress website.
WPForms allows you to add your forms to many locations on your website, including your blog posts, pages, and even sidebar widgets.
Let’s take a look at the most common page embed option. To start, click on the Embed button at the top of the form builder.

After that select the Create New Page button to create a new form page.

At this point, you’ll need to give a name for the page where you want to embed your booking form. Once you’ve entered a name, click on Let’s Go.

As you click, the WordPress block editor will open where you’ll find your form ready for publication.
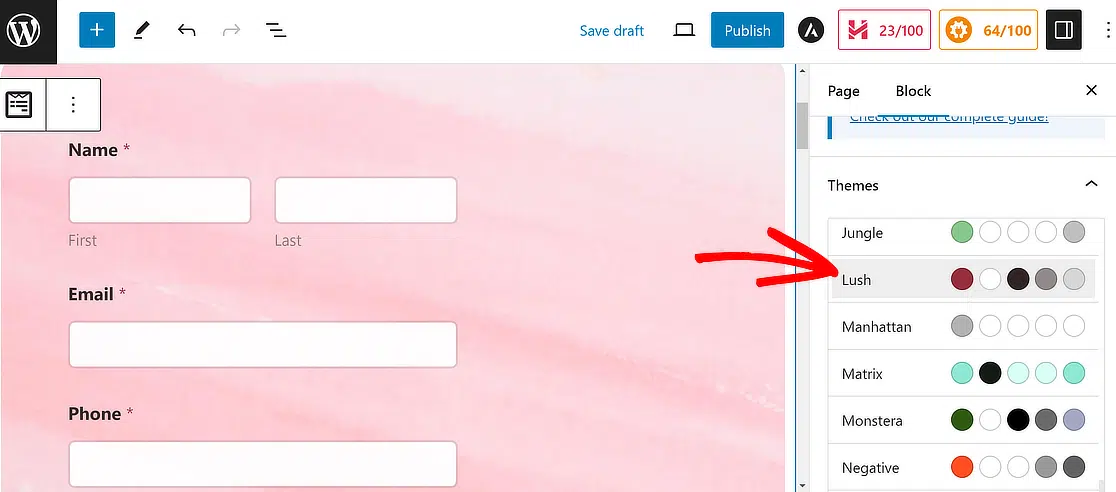
Before you go ahead and publish, feel free to try out a theme for this form or add any custom styling as you see fit.
You can access form themes and extra styling options by clicking on the area around the embedded form. Then, scroll down to the Themes section on the right-hand pane and select one of the many unique WPForms themes available.
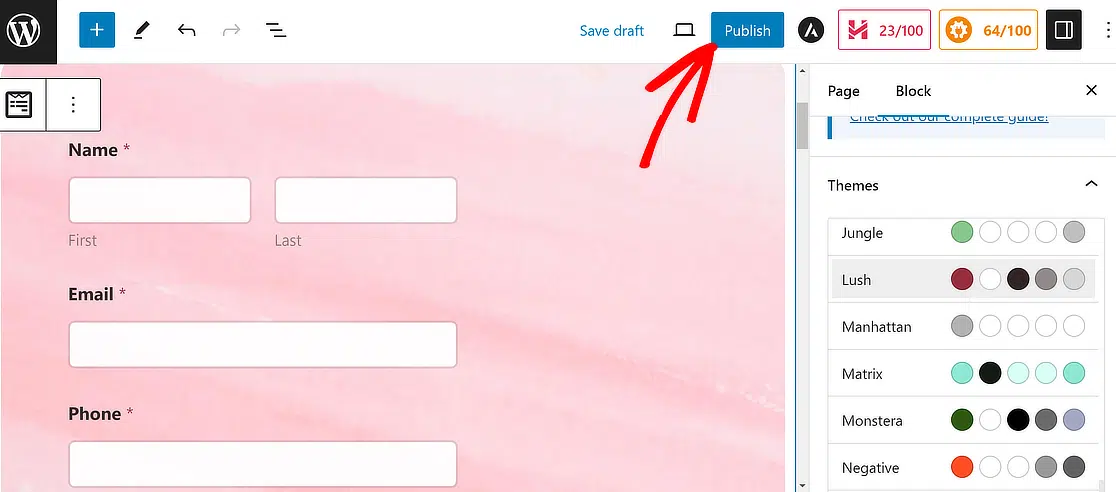
When you’re done making changes, go ahead and press the Publish button at the top.
And there you have it! You now know how to accept appointments online and create a WordPress booking form that fits your business needs.
This would be a good time to visit your form page and check it out.
Before you move on, I want to share an extra tip that could make things appointment management much more convenient for you.
Bonus Tip: Send WPForms Entries to Google Calendar
To make managing your client appointments much easier, you may want to consider syncing your WordPress appointment plugin to Google Calendar.
That way, all booking info is automatically sent to your Google Calendar. It saves you the hassle of having to manually enter each client appointment booked through your website.

To do this, check out our tutorial on sending WPForms entries to Google Calendar.
Want to let users keep track of the appointment? Be sure to read about how to include an Add to Calendar option to your WordPress forms.
Make Your Appointment Booking Form Now 📅
FAQs about Creating a WordPress Booking Form
Looking for answers to your questions? Check out some of the most frequently asked questions we receive about WordPress booking forms:
How do I create a booking form in WordPress?
To make a booking form in WordPress, one easy way is by using the WPForms plugin. First, install WPForms and activate it.
Then, create a new form and select a booking form template or start from scratch. Add the fields you need, such as name, email, date, and time options.
Customize it to fit your needs, then save and embed the form on your desired page using a shortcode. And that’s all there’s to it!
Can you create a booking system with WordPress?
Yes, you can set up a complete booking system on your WordPress site. By utilizing plugins like WPForms, you can create detailed booking forms.
For a more comprehensive system, consider using additional plugins designed specifically for bookings and reservations.
These tools allow you to manage appointments, availability, and even payments directly within your WordPress site, making it versatile for various business needs.
Does WordPress have a booking plugin?
WordPress offers several booking plugins to simplify appointment and reservation management.
These plugins provide you with the tools to create booking forms, calendars, and scheduling systems directly on your website.
Users can select dates, times, and services, enhancing the overall user experience.
What is the best free booking plugin for WordPress?
Among the free options, WPForms Lite stands out as a highly versatile plugin, not only for creating simple contact forms but also for basic booking forms. Its drag-and-drop builder makes form creation accessible to all skill levels.
For businesses looking for more advanced booking features, it may be worthwhile to explore the premium version of WPForms which offers a wider range of functionalities specific to booking and appointment scheduling needs.
Next, Accept Payments When Clients Book Their Appointments Online
Want to accept payments from your clients at the same time they submit their booking request form? Check out our post on Stripe vs Paypal to decide which one will work best for you. We also integrate with Square and Authorize.Net.
Make Your Appointment Booking Form Now! 🙂
Ready to build your form? Get started today with the easiest WordPress form builder plugin. WPForms Pro includes lots of free templates and offers a 14-day money-back guarantee.
If this article helped you out, please follow us on Facebook and Twitter for more free WordPress tutorials and guides.


I will like the user to be able to see a preview of the form submitted and print it. Also that the preview form should have a distinct form no
Hi Olawole,
Sure you can easily view and print entries. For full details, here’s out tutorial on printing entries.
I hope this helps! 🙂
Do you have a form that allows a customer to attach a photo to the form?
Hi Kelly,
We sure do! To do this, you’d just need to add a File Upload field to any form (this is possible with any of our paid licenses). For more details, here’s our tutorial on allowing users to submit images.
I hope this helps! If you have any additional questions, please get in touch and we’d be happy to help 🙂
Do you have the ability to hide certain days of the week or times? Example: business isn’t open on Saturday or Sunday. Could those days be hidden? If yes, how would I go about that? Same example for times as well. If they are only open until 6:00 pm, for example, how could I hide time slots after 6:00 pm?
Hi Brian,
We don’t have a built in way to do this, but it can be accomplished with some custom code (you can find details here for Date & Time picker).
If you have additional questions, please get in touch and we’d be happy to assist 🙂
Hi,
You reference these pages on your comment however both are invalid links. Can you update please?
[URL Removed]
Thanks, Simon
Hey Simon- Thanks for the heads up here! We have updated the valid links now 🙂
Have a good one 🙂
Hi SYED
WPForms gets a lot of positive reviews so I tried out the Lite version for evaluation. There’s hardly anything there and it’s basically a marketing tool to get you to upgrade to a paid version. My boss won’t pay for anything unless I’ve evaluated it, so I’ll have to go elswhere.
Hi Jeremy,
I’m sorry to hear you weren’t satisfied with the free version of WPForms. If you have any questions or concerns you’d like to address, please definitely let us know.
Thanks!
Hi,
first of all, want to thank you for the informative article about the product!
I need a form that witch after submitting makes the product inactive on the field “select”. Can we do that with your wpforms?
Thank you in advance,
Dimitrios
Hi Dimitrios,
We don’t have a way to do this right now, but I’ve made a note on our feature request list so we can keep it on our radar! Thanks for the suggestion 🙂
Hi there, is there any way to hide days that are already booked in the WP forms calendar?
thanks
Hi Marnix,
We don’t have a way to do this right now, but I’ve made a note on our feature request list so we can keep it on our radar! Thanks for the suggestion 🙂
I would also love this feature!
Hi Joy, I apologize we can’t provide what you are looking for at the moment.
However, I’ve noted your interest in this feature and added your email to our list to receive updates about this feature.
Thanks!
This is straightforward enough, but I don’t see a way to prevent something like double bookings since it just adds to the Google Cal but doesn’t block out dates/times based on availability. Is there a way to check the calendar to make sure no one has already scheduled that time slot?
Hi Andrew,
Unfortunately we don’t have a way to do this right now, but I’ve made a note on our feature request list so we can keep it on our radar! Thanks for the suggestion 🙂
I would love to see this feature as well!
I’d love to see this! Any update?
Hey Elizabeth- Currently, we do not have the inbuilt inventory/ slot management feature. We’ve added your vote to the feature request list.
Appreciate your interest here! Thanks, and have a good one 🙂
Exactly what I am looking for, there are many advanced booking apps, but I just need a simple form with 4 appointments slots. Slot would disappear if a client books it. Let me know if you have any updates.
Hey John,
We currently do not have an inbuilt slot management feature available. I have added your vote to the feature request list for future enhancements.
Appreciate your interest here! Thanks, and have a good one 🙂
This is a completely useless software if it doesn’t prevent double booking…
Hey Nikki – We currently don’t have the feature to prevent double booking in the plugin. Our developers are working to have this feature, and while I’m unable to give an ETA, we hope to release an update soon in near future.
Hi there , thanks for the nice plugin.
We also need to block dates/times based on availability. We were able to achieve that with other plugin. but we wold love to have this in wpforms. Do you have any updates on this metter? or is in your roadmap ?
Thanks agains for the nice job
Hi Lucas!
Currently, we don’t have the time ocupation feature in WPForms. I do agree it would be super helpful, though. I’ve made a note of the feature request and we’ll keep it on our radar as we plan out our roadmap for the future.
Have a good one 🙂
This feature looks awesome, but I don’t want the submissions sent directly to my Google Calendar.
Is it possible to attach a link/button on the form submission that I can click to add it to Google calendar IF I approve the request from the customer?
Hi Jørn, thanks for your question!
You should be able to achieve this by adding a custom link to the Notification email sent to you under the form Notification settings.
The link should contain all the needed parameters to be able to generate a calendar event, such as:
text
dates
details
location
And you can take the values for those parameters from the form submission through the fields’ Smart tags.
In case it helps, we have a great tutorial on how to use Smart tags in the form notifications.
I hope this helps!
Have a good one 🙂
Please when a customer books with the form I created, where would I receive the email?? Is it on the WPForm in my WordPress or on my Google email . Thanks
Hi Lawrence!
Yes, you can absolutely set up automatic form notification emails, for both yourself and anyone else you like (including the person who filled out the form). We have a great tutorial on that here
The notification email will be sent to the email address chosen in the notification settings.
I hope this helps.
Have a good one 🙂
Hello, I am using you form for taking online order and it is working well.
I would like to add the option of selecting a collection day but want to allow a 24 hour gap to prepare orders before collection. Is there a way of block off the next day ? For example orders placed on Monday cannot be collected on Tuesday the user has to select from Wednesday onwards.
Many thanks in advance.
Hey Henry – I am afraid there is no built-in option like this but it should be doable with some custom code. I would suggest reaching out to our support team for this.
If you have a WPForms license, you have access to our email support, so please submit a support ticket.
Otherwise, we provide limited complimentary support in the WPForms Lite WordPress.org support forum.
Thanks 🙂
Are there any plans to add Zoom integration with the Appointment Booking Form? If so – would this be implemented with OAuth tokens or just API key? Thanks!
Hey Alexis – That sounds like an interesting integration to have! I do agree it would be super helpful, and we’ll keep it on our radar as we plan out our roadmap in the future.
I am afraid I can’t provide any ETA or details at the moment but I will make sure to suggest to the dev team for future consideration.
Have a good one 🙂
If you integrate with Google Calendar, do the available dates and times in the form date picker update to reflect when they are no longer available for booking or does this have to be done manually?
Hey Matt – I am afraid this feature is currently not available. I have gone ahead and added a feature request for you so that the dev team can consider this in future.
Thanks for the suggestion!
Is there a way to limit the # of people who could book per day?
Hi Tara! We don’t have a specific feature for limiting the # of people who can book per day, but there is a way you could achieve this with our current features.
That would be to basically to have a copy of your form per day, and each of those forms would have a limit on the number of entries it can receive set via our Forms Locker addon. This addon is available with our Pro level (or higher) license, and you can find more details about this specific feature here.
So essentially you would have a copy of your form for (in example) Sept 25th, then a new copy for Sept 26th, and so on. It would mean though you’d need to switch which form is being embedded on your booking page each day, but it would be an easy task to do, just by deleting the block and then embedding the next days copy of the form 🙂
I hope this helps to clarify 🙂 If you have any further questions about this, please contact us if you have an active subscription. If you do not, don’t hesitate to drop us some questions in our support forums.
Hello, We have WP Pro. I would like to know how can I have the option which shows all the calendar and shows date and time only available. Thanks
Hi Eric, I apologize currently we don’t have a native feature to achieve what you are looking for at the moment.
I’ve noted your interest in this feature and added your email to our list to receive updates about this feature.
Thanks and have a good one!
Hello,
The problem with your plugin is that appointment booking forms often require not only departure dates but also return dates too.
And if you insert two Date / Time fields in the form, then the return field allows you to select a date earlier than can be selected in the departure field.
So, the departure date can be selected March 2023 and the return date – January 2023, which is absurd. ‘Disable past dates’ option does not solve this issue in November 2022.
I didn’t find any hooks or snippets on your site to help solve this problem.
Am I wrong?
Hi David,
Did you try to enable the date range as shown in this dev doc using the custom code?
Hope this helps!
Hello! How can I have the form automatically remove a checkbox option from the form after it has been chosen and submitted? I can’t seem to find that option. Is this not included in WPForms? We’re trying to avoid multiple people choosing the same option.
Hi there,
Currently, we do not have a stock inventory management to remove the choices once they are selected. I have gone ahead and added your vote to consider this as a feature request.
Thanks,
Is it possible to book limited tables? So let the user choose “table x” which is available 3 times or “table y” which is available 2 times?
Hey Bas – We currently don’t have the feature to book limited tables in the specific format that you’re looking for. I do agree that it would be helpful, and I’ll add this into our feature request tracker. In the meantime, you can take a look at our Form Locker addon which offers you to limit the submissions.
Can this booking form integrate with Outlook calender?
Yes you can, Liz. With WPForms and our Zapier addon you’ll be able to connect your form with apps like Outlook.
This guide shows how to connect WPForms with Google Calendar. But you can follow the steps and choose Microsoft Outlook Calendar when creating your Zap.
Hope this helps. Thanks!
Is it possible to use this plugin to book workspaces, and then block the dates via a calendar?
Hi Nicola,
Yes, it’s possible to create a booking form for workspaces using WPForms. However, it doesn’t automatically block dates that have already been booked. You can limit availability using the Date/Time field settings to disable past dates and limit which days or hours can be selected. If you need to block specific dates or date ranges (for example, holidays or fully booked days), you can use a custom code snippet to disable them in the date picker.
If you’d like the dates to be blocked automatically once booked, that isn’t something WPForms handles on its own. For that functionality, we recommend using Sugar Calendar alongside WPForms. Sugar Calendar adds a full event management system to your site, so you can manage bookings on a calendar and prevent double-bookings.
Hope this helps!