AI Summary
Would you like to print form entries submitted by users? For many, having physical copies of form entries for administrative purposes is helpful.
In this tutorial, we’ll show you how to print entries in WPForms.

Printing Individual Entries
To access an individual entry, you’ll need to navigate to WPForms » Entries in the WordPress admin area. Then select the form you’d like to view its entries.

Next, in the Actions column, look for the View option and click on it.

This will bring you the individual entry page. In the Actions box on the right, you’ll see the Print option.

Once you’ve clicked on the Print option, you’ll be directed to a print preview page for the entry. Here, you can review the entry, and if you’d like to, you can choose compact printing options. Once you’re ready, click on the Print button.

Printing Multiple Entries
WPForms allows you to print multiple entries from the Entries preview page. To print more than one entry, tick the checkbox next to each entry you wish to add to the printout.

You can select all entries by ticking the checkbox next to the Name column.

After that, click the Bulk actions dropdown to open additional options.

Then click Print to proceed.

You’ll be directed to the print preview page. Here, you’ll see an overview of all the entries you selected.

You can optionally customize the entries preview before printing it out. When you’re ready, click the Print button to print your entries.

Clicking on this button will download a PDF with the entries you’ve selected.
Customizing Printing Options
When printing an entry or multiple entries, you might want to make it more compact or display additional fields. To get started, click the gear icon next to the Print button. This will allow you to view more printing options.

Next, we’ll show you 2 ways to make the entry more compact: hiding Empty Fields and Compact View.
Hiding Empty Fields
By default, fields that do not have user input are hidden. However, if the empty fields are showing and you’d like to hide them, you can disable the Empty Fields option.

Compact View
Another option to reduce the size of the entry is to click on the Compact View option on the right side of the page.

This option displays the entry content in two columns, allowing you to fit more information on a single page.
Note: If you’d like to set this as your default setting for printing entries, please refer to our developer documentation for detailed guidance.
Next, we’ll show you how to maintain your form’s layout while printing entries:
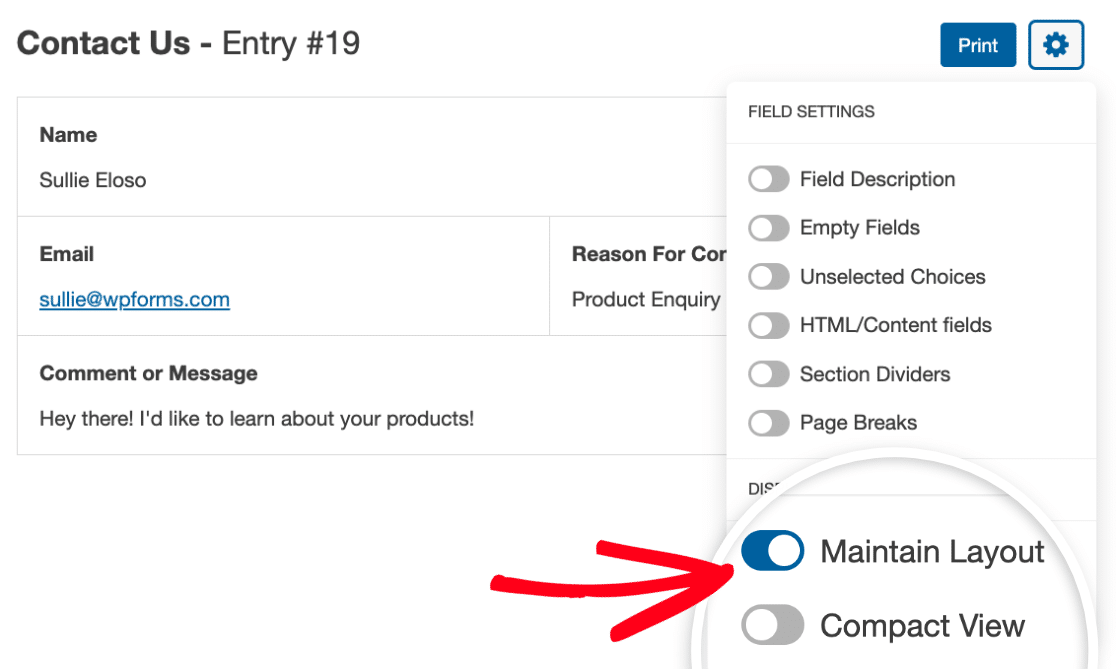
Maintain Layout
If you’d like to print your form entries with the same visual layout as seen on the frontend of your site, simply enable the Maintain Layout option. For example, if you’re using the Layout field to group your fields into different columns, enabling this option will display the fields using the same layout you set up in your form.
Now, we’ll show you how to include other available options while printing entries:
HTML/Content fields
HTML fields are hidden in the print preview page by default. If you’d like to include HTML and Content fields when printing entries, simply select the HTML/Content fields option.

Page Breaks
Page Breaks are hidden by default in the entry preview page. If you’d like to include them when printing your form entry, select the Page Breaks option.

Field Description
If you added descriptions to your form fields, they’d be hidden by default from your entry preview. To include them in your entry printout, enable the Field Description option.

Unselected Choices
By default, only the selected option in a Multiple Choice field is shown in the entry preview page. To show all options when printing entries, enable the Unselected Choices option.

Section Dividers
Section Dividers are also hidden by default in the entry preview page. To include them in your entry printout, select the Section Dividers option.

Once you are satisfied with how the individual entry looks on the print preview page, click the Print button to complete the process.

Note: For more advanced customization of your print styles, such as changing the colors of labels or backgrounds, be sure to check out our developer documentation for more information.
Frequently Asked Questions
These are answers to some of the top questions we see about printing form entries.
Can I automatically convert form entries to PDF and email them?
WPForms doesn’t currently have a built-in solution to automatically convert form entries to PDF and email them to users. However, with our Zapier integration, you can automate the process. Please see our tutorial to learn more about converting form entries to PDF and emailing them.
That’s it! You’ve seen how to print form entries from your WordPress admin area.
Next, would you like to save your entries as a CSV or XLSX? Be sure to check out our tutorial on how to export form entries.