AI Summary
Do you want to export the entries from your WordPress forms? Downloading an export file lets you view form entries in other programs, such as Excel or Google Sheets.
This tutorial will show you how to export form entries in WPForms.

Requirements: Exporting form entries requires a WPForms license. Check out our pricing page to learn which license level works for you.
Before you dive into the tutorial below, be sure you’ve installed WPForms, verified your license key, and collected at least one entry.
Exporting Multiple Form Entries
To export multiple entries at once, you’ll first need to go to WPForms » Tools and click on the Export tab. From there, click the Entries subtab.

Once you’re in the Entries subtab, use the dropdown to choose which form’s entries to export

By default, your entries export file will include all the fields in your form. Below the dropdown, you can uncheck any boxes for fields you want to exclude from your export file.

Including Payment Fields
If the form you’re exporting its entries is a payment form, you’ll likely see the Payment Fields section. This section shows all the payment fields you’ve included on your form.

By default, the Select All option is checked, but you can uncheck it and select the field(s) you’d like to include.
Including Additional Information in Your Export File
Next, you may select the checkbox(es) for any additional information you want to include in your export file.
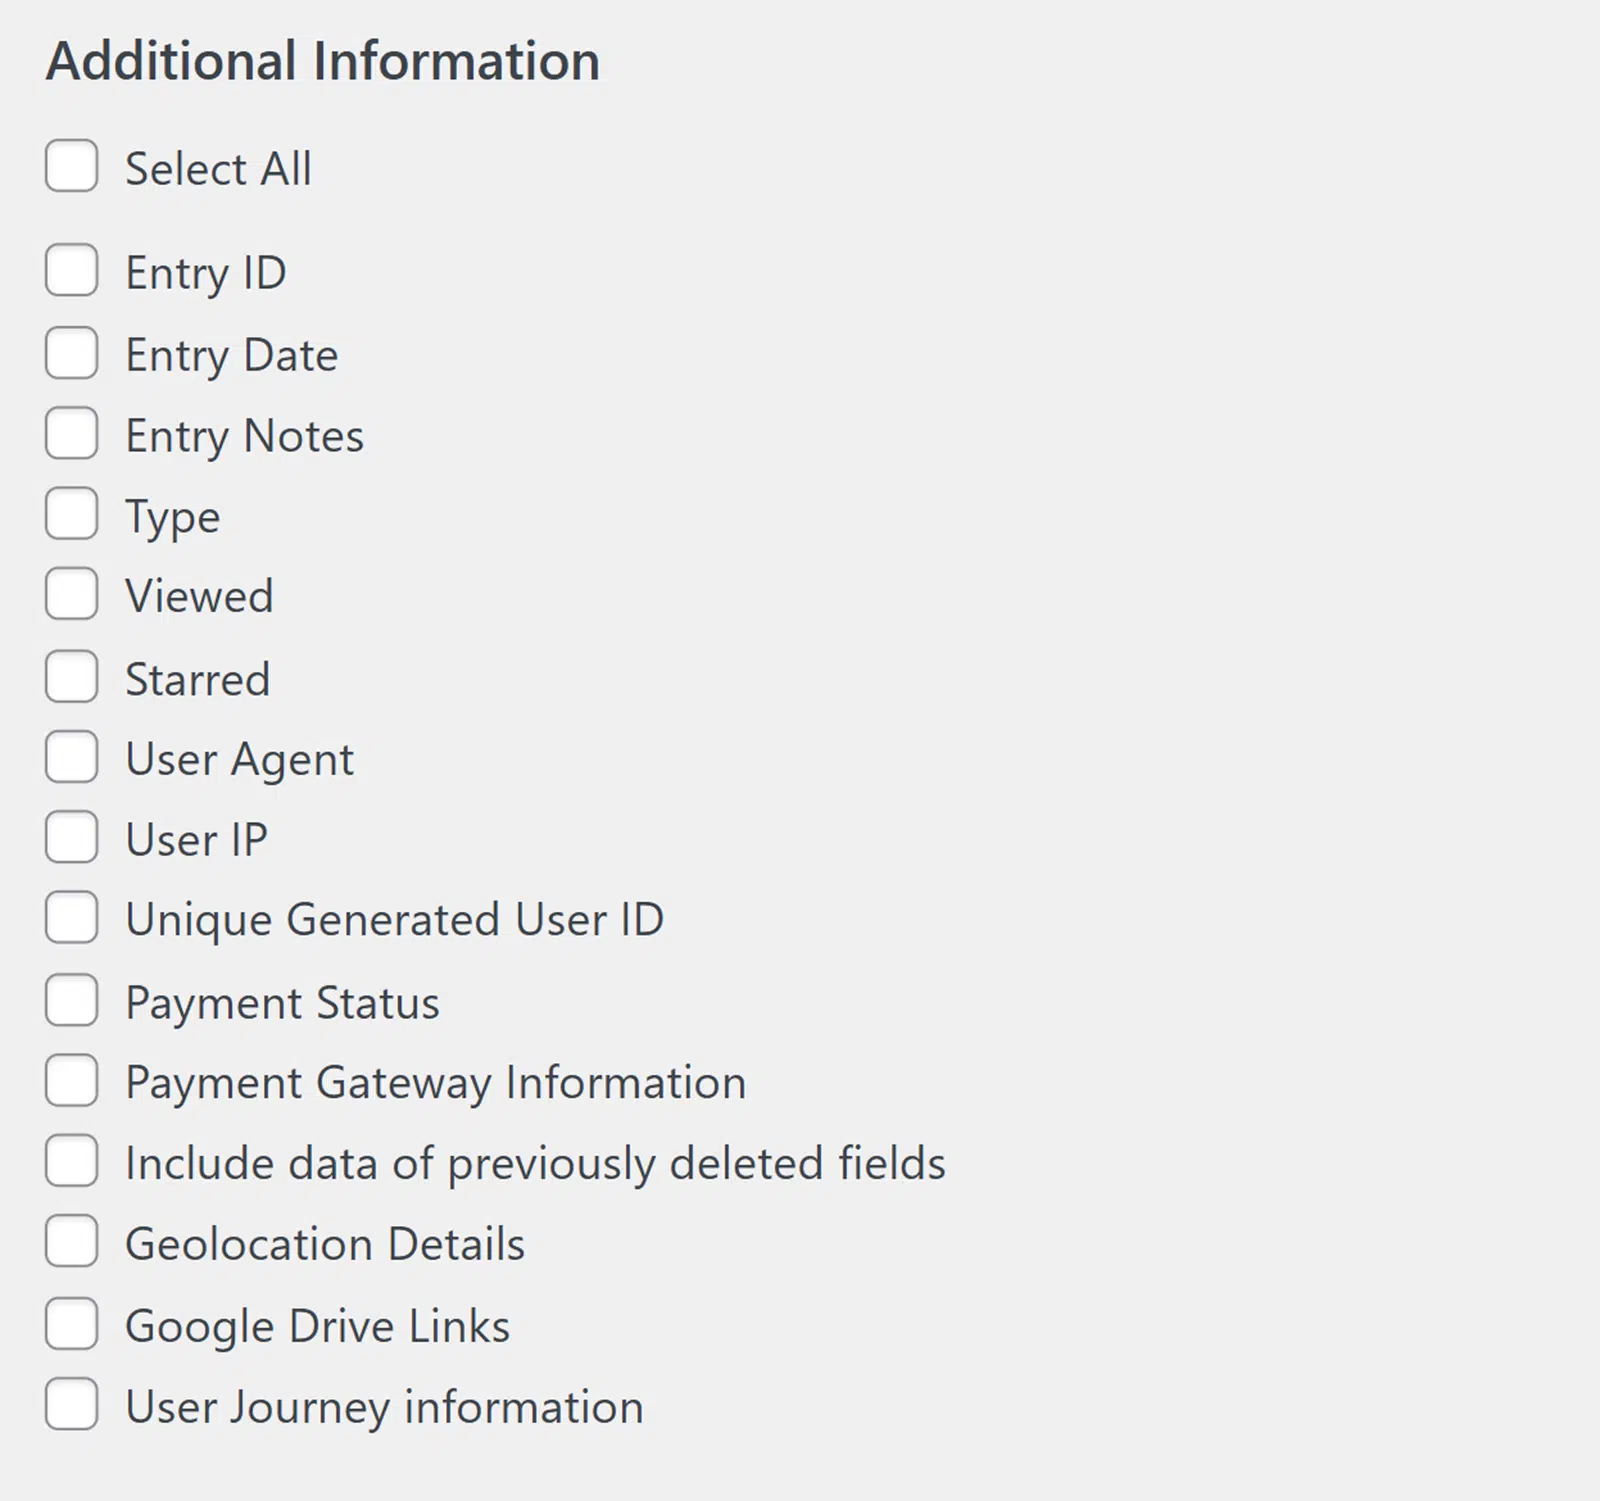
These options include:
- Entry ID: The unique number assigned to each entry.
- Entry Date: When the user submitted the entry.
- Entry Notes: Details you’ve manually added to individual entries. For more details, see our documentation on adding notes to form entries.
- Viewed: A status indicating whether you’ve previously opened the individual entry in your WordPress admin area. Unread entries are marked on the Entries page with a green circle.
- Starred: A status indicating whether you manually starred an individual entry.
- User Agent: Details on the browser used to submit the entry.
- User IP: The user’s IP address.
- Unique Generated User ID: A unique, random value assigned to each user who submits a form (regardless of whether or not they are logged in).
- Payment Status: Whether a payment submitted through your form is pending or completed. This data is only available if you’ve installed and activated the Stripe, Square, Authorize.Net, PayPal Standard, or PayPal Commerce addon and turned on payments for this form.
- Include data of previously deleted fields: Values for fields that you deleted at some point in the form’s history.
- Geolocation Details: General location information for the user who submitted the entry. This data is only available if you’ve installed and activated the Geolocation addon.
- Dropbox Links: The exported file will contain direct links to the files in the Dropbox account. This data is only available if you’ve installed and activated the Dropbox addon.
- Google Drive Links: Enable this option if you’d like to include direct links to files in your Google Drive account. This data is only available if you’ve installed and activated the Google Drive addon.
- User Journey information: The exported file will include the path visitors took through your site before submitting the form. This data is only available if you’ve installed and activated the User Journey addon.
Exporting Options
In the Export Options section, you can choose whether to format your entries as a Microsoft Excel .xlsx file by checking the box provided.

Leaving this box unchecked will format your entries as a CSV file.
If your form is using a multiple-choice field like Checkboxes, Multiple Choice, or Dropdown fields, you’ll likely see the Separate dynamic choices into individual columns option.

If you check this option, the export file will create individual columns for each dynamic choice option on your form. You’ll also see a warning about a possible file size increase if there are many options.

Customizing Your Entries Export File
There are other options you can select to restrict which entries you want to export. These options include Custom Date Range, Status, and the Search filter.
Custom Date Range
The Custom Date Range option lets you set start and end dates to determine which entries to include in your export file. WPForms will only export entries with submission dates falling within the specified range.

Status
The Status section will only show if you have a form that’s partially filled, abandoned, or marked as spam. It lets you export entries based on their status. Below, we’ve explained the available statuses.

- Published: This is the default state for entries submitted through your form.
- Partial: This status applies to forms that use the Save and Resume addon. If the user selects the option to save and resume the form submission at a later time, the entry will be marked as Partial.
- Spam: This status applies to forms with the Spam entry storage option enabled. If an entry is flagged as spam by one of our anti-spam tools, the entry will have the Spam status. See our viewing and managing spam entries guide for more details.
- Abandoned: This status applies to forms that use the Form Abandonment addon. If the user exits the page without submitting your form, it’ll have the Abandoned status.
By default, all statuses are selected, but you can unselect the one(s) you’d like to exclude from your export file.
Search
The Search fields enable you to select entries to export based on the contents of a specific field, the Entry ID, the contents of the Entry Notes, the user IP address, or the User Agent.
For example, you could use the Search fields to export only contact form entries with a message containing the word “help.”

Downloading Your Export File
Once you’ve decided which details you’d like to include in your export, go ahead and click the Download Export File button. The download should begin immediately.

By default, most browsers will save any downloaded files to your computer’s Downloads folder.
Exporting a Single Entry
Sometimes, you may only want to export a single entry. To do so, go to WPForms » Entries and select the name of the relevant form.

Then click the View link to open the page of the specific entry you wish to export.

In the right sidebar of the individual entry’s page, you’ll see a list of Actions you can apply to this entry. From this list, select Export (CSV) to download this entry in CSV form, or the Export (XLSX) option to download this entry in an Excel format.

Once you click one of these export options, the download should begin immediately.
Frequently Asked Questions
These are some of the top questions we receive about exporting form entries.
Can I import WPForms entries from another site?
Yes. Export the entries to a CSV file using this tool, then upload the CSV via the Entry Importer on the destination site. See our guide on importing form entries into WPForms for the full walkthrough.
Can I export my entries from WPForms Lite?
WPForms Lite currently does not enable users to store or export entries. However, you can set up form notification emails to send form submissions to your preferred email address.
With any paid WPForms license, you’ll be able to store and export future entries (i.e., entries created after you’ve installed your paid WPForms plugin).
Some of my entries’ characters come out garbled when I open the export file in Excel. How can I fix this?
In most cases, this is caused by special characters within the entry being improperly encoded in the CSV file. To fix this, be sure to use the Microsoft Excel (.xlsx) option in the export settings to ensure the correct file encoding.
Or, if you’d prefer to stick with a CSV file, be sure to use UTF-8 encoding when opening your file in Excel.
Can I disable multiple-column export for multiple-choice fields?
When exporting form entries with a multiple-choice field, each individual choice is exported as a separate column on the export file.
To disable this option, leave the Separate dynamic choices into individual columns option unchecked when exporting your entry.
If you can’t find the checkbox, you’ll need to add a custom filter to disable this option. To do so, add the code snippet below to your site.
add_filter( 'wpforms_pro_admin_entries_export_allow_multiple_input_field', '__return_false' );
Note: See our tutorial for a complete guide on adding custom PHP code to your site.
I received the following error when downloading my export file: “There were problems while preparing your export file. Please recheck export settings and try again. Unknown request.” How do I fix it?
If you see this error when attempting to export your form’s entries, please ensure you are using the latest version of WPForms. Then try exporting your form’s entries again.
If the problem persists, there may be a file permissions issue that is preventing WPForms from exporting your entries. Typically, this means that your user account does not have access to specific files or directories. This may be due to restricted or incorrect permissions.
You can quickly fix the issue for self-hosted WordPress sites by following this guide for fixing WordPress file and folder permissions.
If you do not have direct access to the server, please get in touch with your hosting provider to help fix this problem.
If the error persists after you’ve confirmed there is no file permissions issue and followed our troubleshooting tips, feel free to contact our support team for more help.
That’s it! Now you know how to use the Entries Export tool in WPForms.
Next, would you like to learn more about other tools available for form management? Be sure to check out our guide to form entries, where we’ve answered all the most common questions about form management options.