AI Summary
Would you like to automatically send files from your WordPress forms to Dropbox? With the WPForms Dropbox addon, you can seamlessly upload files from your form submissions directly to your Dropbox account without relying on third-party services.
This tutorial will show you how to install and set up the Dropbox addon with WPForms.
Requirements:
- You will need the Pro license level to access the Dropbox addon
- Ensure that you’ve installed the latest version of WPForms to meet the minimum required version for the Dropbox addon
Before you get started, be sure to install and activate WPForms on your WordPress site. You will also need to sign up for a Dropbox account if you don’t already have one.
Installing and Configuring the Dropbox Addon
Once the core WPForms plugin is in place and your license is verified, you’ll be able to quickly install and activate the Dropbox addon.
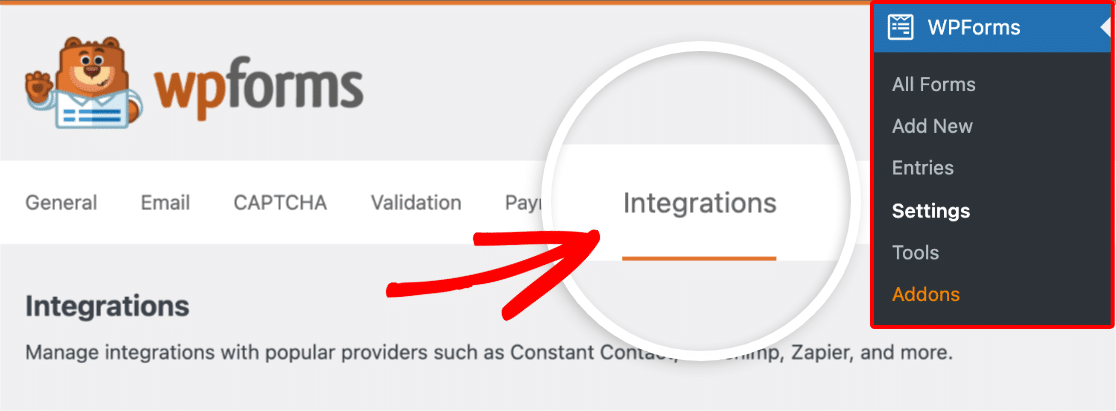
The next step is to integrate WPForms with your Dropbox account. To do this from the WordPress dashboard, you’ll need to go to WPForms » Settings and click on the Integrations tab.
Then, click on the Dropbox option to expand its settings. From here, click the Add New Account button.

This will open a login screen for Dropbox. You can either sign in using your email address by entering it and clicking Continue, or choose Continue with Google or Continue with Apple to sign in through those accounts.

After signing in, you’ll see a security notice from Dropbox. Click Continue to proceed with connecting WPForms.

Next, click Allow to grant WPForms access to your Dropbox account.

After granting permission, you’ll be redirected back to WPForms » Settings » Integrations, where you should see the green Connected status along with your connection details.

Adding a Dropbox Integration to Your Form
Now that you’ve successfully connected WPForms to your Dropbox account, it’s time to add a Dropbox integration to your form. To do this, you’ll need to create a new form or edit an existing one to open the form builder.
Once you’ve accessed the form builder, go to Settings » Dropbox and click the Add New Connection button.

Next, an overlay will appear where you can enter a connection nickname. Feel free to use any nickname you’d like, as this won’t be visible to your users. Once you’ve added a nickname, click the OK button.

After you add a connection nickname, additional settings will appear.
Configuring Connection Settings
First, use the Account dropdown to select the Dropbox account that you’ve connected in the first step.

Next, enter a Folder Name where you want your form files to be stored. By default, this field is prepopulated with your form name, but you can change this to whatever you’d like.
When files are uploaded, WPForms will automatically create this folder inside Apps/WPForms directory in your Dropbox account. A path preview will appear below the field showing the exact location where WPForms will create this folder in your Dropbox account.

Mapping File Upload Fields to Dropbox
Once you’ve configured the basic settings, you’ll need to set up where your files will be stored in Dropbox. You’ll see two important options in this section:
- File Upload Field: Choose a File Upload field from your form whose files you want to store in Dropbox. The dropdown displays all File Upload fields from your form, allowing you to map each field to a specific Dropbox location.
- Folder to Store Data: Select the folder within your Dropbox account where you want the files from the selected File Upload field to be stored. The dropdown shows your root storage folder (displayed using the name you entered in the Folder Name field above) along with any existing subfolders within it.
- To store files in a new subfolder, select – Create New Subfolder from the dropdown. A text input will appear where you can type the name for your new subfolder. You can also use Smart Tags to make the name dynamic — for example, use
{date format="Y"}to automatically sort uploads into a folder named after the current year, or{field_id="1"}to use a value the user entered in the form. - To create nested subfolders, separate each level with a forward slash. For example, entering
clients/sullie/2026will store files three levels deep inside your root folder. You can nest up to three levels deep.
- To store files in a new subfolder, select – Create New Subfolder from the dropdown. A text input will appear where you can type the name for your new subfolder. You can also use Smart Tags to make the name dynamic — for example, use

You can map multiple File Upload fields to different Dropbox subfolders by clicking the blue plus (+) button. This is particularly useful if you want to organize different types of uploads into separate folders.

Enabling Conditional Logic (Optional)
Conditional logic lets you automatically change certain aspects of your form depending on users’ selections or input.
As an example, we’ll show you how to use conditional logic to send files to Dropbox only when a user selects a specific option in your form.
To set this up, you’ll first need to add a Checkboxes field to your form. For our example, we’ll add a single choice and label it, “Store files securely in cloud storage?”

Next, go to Settings » Dropbox in the form builder and toggle on the Enable Conditional Logic option.

This will reveal several additional options. Then you’ll need to use the dropdowns that appear to set up your conditional logic rule. For our example, ours will read Process this connection if Store files securely in cloud storage? is checked.

Finally, be sure to save any changes and test your form before displaying it on your site.
Managing Local File Storage
After configuring your Dropbox connection, you can control how your uploaded files are stored. To do so, go to Settings » Dropbox and scroll down to the Advanced Section.
From there, you can enable this setting using the Delete Local Files After Upload option.

When this option is disabled, files uploaded through your form will be stored both on your WordPress site and in your Dropbox account.
You can access these files from WPForms » Entries, where you’ll have options to view them directly on your WordPress site or use the View in Dropbox link to access them in your Dropbox account.

If you enable the Delete Local Files After Upload option, files will be automatically removed from your WordPress site’s storage once they have been successfully uploaded to Dropbox and will only exist in your Dropbox account.
In this case, WPForms automatically updates file links in form entries and email notifications to point to the files in your Dropbox account.

Frequently Asked Questions
Below, we’ve covered some of the top questions we receive about integrating Dropbox with WPForms.
Can I create subfolders for organizing my files in Dropbox?
Yes. You can create subfolders in two ways: directly within WPForms, or manually in your Dropbox account.
- Option 1: Create a subfolder in WPForms
- In the form builder, go to Settings » Dropbox and find the Storage Location section. In the Folder to Store Data dropdown, select – Create New Subfolder. A text input will appear where you can type the subfolder name.
- Save the form. The subfolder will be created in your Dropbox account automatically when the first form entry is submitted.
- Option 2 — Create a subfolder manually in Dropbox
- Go to your Dropbox account and navigate to Apps/WPForms/[Folder Name], where
[Folder Name]matches the value in your WPForms Dropbox settings. Create a new subfolder inside this directory, then save your form. The subfolder will then appear as an option in the Folder to Store Data dropdown. - If you don’t see a newly created subfolder in the dropdown, save your form to refresh the list.
- Go to your Dropbox account and navigate to Apps/WPForms/[Folder Name], where
Can I upload multiple files to different folders in Dropbox?
Yes, you can map different File Upload fields to separate Dropbox folders. Simply click the plus (+) button in the Storage Location section to add another mapping, then select the appropriate File Upload field and destination folder for each.
What happens to file links in form entries and email notifications when local files are deleted?
When the Delete Local Files After Upload option is enabled, WPForms automatically updates file links in form entries and email notifications to point to the files in your Dropbox account, ensuring they remain accessible even if local files are deleted.
That’s it! Now you know how to set up and use the Dropbox addon with WPForms.
Next, would you like to learn more about file handling in WPForms? Be sure to check out our guide on using the File Upload field for all the details.