
AI Summary
Do you want to create a GDPR consent form for your WordPress site?
It’s very important to ensure compliance with GDPR if you’re website with visitors from the EU or the UK.
If you’re collecting information from your EU site visitors using forms, it’s always a good idea to obtain express consent before form submission.
In this article, we’ll look at the easiest way to add a GDPR agreement field to your WordPress forms.
Create Your GDPR Consent Form Now
How to Create a GDPR Compliant Form in WordPress
Using WPForms, you can easily add a GDPR agreement form field to any form on your website. That way, the visitor can freely give consent when giving you their personal data.
Here are the steps we’re going to work through:
In This Article
At the end of the article, we added a FAQ to help you with the advanced GDPR options in WPForms. We’ll also explain how to easily erase personal information if you’re asked to.
First, let’s step through the tutorial.
This tutorial only shows the steps you can take to create a general GDPR compliant form. However, GDPR is a complex piece of regulation and we strongly advise you to seek legal counsel for your specific forms.
Step 1: Install the WPForms Plugin
Creating a GDPR compliant form is a quick and easy process if you’re using WPForms. If you haven’t already, go ahead and install the WPForms plugin on your website now.

While you can use the GDPR enhancements in both the free and paid versions of WPForms, we recommend getting WPForms Pro to access a huge variety of useful features such as the Calculations addon and over 2,100+ form templates.
After you’ve successfully installed the plugin, move on to the next step.
Step 2: Enable GDPR Enhancements
Before we create any forms, we first need to turn on GDPR enhancements in WPForms. When we turn these enhancements on, the GDPR Agreement field will become available in the form builder.
To start, go to WPForms » Settings. You should see the General tab is open.
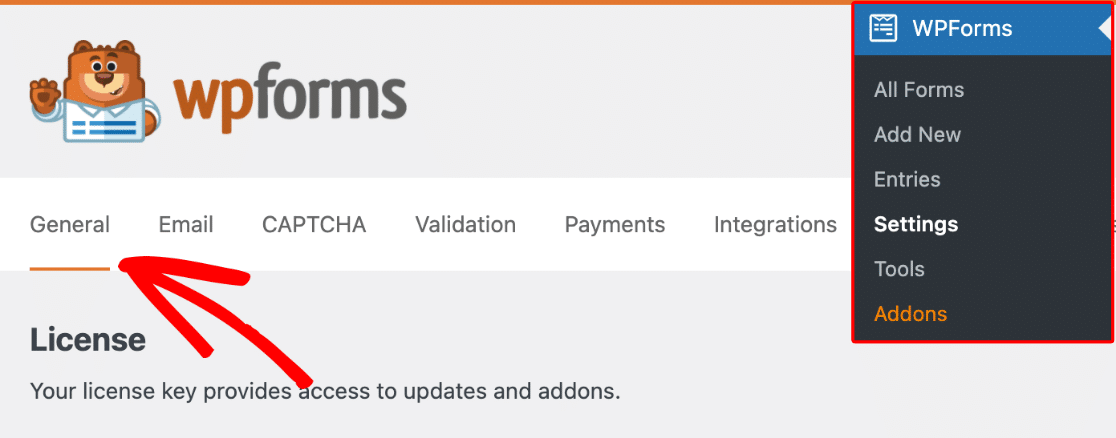
Scroll down and click the GDPR Enhancements toggle button.
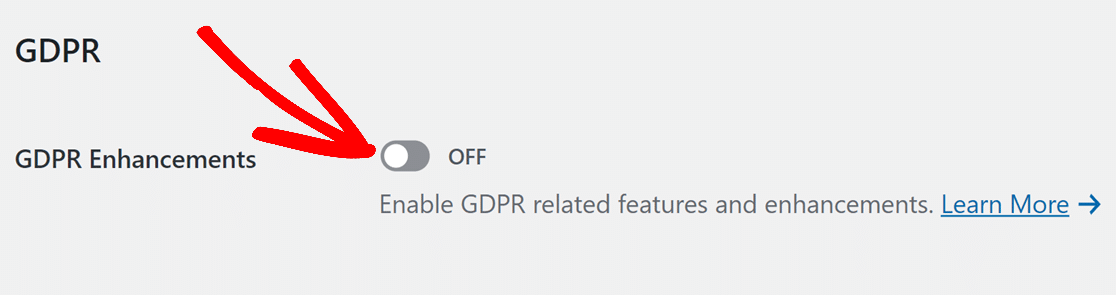
When you click the checkbox, you’ll notice that 2 new options appear underneath.
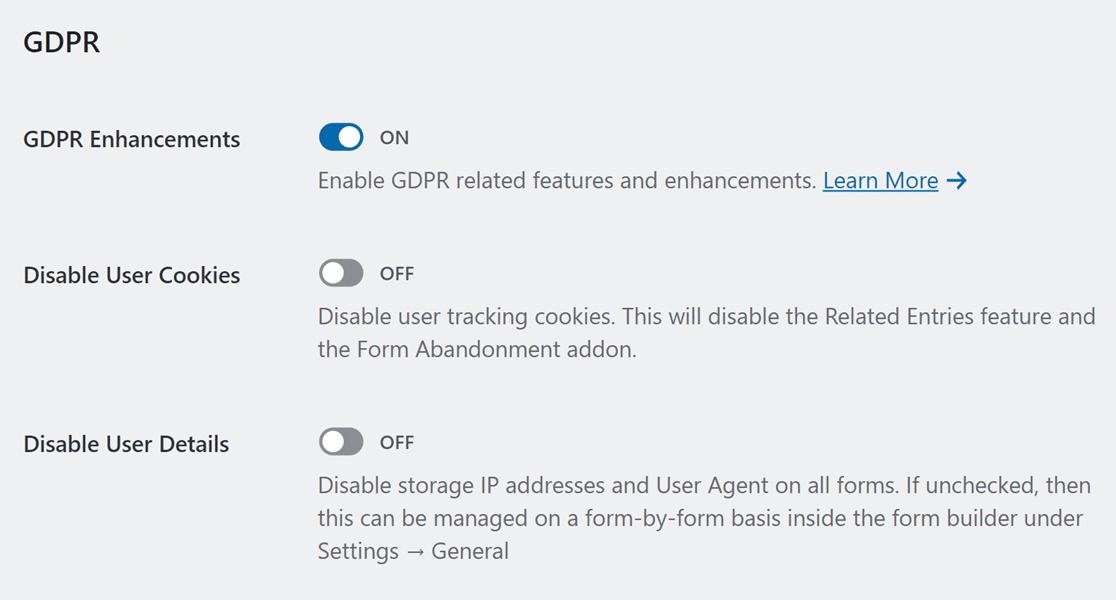
[alert_box]The options for disabling user cookies and user details will not appear if you’re using WPForms Lite. This is because the Lite version never tracks user cookies or IP addresses.[/alert box]
If you’re using a premium WPForms license, you may want to disable user cookies and additional detail storage to ensure full compliance with GDPR.
Cookies in WPForms
Disabling cookies will also disable features such as the Form Abandonment addon, Related Entries (linked entries submitted by the same user), and Geolocation.

If you’d like to continue using these features, you’ll have to leave the Disable User Cookies option in the off position.
But it’s strongly recommended to mention your usage of cookies in the GDPR Agreement field, so people can consent to it.
IP Address and User Agent Storage in WPForms
The Disable User Details option can be controlled globally from the General tab of WPForms settings from the admin menu.
If you’d like to disable the collection of IP addresses and User Agent on specific forms only, you can do that on a form-by-form basis (more on this in the next step).
Let’s move on and create a GDPR compliant contact form.
Step 3: Create Your GDPR Consent Form
It’s time to create a WordPress form with a GDPR consent field.
First, let’s click WPForms » Add New from your WordPress admin menu.

When the form builder opens, go ahead and type in a name for your contact form at the top.

Next, scroll down a little to the templates area. For this tutorial, we’ll be using a contact form template to speed up the form building process.
Click on the Use Template button under the Simple Contact Form template.

You’re free to choose any other template or even start from scratch using the Blank Form option.
After selecting a template, it will load on your screen in a few seconds.

If you want to add more fields, you can drag them from the left-hand panel to the form preview on the right. Keep adding fields until your basic form is set up the way you want it.
Step 4: Add a GDPR Agreement Form Field
WPForms includes a ready-made GDPR Agreement field that you can add to your form. It can be found under the Standard Fields section.
Drag and drop the field to where you want to place it on your form on the right-hand side area.

After the field is inserted, you can click on it to access its Field Options. These allow you to change the label of your field as well as the agreement text explaining why you’re collecting a visitor’s information.

This field is different from a regular checkbox field. If the GDPR agreement is not ticked, the form can’t be submitted.
Besides, the checkbox can’t be pre-selected. This is important because consent has to be deliberately given by each respondent per GDPR.
If you’d like to collect cookies and IP address information of respondents, we recommend editing the agreement text to clearly mention this as well.
When you’re done customizing your form and the GDRP Agreement field, go ahead and click Save to save your progress so far.

Now, we’re all set to publish your form in the next step.
Step 5: Publish Your GDPR Compliant Form
With the WPForms embed wizard, publishing your form is a breeze.
At the top of the form builder, click the Embed button.

You’ll see a popup open. We’ll click Create New Page here in order to embed the form in a separate new page.

And finally, let’s type in a name for your page.
All set? Click Let’s Go.

WPForms will automatically create a new page. You’ll see your contact form already embedded into it.
Let’s click Publish to publish the page.

And that’s it! Now you have a contact form with a GDPR agreement field.

You can repeat the process to easily add GDPR agreement fields to any form on your website, so you can be sure they’re all compliant with the GDPR.
And that’s it! You can now easily build GDPR consent forms for your WordPress site.
FAQ on GDPR Forms and Compliance
The powerful GDPR controls in WPForms can help you comply with privacy laws in different ways. In this section, we’ll look at the advanced settings in the plugin.
How to disable user agent and IP address tracking in a specific form?
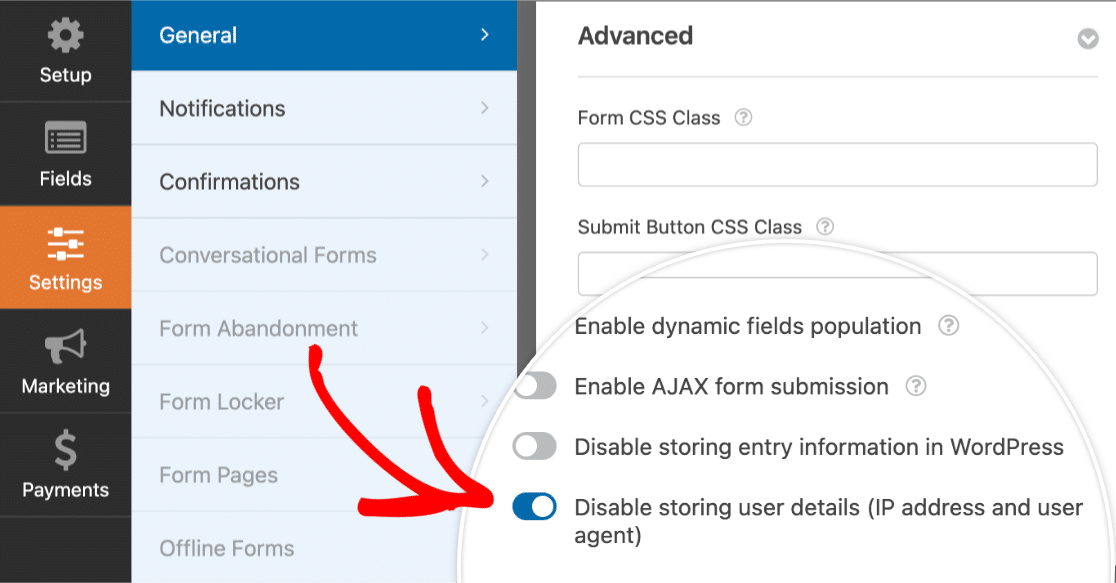
WPForms allows you to disable user agent and IP address storage on a form-by-form basis. To disable it in a specific form, go to Settings » General in your form builder.
Scroll down to the bottom of the General settings and expand the Advanced section. Here, you can click on the Disable storing user details (IP address and user agent) toggle button to stop your form from storing these details.
How can I handle personal data erasure requests in WPForms?
Under GDPR, users have a right to ask for their personal data to be deleted. It’s a good idea to create a separate form on your site designed specifically to let users submit data deletion requests.
To delete an entry go to WPForms » Entries and select the form you need.

Then, simply look for the entry you wish to delete either manually or by using the search box.
For example, you can select Name in the dropdown and type in the user’s name to find all of their entries.

When you click Search, WPForms will show all of the matching entries. Select each entry, then click the Bulk Actions dropdown and click Delete.

Repeat these steps with each form on your website.
Here are 2 things to keep in mind if you get ‘right to be forgotten’ requests:
- In WPForms, entry deletion is permanent. Once you delete form entries, they can’t be recovered unless you have website backups. However, you can move an entry to “Trash” which allows you to either restore them or permanently delete them later.
- You don’t usually need to delete personal data from backups. Most backup plugins will overwrite your old backups automatically over a few days or weeks.
How to disable entries from storing in a form?
Entry storage is a super helpful way to review, manage, and organize form entries from your site. Most people find this helps to keep track of entries, so we recommend keeping it switched on.
However, disabling entry storage can be helpful if you don’t want to store any visitor information at all. You don’t have to worry about user consent if you’re not storing entries at all.
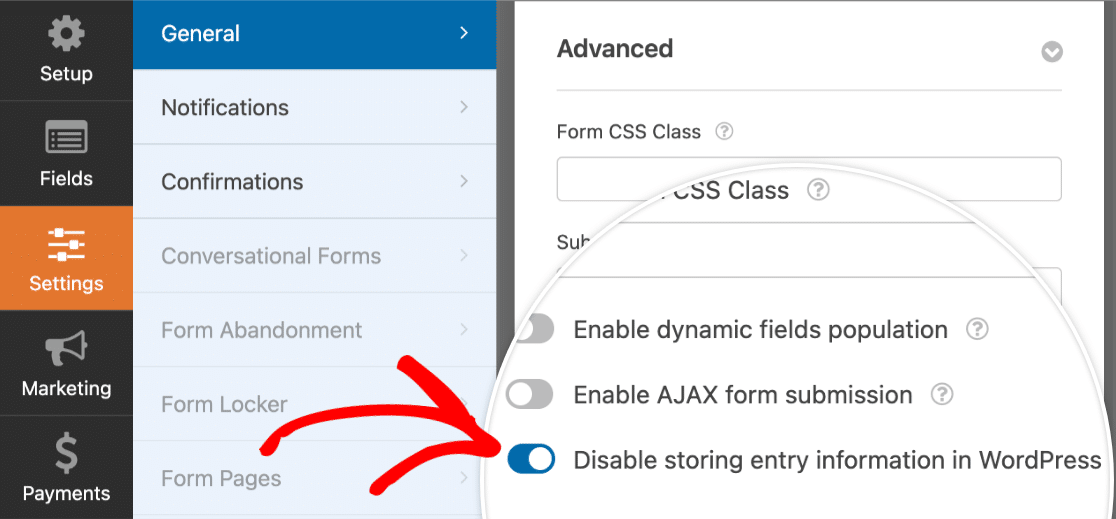
To do that, open up your form and click Settings on the left of the form builder. Scroll all the way down to the Advanced section and check the Disable storing entry information in WordPress box.
Disabling entry storage might reduce the risk of a personal data breach. At the same time, keep in mind that you’ll only be able to receive form responses via email.
Create Your GDPR Consent Form Now
Next, Export Your Form Entries
Do you want to export your form entries? Maybe you need to use them in a different platform, or analyze your data in different ways.
With WPForms, it’s easy to export form entries to CSV. That way, you can easily archive the data if you need to.
Don’t forget to make your waiver forms too. We published a tutorial on making an online model release form that you can use for inspiration.
Ready to build your GDPR compliant form? Get started today with the easiest WordPress form builder plugin. WPForms Pro includes lots of free templates and offers a 14-day money-back guarantee.
If this article helped you out, please follow us on Facebook and Twitter for more free WordPress tutorials and guides.


I follow these steps but get the error: “Something went wrong while saving the form. Please reload the page and try again. Please contact the plugin support team if this behavior persists.”, I tried many times but nothing changed.
Hi Simona- I am sorry to hear about that!
Essentially, the AJAX script (which allows the form to save without refreshing the page) is not being allowed to load. This almost always stems from a file permissions issue. If you contact your host and ask them to reset file permissions, this should start working properly.
If you have a WPForms license, you have access to our email support, so please submit a support ticket. Otherwise, we provide limited complimentary support in the WPForms Lite WordPress.org support forum.
Thanks 🙂
Hi,
i need to know if it can change the opacity for the submit button when the user accept the gdpr agreement, like a “you can just now send the inquiry or contact form”
I hope was clear my consult
Thanks
Hi Daniel! I apologize if I may have misunderstood your request, but it seems like you’re looking to style the submit button, but you want the form to only be able to submit after the user has accepted the GDPR agreement.
Styling the submit button by changing its opacity wouldn’t provide the kind of logic that you’re looking for. Please take a look at this Developer’s Documentation guide instead, it provides some information and code that would allow you to apply conditional logic to the submit button.
Also, in case it helps, we have a guide on how to style WPForms with CSS here.
I hope this helps 🙂 If you have any further questions about this, please contact us if you have an active subscription. If you do not, don’t hesitate to drop us some questions in our support forums.
Hello, thanks for the tutorial, it’s great. But the text looks weird if it’s placed above the submit button. Is it possible to somehow move it under the button or put it next to it? Thanks for the information.
Hey Lucy,
I apologize, we currently don’t have the inbuilt feature to move the GDPR agreement checkbox and place it alongside or under the Submit button. I do agree this would be helpful, and I’ll add this to the feature request tracker so that it’s on the radar of our developers. In the meantime, you can try using some custom CSS to make the changes that you’re looking for:
div#wpforms-561-field_3-container {

    position: absolute;

    right: 300px; /* Please adjust the values as per your requirement */

}

form#wpforms-form-561 .wpforms-submit-container {float: left !important;}
In the above code, please be sure to replace the form and field ID.
I hope this helps 🙂 If you have any further questions, please contact us if you have an active subscription.
Hi, it worked out for me. Thanks a lot. But still one Question: How can i change the color of the Text in The Agreement ” I consent to having this website…..”. It is now black and my background is dark too, so its hard to read. I want the color white. I changed already the Color of the Titels from the Form (Name, E-Mail, Your Message… etc.) but cant find a solution for the Text in this Agreement Box.
Thanks
Regards
Haluk
Hey Haluk – We’d be happy to help! When you get a chance, please submit a support ticket so we can assist.
Thanks 🙂
Hello, I have a form that can accept customers from the whole world, so mainly from the US and Europe. That’s why I added the GDPR button, but it’s mandatory.. does it mean there is no way around it, and also customers who reside in the US have to tick it to be able to buy the product?
Thank you!
Hey Krisztina – For this one, you can make use of conditional logic feature and based on the country selection, you can display the GDPR checkbox. However, to do this, you will need to use a dropdown field instead of the Address field since conditional logic won’t work for the address field right now.
Hope this helps. Thanks 🙂
Hi we have the smush image optimization plugin running on our site and this interferes with the left most bar of the form. Essentially you are unable to check the GDPR box as it cannot be positioned elsewhere on the form.
Do you have any ideas how to get around this?
Hi Jacquie. Thanks for the valuable feedback. It definitely sounds like there’s a styling conflict there, and we’d be happy to resolve it. The trusted advisors in our support team would be best placed to do this. If you’re using a paid version of WPForms, please submit a support ticket and share the same details that you posted here. If you’re using our free version, please head to the WPForms Lite WordPress.org support forum and open a new thread.
Thanks!