AI Summary
Would you like to be able to add custom styles to your forms? CSS is a powerful tool that allows you to give your forms a unique, individual style.
This tutorial will walk you through how to create custom CSS to style your forms, with plenty of examples included.
In This Article
What Is CSS?
CSS stands for Cascading Style Sheets, and is the code read by web browsers to style almost everything you see on the internet. It controls everything from font size and style to colors and hover effects. Without it, most of the web would look like a very boring text file.
Note: If you’d prefer to style your form but skip the code, consider checking out our form styling tutorial.
Reading CSS
Unlike many other types of code, CSS is fairly easy to learn even with absolutely no coding experience. The first step is just to understand the three main components of CSS:
- Selectors: the ‘target’ that you want to apply styles to
- Properties: the specific style you want to change, such as font size or color
- Values: the specific style effect you want to apply
As an example, check out this snippet of CSS which sets the size of your form title:
.wpforms-form .wpforms-title {
    font-size: 26px !important;
}
The selector in this example is .wpforms-form .wpforms-title and it will apply your CSS to the title of all of the WPForms on your site.
Then, in the curly brackets, there is one CSS property in this example: font-size. This property has a value of 26 pixels.
Note: When adding CSS to your site, it might be necessary to include !important before the semicolon to ensure your custom styles are applied successfully. Check out our guide on troubleshooting CSS for more details.
If we decide that we want our form’s title text to be bigger (let’s say 35 pixels), we would just need to change that value in the CSS:
.wpforms-form .wpforms-title {
    font-size: 35px !important;
}
Choosing a CSS Selector
The first step in writing CSS is to identify the correct selector for targeting a specific part of your form. There are two ways of choosing a selector:
1) Copying a selector from our list
We have created a comprehensive list of selectors for every available field in our forms, so you can just pick the selector for whichever area you would like to apply CSS to.
2) Using developer tools in your browser
This more advanced approach may offer a bit of a learning curve but is a great option if you want to create a bunch of custom CSS.
Developer tools allow you to inspect any part of the webpage to see what CSS is being applied. You can also test changes to CSS on the fly and see it applied right in your browser. WPBeginner has a great tutorial on using developer tools that should help get you started, including a step-by-step video on using Chrome’s developer tools.
Using CSS Properties and Values
Now that you know how to choose a CSS selector, we can discuss how to change specific styles with CSS properties and values.
Below, you’ll find some basic CSS properties that you may find useful for your forms. Additionally, you’ll find examples of style changes you can make by combining selectors, properties, and values to make a complete snippet of CSS.
Just click the link in this list to skip ahead to the section you need:
Note: Looking for other properties? Check out this CSS Reference for a comprehensive list.
font-family
-
- Definition: The default font style
- Example: To change the default font of the title in your site’s forms to Arial, you would use:
.wpforms-form .wpforms-title {
    font-family: 'Arial', sans-serif !important;
}

Note: It’s common to provide fallback fonts in case the primary font is not available. In the example above, if Arial is not available, the browser would use any available sans-serif font.
color
-
- Definition: Font color
- Example: To make the title on all of your site’s forms blue, you could use:
.wpforms-form .wpforms-title {
    color: #007acc !important;
}

font-size
-
- Definition: How big the font will be (units can be px, em, or rem)
- Example: To make the title on all of your site’s forms 35px, you would use:
.wpforms-form .wpforms-title {
    font-size: 35px !important;
}

background-color
-
- Definition: The color that will fill the background of the selector area
- Example: To make the entire background of a form a light grey, you could use the following CSS:
.wpforms-form {
    background-color: #eee !important;
}

padding
-
- Definition: The distance between the selector element and its border
- Example: Did you notice how the example above doesn’t have any distance between the text and the edges of the colored box? In addition to the background color, let’s add 20 pixels of padding to the top and bottom of the form, as well as 15 pixels of padding to the right and left sides. We’ll do this by adding
padding: 20px 15px;to the CSS from the previous example:
.wpforms-form {
    background-color: #eee !important;
    padding: 20px 15px !important;
}

border
-
- Definition: Determines the style and thickness of an element’s edge
- Example: Let’s add a border that is 3 pixels thick, a solid line, and dark grey to our example above. We’ll do this by adding
border: 3px solid #666;to the existing CSS for.wpforms-form:
.wpforms-form {
    background-color: #eee !important;
    padding: 20px 15px !important;
    border: 3px solid #666 !important;
}

border-radius
-
- Definition: How curved the corners of an element will be (0px is a square edge, higher numbers are more curved)
- Example: We will continue to build off of the above example, adding a border-radius of 20 pixels to round our forms edges. We can do this by adding
border-radius: 20px;to the CSS we’ve already made:
.wpforms-form {
    background-color: #eee !important;
    padding: 20px 15px !important;
    border: 3px solid #666 !important;
    border-radius: 20px !important;
}

Note: If you’d like to change the CSS styling of specific form fields, see our guide on customizing the style of individual form fields.
Styling an Individual Form
By using the CSS selectors described above, you can easily apply the same styles to all WPForms on your site. If you’d like to apply some styles only to a single form, however, you’ll need to add the form’s ID to the selector.
To easily find the form’s ID, you can look in its shortcode. This can be seen in the page/post editor, or you can go to WPForms » All Forms and look in the Shortcode column.
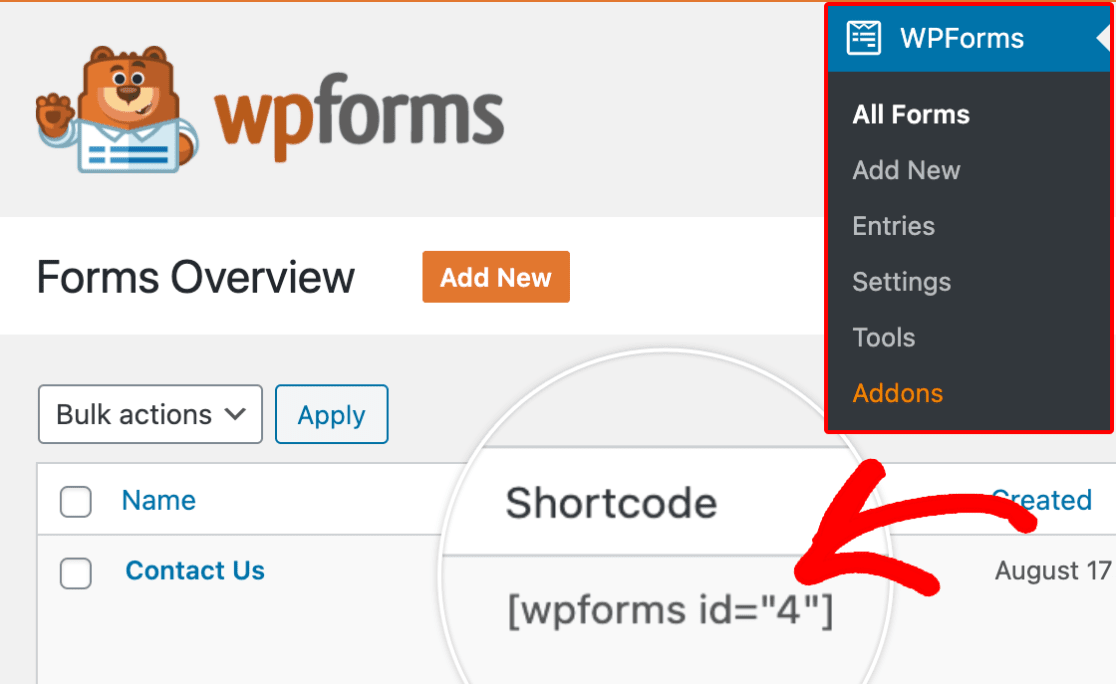
In this example, our form has an ID of 4. To apply our earlier styles only to this single form, we’d need to add #wpforms-4 to the beginning of the selector. Here’s our modified CSS:
#wpforms-4 .wpforms-form {
    background-color: #eee !important;
    padding: 20px 15px !important;
    border: 3px solid #666 !important;
    border-radius: 20px !important;
}
Once you’ve created your CSS snippet, the next step is to add it to your site. You can learn how to do this by following WPBeginner’s guide to adding custom CSS to WordPress.
That’s it! You can now create custom CSS styles for your forms. For more CSS examples to create custom form designs, please see our article on beautiful form designs you can steal.
Next, would you like to add custom submit button styles to your forms? Check out our tutorial on customizing the submit button for details and examples.