
AI Summary
Looking for donation page examples that actually move donors to give? A well-designed donation page can be the difference between a visitor who clicks away and one who becomes a recurring supporter.
The M+R Benchmarks 2025 report found that the average nonprofit donation page converts at 11% on desktop and 8% on mobile. The pages that hit those numbers aren’t accidents. They follow a small set of design principles that every nonprofit can copy.
In this post, I’ll walk you through 12 real donation pages I’ve pulled apart to show exactly what they do well. You’ll also get a quick framework for what makes a donation page convert, plus how to build your own in WordPress without hiring a developer.
12 Best Donation Page Examples to Inspire You
Each example below is a live page from a nonprofit doing meaningful work. Under each one, you’ll see the specific design choices that drive donations, so you can apply the same patterns to your own page.
- What Makes a Great Donation Page?
- 1. The Obama Foundation
- 2. United Nations Population Fund (UNFPA)
- 3. GetUp
- 4. Children's Minnesota
- 5. Special Olympics
- 6. Future in Sight
- 7. Pencils of Promise
- 8. She's the First
- 9. Code for America
- 10. Black Girls Code
- 11. Make-A-Wish Ireland
- 12. Community Environmental Council
- How to Build a Donation Page That Converts
What Makes a Great Donation Page?
Before the examples, it helps to know what you’re looking at. The strongest donation pages share six design patterns that consistently lift conversions.
- Impact-tied donation amounts: Show donors what their gift does. “$25 feeds a family for a week” outperforms a blank amount field every time.
- Outcome-framed calls to action: A button that says “Donate Now” is forgettable. “Feed a Child” or “Plant 10 Trees” is memorable and ties the click to a result.
- Form above the fold: Donors shouldn’t hunt for where to give. Put the form on the first screen they see, not below a wall of copy.
- Mobile-first design: Over half of nonprofit traffic now comes from mobile devices, per M+R 2025. If your page doesn’t feel natural on a phone, you’re losing most of your donors before they start.
- Recurring framed as membership: Monthly donors give more over their lifetime than one-time givers. Position recurring gifts as joining a community, not as a bigger financial commitment.
- Visible trust signals: Security badges, tax-deductibility notes, impact stats, and social proof all belong on the page. Donors hesitate when they feel unsure, and these cues remove hesitation.
Keep these six in mind as you scroll through the examples. You’ll start to see them repeat across pages that look very different on the surface.
1. The Obama Foundation

The Obama Foundation runs a visually clean page that splits recurring donations on the left and one-time gifts on the right, giving donors two clear paths without overwhelming them.
Why it converts:
- A checkbox is pre-selected to cover the transaction fees. This both boosts the amount collected and avoids the “surprise fee” moment at checkout.
- Users can activate recurring payments with a single checkbox, a pattern that lifts monthly donor conversion.
- The Obama campaign logo reinforces credibility by anchoring donors in a recognizable identity.
- Images are sized for performance, keeping the page fast on mobile.
Takeaway for your form: A pre-selected fee-cover checkbox is one of the highest-impact additions you can make. It’s a single setting that pays for itself quickly.
2. United Nations Population Fund (UNFPA)

UNFPA pairs a striking mission image with two clear calls to action, giving donors an emotional reason to give before they ever see the form.
Why it converts:
- The image does emotional work by showing the people behind the mission, not a generic stock photo.
- A one-time or monthly toggle lets donors pick their preference without leaving the page.
- An FAQ section right on the donation page answers security concerns before donors have to search for answers.
- Two side-by-side sections keep the form above the fold even on smaller screens.
Takeaway for your form. Put your most common donor questions directly on the page. Every click away from the form is a chance for the donor to bounce.
3. GetUp

GetUp uses a two-column layout that keeps the mission message and the donation form on the same screen. The form itself is broken into multiple steps to feel shorter than it really is.
Why it converts:
- Multi-step forms in WordPress reduce perceived length, which lifts completion rates for any form over 4 fields.
- A monthly donation checkbox converts one-time donors into recurring ones at the peak moment of motivation.
- The side-by-side mission copy builds conviction while the form builds commitment.
- Multiple payment methods (card plus PayPal link) remove the “I don’t have my card handy” objection.
Takeaway for your form: If your donation form has more than four or five fields, break it into steps. Donors complete short forms at much higher rates than long ones.
4. Children’s Minnesota

The donation form on Children’s Minnesota’s website keeps navigation to a minimum and uses conditional logic to show only the fields that are relevant to each donor.
Why it converts:
- External links and the navigation menu are stripped out, which keeps donors focused on the one action that matters.
- The page clearly explains how funds are used, so donors see the cause-and-effect of their gift.
- Conditional logic hides fields until they’re needed, making the form feel simple even when it’s doing complex routing behind the scenes.
- A relevant image beside the form reinforces the emotional connection to the cause.
Takeaway for your form: Strip the navigation from your donation page. Every link out is a potential exit. The one job of this page is to accept donations.
5. Special Olympics

Special Olympics anchors its donation form on the right side, next to a mission statement and an image that uses human sightlines to guide attention toward the form.
Why it converts:
- The header leads with a benefit statement about what the donation achieves.
- The child in the background image is looking toward the donation form, a subtle design trick that draws the donor’s eye in the same direction.
- A donation amount is pre-selected, which makes it easy to continue to the next step without having to decide.
- A pre-selected checkbox covers transaction fees, boosting the net amount received per donor.
- A multi-step flow guides donors through “continue to step 2” language that makes each stage feel manageable.
Takeaway for your form: Pair your form with imagery where the subject faces toward the form, not away from it. Eye tracking studies show readers follow gaze direction in photos.
6. Future in Sight

Future in Sight runs a clean two-column donation page with a strong focus on recurring giving and easy-to-scan donation amount buttons.
Why it converts:
- The overall design is simple, and every section of the form is well organized.
- Conditional logic shows only the fields that apply to the donor’s selected options, which keeps the form short.
- A donation amount is pre-selected, giving donors a suggested anchor without forcing the choice.
- The form emphasizes the long-term impact of monthly donations, framing recurring as the default rather than the upsell.
Takeaway for your form: Make recurring the visual default. Donors who see monthly giving as the primary option give at higher lifetime values than those who see it as an add-on.
7. Pencils of Promise

Pencils of Promise keeps the donation page minimal, with a clear “Give Education” call to action and a membership-framed recurring option on the side.
Why it converts:
- A simple page with a specific call to action that ties the gift to an outcome the donor can picture.
- The recurring donation option is framed as a membership, which makes the donor feel like they’re joining something rather than signing up for a bill.
- Donors can pick between credit card or PayPal at checkout, which covers most donor preferences without adding clutter.
- No sidebar and no distracting navigation, so the form stays front and center.
Takeaway for your form: Reframe your recurring gift as a membership or a community. The psychological difference between “monthly donation” and “monthly member” changes how donors feel about the commitment.
8. She’s the First

She’s the First spells out the concrete impact of donations (expanding access to education for girls) and backs it up with multiple ways to give, including stocks, crypto, and checks.
Why it converts:
- A clear message about what each donation does, tied directly to the girls the organization supports.
- Multiple giving options (stock, cryptocurrency, checks, Donor-Advised Funds) meet donors where they already are financially.
- Links to additional information about corporate giving and partnerships for donors who want to give in other ways.
- Contact information for donors who want to talk to a human before committing.
Takeaway for your form: Offer more than just credit card. Adding stock and DAF options can unlock major gifts from donors who would never have given through a standard form.
9. Code for America

Code for America turns the donation page into an impact report, showing donors exactly what past donations funded and what new ones will do.
Why it converts:
- Impact statements translate dollars into outcomes (benefits delivered, people helped).
- Tax-deductibility and nonprofit status are spelled out, which reassures donors who want to claim the gift.
- A focused FAQ section handles common donor questions in one place.
- The call to action is simple and specific, with no decoration to distract from the donate button.
Takeaway for your form: Show past outcomes, not just future promises. “Last year, donors funded X” is more persuasive than “Your gift will fund X.”
10. Black Girls Code

Black Girls Code connects donors directly to the mission of supporting Black girls in tech, with features that make each gift feel personal.
Why it converts:
- A clear mission statement anchors the page in what the organization stands for.
- Space for donors to leave comments gives the gift a personal dimension and creates a sense of participation.
- Employer matching is featured so donors can double their impact without extra effort.
- Recurring options include monthly, quarterly, and annual frequencies, which covers every donor preference.
- Donors can dedicate the gift in honor or memory of someone, which unlocks tribute giving and memorial gifts.
Takeaway for your form: Add an “in honor of” or “in memory of” field. These gifts often come with personal stories and tend to be higher than typical donations.
11. Make-A-Wish Ireland

Make-A-Wish Ireland leads with emotional stories of children whose lives have changed thanks to donations, then makes the path to donate short and simple.
Why it converts:
- Heartfelt stories connect the donor to a real outcome, not an abstract cause.
- Secure payment methods are visible, which matters for donors who hesitate at the payment step.
- Both monthly and one-time donation options are clear from the start.
- Tax-effective giving details help donors see the personal benefit of supporting the cause.
- Information about donation impact is woven into the page rather than buried in a separate section.
Takeaway for your form: Put one specific story on your donation page. A single named beneficiary with a real photo outperforms generic copy about “the people we help” every time.
12. Community Environmental Council

The Community Environmental Council wraps its donation page in urgency, tying gifts to climate action and offering multiple giving channels including legacy gifts and IRA rollovers.
Why it converts:
- A compelling message about climate urgency gives donors a reason to act now rather than later.
- Multiple giving options (online, check, phone, IRA rollover) open up higher-value gift paths.
- Corporate giving and legacy giving are featured for donors who want to give at scale.
- Clear tax benefit information helps donors see the financial side of the gift.
- Contact details for direct inquiries lower the barrier for donors who want to speak with someone before committing.
Takeaway for your form: Name the urgency. If there’s a real reason donors should give this week rather than next quarter, say it plainly. Urgency drives conversion far more than perfect copy.
How to Build a Donation Page That Converts
You’ve seen what works. Now here’s how to put these patterns into practice on your own WordPress site without hiring a developer.
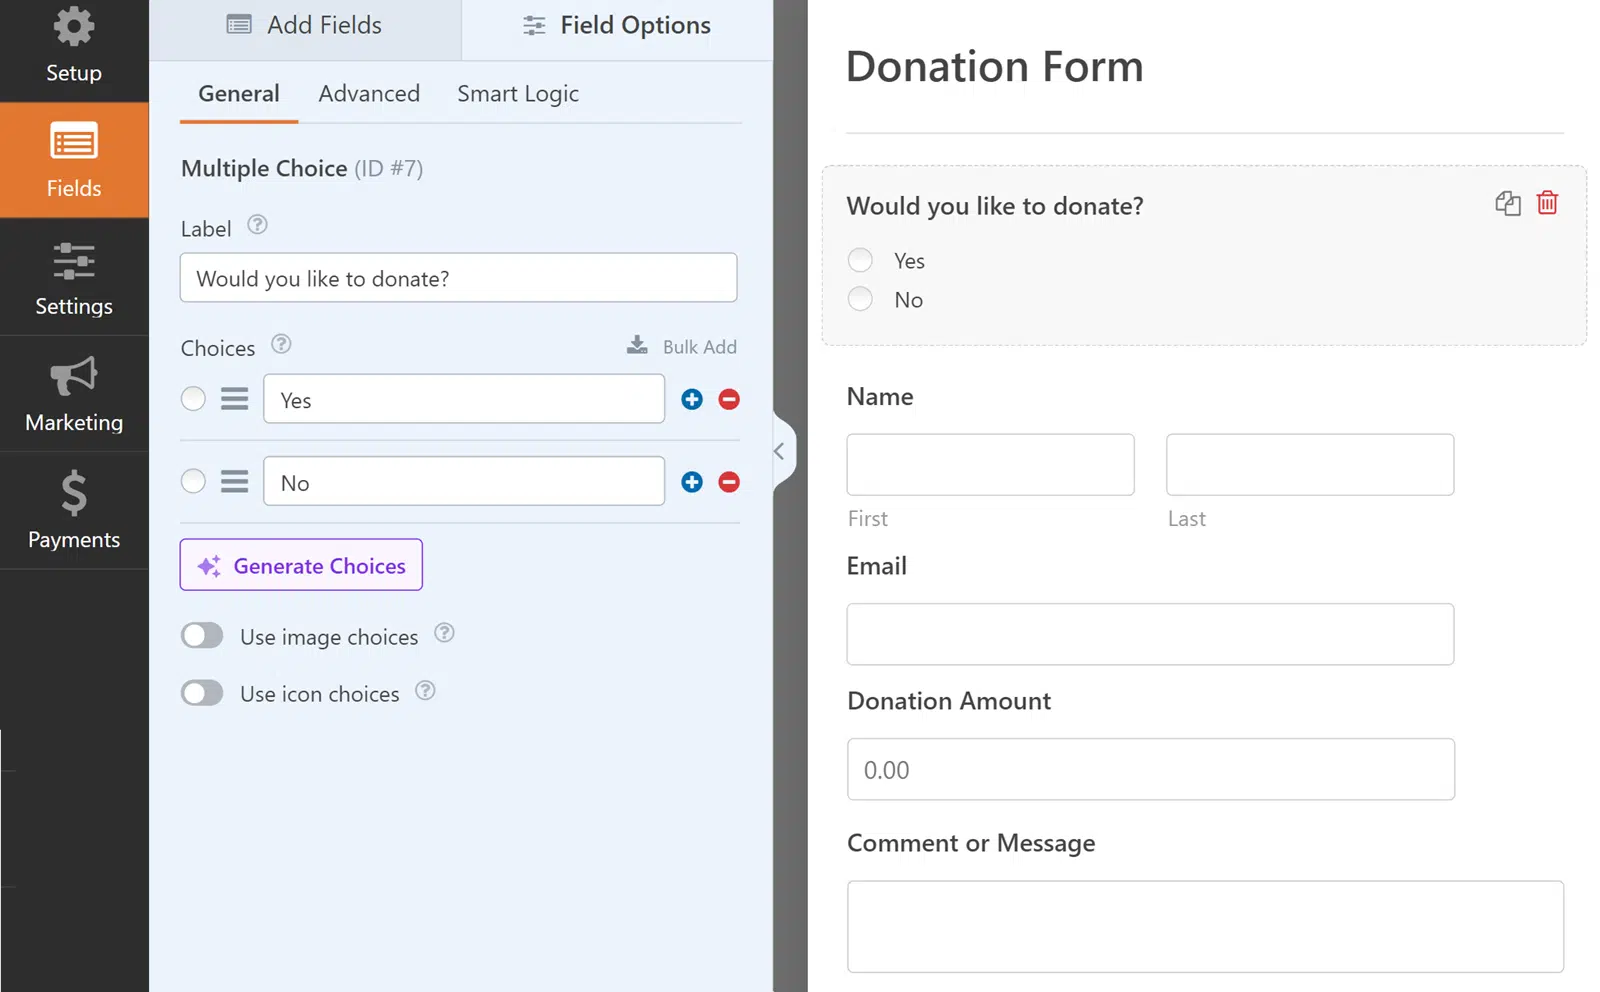
WPForms Pro includes a pre-built donation form template that covers the basics out of the box. From there, you can add the features you saw in the examples above.
- Accept payments with Stripe, Square, or PayPal Commerce. All three support recurring donations, which is the single biggest lever for long-term donor value.
- Use conditional logic to branch the form based on donor choices (one-time vs recurring, specific fund vs general, dedication vs no dedication).
- Turn on multi-step form mode to break longer donation flows into short pages with progress indicators.
- Add a pre-selected option to cover transaction fees, which boosts net donation revenue without asking more of donors.
- Set suggested donation amounts tied to real outcomes ($25 funds X, $50 funds Y) rather than arbitrary dollar buttons.
For a step-by-step walkthrough, see our guide on how to create a nonprofit donation form. If you run a qualified nonprofit, WPForms also offers a 75% nonprofit discount on Pro licenses.
Build Your Donation Form With WPForms
FAQs About Donation Page Examples
Creating donation pages that convert is a topic nonprofit teams ask about often. Here are the questions that come up the most when planning a new donation page or refreshing an existing one.
What makes a good donation page?
A good donation page keeps the form above the fold, explains the impact of each gift in concrete terms, and removes any navigation that could pull donors away. It uses pre-selected donation amounts tied to outcomes, supports recurring donations as a default path, and shows clear trust signals like security badges and tax-deductibility information.
What should a donation page include?
At a minimum, a donation page should include an outcome-focused headline, a short mission paragraph, a form with suggested amounts, multiple payment options, a recurring donation toggle, tax-deductibility info, and secure payment indicators. Mobile-friendly layout is no longer optional, over half of nonprofit traffic now comes from phones per the M+R Benchmarks 2025 report.
How do I create a donation page on my website?
The easiest way on a WordPress site is to install a form plugin that supports donations and payments, pick a donation form template, and embed it on a dedicated page with minimal navigation. WPForms Pro, for example, includes a donation template, Stripe and PayPal support, and conditional logic, so you can build and publish in under an hour.
How much do donors give on average?
Average donation amounts vary by cause and region, but the M+R Benchmarks 2025 report showed average one-time gifts in the range of $130 and monthly gifts averaging around $25 per month. Pages that pre-select a suggested amount and pair it with a clear outcome tend to pull the average gift size upward.
Next, Learn How to Set Suggested Donation Amounts
Suggested donation amounts are one of the easiest changes you can make to lift your average gift size. If you want to see the exact pricing patterns top nonprofits use, check out our guide on how to set suggested donation amounts with real examples.
You may also want to explore our roundup of the best WordPress donation plugins to compare your options before you build.
Ready to build your form? Get started today with the easiest WordPress donation plugin. WPForms Pro includes lots of free templates and offers a 14-day money-back guarantee.
If this article helped you out, please follow us on Facebook and Twitter for more free WordPress tutorials and guides.

