Want to allow CSV uploads in WordPress?
Letting your visitors attach CSV files to forms can help you to easily accept information stored in tables.
In this article, I’ll show you how to easily create a CSV upload form in WordPress.
Create Your CSV Upload Form Now
Why Use a CSV Upload Field on Your WordPress Forms?
CSV stands for comma-separated value. It’s basically just a plain text file that has a bunch of data inside of it. These kinds of files store data in tables.
So they pretty much exist to make it easier to send that data from one app to another.
For instance, here are some real-life reasons you may want to let visitors upload a CSV file to your website’s forms:
- You’re gathering timesheets for employees working on a personal improvement plan.
- You want to collect nutrition diaries for customers on health or wellbeing plans.
- You need to store inventory details for an equipment checkout form.
- You’re gather financial information for a mortgage application.
- You want to allow for bulk purchases on a wholesale order form.
- Your online business needs to collect payments with your file uploads.
- You want to create an RSVP form in WordPress and let your visitors upload attachments.
You can probably think of a bunch more.
It’s really easy to allow CSV uploads in WordPress. You can collect data in CSV files from any page on your website.
WordPress blocks some file types for security reasons. But most image files can be uploaded using WPForms, and CSV files are allowed by default. If you have issues with other file types, read our guide on how to allow additional file upload types.
Let’s create our first CSV upload form.
How to Create a CSV Upload Form in WordPress
In this article, we’ll use the WPForms plugin to quickly create a form that will allow CSV file uploads in WordPress.
We’ve broken it down into 7 steps.
- Step 1: Create Your CSV Upload Form in WordPress
- Step 2: Configure File Upload Field Options
- Step 3: Configure Your CSV Upload Form Settings
- Step 4: Customize Your CSV Upload Form's Notifications
- Step 5: Configure Your CSV Upload Form Confirmations
- Step 6: Add Your CSV Upload Form to Your Website
- Step 7: View the CSV Files
Let’s jump right in.
Step 1: Create Your CSV Upload Form in WordPress
To create your CSV upload form, you’ll need to install the WPForms plugin.
WPForms is the best file upload plugin for WordPress. It makes it really easy to create a form for any purpose using a drag and drop builder.
Once you’ve created your CSV upload form, you can display it anywhere on your site. You can even place it in the sidebar.
If you need a little help getting the WPForms plugin installed, see this step-by-step guide on how to install a plugin in WordPress.
Once you have WPForms installed, activate the plugin. You’ll see WPForms in the left-hand navigation menu in the WordPress dashboard.
Click WPForms » Add New to create a new form. Type a name for your form at the top.

Let’s start with a template and then customize it to allow CSV uploads.
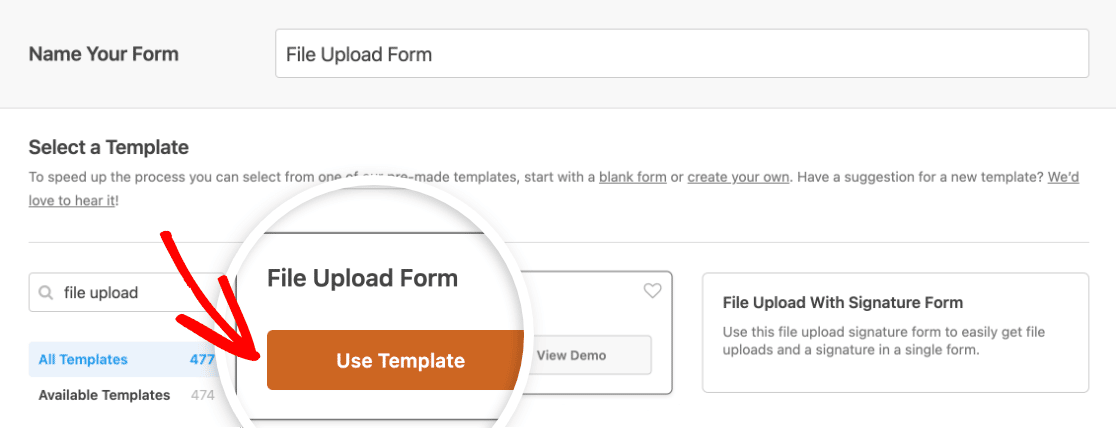
In WPForms, scroll down to the Select a Template section. Search for “file upload” and click on Use Template for the File Upload Form template.
WPForms will create a blank form with 5 fields: Name, Email, Phone, File Upload, and Additional Comments.
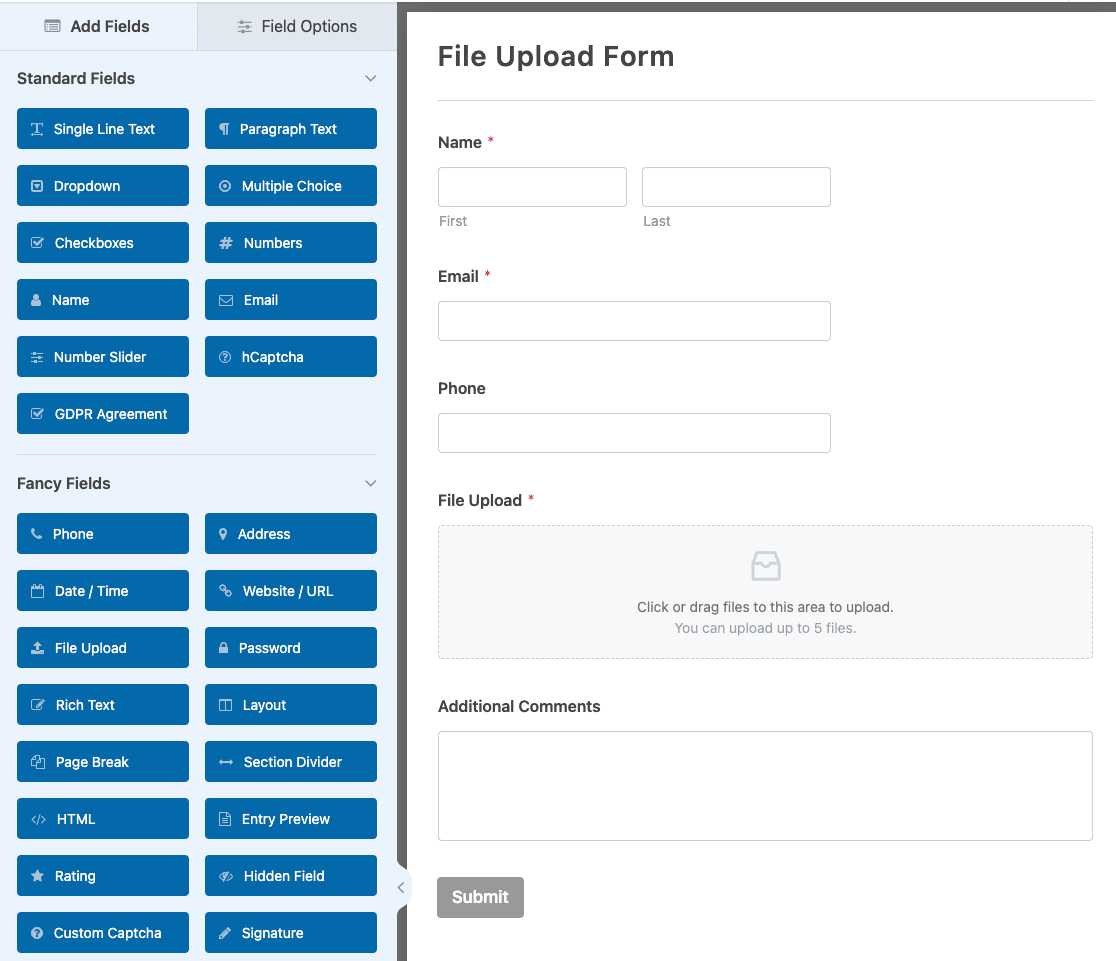
To add more fields to the form, drag and drop the field you want to add from the left-hand panel to the right-hand preview area.
You can also change the order of the fields. Click on the field you want to move and drag it up or down on the form preview.
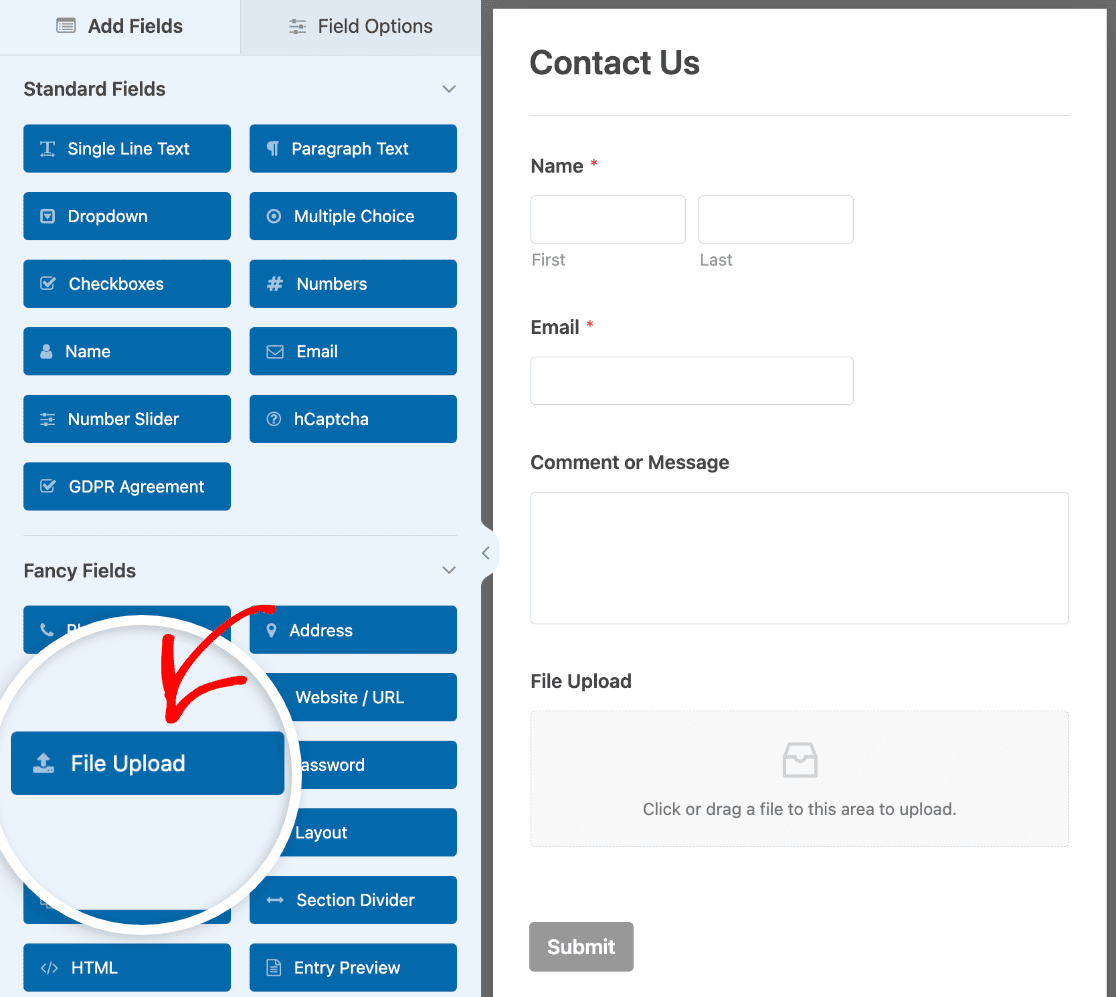
Do you already have a form that you want to use for CSV uploads? You can easily add the File Upload field to it. Open the existing form in the WPForms editor, expand the Fancy Fields drop-down, and drag a File Upload field from the left-hand panel to the preview area.
Step 2: Configure File Upload Field Options
Now you have a file upload field on your form. By default, it will allow users to upload many different file types.
To only allow CSV files to be uploaded, click on the File Upload field. In the Allowed File Extensions field, type “csv.”
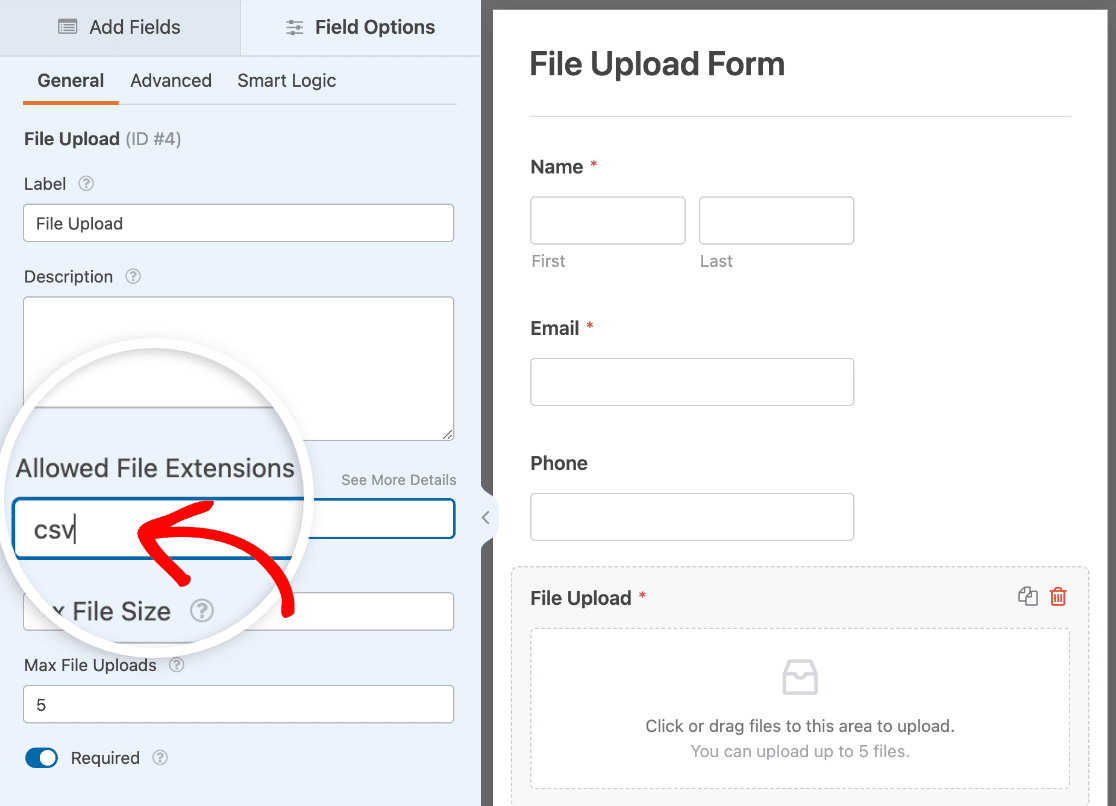
Sometimes applications save CSV files in a different format. To make things easier for your visitors, you may want to allow those formats too.
For example, to allow Excel formatted files and CSV files to be uploaded, you would type “csv,xls,xlsx” in the Allow File Extensions field.
You can change other options for the File Upload field here as well:
- Label — Give the File Upload field a label like “Upload Your CSV File” so your visitors know what the field is for.
- Description — Add a description. For example, you might want to specify which file extensions your visitors can upload.
- Max File Size — Specify the maximum size of the CSV file users can upload. If you don’t specify a number here, WPForms will default to the maximum file size that your server allows. If you need to change this, see this tutorial on how to increase the maximum file upload size in in WordPress.
- Max File Uploads — If your File Upload filed allows users to upload multiple files, you can specify the number of files allowed here. Leaving this field empty will default the max file uploads to 1.
- Required — If this setting is turned on, your visitor must attach a CSV file before they can submit the form.
There are a couple of other options for your File Upload field in the Advanced tab.
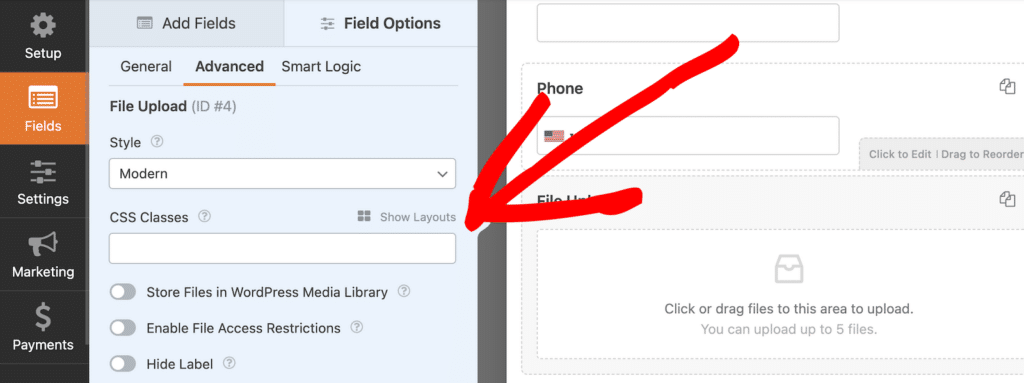
Here you can select:
- Style — You can choose the Modern style file uploader or the Classic style. The Modern style lets users drag and drop their files onto your form and allows multiple file uploads. The Classic style uses a Choose File button so users can select the file to upload from their computers. It only allows users to upload 1 file.
- Store file in WordPress Media Library — When this option is turned on, files uploaded to your form will be added to your WordPress Media Library. If this setting is turned off, files will be stored in your WordPress site’s Uploads folder, which you can access via FTP. However, if you don’t want to store files in the Media Library but still need to be able to access them easily, we’ll show you how to email them to yourself in the next step.
- Enable File Access Restrictions — This option lets you restrict access to uploaded files. You can restrict access based on User Role (users must be logged in). You can also restrict access by password-protecting files.
- Hide Label — This option lets you hide the form field label.
We’re done creating our simple upload form!
If you have a complicated form, you can make it easier to navigate by following our tutorial on how to create a multi-step form in WordPress.
Step 3: Configure Your CSV Upload Form Settings
Now you’ll need to configure some settings for your CSV upload form. Click Settings » General to open your form’s settings.

In this section, you can configure the following options:
- Form Name — Edit the name of your form.
- Form Description — Add a description for your form. You can choose to display the description above the form when you embed it on your site.
- Tags — Add tags to organize your site’s forms and find them more easily.
- Submit Button Text — Customize the wording on the Submit button.
- Submit Button Processing Text — Change the text that appears while your form is submitting.
You can also expand the Advanced settings to configure the following:
- CSS Classes — Add custom CSS to your form or submit button.
- Prefill by URL — Fill out some fields automatically based on a custom URL.
- Enable AJAX form submission — Enable AJAX settings so the form can be submitted without reloading the page.
- Disable storing entry information in WordPress — Make your form GDPR compliant. This will reduce the amount of data that the form captures about your visitors. If your form is likely to be used by people who live in the European Union, you might need to check this. For more details, see our guide on how to add a GDPR Agreement Field to your site’s forms.
Once you’re done with all the general settings, go to the Spam Protection and Security settings.
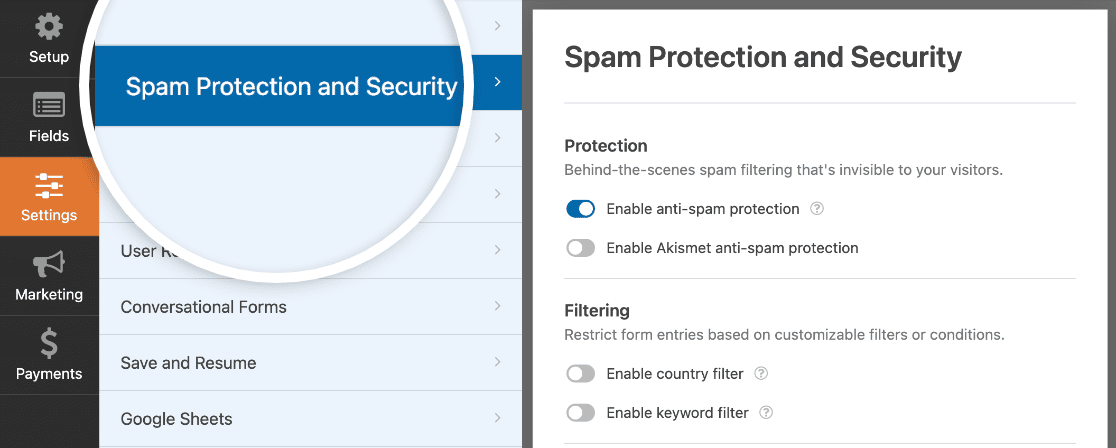
- Enable anti-spam protection — Stop spammers from submitting junk entries through your contact form. You can use the anti-spam feature, custom CAPTCHA, hCaptcha, or Google reCAPTCHA. Keep in mind that the anti-spam feature is enabled on all new forms by default.
- Enable Akismet anti-spam protection — If you use the Akismet plugin to combat comment spam, you can also connect it to your form to prevent spam submissions.
- Enable country filter — Prevent submissions from a specific country.
- Enable keyword filter — Prevent submissions that include certain words or phrases.
Click Save when you’re done.
Step 4: Customize Your CSV Upload Form’s Notifications
You can choose how you’d like to be notified when someone submits your form.
By default, every form has email notifications switched on. You can customize the email notification, or turn it off, in the Settings » Notifications panel.
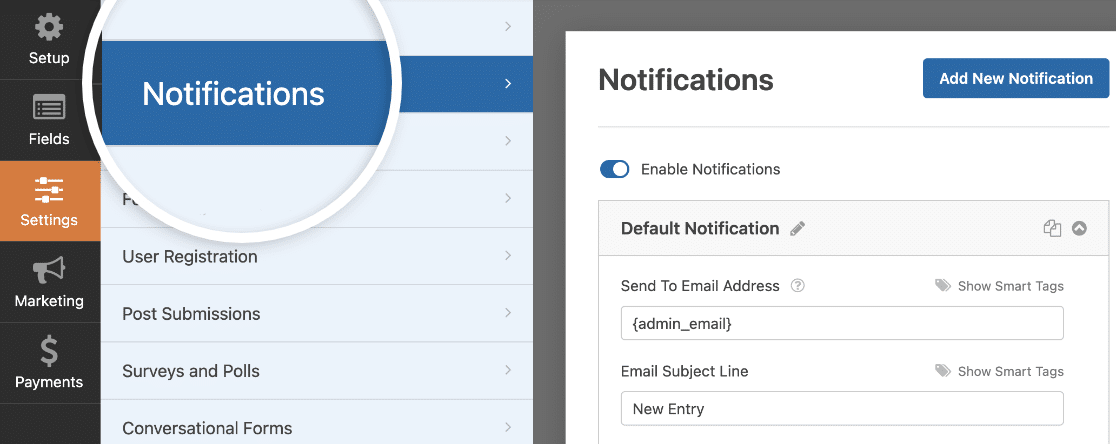
If you need help getting these notification emails set up, you can read our guide on setting up form notifications in WordPress.
You can also send a notification to your visitor automatically when they submit a form. This is a great way to let them know that you received their file. To set this up, you’ll need to use Smart Tags in your notification template.
You could also send the CSV file to other departments in your company. For example, you could have all of your wholesale orders go to the fulfillment center.
To send multiple notifications, read our guide on sending multiple form notifications in WordPress.
Remember how we said that you could access CSV uploads in your email notifications? Using Smart Tags to include your form’s file upload field in the body of the email will add it as a link you can click to view the CSV file.
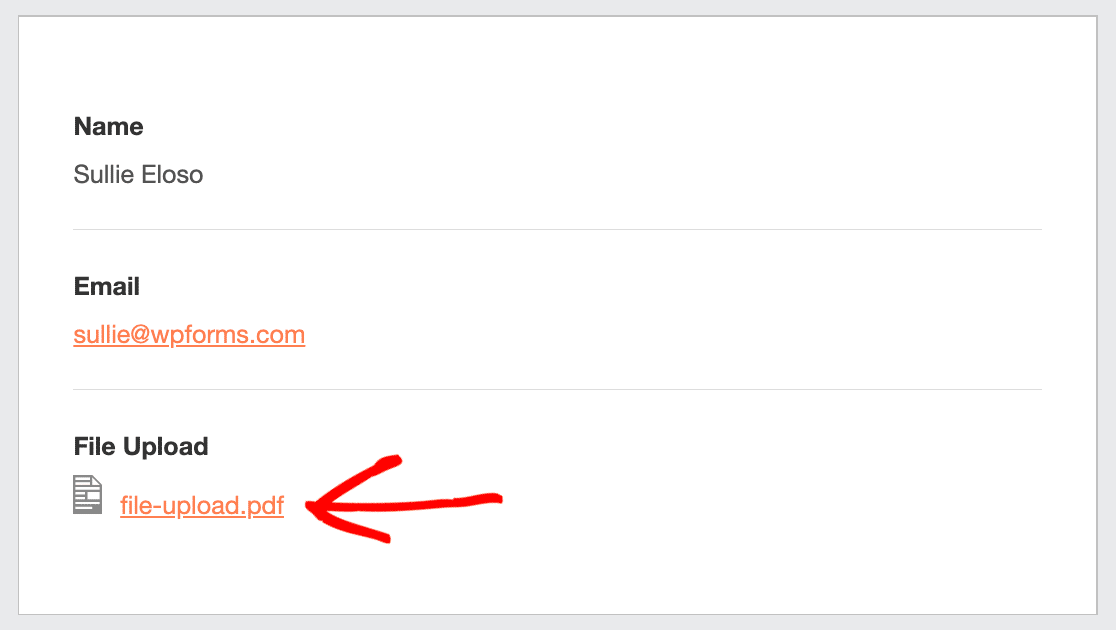
The other option is to scroll down to the Advanced settings for your email notification and Enable File Upload Attachments.
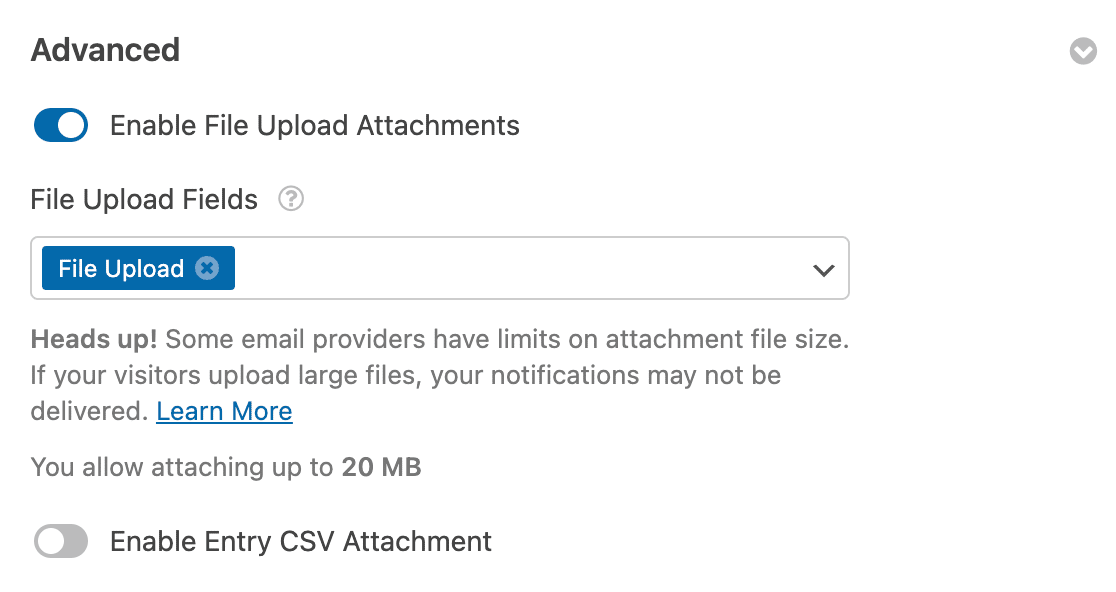
It’s important to note that most email providers limit the size of attachments, so your notifications might fail when this settings is turned on. To avoid this, make sure you’ve set the max file upload size as we mentioned in Step 2.
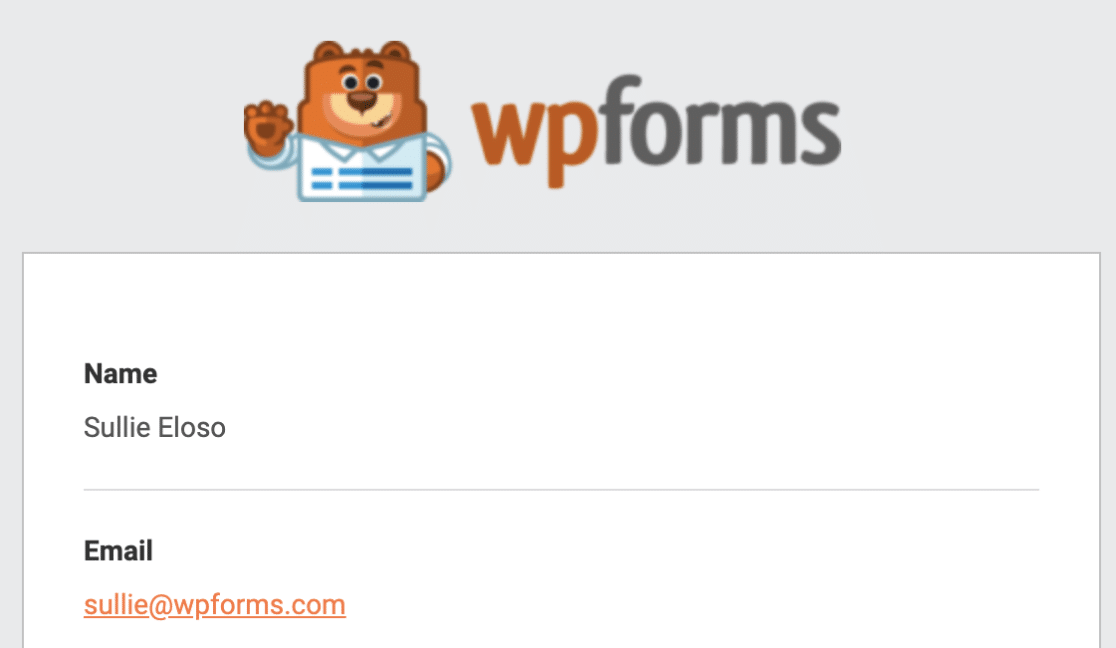
Finally, if you’d like to brand your emails, WPForms can add an image or company logo to notification emails as a custom header image. Your logo will show up at the top of the email, like in the screenshot below.
Step 5: Configure Your CSV Upload Form Confirmations
Confirmations are actions that automatically happen when a form is submitted. If you need more help with this, read our tutorial on how to set up form confirmations.
You can choose between three different types of confirmations:
- Message — Displays a message to confirm that the form has been submitted. This is the default Confirmation for every form. You can customize it if you want to.
- Display Page — Automatically displays a page or post on your site when the form is submitted.
- Redirect — Automatically loads a page on another website.
For our CSV upload form, let’s display a simple confirmation message.
Head back to the form editor and open your form. Click Settings » Confirmations.
In the Confirmation Type dropdown, select Message.
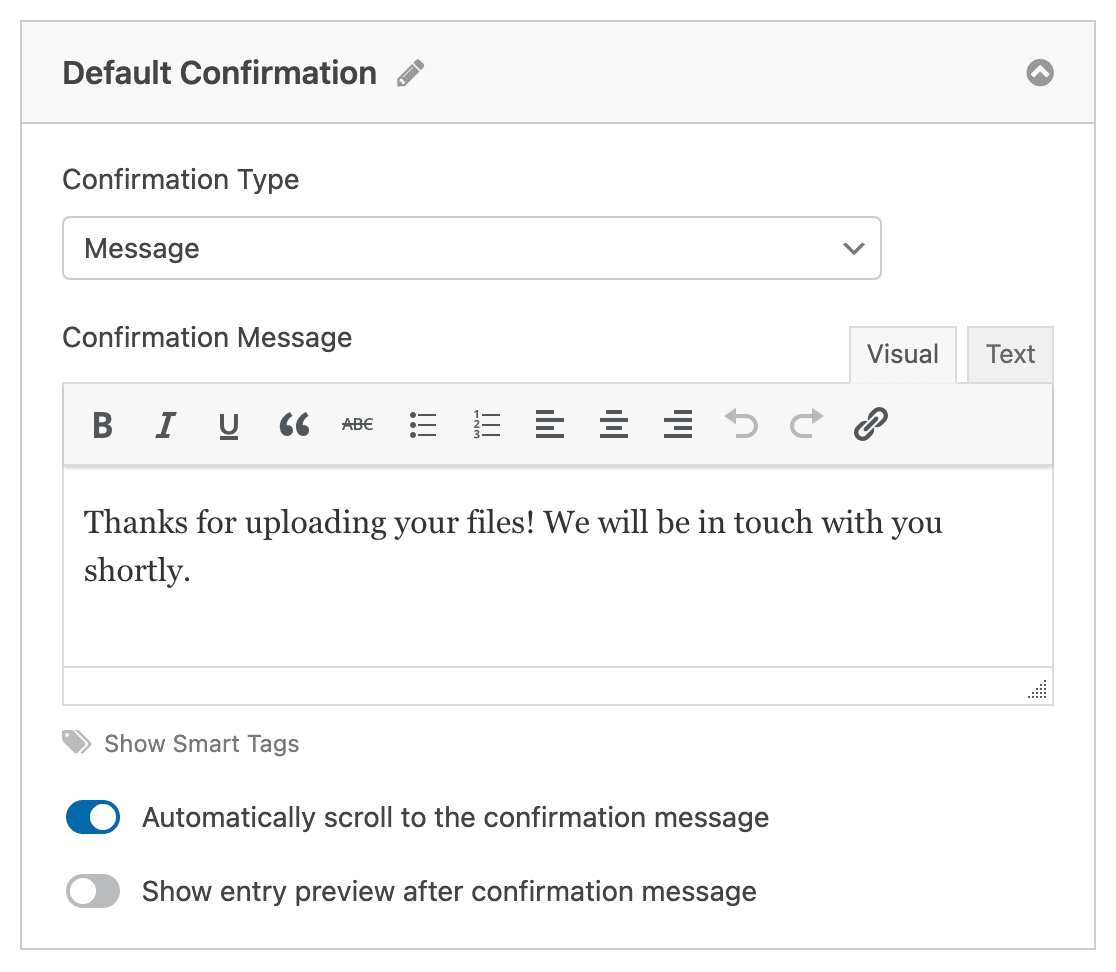
Customize the message and click Save.
All done! Everything’s complete, except for one important step. Let’s put the CSV upload form onto your website.
Step 6: Add Your CSV Upload Form to Your Website
WPForms lets you add forms anywhere in WordPress, such as a page, a post, a sidebar, or your site’s footer. We’re going to add it to a new page in this example.
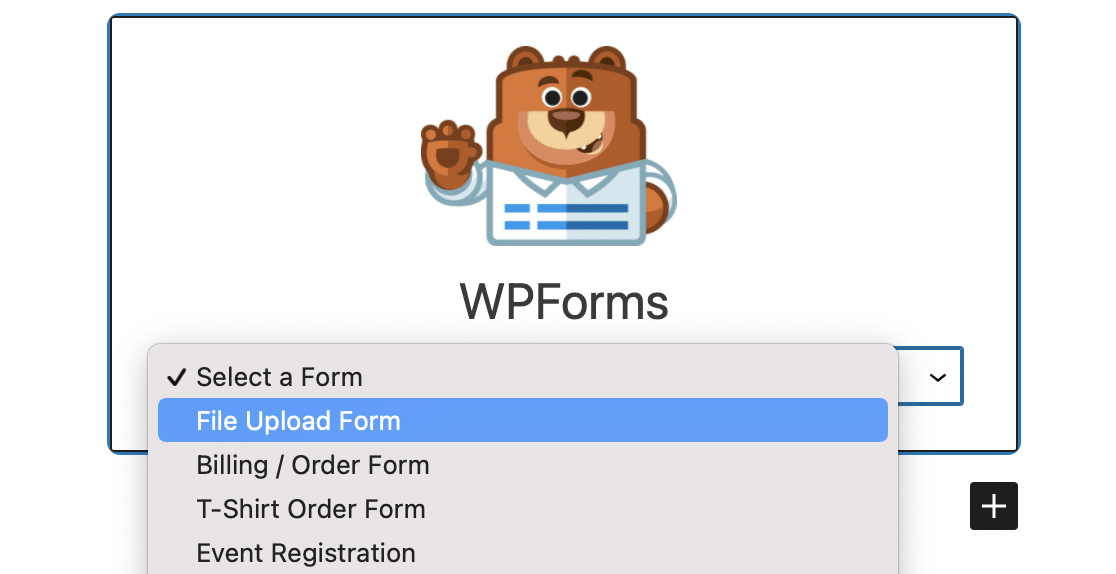
Create a new page and click on the plus (+) button to add a new block. Search for and click on the WPForms block.
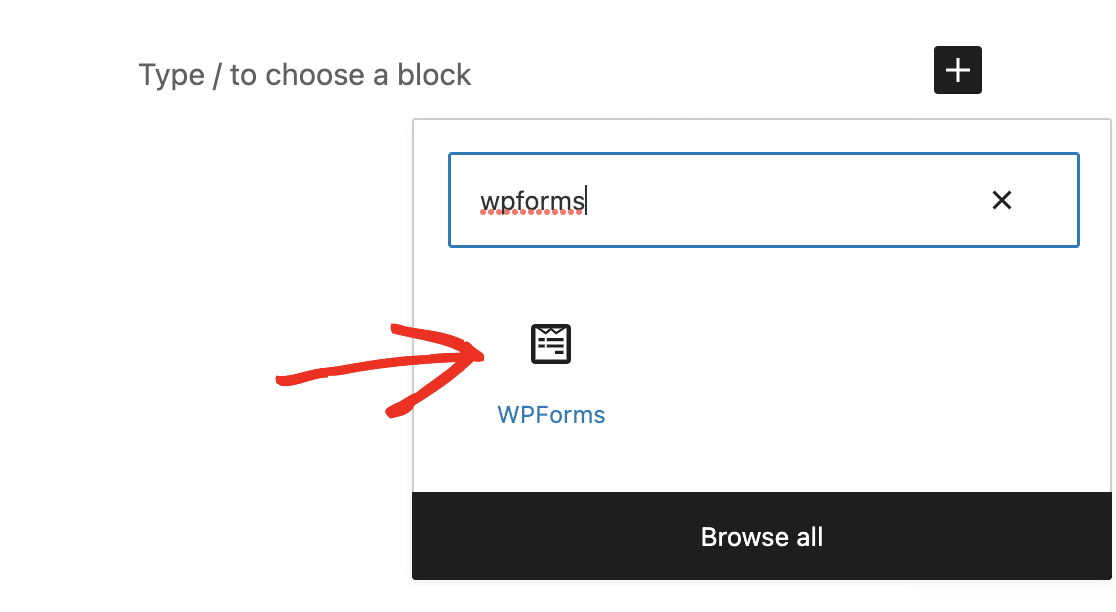
The WPForms block will load in the editor. From the dropdown list, select the CSV upload form you made.
Next, click the blue Publish button in the top right corner.

You’re all done! Your new CSV upload file is now live on your website and ready for your visitors to upload their files.
Step 7: View the CSV Files
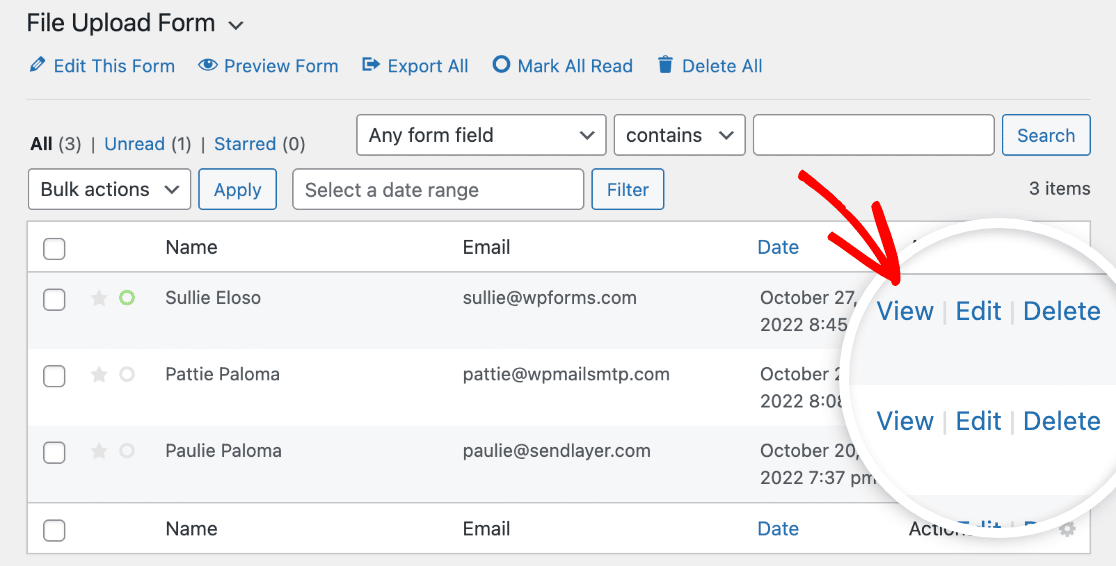
You can view all of the form submissions you’ve received in the WordPress dashboard, including any files users have uploaded. Click on WPForms » Entries and find your CSV upload form.
To view each individual form submission, click the View link on the right-hand side of the row.
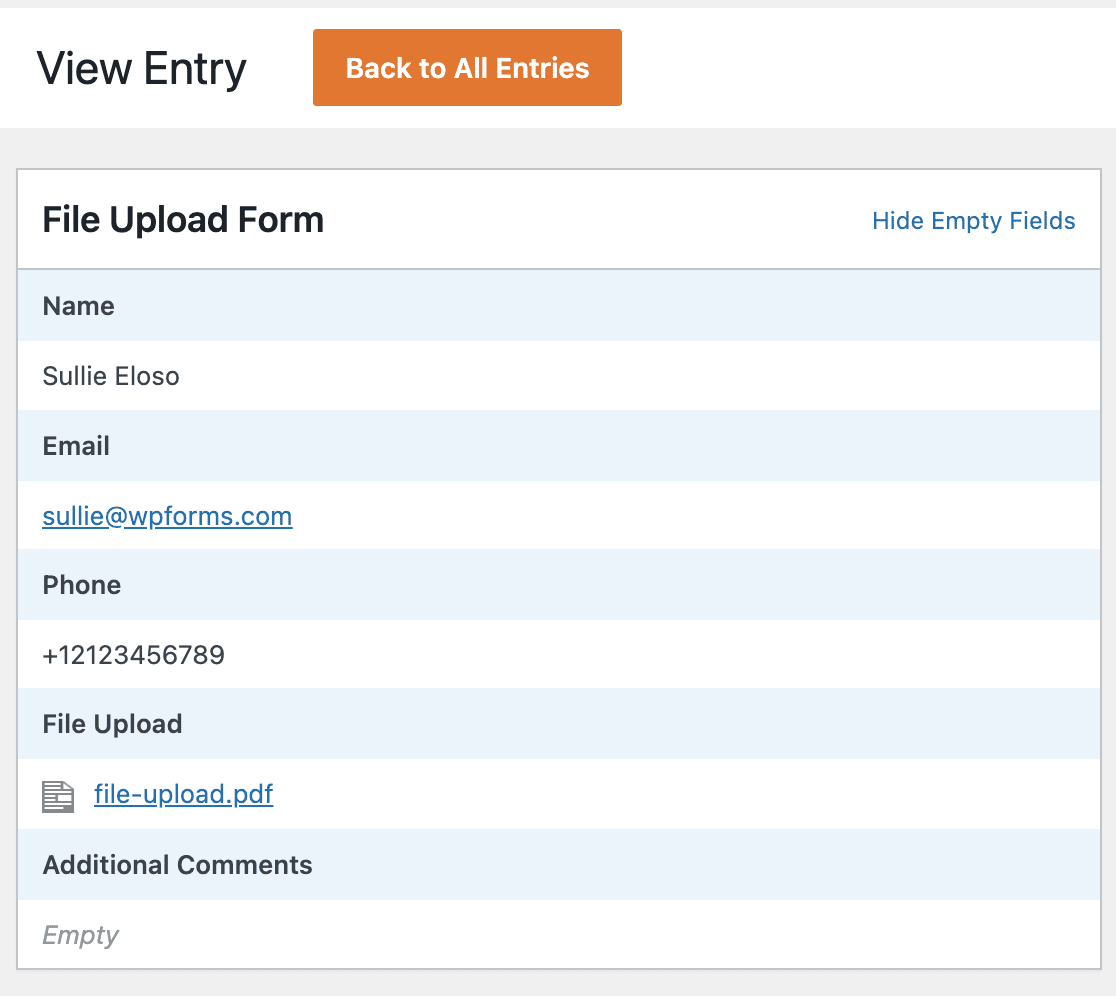
You can save or open the files the user uploaded by clicking the link.
If you need to store uploaded files in Dropbox or Google Drive, you can use the Zapier addon to do that automatically.
Create Your CSV Upload Form Now
Next, Create a File Upload Widget
That’s it! Now you know how to allow CSV file uploads in WordPress.
If you’d like to create a sidebar widget for your CSV upload forms, check out how to create a file upload widget in WordPress.
Did you know that you can also export WordPress form entries in CSV format? It’s a great way to view your contact form entries in Excel.
Create Your Wordpress Form Now
Ready to build your form? Get started today with the easiest WordPress form builder plugin. WPForms Pro includes lots of free templates and offers a 14-day money-back guarantee.
If this article helped you out, please follow us on Facebook and Twitter for more free WordPress tutorials and guides.



Hello, I need users to upload a CSV file into my WP website. Then I need to extract the data and compare it against other csv I have and return a value. Finally I’d need the system to erase the csv the user uploaded. What tools should I use.
Hey Alfonso- To achieve what you’ve mentioned, you’ll need to create a custom workflow. In case you’d like to look into custom development options, we highly recommend using Codeable and form long term you can go for WPBuffs
Thanks 🙂
I need to create a form to create a blog post from frontend. User can provide a title, a picture and a table in google sheets saved as a “csv” file and after sumbitting and admin review and admin confirmation the table should be viewed on the blog post automatically with the title and picture. Is this possible in wpforms?
Hey Dilan – We have the Google Sheet addon that you can use to connect your forms to Google sheet, and Post submissions addon to allow users to post blog posts. When you have sometime, can you please share some more details on the confirmation table that you’re referring too using our contact form and submit a support ticket?
Very helpful, but the files are stored in either the /wp-content/uploads/wpforms/ folder or the /wp-content/uploads/ folder, both of which are publicly accessible. If you are gathering order data containing sensitive information, how does one secure these folders so no one can access them except internal users, but also keeping it possible that visitors can open files that we intend them to access such as a pdf?
Hey Adam – To give you some context, when the file is uploaded, we add a unique hash to the end of the file (eg: my-logo-570543445db74.png) so that a malicious user couldn’t easily open up a bunch of files that have been uploaded to your site. Having said that, about the security that you’re looking for to block the access to the folder except internal users, we currently don’t have, and I’ll add this into our feature request tracker.