
AI Summary
File uploads are a blessing and a curse. They’re essential for collecting everything from job applications to client documents, but managing all those files? That’s where things get messy fast.
Manually downloading files from your WordPress forms and organizing them is a time sink, and when you’re juggling multiple projects, important documents have a habit of getting lost in the shuffle.
WPForms just made this whole process way simpler with our native Dropbox integration, which you use to set up automatic uploads that handle everything behind the scenes.
This guide walks you through the entire setup process, from installing the addon to configuring your file organization system. I’ll also cover some advanced tricks that’ll make your workflow even smoother.
Create Your Dropbox Upload Form Now! 🙂
How to Add a Dropbox Upload Form to Your WordPress Website
The WPForms Dropbox integration is quick to set up. Install WPForms Pro and add the Dropbox addon, then connect your Dropbox account under WPForms » Settings » Integrations.
Add a File Upload field to your form, open Settings » Dropbox in the form builder, and map the field to a folder. From that point on, every file your visitors upload is saved to your Dropbox account automatically.
Prefer to watch and learn? The video above will walk you through the entire process, or check out the steps below for the most up-to-date and step-by-step information.
Step 1: Install the WPForms Plugin
The free version of WPForms is solid for basic contact forms, but when it comes to file uploads and management, the Pro version unlocks some serious power.
With Pro, you get the File Upload field that lets users upload documents, images, or any file type you specify directly through your forms.
More importantly, you get access to the Dropbox integration that automatically sends those files to your Dropbox account without any manual work on your end.
You also get advanced file controls where you can set size limits, restrict file types, and limit how many files users can upload at once. This keeps prevents people from uploading massive files that’ll eat up your space.

To get started, buy the Pro license. Then install and activate WPForms on your site. If you’ve never added a plugin before, here are step-by-step instructions on how to install a WordPress plugin.
Already have WPForms installed? You can upgrade your license anytime from your account dashboard, and the new features activate immediately.
Step 2: Get the Dropbox Addon
From your WordPress dashboard, go to WPForms » Addons. You’ll see a bunch of available addons here, but we’re looking for the Dropbox one.

Click Install Addon next to the Dropbox addon. It’ll download and install automatically, which usually takes just a few seconds.
Once it’s installed, you’ll see a confirmation message. The addon will be automatically activated, so you’re good to create your file upload form!
Step 3: Create Your File Upload Form
If you don’t have a form on your website with a file upload function yet, you can follow this guide on creating a file upload form.

Or, if you’d prefer a written tutorial, You can also read about how to create a WordPress upload widget, or check out any of these more specific tutorials:
Once you’ve created an upload form, you can connect Dropbox with it to send a copy of all uploaded files as backups. Make sure to hit Save here.

Step 4: Connect WPForms to Dropbox
After you’ve set up your form, look for the Settings tab at the top of the form builder. Click on it, then find Integrations in the left sidebar. You’ll see Dropbox listed among the available integrations.
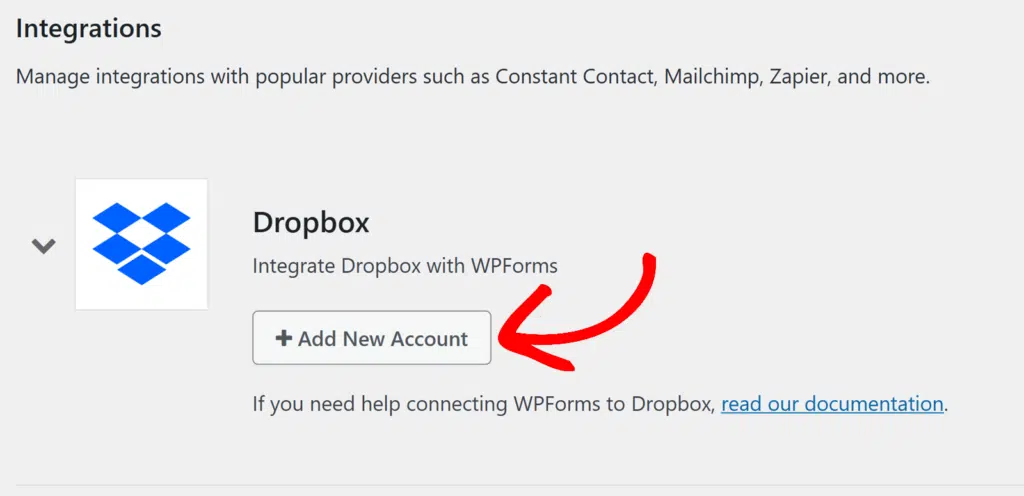
The first thing you’ll need to do is connect your Dropbox account by clicking +Add New Account button. This’ll open a new window where Dropbox asks for permission to let WPForms access your account.
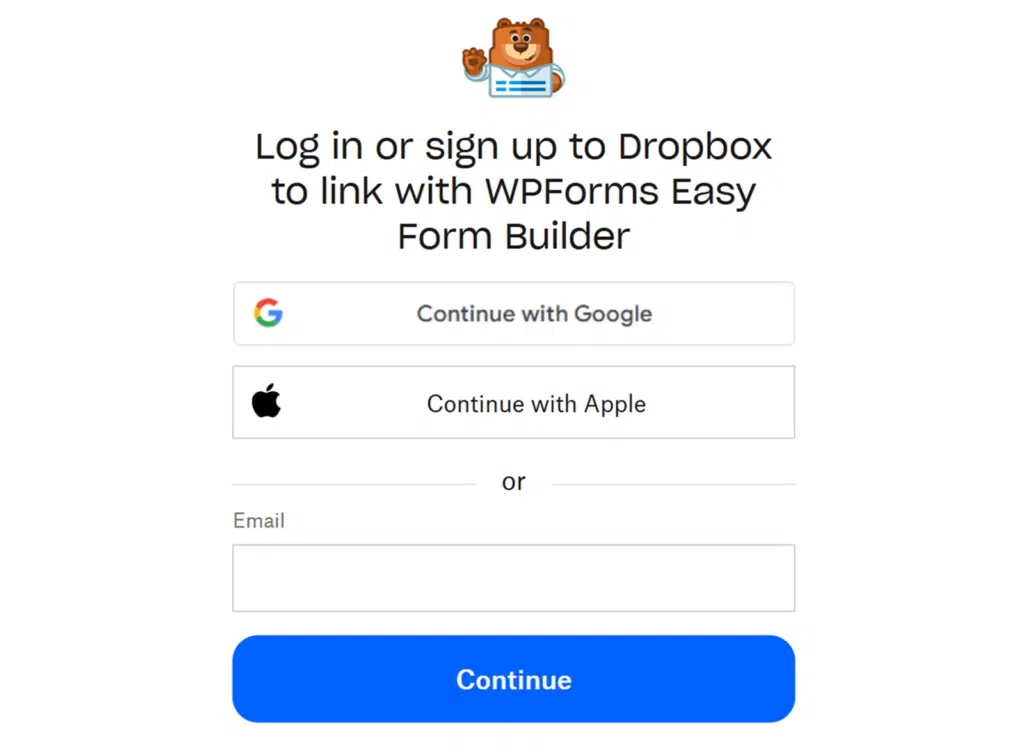
Go ahead and authorize the connection. WPForms only gets permission to create and manage files, not read your existing stuff.

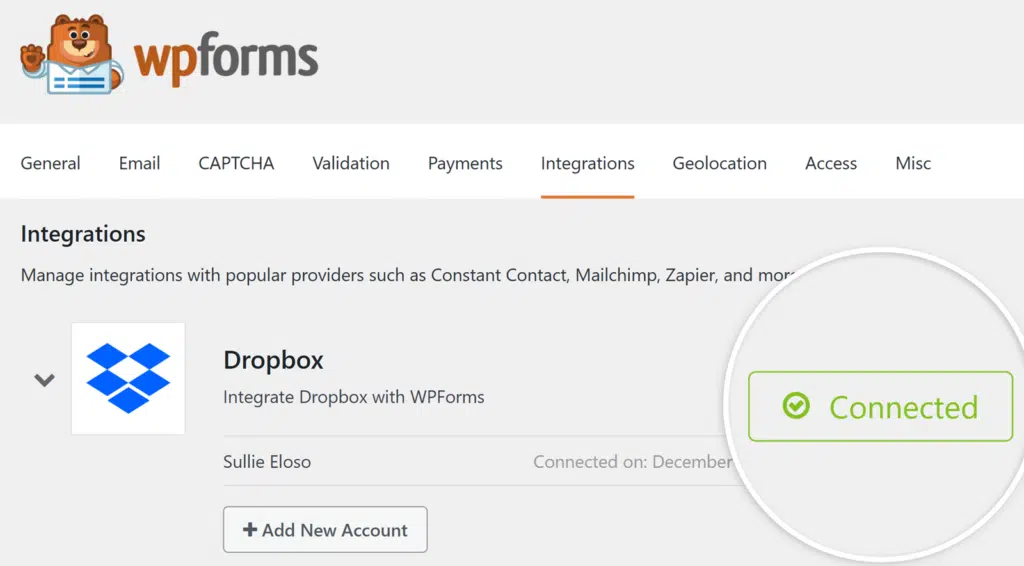
Once you authorize it, you’ll be redirected back to your form settings where you should see “Connected” next to your Dropbox account.
Step 5: Add a Dropbox Connection to Your Form
Now that you’ve connected WPForms to your Dropbox account, it’s time to add the actual integration to your form.
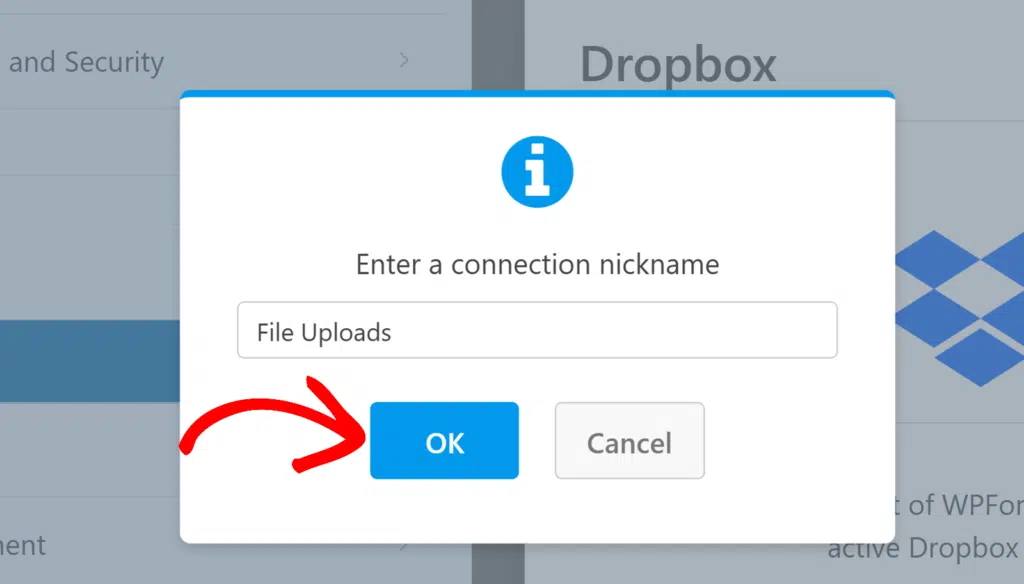
In your form builder, head to Settings » Dropbox and click the Add New Connection button. This opens up an overlay where you can enter a connection nickname.
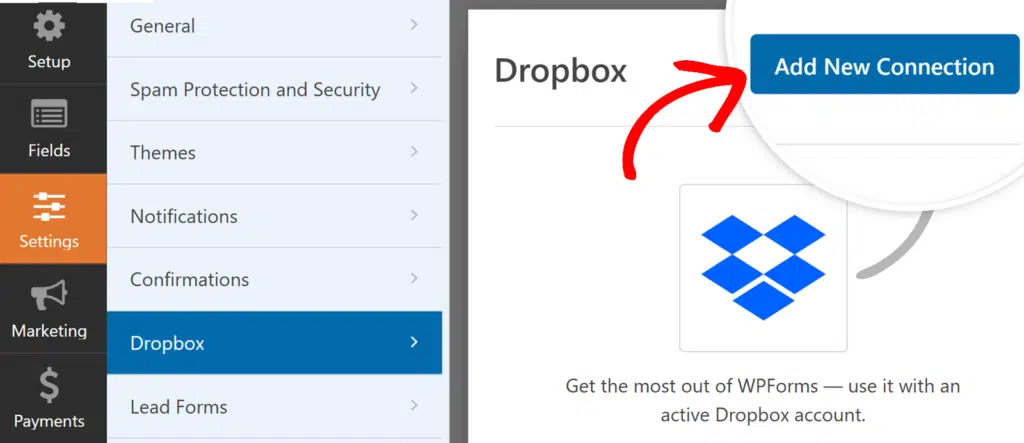
Use whatever makes sense to you since your users won’t see this. Something like “Client Documents” or “Resume Uploads” works great. Hit OK when you’re done.
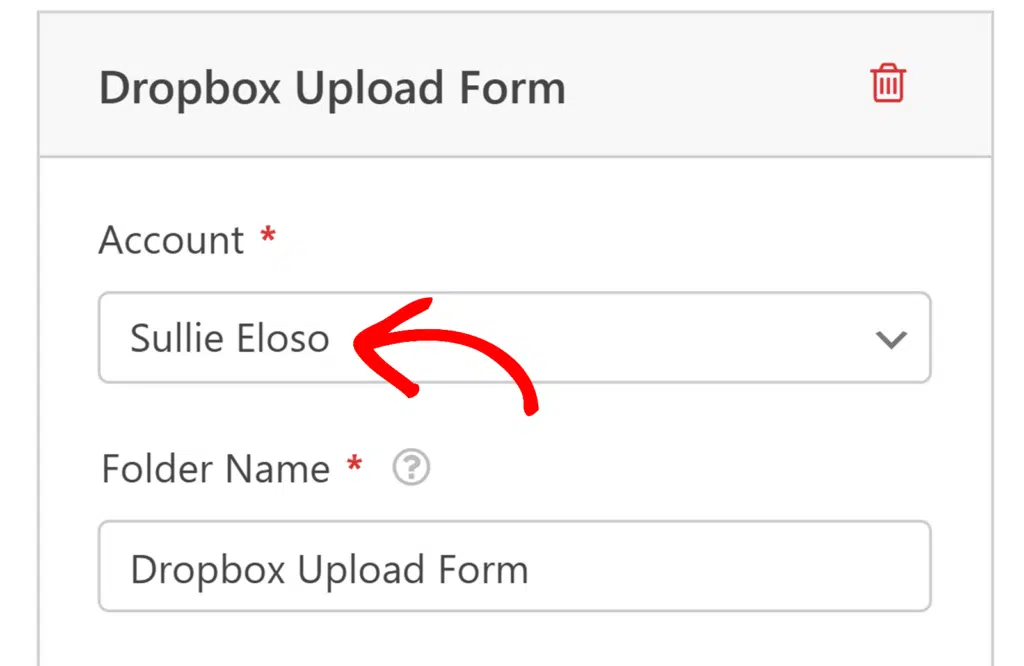
After adding the nickname, you’ll see additional settings appear. First, use the Account dropdown to select the Dropbox account you connected earlier.
Then, enter a Folder Name where you want your form files stored. By default, this field shows your form name, but you can change it to anything you want.
A small path preview appears below the field so you can see exactly where the folder will live in Dropbox.
When files get uploaded, WPForms automatically creates this folder inside the Apps/WPForms directory in your Dropbox account.
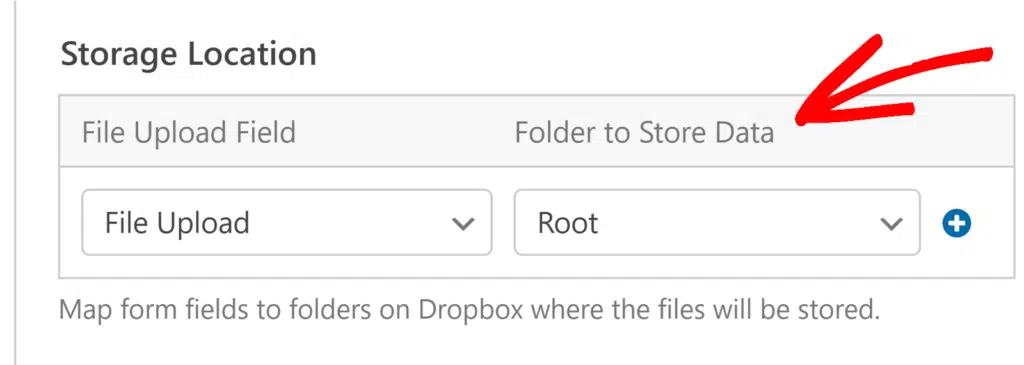
Next, you need to tell WPForms exactly which files go where in your Dropbox. You’ll see two key options in this section for managing your files:
- The File Upload Field dropdown lets you choose which file upload field from your form should send files to Dropbox. If you have multiple file upload fields, you can map each one separately.
- The Folder to Store Data option lets you pick where within your Dropbox folder these files should go. You can choose “Root” (which means directly in your main folder) or create subfolders for better organization.
Want to get fancy with organization? Click the blue plus (+) button to map multiple file upload fields to different subfolders. For example, you could send resumes to one subfolder and cover letters to another.
You can also nest subfolders a few levels deep by separating each level with a forward slash. Name a folder 2026/resumes/engineering, for example, and WPForms files uploads three folders deep inside your main folder. You can go up to three levels.
For folders that organize themselves, try Smart Tags in the folder name. Adding {date format="Y"} sorts uploads into a folder named after the current year, and {field_id="1"} names the folder from whatever the user entered in that field. A job application form could file every applicant’s documents into their own folder without you touching a thing.
This step is optional, but it’s handy when you don’t want every submission going to Dropbox. With conditional logic, you can send files to Dropbox only when someone makes a specific choice on your form.
Say you only want to back up files when a user opts in. Start by adding a Checkboxes field to your form with a single choice, labeled something like “Store my files securely in cloud storage”.
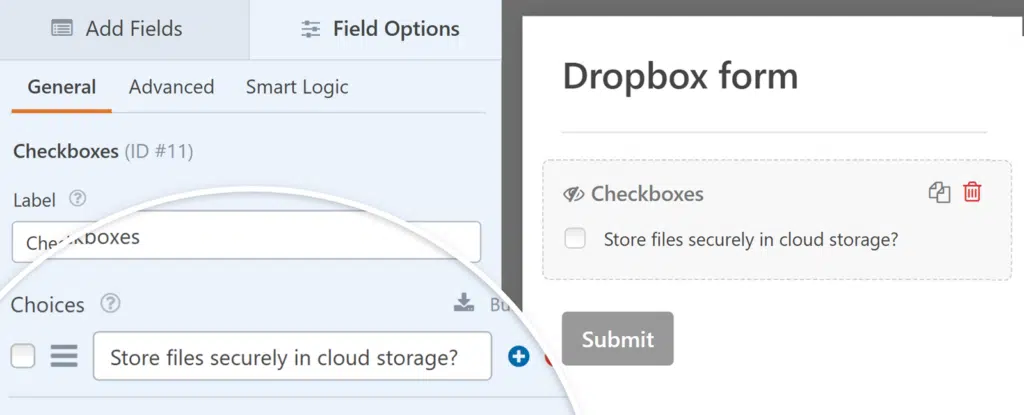
Then go back to Settings » Dropbox in the form builder and toggle on Enable Conditional Logic. A few dropdowns appear where you build your rule.
For this example, you’d set it to process the connection if “Store my files securely in cloud storage” is checked.
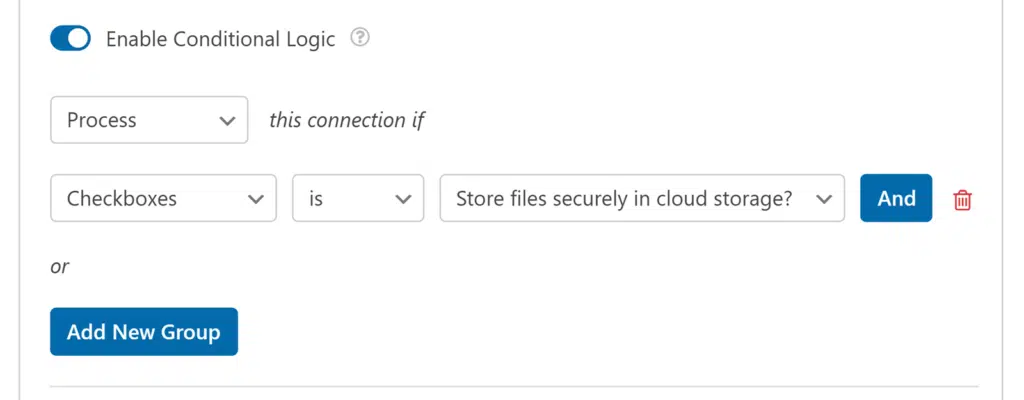
Now the upload only lands in Dropbox when the user ticks that box. Go ahead and save your form once your rule is in place.
Step 7: Test Your Dropbox Integration
Before you launch your form to the world, you need to make sure everything’s working properly. Trust me, testing now saves a lot of headaches later.
Save your form first by clicking the Save button in the form builder. Then, grab the form’s shortcode or use the form block to add it to a test page or post on your site.
Visit the page where your form is embedded and fill it out like a regular user would. Upload a test file like a simple document or image from your computer. Fill in any other required fields and hit submit.

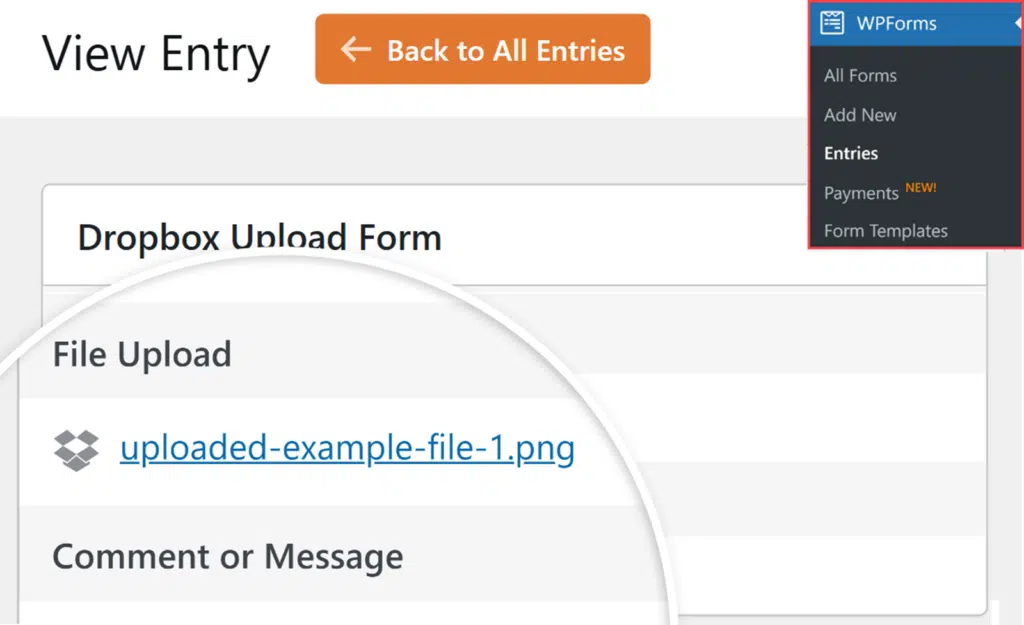
After submitting, head over to your Dropbox account and navigate to the Apps » WPForms folder. You should see your designated folder there, and inside it, your test file should be sitting pretty.

If you set up subfolders, make sure the file landed in the right spot. Also check your WPForms » Entries in your WordPress dashboard.
By default, WPForms keeps a copy of each upload on your site and in Dropbox. If you’d rather save server space, open Settings » Dropbox and expand the Advanced section, then turn on Delete Local Files After Upload.
With that on, files live only in Dropbox once the upload finishes, and WPForms updates the links in your entries and email notifications to point to the Dropbox copies.
If something’s not working, don’t panic, since the fixes are usually simple. Permission problems clear up when you re-authorize your Dropbox connection, and folder mapping mistakes are usually a quick fix in your folder settings.
FAQs on How to Add a Dropbox Upload Form to Your WordPress Website
Learning how to add a Dropbox upload form to WordPress is a popular topic of interest among our readers. Here are answers to some common queries about it:
What file types can I upload through WPForms to Dropbox?
WPForms supports a wide variety of file types for upload to Dropbox, including documents (PDF, DOC, DOCX), images (JPG, PNG, GIF), spreadsheets (XLS, XLSX), and many others.
By default, WPForms allows common file types for security reasons, but you can customize which file extensions are permitted through the File Upload field settings.
To restrict or expand allowed file types, simply edit your file upload field in the form builder and specify the extensions you want to allow.
This gives you complete control over what types of files users can submit through your forms, whether you’re collecting resumes, portfolios, or business documents.
Is there a file size limit for Dropbox uploads?
Yes, there are file size limits that depend on both your WordPress server settings and your Dropbox account. WPForms respects your server’s maximum file upload size, which is typically set by your hosting provider (usually between 2MB to 100MB).
You can also set custom file size limits within WPForms itself through the File Upload field settings. For Dropbox specifically, individual files can be up to 50GB in size, but your overall account storage depends on your Dropbox plan.
Can I organize files into different Dropbox folders automatically?
Absolutely! The WPForms Dropbox addon allows you to map different file upload fields to specific folders within your Dropbox account. When setting up your integration, you can choose a main folder name, and WPForms will create subfolders as needed.
If you have multiple file upload fields on the same form, you can send each type to a different subfolder – for example, resumes to one folder and cover letters to another. You can also use conditional logic to route files to different folders based on user selections.
All folders are automatically created within the Apps/WPForms directory in your Dropbox account, keeping everything organized and separate from your personal files.
What happens if my Dropbox storage is full?
When your Dropbox account reaches its storage limit, new file uploads will fail, and users submitting your forms will likely receive an error message. Dropbox Basic (free) accounts have a 2GB limit, while paid plans offer significantly more storage.
If you’re approaching your limit, you have several options: upgrade your Dropbox plan, delete old files you no longer need, or enable the “Delete Local Files After Upload” option in WPForms to save space on your WordPress server while keeping files only in Dropbox.
It’s important to monitor your Dropbox storage regularly, especially if you’re collecting large files or have high-volume forms, to ensure your file upload forms continue working properly.
Can I allow others to upload files to my Dropbox through forms?
Yes, that’s exactly what the WPForms Dropbox integration is designed for! When visitors fill out your forms and upload files, those files are automatically sent to your Dropbox account without requiring them to have their own Dropbox account or access to yours.
The files go into a designated folder within your Dropbox (specifically in the Apps/WPForms directory), and you maintain complete control over the organization and access. This is perfect for collecting client documents, job applications, project files, or any situation where you need others to send you files securely.
Do uploaded files get deleted from my WordPress site?
This depends on your settings. By default, WPForms stores uploaded files both on your WordPress server and sends copies to Dropbox, giving you redundancy.
However, you can enable the “Delete Local Files After Upload” option in the Dropbox addon settings, which automatically removes files from your WordPress server once they’re successfully uploaded to Dropbox.
When this option is enabled, WPForms automatically updates all file links in form entries and email notifications to point directly to the Dropbox versions.
Can I upload folders instead of individual files?
No, the WPForms file upload field is designed for individual files only, not entire folders. This is a standard limitation across most web-based file upload systems for security and technical reasons.
If users need to submit multiple files, you can configure your file upload field to accept multiple files at once by enabling the “Allow Multiple Files” option in the field settings.
Users can then select multiple files from their computer in a single upload action. Alternatively, you can ask users to compress their folders into a ZIP file before uploading.
How do I create subfolders in my Dropbox integration?
Creating subfolders in your WPForms Dropbox integration is straightforward. In your form builder, go to Settings » Dropbox and look for the Folder to Store Data dropdown when mapping your file upload fields.
You can select “Root” to store files directly in your main folder, or you can type in subfolder names to create organized storage. If you have multiple file upload fields, click the blue plus (+) button to map each field to different subfolders.
WPForms automatically creates these subfolders within your Apps/WPForms/[Your Folder Name] directory in Dropbox if they don’t already exist.
Can I connect multiple Dropbox accounts to different forms?
Yes, you can connect multiple Dropbox accounts and assign them to different forms or even different connections within the same form.
In the WPForms Dropbox settings, you can authorize multiple Dropbox accounts and then choose which account to use for each form integration.
This is particularly useful for agencies or businesses that need to separate client files into different Dropbox accounts, or when you want to keep personal and business uploads completely separate.
Each form can have its own Dropbox connection with its own folder structure and organization system, giving you complete flexibility in how you manage file uploads across your website.
How do I stop or cancel file uploads to Dropbox?
To stop file uploads to Dropbox, you can disable the integration in several ways depending on your needs. For a temporary pause, go to your form’s Settings » Dropbox and toggle off the specific connection.
To permanently remove the integration, you can delete the Dropbox connection entirely from the same settings page. If you want to stop uploads immediately for a form that’s already published, you can also deactivate the Dropbox addon from WPForms » Addons.
Unfortunately, there’s no way to cancel uploads that are already in progress, but you can delete files from your Dropbox account manually if needed.
Next, Check Out More WPForms Integrations
Bravo! You can now save a substantial amount of time and effort with every new file submission you collect getting automatically backed up in your Dropbox account.
Want to send form entries to Google Sheets so you can view all your entry information in a spreadsheet? The WPForms Google Sheets addon lets you connect any form directly to Google Sheets.
And, for more awesome ways to use WPForms with a number of different integrations, check out these step-by-step guides:
- How to create a Google Drive upload form
- How to connect your WordPress contact form to Discord
- How to create a custom Airtable form for WordPress
- How to sign users up for webinars in GoToWebinar
Set Up Your Dropbox Integration Now
Ready to build your form? Get started today with the easiest WordPress form builder plugin. WPForms Pro includes lots of free templates and offers a 14-day money-back guarantee.
If this article helped you out, please follow us on Facebook and Twitter for more free WordPress tutorials and guides.


Is there a way to just send the photos to Dropbox? So they don’t take space within wordpress?
Hi Gabriela,
While you can send a copy of all uploaded files to Dropbox, as described in this tutorial, we don’t currently have a way to avoid also uploading the file to your site. This is because our Dropbox integration isn’t direct, but rather uses Zapier as a middle man. But we’ve noted direct Dropbox integration on our feature request list, and will keep that on our radar as a potential option down the road.
If you have any additional questions, please get in touch 🙂
Any way to bypass Zapier?
Hi David,
Unfortunately we don’t have a built-in integration with DropBox so you won’t be able to send form data from WPForms to DropBox without the Zapier addon. I apologize for the inconvenience! 🙁
Is there an upload limit? I need to be able to upload up to 1gb.
Hi Hemal!
The file upload size limitation in your forms defaults to the maximum that your web host allows. For most web hosts this is 8 or 16MB, though some are much lower or higher.
While we provide the option for you to decrease the upload size limit in your forms, we have no control over the upper limits imposed by your host’s server. To get this increased (or find out if an increase is possible), you’ll need to get in touch with your hosting provider.
I hope this helps.
Have a good one 🙂
Is it possible to send files to different folders within Dropbox? For example, can I create two forms with WPForms and have one send files to http://www.dropbox.com/home/Folder1 and the other form send files to http://www.dropbox.com/home/Folder2?
Thanks.
Hi Chris!
Yes, when you create a Zap for a form you are choosing a Dropbox folder where your files will be saved to. This way if you have two forms then you can create two different Zaps and choose different folders for them.
I hope this helps.
Have a good one 🙂
Is there a reason why when using the modern version of the upload field (where you can upload multiple files), it uploads a .txt file to my Dropbox? When I force the .PDF on zapier, it pops out a corrupted PDF file. Any way to move around this issue?
Hi Ernesto!
If you have a WPForms license, you have access to our email support, so please submit a support ticket.
Otherwise, we provide limited complimentary support in the WPForms Lite WordPress.org support forum.
Have a good one 🙂
When using the new upload field that allows for multiple documents to be uploaded at once, it ends up uploading a .txt file. When I force the file extension to .pdf, it comes out as corrupted.
I believe this issue doesn’t happen when it’s done by separate “classic upload fields”.
So, 4 years laters and you still don’t have a direct upload to dropbox? I don’t want a copy of the file, or to use Zapier, can’t you just upload to dropbox like Ninja Forms?
Hi there- We apologize for the frustration you are facing here! This is still under the review of our development team. I have added your vote and email address to the feature-request list and you’ll be notified once this integration is added!
Thanks, and sorry!
After I click add new account, it kept displaying error sentence below:
“some error occured please try again after some time or use manual connect method”
Hello there, sorry to hear you’re facing that error!
For a smoother experience, we recommend using the built-in integration available through our Dropbox addon instead. It’s more reliable and should help you connect without issues.
You can check out our Dropbox addon documentation here for step-by-step instructions.
Please submit a support ticket for any help in setting this up!