
AI Summary
If you’re handling customer support through email alone, you already know how messy it gets. Requests get buried, responses get delayed, and there’s no easy way to track what’s been resolved and what hasn’t.
A dedicated support ticket form fixes that. It gives your users a clear way to submit requests, and it gives your team a structured system to manage them.
You can route tickets to the right department, set priority levels, collect screenshots, and track everything from your WordPress dashboard.
WPForms comes with a ready-to-use support ticket form template that you can customize in minutes. In this guide, I’ll walk you through how to use it up step by step.
Get the WPForms Support Ticket Form Template! 🙂
- How to Create a Support Ticket Form in WordPress
- Step 1: Install WPForms and Choose the Support Ticket Template
- Step 2: Customize Your Support Ticket Form Fields
- Step 3: Configure Your Form Settings
- Step 4: Set Up Smart Email Notifications
- Step 5: Customize Your Confirmation Message
- Step 6: Publish Your Support Ticket Form
- Support Ticket Form Best Practices
How to Create a Support Ticket Form in WordPress
I’ll be using WPForms for this tutorial because it has a pre-built support ticket form template that handles most of the setup for you.
You can also use the AI form builder to describe the form you want and have WPForms generate it automatically. The support ticket form template is available with WPForms Pro. Let’s get started.
Step 1: Install WPForms and Choose the Support Ticket Template
First, install and activate the WPForms plugin on your WordPress site. If you need help, WPBeginner has a detailed guide on installing WordPress plugins.
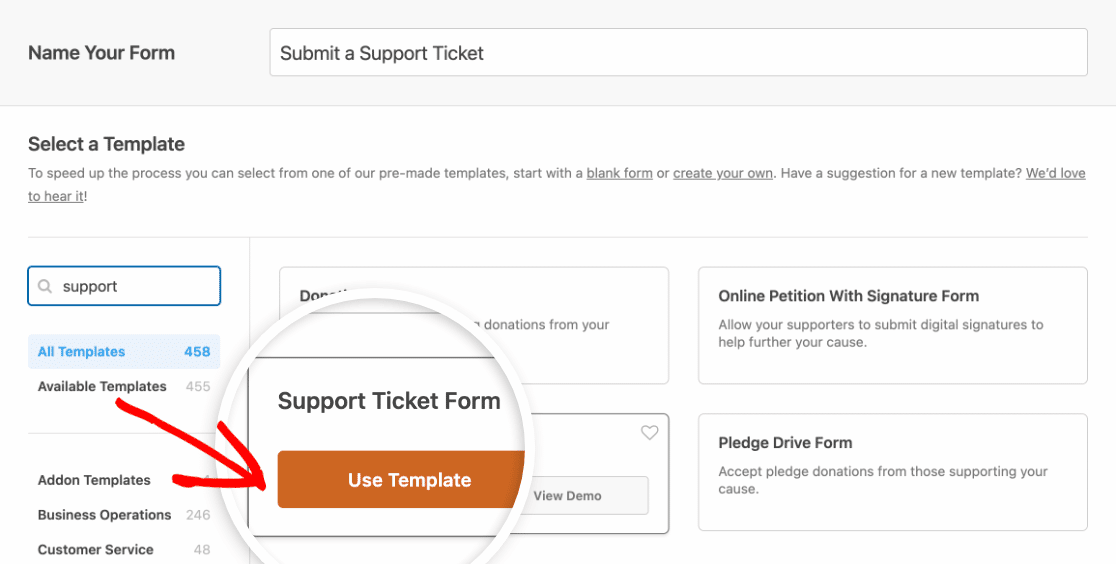
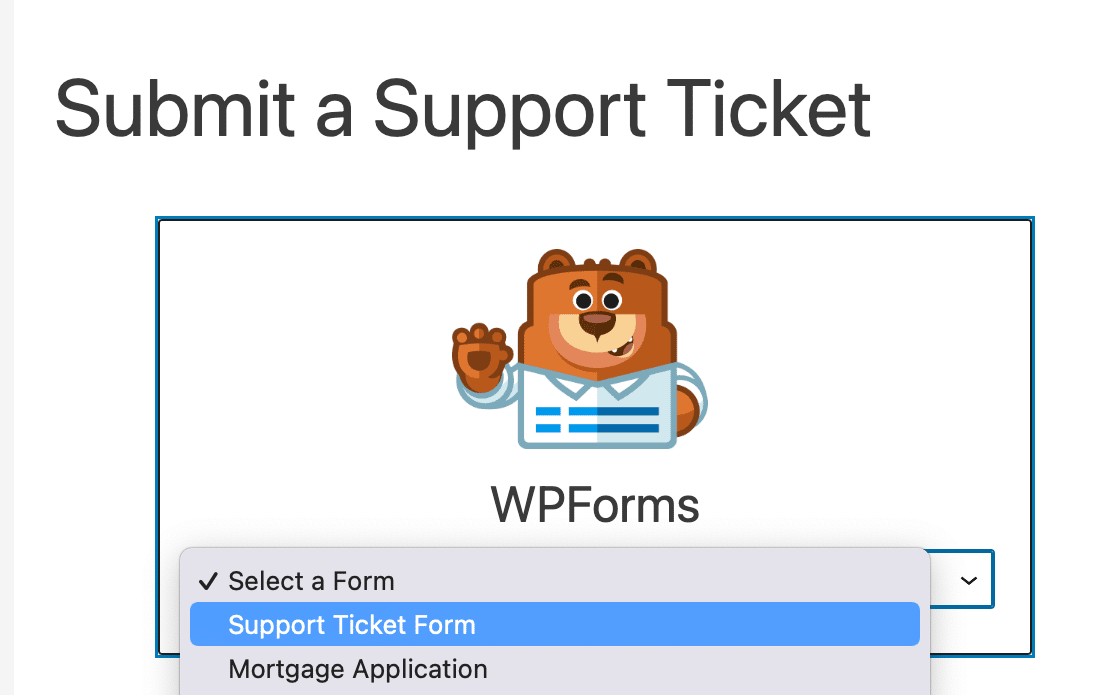
Once WPForms is active, go to WPForms >> Add New to create a new form. Name your form something like “Support Ticket Form,” then scroll down to the template section.
Type “support” into the search bar and you’ll see the support ticket form template. Click Use Template to load it into the form builder.
Step 2: Customize Your Support Ticket Form Fields
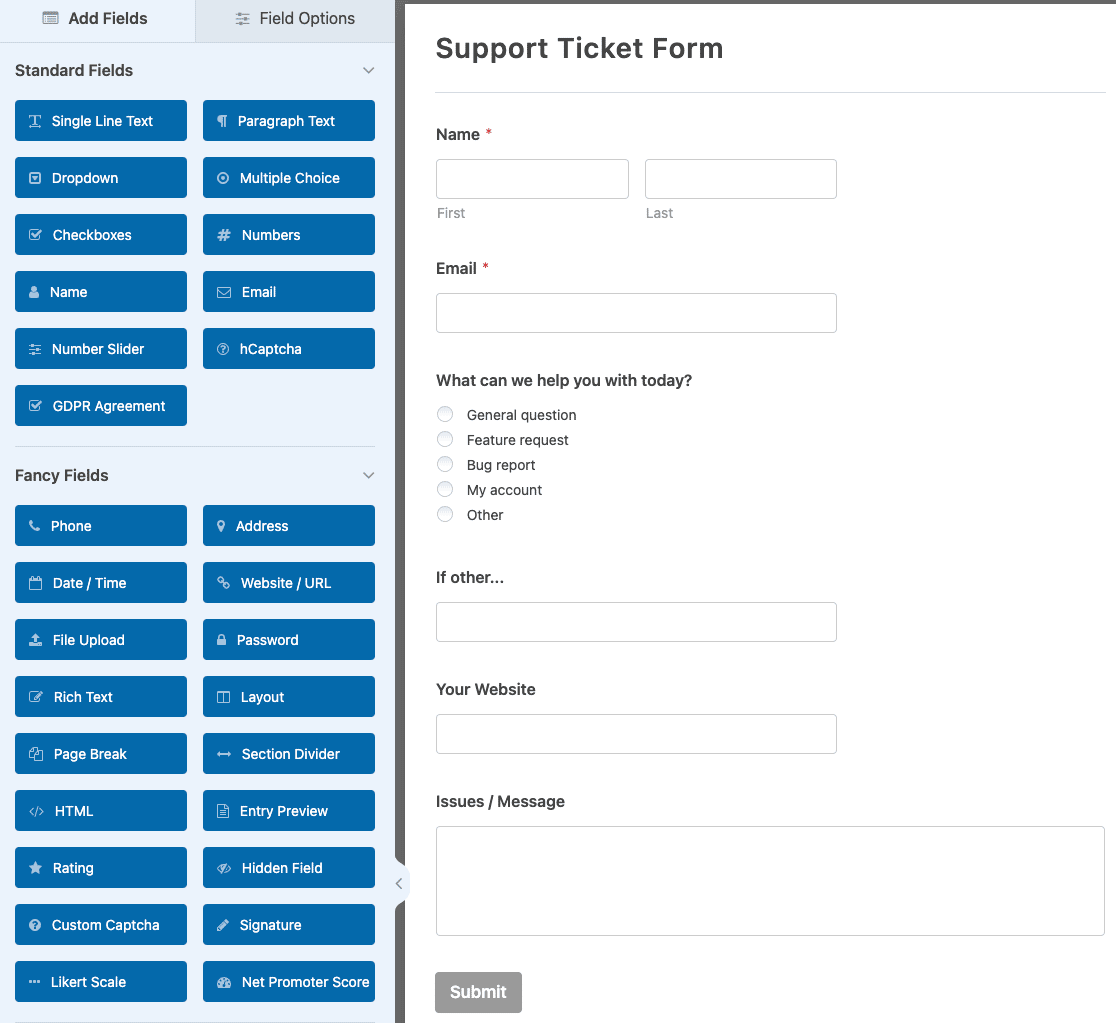
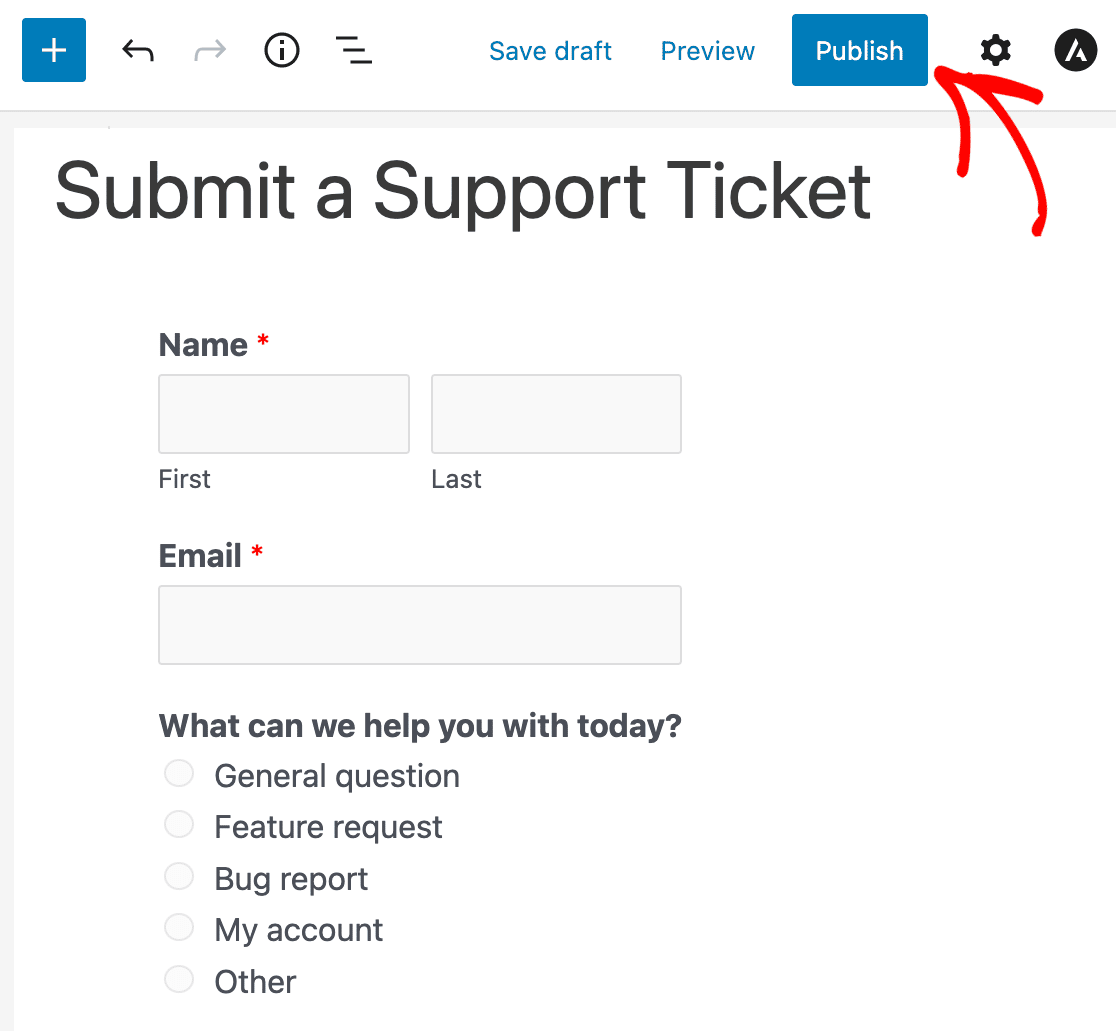
When the template loads, you’ll already have a solid foundation with these fields:
- Name
- What can we help you with today? (dropdown)
- Your Website
- Issues/Message
This is a good starting point, but I’d recommend adding a few more fields depending on your needs. A strong support ticket form typically includes:
- Name and email for identifying the requester
- Department or category so tickets get routed to the right team
- Priority level (Low, Medium, High, Urgent) so your team can triage
- Subject line for quick scanning
- Description for the full details
- File upload so users can attach screenshots or documents
To add a field, drag it from the left panel onto your form. To customize a field, click on it to open its options.
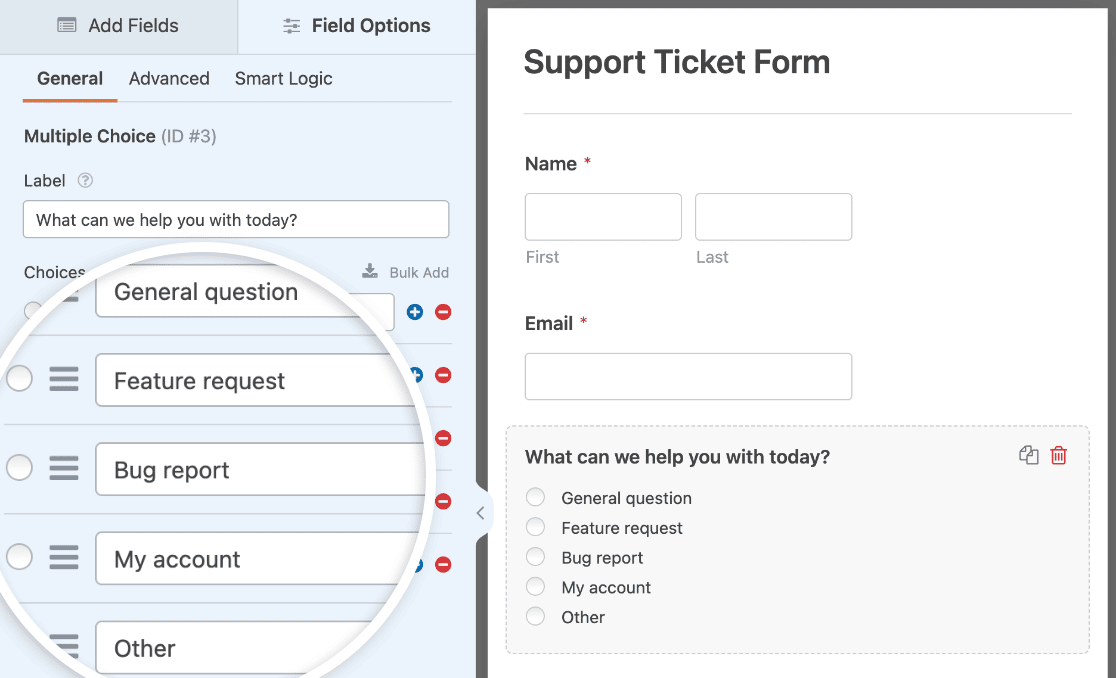
For the “What can we help you with today?” dropdown, you can customize the choices to match your support categories. Common options include General Question, Bug Report, Feature Request, Billing Issue, and Account Help.
If you want users to attach screenshots or files, add a file upload form field. This is really helpful for troubleshooting visual issues or collecting documents. When you’re happy with your fields, click Save.

Step 3: Configure Your Form Settings
Head to Settings >> General to review the basics.
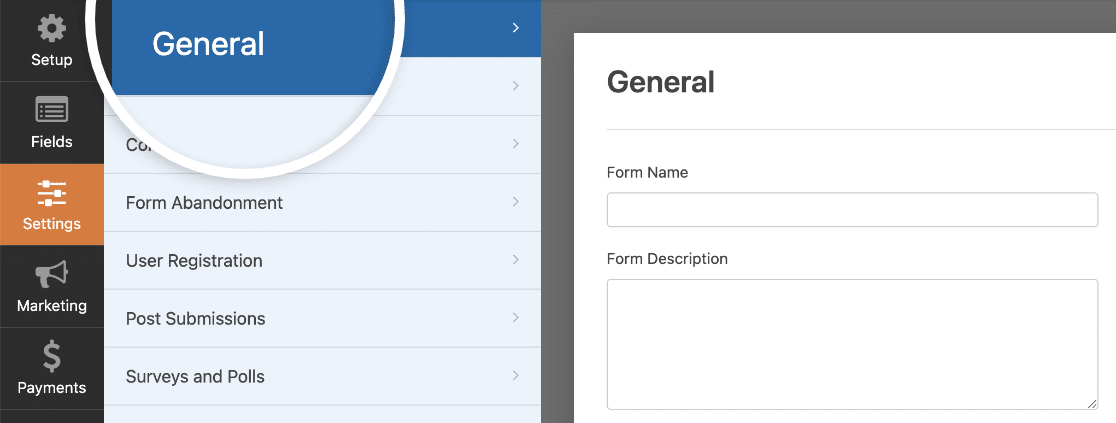
The key settings to check here:
- Form Name for your own reference
- Submit Button Text (consider changing it to something like “Submit Ticket” instead of the default “Submit”)
- Tags to organize your forms if you have multiple forms on your site
Next, head to Spam Protection and Security to make sure your form is protected.
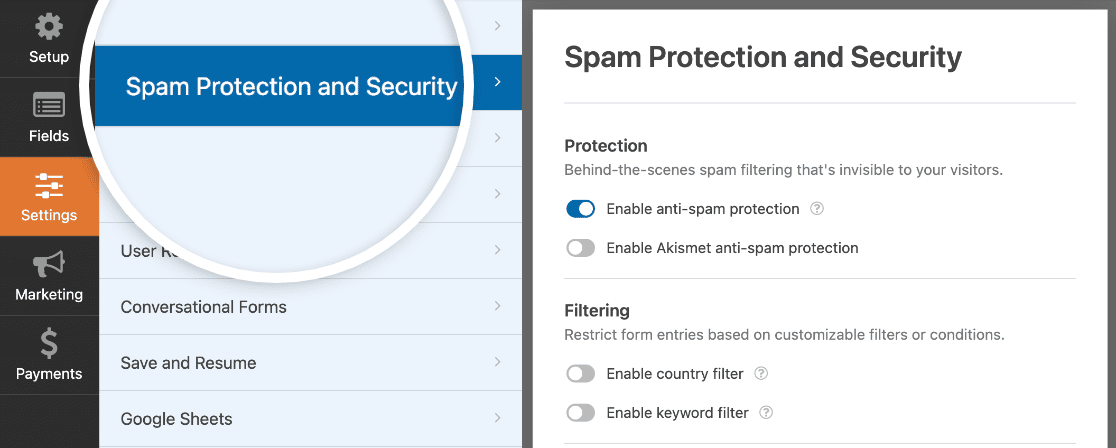
WPForms has built-in anti-spam protection that’s enabled by default on every new form. You can also layer on reCAPTCHA, hCaptcha, or Cloudflare Turnstile if you want extra protection.
For a deeper dive, check out the full guide on how to stop contact form spam. Click Save when you’re done.
Step 4: Set Up Smart Email Notifications
This is where your support ticket form gets really powerful. By default, WPForms sends you an email notification every time someone submits a ticket.
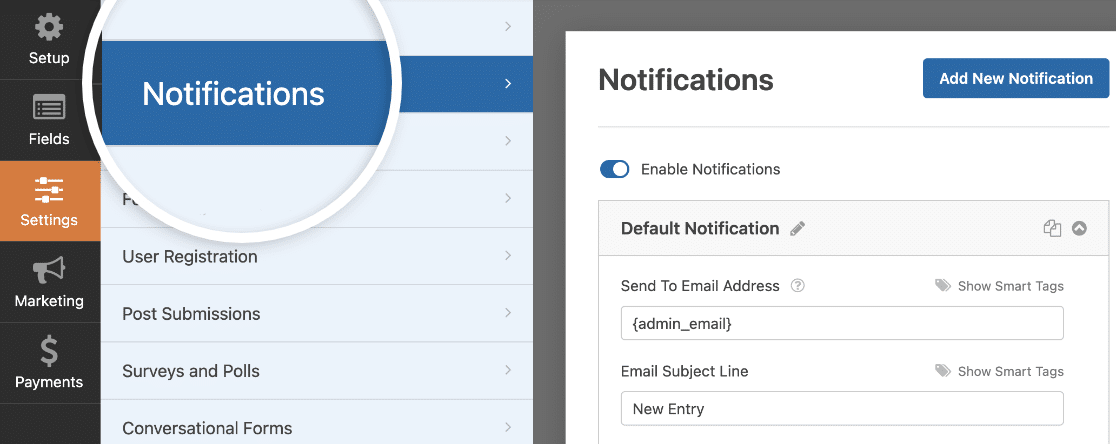
But you can go much further. With conditional logic, you can automatically route tickets to different team members based on what the user selects.
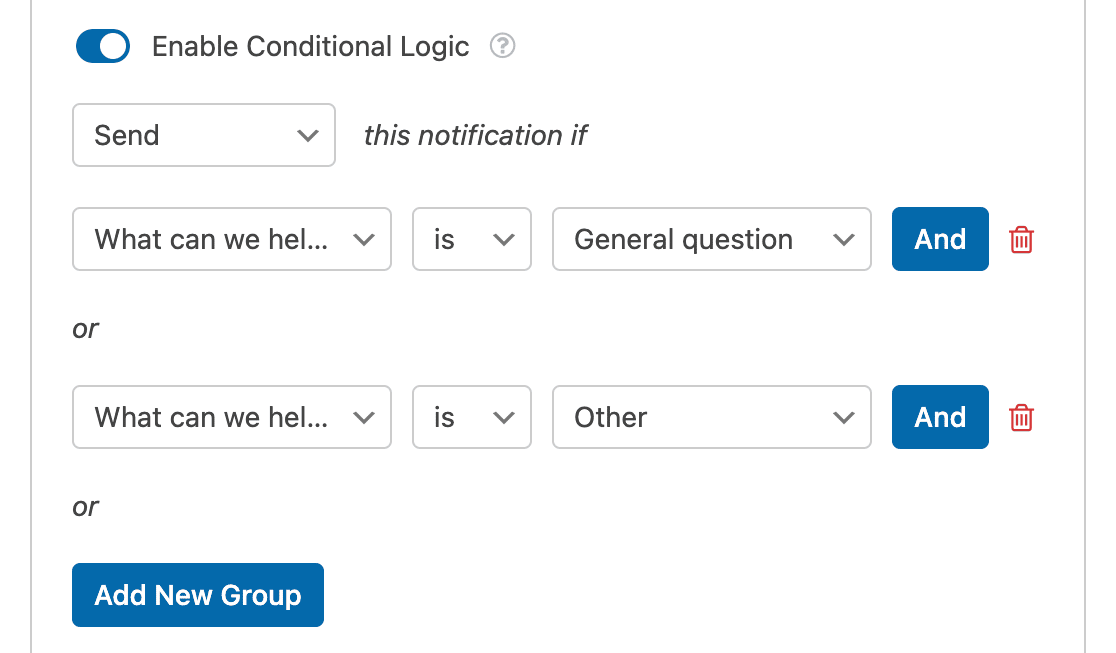
For example, say you want General Questions and Other to go to your sales team, and Bug Reports, Feature Requests, and Account Issues to go to your support team. Here’s how.
Go to Settings >> Notifications. Scroll to the bottom and enable Conditional Logic.

Set the rules so this notification sends when the user selects General Question or Other. Click Add New Group to add the second condition.
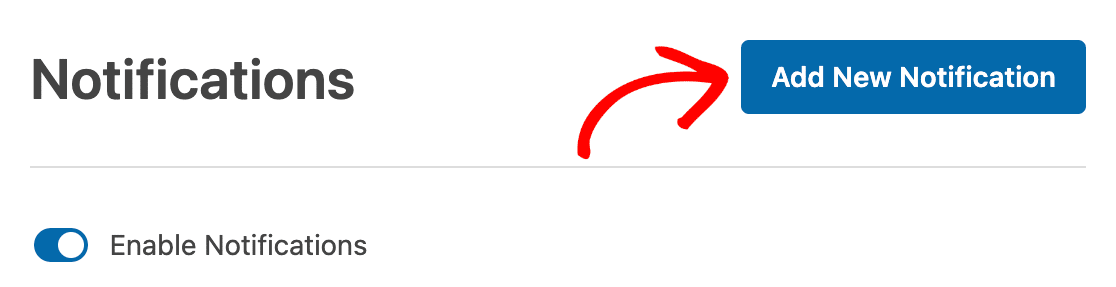
Then scroll back up and change the Send To Email Address to your sales team’s email.

Now click Add New Notification to create a second one for your support team.
Set the conditional logic rules for Bug Report, Feature Request, and My Account.
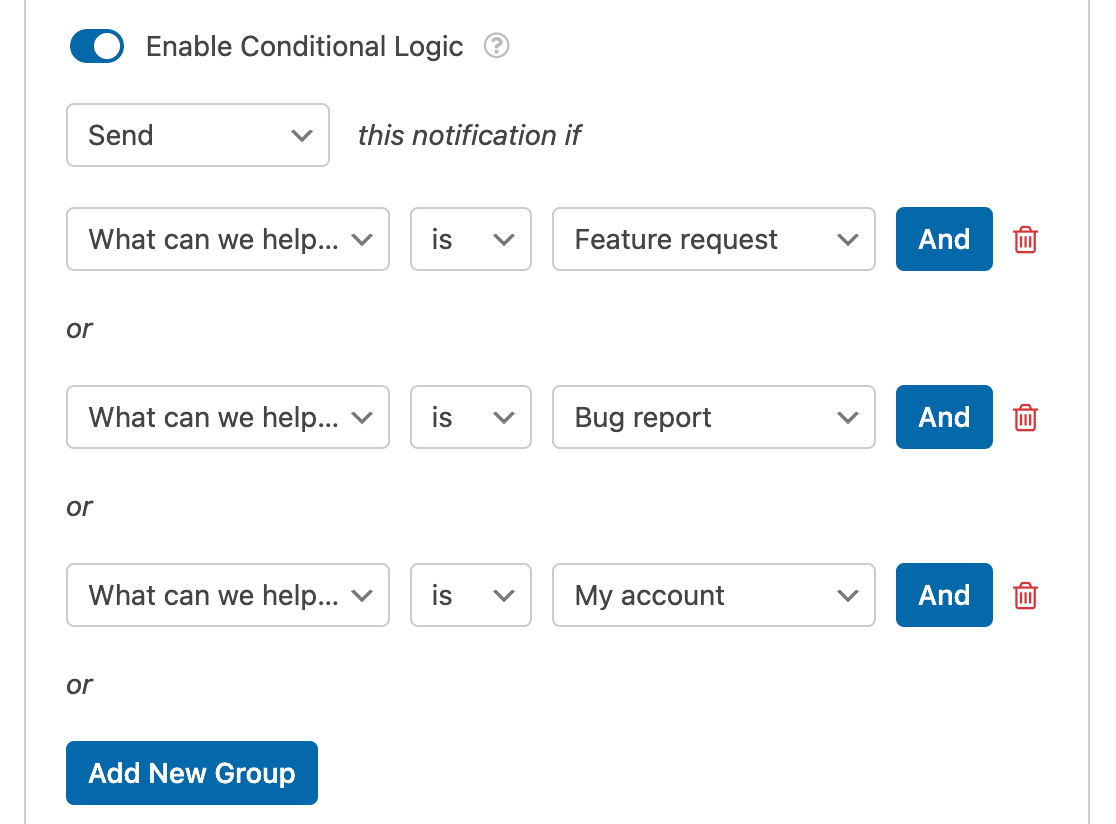
And point the Send To address to your support team.

You can also send a confirmation notification back to the user so they know their ticket was received. For more on this, check out the guide on email notification best practices or the tutorial on sending multiple notifications.
Save your form when you’re done with notifications.
Step 5: Customize Your Confirmation Message
After a user submits a ticket, they need to know it went through. WPForms gives you three options:
- Message (default): Show a text confirmation right on the page. Something like “Thanks! We’ve received your ticket and will get back to you within 24 hours.”
- Show Page: Redirect to a custom thank you page on your site.
- Go to URL: Redirect to an external page.
Go to Settings >> Confirmations to set this up.
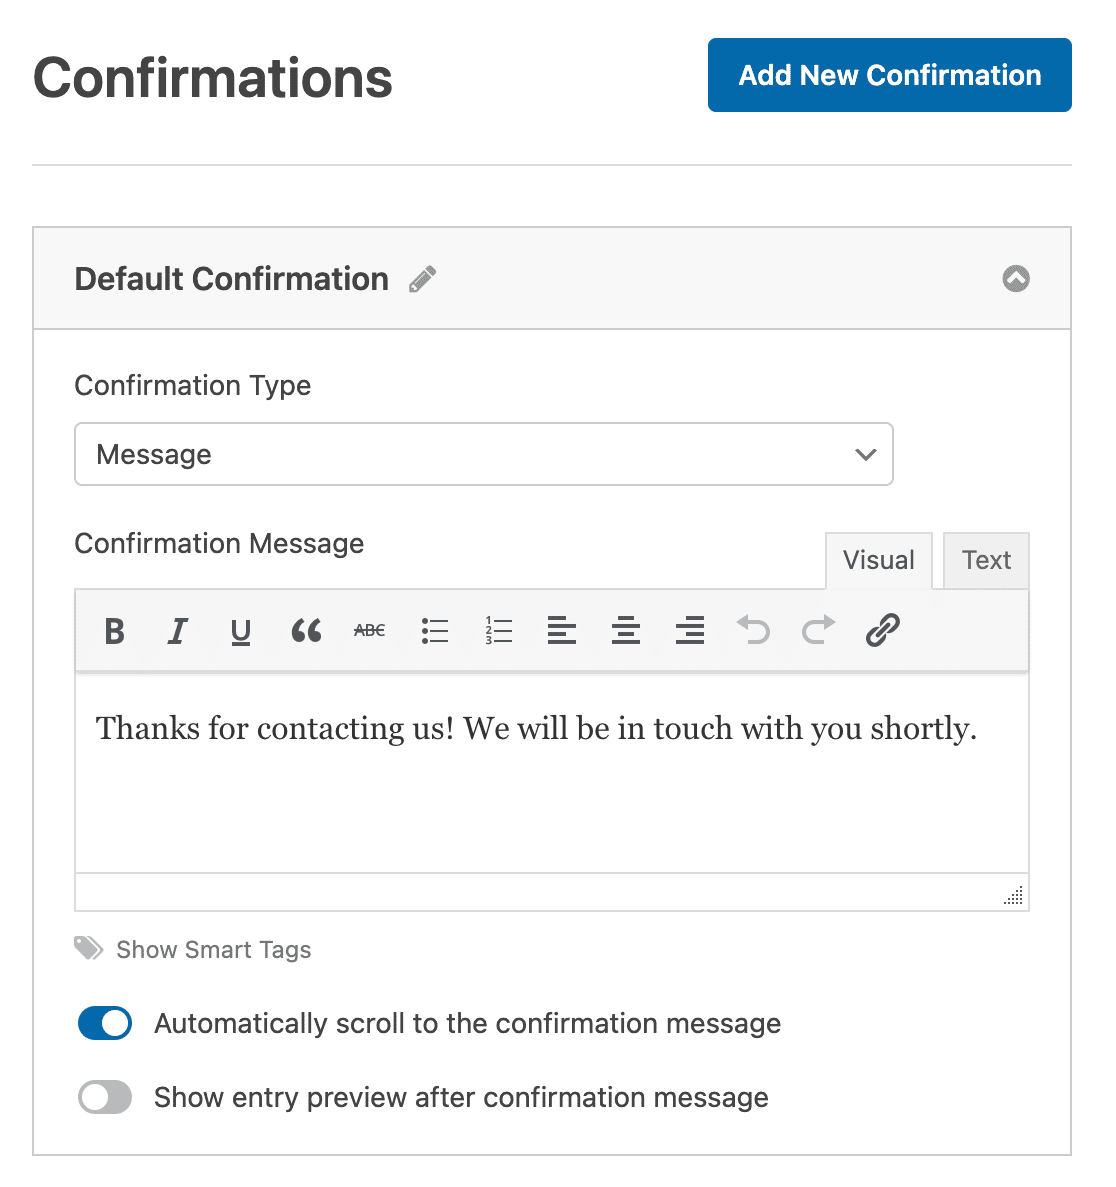
For support ticket forms, I’d recommend the Message option with a clear note about expected response time. Setting expectations here reduces follow-up emails and keeps users patient.
If you want to go further, you can set up confirmation emails that automatically send users an email receipt of their submission.
Click Save.
Step 6: Publish Your Support Ticket Form
Your form is ready. Now you need to add it to your site. Create a new page (or open an existing one) in the WordPress editor, add a new block, and search for WPForms.
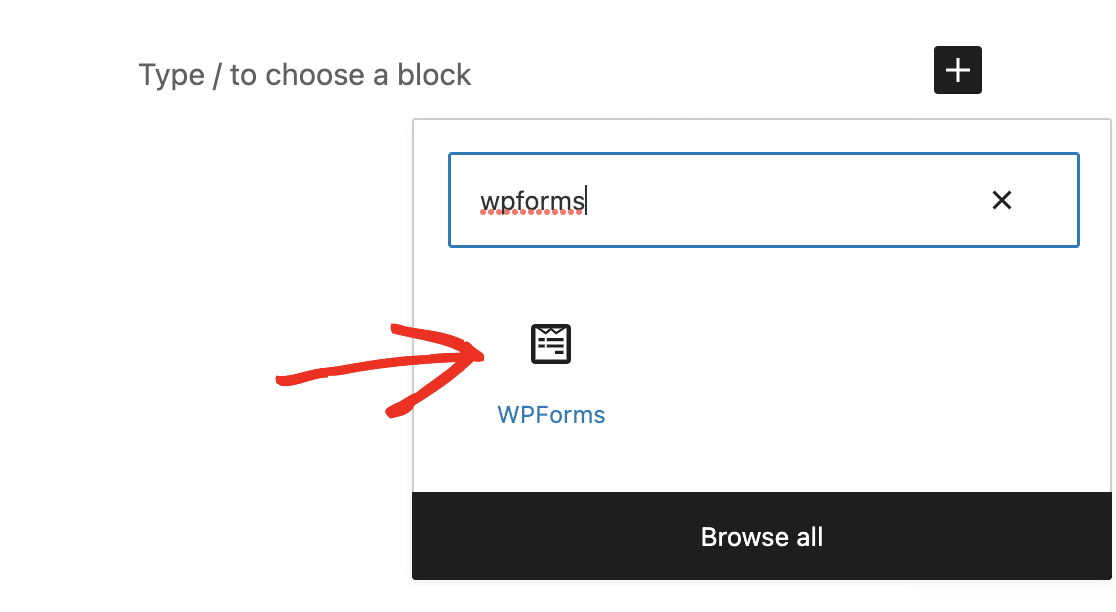
Select your support ticket form from the dropdown.
Hit Publish and your support ticket form is live.
You can also embed your form using a shortcode, or use the native WPForms modules for Elementor, Divi, and SeedProd if you’re using a page builder.
Create Your Support Ticket Form Now
Support Ticket Form Best Practices
Now that your form is set up, here are some best practices I’ve found helpful for making your support workflow actually efficient.
1. Use Categories to Route Tickets Automatically
This is the single biggest time-saver. Instead of one person triaging every incoming ticket, use conditional logic to route submissions to the right team based on the user’s selection.
I covered how to set this up in Step 4 above. Once it’s running, your sales team gets sales questions and your support team gets bug reports, automatically.
2. Add a Priority Field
Not every ticket is equally urgent. Adding a Priority dropdown (Low, Medium, High, Urgent) lets your team triage their queue at a glance.
This is especially valuable if you get a high volume of tickets, because it helps your team decide what to tackle first without reading every submission in full.
3. Enable File Uploads for Screenshots
When a user reports a bug or an issue, a screenshot is worth a hundred words of description. Adding a file upload field to your support ticket form lets users attach images, documents, or even screen recordings.
This reduces the back-and-forth of asking “can you show me what you’re seeing?” and helps your team resolve tickets faster.

4. Track Tickets With Entry Management
With WPForms Basic and higher, every form submission is stored in your WordPress dashboard. You can view, search, star, and export your support tickets without relying on email alone.
If you want to go beyond the WordPress dashboard, you can connect your form to Google Sheets with the WPForms Pro Google Sheets addon and build a shared tracking spreadsheet your whole team can access.
5. Connect to Your Help Desk Tool
If you’re already using a help desk platform like Zendesk or Freshdesk, you can connect your WPForms support ticket form directly to it.
The WPForms Pro Zapier addon connects to over 10,000 apps, so you can automatically create tickets in your help desk whenever someone submits the form.

For a full walkthrough, check out the guide on how to integrate your form with Zendesk.
6. Send a Confirmation Email
When someone submits a support ticket, they want to know it went through. A simple confirmation email that says “We’ve received your ticket and will respond within 24 hours” goes a long way.
It reduces “did you get my message?” follow-ups and sets clear expectations from the start. You can set this up using WPForms’ notification system with Smart Tags to personalize the email.
FAQs on Support Ticket Form Templates
Support ticket forms are one of the most common form types WordPress site owners build. Here are answers to the questions I see most often about setting them up.
What fields should a support ticket form have?
At a minimum, include Name, Email, a Category or Department dropdown, and a Description field. For more effective support, add a Priority dropdown, a Subject line for quick scanning, and a File Upload field so users can attach screenshots. The right fields depend on your workflow, but those cover most use cases.
Can I create a support ticket form for free?
WPForms Lite (the free version) lets you create basic forms, but the Support Ticket Form template requires WPForms Basic ($49.50/year) or higher.
Basic also gives you conditional logic, entry management, and advanced fields that are important for a functional support workflow.
How do I route support tickets to different teams?
Use conditional logic in your form’s notification settings. You can create multiple email notifications, each with conditions based on what the user selects (e.g., “Bug Report” goes to your development team, “Billing Question” goes to your finance team). This is built into WPForms Basic and higher.
Can I integrate my support ticket form with Zendesk?
Yes. With the WPForms Pro Zapier addon, you can connect your form to Zendesk so every submission automatically creates a new Zendesk ticket.
You can also connect to Freshdesk, HubSpot, and thousands of other apps through Zapier.
Does WPForms store support ticket submissions?
Yes. WPForms Basic and higher stores every form submission in your WordPress dashboard through the entry management system.
You can view, search, filter, star, and export entries as Excel, PDF, or CSV files. Even on WPForms Lite, submissions are backed up in the cloud via Lite Connect so you can unlock them when you upgrade.
Next, Explore More WPForms Guides
And that’s it! You now know how to create a support ticket form in WordPress using a template, and you’ve got some solid best practices to make your support workflow more efficient.
If you’re looking for more ways to use WPForms, check out these related guides:
- How to Create a Custom Support Ticket Form With Zendesk
- How to Send Confirmation Emails After Form Submission
- How to Create Multiple Form Notifications
- How to Save Form Entries to Google Sheets
Ready to build your form? Get started today with the easiest WordPress form builder plugin. WPForms Pro includes lots of free templates and offers a 14-day money-back guarantee.
If this article helped you out, please follow us on Facebook and Twitter for more free WordPress tutorials and guides.


My website uses WPForms, but I’m not receiving email notifications when the form is submitted. I’ve entered my email address in both the ‘Send To’ and ‘CC’ fields, but I’m still getting an error.
Hello Prabhakar,
This issue is often related to your WordPress site’s email settings and not WPForms plugin. We have a detailed guide covering how to fix WordPress site not sending email issue. Please check it out and let me know if it solves the issue for you.
Thanks!