AI Summary
If you’ve ever run a blog, you know how hard it is to keep publishing fresh content on a regular schedule. One of the best ways I’ve found to solve that problem is to let other people contribute posts directly through your site.
With user submitted posts, visitors can write and submit articles from the frontend of your WordPress site without ever logging into your dashboard, allowing you to scale your blog posts library.
You stay in control of what gets published, and your contributors get a simple way to share their work. In this guide, I’ll walk you through how to set up a post submission form using WPForms.
Create Your Post Submission Form Now! 🙂
Why Accept User-Submitted Posts on Your WordPress Site?
Before we get into the setup, it’s worth understanding why this is such a useful feature. From what I’ve seen, accepting user-submitted posts can help your site in several ways:
- Scale your content production: More contributors means more posts without you writing every single one.
- Diversify your SEO keywords: Guest authors naturally bring in topics you might not have covered yet.
- Build a community: Giving people a voice on your site turns passive readers into active participants.
- Reduce your workload: You can focus on editing and curating while others handle the writing.
And this goes beyond standard guest blogging. You can use the same approach to accept user-submitted events, directory listings, customer testimonials, product reviews, and community stories.
How to Allow User Submitted Posts on Your WordPress Site
Prefer to watch and learn? The video below will walk you through the entire process, or check out the written steps for the most up-to-date information.
Step 1: Install the WPForms Pro Plugin
WPForms is a drag-and-drop form builder that makes accepting user-submitted posts really straightforward. What I like most about it for this use case is that it maps your form fields directly to WordPress post fields.
So when someone submits a guest post through your form, it shows up in your dashboard as an actual WordPress post, ready for review.
Your contributors never need access to your WordPress admin area. They fill out a form on the frontend, and you handle everything from there.
To accept post submissions, you’ll need WPForms Pro, which includes the Post Submissions addon along with 2,100+ form templates and all the advanced features.

Go ahead and grab a Pro license, then install WPForms on your site. If you need a hand with that, here’s a guide on how to install a WordPress plugin{target=”_blank” rel=”noopener nofollow”}.
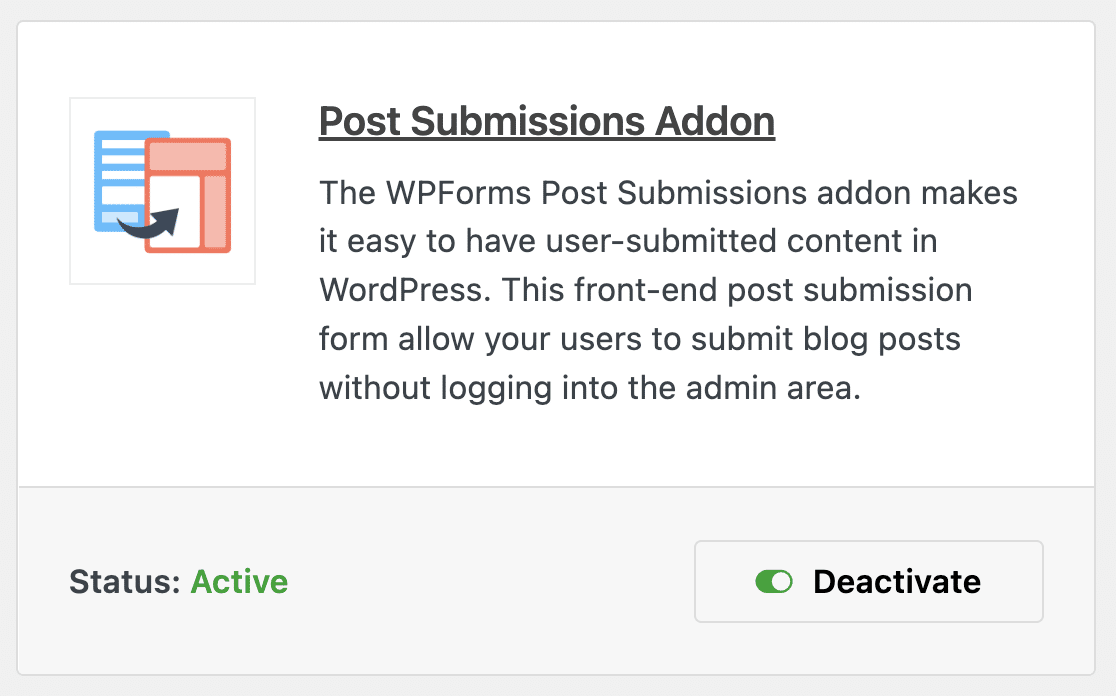
Step 2: Activate the Post Submissions Addon
With WPForms Pro installed, the next step is activating the Post Submissions addon. This is what lets you turn any form into a post submission form. In your WordPress admin, go to WPForms » Addons.
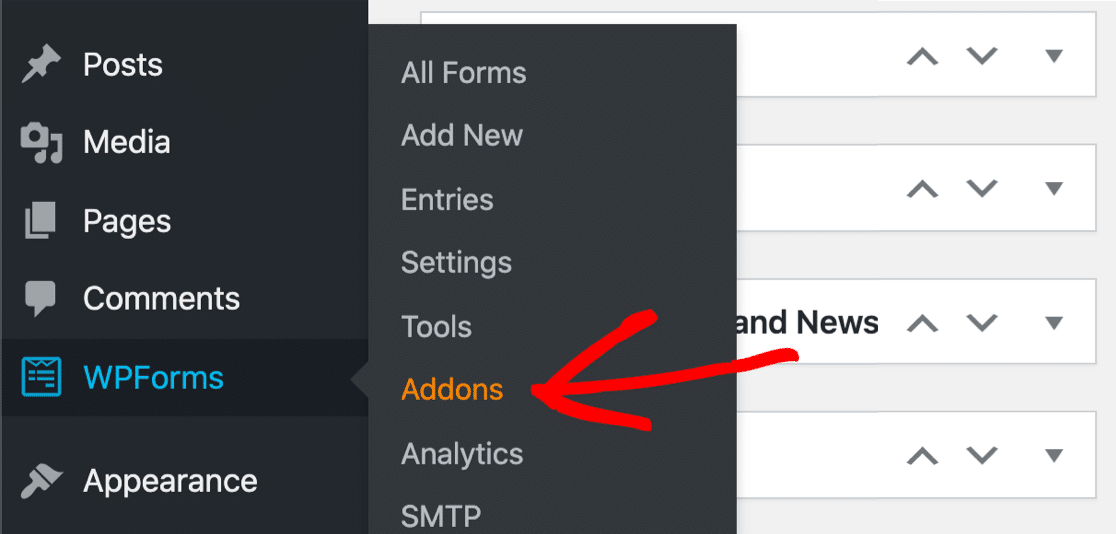
Find the addon labeled Post Submissions, then click Install Addon and Activate. That’s all there is to it. Now let’s build the actual form.
Step 3: Create Your Post Submission Form
Go to your WordPress dashboard and click on WPForms » Add New in the left-hand menu to add a new form.
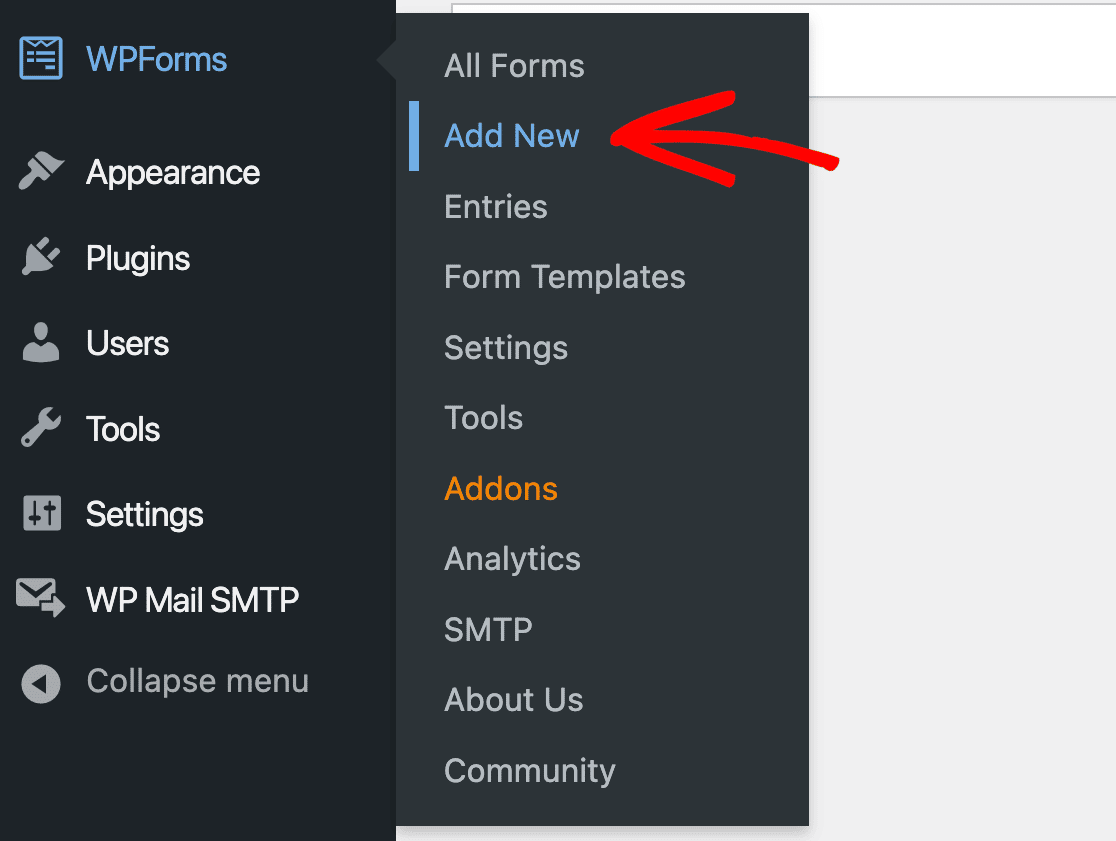
Give your form a name at the top, then scroll down and select the Blog Post Submission Form template.
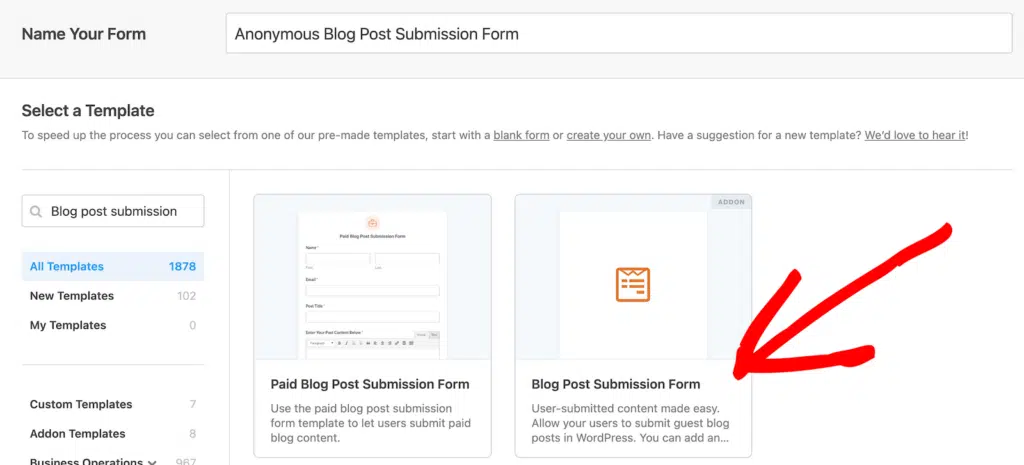
WPForms will generate a form with two sections already built in:
- Author Details for the writer’s name, email, and bio.
- Create a Blog Post for the post title, content, excerpt, featured image, and category.
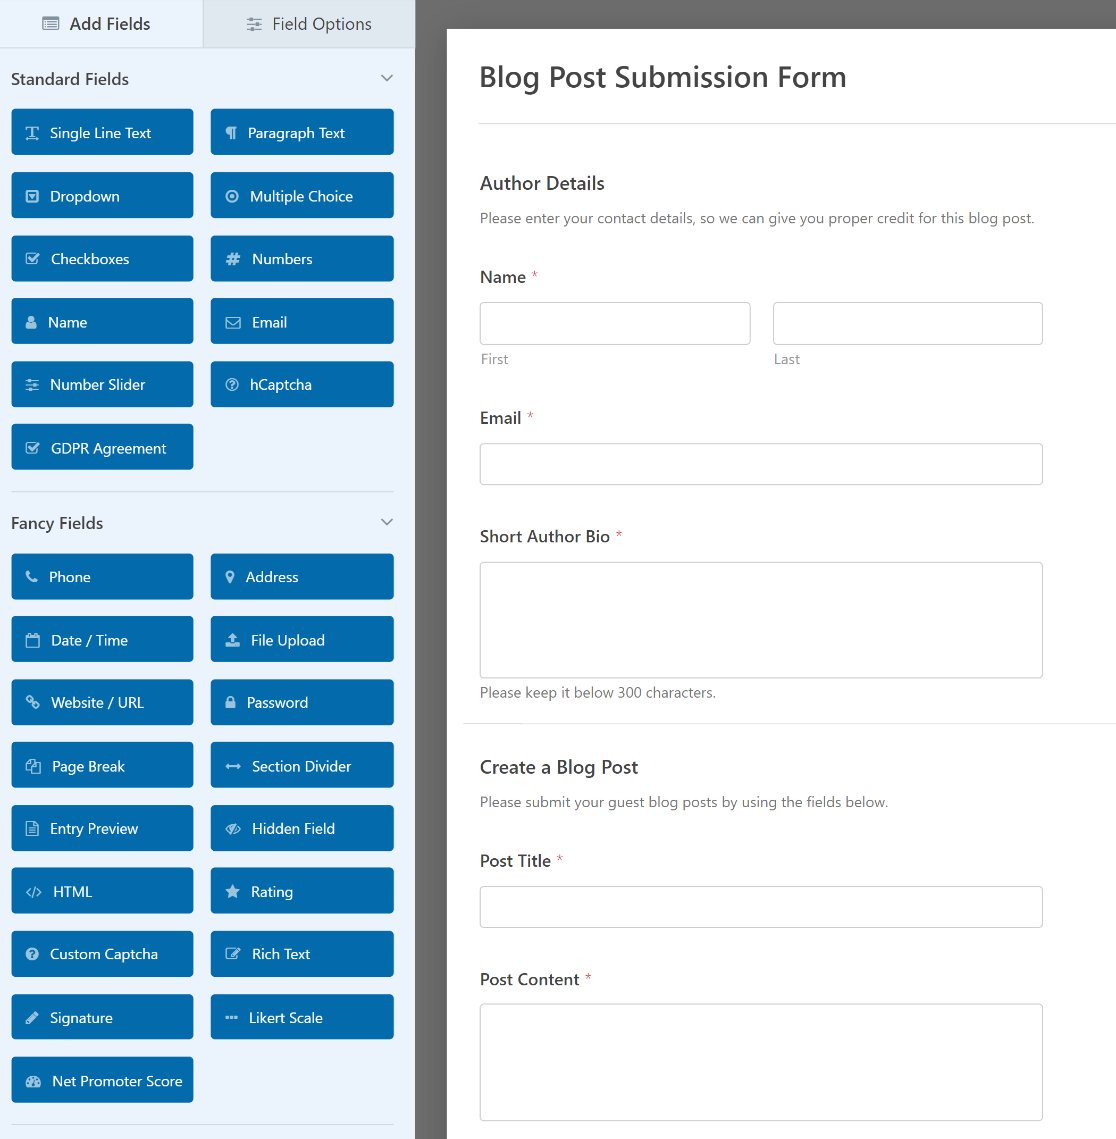
This template is fully customizable. You can add, remove, or rearrange any field. Let me walk you through a few important ones you’ll want to configure.
Use the Rich Text Field for Formatted Content
By default, the template uses a Paragraph Text field for post content. That works fine for plain text, but if you want your contributors to format their posts with headings, bold text, links, and images, I’d recommend swapping it out for a Rich Text field.
Just drag the Rich Text field from the left panel into your form and remove the old Paragraph Text field for post content. The Rich Text field gives your writers a mini editor right inside the form, so their posts arrive with formatting already in place. That saves you a lot of cleanup time on the backend.
If you want writers to include images in their posts, click on the Rich Text field to open its settings. Turn on Allow Media Uploads and Store files in WordPress Media Library.
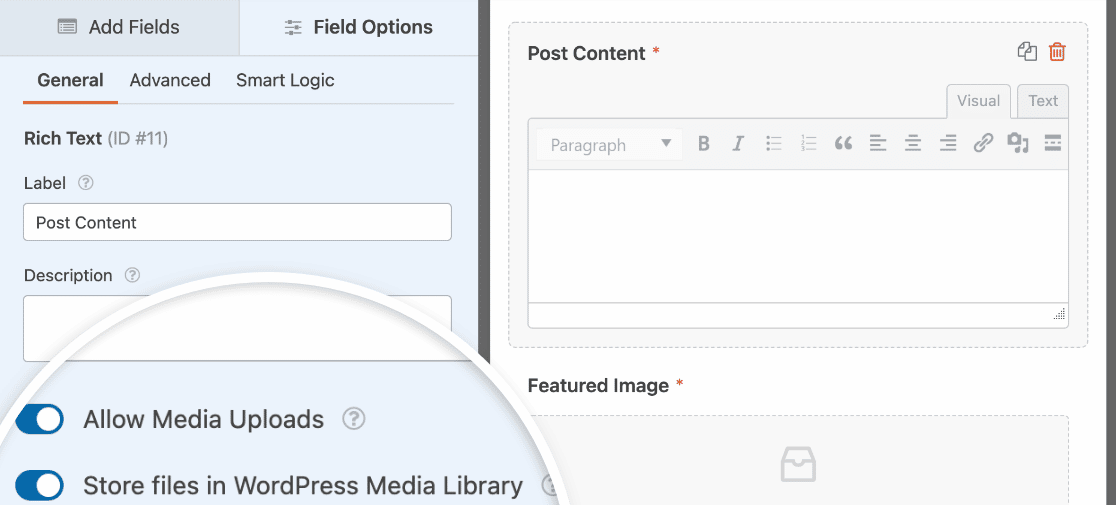
This way, any images your contributors add will be stored in your Media Library where you can manage them just like your own uploads.
Add a Featured Image Upload
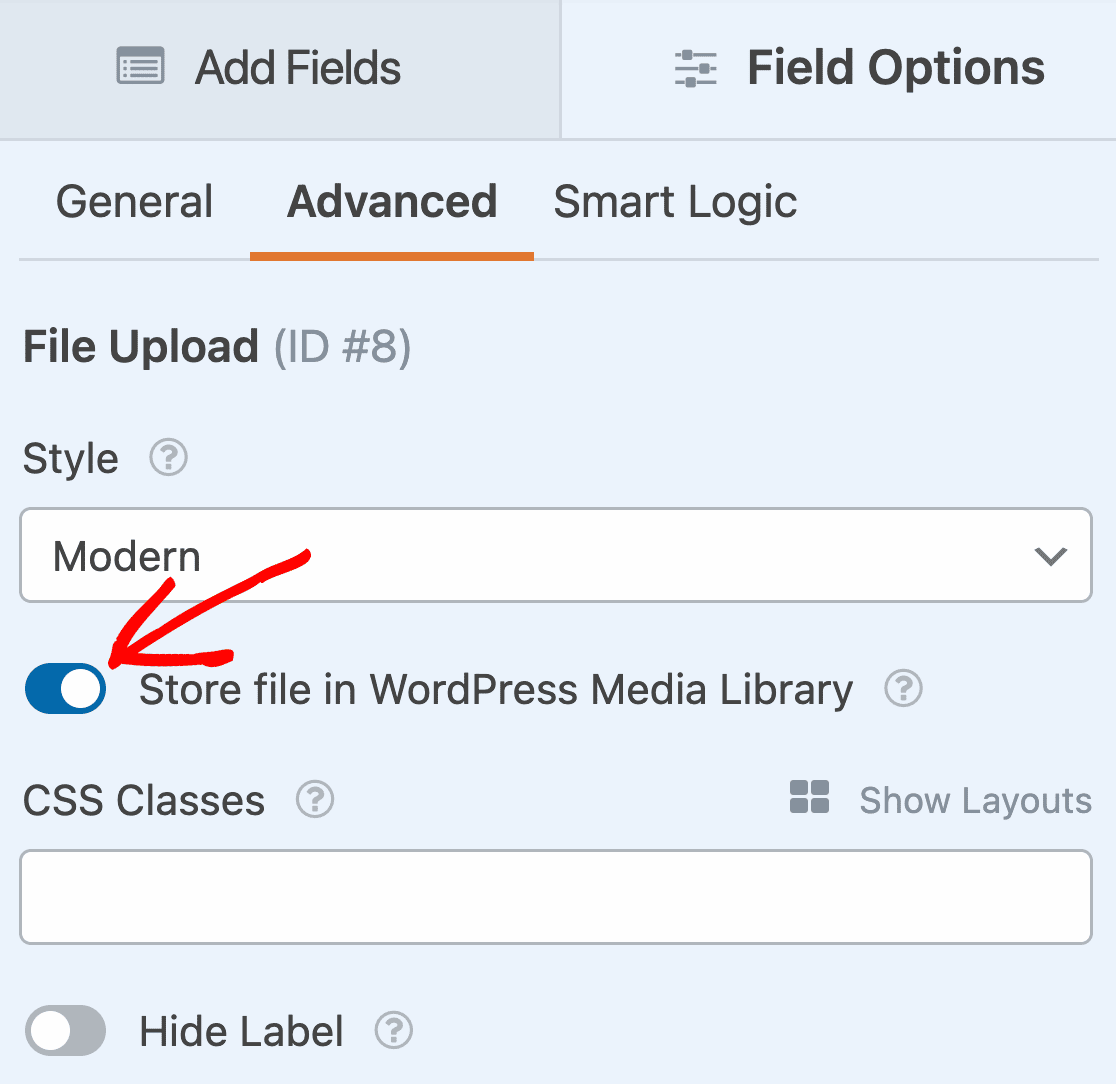
The template already includes a File Upload field for featured images. To make sure those images are easy to work with, click on the Featured Image field and check the settings.
You can use the field Description to tell contributors what size image you need. You can also limit the Allowed File Extensions to specific formats like png or jpg.
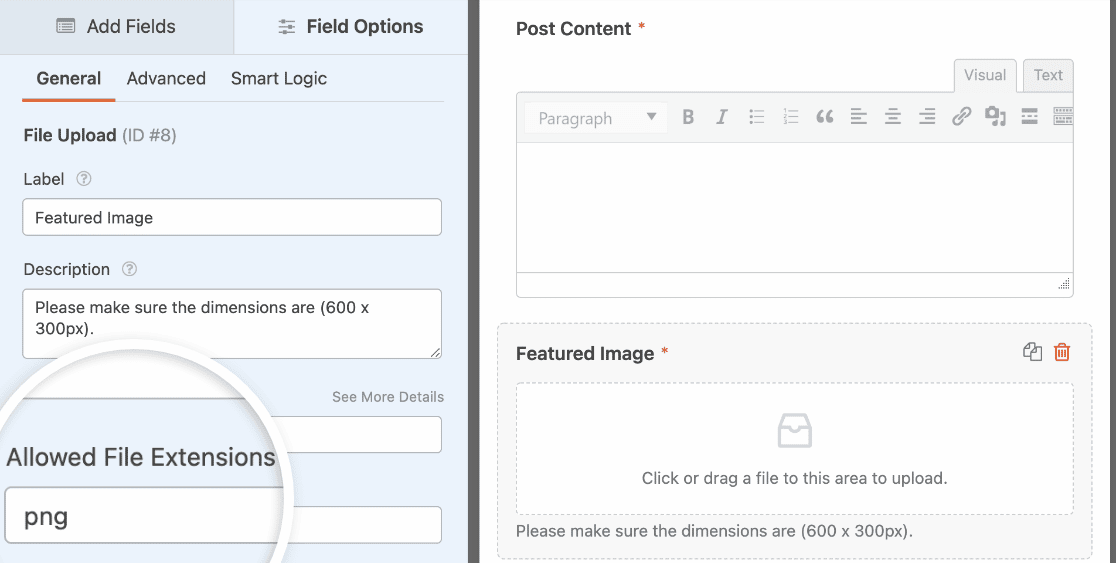
Then click the Advanced tab and make sure Store file in WordPress Media Library is turned on.
Let Guest Bloggers Choose a Category
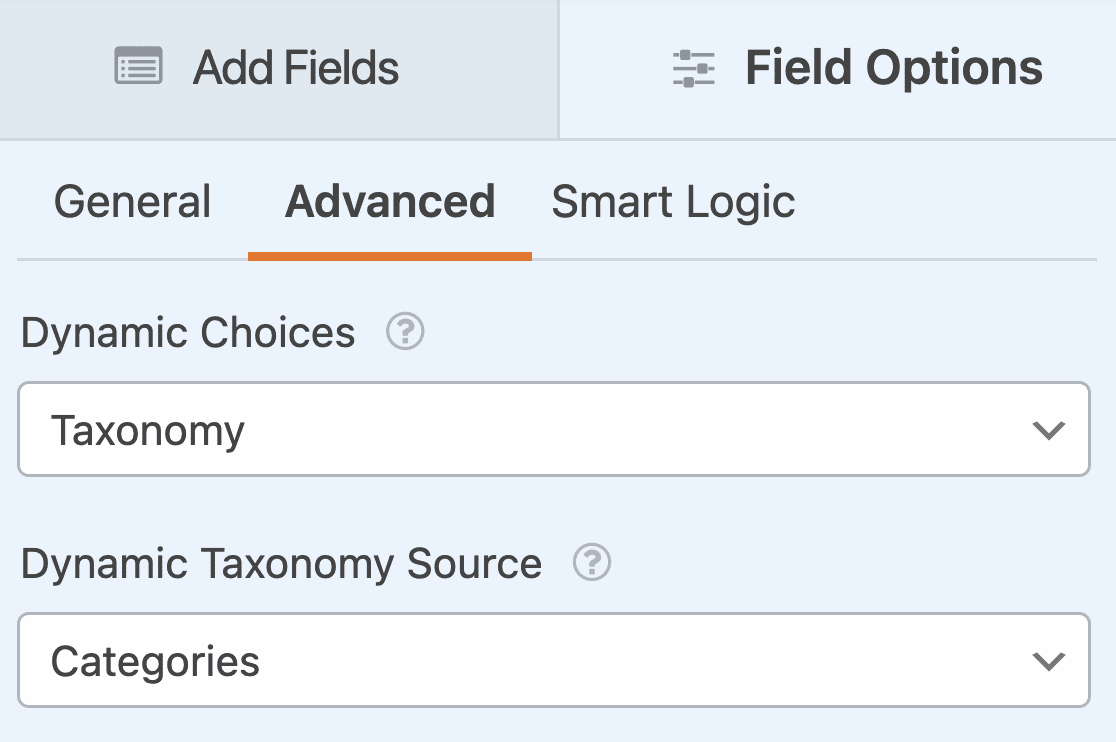
The template automatically pulls your blog categories into the form using dynamic choices. This means contributors can pick the right category for their post, and the list always matches what’s on your actual site.
To check this, click the Category field, then open the Advanced tab. You’ll see Dynamic Choices set to Taxonomy and Dynamic Taxonomy Source set to Categories.
Want writers to add tags too? Add a Checkboxes field, set Dynamic Choices to Taxonomy, and choose Tags from the Dynamic Taxonomy Source dropdown.
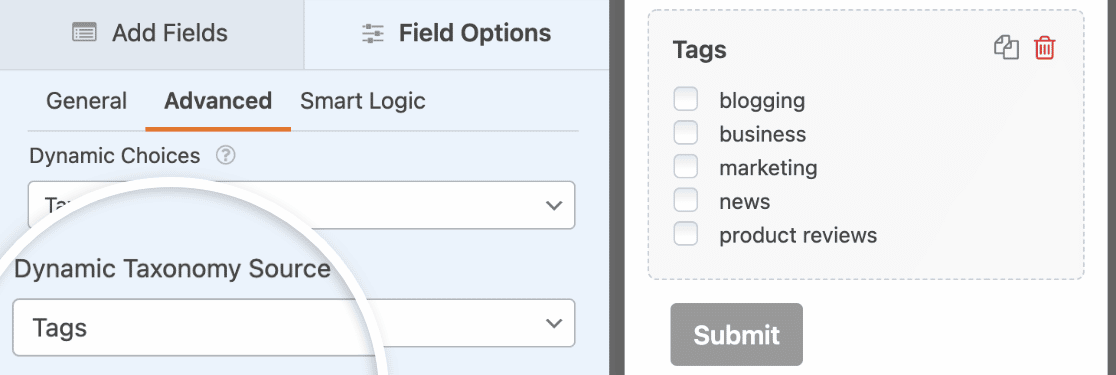
You could also use a multi-select dropdown if you’d prefer a more compact layout for tags.
Step 4: Configure Post Submission Settings
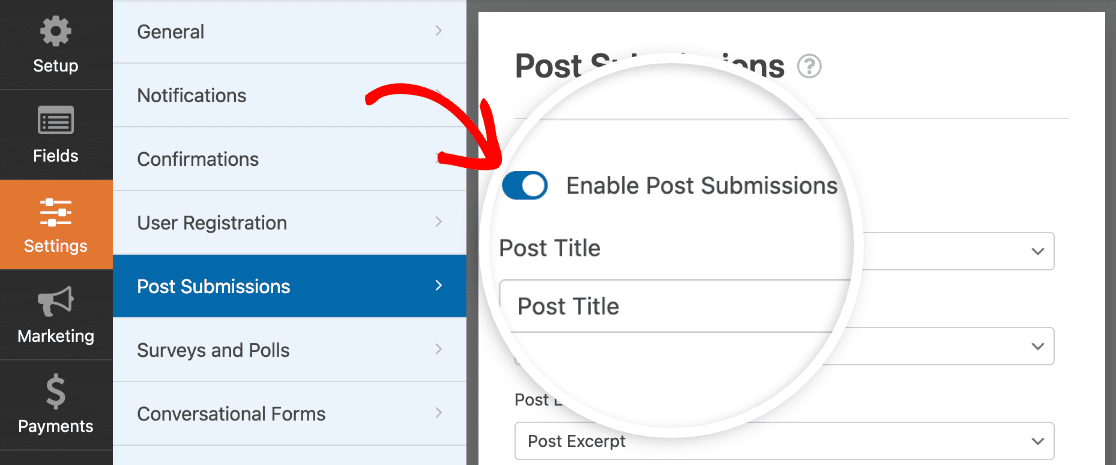
Now let’s connect your form fields to WordPress so that each submission turns into an actual post. Go to Settings » Post Submissions in the form builder. Make sure the Enable Post Submissions toggle is turned on.
If you’re using the Blog Post Submission Form template, most of these settings are already configured. But it’s worth checking each one:
- Post Title maps to the title field your contributor fills in.
- Post Content maps to the Rich Text or Paragraph Text field.
- Post Excerpt pulls in the short summary.
- Post Featured Image connects to the File Upload field.
Below the field mapping, you’ll find three important settings:
- Post Type: Lets you choose whether submissions are saved as posts, pages, or a custom post type. If you’re accepting standard blog content, leave this set to Posts. But if you’re collecting events or directory listings, you can point it to a custom post type instead.
- Post Status: Controls what happens when someone submits. I’d strongly recommend setting this to Draft or Pending Review. This gives you the chance to review and edit every submission before it goes live. Publishing posts automatically from unknown contributors is risky, especially if your form is open to anyone.
- Post Author lets you assign a default author to all submissions. If you restrict your form to logged-in users, you can select Current User so each contributor is credited as the author of their own post.
Adding Custom Post Meta
If your site uses custom fields (through ACF or a similar plugin), you can map form fields to custom post meta keys. Scroll down to the Custom Post Meta section and enter the meta key alongside the corresponding form field.

For a full walkthrough, check out this guide on custom fields in user-submitted posts.
Setting Up Notifications
Click on Notifications in the form builder to configure email alerts. By default, WPForms sends you an email whenever someone submits a post.
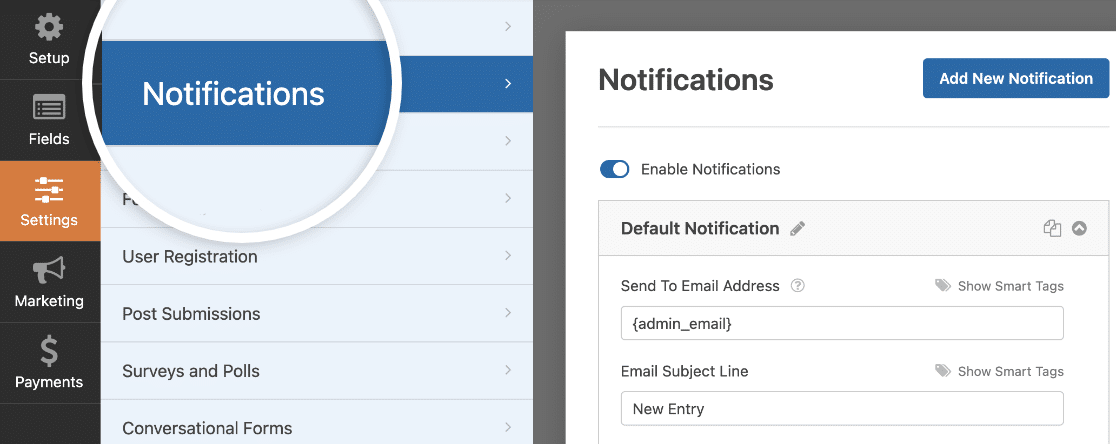
You can also set up a confirmation email to thank the contributor. If you want to customize those, here’s how to set up form notifications. Click Save when you’re done.
Step 5: Add Spam Protection to Your Form
Any form that’s open to the public is going to attract spam. I’ve seen it happen on every site I’ve worked on, and post submission forms are no exception.
WPForms has built-in anti-spam technology that works automatically on all your forms. But for a public-facing submission form, I’d recommend adding an extra layer.
Go to Settings » Spam Protection and Security in the form builder. From here you can enable:
- reCAPTCHA or hCaptcha for a familiar checkbox challenge
- Cloudflare Turnstile for invisible, privacy-friendly verification
- Custom CAPTCHA if you prefer a simple math question or custom challenge
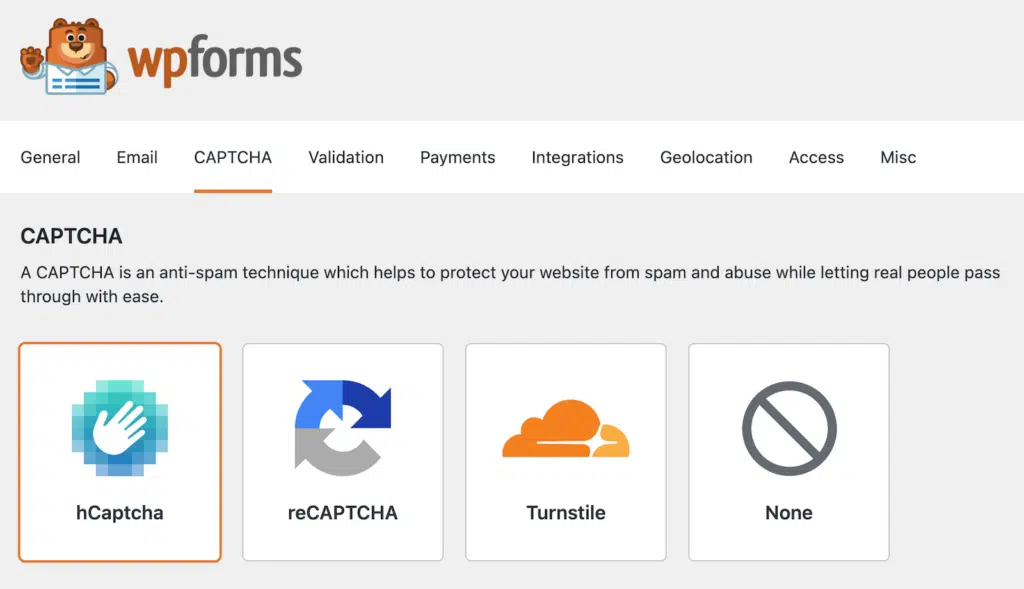
Any of these will cut out the vast majority of bot submissions. For a post submission form that’s visible to anyone, Cloudflare Turnstile or reCAPTCHA v3 are my go-to picks because they don’t add friction for real contributors.
For more on protecting your forms, check out the WPForms spam protection features.
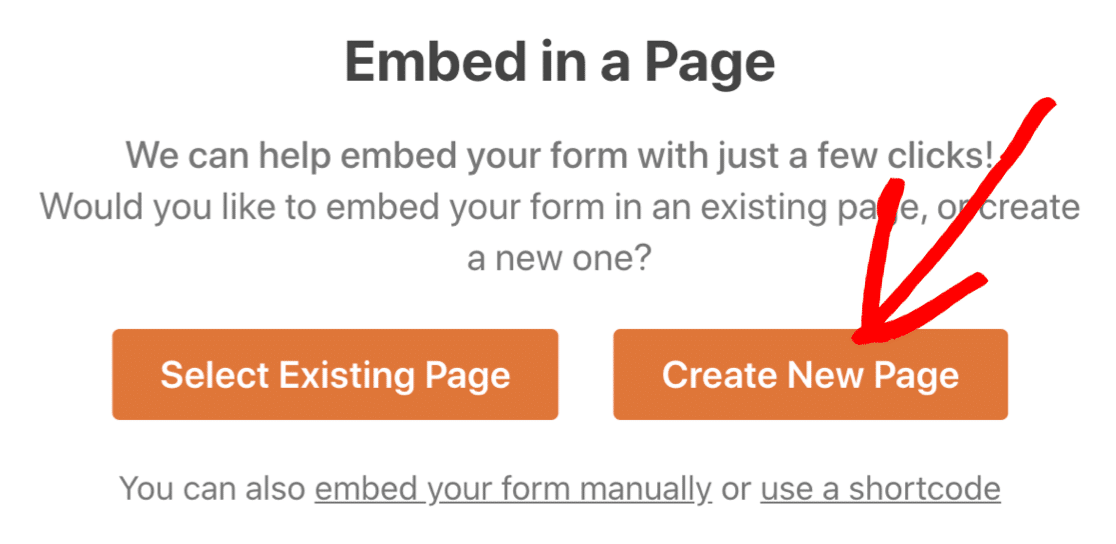
Step 6: Publish Your Form to Accept New Posts
WPForms lets you add your forms to multiple places on your website including your pages, blog posts, and sidebar widgets.
Let’s take a look at the most common placement option: page/post embedding. To begin, click the Embed button at the top of the form builder.

You can choose to publish the form on an existing page or create a new page, after which you’ll be redirected to the WordPress block editor.
Now, you can either publish this page directly to launch your form or try making some styling changes to give it extra oomph.
To make quick work of styling your form, you can select a ready-made theme under the Form Theme section. In this example, I’m using the Frost theme (which is one of my favorites).
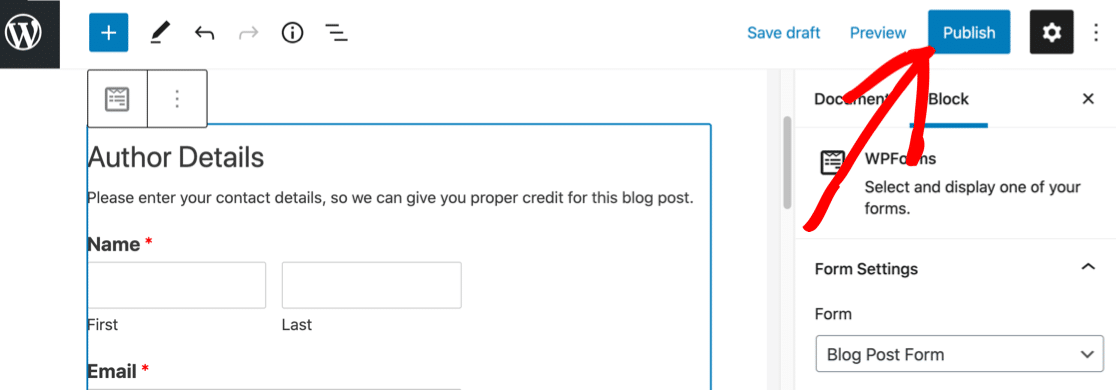
That’s it. Your site is now set up to accept user-submitted WordPress posts. You can also embed the form using a shortcode, a block in the editor, or in a sidebar widget if you prefer a different placement.
Create Your Post Submission Form Now! 🙂
Taking Your Post Submission Form Further
The basic setup covers most use cases, but WPForms gives you several ways to extend your post submission form depending on what you need.
Charge for Post Submissions
If you’re running a directory, a job board, or a premium guest posting platform, you might want to charge a fee for each submission. WPForms Pro includes payment integrations with Stripe, PayPal Commerce, and Square.
Just add a payment field to your submission form, connect it to your payment processor, and you’re set. Contributors pay when they submit, and you collect the fee automatically. For the full setup, see this guide on creating a payment form.

Require User Registration Before Submitting
If you don’t want anonymous submissions, you can require users to create an account first. WPForms Pro includes both the User Registration addon and the Form Locker addon.
With Form Locker, you can restrict your post submission form so only logged-in users can see and fill it out. Combine that with the User Registration addon to let people create accounts on your site before they submit.

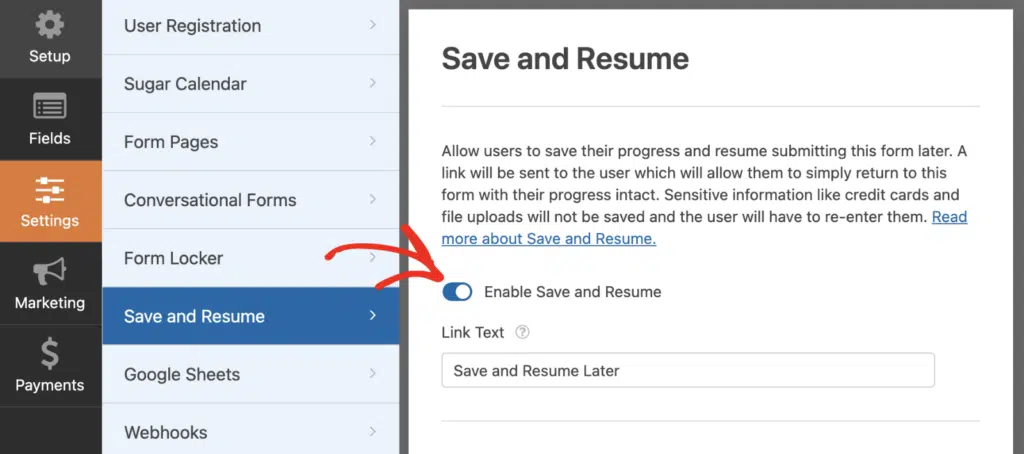
Let Writers Save Drafts and Finish Later
Long-form guest posts take time to write. If your contributors need to step away and come back later, the Save and Resume addon lets them save a partial submission and pick up where they left off.
WPForms sends them an email with a unique link to resume their form. This is especially useful for detailed submissions where you’re asking for a full article, bio, and featured image.
Accept Different Types of User-Generated Content
The Post Submissions addon isn’t limited to blog posts. By changing the Post Type setting in Step 4, you can accept submissions for any custom post type registered on your site.
That means you can use the same approach to accept user-submitted events, directory listings, portfolio entries, testimonials, or community stories. The form setup is nearly identical.
FAQs About User Submitted Posts in WordPress
User submitted posts are a popular feature for WordPress sites, especially community blogs and guest posting platforms. Here are answers to the questions I see come up most often.
What’s the benefit of accepting user-submitted posts in WordPress?
The biggest benefits are scaling your content, growing your keyword footprint, and building community engagement. Every guest post brings a fresh perspective and potentially targets keywords you haven’t covered yet.
How many WordPress posts can a user create?
There’s no limit. A contributor can submit as many posts as they want through your form. Since you control the post status (Draft or Pending Review), you decide which ones actually get published.
What types of posts can I accept?
With the WPForms Post Submissions addon, you can accept articles, images, reviews, testimonials, event listings, and more. It depends on how you configure your form and what post type you’re mapping to.
Can I require users to register before submitting a post?
Yes. WPForms Pro includes User Registration and Form Locker addons. You can require visitors to create an account and log in before they can access your submission form.
Can I edit user-submitted posts before publishing them?
Absolutely. Set your Post Status to Draft or Pending Review, and every submission lands in your WordPress dashboard for editing before it goes live. I’d always recommend this over auto-publishing.
Is it safe to accept user-submitted posts on my site?
Yes, as long as you take the right precautions. Using a frontend form keeps contributors out of your WordPress admin.
Adding spam protection (reCAPTCHA, Turnstile, or Custom CAPTCHA) blocks bot submissions. And setting posts to Draft or Pending Review means nothing goes live without your approval.
Can users edit their posts after submitting?
No. Once a post is submitted through the form, only users with access to your WordPress dashboard can edit it. If you need contributors to edit their own work, you could assign them an Author or Contributor role in WordPress.
Do I need to give users access to my WordPress dashboard?
Not at all. That’s one of the main advantages of using a form-based approach. Contributors submit their posts from the frontend, and you manage everything from the backend. They never see your dashboard.
Next, Get More Guest Post Submissions
Now that your site is ready to accept user-submitted posts, the next step is getting people to actually use the form. If you’re looking for ideas, here’s a guide on how to get more guest post submissions on your WordPress blog.
Ready to build your form? Get started today with the easiest WordPress form builder plugin. WPForms Pro includes lots of free templates and offers a 14-day money-back guarantee.
If this article helped you out, please follow us on Facebook and Twitter for more free WordPress tutorials and guides.


Is this also applicable to blogger site?
Hi Nwachukwu.
I apologize WPForms is a WordPress plugin and therefore it will not work within a blogger site.
Apologizes for the inconvenience!
how can the user check his post analytics
Hi there.
Great question, to check your post analytics and your entire WordPress site. We highly recommend making use of the MonsterInsights plugin. In case it helps, here is a great article on the same.
Thanks!
Hi, twoquestios:
1. is it posible to allow users to also upload a PDF, and if yes, how will it display at the frontend?
2. Can the user upload multiple images? or to use multiple image fields in the form? and if yes how will they be shown?
Hey Alvaro,
Whereas with the file upload field, you should be able to allow users to upload PDF file as well as multiple images. To allow multiple files upload, please take a look at our guide on the same.
However, at the moment we don’t have an inbuilt feature to display them in the frontend of the page. Using the code from this dev doc, you should be able to display it in the frontend. For any further customization, we suggest using codeable or WPBuff.
I hope this helps!
I need to send a automatic notification with the new page/post ID or URL generated/created with the Blog Post Submission Form.
How can I get it? I have tried with all the smart tags but I dont find any with the new url/id page created.
Hey Henry- We do not have an inbuilt feature to achieve what you have mentioned. I have added your vote to consider this as a feature request for future enhancement.
However, you can achieve this by using the custom code as shown in this dev doc
Hope this helps! 🙂
Hi… can I use WP forms for reader submissions in the following way?
1. not required to log into site
2. force a choice only 3 categories ie news tips, reviews, announcements
so they don’t see my other categoreies
Hey Jim- We do not have an inbuilt feature to conditionally display the post categories based on user selection. I agree that it would be super helpful and I have added your vote to the feature request for future enhancements.
Thanks 🙂
Hi, if we allow non-registered users to post, is it possible to send them a notification email containing a unique link that would allow them to edit/delete their submitted post?
thanks!
Hey Paul, with our Save and Resume addon, let users save their progress in your forms and return to complete and submit their entries later.
However, we don’t an inbuilt feature to allow users edit/delete submitted post as you’ve described. Thanks for your suggestion! I have added your vote to the existing Feature Request. We appreciate your interest and thank you for sharing your valuable idea!
Thanks!
I have a request: when the article is sent in a “pending” state, and an email arrives to the site administrator with the content of the form, is it possible to insert a link to change the status from pending to publish?
In other words, instead of going into wordpress and changing the status, the administrator reads the content of the form by email, and wothout login into WordPress, if he wants to approve it, he just clicks on a link.
Hey Francesco,
Currently, we do not have an inbuilt feature to insert a link to change the status of the submitted blog posts. I do agree it would be super helpful, though. I’ve made a note of the feature request and we’ll keep it on our radar as we plan out our roadmap for the future.
Hi,
how can I create a blogging platform where anyone can login/register and write a blog on my website?
any additional plugins that you would suggest?
Hey Virat- You can achieve this by adding the User Registration add-on which will enable the users to register and then with the Post Submission add-on, you can allow the registered users to submit the Post. (both the addons are available with Pro and higher license level)
Hope this helps 🙂
Please help
Where or how to show guest posts submitted up? Or, How can we organize /confine/ collect/ all of guest posts in a special part/ meun part/ submenu box/ or any part under any name? But I mean how we can collect all of guest posts and show them in a single title/category/tage together, and then direct our readers to visit them easily?
Hey there, in order to make sure we answer your question as thoroughly as possible and avoid any confusion, could you please contact our team?
If you have a WPForms license, you have access to our email support, so please submit a support ticket. Otherwise, we provide limited complimentary support in the WPForms Lite WordPress.org support forum.
Thanks.
Hi there, we want to do “Post submissions” without the author being logged into our site. That only gives us the option to use one of our “Registered authors” as the author.
Is there no way that when I compile my form, I am able to use the field “Name” as the author? Thank you so much
Hey Yvonne – In order to submit posts, the user is not required to be logged into the website. Once the user submits the form, the details entered in the Name field will get considered as the Post author. For more details, you can take a look at our documentation here.
Hello,
Can I map the Form Fields to a Custom Post Type ?
Hey Tom. Yes, you can select the post type using the Post Type dropdown in the settings when you set up the field mapping. This allows you to save the content submitted through your form as a Post, Page, or any other custom post type you have set up on your WordPress site.
For more detailed instructions, you can refer to this example. Here we’ve mapped guest post submissions to an events post type: https://wpforms.com/create-a-user-submitted-events-calendar-in-wordpress/
Can I limit who can post to the blog? Like – only allow specific login id’s that we’ve pre-approved the ability to post? We want the blog to be informational related to our business’s product, not a public forum to write about whatever you’d like.
Hi Katie. There are various ways you could achieve this, and it probably depends if you give pre-approved people a WordPress login. If you do, you could hide the form unless the visitor was logged in. The Form Locker addon will help you to do that. If you don’t, you could simply accept posts in draft and approve or delete them when they come in. Since you have a Pro license, you have access to email support from our trusted advisors in the support team; just open a support ticket and we can help you to set it up.
If I have a wpforms field multiple choice with image option open so how can I add this image into any post through post submission as ACF field have not any field type to take the image which ever multiple field is selected.
Hey Asim.
Looks like you’re trying to add images in a Multiple choice field to a post on your site, which is currently not supported by default.
If you want to customize the Post Submission addon, please get in touch with our Trusted Advisors in the support team for personalized advice. Please submit a support ticket and they will get back to you as soon as possible (usually within 1 working day).
If you’re using our free version, please head to the WPForms Lite WordPress.org support forum and open a new thread.