Do you like the idea of using a WooCommerce wholesale order form for your eCommerce site, but you don’t actually want to set up WooCommerce? What if we said you didn’t have to?
Offering wholesale orders allows you to offer discounts for items purchased in bulk, which customers love. Not every business owner has the time to set up an entire wholesale store on an eCommerce platform like WooCommerce, though.
Fortunately, it’s super easy to add a wholesale order form to your WordPress site without using WooCommerce. We’ll show you how.
Create Your Wholesale Order Form Now
Why Use a Wholesale Order Form?
If you’ve got an online store and can fulfill orders of large quantities, you might want to set up a bulk order form with wholesale pricing to allow customers to buy in bulk.
Wholesale prices are an especially attractive offer to B2B and dropshipping businesses that might best benefit from your online order form.
And if you’re looking to fulfill orders but process the payments offsite, check out our tutorial on creating order forms without payment.
Why Can’t I Use WooCommerce for Wholesale Pricing?
There are 2 main reasons why you’ll want to skip enabling wholesale pricing on WooCommerce.
- You can’t have wholesale pricing on WooCommerce by default. You’d need additional tools to add that functionality.
- Even if you got those tools, you might not want to spend all that time setting up an entire eCommerce website just for wholesale customers.
WooCommerce is a great platform for setting up robust stores online with tons of products and product pages. However, if you’re looking for a simpler solution to getting wholesale pricing up on your WordPress website, we’ve got you covered.
Let’s take a look at how to build a wholesale order form on WordPress so you can sell your customers bulk orders quickly.
How to Create a Wholesale Order Form on WordPress Without WooCommerce
If you don’t have the time to set up an entire WooCommerce store and want to create a simple wholesale order form on WordPress easily, here are the steps.
Step 1: Generate a Simple Order Form
To make a quick order form, the first thing you’ll need to do is install and activate the WPForms plugin. There are only a few free order form plugins in WordPress, and WPForms is at the top.
If you haven’t installed a plugin before, see this step-by-step guide on how to install a plugin in WordPress.
Next, go to WPForms » Add New to create a new form.
On the setup screen of the order form creator, name your form and select the Wholesale Order Form template.
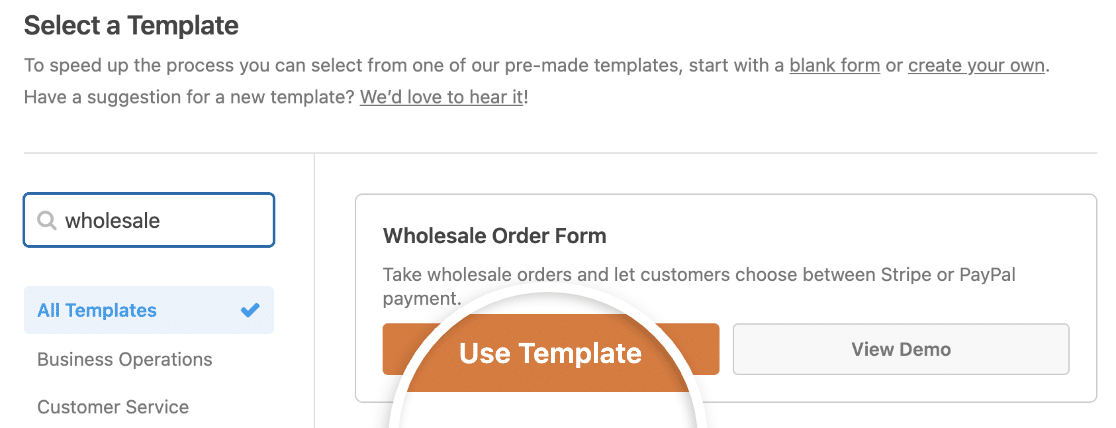
Next, the order form template will be generated for you. Pretty awesome, right?
Let’s go ahead and customize this form.
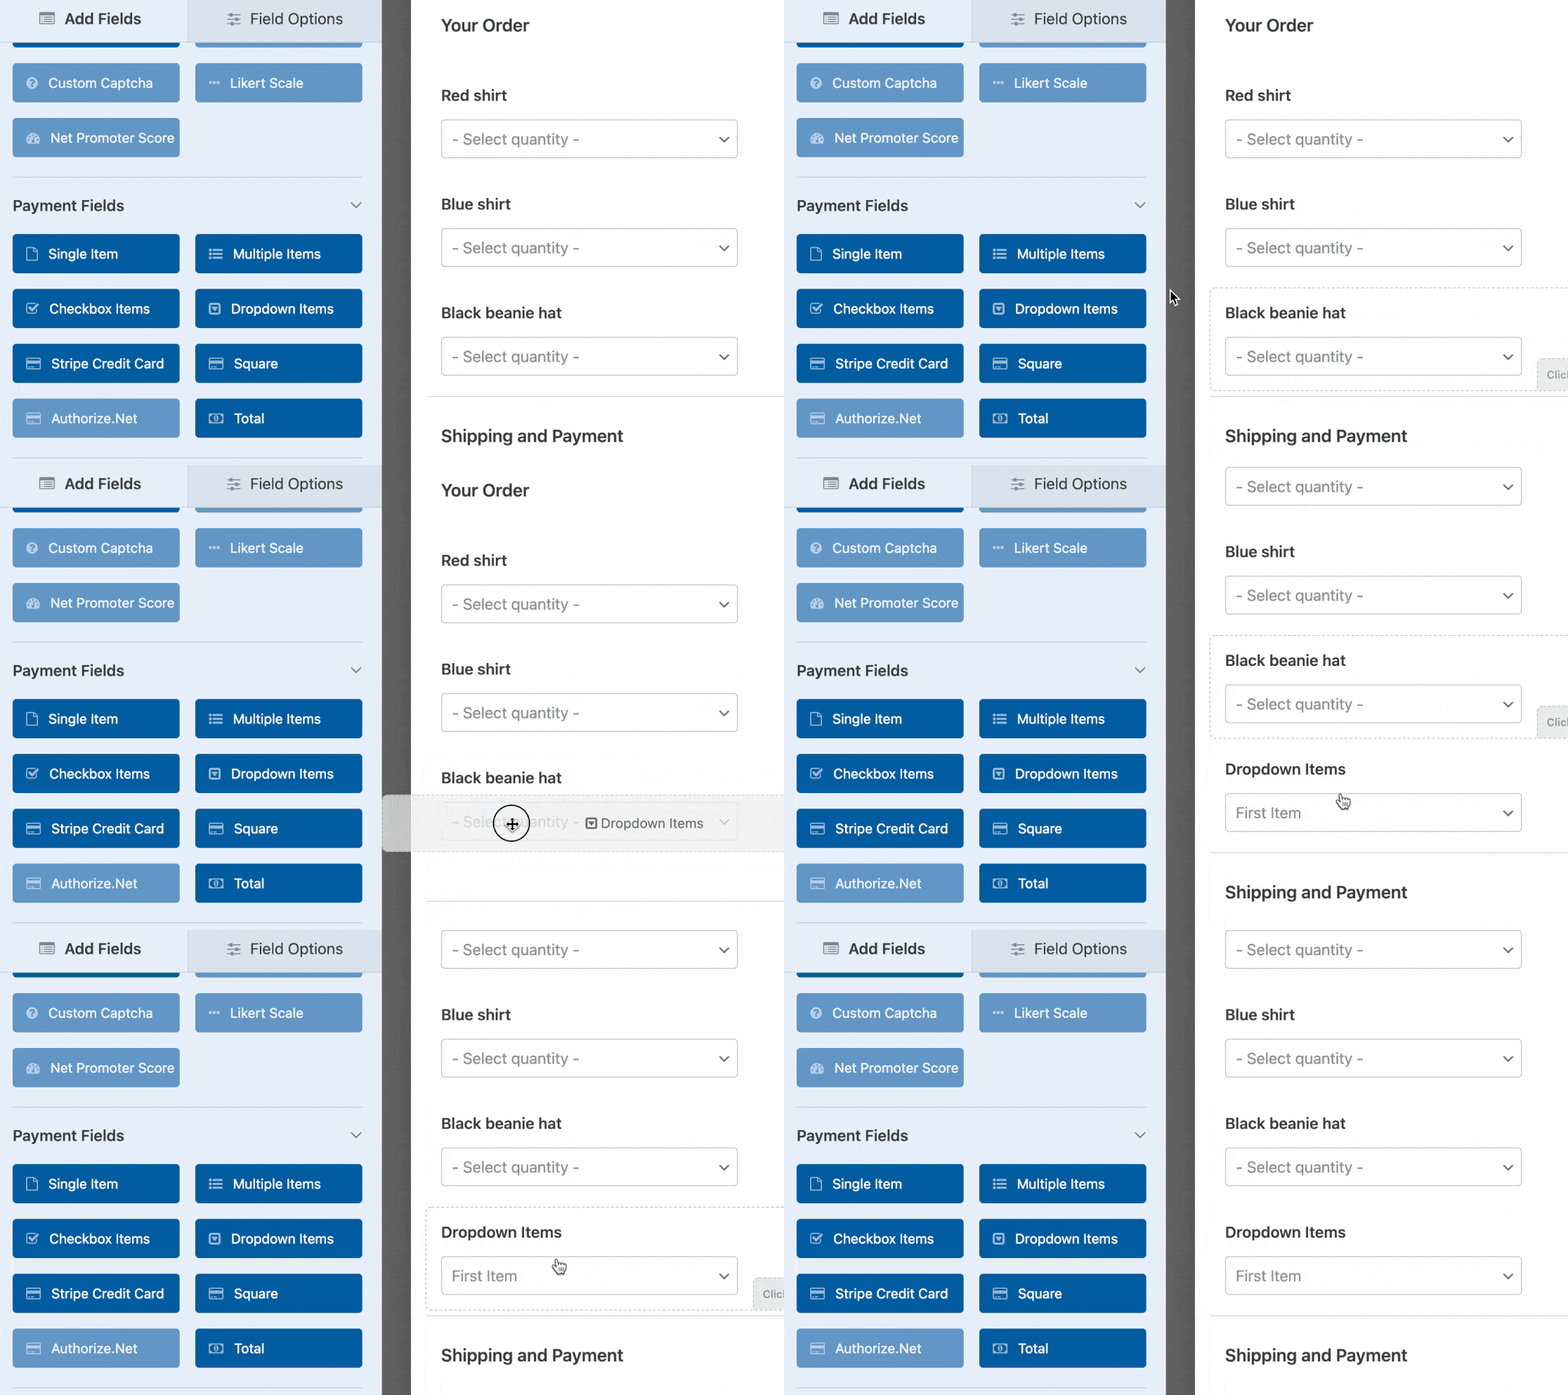
First, scroll down on your form to the Your Order section and look for the Dropdown Items fields. Click on one to open its settings in the left-hand panel.
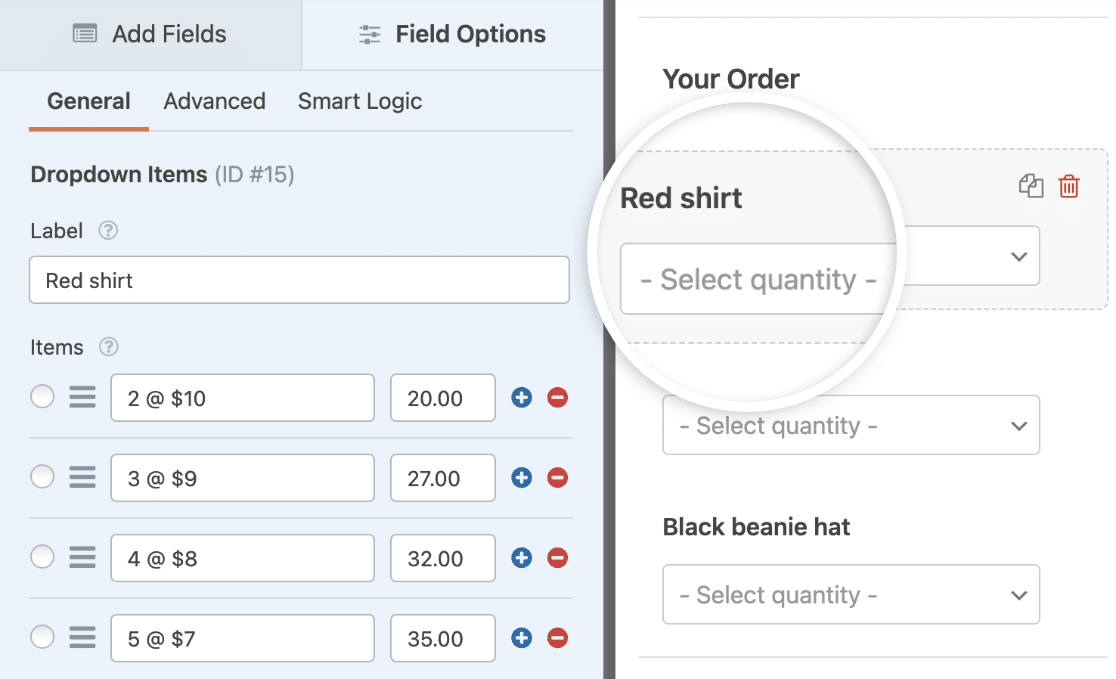
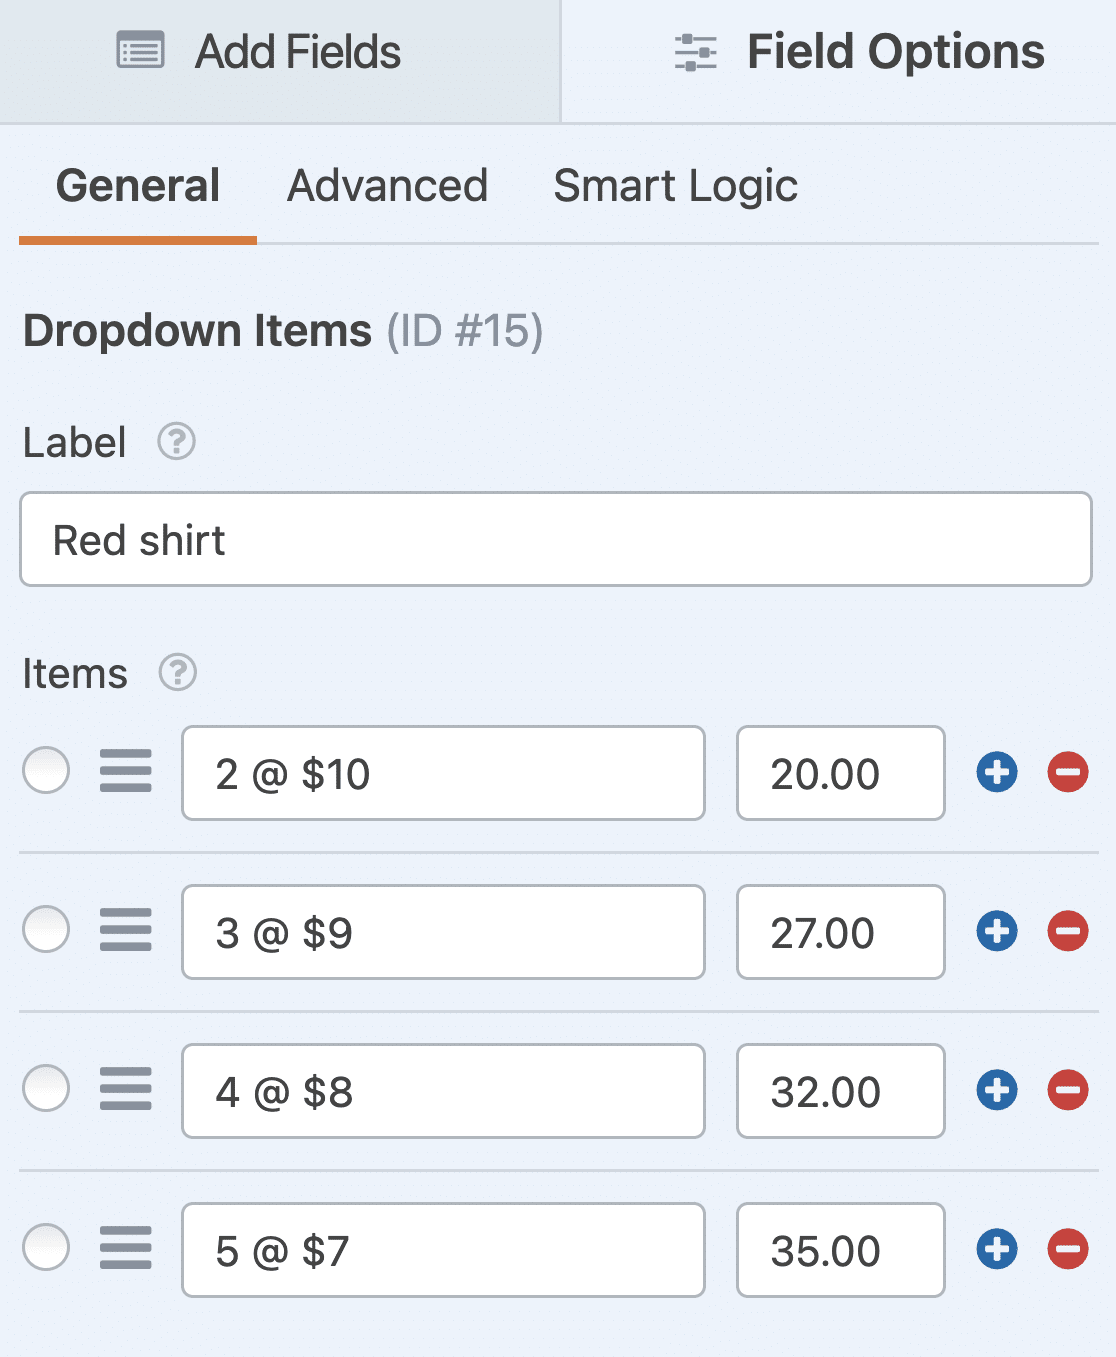
Here you can rename the Label to whatever your product is and change the quantities and prices.
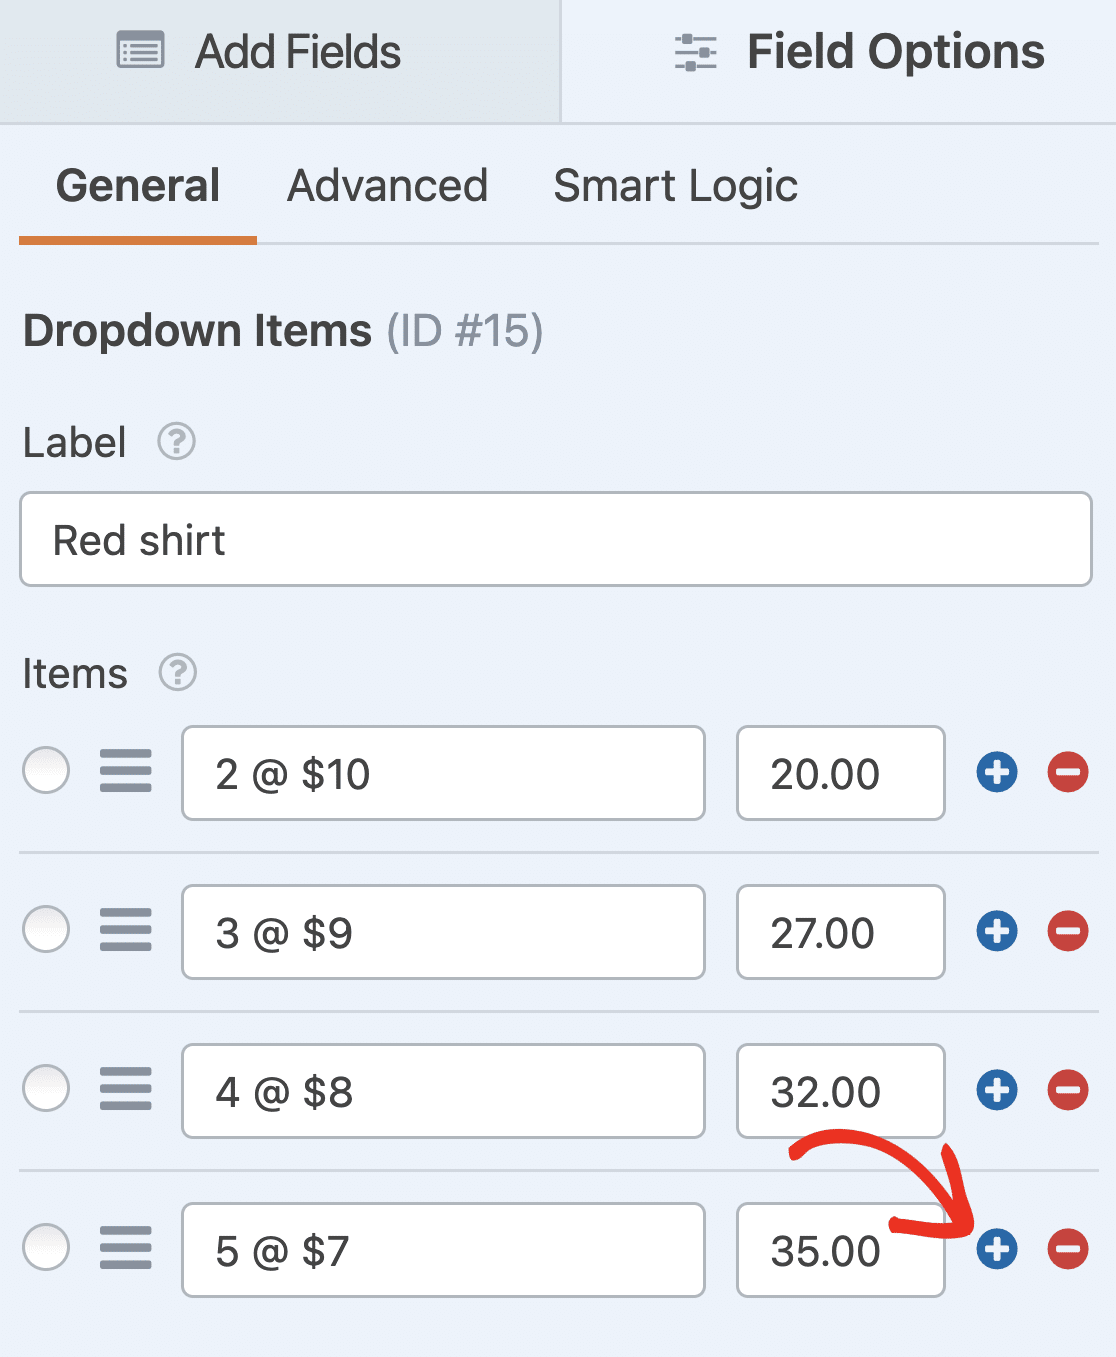
If you want to add more purchasing options, just click on the blue plus (+) button to add another choice to your Dropdown Items field.
Repeat these steps for each of the Dropdown Items fields in the template. If you want to add more products, drag and drop another Dropdown Items field into the form preview and edit its options the same way.
You can also make forms look great by following the steps in our post on how to create a multi-step form in WordPress. But for the sake of this tutorial, we’ll stick with a single page.
Lastly, you can add any additional fields to your order form by dragging them from the left-hand side to the right-hand side. For example, if you don’t need the customer’s full address, it’s easy to add a dropdown list of countries instead.
Did you know you can add custom coupon fields to your forms? If you’d like to offer discounts or sales, check out our tutorial on how to add a coupon code field to your WordPress form.
When you’re done customizing your wholesale order form, click Save in the top right corner of the form builder.
Step 2: Configure Your Wholesale Order Form Settings
Next, you’ll need to configure your form’s settings. To start, go to Settings » General.

Here you can configure the following:
- Form Name — Change the name of your form here if you’d like.
- Form Description — Give your form a description.
- Tags — Add tags to keep your WordPress forms organized.
- Submit Button Text — Customize the copy on the submit button.
- Submit Button Processing Text — Customize the text that’s shown while your form is submitting.
There are also advanced settings you can customize, such as:
- CSS Classes — Add custom CSS classes to your form or submit button.
- Enable Prefill by URL — Automatically fill in some fields based on a custom URL.
- Enable AJAX form submission — Allow users to submit your form without reloading the page. This setting is turned on by default for all new forms.
- Disable storing entry information in WordPress — You can disable the storing of entry information and user details, such as IP addresses and user agents, to comply with GDPR requirements. Check out our step-by-step instructions on adding a GDPR agreement field to your simple contact form.
Next, move down to the Spam Protection and Security settings.

There are several options here, including:
- Enable modern anti-spam protection — Stop contact form spam with modern anti-spam protection. The anti-spam toggle is automatically turned on for all new forms, but you can use it on a form-by-form basis if you like. The modern anti-spam protection runs seamlessly in the background to keep your forms safe and secure. You can also pair it with another layer of security, such as a CAPTCHA.
- Enable Akismet anti-spam protection — Connect your form to the Akismet anti-spam plugin to prevent spam submissions.
- Enable country filter — Block entries from certain countries.
- Enable keyword filter — Prevent submissions that include specific words or phrases.
When you’re done, click Save.
Step 3: Configure Your Form Notifications
When you receive a bulk order from your website, it’s important to notify your team right away.
Emails are a great way to send a notification whenever someone submits an online wholesale order form on your website.
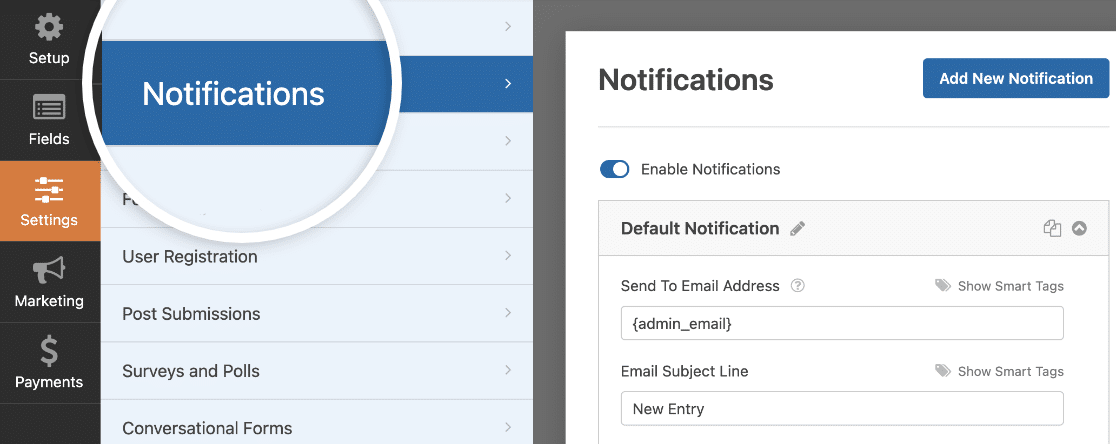
If you use Smart Tags, you can also send a notification to the user after they fill out your form to let them know you received their order and that someone will begin working on it shortly. This assures people their request has gone through.
For help with this step, check out our documentation on how to set up form notifications in WordPress.
And if you want to keep branding across your emails consistent, you can check out this guide on adding a custom header to your email template.
This is a great way to send bulk orders to your staff to make sure they jump on things quickly!
Step 4: Customize Your Form Confirmations
Form confirmations are messages displayed to site visitors once they submit a wholesale order on your website. They let people know that their request has gone through, and offer you the chance to let them know the next steps.
WPForms has 3 confirmation types to choose from:
- Message — This is the default confirmation type in WPForms. When a site visitor submits a request, a simple message confirmation will appear letting them know their order was processed. Check out some great success messages to help boost user happiness.
- Show Page — This confirmation type will take site visitors to a specific web page on your site, thanking them for ordering. For help doing this, check out our tutorial on redirecting customers to a thank you page. In addition, be sure to read our article on creating effective Thank You pages.
- Go to URL (Redirect) — This option is for when you want to send site visitors to a different website after they submit your form.
Let’s see how to set up a simple form confirmation in WPForms so you can customize the message site visitors will see when they fill out your form.
To start, click on Settings » Confirmations in the form builder.
Next, select the type of confirmation you’d like to create. For this example, we’ll select Message.
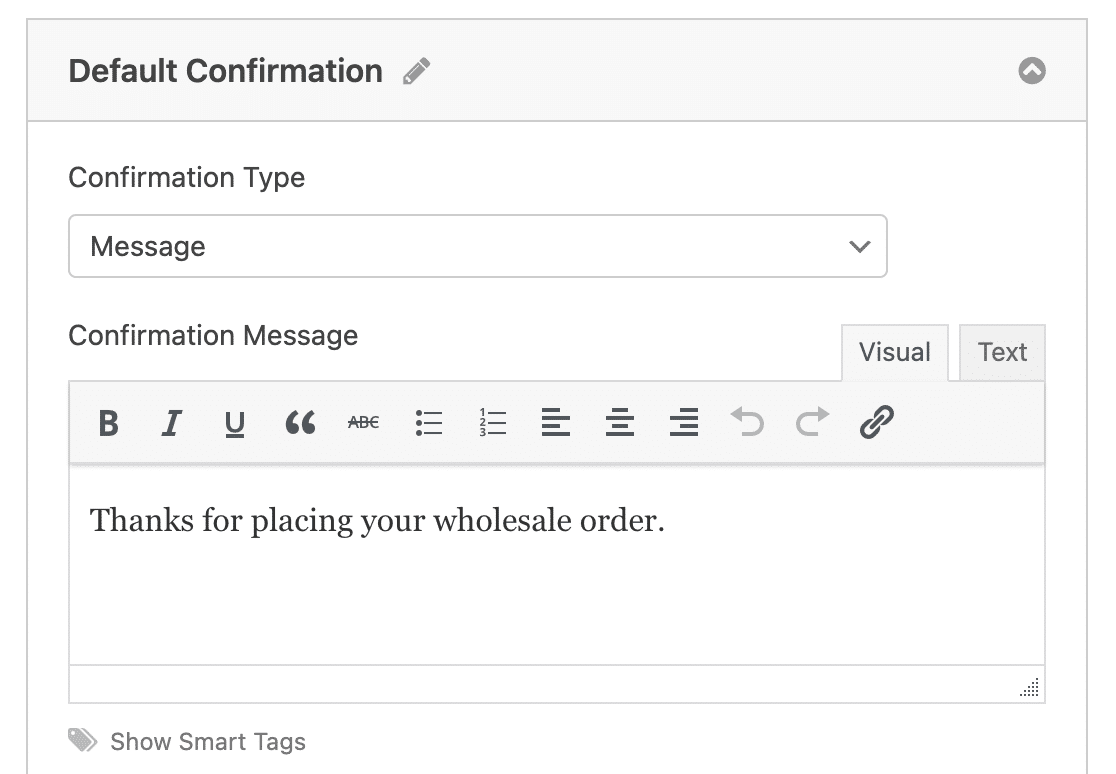
Then, customize the confirmation message to your liking and click Save.
For help with other confirmation types, see our documentation on setting up form confirmations.
Step 5: Configure the Payment Settings
To make bulk order checkout quick and easy, you’ll need to enable at least one payment gateway on your website.
WPForms works with Stripe, PayPal, Square, and Authorize.Net. You might want to consider the pros and cons of Stripe vs PayPal, or offer multiple payment methods.
For this example, we’ll use Stripe. Once you’ve set up the Stripe addon, drag the Stripe Credit Card field from Payment Fields onto the form.
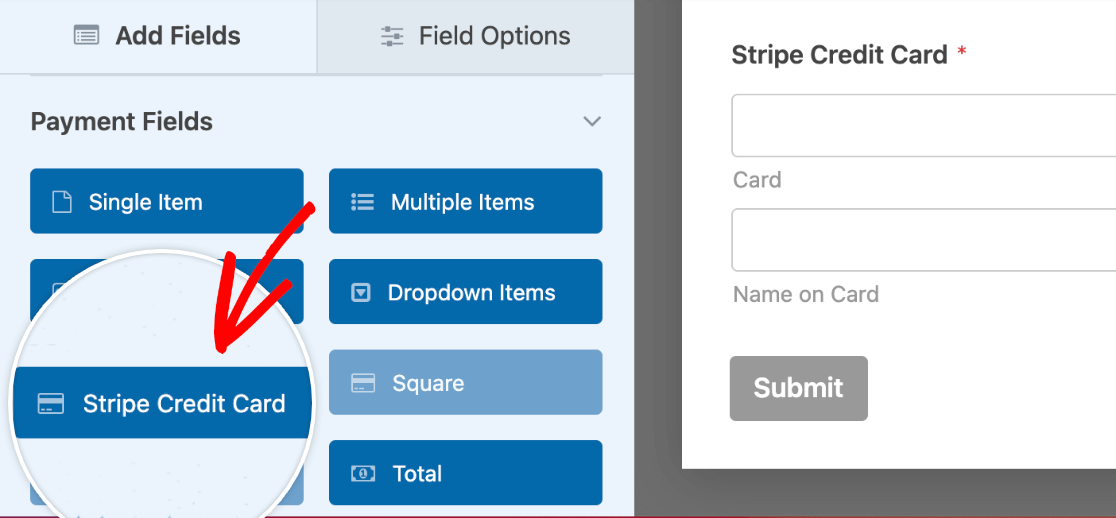
Then go to the Payments section of the form builder. Click on Stripe, then fill out the settings on the right.
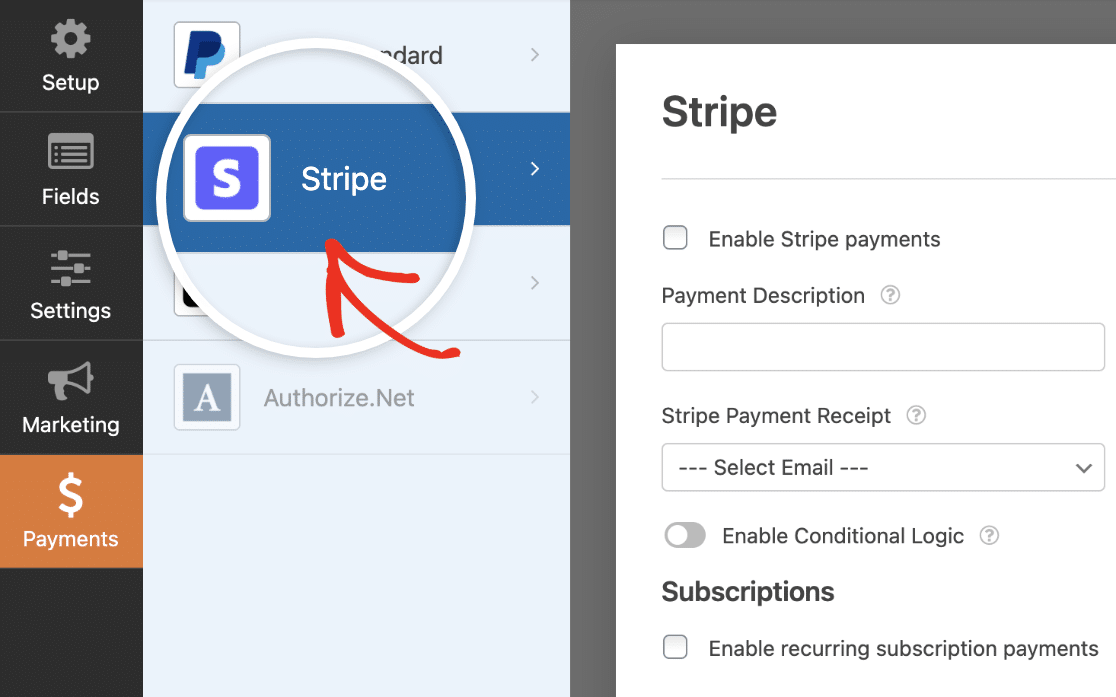
This process is pretty much the same for each of the payment addons. You can check out the tutorials for using Square, PayPal, and Authorize.Net for more details on how to use them in your WordPress wholesale order form.
Click on Save when your payments settings look how you want them.
Step 6: Add Wholesale Order Form to Your Site
After you’ve created your form, you need to add it to your WordPress website. WPForms allows you to add your forms to many locations on your website, including your blog posts, pages, and even sidebar widgets.
Let’s take a look at the most common placement option: page/post embedding.
To begin, create a new page or post in WordPress, or edit an existing one.
After that, click inside the first block (the blank area below your page title) and click on the plus (+) button. From the different blocks, find and Select WPForms.
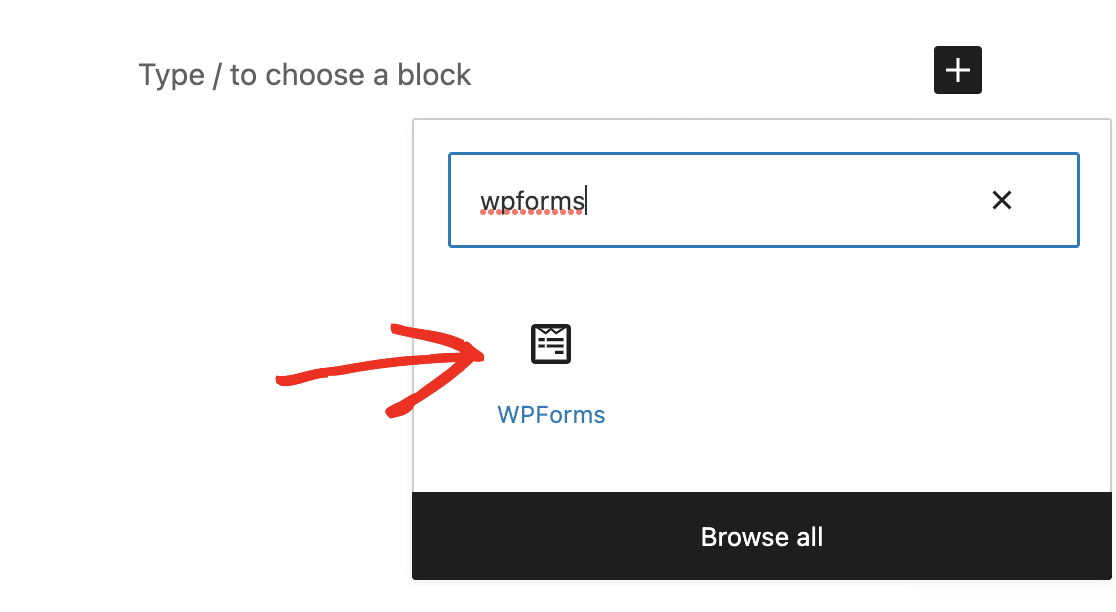
Now, the handy WPForms widget will appear inside of your block. Click on the WPForms dropdown and pick which one of the forms you’ve already created that you want to insert into your page.
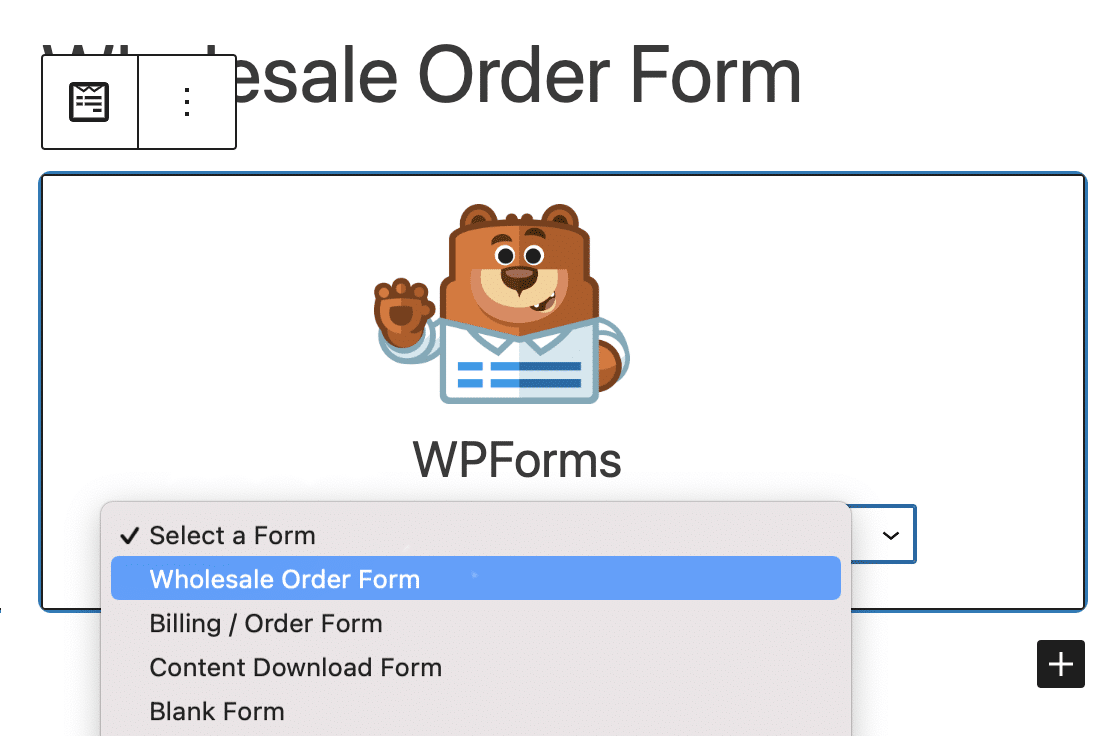
Select your Wholesale Order Form from the dropdown. Then, publish or update your post or page so your wholesale order form will appear on your website.
You can also use the Embed button from the form builder or embed your form using a shortcode. Learn more about embedding forms on your website with WPForms.
To learn more about viewing form submissions, check out this complete guide to form entries. For example, you can view, search for, filter, print, and delete any form entries, making the wholesale order process that much easier.
Create Your Wholesale Order Form Now
Next, Auto-Fill Forms for Your Users
And there you have it! You now know exactly how to create a wholesale order form on WordPress instead of building an entire WooCommerce store. Hopefully, this guide helped you get your bulk items online in no time.
If you have a list of products set up in WordPress already, try auto-populating fields in your form to save your visitor time.
Also, be sure to check out our post on how to create a restaurant order form in WordPress.
Ready to build your form? Get started today with the easiest WordPress form builder plugin. WPForms Pro includes lots of free templates and offers a 14-day money-back guarantee.
If this article helped you out, please follow us on Facebook and Twitter for more free WordPress tutorials and guides.



Is there a way to allow user to enter a quantity? Dropdowns are not the best choice for this application.
Hey Marc – Currently we don’t have the feature to allow users to enter quantity. I do agree this would be helpful, and I’ll add this into our feature request tracker so that it’s on the developers radar.