
AI Summary
Do you like the idea of using a WooCommerce wholesale order form for your eCommerce site, but you don’t actually want to set up WooCommerce? What if we said you didn’t have to?
Most wholesale operations are straightforward. You need to show your products, let customers pick quantities, calculate totals, and collect payment or order details.
I’ve set up dozens of these forms, and the simple approach wins every time. This guide walks you through creating a professional wholesale order form that handles everything from product selection to payment processing!
Create Your Wholesale Order Form Now! 😀
Why Use a Wholesale Order Form?
If you’ve got an online store and can fulfill orders of large quantities, you might want to set up a bulk order form with wholesale pricing to allow customers to buy in bulk.
Wholesale prices are an especially attractive offer to B2B and dropshipping businesses that might best benefit from your online order form.
And if you’re looking to fulfill orders but process the payments offsite, check out our tutorial on creating order forms without payment.
Why Can’t I Use WooCommerce for Wholesale Pricing?
There are 2 main reasons why you’ll want to skip enabling wholesale pricing on WooCommerce.
- You can’t have wholesale pricing on WooCommerce by default. You’d need additional tools to add that functionality.
- Even if you got those tools, you might not want to spend all that time setting up an entire eCommerce website just for wholesale customers.
WooCommerce is a great platform for setting up robust stores online with tons of products and product pages. But, if you’re looking for a simpler solution to getting wholesale pricing up on your website, I wouldn’t recommend it.
Let’s take a look at how to build a wholesale order form on WordPress so you can sell your customers bulk orders quickly using a simple form plugin like WPForms!
How to Create a Wholesale Order Form on WordPress Without WooCommerce
If you don’t have the time to set up an entire WooCommerce store and want to create a simple wholesale order form on WordPress easily, here are the steps.
Step 1: Install the WPForms Plugin
To build a wholesale order form, you’ll need WPForms. The good news is you can actually get started with WPForms Lite and still accept payments through the built-in Stripe integration.
WPForms Lite gives you the basics like form fields, Stripe payments, and email notifications. However, if you want a bit more flexibility and access to some automation capabilities, I do recommend going for the Pro version.
This whay, you get the Calculations addon for automatic pricing, conditional logic for tiered wholesale rates, unlimited email notifications for different departments, and payment integrations like PayPal Commerce.
Plus, if you ever want to integrate with Google Sheets for order tracking or add features like electronic signatures for wholesale agreements, you’re already set up.


“💡 Pro Tip: Most wholesale businesses end up needing advanced features within their first month. Save yourself the upgrade hassle and start with Pro. The time you’ll save on calculations and conditional logic alone makes it worth it.”
Installing WPForms takes about two minutes. Just search for it in your WordPress plugins directory and activate it. If you need help with the installation process, check out this guide on how to install and activate WPForms.
Step 2: Generate a Simple Order Form
From your WordPress dashboard, go to WPForms » Add New to create a new form. You’ll see the template selection screen where you can name your form and pick a starting point.
Look for the Wholesale Order Form Template and click Use Template. This gives you a pre-built structure with product dropdowns, quantity fields, customer information, and automatic calculations already set up.

Once the template loads in the form builder, you’ll see two main sections: the left panel with available fields and the right panel showing your form preview.
The template includes everything most wholesale businesses need, but I always customize it to match the specific products and workflow.

First, scroll down on your form to the Your Order section and look for the Dropdown Items fields. Click on one to open its settings in the left-hand panel.
Here you can rename the Label to whatever your product is and change the quantities and prices.

If you want to add more purchasing options, just click on the blue plus (+) button to add another choice to your Dropdown Items field.

Repeat these steps for each of the Dropdown Items fields in the template. If you want to add more products, drag and drop another Dropdown Items field into the form preview and edit its options the same way.

You can also make forms look great by following the steps in our post on how to create a multi-step form in WordPress. But for the sake of this tutorial, we’ll stick with a single page.
Lastly, you can add any additional fields to your order form by dragging them from the left-hand side to the right-hand side. For example, if you don’t need the customer’s full address, it’s easy to add a dropdown list of countries instead.
When you’re done customizing your wholesale order form, click Save in the top right corner of the form builder.
Step 3: Configure Your Wholesale Order Form Settings
Now you’ll need to configure your form’s settings to handle wholesale orders properly. Go to Settings » General to access the main configuration options.

Here’s what I always adjust for wholesale forms:
- Form Name — Change the name of your form here if you’d like.
- Form Description — Give your form a description.
- Tags — Add tags to keep your WordPress forms organized.
- Submit Button Text — Customize the copy on the submit button.
- Submit Button Processing Text — Customize the text that’s shown while your form is submitting.
For wholesale forms, I also recommend configuring these advanced settings:
- CSS Classes — Add custom CSS classes to your form or submit button.
- Enable Prefill by URL — Automatically fill in some fields based on a custom URL.
- Enable AJAX form submission — Allow users to submit your form without reloading the page. This setting is turned on by default for all new forms.
- Disable storing entry information in WordPress — You can disable the storing of entry information and user details, such as IP addresses and user agents, to comply with GDPR requirements. Check out our step-by-step instructions on adding a GDPR agreement field to your simple contact form.
Next, move down to the Spam Protection and Security settings.
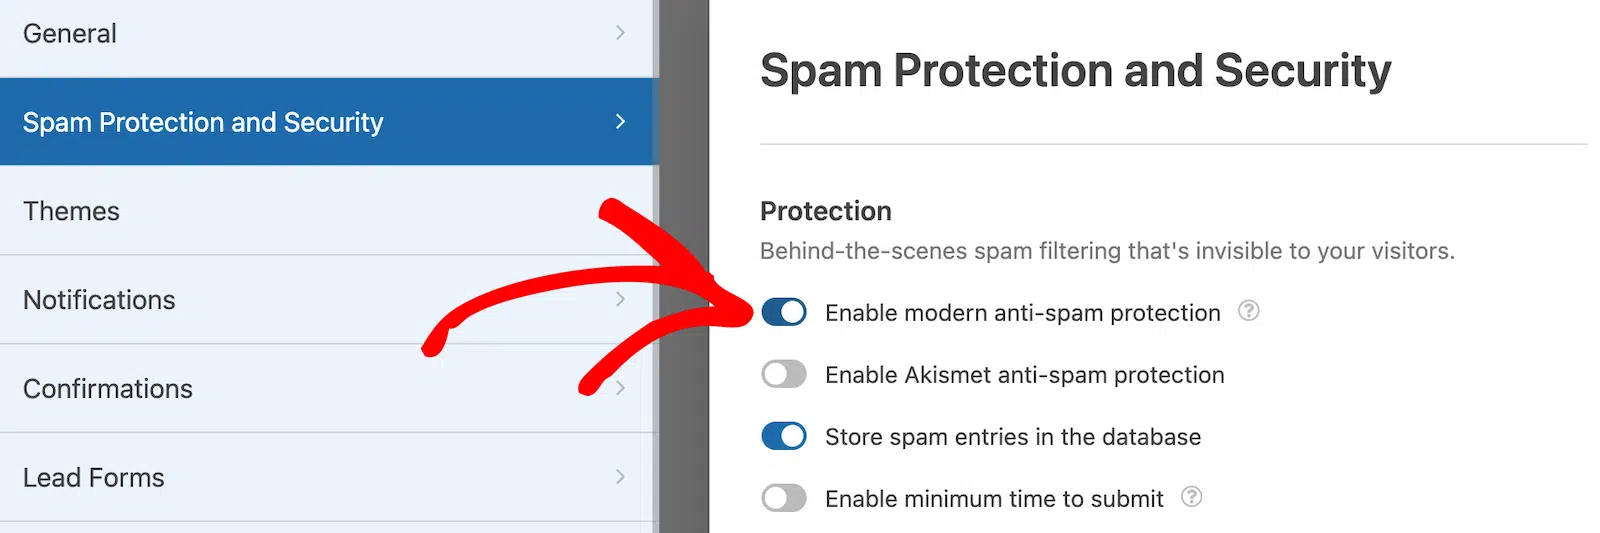
There are several options here, including:
- Enable modern anti-spam protection — Stop contact form spam with modern anti-spam protection. The anti-spam toggle is automatically turned on for all new forms, but you can use it on a form-by-form basis if you like.
- Enable Akismet anti-spam protection — Connect your form to the Akismet anti-spam plugin to prevent spam submissions.
- Enable country filter — Block entries from certain countries.
- Enable keyword filter — Prevent submissions that include specific words or phrases.
You can also disable storing entry information if you need to comply with GDPR requirements, though most wholesale businesses prefer to keep order records for tracking and customer service.
“💡 Pro Tip: For wholesale forms, I always enable the country filter and keyword protection. B2B customers won’t mind an extra layer of security, and it keeps your order queue clean so you can focus on real wholesale inquiries.”
When you’re satisfied with your settings, click Save to lock in your configuration.
Step 4: Configure Your Form Notifications
When you receive a bulk order from your website, it’s important to notify your team right away. Wholesale orders often involve larger quantities and higher values, so quick response time can make the difference between closing a deal and losing a customer.
Navigate to Settings » Notifications to set up your email alerts. The default notification goes to your admin email, but I always customize this for wholesale operations since different team members might need to handle different aspects of the order.

First, update the Send To Email field. You can add multiple email addresses separated by commas. Maybe your sales manager, warehouse supervisor, and accounting team all need to know about incoming wholesale orders immediately.

Next, customize the Email Subject to something clear like “New Wholesale Order from {company_name}” or “Bulk Order Submitted – {order_total}”.
If you use Smart Tags, you can also send a notification to the user after they fill out your form to let them know you received their order and that someone will begin working on it shortly.
In the Message field, include all the essential order details your team needs. I typically include the customer’s company name, contact information, products ordered, quantities, and total value.
You should also create a second notification that goes to the customer. Click Add New Notification and set the Send To Email field to {email} (the Smart Tag for the customer’s email address).

This lets them know you received their order and that someone will begin working on it shortly, which is crucial for maintaining trust with wholesale customers who might be placing large orders.
Step 5: Customize Your Form Confirmations
Form confirmations are messages displayed to site visitors once they submit a wholesale order on your website. They let people know that their request has gone through, and offer you the chance to let them know the next steps.
To get started, navigate to Settings » Confirmations in the form builder to access your confirmation options. WPForms gives you 3 confirmation types to choose from, and each works differently for wholesale scenarios.
- Message — This is the default confirmation type in WPForms. When a site visitor submits a request, a simple message confirmation will appear letting them know their order was processed. Check out some great success messages to help boost user happiness.
- Show Page — This confirmation type will take site visitors to a specific web page on your site, thanking them for ordering. For help doing this, check out our tutorial on redirecting customers to a thank you page. In addition, be sure to read our article on creating effective Thank You pages.
- Go to URL (Redirect) — This option is for when you want to send site visitors to a different website after they submit your form.
For most wholesale forms, I recommend starting with a Message confirmation since it’s immediate and doesn’t require creating additional pages. Click Message if it’s not already selected.

Then, customize the confirmation message to your liking and click Save. For help with other confirmation types, see our documentation on setting up form confirmations.
“💡 Pro Tip: Instead of a generic “Thanks for your submission,” try something like: “Thank you for your wholesale order request! We’ve received your order for [products] and will contact you within 24 hours with final pricing and delivery timeline. If you have urgent questions, call us at [phone number].””
Step 6: Configure the Payment Settings
To make bulk order checkout quick and easy, you’ll need to enable at least one payment gateway on your website. Customers should be able to place large orders and pay immediately.
WPForms works with Stripe, PayPal, Square, and Authorize.Net. You might want to consider the pros and cons of Stripe vs PayPal, or even offer multiple payment methods to customers.
For this example, I’ll show you how to set up Stripe since it handles larger transactions well and processes payments quickly.
Once you’ve activated the Stripe addon, drag the Stripe Credit Card field from Payment Fields in the left panel onto your form preview.

Then go to the Payments section of the form builder. Click on Stripe, then fill out the settings on the right.

This process is pretty much the same for each of the payment addons. You can check out the tutorials for using Square, PayPal, and Authorize.Net for more details on how to use them in your WordPress wholesale order form.
One thing that’s crucial for wholesale forms: test your payment processing with realistic order amounts. Click on Save when your payments settings look how you want them.
Step 7: Add Wholesale Order Form to Your Site
After you’ve created your form, you need to add it to your WordPress website. WPForms allows you to add your forms to many locations on your website, including your blog posts, pages, and even sidebar widgets.
Let’s take a look at the most common placement option: page/post embedding. To begin, create a new page or post in WordPress, or edit an existing one.
After that, click inside the first block (the blank area below your page title) and click on the plus (+) button. From the different blocks, find and Select WPForms.

Now, the handy WPForms widget will appear inside of your block. Click on the WPForms dropdown and pick which one of the forms you’ve already created that you want to insert into your page.

Select your Wholesale Order Form from the dropdown. Then, publish or update your post or page so your wholesale order form will appear on your website.
You can also use the Embed button from the form builder or embed your form using a shortcode. Learn more about embedding forms on your website with WPForms.
To learn more about viewing form submissions, check out this complete guide to form entries. For example, you can view, search for, filter, print, and delete any form entries, making the wholesale order process that much easier.
Create Your Wholesale Order Form Now! 🙂
FAQs on How to Create a Wholesale Order Form (Without WooCommerce)
Learning how to create a wholesale order form without WooCommerce is a popular topic of interest among our readers. Here are answers to some common queries about it:
What steps are needed to set up a bulk order form with WPForms?
Start by installing WPForms and creating a new form from the Billing/Order Form template.
Add product fields for each item you sell, let users choose quantities, and include total cost calculations.
Finally, set up payment integration and email notifications so both you and your customers get order details.
Can I collect payments on a wholesale form without WooCommerce?
Yes. WPForms supports direct payment collection through Stripe, PayPal, and Authorize.Net.
Once you connect your account, customers can pay right inside the form after placing their wholesale order.
How do I add product options and pricing in a WPForms order form?
WPForms lets you add Dropdown, Checkboxes, or Multiple Choice fields with price options.
You can set fixed prices, allow quantity selections, and even add conditional logic if certain products require extra details.
The form automatically calculates the total for customers.
What fields should be included in a wholesale order form using WPForms?
A good wholesale order form should have customer details (name, email, phone, company), product selection with quantities, a pricing summary, and payment fields.
You may also want to include shipping or pickup options, plus an extra notes field for special requests.
How do I send order notifications and confirmations with WPForms?
In WPForms settings, you can set up admin notifications so you’re alerted each time a new order comes in.
You can also create an automatic confirmation email for the customer that includes their order summary and payment details.
How do I show the wholesale form on my WordPress site?
Once your form is ready, you can embed it on any page or post using the WPForms block or shortcode.
Many site owners add it to a dedicated “Wholesale Orders” page so customers can find it easily.
Next, Auto-Fill Forms for Your Users
And there you have it! You now know exactly how to create a wholesale order form on WordPress instead of building an entire WooCommerce store. Hopefully, this guide helped you get your bulk items online in no time.
If you have a list of products set up in WordPress already, try auto-populating fields in your form to save your visitor time. Also, be sure to check out our post on how to create a restaurant order form in WordPress.
Ready to build your form? Get started today with the easiest WordPress form builder plugin. WPForms Pro includes lots of free templates and offers a 14-day money-back guarantee.
If this article helped you out, please follow us on Facebook and Twitter for more free WordPress tutorials and guides.


Is there a way to allow user to enter a quantity? Dropdowns are not the best choice for this application.
Hey Marc – Currently we don’t have the feature to allow users to enter quantity. I do agree this would be helpful, and I’ll add this into our feature request tracker so that it’s on the developers radar.