AI Summary
Wondering how to use WordPress payment processing to transform your online business and start bringing in sales? You’ve landed in the right place!
If you’re running an eCommerce store, you probably already know that customers can abandon their carts at any stage of the checkout process.
This could be because of complex procedures, lack of trust, or payment issues. Either way, understanding the nuances of payment processing is crucial.
In this guide, we will dive deep into the mechanics behind WordPress payment processing to harness the full potential of efficient online transactions.
So, How Do Payment Processes Work?
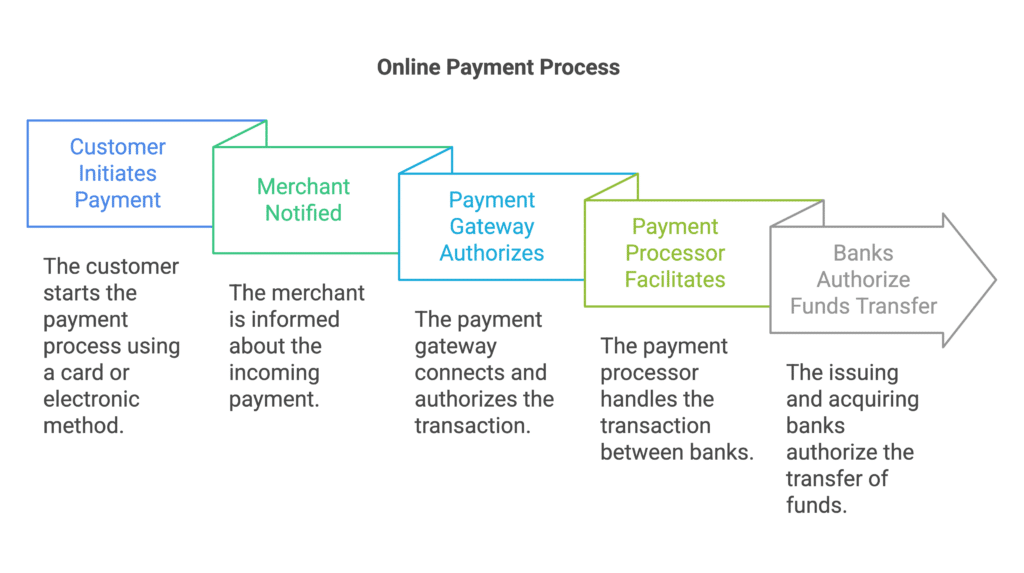
When it comes to processing online payments, there are several parties involved. Let’s briefly break down who they are and what they do:
- Customer: The customer initiates the first step of the payment process and may opt to pay via credit or debit cards. Some customers may also pay via an electronic payment method like PayPal (we’ll discuss this in the upcoming sections).
- Merchant (You): Once the customer initiates the payment, the merchant, i.e., the website or business owner, gets informed about the upcoming payment. The transaction is deposited into a merchant account or acquirer.
- Payment Gateway: To carry out the payment process between the customer and merchant, the payment gateway plays an important role. It authorizes the transaction by connecting the customer’s buying cart to the network for processing.
- Payment Processor: Once the payment gateway has authorized the payment, the payment processor facilitates the transactions between the payment gateway and the banks involved (debiting a customer account and crediting the business account).
- Issuing & Acquiring Bank: The last step in the process is where, through the help of the payment processor, the customer’s bank (issuing bank) and the merchant’s bank (acquiring bank) authorize the transfer of funds.
Difference Between Payment Gateways and Payment Processors
As the name implies, payment gateways are basically intermediaries. Their job is to act as a “gateway” between websites and payment processors. They connect the customer cart on your website to the payment network for processing.
Payment Processors handle transactions by facilitating communication between the payment gateway, banks, and card networks like Visa or Mastercard.
After the payment gateway sends customer data, the processor coordinates with the card network to approve the transaction, instructs the issuing bank to transfer funds, and ensures the acquiring bank (merchant) receives them. This process involves multiple steps but happens swiftly, with settlements varying depending on the provider.
In essence, payment gateways and processors work hand in hand to complete your payment.
All-In-One Gateways and Processors
Some services handle the job of both payment gateways and processors to speed up the online payment process for customers and business owners operating an eCommerce website.
These services handle the whole transaction process. Like a gateway, they make it safe for payment information to be sent, and like a processor, they handle the transaction between the banks.
Since they don’t have to coordinate between a separate gateway and processor, this integration offers better security, great support, and often, more competitive pricing, which is why many WordPress websites prefer it.
Top 5 WordPress Payment Processors
1. Stripe

Stripe is one of the best and most recommended WordPress payment processors that can handle all your website’s payment needs. It has a user-friendly interface and can seamlessly integrate with numerous eCommerce platforms, including WordPress.
It supports numerous payment methods, from modern digital wallets to traditional credit and debit cards, hence why it is a preferred choice for most online businesses. Additionally, it is also PCI-compliant and features numerous advanced fraud detection systems.
Features:
- Supports multiple payment methods (credit cards, digital wallets, etc.)
- Seamless integration with WordPress and other platforms
- Robust security with PCI compliance
- Advanced fraud detection and prevention tools
- User-friendly interface for easy navigation and use
- Real-time transaction processing
- Extensive customization options for checkout experiences
- Global payment support for international transactions
Price:
- Per Transaction:
- 2.9% + 30¢ per successful charge for domestic cards
- + 0.5% for manually entered cards
- + 1.5% for international cards
- + 1% if currency conversion is required
- ACH Direct Debit:
- 0.80% and up to $5 per transaction
- Complete merchant fee details
Accept Stripe Payments with WPForms
2. PayPal

PayPal has been in the marketplace of online payment processors for quite a while. As such, we highly recommend using it with WordPress for eCommerce transactions. It’s widely recognized, hence why it’s a popular choice among shoppers worldwide.
It also offers many robust security features, integrates with WPForms, and protects customers and merchants alike. WordPress site owners will appreciate its user-friendly interface and extensive support and recognition.
Features:
- Broad global acceptance and recognition.
- User-friendly interface for ease of transaction.
- Secure transaction environment with advanced protection.
- Integration with various eCommerce platforms, including WordPress.
- Support for multiple currencies and international transactions.
- Mobile-friendly solutions for on-the-go payments.
- Option for recurring billing and subscriptions.
- Detailed transaction reports for better financial management.
Price:
- Per Transaction:
- 3.49% + fixed fee for domestic cards
- Complete merchant fee details
Make sure to check out these guides related to PayPal:
3. Square

Square is a popular payment processing tool widely used by businesses for WordPress payment processing. Known for its versatility, it caters to both online and in-person transactions.
Square’s ease of integration with WordPress makes it a go-to choice for many eCommerce sites. Its user-friendly interface and strong security protocols ensure safe and efficient transactions.
Take a look at this Stripe vs. Square guide to learn about the differences between the two and determine which is right for you based on your business needs.
Features:
- Easy integration with WordPress
- Supports various payment methods
- Strong security and fraud prevention
- User-friendly interface
- Real-time analytics and reporting
- Mobile payment capabilities
- Customizable checkout options
- Global payment acceptance
Price:
- Per Transaction:
- 2.6% + $0.10 in-person price
- 2.9% + $0.30 online price
- 3.5% + $0.15 manually-entered price
- Complete merchant fee details
4. Authorize.net
 Authorize.net is a widely recognized payment processing solution, particularly suitable for WordPress payment processing needs. It’s known for its reliability and comprehensive security measures, making it a trusted choice for merchants of all sizes.
It also excels in handling a variety of payment types, including credit cards and electronic checks. It’s also well-regarded for its customer service and fraud prevention tools, offering a robust platform for secure online transactions.
Features:
- Reliable and secure transaction processing
- Supports multiple payment types
- Advanced fraud detection
- Comprehensive customer support
- Easy integration with WordPress
- Customizable security settings
- Real-time transaction monitoring
- Detailed reporting and analytics
Price:
- Per Transaction:
- 2.9% + $0.30 per transaction plus a monthly fee of $25.
- Complete merchant fee details
5. Braintree

Braintree, a PayPal service, is renowned for its comprehensive payment processing solutions, making it an ideal choice for WordPress-based eCommerce sites. It offers various payment options, including credit cards, PayPal, and other digital wallets, enhancing flexibility for merchants and customers.
Braintree’s global reach, supporting transactions in multiple currencies, is a significant asset for businesses targeting an international market. Its robust security protocols, including fraud protection and PCI compliance, ensure safe and secure transactions.
Features:
- Multiple payment options (credit cards, PayPal, digital wallets)
- Global currency support
- Advanced fraud protection
- PCI compliant
- Seamless integration with WordPress
- Customizable checkout experiences
- Reliable customer support
- Real-time data and analytics
Price:
- Per Transaction:
- Cards and Digital Wallets Price: 2.59% + $.49 per transaction
- Venmo Price: 3.49% + $.49 per transaction
- ACH Direct Debit Price: 0.75% per transaction
- Complete merchant fee details
Top 5 WordPress Payment Plugins
1. WPForms
WPForms is the best form builder plugin for WordPress that can be used to create various forms. From simple contact forms and order forms to more complex Calculator Forms, it supports a variety of payment methods.
These include:
- Stripe
- PayPal
- Authorize.net
- Square
The Stripe integration works on all versions of WPForms – free and paid. However, you can remove the 3% transaction fee by upgrading to WPForms Pro. This also gives you conditional logic for Stripe, which is super handy for process payments differently based on user selections in your form.
If you’re running a basic eCommerce store and are looking for a plugin that successfully handles all payment needs, look no further than WPForms.
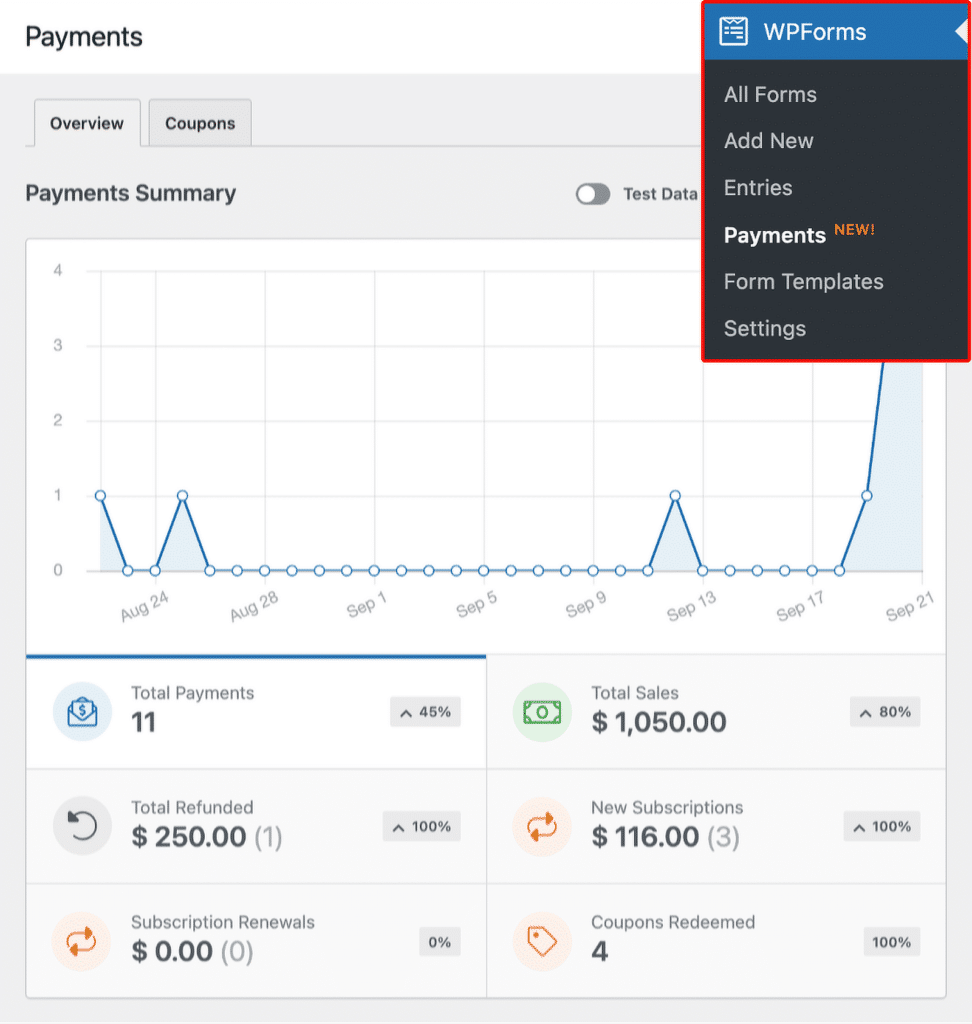
WPForms also offers a Payments screen, which provides comprehensive graphs, tables, and payment summaries for individual transactions.
You can even use the plugin to create coupon codes or use the Calculations Addon to deploy shipping discounts, tax, and more!
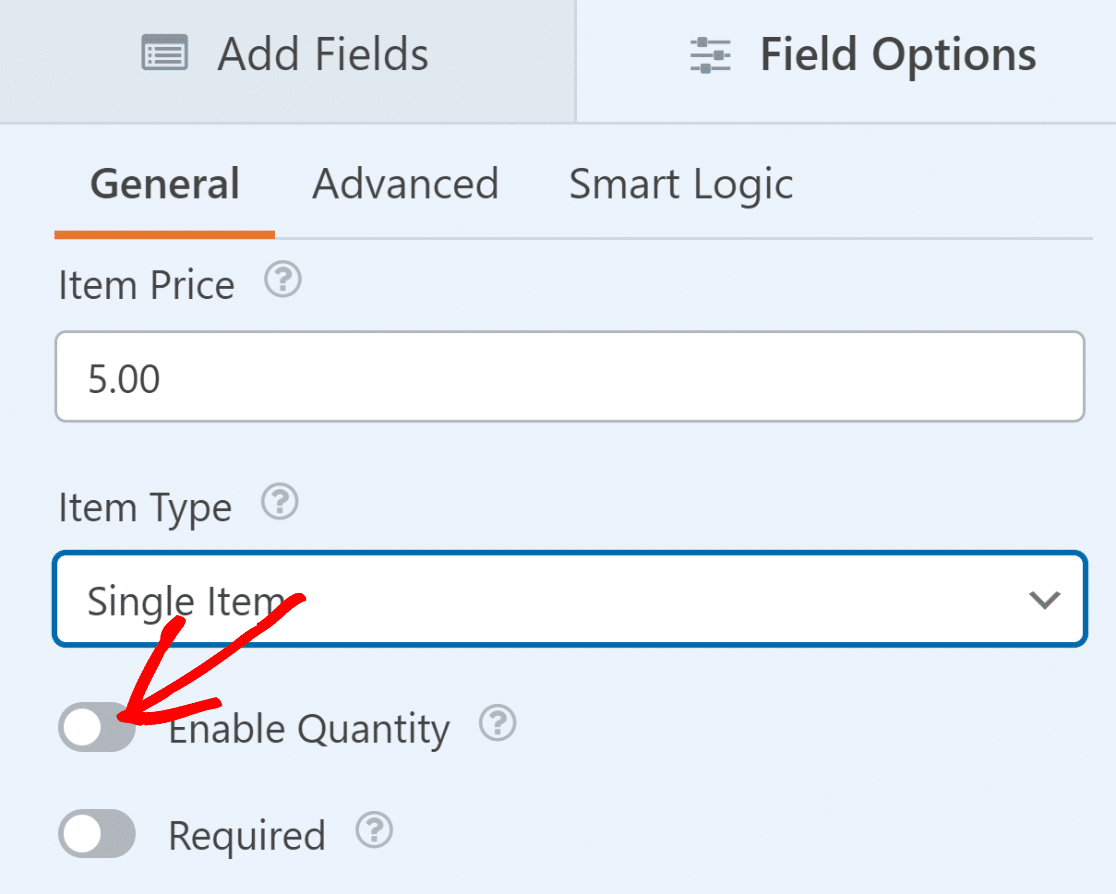
You can even use WPForms to create an order form that features all your products, allows buyers to select product quantities, and view a detailed order summary before making their purchase to give them a clear idea about their orders.
Features:
- Drag-and-drop visual form builder
- 2,000+ WordPress form templates
- Survey forms, including star ratings and other survey fields
- File uploads, including Modern and Classic field types
- Support for Stripe, Square, PayPal, Authorize.net, and more
Price:
WPForms Lite can be used for free. For more advanced features and addons, you can upgrade to a PRO plan, which starts at $49.50 per year!
For more information, check out this WPForms review.
2. WP Simple Pay
WP Simple Pay is the best WordPress payment plugin for website owners who want to start accepting one-time and recurring payments while creating forms and payment pages in a matter of minutes.
The plugin integrates with Stripe and uses its PCI-compliant servers to handle all payments from WordPress websites. It can accept debit or credit cards, ACH, Apple Pay, Google Pay, and Afterpay, among other payment methods.
Thanks to a payment dashboard, managing your payments and subscriptions with WP Simple Pay is hassle-free. You can easily view and track payment details, including transaction history and customer information, right within the plugin.
Features:
- Tax handling and fee management features
- Flexibility for custom data and donations
- Versatility in form building and payment methods available
- Security and Simplicity in payment processing (PCI-Complaint)
- Supports recurring payments and management of subscriptions
Price:
WP Simple Pay, available on WordPress.org, is free and has basic payment features. To access more advanced functionalities, plans start at $49.50/year.
For more information, check out this WP Simple Pay review.
3. Easy Digital Downloads
Easy Digital Downloads (EDD) is a complete WordPress tool that makes it easy to sell digital products. EDD makes sure that the payment process is simplified, which makes it easy for people to buy eBooks, audio files, or digital art.
It also has a smart and easy-to-use earnings report from the WordPress dashboard that lets you see how much money you made over a certain time period. It also comes with many built-in themes that you can use to create and customize your eCommerce store.
Features:
- Customizable payment and checkout fields
- Easy discount code creation and management
- Simplifies customer data tracking and management
- Easy-to-use shopping cart enhances user experience
- Supports popular payment gateways like PayPal and Stripe
Price:
Easy Digital Downloads offers a free plan for small eCommerce. For more advanced payment and eCommerce features, premium versions start at $99.50/year.
For more information, check out this Easy Digital Downloads review.
4. WooCommerce

WooCommerce is one of the biggest names in the eCommerce business, and it powers a lot of online shops. WooCommerce stands out because of its flexible buying system that works for many types of businesses.
It has guest payment options, supports multiple payment gateways, provides easy tax and shipping settings, and even integrates with WPForms. With hundreds of extensions and styles available, you can also make your store look exactly how you want it to.
Features:
- Custom payment and checkout fields
- Supports multiple payment gateways
- One-page payment and checkout templates
- Calculates taxes with geo-location support
- Adheres to PCI Compliance
Price:
Although WooCommerce is primarily a free plugin, it does provide premium extensions for more advanced features.
Make sure to check out these guides related to WooCommerce:
5. BigCommerce

BigCommerce is another great WordPress payment plugin that allows you to create an eCommerce store that is equipped with support for over 65 payment gateways. TIt is one of the best eCommerce plugins that easily integrates with WordPress and offers a sophisticated number of options for product pages, cart & checkout,
Features:
- Supports multi-step checkout processes
- Provides dependable security protection
- Excellent long-term solution due to scalability
- Supports 65+ payment gateways
- Dashboard to access payment-related data
Price:
BigCommerce offers a 15-day free trial to test out its service. After the trial, premium plans start at $29/year, which is quite reasonable, to say the least.
Choosing Your Ideal WordPress Payment Processing Solution
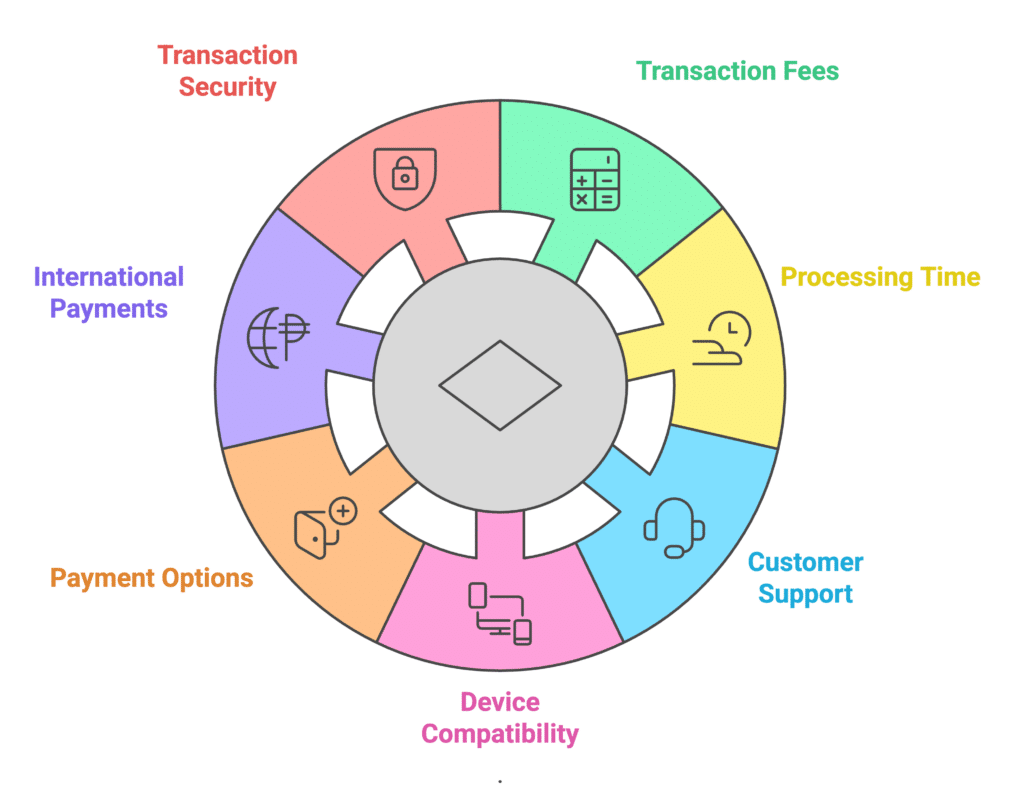
Now that you understand how WordPress payment processing works, it’s important to discuss the factors that may influence your decision to select a provider for your WordPress website. Consider the following:
- Transaction Fees: Make sure you look at the fee structure of the WordPress payment processor. Most providers will charge a certain transaction fee, monthly fee, or hidden fee. You need to know all the transaction costs associated with your online payments.
- Processing Time: Using a payment method that supports quick processing times is incredibly important. Not only does it increase customer satisfaction, but also makes it possible for you to dispatch orders as soon as possible.
- Customer Support: Wherever money is involved, it’s important to have a reliable support network that can help resolve issues promptly, as when dealing with online transactions, chargebacks, cancellations, etc, are very common.
- Device Compatibility: With the advent of technology, customers are now spread across numerous devices. Whether it be tablets, desktops, or mobiles, make sure that your customers can shop on different platforms conveniently.
- Payment Options: Offering a range of payment methods can enhance customer convenience and increase conversions. This includes traditional options like credit cards and modern solutions such as PayPal, Apple Pay, and other digital wallets.
- International Payments: If you are catering to a global audience, it is especially important to look for solutions that are compliant with international payment standards and that handle transactions taking place in many currencies.
- Transaction Security: When it comes to protecting sensitive client data, it is important to give priority to solutions that include comprehensive security features such as SSL encryption and PCI compliance.
All of these are important things to think about when picking a payment method for WordPress on your site. In case you want some help choosing one, we’ve also created a list of payment companies that we think are the best.
More Questions about WordPress Payment Processing
WordPress payment processing is a popular topic among our readers. Here are answers to some common questions about it.
Does WordPress offer payment processing?
WordPress itself doesn’t offer a built-in payment processing system. However, it allows for the integration of various payment gateways through plugins.
For basic payment forms, WPForms is a great tool, seamlessly integrating with popular payment services like PayPal and Stripe.
This flexibility makes WordPress a versatile platform for online transactions, catering to various eCommerce needs.
Which payment gateway is best for WordPress?
The best payment gateway for WordPress largely depends on your specific needs. For straightforward payment solutions, WP Simple Pay is a strong choice, offering a user-friendly interface for advanced checkout needs.
PayPal and Stripe are also popular due to their reliability and global acceptance. When choosing a payment gateway, it’s important to consider factors like transaction fees, ease of integration, and geographic availability.
How do I accept free payments on WordPress?
Consider using basic payment form plugins to accept payments without incurring fees. WPForms Lite allows for easy creation of payment forms and integrates with payment gateways like Stripe.
While the plugin itself is free, remember that payment gateways like Stripe may ch
How to do payment integration in WordPress?
Integrating payments into WordPress is straightforward. Plugins like WPForms for basic payment forms or WP Simple Pay for more advanced needs make the process user-friendly.
First, choose a plugin that fits your requirements, install it, and then connect it with a payment gateway like PayPal or Stripe. Follow the plugin’s setup guide to configure your payment options, and you’ll be ready to accept payments on your site.
How much does it cost to integrate a payment gateway on WordPress?
The cost of integrating a payment gateway on WordPress can vary. Plugins, like WPForms for basic forms, offer free versions with essential features. However, advanced payment features might require a premium version.
Also, consider the fees charged by the payment gateway providers, which typically include a percentage of each transaction. It’s essential to factor in the plugin costs and the transaction fees to get a clear picture of the total cost.
Next, Check Out Other Best WordPress Plugin Guides
We are confident that this guide will assist you in selecting a WordPress payment processor and plugin that caters to your specific requirements. See the posts below for more of our suggested WordPress plugins.
- Best SEO Plugins
- Best Backup Plugins
- Best Social Media Plugins
- Best WordPress Affiliate Plugins
- Best Survey Plugins
Create Your Wordpress Form Now
Ready to build your form? Get started today with the easiest WordPress form builder plugin. WPForms Pro includes lots of free templates and offers a 14-day money-back guarantee.
If this article helped you out, please follow us on Facebook and Twitter for more free WordPress tutorials and guides.

