
AI Summary
A WordPress registration form with payment lets you collect user account details and process a payment in a single form — no separate checkout page, no manual account creation. It’s ideal for paid memberships, premium courses, event signups, or any scenario where new users need to pay before getting access to your site.
This tutorial walks you through the full setup. We’ll combine WPForms’ User Registration and PayPal Commerce Pro Addons to build a form that registers users and processes payments in one step — no coding required.
Create a Registration Form with Payments Enabled! 🙂
How to Create a WordPress Registration Form With Payment
You have several options for collecting payments on your WordPress site. If you’re building a registration form, the easiest thing to do is to use a drag-and-drop form builder plugin like WPForms that connects to a payment gateway. Follow the steps below to get started:
- What You'll Need
- Step 1: Install and Activate the WPForms Plugin
- Step 2: Install the User Registration + PayPal Commerce Addons
- Step 3: Configure PayPal Commerce in WPForms
- Step 4: Create a User Registration Form in WordPress
- Step 5: Enable PayPal on Your User Registration Form
- Step 6: Publish Your Registration Form With Payment
- FAQs About WordPress Registration Forms With Payment
What You’ll Need
Before you get started, here’s what you’ll need to follow this tutorial:
- WPForms Pro — includes the User Registration Addon and the PayPal Commerce Pro Addon at no extra cost
- A PayPal Business account (free to create at paypal.com)
Don’t have WPForms Pro yet? It comes with 2,100+ form templates, all payment integrations, and a 14-day money-back guarantee.
Step 1: Install and Activate the WPForms Plugin
To build a form that can both register a user and take their payment, you need a single tool that can handle both actions in one submission.
WPForms solves this by integrating both functions into one form. For this process, you will need a WPForms Pro license, which unlocks two essential addons.
The User Registration addon that creates the WordPress user account, and the PayPal Commerce addon, which processes the payment.

Once you’ve purchased your license, install and activate the WPForms plugin. If you need help with this, you can follow our step-by-step guide on how to install a WordPress plugin.
Step 2: Install the User Registration + PayPal Commerce Addons
With WPForms Pro installed, you now have access to the powerful addons that make this automation possible. To get started with this step, head into the WordPress admin area and click through WPForms » Addons.

Then scroll down till you find the User Registration Addon, or use the search bar. When you find it, click Install Addon. This addon is what allows your form to create a new WordPress user account upon submission.

Next, on the same screen, search for the PayPal Commerce Addon and install it as well. This is the addon that will handle the secure payment processing.

Once both addons show a green Active status, your site is equipped to handle both user creation and payments within a single form.
Make sure to disable the PayPal Standard addon if you have it installed. Both PayPal addons can’t be used at the same time.
Step 3: Configure PayPal Commerce in WPForms
This next step creates the secure, one-time connection between your WordPress site and your PayPal account.
From your WordPress admin area, navigate to WPForms » Settings and click on the Payments tab.
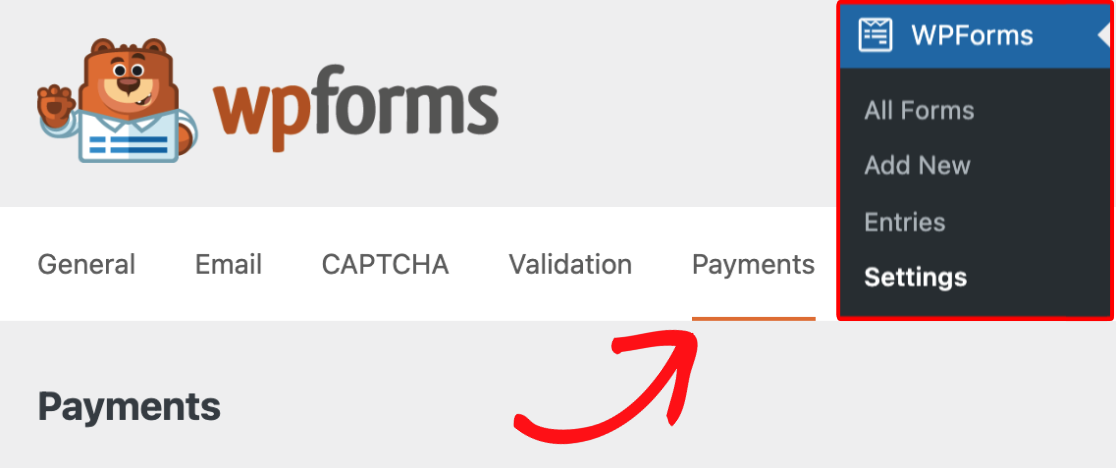
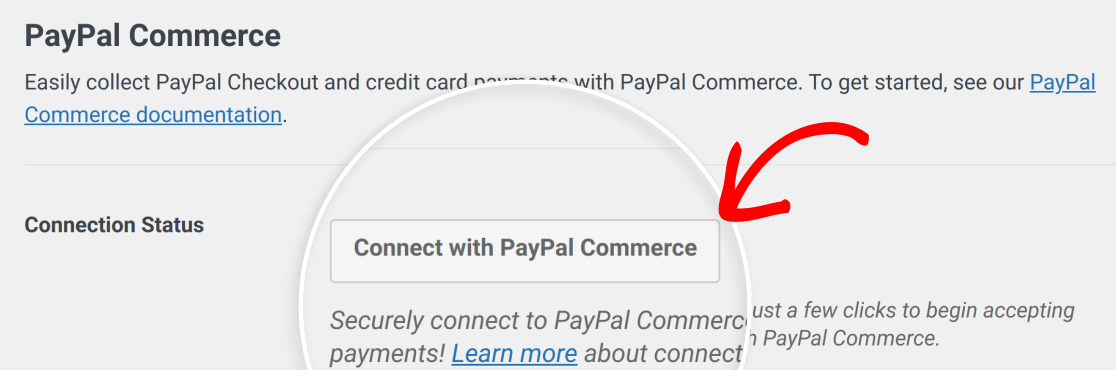
From there, scroll down till you find the section labeled PayPal Commerce, then click Connect with PayPal Commerce.
You’ll be redirected to PayPal’s secure login page. This is a standard OAuth process, which means you’re authorizing the connection without ever sharing your password with WPForms.
Make sure to log in with the email address associated with your PayPal Business account, as Personal accounts do not support this integration.

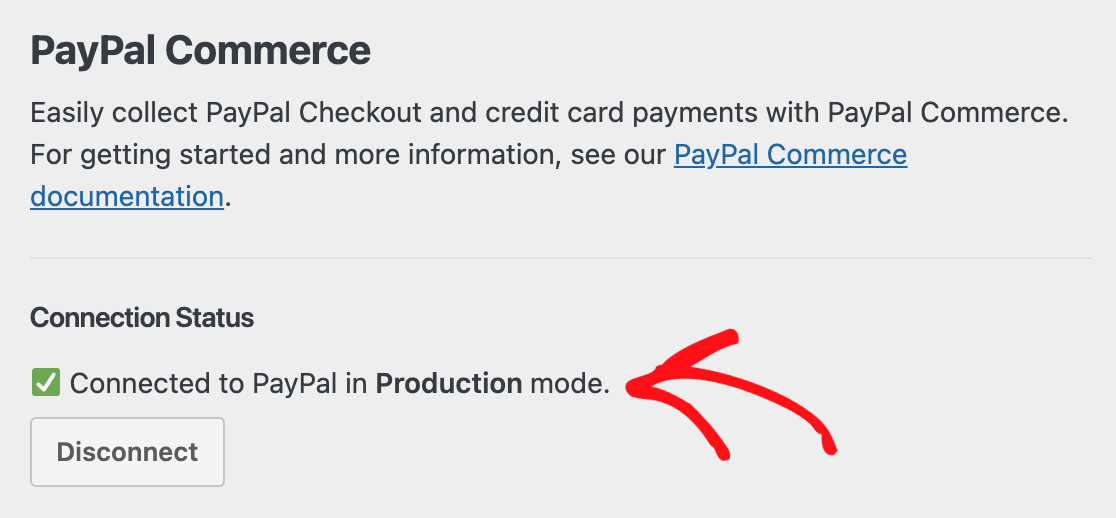
After completing the short setup on PayPal’s end, you’ll be sent back to your WordPress dashboard. You should now see a green checkmark and a Production status, confirming that your form is ready to accept live payments.
For now, I strongly recommend enabling Test Mode by checking the box. This lets you test your entire registration and payment workflow without using real money.

When you have your settings where you want them, you can click the Save Settings button. Now we’re going to create our new form.
WPForms version 1.10.0 and higher will automatically configure PayPal Commerce webhooks when you connect your account. Webhooks keep your payment records in sync — so when a payment completes, a subscription renews, or a refund is processed, your WordPress dashboard updates in real time.
Step 4: Create a User Registration Form in WordPress
Now that your addons are active and PayPal is connected, you can create the form itself. The fastest way to build a reliable registration form is to start with a pre-built template.
For this example, I’ll use the User Registration Form template, which is only available to Pro version users with the User Registration Form addon enabled.
However, the Online Event Registration Form Template could also work for this purpose. To create the user registration form, click on WPForms » Add New.

This will open up the WPForms template gallery, where you’ll find hundreds of pre-built form templates. You can find the User Registration Form template using the search bar. Click Create Form to select it.

The User Registration Form Template will now open in the WPForms form builder. You’ll see the form template in the preview area on the right of your screen, with the form field panel on the left.

You can add custom fields or remove form fields using the drag-and-drop editor to customize your form to suit your needs.
If you’d like to learn more about setting up and configuring the user registration form, here’s a comprehensive guide to using the user registration addon.
When your user registration form is customized to your liking, the next step will be enabling PayPal Commerce on the form.
Step 5: Enable PayPal on Your User Registration Form
With your user registration form set up, the final step we’ll take is enabling the PayPal Commerce field on the form.
From the form builder, find the PayPal Commerce field under the Payment Fields section and drag it onto your form.

After adding the field, a popup will prompt you to enable PayPal payments in your form’s settings. Click OK to jump directly to the Payments » PayPal Commerce tab.

Before you hop into the Payments tab, you may want to play around with the PayPal Commerce field first. Simply click on it to open Field Options on the left of your screen.

The PayPal Commerce field supports three payment methods — and you can enable any combination of them:
| Payment Method | What It Does | Best For |
| PayPal Checkout | Lets customers pay with their PayPal account, balance, Venmo, Pay Later, Apple Pay, Google Pay, or linked cards | Broadest coverage — the most ways to pay |
| Credit Card | Displays card fields directly on your form (Visa, Mastercard, Amex, Discover) | Customers who prefer entering card details |
| Fastlane | PayPal’s accelerated checkout — auto-fills saved payment details for returning customers | Reducing friction for repeat buyers |
You can also set the Default Payment Method and choose which credit cards to accept under Supported Credit Cards. You can also change some styling and other optional settings in the Advanced tab.
Now that we’re done working in the PayPal Commerce field, navigate over to the menu on the left sidebar and click on Payments » PayPal Commerce to get to the PayPal payment settings page.

PayPal Commerce supports both one-time and recurring payments. You’ll need to enable at least one to fully set up PayPal Commerce on your user registration form.

Here’s how each one works:
One-Time Payments
Toggle on Enable one-time payments to charge a single registration fee.
One thing to remember is that you can add both one-time payment and recurring payment options, but you’ll need to use conditional logic to determine which one to apply on a case-by-case basis.
Next, you may want to look at a few optional settings. These fields are set up to automatically pull corresponding data from the new user registration fields to the PayPal Commerce field:
- Name
- Billing Address
- Shipping Address
- Payment Description

Just use the dropdowns to select the appropriate form fields for each item. For a detailed guide to PayPal Commerce settings, here’s our PayPal commerce addon documentation.
Recurring Payments (Subscriptions)
If your registration includes an ongoing membership or subscription, toggle on Enable recurring subscription payments. You can configure:
- Plan Name — a descriptive name for the subscription
- Product Type — Digital, Physical, or Service
- Recurring Times — Weekly, Monthly, Quarterly, Semi-Yearly, or Yearly
- Total Cycles — set a limit (1–99) or Infinite for ongoing subscriptions
- Shipping Address — optional
Once you’re done with these settings, there’s just one more step you’ll need to take. You’ll need to enable Ajax form submission for the PayPal Commerce field to work.
Access your form settings from the left sidebar menu by clicking Settings » General » Advanced. Now you can toggle the Ajax form submission button to enable it.

This prevents the entire page from reloading when the user submits the form, which is essential for modern payment gateways and reduces the chance of abandoned registrations.
Step 6: Publish Your Registration Form With Payment
With your form fully configured, the final step is to add it to your website. WPForms makes this easy with a built-in embed wizard that prevents the copy-paste errors that can happen with shortcodes.
So, to wrap things up, publish your form by clicking the Embed button at the top right corner of the form builder page. A dialog box will appear.

To create a dedicated signup page, click Create New Page. WPForms will then ask you to name the page. Give it a clear title like “Event Registration” or “Membership Signup” and click Let’s Go.

You’ll be taken directly to a new page in your WordPress editor with your form already in place. Simply click Publish, and your registration and payment form is live.

When you check this page on the front end, you’ll see that you have a fully functional PayPal registration form. Aside from the payment, the information that users enter in the form will be used to set up their user logins.

Note that it’s also possible to embed your forms using a shortcode or widget, as well. You can also create a group registration form with repeatable fields.
With the repeater field feature, your website visitors can add and remove fields as needed. And that’s it. Your registration page is complete!
FAQs About WordPress Registration Forms With Payment
Here are answers to the most common questions about creating registration forms that accept PayPal payments in WordPress.
How do I create a registration form with PayPal in WordPress?
Install WPForms Pro, activate the User Registration Addon and PayPal Commerce Pro Addon, and connect your PayPal Business account in WPForms » Settings » Payments.
Create a new form using the User Registration Form template, drag the PayPal Commerce field onto it, enable payments under Payments » PayPal Commerce, map your registration fields to WordPress user profiles, and publish the form on any page.
Can I create a registration form with payment for free?
PayPal Commerce is now available on every WPForms plan, including the free Lite version — so you can accept payments without upgrading. However, creating WordPress user accounts from form submissions requires the User Registration Addon, which is included with WPForms Pro.
WPForms Lite also adds a small 3% platform fee on PayPal payments; upgrading to Pro removes that fee.
What’s the best WordPress plugin for a registration form with payment?
WPForms is the most beginner-friendly option because it handles both user registration and payment processing in a single drag-and-drop form — no coding required. It supports PayPal, Stripe, and Square, and includes 2,100+ templates to get started. Other options like Gravity Forms or dedicated membership plugins exist, but they typically require more technical setup.
How do I integrate a PayPal payment form into my WordPress site?
Go to WPForms » Settings » Payments and click Connect with PayPal Commerce. Once connected, you can add the PayPal Commerce field to any form from the Payment Fields section in the form builder. Enable payments under the Payments » PayPal Commerce tab and publish your form.
How do I connect my PayPal account to a WordPress form?
In your WordPress dashboard, go to WPForms » Settings » Payments. Scroll to the PayPal Commerce section and click Connect with PayPal Commerce. Enter your PayPal Business email, select your country, and log in to authorize the connection. Once connected, you’ll see a “Production” status confirming you’re ready to accept payments.
Do I need a PayPal Business account for this to work?
Yes. A PayPal Business account is required to connect your site to PayPal Commerce. If you currently have a Personal account, you can upgrade to Business for free at paypal.com.
Can I offer recurring payments or subscriptions on my registration form?
Yes. In the Payments » PayPal Commerce settings for your form, toggle on Enable recurring subscription payments. You can set the billing interval (weekly, monthly, quarterly, semi-yearly, or yearly), the number of billing cycles, and the product type. You can also use conditional logic to let users choose between a one-time payment and a recurring subscription at checkout.
Next, Customize Your Email Notifications
Ready to take your email notifications to the next level? Don’t miss your chance to reach users after they click the submit button. Learn to connect WPForms to ChatGPT to send AI-generated form notifications.
You can also attach files to your notification emails. This is useful if you have an eCommerce store to sell digital downloads.
Create a Registration Form with Payments Enabled! 🙂
Ready to build your form? Get started today with the easiest WordPress form builder plugin. WPForms Pro includes lots of free templates and offers a 14-day money-back guarantee.
If this article helped you out, please follow us on Facebook and Twitter for more free WordPress tutorials and guides.

