AI Summary
If you’re running a WordPress site and want people to send you images maybe for submissions, feedback, or content contributions, you’ll quickly find that WordPress doesn’t really make that easy out of the box.
I’ve run into this problem before. Giving people backend access isn’t an option, and asking them to email files gets messy fast. What you really need is a form that lets users upload images directly through the front end.
I usually use WPForms for this. It lets me control exactly how the form works, where the files go, and what types of images are allowed. Here’s how I do it. Step by step!
Create Your Image Upload Form Now 🔼
- Step 1: Install a WordPress Image Upload Form Plugin
- Step 2: Create an Image Upload Form in WordPress
- Step 3: Edit Your File Upload Field Options
- Step 4: Edit File Upload Form Notifications
- Step 5: Publish Your WordPress Image Upload Form
- Step 6: View the Uploaded Files in WordPress
How Do I Allow Users to Upload Images to WordPress?
Firstly, you’re going to need a form builder plugin that enables you to easily create a file upload form. Here’s a video that shows you how to upload an image in a form using WPForms.
If you would prefer to read the instructions for user submitted images that get added to your WordPress media library, I’ll walk through the process in the steps below. Let’s jump into it.
Step 1: Install a WordPress Image Upload Form Plugin
WPForms is an incredibly versatile plugin. We can use it as a WordPress image upload plugin using its simple drag-and-drop functionality without touching any code.
In order to accept user-submitted photos in WordPress, you first need to get a WPForms Basic license or above. This will give you access to a ton of extra features, addons, and integrations.

Once you’ve purchased a premium license, proceed to install and activate the WPForms plugin on your WordPress website.
If you need help with installing the plugin, you can see follow these step-by-step instructions on how to install a WordPress plugin.
Step 2: Create an Image Upload Form in WordPress
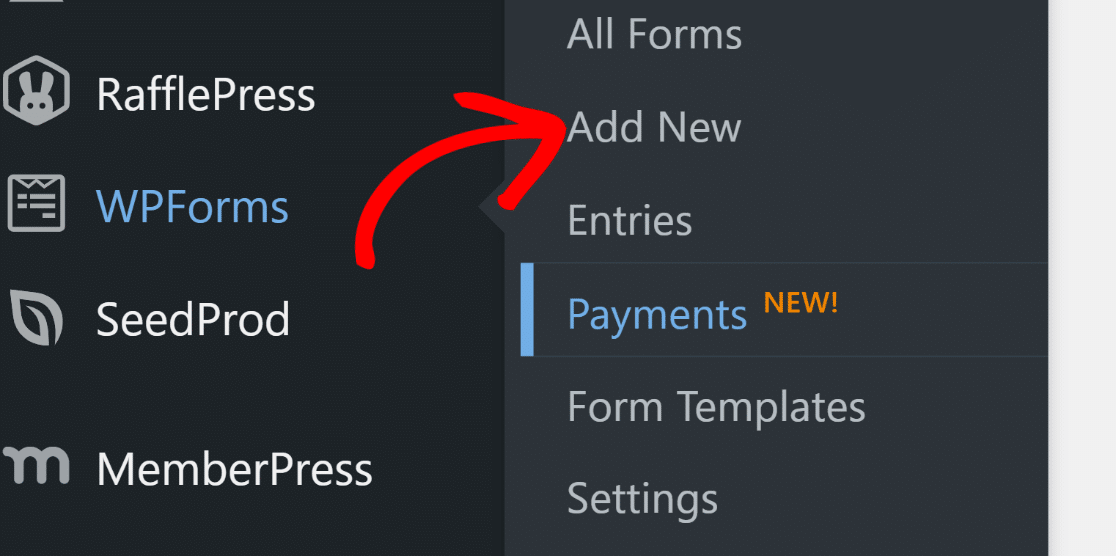
Wondering how to let users upload pictures on your website? Well, to kick things off, you need to create a form with a file upload field. Go to WPForms » Add New in your WordPress menu.
Once you’ve done that, you’ll be taken to the form setup screen. Start by giving a name to your form (the name helps you track the form and its entries inside your dashboard).
WPForms comes with 2,000+ WordPress form templates to make form creation easy. You can use the pre-made File Upload Form template to start.
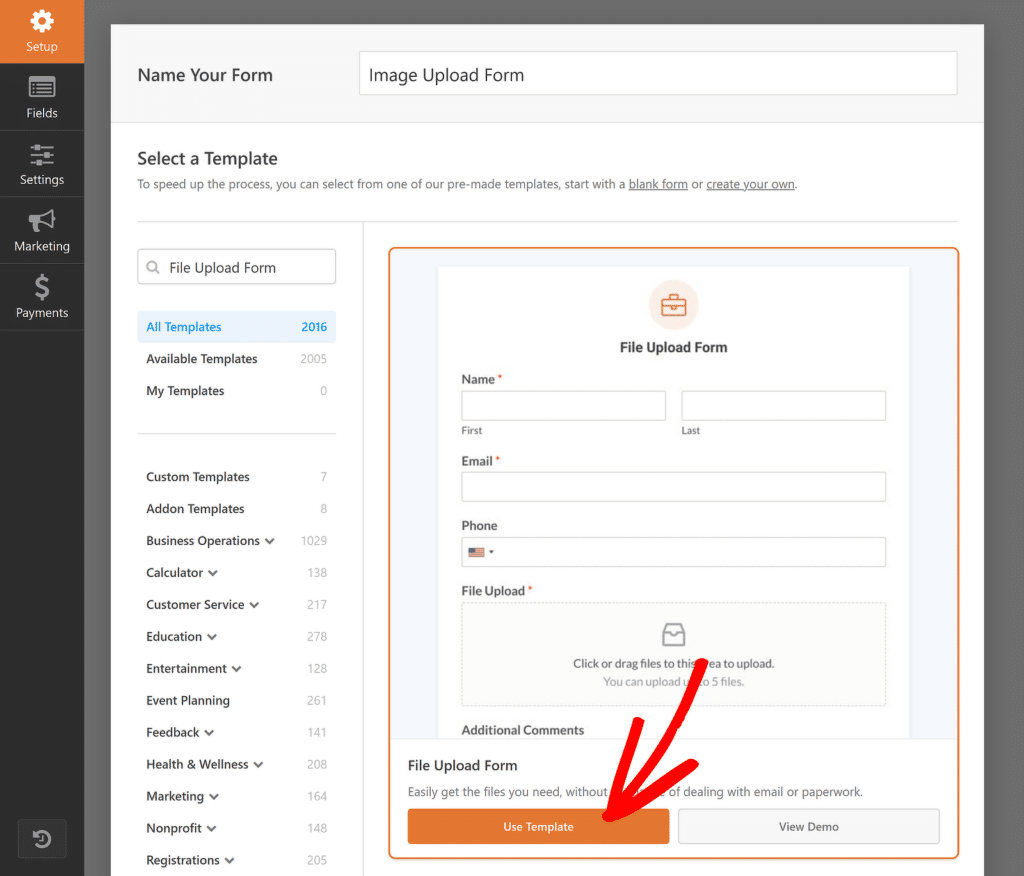
After selecting the template, the form builder will load it up in just a few seconds. You’ll now be able to add, remove, or reorder fields and view a live preview on the right sight of screen.
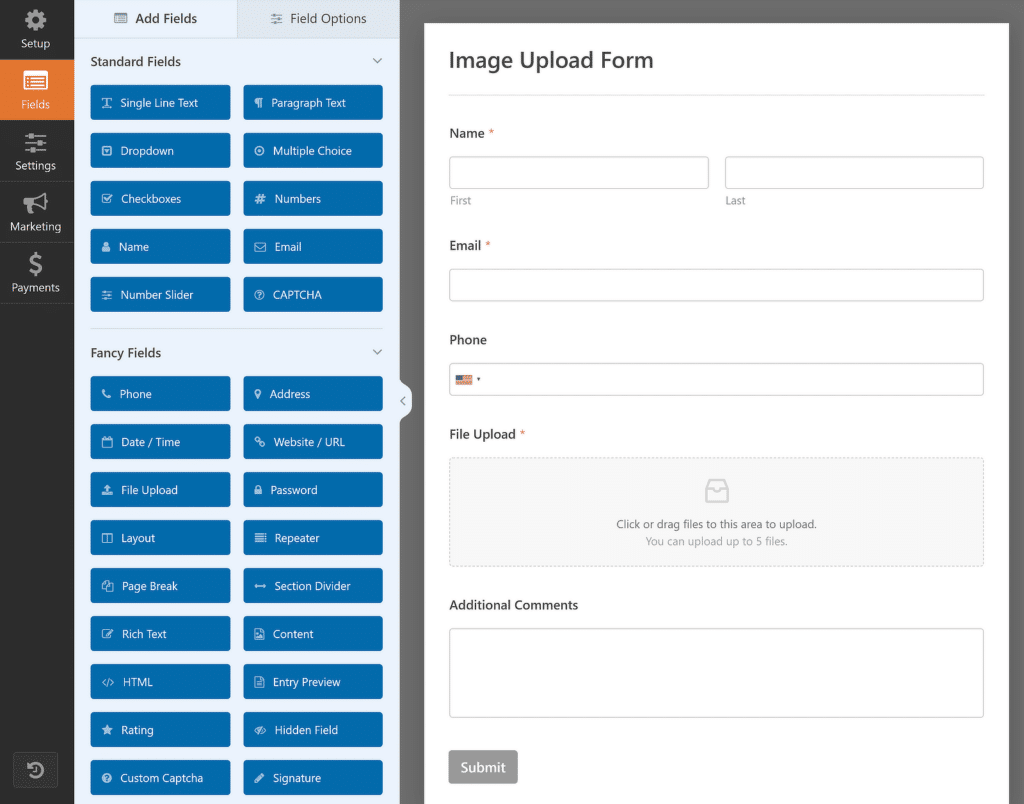
Whether you’re building your file upload form from scratch or using a template, make sure to include one of the following fields:
- File Upload: This field will add a simple file uploader to your form so you can accept user submitted photos, pdfs, videos, and other files.
- Rich Text: If you’re using WPForms as an image upload plugin for guest or sponsored posts, you can let users add images alongside written content with the Rich Text field. For more information, see our complete guide to the Rich Text field.
Get the File Upload Form Template Now 👉
Step 3: Edit Your File Upload Field Options
The File Upload Form template comes pre-equipped with all the important fields, including Name, Email, Phone, and, of course, the File Upload field.
However, you can customize the form by adding more fields by dragging them from the left-hand panel to the right-hand panel. You can also remove any existing fields you don’t need or reorder them by clicking and dragging the fields.
But most importantly, you should review your file upload field settings if you want to impose any restrictions. To access the settings for the file upload field, click on the field to open the Field Options.
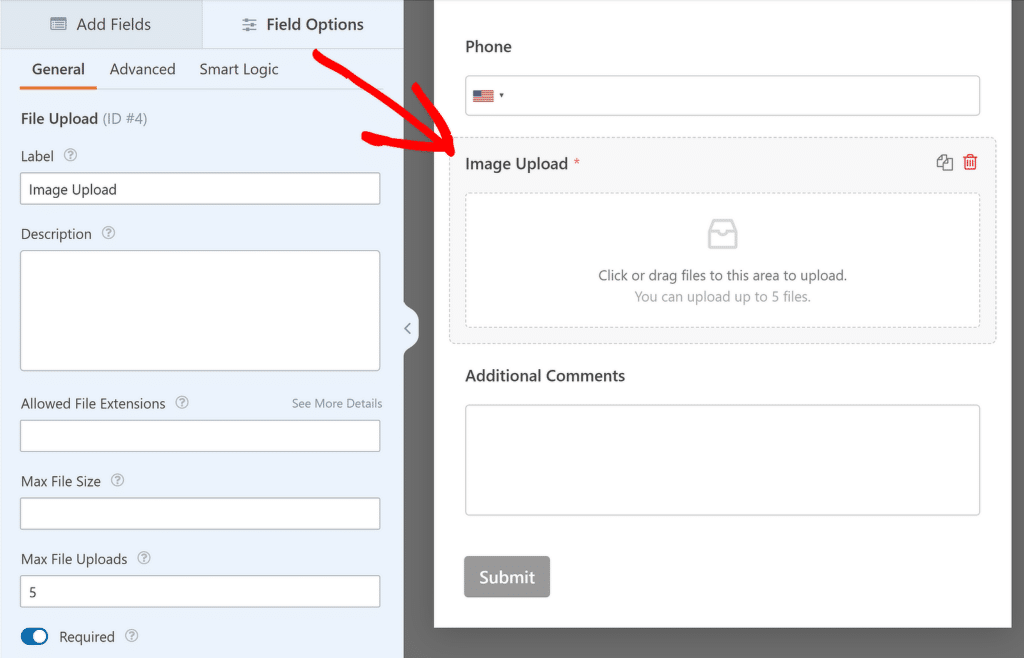
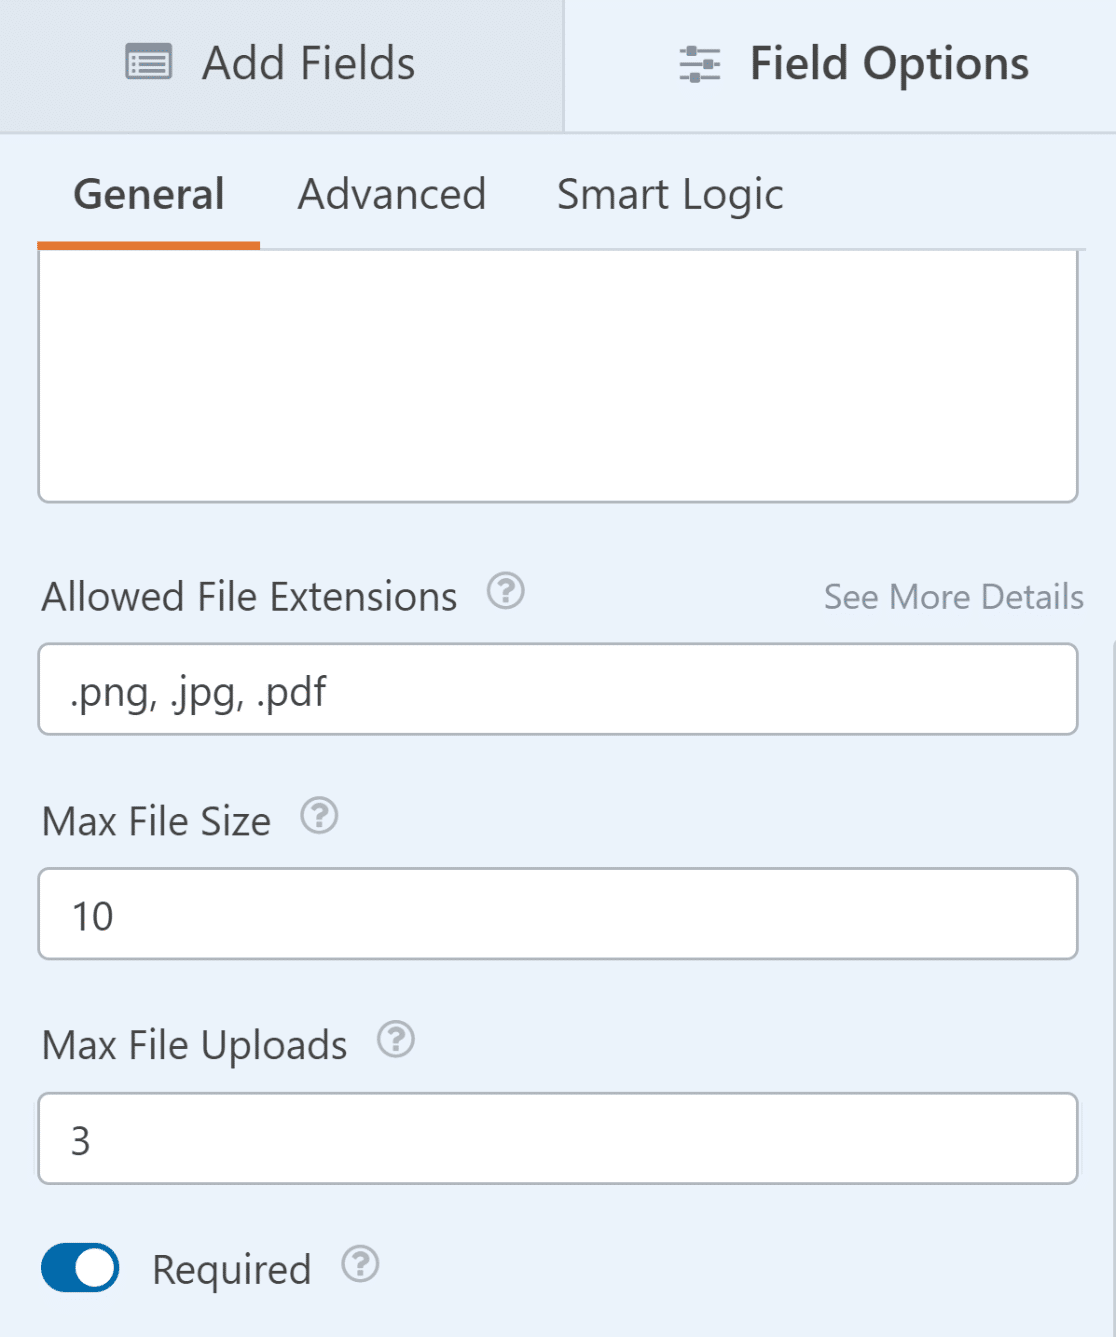
Under the General tab on the left-hand pane, you’ll find several settings that allow you to control the files you want to accept in the upload field:
- Label: Feel free to change the label of the File Upload field to something like “Image Upload” to make it more relevant to the form itself and guide users accordingly.
- Allowed File Extensions: If you only want to accept specific file types, you can specify them here. Simply enter the file extensions separated by commas. Leaving this option blank will allow all supported file types (.png, .gif, .jpg, .doc, .xls, .ppt, .pdf, .wav, .mp3, .mp4,.mpg, .mov, .wmv)
- Max File Size: You can enter the max file size that you want to allow for each file. This input accepts values in MBs. Leaving this setting blank will default the file size limit to the value set by your web host.
- Max File Uploads: This setting allows you to specify the max number of files a user can submit during a single entry.
You can also choose to save the uploaded files in your WordPress Media Library. This is handy if you want to publish the images in your posts or pages later on.
To set this up, click on the Advanced tab in the Field Options of the File Upload field.

Then, click on the toggle button next to the Store file in WordPress Media Library option to enable it.
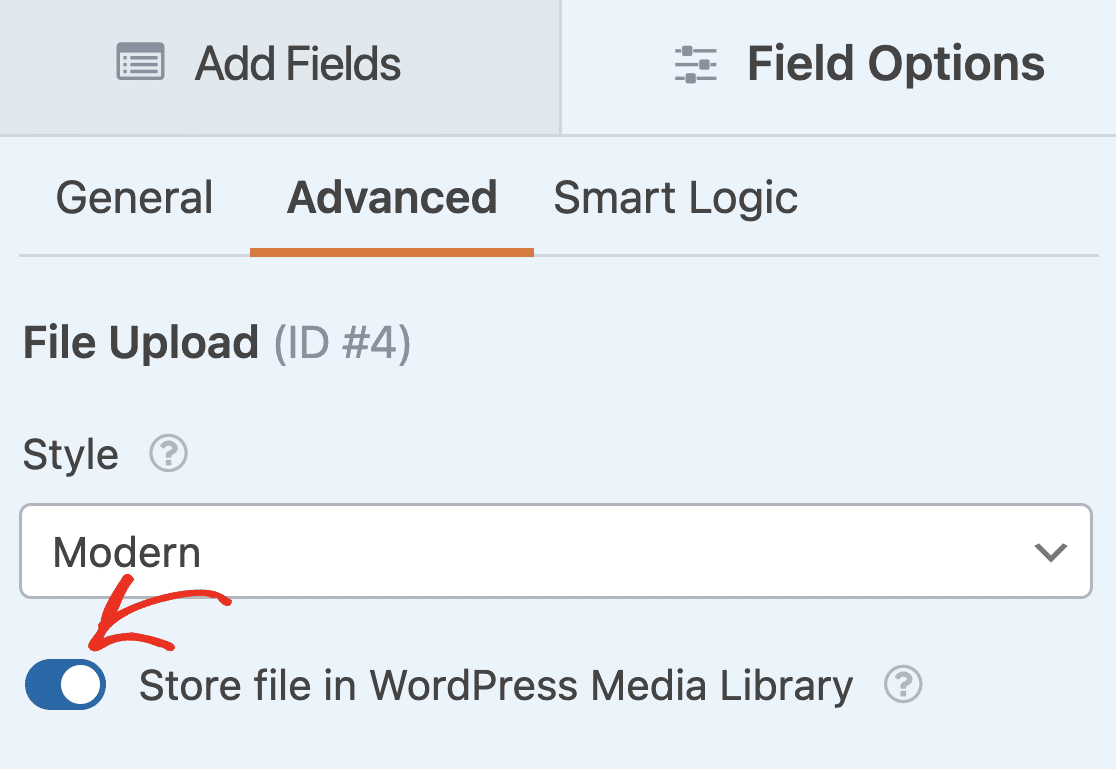
This way, you can access user-submitted images from your WordPress gallery.
If you’re using the Rich Text field to let users upload images to your WordPress site, you’ll first need to open its field options and turn on the Allow Media Uploads option.
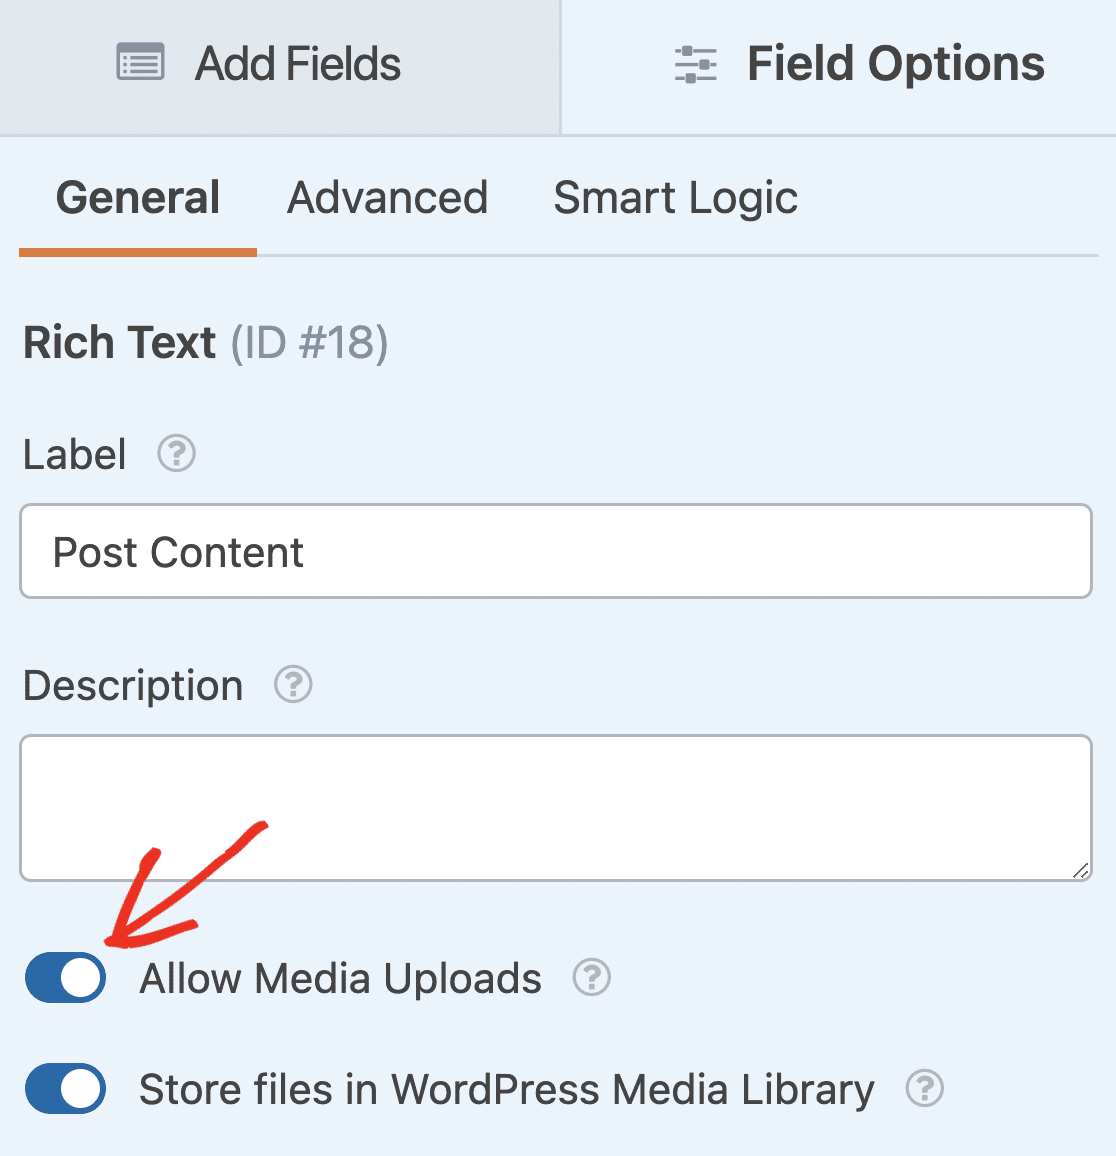
Then you can turn on the Store file in WordPress Media Library option as well if you want. When your form looks the way you want it to, click Save at the top of the form builder.
Step 4: Edit File Upload Form Notifications
WPForms allows you to receive the uploaded files as attachments in email notifications. To edit your notifications, go to Settings » Notifications.
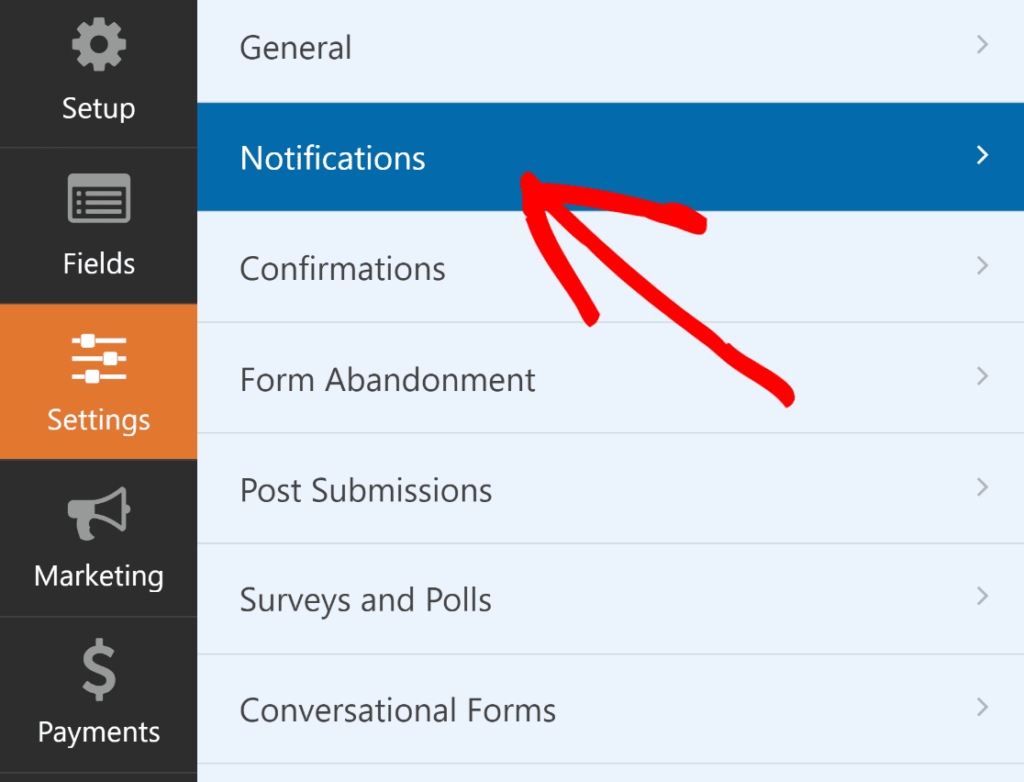
You can edit the notification subject line, email body, Send To email address, and more to ensure the notifications are as helpful and readable as you want.
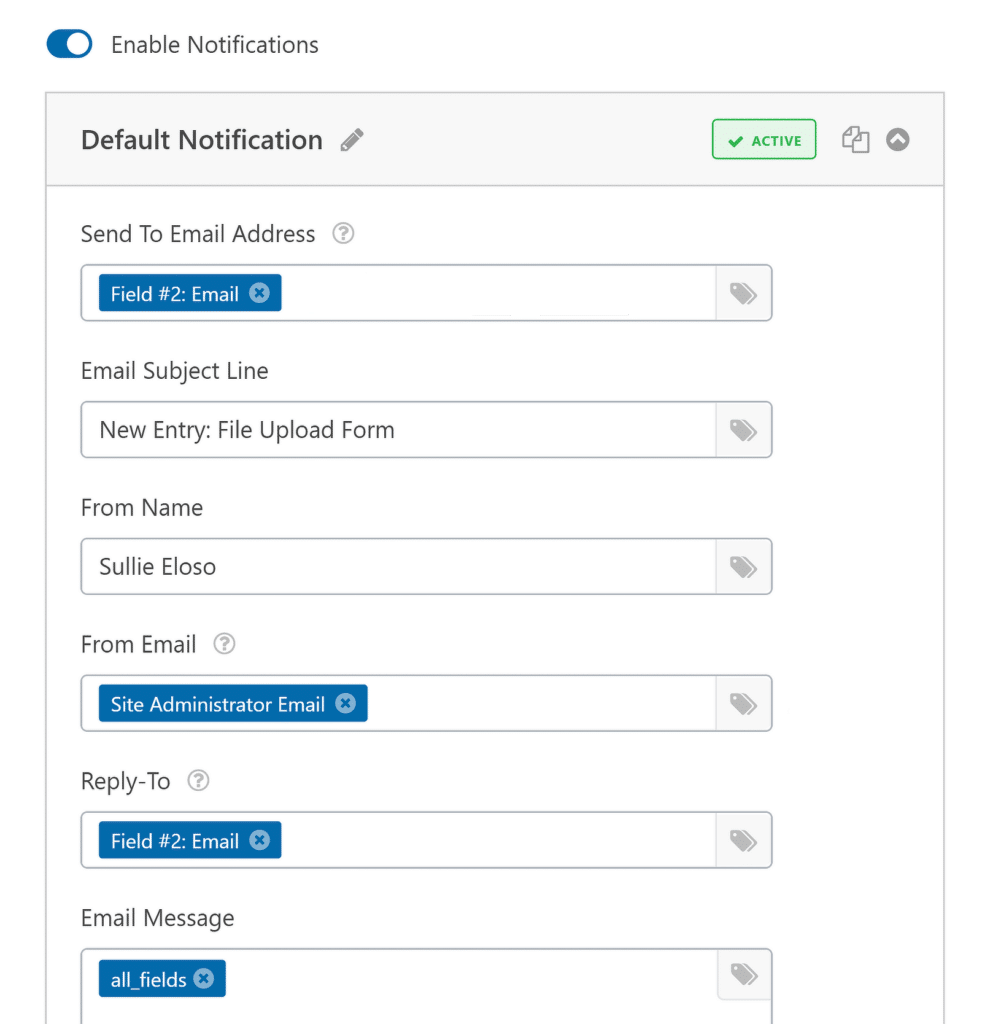
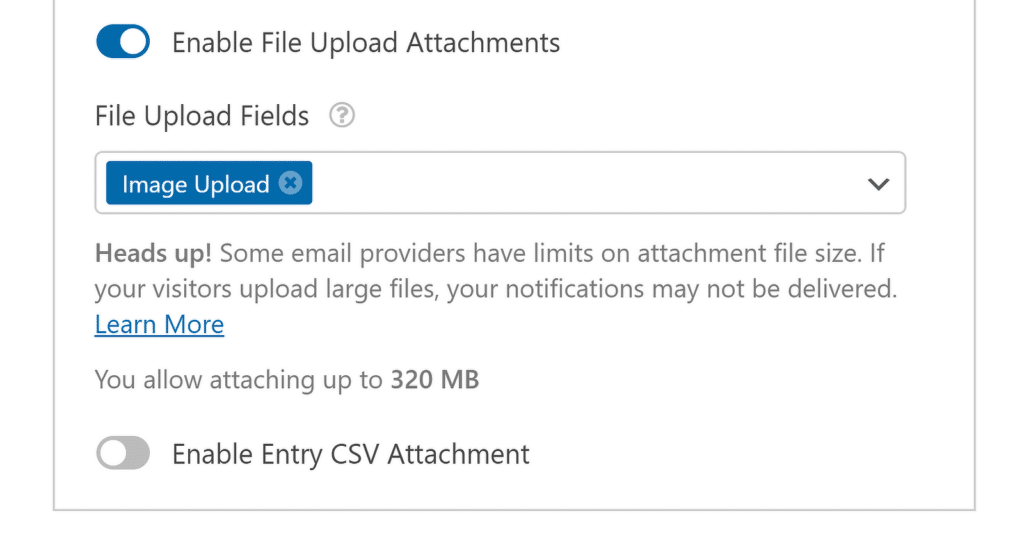
If you want to enable file upload attachments with the email, scroll down to the Advanced section and click on the Enable File Upload Attachments toggle.
After that, simply specify the file upload field from the dropdown and you’re good to go!
It’s also a good idea to review your confirmation message, which appears on the screen immediately after the form is submitted by a user.
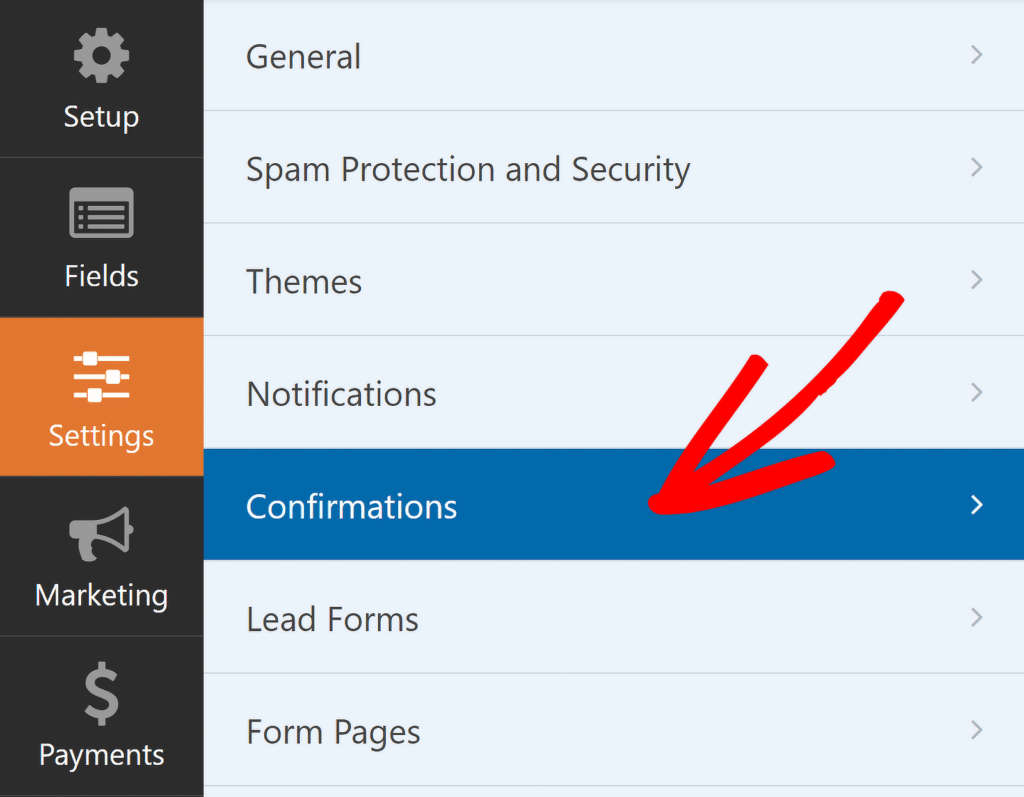
To check or edit your confirmations, go to Settings » Confirmations. Then, customize the confirmation message to your liking and click Save.
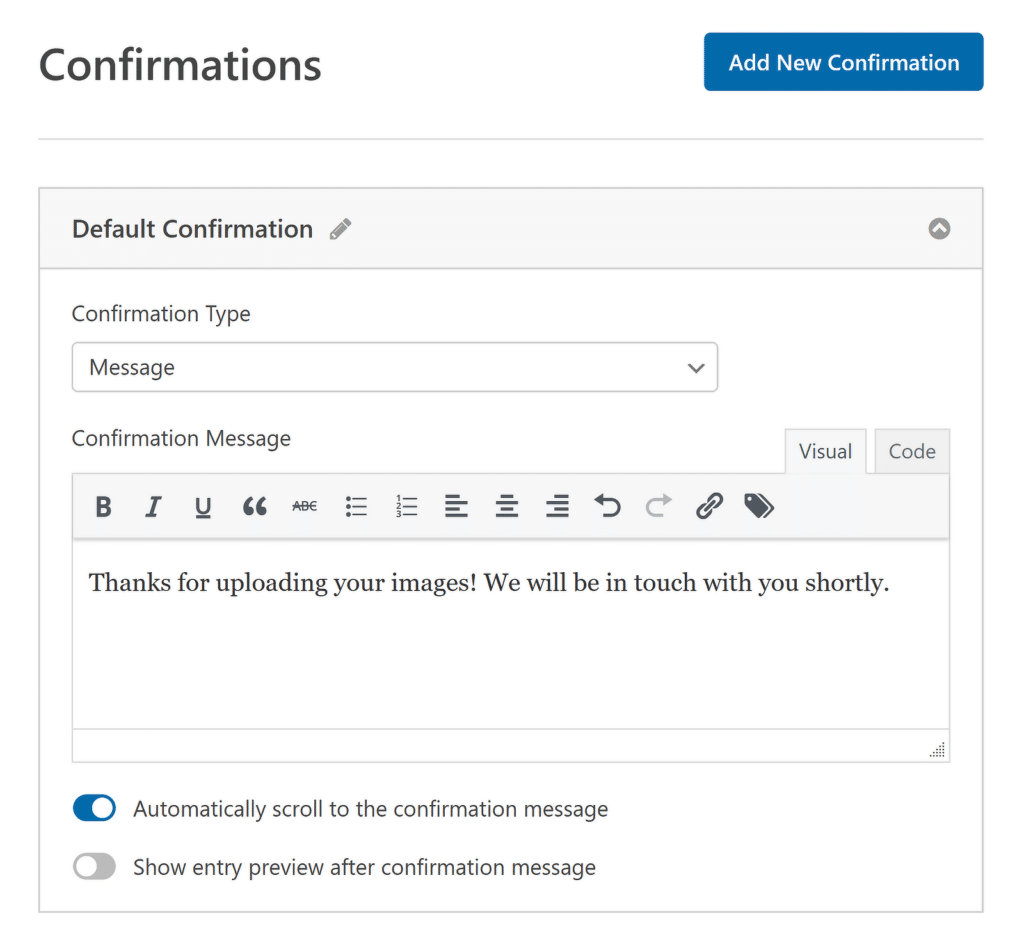
For help with other confirmation types, see our documentation on setting up form confirmations. And with that, you’re ready to get your image uploader up and ready!
Step 5: Publish Your WordPress Image Upload Form
WPForms allows you to add your forms to lots of locations on your website, including your WordPress blog posts, WordPress pages, and even sidebar widgets.
To begin, click on the Embed button next to Save at the top of the form builder.

At this point, you’ll see a couple of embedding options. Let’s choose Create a New Page to embed the form in a fresh new page.

After that, you’ll need to enter a name for your page. Enter a name and press Let’s Go to proceed.

The form will now show up inside the WordPress editor, and you can check to make sure you like the way it looks.
Once you’re satisfied with the appearance of your form, go ahead and press the Publish button to launch your file upload form.

Ok, now that you’re ready to accept form submissions with file uploads. Feel free to test it by adding files to confirm it’s working as intended.

Great! So now your form is all ready to accept file uploads from your visitors.
But once you start getting submissions, how are you going to view the uploaded files? That’s really easy as we’ll show in the next step.
Step 6: View the Uploaded Files in WordPress
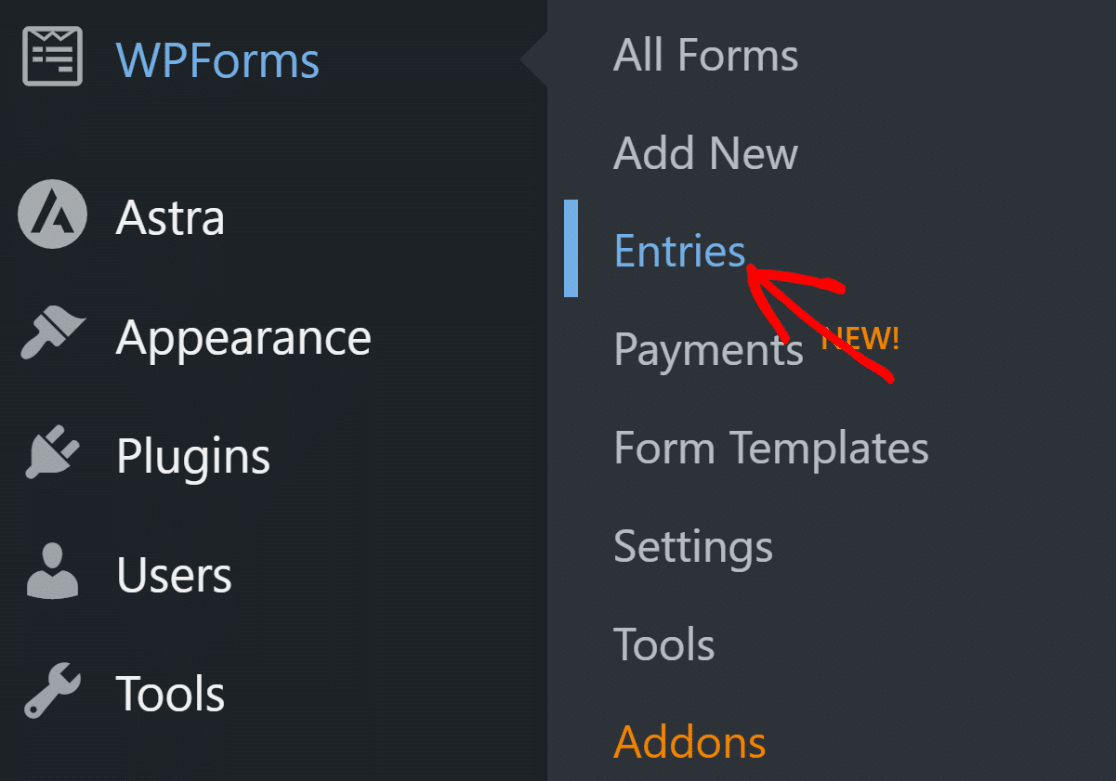
You can view the uploaded files from your WPForms Entries. Head to your WordPress dashboard and click on WPForms » Entries.
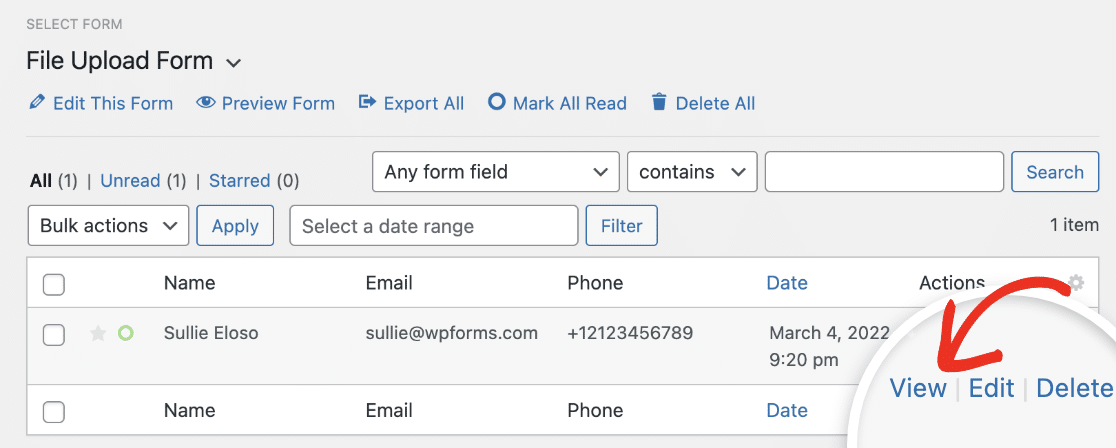
Then, you’ll see the Entries screen, where you’ll find all your active forms. Click on your file upload form to see its submissions, and hit View to see details about a specific entry.
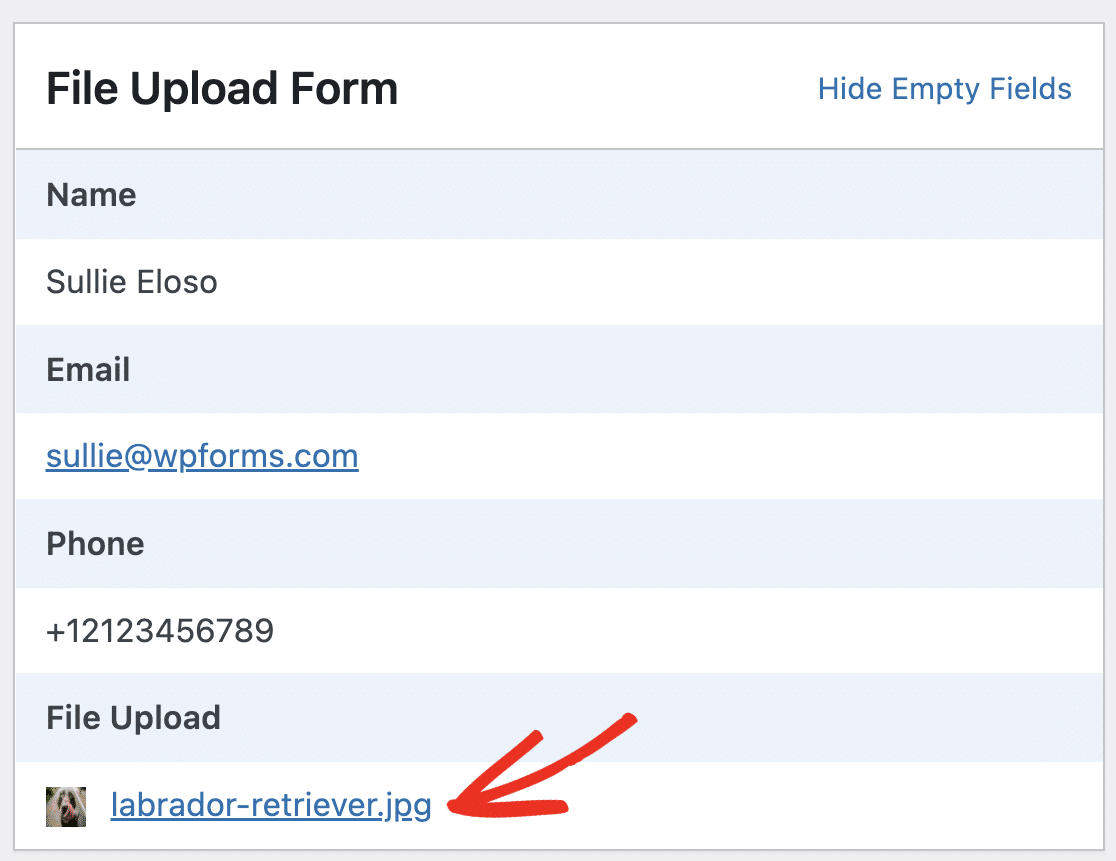
Now that you’re inside the entry, you’ll be able to see the file name, plus click on it to view and/or download it.
Check out this complete guide to form entries if you’d like to learn more. And there you have it! You now know how to let users upload images to your WordPress site.
FAQs on Image Uploads in WordPress
Image uploads are easy to set up with WPForms, but you may run into issues with file sizes and formats. Here are some common questions we get.
How do I create an image uploader on my website?
You can use a form builder plugin as an image uploader on your site if the goal is to allow users to upload images to your WordPress media library.
Can users upload to WordPress directly?
Yes, you can allow users to upload images to your gallery in WordPress. But you’ll need a plugin like WPForms, which works as an image uploader for WordPress.
It lets users upload file types like images, audio, video, and documents to be uploaded with a single click. You can even view these uploads as attachments within your WPForms entry management screen.
Why allow users to upload an image?
You might wonder when it makes sense to allow your website visitors to upload image files to your site. Adding media files into a form is not only easy, but it can also be really helpful.
Here are just a few ways your WordPress contributor can use an image upload form:
- To add images to their profile photos
- Adding images to their guest blog post submissions
- Adding media file to a custom order form
- Gathering testimonials of your products
- Letting users submit events on a calendar
…and you can probably think of quite a few more reasons to use an image uploader for WordPress!
Having an image upload form saves you time since you don’t have to upload the user’s images yourself. It also helps to keep your site secure because you don’t have to give all your users access to log in to your site if they want to upload images.
What image formats does WordPress allow?
When you create an image upload form, WPForms uses the same defaults as WordPress.
You can accept lots of different types of files through your forms by default, including:
- Images (.png, .gif, and .jpg)
- Documents (.doc, .xls, .ppt, and .pdf)
- Video (.mpg, .mov, and .wmv)
- Audio (.wav, .mp3, and .mp4)
If you want to add other image formats, here’s how to allow additional file upload types to your forms. This is handy if you want to allow image uploads from smartphones since the file format and MIME type might be different.
If you’d like to increase the maximum upload image size for your site, you’ll need to reach out to your WordPress hosting provider to find out if it’s possible. Check out this tutorial on increasing the maximum file upload size in WordPress for more details.
What if WordPress shows “please login to upload image”?
This message means your site is set to allow uploads only from logged-in users. To fix it, you can use a plugin like WPForms to let guests upload images without needing to log in.
Why does WordPress say ‘you are not allowed to upload this file type’?
WordPress blocks some file types by default for security reasons.
If you see this message, the image file you’re trying to upload isn’t on the allowed list. You can fix it by using a plugin that lets you add more file types safely.
What is a photo submission form in WordPress?
A photo submission form lets people upload pictures to your site without needing access to the admin area. It’s often used for contests, guest posts, or image galleries. You can build one easily with plugins like WPForms.
Next, Accept User Submitted Blog Posts in WordPress
Want your users to be able to submit a whole blog post, instead of just an image? Check out our guide on how to allow users to submit blog posts.
Create Your Image Upload Form Now 🔼
Ready to build your form? Get started today with the easiest WordPress form builder plugin. WPForms Pro includes lots of free templates and offers a 14-day money-back guarantee.
If this article helped you out, please follow us on Facebook and Twitter for more free WordPress tutorials and guides.




The source folder also contains a Wordpress page template with a custom loop that displays published images for all users. You may wish to place more stringent validation on your image uploads. Remember, you’re accepting data from users who may accidentally or maliciously upload inappropriate files. Checking the file type and size is a good start.
Hey Dovolena – Thanks for the feedback. A file type check is already included in the file upload field. By default, only secure file types as recommended by WordPress are allowed to be uploaded. You can allow to upload more file types though, if you wish using this tutorial.
Same goes with File size. It will allow maximum file size that is allowed in your server config and you can reduce it further if you need as explained here
I apologize but I am not sure I understand your info about that custom loop, could you please contact our support team here and provide some more info and we can surely check it further.
Thanks!
Are customers able to upload as many images as they want or is the form limited to only accepting one image at a time?
Hey Nivia – Great question!
Yes, you can absolutely upload multiple files to a single File UPload field. To do this, please navigate to Field Options of the File Upload field >> Advanced option and select the style as “Modern”.
Next, in the “Max File Number” field, you can choose the number of files that users are allowed to submit.For more details on using the File Upload field’s Modern style, please see our tutorial
I hope this helps! If you have more questions about this, or if I’ve misunderstood your question in any way, please contact our support team. We’d be happy to help more from there! 🙂
Hi I’m really interested in this feature and looking forward to using it for an interactive guestbook. Is it possible to have the photos uploaded saved in a particular folder or gallery in the Wordpress site so that I can use the folder for an album or slider on the page itself or somewhere else?
Thank you and good day!
Hey Leonard – You can change the file upload location to your media library in WordPress as explained in this tutorial. Once they are in media library, you will be able to use them easily on galleries or sliders, etc.
I hope this helps!
Yes I saw that however wouldn’t that feature just save in the general media folder. Is it possible to have them automatically saved in another media folder so not to get mixed up with the website’s other media?
Hey Leonard – I am afraid that feature is not available at the moment. We will keep that on our radar for the future!
Thanks for the suggestion!
Hi, Let’s say I have a website that sells photo frames. Is there a way to allow users to upload a photo and preview their image with the frames available on my site in real-time? Please help!
Hey Husnul – I am afraid this option is not available at the moment. We will keep it on our radar for the future. Thanks for the suggestion!
Hello! Abhishek,
Is there any update on this issue? can we achieve this now?
Hey Ramin – I apologize, this feature is not availabel yet and we’re not able to provide the solution you need for now or an ETA if or when this feature will be available.
Due to the large number of feature suggestions we’re receiving from our users, we need to review and prioritize the features and enhancements to be included in each development cycle.
Currently, new features/enhancements get prioritized based on several factors, such as their benefit to the majority of our plugin users, the demand for the feature, as well as development resources required. Unfortunately, for now, the feature you’ve requested is not something that many users have asked for.
However, I made sure that your email is noted in the feature request report so that you will get an update in case this feature will be available in a release.
Thanks!
Bro can you suggest me a plugin for that? Even I am not able to find it.
Hey Divij – I am afraid, currently we don’t have any such option, I will add your vote to the feature request so that the dev team can consider this for the future.
Sorry for the inconvenience.
Hi, In my website have list of pdf files. I need to allow user to upload their pdf files in that same page automatically is their any way
Hey Sudha – I am afraid there is no built-in way to upload the file to the same page automatically, the max you can do currently is to upload the files in the media section of your site so it will be easy for you to add them to the pages.
I hope this helps!
Is there a way to set a default image (from the media library) if the user doesn’t fill one in? In my case, I have a post submission form that includes an optional image.
Hi Ted — We’d be happy to help! When you get a chance, please drop us a line in support so we can assist. If you have a WPForms license, you have access to our email support, so please submit a support ticket. Otherwise, we provide limited complimentary support in the WPForms Lite WordPress.org support forum.
Thanks 🙂
Hiya,
Is there a way to display uploaded images?
Hey Mike – Great question! All the files are stored in the upload folders of your WordPress install, you can even change them to be stored in the media section of your WordPress install.
Once the files are in the media library, you can display them anywhere on your site, as you do with any other image present in your media library.
I hope this helps!
Can I use this plugin to allow my registered site visitor to upload multiple images in one submission?
Hey Rex – Yes there’s a built-in file upload feature in the Modern Style option with the ability to upload multiple images.
For further questions on this please reach out to the support team.
Have a good one 🙂
Hello, so I sell custom keychains with my customers pictures on it. They usually send me there pictures individually through email and sometimes it can be a hassle looking through them. Would this website allow a customer to upload a picture for a custom order.
Hey Abigail – Great question! Yes, you can absolutely allow users to upload images on your site. The file upload field is available with any paid version of WPForms.
For any further help on this, please feel welcome to reach out to our support team.
Have a good one! 🙂
Hi Grace, Do any versions of your plugins scan uploads from users to prevent uploading viruses or malware to the site/server?
Hi Shane,
WPForms should handle the bulk of file upload security for you — we don’t allow any unapproved or unauthorized files to be uploaded. So as long as you are using a reputable web host, there should be no issues.
If you aren’t sure about what methods your web host uses to secure their servers, I would suggest asking them both about that and what they would do for you if your site were breached. Always best to know!
You can also restrict file types and this will restrict specific file types from getting uploaded.
If you have any questions, please drop us a line in support so we can assist.
If you have a WPForms license, you have access to our email support, so please submit a support ticket. Otherwise, we provide limited complimentary support in the WPForms Lite WordPress.org support forum.
Thanks! 🙂
Can members upload their own images/documents and keep them secure from others?
Hey Leslie- File Upload security depends upon the reputable web hosting. If you aren’t sure about what methods your web host uses to secure their servers, I would suggest asking them both about that and what they would do for you if your site were breached. Always best to know!
Additionally, we add a unique hash to the end of the file (eg: my-logo-570543445db74.png) so that a malicious user couldn’t easily open up a bunch of files that have been uploaded to your site.
Also, please know that we do not have a feature to upload the files to specific folders for each users.
If you have any questions, please drop us a line in support so we can assist.
If you have a WPForms license, you have access to our email support, so please submit a support ticket. Otherwise, we provide limited complimentary support in the WPForms Lite WordPress.org support forum.
Thanks! 🙂
Sounds great!
But could you elaborate how to connect this form and image upload to a guestbook plugin? I’m looking for an option that lets visitors write af guestbook post with one or more pictures – preferrably displayed on my page as automatically as possible. However, for security/spam reasons I’d like to be able to accept/decline the guestbook posts/pictures.
Suggestions on how to do this?
Hey Seline-If the guestbook plugin has the ability to create custom post types (as most of the plugins do have this feature) then this can be achieved! You can make use of our Post submission addon and set up a custom post type there. With this, the image you upload can be used as the feature image for that custom post type.
I hope this helps!
If you have a WPForms license, you have access to our email support, so please submit a support ticket. Otherwise, we provide limited complimentary support in the WPForms Lite WordPress.org support forum.
Thanks! 🙂
I want users to be able to download my application for employment, complete it, and then upload it back to my website, and have it sent to my email/notify me. Is that something WP Forms can do?
Hey Emily – We might need more details to provide the best possible solution for this. If your application form is in a downloadable format like pdf, users can download it via a link and then fill it. Once done, they should upload the filled pdf to a form created by WPForms using the file upload field.
For further help with this, please submit a support ticket and our support team will be happy to help!
Thanks 🙂
Hi, is it possible to use the entry from the form to be used on another plugin, say WP Inventory Manager? I wanted a way to let my users add new items to the inventory backlog. So I take their input with this form and store/display what they enter using WP Inventory Manager.
Hey Bryan- To achieve what you have mentioned would require some extensive customization. Please see our article with details about our data table structure.
Basically, we store all form data in two tables within the native WordPress database. The field values for entries are stored in the entries table, and are encoded in a single JSON object for better storage.
I hope this helps! 🙂
Hi, can we make custom frame? user can upload their picture in to frame that we already prepare for it. just like photo booth.
Hi Yohan! Our plugin only provides the tools for uploading pictures to your site, and do not have any features for displaying the uploaded images. I’m sorry we don’t have a solution for you on this, but if you have any further questions regarding WPForms, please don’t hesitate to contact us 🙂
Hi, I want my users to be able to upload a description and an image to a page and only they can see this description and image. So they would be listening to tracks or watching videos and the description and photo they uploaded remains on the page when they are logged in, but only appears on the page for them. Thank You!
Hey Julius- Currently, we do not have an inbuilt feature that shows entries/ images to logged-in users uploaded by them. I do agree it would be super helpful, though. I’ve made a note of the feature request and we’ll keep it on our radar as we plan out our roadmap for the future.
In the meantime, if you’re willing to give some code a try we do have a code snippet that will allow you to display a table of all entries on the frontend of your site. In case you’d like to look into custom development options, we highly recommend using Codeable and form long term you can go for WPBuffs
Thanks 🙂
Did you find a solution about that?
Hi Oliver,
I apologize for the inconvenience as this feature is still under review and within the radar of the development team.
Thank you for understanding.
I’m making a website where people can upload images. It’s a comic website and I want to know how I can implement a system where people can create an account and upload their comics. Is that possible?
Hi Jullian! Any of our paid versions will give you access to our File Upload Field, with which you can create forms that would allow people to upload their comics. We have an article here about creating forms to allow uploads.
To create forms that allow people to create an account though would require our User Registration addon, which is available with our Pro level or higher licenses. More information about this addon can be found at: https://wpforms.com/docs/how-to-install-and-use-user-registration-addon-with-wpforms/
I hope this helps to clarify 🙂 If you have any further questions about this, please contact us.
Hallo Kann man dieses formular auch so einstellen das die nutzer schon alles hochladen können jedoch erst nach prüfung durch den admin und manuelles freischalten das bild auf der website sichbar ist. ? Mit freundlichen Grüßen
Hi there,
That’s a good question! Please know that any files uploaded using the File Upload field in WPForms will not be visible on the front end of the website. However, please know that by default, the user-uploaded files are stored in the WPForms folder inside the Uploads directory of your site.
If you’d prefer to upload the files to the WordPress Media Library, click on the File Upload field in the form builder. Then, under Advanced Options, check the box next to Store file in WordPress Media Library.
In case it helps, please see our tutorial here for more details.
If you are wanting to have the Posts approved, we do have the Post Submission addon where it includes the Post Featured Image which can be approved/ declined manually. Please see the complete guide on this addon.
If you have a WPForms license, you have access to our email support, so please submit a support ticket. Otherwise, we provide limited complimentary support in the WPForms Lite WordPress.org support forum.
Thanks 🙂
Hi
can conditions be set so only photos of a certain size and dimension is allowed to be uploaded?
/Urban
Hi There,
We do not have a feature to set the dimension of an image and validate it for uploading. I will add your vote to consider this feature as an enhancement for the future. However, you can absolutely set the Maximum File Upload size as shown here.
Hope this helps! 🙂
Hi,
Is this form accessibility compliant? How would the image get “alt” text? Would I have to add it myself?
Thank you
Hey Robin – In order to make sure we answer your question as thoroughly as possible, could you please contact our team.
If you have a WPForms license, you have access to our email support, so please submit a support ticket. Otherwise, we provide limited complimentary support in the WPForms Lite WordPress.org support forum.
Thanks.
Is there a way to connect an uploaded PDF to the post (using Post Submissions) so it can be downloaded from the post on the front end?
Hey Bekee, you would need our Post Submission addon which is available in the Pro or higher license level.
Next, you will need to set up your custom meta fields specifically the file upload field. We recommend using the Advanced Custom Fields plugin for this. Here is a great guide on how to use custom fields. For more information how to add additional custom post meta, please take a look at our guide here.
To display additional fields in the published post, your site theme will need to have the ability (or be customized) to display the custom fields. However, if it does not, you will need some custom implementation and we suggest using codeable or WPBuff.
I hope this helps!
Hello. Is it possible to allow users to upload a photo to their personal user account?
Hey Angie, that is possible with our User Registration addon and mapping the file upload field custom meta as outlined here.
Please check out our complete tutorial on setting up custom user meta fields.
I hope this helps.
hi, is there a way for me to allow the user to crop their image when uploading their profile image
Hey Minesh – Currently we don’t have the feature in the file upload field to crop images when uploading. I do agree it would be super helpful, and I’ll add this into our feature request tracker so that it’s on the radar of our developers.
Hi there
I’m finding I cannot upload images from a mobile – they’re in JPEG not OIC format. When I download them to my computer they can be uploaded to the website via the form just not from any mobile. Is there something I can change?
Hey Susan – We’d be happy to help! When you get a chance, please drop us a line in support so we can assist.
If you have a WPForms license, you have access to our email support, so please submit a support ticket.
Otherwise, we provide limited complimentary support in the WPForms Lite WordPress.org support forum.
Thanks 🙂