
AI Summary
Organizing a race is hard enough without worrying about how to get participants signed up. Are you hosting a race and need a simpler, faster way to let people sign up to participate?
Whether it be a running, biking, or swimming race, creating an online race registration form gives you an easy way to register people who want to participate in your event.
In this guide, I’ll show you how to set up a race registration form using WPForms, making it simple for participants to sign up and for you to manage the details. Let’s walk through the steps together!
Create Your Race Registration Form Now! 🙂
Step 1: Install and Activate the WPForms Plugin
Using WPForms is the easiest way to create a race registration form in WordPress. WPForms comes with 2,100+ WordPress form templates for every niche and industry, including an online race registration form template.
The first thing you’ll need to do is install and activate the WPForms plugin. For more details, see this step-by-step guide on how to install a plugin in WordPress.

Now you’ll need to create a new form. To do this, go to WPForms » Add New, and name your form. Then, scroll down to the templates section and type “Online Race Registration Form” into the search bar.

Click on Use Template to select one and when the pre-built online race registration form template loads, most of the work is already done for you.
If you want to see the online race registration form template in action, head over and check out our race registration form template. You can also see additional registration form templates in our registration category.
You can now add additional fields to your form by dragging them from the left-hand panel to the right-hand panel. Then, click on the field to make any changes.
For example, if you want to collect race registration fees for your event, add a Single Item, Multiple Item, or Dropdown Items form field to your race registration form template.
For our example, we’ll add a Single Item form field and require a flat fee payment for entering the race.

Make sure to toggle on the Required option so new race participants cannot submit their race registration form without paying the race fee.
WPForms integrates with PayPal, Square, Stripe, and Authorize.Net. You can check out these tutorials for help setting up your preferred payment method:
When your online race registration form looks the way you want it to, click Save.
Step 2: Configure Your Race Registration Form Settings
To start, go to Settings » General.

Here you can configure the following:
- Form Name — Change the name of your form here if you’d like.
- Form Description — Give your form a description.
- Tags — Use tags to organize your WordPress forms.
- Submit Button Text — Customize the copy on the submit button.
- Submit Button Procession Text — Customize the text that shows while your form is submitting.
If you expand the Advanced section, you can also configure these options:
- CSS Classes — Add custom CSS classes to your form or submit button.
- Enable Prefilly by URL — Fill in some fields automatically based on a custom URL.
- Enable AJAX form submission — Enable AJAX settings with no page reload.
- Disable storing of entry information in WordPress — You can disable the storing of entry information and user details, such as IP addresses and user agents, in an effort to comply with GDPR requirements. Check out our step-by-step instructions on how to add a GDPR agreement field to your simple contact form.
Next, move down to the Spam Protection and Security settings.
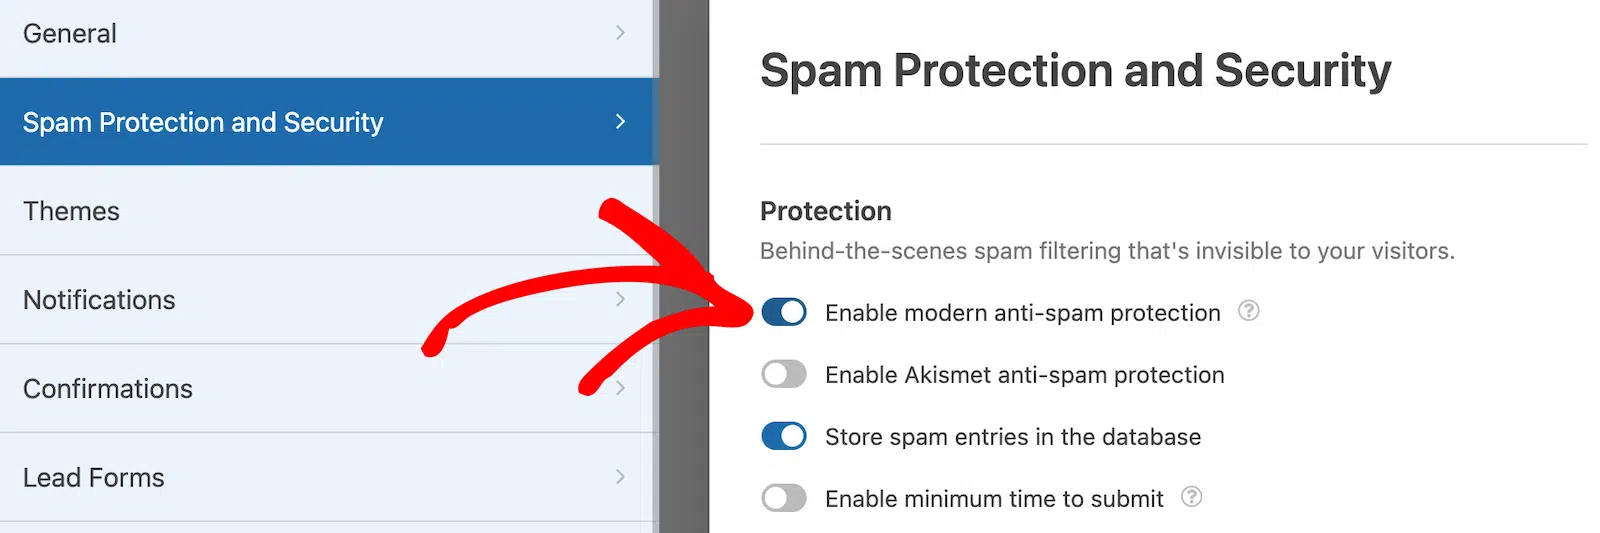
The options here include:
- Enable modern anti-spam protection — Stop contact form spam with the WPForms modern anti-spam protection. It’s automatically enabled by default on new forms, but you can choose whether you want to toggle it off on a form-by-form basis. This built-in spam protection runs seamlessly in the background to keep your forms safe. You can also pair it with another layer of security, such as a CAPTCHA.
- Enable Akismet anti-spam protection — By connecting your form to the Akismet plugin, you can block spam entries.
- Enable country filter — Prevent entries from certain countries.
- Enable keyword filter — Stop submissions that contain specific words or phrases.
Click Save.
Step 3: Add Your Form Notifications and Confirmations
Notifications are a great way to send an email whenever someone registers for a racing event on your website.

In fact, unless you disable this feature, whenever someone submits a race registration form on your site, you’ll get a notification about it.
If you use Smart Tags, you can also send a notification to your participants when they fill out your form, letting them know you received it and will be in contact shortly if needed. This assures people their entry has gone through properly.
You can also add important information to the notification about the upcoming race. For instance, provide directions, start times, a list of what to bring, and parking information.
For help with this step, check out our documentation on how to set up form notifications in WordPress.
You can send more than one notification when someone registers for your racing event on your site. For instance, you can send a notification to yourself, your participants, and your event organizer.
For help doing this, check out our step-by-step tutorial on how to send multiple form notifications in WordPress.
Lastly, if you want to keep branding across your emails consistent, you can check out this guide on adding a custom header to your email template.

Form confirmations are messages that display to people once they submit a race registration form on your website. They let people know that their registration has gone through and offer you the chance to let them know what the next steps are.
WPForms has three confirmation types:
- Message. This is the default confirmation type in WPForms. When someone submits an online race registration form, a simple message confirmation will appear letting them know their entry to your racing event was processed.
- Show Page. This confirmation type will take registrants to a specific web page on your site thanking them for their form entry. You can also redirect them to a page providing more information about the event for their convenience. For help doing this, check out our tutorial on redirecting people to a thank you page.
- Go to URL (Redirect). This option is used when you want to send people to a different website.
Let’s see how to set up a simple form confirmation in WPForms so you can customize the message site visitors will see when they fill out an online race registration form on your website.
To start, click on Settings » Confirmations in the form builder.
Next, select the type of confirmation type you’d like to create. For this example, we’ll select Message.

Then, customize the confirmation message to your liking and click Save.
If you want to display different confirmations to site visitors based on their behavior, be sure to read up on how to create conditional form confirmations.
Step 4: Customize Race Registration Form Access Controls
WPForms comes with a Form Locker addon that gives website owners a way to configure form permissions and access controls. You can enable it by going to WPForms » Addons.

To restrict who can sign up for your race, return to the form builder and go to Settings » Form Locker. Here, you’ll see 4 different settings:

- Form Verification — Require users to provide some information, like an email address, to fill out the form.
- Form Scheduling — Set a start date and end date for race registrations.
- Form Restrictions — Make users log in before they fill out your form.
- Entry Limits & Restrictions — Set a limit on how many people can sign up for your race.
The Form Locker addon also gives you the ability to limit race entries to one person. For detailed help with form permissions, check out this documentation on how to install and use the Form Locker addon.
Step 5: Add Your Race Registration Form to Your Website
After you’ve created a WordPress race registration form with the WPForms plugin, you need to add it to your WordPress website.
WPForms allows you to add your forms to many locations on your website, including your blog posts, pages, and even sidebar widgets.
Let’s take a look at the most common post or page embed option.
To begin, create a new page or post in WordPress, or go to the update settings on an existing one. After that, add a WPForms block.

The handy WPForms widget will appear inside your block. Click on the WPForms dropdown and pick the form you’ve just created and that you want to insert into your page.

If you’re satisfied with the way your WordPress form looks, go ahead and click on Publish, and your form will go live on the Internet.

Take a look at your published page to see exactly how it looks on your website!
To view your WordPress race registration form entries after they’ve been submitted, check out this complete guide to form entries.
Create Your Race Registration Form Now! 🙂
FAQs on Creating a Race Registration Form
How do I add event registration to WordPress?
To add event registration to WordPress, you can use a plugin like WPForms. WPForms allows you to create a custom event registration form, where users can fill in their details, select options, and submit payments if needed. Simply install the plugin, create your form, and embed it on any page of your WordPress site.
How do I add a registration option in WordPress?
Adding a registration option in WordPress is easy with WPForms. After installing WPForms, use the drag-and-drop builder to create a registration form for your event. You can customize the fields to collect names, contact details, and more, and then add the form to your event page.
How to create a registration link for an event?
To create a registration link for an event, first create your event registration form using WPForms. Once your form is ready, you can embed it on a page and copy the URL of that page. Share the URL as your event registration link so participants can easily sign up.
Next, Collect Volunteer Applications Online
And there you have it! You now know how to create an online race registration form in WordPress. If you want to recruit volunteers for your racing event, be sure to check out how to create a volunteer application form on your website.
Create Your WordPress Form Now
Ready to build your form? Get started today with the easiest WordPress form builder plugin. WPForms Pro includes lots of free templates and offers a 14-day money-back guarantee.
If this article helped you out, please follow us on Facebook and Twitter for more free WordPress tutorials and guides.

