
Do you want users to submit events to a calendar on your website?
Running a community group, promoting local events, or hosting webinars often means managing a busy calendar. Letting others submit their own events can take a big load off your plate.
I’ve helped several site owners set this up, and it always surprises them how quickly the calendar fills up once users know they can contribute, keeping their calendar active without having to manage every entry manually.
So, if you’re wondering how to make this work on WordPress without needing custom code, you’re in the right place. I’ll walk you through how to let users submit events using WPForms and a simple calendar plugin that works well with it.
Create Your User-Submitted Events Form Now! 🙂
How to Create a User-Submitted Events Calendar Form in WordPress
Letting people submit their own events is a great way to keep your calendar active without having to manage every entry yourself. Follow the steps below to get started:
- Step 1: Install the WPForms Plugin
- Step 2: Create a Form for User-Submitted Events
- Step 3: Install The Sugar Calendar Plugin
- Step 4: Connect Your Form to Your WordPress Event Calendar
- Step 5: Customize Confirmation Message After Event Submission
- Step 6: Publish Your User Submitted Events Form
- Step 7: Review and Publish Event Calendar Submissions
Step 1: Install the WPForms Plugin
The first thing you’ll need to do is install and activate the WPForms plugin. WPForms is the best WordPress form builder plugin. If you’re new to WordPress, here’s a step-by-step guide on how to install the WordPress plugin.

Now it’s time to make your event submission form, so that you can start accepting entries and get those submitted on your calendar without any hassle.
Step 2: Create a Form for User-Submitted Events
WPForms makes it easy to create any kind of form for your website, thanks to its huge library of pre-built templates. You get a whole category of event planning form templates so you can easily find the perfect form for your specific needs.

Whenever you’re ready to create your form, make sure it includes the following fields to turn this into an event submission form:
- Post Title: Rename as Event Title
- Featured Image: Rename as Promotional Image
- Post Excerpt: Rename as Short Event Description
Now we need to add some more fields to the form. First, let’s add a Rich Text field so that your visitor can add fully formatted event listings with images.
Delete the existing text field for Post Content and then drag a Rich Text field in its place. You’ll want to name it Full Event Description.

In the Field Options for the Rich Text field, make sure to turn on all 3 of these settings:
- Allow Media Uploads: this will let your visitor add images to their event listing
- Store files in WordPress Media Library: adds uploaded images to the Media Library in WordPress
- And make sure to also set the field as Required.

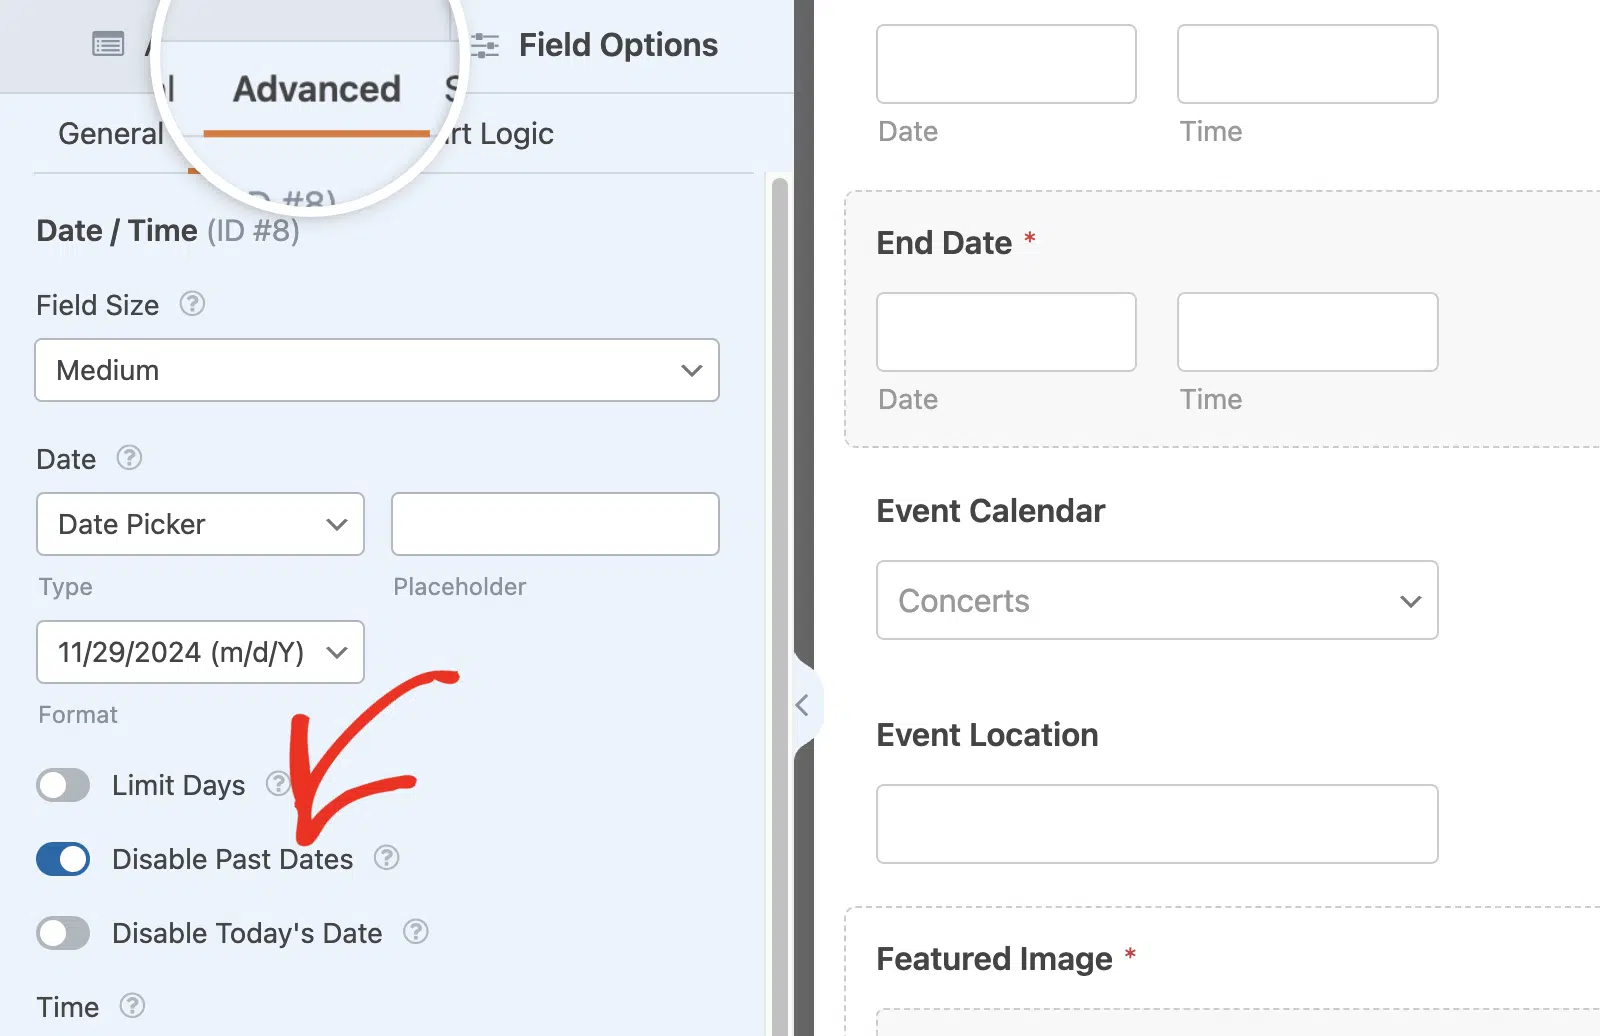
Now let’s add two Date/Time fields: one is for the event start time and one for the event end time. Using these fields, visitors can add either single-day or multi-day events to your WordPress calendar.

On both the Date / Time fields, it’s a good idea to Disable Past Dates. You’ll find this in the Advanced Options for the Date / Time field.
Disable Past Dates will mean all of your new events have to have a future date. That can help to catch mistakes, like accidentally selecting the wrong year.
OK, we’re done. Let’s click Save. Next, you’ll need to install a WordPress events calendar plugin. I recommend using Sugar Calendar because it integrates really well with WPForms.
Step 3: Install The Sugar Calendar Plugin
The Sugar Calendar plugin creates a custom post type called Events that will appear in your WordPress dashboard. When a visitor submits your form, it’ll create a new event post.
The free version of the Sugar Calendar lets your users create single local community events. You can create recurring events with Sugar Calendar Pro.
To install it, go to Plugins » Add New in your WordPress dashboard and search for Sugar Calendar. Click Install Now to install the plugin.

Keep in mind that you will need a paid subscription to Sugar Calendar to utilize it within WPForms.
Next, make sure to Activate the Sugar Calendar plugin and then run through the settings. It’s important to do this now so that your Events post type is ready for the next step.
Now we’re going to create a connection between your form and your WordPress events plugin. Also read: How to Switch from The Events Calendar to Sugar Calendar
Step 4: Connect Your Form to Your WordPress Event Calendar
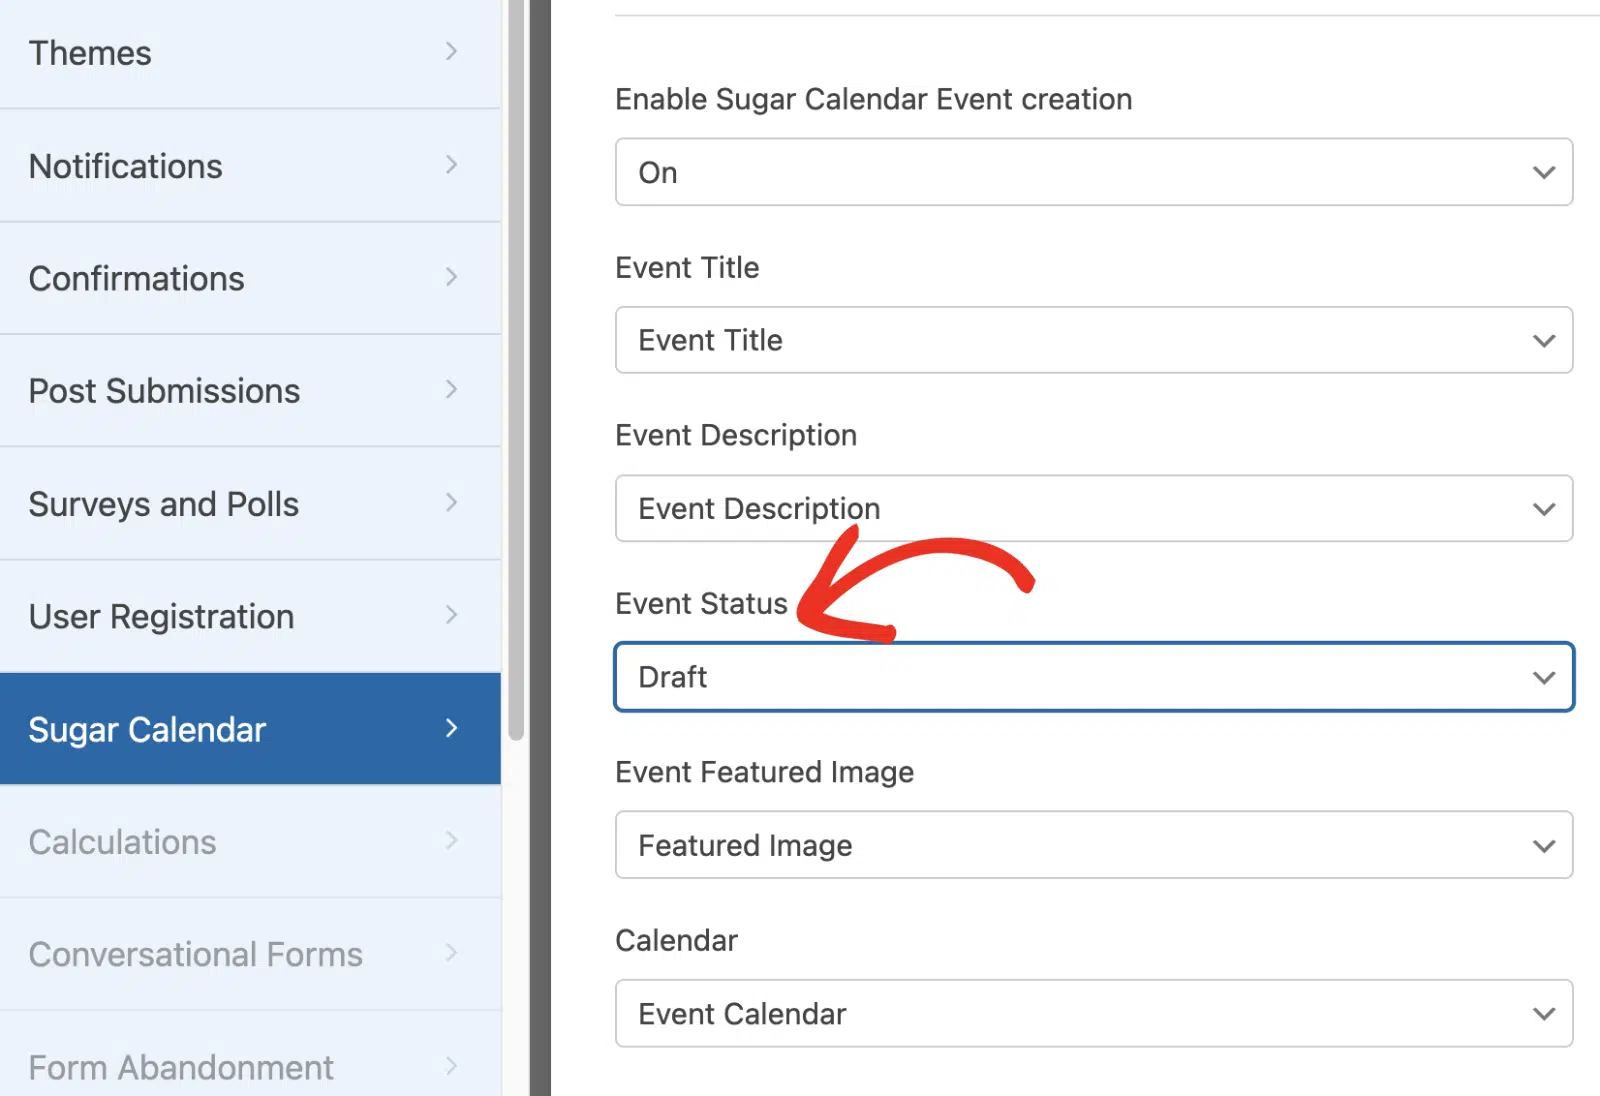
After setting up the Sugar Calendar plugin, you need to connect the form you’ve created to your calendar. To do so, go to Settings » Sugar Calendar in the form builder.
From here, select On from the Enable Sugar Calendar Event creation dropdown. Next, you’ll want to match your form fields with the fields that The Events Calendar is looking for.
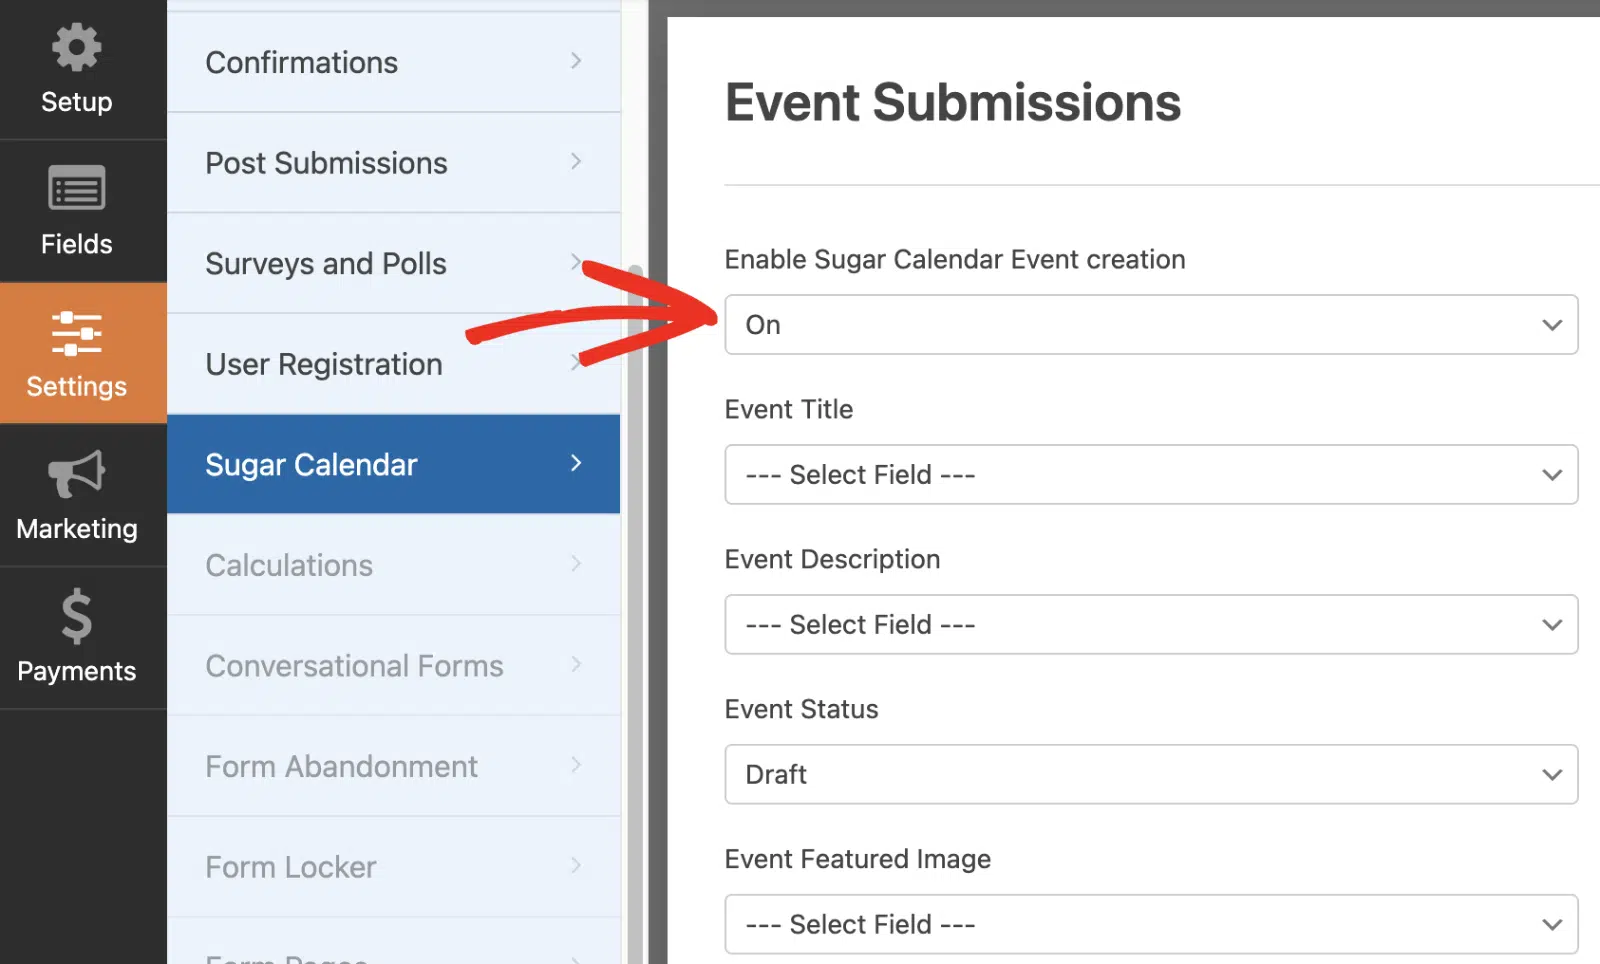
In the Event Status field, you can specify whether the submitted event should be saved as a draft, published immediately, or set to pending review.
Once you’re done mapping the fields, make sure to save your form. Then, I suggest submitting some test entries to confirm everything works as expected.
Step 5: Customize Confirmation Message After Event Submission
Before you publish your event submission form, it’s a good idea to change the default thank you message that your users will see. You can do this by going to Settings » Confirmations.

In the preview panel, customize your message in any way you like. WPForms gives you lots of options after someone submits an event to your website’s calendar. You can also:
- Use conditional confirmations to show a different message depending on the event type
- Forward your visitor to a designated thank you page
- Forward them to a separate website.

For help with form confirmations:
- Check out this helpful documentation on how to set up form confirmations in WordPress.
- If you want more than one confirmation, check out how to create multiple form confirmations in WPForms.
Don’t forget to let your users preview their entry before submitting the form. Here’s our guide showing you how to preview a form entry before submitting it.
Also Read: Appointment Reminder Templates for Email and SMS
Step 6: Publish Your User Submitted Events Form
OK, now we’re ready to publish the event on your WordPress site! WPForms allows you to add your forms in different ways, like:
- Embed wizard
- Shortcode
- WPForms block in the block editor
- Sidebar widget
- Elementor form module
- Divi embed
- SeedProd module
Let’s add your event registration form with the Embed wizard in this example. This will automatically create a new page for your visitors to add user submitted events.

At the top of the form builder window, click Embed. After that, choose whatever option seems best. I’m going to click on the Create New Page button.

And finally, type in a name for your page and click the orange Let’s Go button to create it. This will redirect you to the WordPress block editor.

Now, all you need to do is hit Publish to publish your form. Feel free to use the many styling options in the Block Editor to customize the form appearance to your liking.

And that’s it! Your form is live. Now, visitors can submit events through your form, and you can manage them using the Sugar Calendar plugin.
Step 7: Review and Publish Event Calendar Submissions
Entries from this form will be added as new events in Sugar Calendar. So, first go ahead and submit a test entry from the event form.
Then, to access your events, go to Sugar Calendar » Events. From here, you’ll see details about all the events on your site.
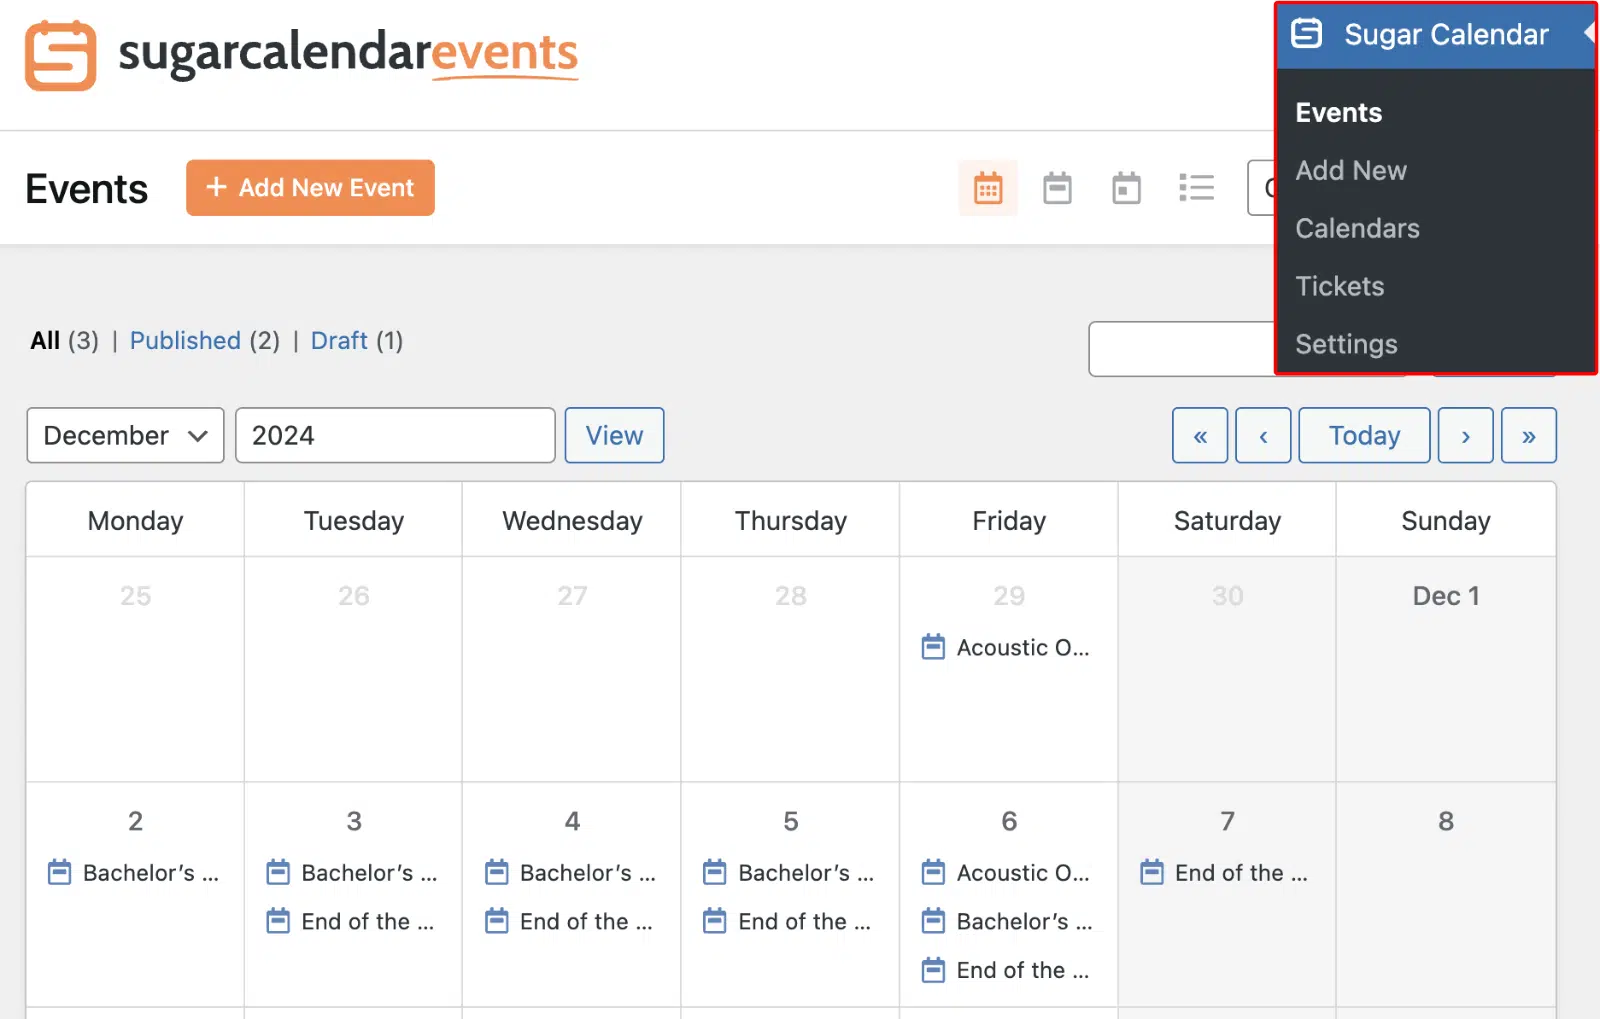
Locate the one you submitted through WPForms, click on it, and then select Edit. Recall that we’re yet to publish this event as we set the event status as Draft in WPForms form builder settings.

Now, users can submit events on your site using a WordPress form plugin. You can review each user’s submission, edit, and customize the event to allow ticket sales before publishing it on your site.
Create Your User-Submitted Events Form Now! 🙂
FAQs on User Submitted Events Calendar
Got more questions on user-submitted events? Let’s look at more ways you can use this WPForms Events Calendar integration.
Can I add events to WordPress without approval?
Yes! If you want, you can publish submitted events as soon as someone submits your calendar form. That way, you don’t need to approve them manually, and they’ll show up on your WordPress events calendar instantly.
The WPForms and Sugar Calendar events calendar plugin we’re using supports this. To make it work, there is just 1 thing you’ll need to tweak in the steps above.
In the Event Status field, you can specify whether the submitted event should be saved as a draft, published immediately, or set to pending review.

Can I charge for listing events in WordPress?
Yes, WPForms makes this easy too! You can add a payment field to your events listing form and connect your payment gateway to WPForms.
You can integrate WPForms with several major payment gateways like Stripe, Square, Authorize.net, and PayPal. Here are a few helpful guides that explain how to collect payments through WPForms in detail:
- How to accept payments with Stripe in WPForms
- How to add Square payments to WordPress
- How to use the PayPal Standard addon with WPForms
- How to use the PayPal Commerce addon with WPForms
- How to use Authorize.Net with WPForms
- How to allow users to choose a payment method on your form
Keep in mind that you’ll want to manually check that the payment was successful before manually approving the event.
Can I send email notifications for event submissions?
Yes, you can! By default, WPForms will email the admin email address in WordPress when you receive a new event listing. If you’d like to customize the email notification or add more notifications, check out this guide to sending form notification emails.
If you want, you can turn WPForms notifications off and let Sugar Calendar plugin send an email notification for each event. If you’re not getting those alerts from the Sugar Calendar, check out how to fix WordPress not sending emails.
Can I notify my visitors when I publish an event?
Sure! Did you know that you can send browser push notifications from WordPress with a free plugin? Check out this article on how to send push notifications from WordPress.
Can I Send New Events to Google Calendar?
Yes! WPForms lets you easily send WordPress form entries to Google Calendar as well.
How Do I Export Events to CSV?
With WPForms, you can export any form entries to CSV or XLSX. Please check out this guide on how to export form entries in WordPress.
Next, Accept User Submitted Blog Posts
Now that users can submit a WordPress event to your site, wouldn’t it be neat if they could also blog about it? If you accept user submitted posts, your visitors could share press releases and other event information to drive traffic to the calendar.
To set this up, check out the easy way to accept user-submitted posts in WordPress. And if you plan to take pictures at your event, don’t forget to make an online model release form.
Create Your Wordpress Form Now
Ready to build your form? Get started today with the easiest WordPress form builder plugin. WPForms Pro includes lots of free templates and offers a 14-day money-back guarantee.
If this article helped you out, please follow us on Facebook and Twitter for more free WordPress tutorials and guides.


We have a non-profit community (URL Removed) and wanted to use the event calender functionality as desribed above.
But while installing it seems I need to upgrade to WPForms Pro, this is not mentioned and we have no funding for that. Do you have alternatives?
Hi Rinke,
We currently offer two very special discounts for nonprofits, and I’ve included the details below:
$99 per year for a Pro license (normally $399 per year). Our Pro license provides you with access to lots of addons, including Stripe and PayPal addons (so you can accept donations through forms on your site).
$199 per year for an Elite license (normally $599 per year). Our Elite license provides everything you get with a Pro license plus additional addons like Webhooks, ActiveCampaign, Authorize.Net, and the Salesforce addons.
Please note that both the Pro and Elite nonprofit licenses are limited to 5 sites.
The rate will stay the same for as long as you keep your non-profit site and choose to renew.
In order to qualify for this special pricing, you’d first need to complete this form. This will initiate the approval process.
Once you’ve submitted the form and been approved, we’ll reach back out to you with a special checkout link so you can receive the nonprofit rate.
Hope this helps! 🙂
Is it possible to create a recurring dates field in the Blog Post Submissions add-on that can be mapped to The Events Calendar? Or is there a workaround?
Hi Legha, thanks for reaching out to us.
I apologize that it not possible at the moment to create a recurring date field. I apologize we can’t provide what you are looking for at the moment but I’ve made a note for the feature.
It is worth mentioning that, the Event Calendar plugin does not recommend setting up a recurring event on their end. Because, a long-term recurrence pattern with hundreds of instances could place a significant burden on your database, slowing your site and events down considerably. Please check more details from the Event’s Calendar plugin here: Never-Ending & Long-Term Recurrence Patterns
Thank you and have a good one!
Can we show the available Google Calendar Events in Wpform Date calendar?
Hi Saleem, thanks for reaching out to us!
Currently, it is not possible to show the available Google Calendar Events in the WPForms date picker. I apologize that we can’t be able to provide what you are looking for at the moment.
I’ve noted your interest in this feature and added your email to our list to receive updates about this feature.
Thanks and have a good one!
How can we allow users to create event tickets? We have both The Events Calendar Community Events and Community Events Tickets and Event Tickets Pro.
Is there a way to allow them to create a ticket in the form when submitting? You mention it at the top of the page but it is not in the article.
Thak yo,
Simon
Hey Simon — We are sorry for any trouble. In order to make sure we answer your question as thoroughly as possible and avoid any confusion, could you please contact our team?
To access our email support, please submit a support ticket and we will get back to you.
Thanks.
If the date of the event has to be changed or the wpform entry to get deleted or the wpform entry needs to change date or starting hour will this change also update the event or the otherway around?
Hey George – If you decide to make changes to the WPForms Entry date, those changes will only affect the WPForms entry itself. The corresponding event, such as the actual event listing or calendar, will not be automatically updated with these changes. So, modifying the WPForms entry won’t automatically update the event information.
Having said that, if you make changes to the event details separately from WPForms in the Events Calendar plugin, those changes will not automatically update the corresponding WPForms entry. The WPForms entry and the event are independent of each other.
Hello,
I’ve followed all the steps to create a time off calendar that our team members can fill out the form to complete. Its an easy way for us to know when people will be out of the office, etc. The issue i’m running into is that I have the additional meta fields created to allow auto-posting without approval. Once an event is created though, it won’t appear until I go into the event and press the update button. Am I missing something?
Hey Chad – We’d be happy to help! When you get a chance, please drop us a line in support so we can assist.
If you have a WPForms license, you have access to our email support, so please submit a support ticket.
Otherwise, we provide limited complimentary support in the WPForms Lite WordPress.org support forum.
Thanks 🙂
hello, is there a way to do the same thing with a booking calendar ?
we need the calendar for room reservations so we want the room to be classed as unavailable if another user has already booked it
Hey Mariem – We currently don’t have the feature to prevent double booking in the plugin. I do agree this would be a handy feature to have, and I’ll add this into our feature request tracker so that it’s on the radar of our developers.
Hello,
This is not working in v6 version of the events calendar: https://wordpress.org/support/topic/month-view-7/#post-16752346
Hey Boris – We’d be happy to help! When you get a chance, please drop us a line in support so we can assist.
If you have a WPForms license, you have access to our email support, so please submit a support ticket.
Otherwise, we provide limited complimentary support in the WPForms Lite WordPress.org support forum.
Thanks 🙂
Is it possible to have WP Forms create an Organizer post type from this plugin?
I’ve installed everything, and I see the Event post type, but not the Oranizer (or Venue) post types.
Thanks! 🙂
Hey Daniel – I apologize, currently, the fields starting with _Venue or _Organizer won’t work with the event post type. Since this involves a 3rd party plugin, I’d suggest you to please check with the Events Calendar plugin support team to see if they can come up with a workaround. In the meantime, I’ll also add this to our list of feature requests so that it’s on the radar of the developers.
Thanks 🙂