AI Summary
I’ve been building surveys for WordPress websites for years, and I can tell you that most people tend to overcomplicate this process.
They think they need expensive survey tools, complex integrations, or coding skills to create professional surveys that actually get responses.
The truth is, creating effective survey forms in WordPress is much simpler than most people realize, especially if you use a form builder plugin like WPForms.
You get everything from basic contact surveys to advanced Net Promoter Score (NPS) surveys with beautiful real-time reporting. Interested? Stick around!
In this guide, I’ll walk you through my proven process for creating surveys that people actually complete and that give you the insights you need to make better business decisions.
How to Build a Survey Form in WordPress
And away we go…
Step 1: Install WPForms and the Surveys & Polls Addon
Creating professional surveys in WordPress requires the right foundation, and that starts with WPForms.
You need specialized survey fields like rating scales, Likert scales, and Net Promoter Score (NPS) questions, plus the ability to generate meaningful reports from your data.
To get access to these features, you’ll need the WPForms Pro plan, which gives you access to our Surveys and Polls addon, and a bunch of other amazing integrations, tools, and templates
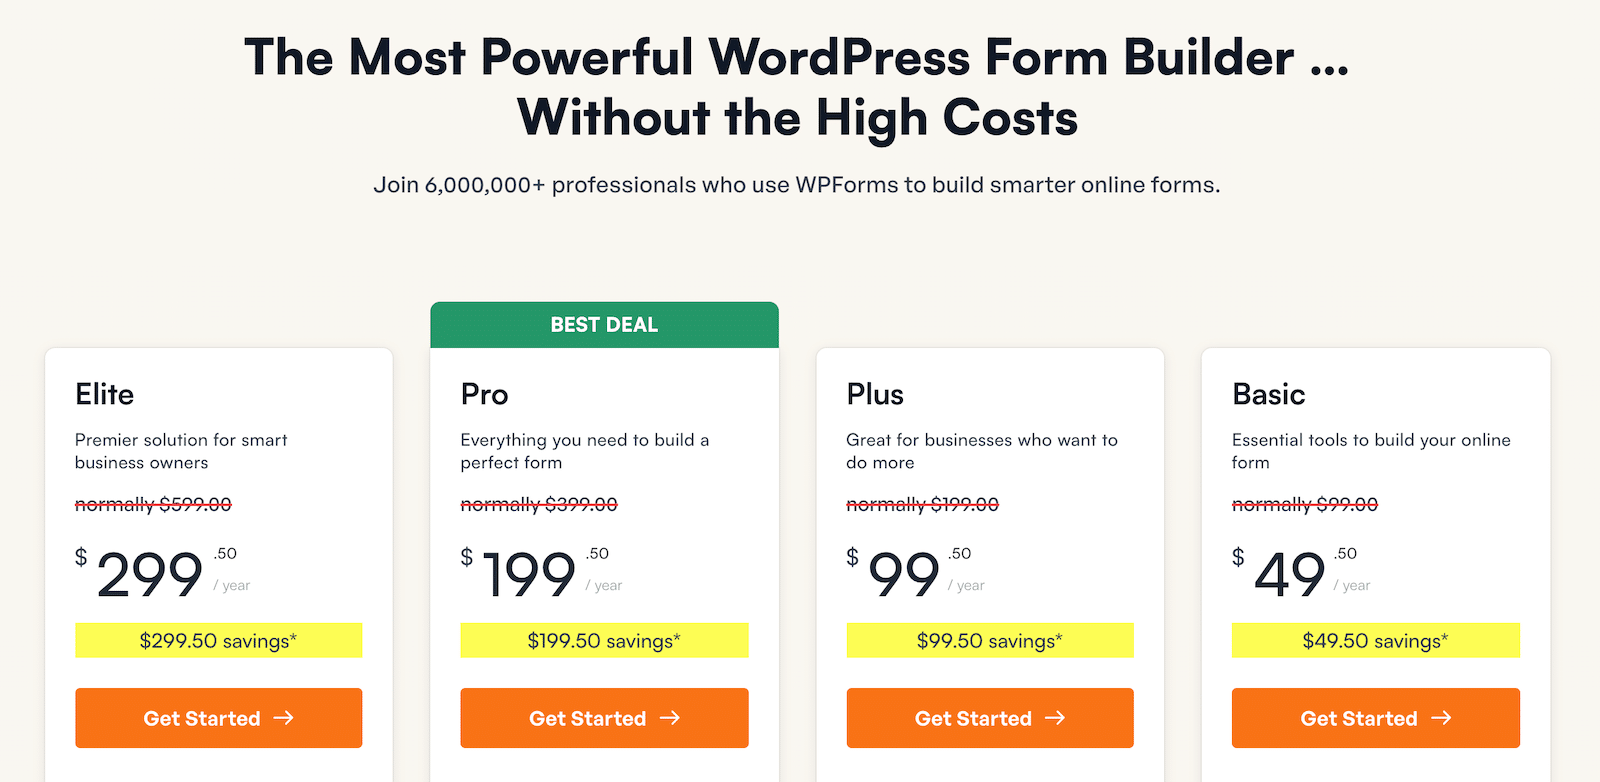
After you register and purchase your plan, you’ll be able to download the plugin file from your account page. From there, you can install it in WordPress.
Need some help with that step? Check out this guide to installing WordPress plugins. Once done, navigate to WPForms » Addons from your WordPress dashboard.
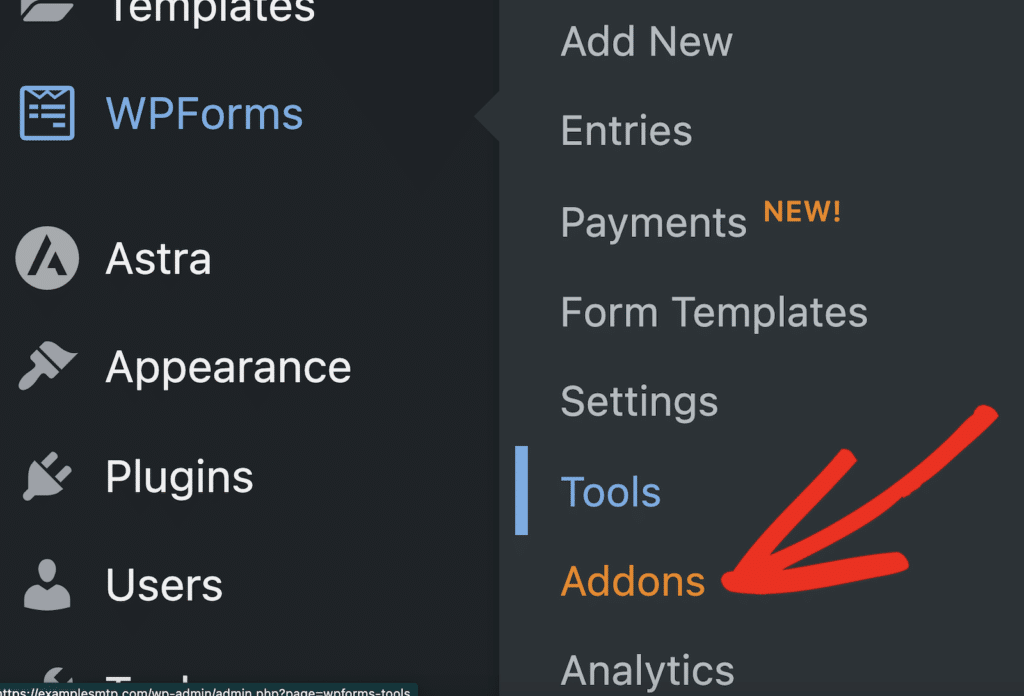
Locate the Surveys and Polls addon, install it, and activate it. This addon is what transforms WPForms from a basic contact form plugin into a powerful survey platform with advanced reporting capabilities.
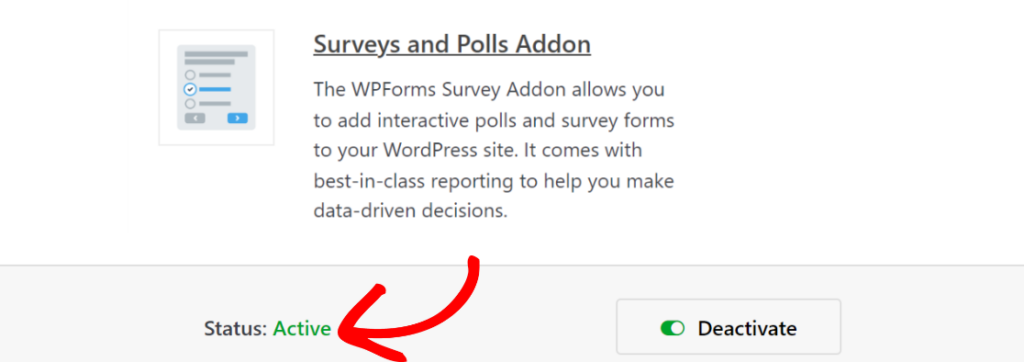
Once you’ve got both WPForms and the Surveys & Polls addon installed, you’re ready to start building surveys that actually get results.
Step 2: Build Your Survey Form
There are 2 super easy, beginner-friendly ways that you can build a survey form with WPForms: templates and AI. I’ll walk you through both of them here and you can choose which is best for you. Sound good?
Build a Form From a Template
If you’re already a WPForms user, hopefully you’ve had a chance to check out some of our 2,000+ form templates. If you’re new to WPForms, templates are the best way to get started.
So many people aren’t comfortable enough to build a form from scratch, which makes the template options so handy. You can use them as-is or customize them however you want.
And since we like easy, let’s go ahead and use a template. From your WordPress dashboard, use the left-side menu to navigate to WPForms » Add New.
When you do this, you’ll be prompted to name your form, as well as to select either a blank form or a template.
Since we’re going to use an existing survey form template, go ahead and search for Survey Form in the Search Templates box. Select the one that’s called Survey Form and click the Use Template button.
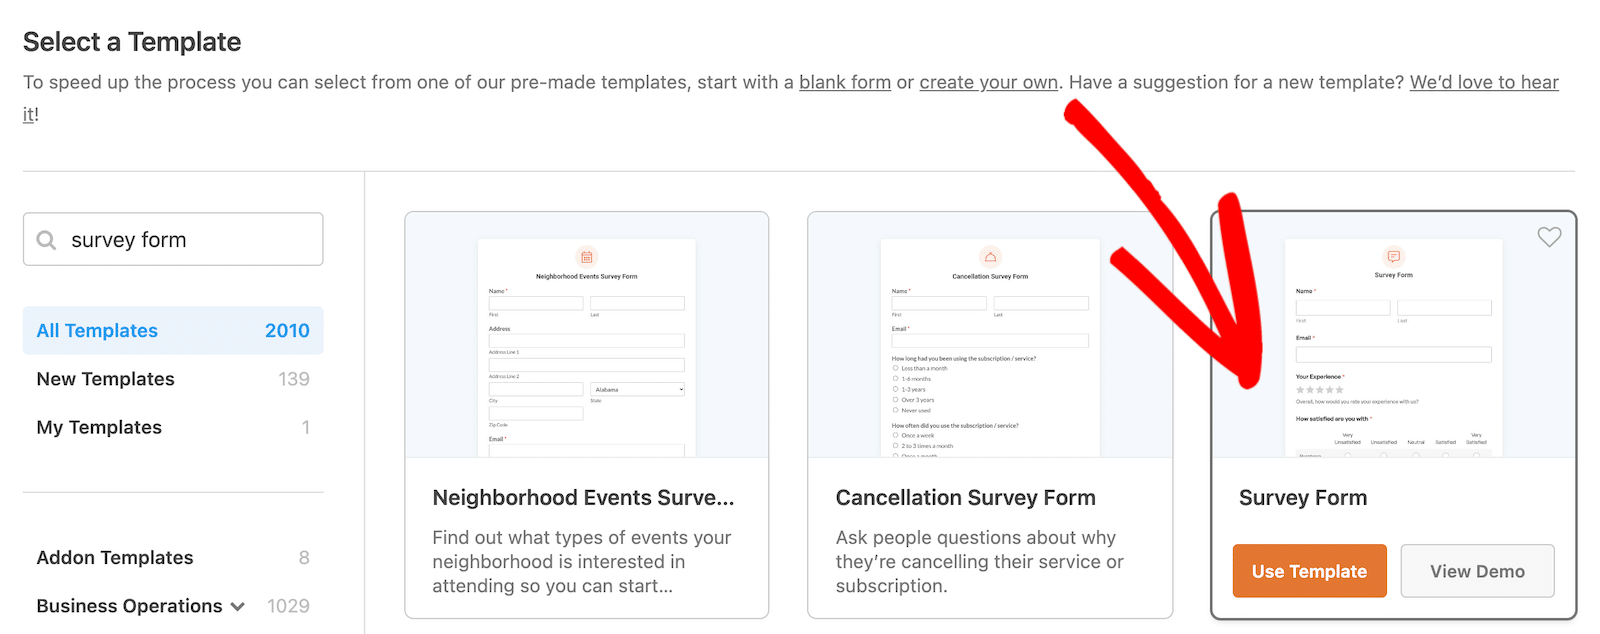
Once you click that, the template will load in the form builder.
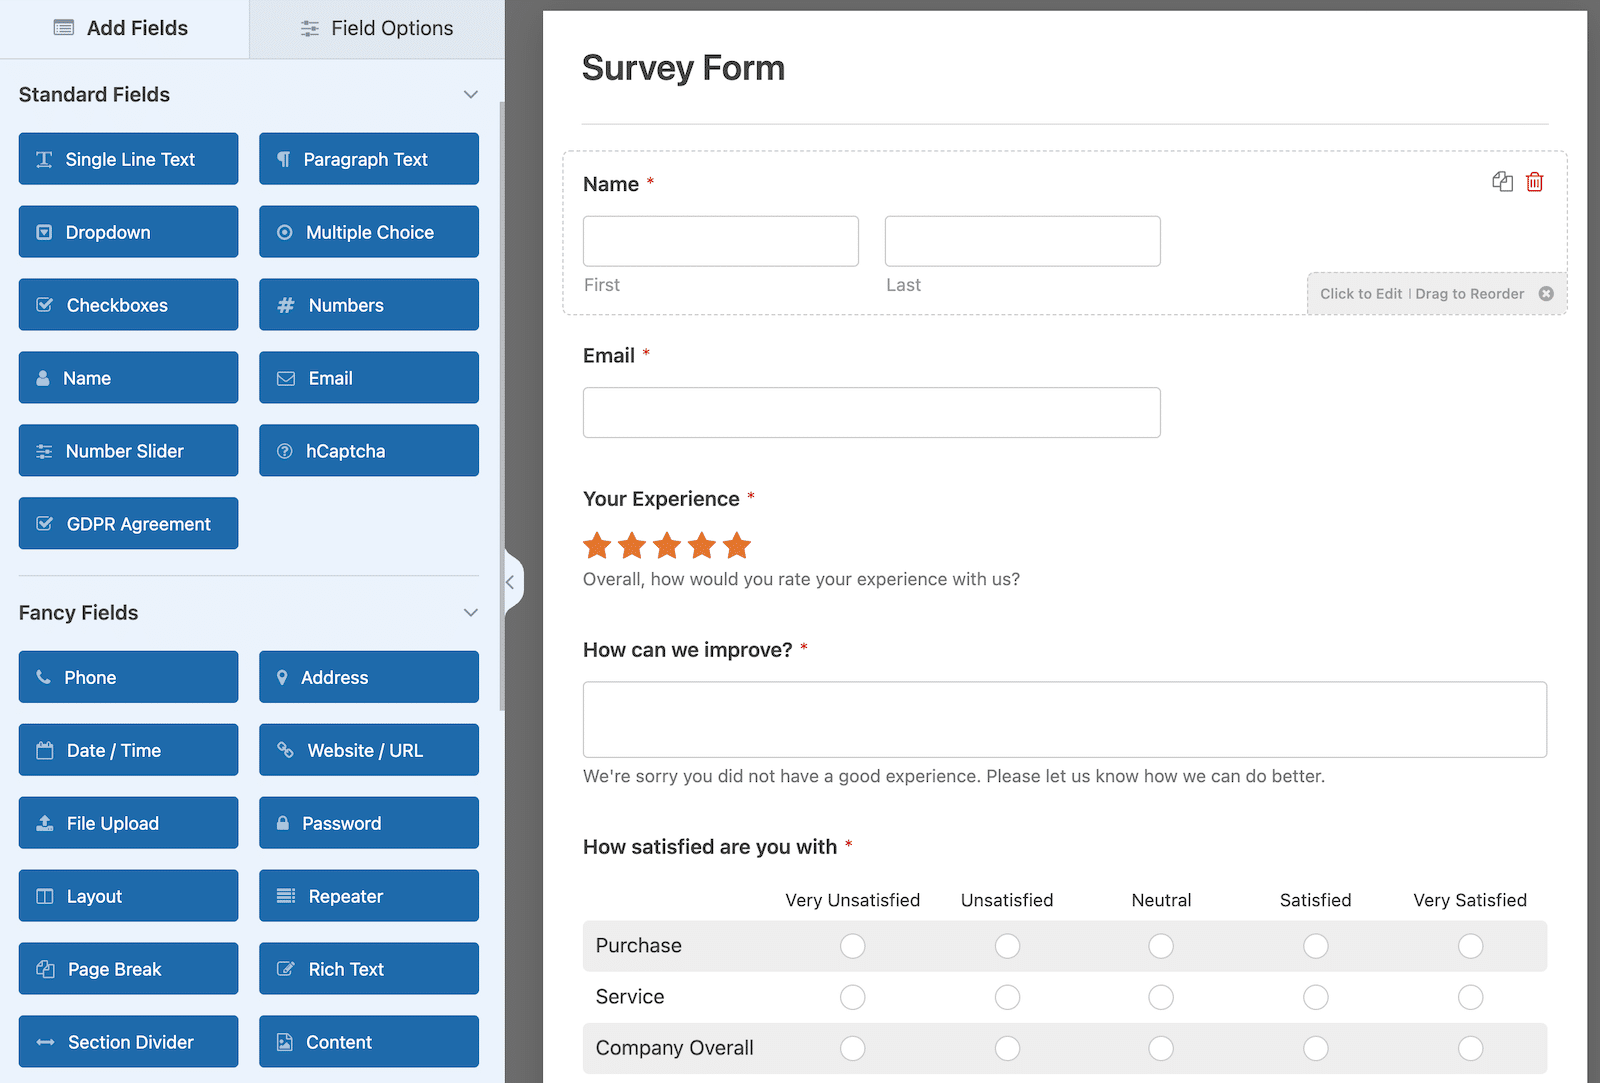
The Survey Form template in WPForms comes with the following form fields:
- Name
- Rating
- Likert Scale (sometimes known as a matrix question)
- Paragraph Text (For written answers)
Now, like I said before, you can use this form as-is or you can customize it by dragging and dropping new fields from the left panel into the form builder, moving fields around, or removing them altogether. That’s totally down to your needs and comfort level.
WPForms has a Form Revisions feature that lets you revert back to an older version of your form if you need to. That takes a lot of worry out of form-building by giving you a safety net.
Build a Form With WPForms AI
With WPForms AI, you can actually spend a few seconds telling the form builder exactly what you need. Like magic, you’ll see an AI-powered form appear in your form builder. If it’s not exactly what you want, you can keep giving it directions until it is.
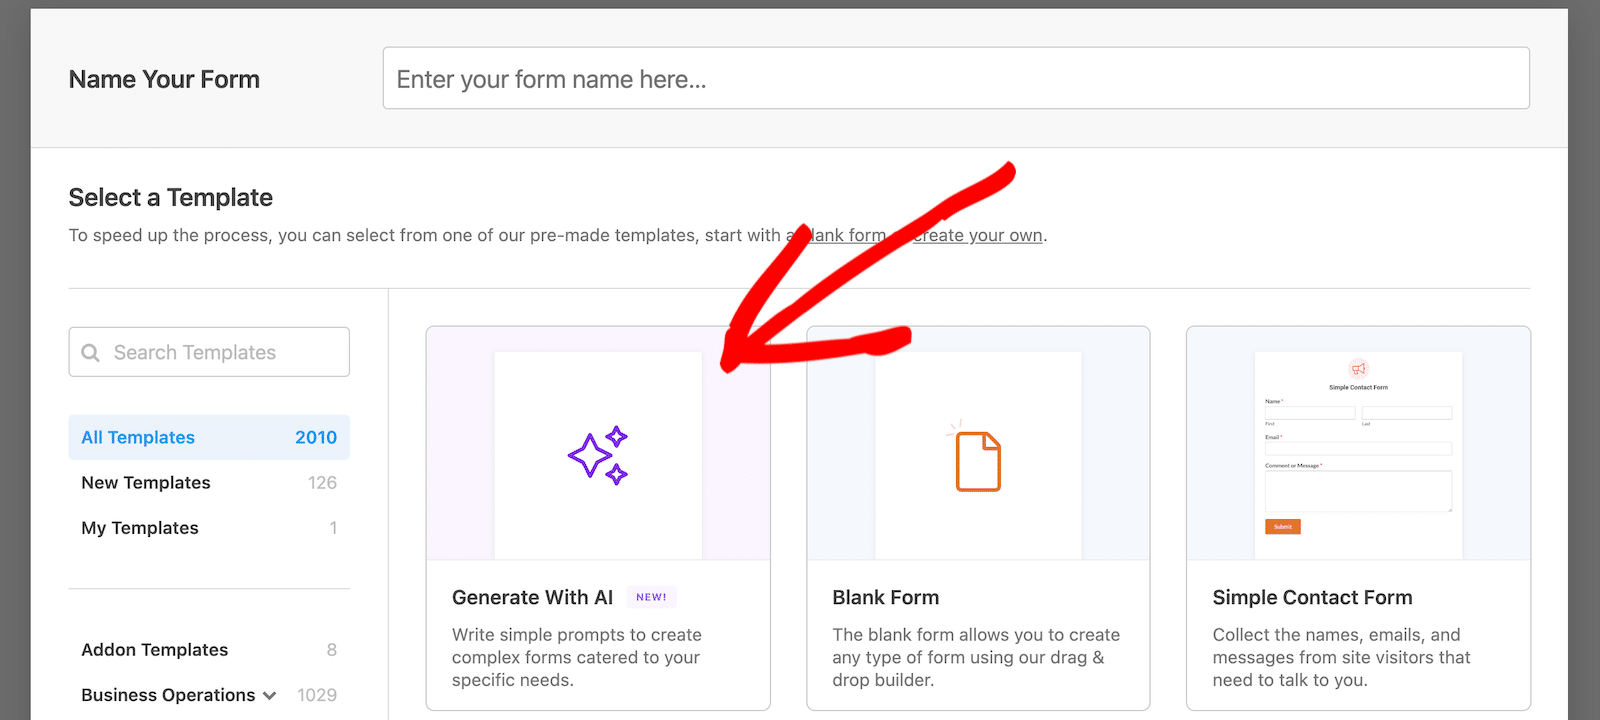
To create a form with AI, go to your WordPress dashboard and then navigate to WPForms » Add New. You should see an option to Generate With AI. Select that.
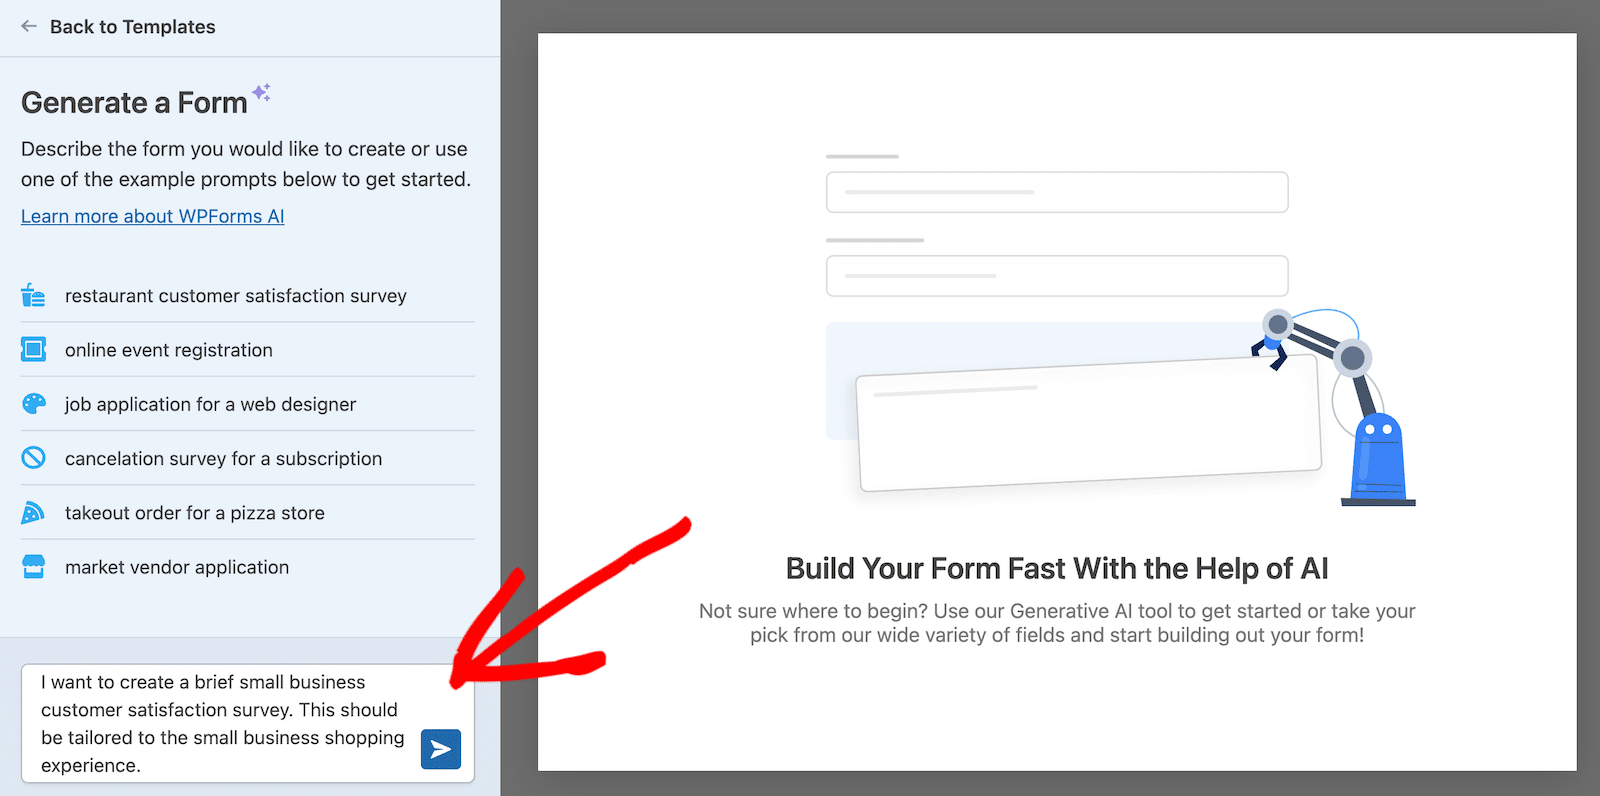
The form builder will load with a chat on the left side. This is where you’ll give information about the kind of form you want to create. You can use natural language here.
After you’ve explained what kind of form you want, you’ll see the form appear right there in the form builder. You’ll also see that the chat is still open.
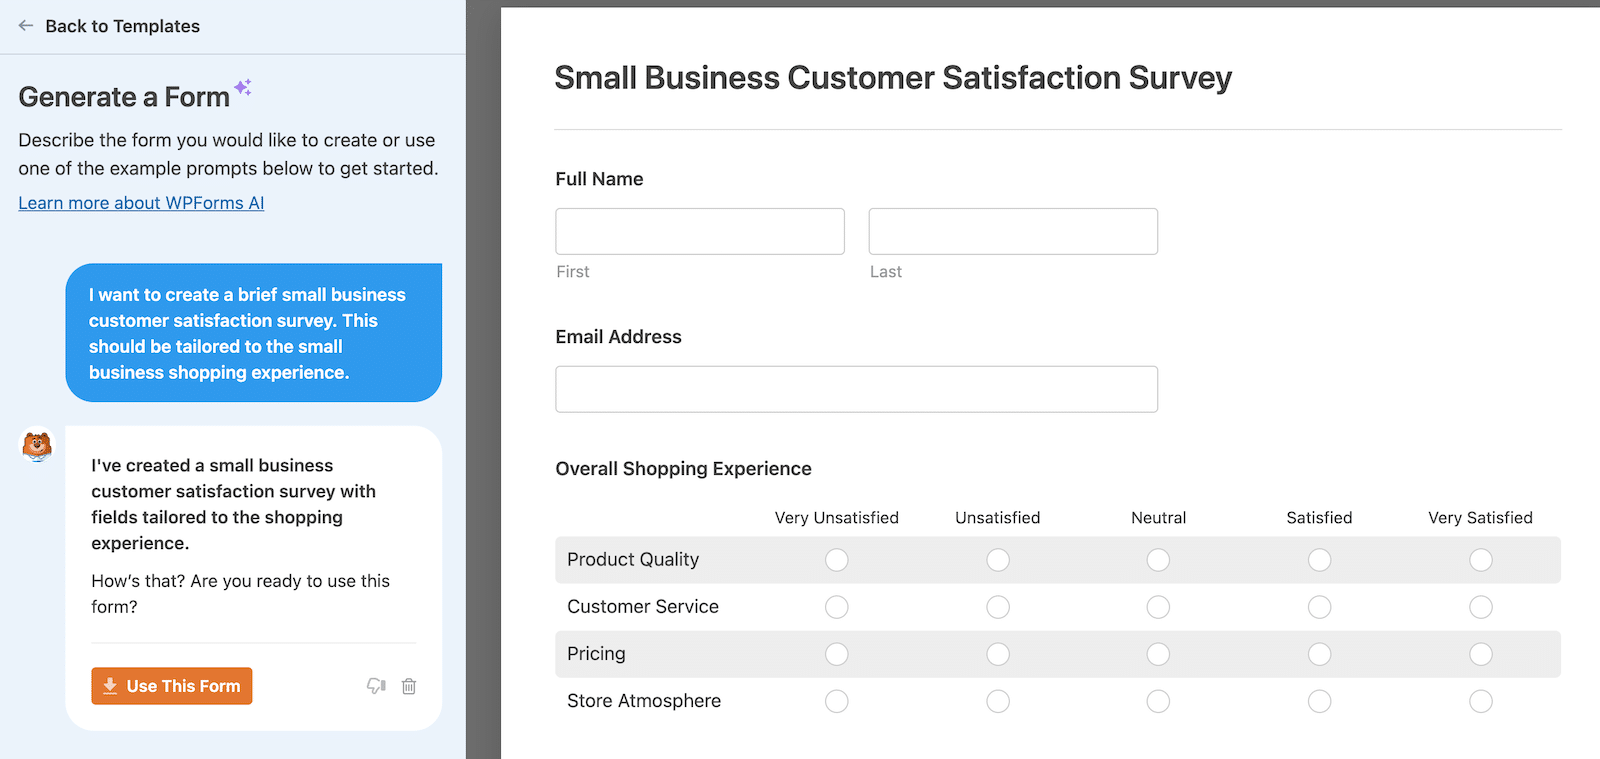
If the form looks good to you, you can click on the orange button that says Use This Form. If you want to make changes, you can chat back to tell it to add or remove sections, make certain questions required, or whatever you need.
Once you click the button to use the form, it will open in the form builder. You won’t be able to chat with AI anymore then, but you will be able to make changes by dragging and dropping form fields as needed. It might be old school, but it’s also easy!
If you want to learn more about customizing the different survey form fields, I’m going to break that down in just a second. If you don’t, no worries! Feel free to jump ahead to Step 3.
Step 3: Customize Advanced Survey Fields
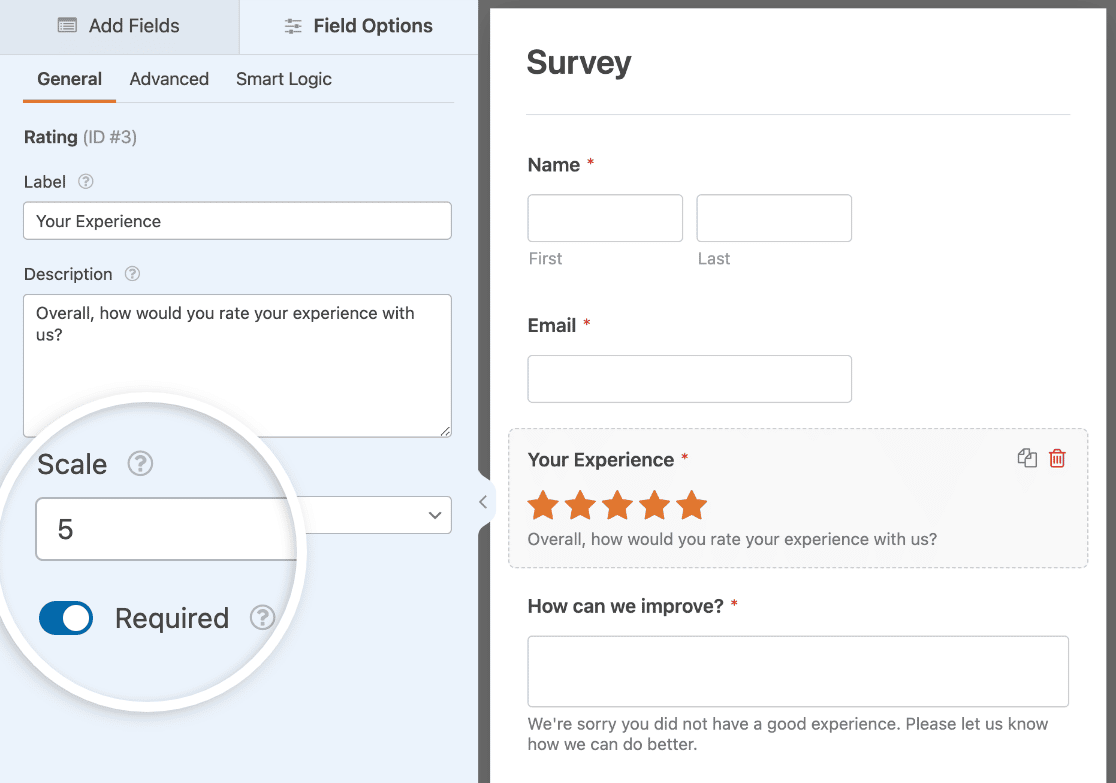
Let’s first take a look at how you can customize your form’s Rating Field. To start, change the field label, add a description telling survey respondents what they’re rating, and choose the Scale, which can be between 2 and 10.
You can also make this field Required so that respondents have to choose a rating before submitting the survey.
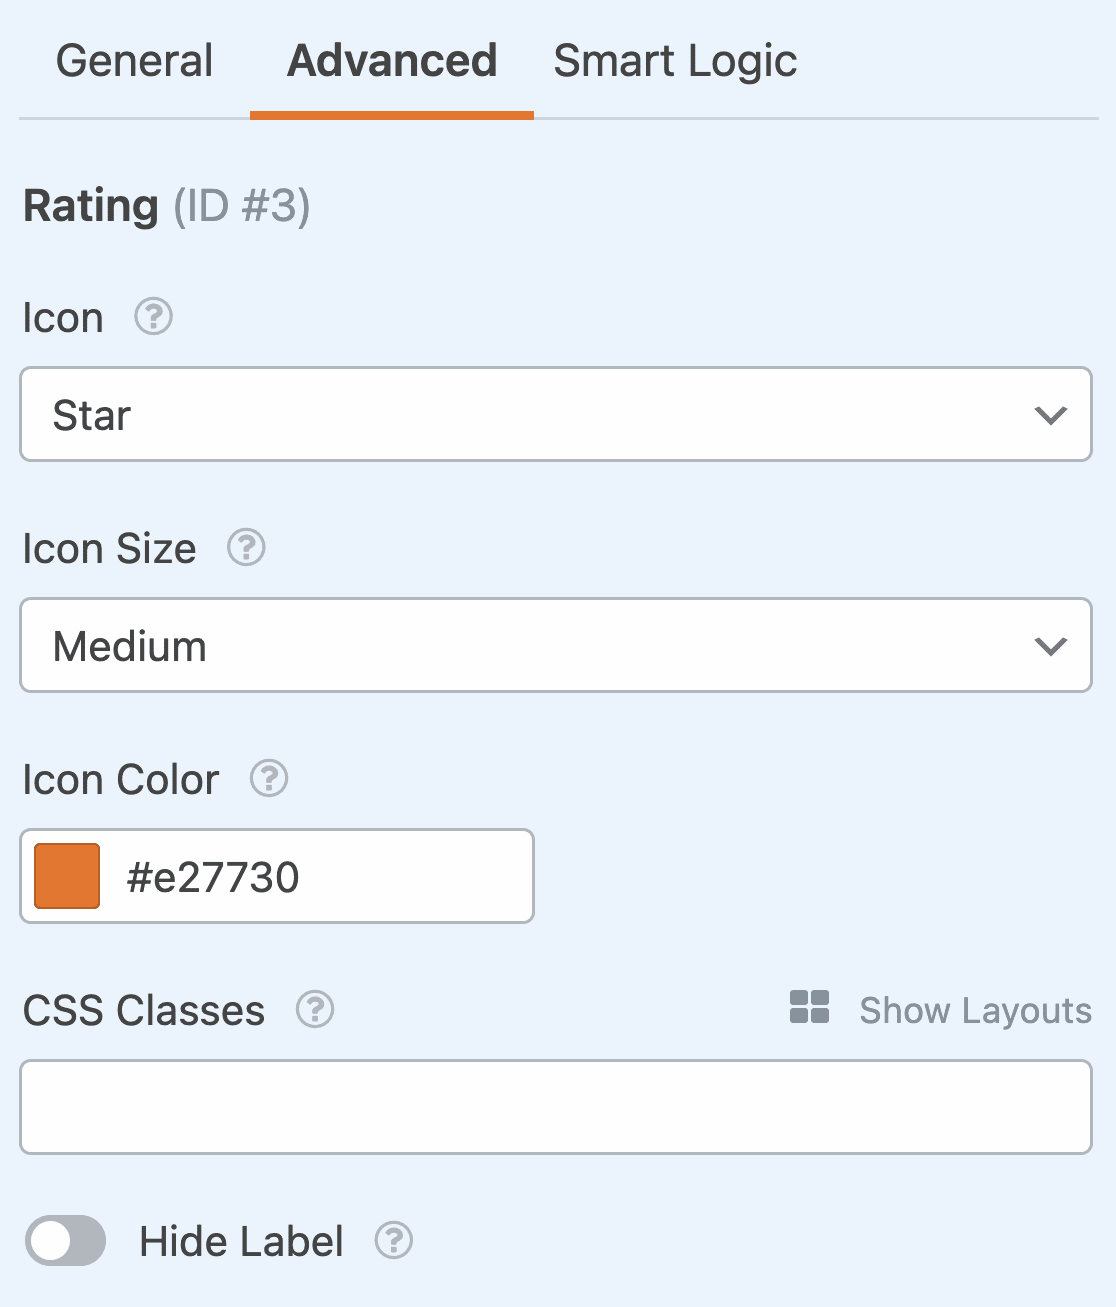
If you click on the Advanced tab, you can change the rating icon in the following ways:
- Icon: You can use a star, heart, thumb, or smiley face icon.
- Size: You can choose the rating icon to be small, medium, or large.
- Color: Use the color picker to change the icon color.
Would you like to collect more information from respondents who give a low rating? In the Survey Form template, a text field asking “How can we improve?” will appear if a user gives a 1- or 2-star rating.
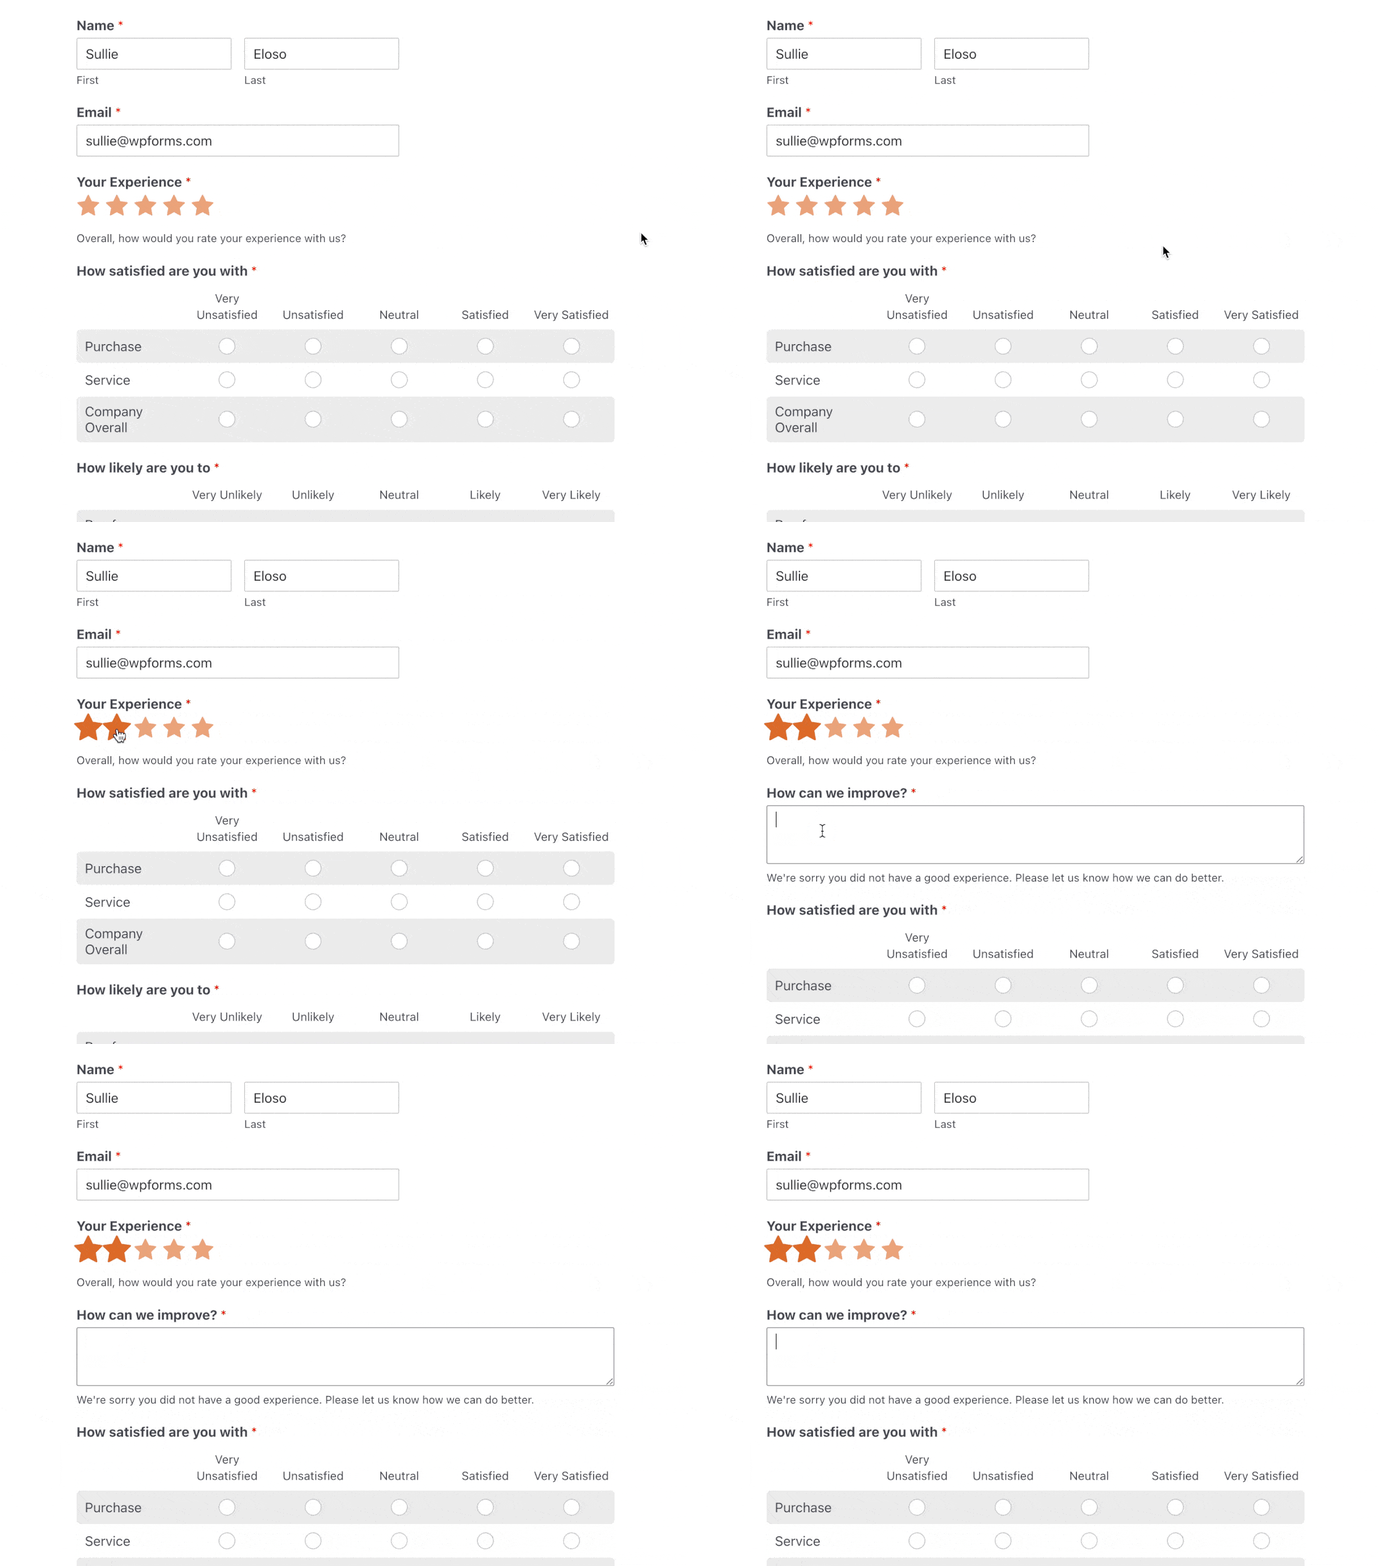
You can hide or show fields like this using conditional logic. For help with this, check out our tutorial on how to use conditional logic for ratings.
Next, we’ll customize the Likert Scale form field, which is one of the most widely used scales for measuring customer experience feedback.
Customize the Survey Form Likert Scale
Customizing the Likert Scale on your form is done the same way you customize the Rating field. All you have to do is click on it.
From there, you can change the following:
- The Label, so site visitors know what you are measuring.
- Rows options, which are the survey questions you’re asking site visitors about.
- Columns options, which are the response options your site visitors have to choose from.
- The Description, if you want to add additional information for site visitors to reference.
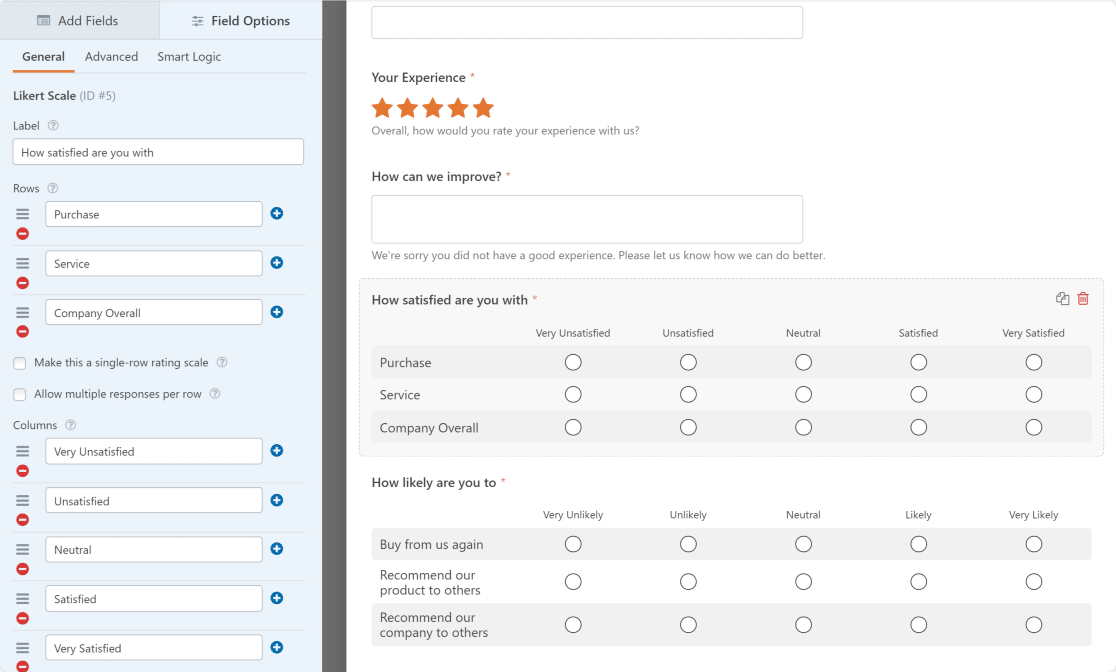
We’ve put together a handy sample list of different question types for Likert Scales if you need some guidance.
And if you want to take it a step even further, you can create a Net Promoter Score (NPS) survey to calculate how your site visitors feel about your company. The best part here is that WPForms will calculate the score for you so you don’t have to. That’s time you can spend doing something else.
When you’re done with making all the changes to your WordPress survey form, click Save.
Step 4: Enable Survey Reporting
In order to receive real-time results as survey respondents fill out your form on your web page, you need to enable survey reporting.
To do this, go to Settings » Surveys and Polls. Then, click on the Enable Survey Reporting toggle.
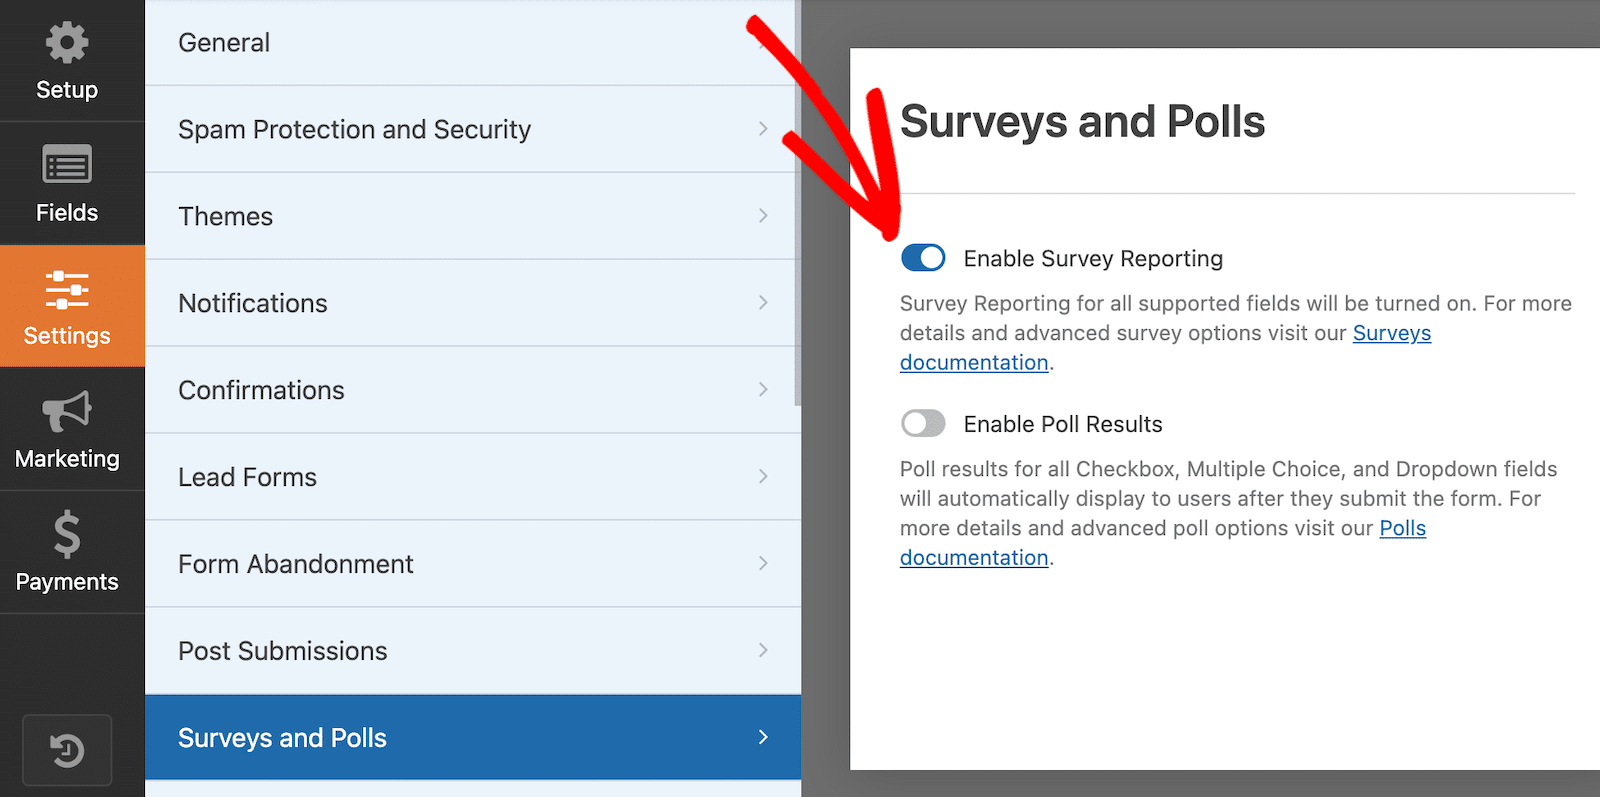
WPForms will collect data in survey results for the following form fields:
- Single Line text
- Paragraph text
- Dropdown
- Checkboxes
- Multiple Choice
- Rating
- Likert Scale
- Net Promoter Score
Using the Survey Form template (or other questionnaire templates) will enable this data collection option by default.
However, if you use another form template or create something from scratch and want to collect survey results, you’ll need to turn this option on manually.
Step 5: Configure Your Survey Form Settings
There are 4 types of settings to configure on your form:
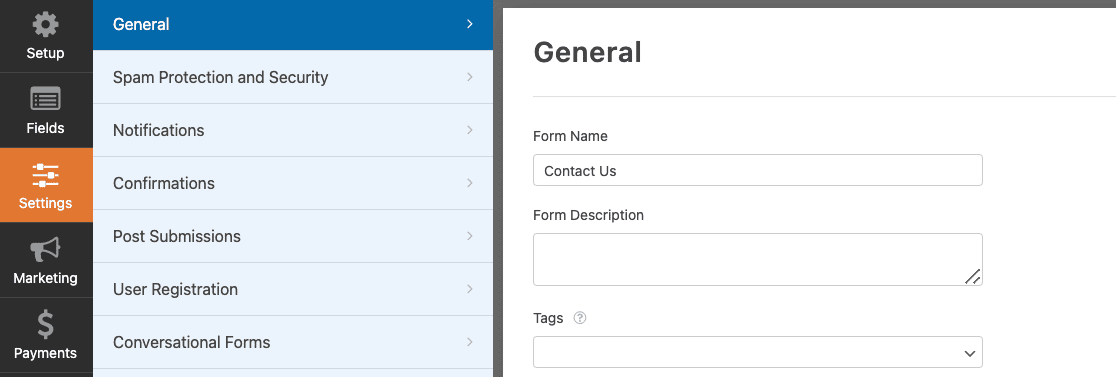
- General. Here you can change the form name, customize the submit button, add form tags, and disable storing entry information and user details, like IP addresses and user agents, to further comply with GDPR.
- Spam Protection and Security. These settings will help prevent bots from submitting your form. Check that the modern anti-spam feature is enabled, connect your form to the Akismet plugin, create custom anti-spam filters, and set up your preferred CAPTCHA.
- Notifications. To receive an email that someone has completed your WordPress survey, you’ll need to set up form notifications in WordPress. If you use smart tags, you can also send a notification to site visitors when they complete your survey, letting them know you received it.
- Confirmations. Once site visitors complete your form, you can show them a message right after, take site visitors to another page on your website, like a Thank You page with your social media links, or redirect visitors to another website altogether. For help with this step, check out our helpful tutorial on how to set up form confirmations.
If you’d like, you can also add images to your surveys.
Want to boost response rates even further? It helps to make your survey form anonymous.
Step 6: Add Survey Form to Your Website
Once you complete all the form customizations, click on the Save button in the top right corner of the page.
If you want to peek at how your form will look on the live page, preview your form by clicking on the Preview button.

Now let’s add your survey form to your site. WPForms lets you embed surveys in your website without requiring any code.
You can add the survey form to your pages, blog posts, and sidebar widgets. With WPForms, there are 3 ways to embed a form on a page:
- Add WPForms to a page using the Embed button and wizard
- Add WPForms to a page using the block editor.
- Add WPForms to a page using a shortcode.
Let’s add your form to a page using the Embed wizard. Start by clicking on the Embed button at the top of your page.

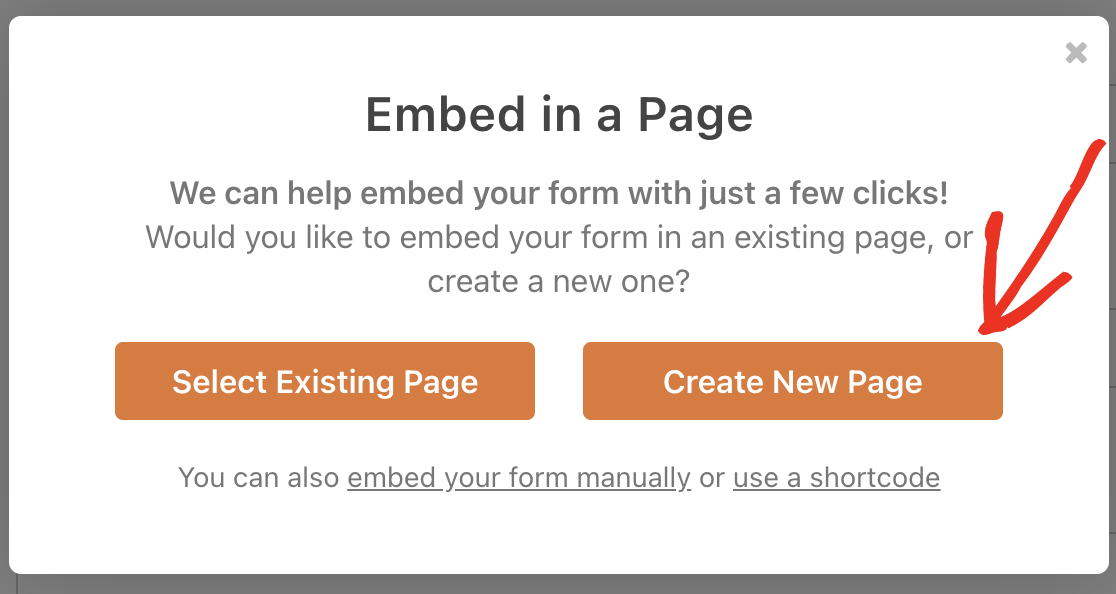
Clicking this will open a popup window with 2 options. If you have an existing page already set up and want to embed your form there, you’d click Select Existing Page and choose the correct page from a dropdown. For this tutorial, we’re going to create a new page.
Click Create New Page.
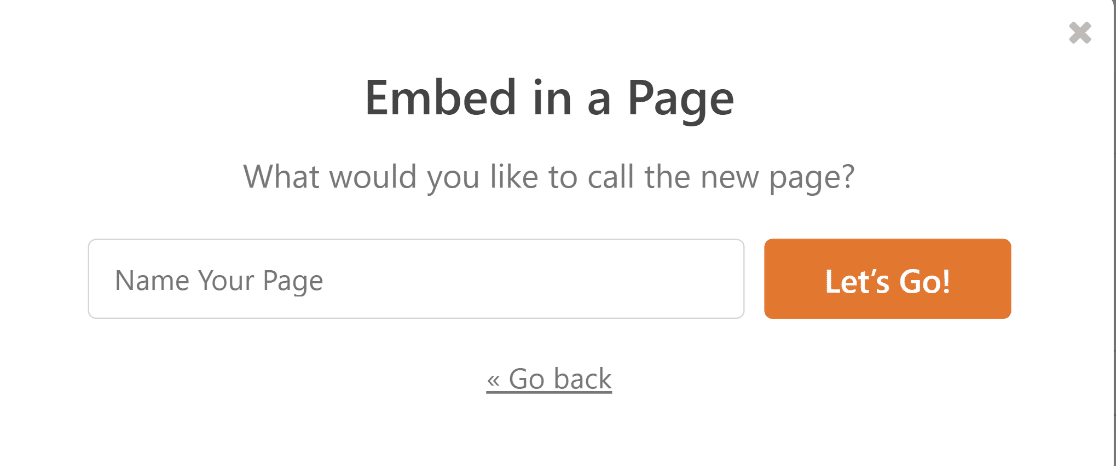
Add a name for your page and click the Let’s Go button to create it.
Now you’ll be redirected to your page. When you’re ready to post your survey, all you need to do is click the Publish button and publish your form.
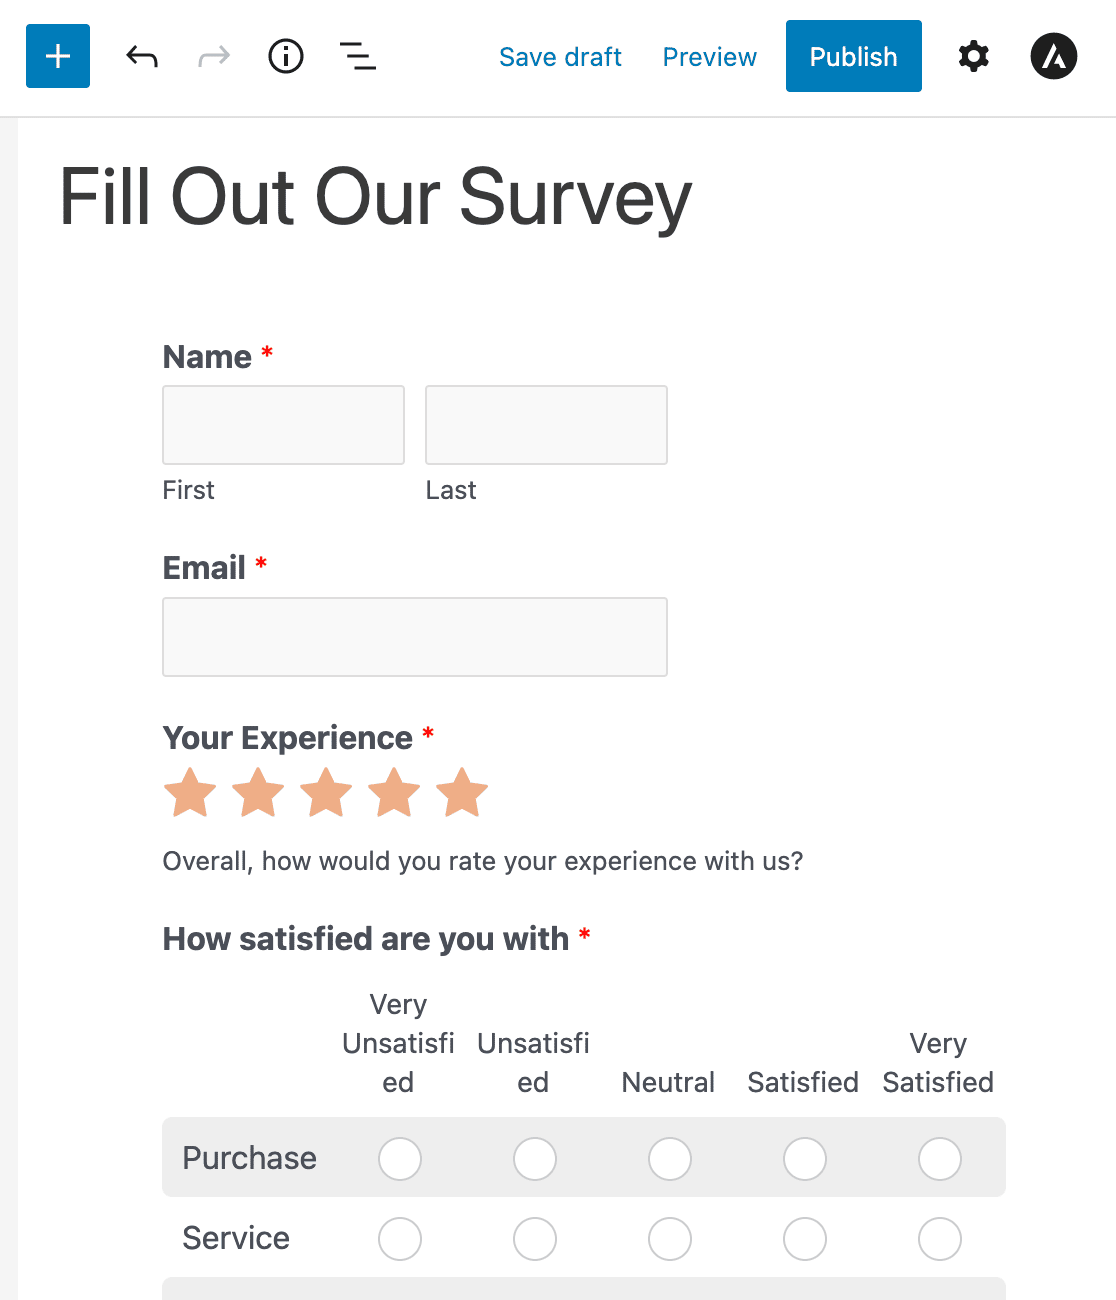
Fantastic job! Now you know how to create a survey online. Let’s check out how to view your survey results next.
Step 7: Generate Survey Reports
Once people start filling out your feedback forms, you can see any data that’s collected.
To generate a survey report, go to WPForms » All Forms and hover over your form to display the options. Then, click on Survey Results.

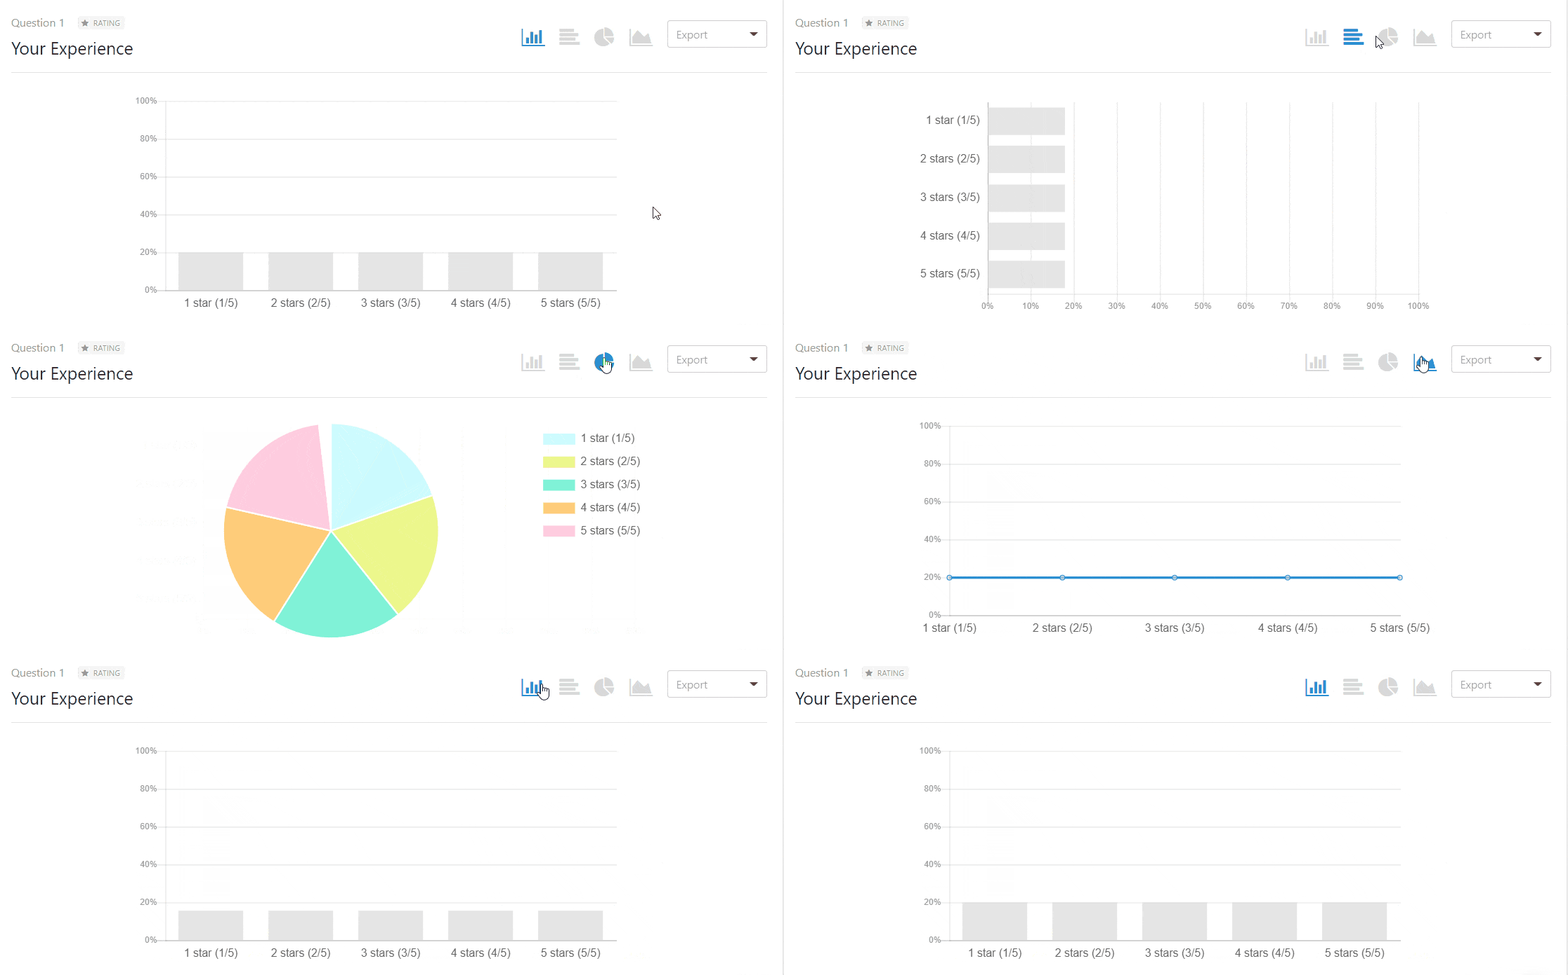
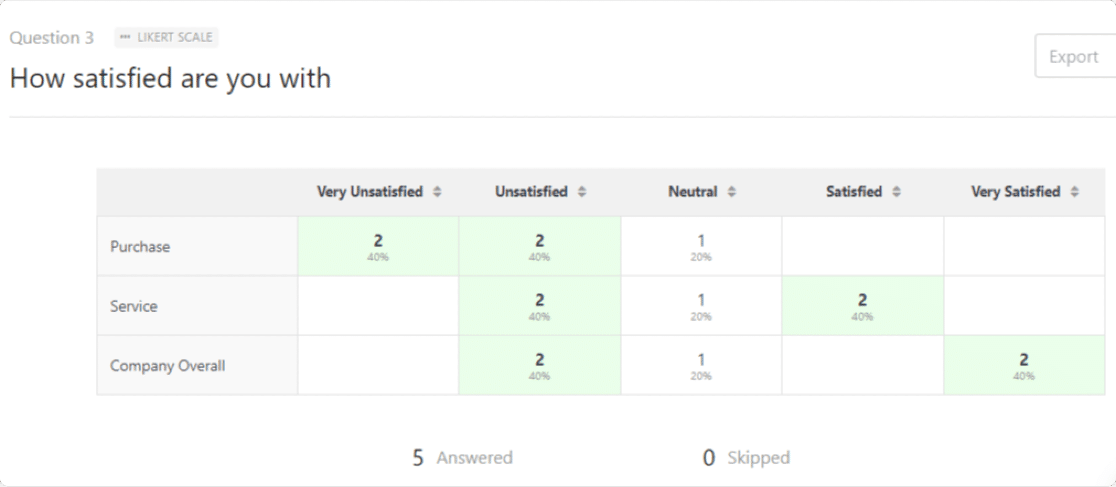
The Surveys and Polls addon creates beautiful survey reports and displays real-time insights with the best visualizations for each form field. For example, here’s how your rating survey results might look:
And, here’s a Likert Scale survey report:
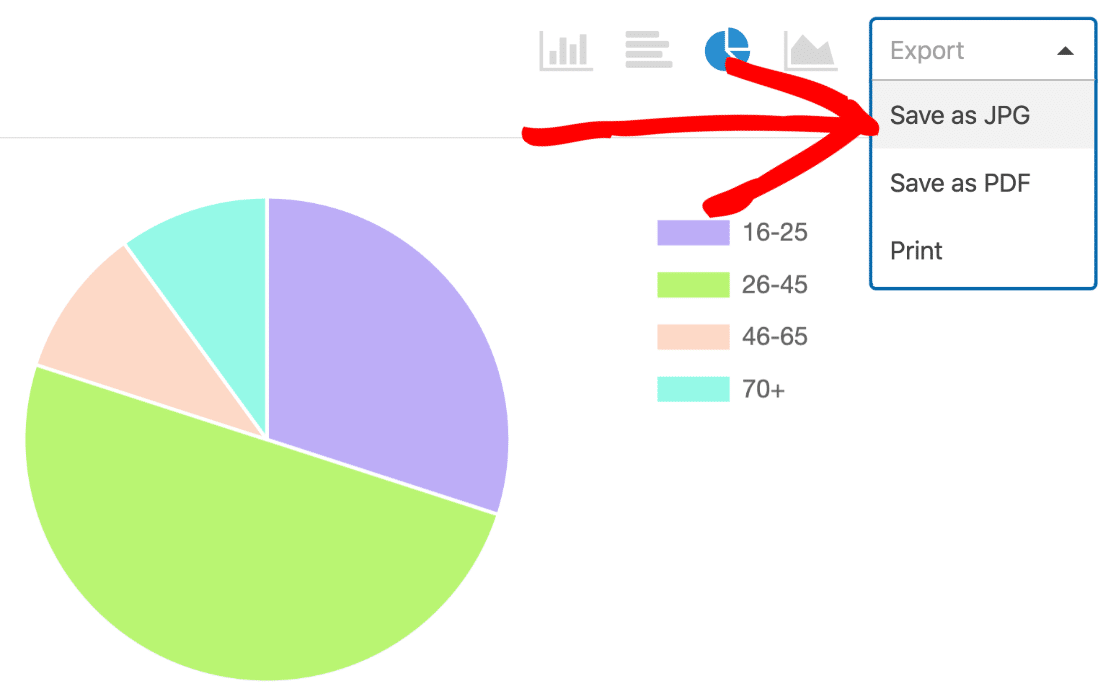
And also, you can export the entire survey report or individual charts as PDF or JPG with a single click.
If you want to write up the results for your website, we have some tips on exporting data and then writing a survey report that’ll make it easy.
And don’t forget, with WPForms’ awesome functionality, you can also connect your forms to your small business CRM software like Salesforce, Zoho, and more too.
FAQS: More Questions on Creating Simple Survey Forms
Do you want more hints and tips on creating a simple survey? Here are answers to some common questions about survey forms:
What is an online survey form?
An online survey form consists of a series of questions that you can ask your target audience through your website, email, or social media.
The best online survey form builders allow you to easily analyze survey results with visual reports.
They also store responses in a database, so you can go back at any time to view reports and create visual survey reports summarizing the responses of your customers.
Some of the most common types of surveys are:
- Employee engagement
- Event feedback
- Product surveys
Surveys play an important role across a wide range of industries whenever detailed data is needed regarding a certain demographic.
Healthcare and market research are two common fields where surveys are frequently used to understand consumer behaviors.
But they’re not limited to just these two areas by any means.
How can I create an effective survey form?
To create an effective survey form, be sure to lay out your fields in a way that encourages the user to complete the survey.
Check out our tips on form layout best practices to learn how to use different layouts to minimize fatigue and survey abandonment.
You should also ensure you get a balanced mix of respondents. We’ve got an article on the best demographic questions to ask that’ll help with that.
How do I create a survey on Facebook?
The easiest way to create a survey on Facebook is to publish a survey form on your website first, and then link to that form from Facebook.
We recommend this method because you get much more control over the data you collect. With WPForms, it’s also easy to export your survey data to Google Sheets.
This allows you to save the entries to a spreadsheet in real-time, and you can then share access to the spreadsheet so other people can see the survey responses.
Can I create a survey with a Google Form?
Yes, it’s possible to create a survey using Google Forms. However, we recommend using WPForms to collect responses, then exporting your form data to a Google Sheet automatically.
This allows you to combine the power of WPForms Pro and its surveys and polls tools with the convenience of Google Sheets for analysis.
What types of surveys can I create with WordPress?
With WPForms, you can create virtually any type of survey including customer satisfaction surveys, employee feedback forms, market research questionnaires, product feedback surveys, event evaluation forms, and Net Promoter Score (NPS) surveys.
The plugin supports all major question types including multiple choice, rating scales, Likert scales, open-ended questions, and conditional logic for dynamic surveys.
Can I analyze survey results within WordPress?
Yes, WPForms provides comprehensive survey analytics directly within your WordPress dashboard.
The Surveys & Polls addon generates visual reports with charts and graphs, shows response trends over time, and allows you to export data in multiple formats (PDF, JPG, CSV).
You can view individual responses or aggregate data, and the reporting updates in real-time as new responses come in.
Can I create anonymous surveys with WordPress?
Yes, WPForms allows you to create completely anonymous surveys by disabling user tracking in the form settings.
You can turn off IP address collection, user agent tracking, and other identifying information to ensure complete anonymity.
This is particularly useful for employee feedback surveys or sensitive topic research where respondents need to feel safe providing honest answers.
Next, Get More Survey Responses
Now that you know how easy online survey creation is and you’re ready to build your survey or questionnaire, check out how to increase your survey response rates so you can get the most out of your online survey and the WPForms survey tool.
Also, consider checking out our tutorial on creating a survey popup form for even higher conversions.
Ready to build your form? Get started today with the easiest WordPress form builder plugin. WPForms Pro includes lots of free templates and offers a 14-day money-back guarantee.
If this article helped you out, please follow us on Facebook and Twitter for more free WordPress tutorials and guides.


Hi guys, this is a great tool and I hope you spend more time on its development. The one feature I would like to see soonest is the ability to “Print Survey Report” by custom dates.
It’s possible with the CSV/XLSX export, but that’s just not the same.
PLEASE!!!
Hi Roger,
We’d be happy to add this feature. Would you mind reaching out to us with additional details on the Survey Report that you are expecting? If you have a WPForms license, you have access to our email support, so please submit a support ticket. That way we can discuss more details and investigate this further.
Thanks 🙂
Hi~How can I change the color of the bar chart on a survey results? Light gray will not be visible when projected.
Thank you in advanced.
Have a great day!!!
Hi Pamela, Looks like you want to customize the survey results colors. This feature isn’t currently available by default.
If you have a WPForms license, you can get in touch with our Trusted Advisors in the support team for personalized advice. Please submit a support ticket and they will get back to you as soon as possible (usually within 1 working day).
If you’re using our free version, please head to the WPForms Lite WordPress.org support forum and open a new thread.
Thank you for your kindly reply. I’ll follow up with support team. Many thanks!