
AI Summary
Do you need an easy and organized way to collect information about your employees? Creating an employee information form in WordPress gives you the flexibility to gather the information about people you need, store that information in one convenient location, and access it whenever you need to.
In this article, we’ll show you the easy way to create an employee information form in WordPress using WPForms.
What Is an Employee Information Form?
An employee information form is a form people who work for you fill out that includes key data about themselves. It documents basic personal information, emergency contact information, and data related to their position within the company.
Here are some of the most important things to ask new employees when they fill out your employee information form:
- Full name
- Contact information including email and phone
- Address
- Date of birth
- Job title
- Department and supervisor
- Office contact information
- Start date and salary
- Emergency contact information
It’s important that you collect information from people once they start working for you. It’s also a good idea to encourage employees to update their information regularly so you always have the most recent information.
Now let’s see how to create an employee information form in WordPress.
How to Create an Employee Information Form in WordPress
- Step 1: Create a New Form
- Step 2: Configure Your Employee Information Form Settings
- Step 3: Configure Your Employee Information Form Notifications
- Step 4: Configure Your Employee Information Form Confirmations
- Step 5: Configure Employee Information Form Access Controls
- Step 6: Add Your Employee Information Form to Your Website
Step 1: Create a New Form
Using WPForms is the easiest way to create a new employee information form in WordPress. WPForms comes with 2,100+ WordPress form templates for every niche and industry, including an employee information form template.
The first thing you’ll need to do is install and activate the WPForms plugin. For more details, see this step-by-step guide on how to install a plugin in WordPress.
Next, you’ll need to create a new form.
To do this, go to WPForms » Add New, and name your form. Then, scroll down to the section labeled Select a Template and type “employee information form” into the search bar.
There are lots of options to choose from here. Select the form that works best for you, and keep in mind that you can customize any template to meet your needs.
For our example, we’ll use the Employee Information Form template.

When the pre-built employee information form template loads, most of the work is already done for you. In fact, you’ll find the following fields in the form:
- Section Divider
- Name
- Phone
- Address
- Date / Time
- Single Line Text
- Single Item

If you want to see the employee information form template in action, head over and check out our sample employee information form demo.
You can add additional fields to your form by dragging them from the left-hand panel to the right-hand panel.
Then, click on the field to make any changes. You can also click on a form field and drag it to rearrange the order on your employee information form.
For example, if you want people to upload an image of themselves to be used for their ID badge, add a File Upload form field to your employee information form template.

This way, people can choose a photo that they like. They can do this either by uploading the file or simply dragging and dropping it into the dropzone. Plus, this saves you the time and hassle of having to hire a photographer to take pictures of every new employee you hire.
Make sure to toggle on the Required setting so new employees cannot submit their employee information form without uploading a picture.

When your employee information form looks the way you want it to, click Save.
Step 2: Configure Your Employee Information Form Settings
To start, go to Settings » General.

Here you can configure the following:
- Form Name — Change the name of your form here if you’d like.
- Form Description — Give your form a description.
- Tags — Add tags to organize your WordPress forms.
- Submit Button Text — Customize the copy on the submit button.
- Submit Button Processing Text — Chang the text that shows while your form is submitting.
If you expand the Advanced section, you can also:
- Add CSS Classes — Use custom CSS to style your form or submit button.
- Enable Prefill by URL — Automatically fill in some fields using a custom URL.
- Enable AJAX form submission — Enable AJAX settings with no page reload.
- Disable storing entry information in WordPress — You can disable the storing of entry information and user details, such as IP addresses and user agents, in an effort to comply with GDPR requirements. Check out our step-by-step instructions on how to add a GDPR agreement field to your simple contact form.
Once you’re done, move down to the Spam Protection and Security settings.
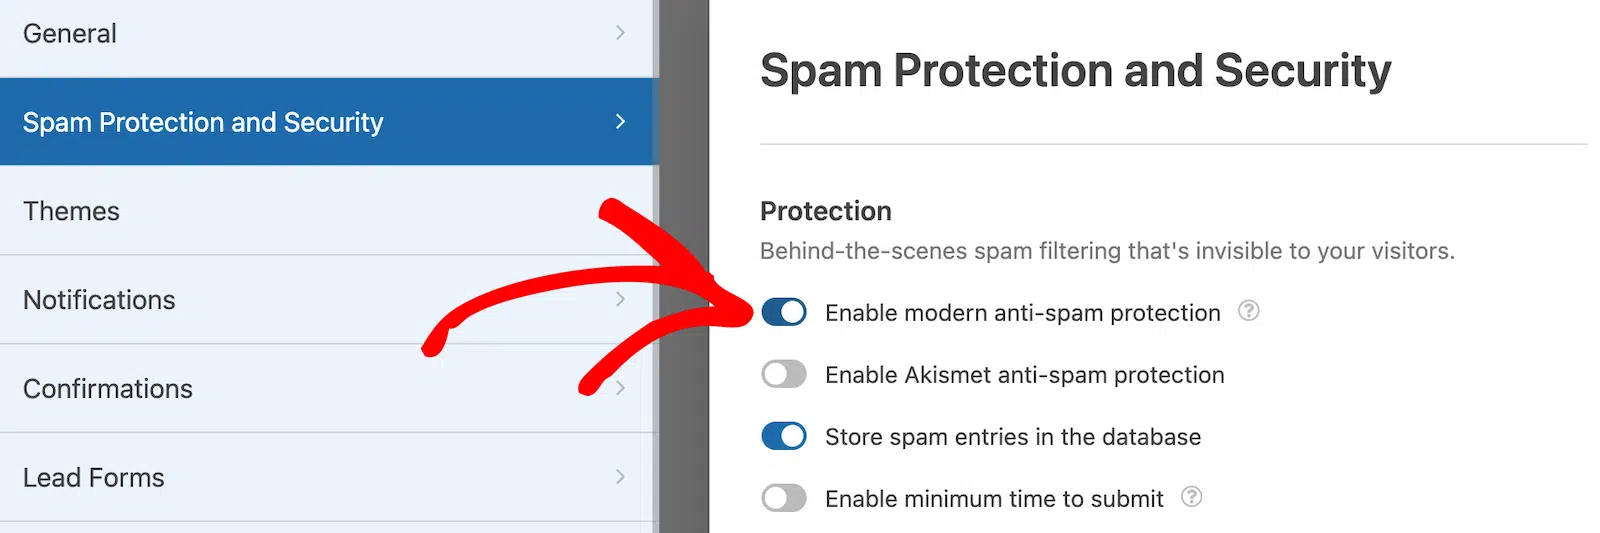
Here you can:
- Enable modern anti-spam protection — Stop contact form spam with WPForms’ built-in anti-spam protection. The anti-spam feature is automatically enabled on all new forms, though you can turn it off with the flick of a toggle switch if you want to. It runs seamlessly in the background to protect forms from spam, and can also be paired with other measures such as CAPTCHAs for extra protection.
- Enable Akismet anti-spam protection — If you use the Akismet anti-spam plugin, you can connect it to your form.
- Enable country filter — Block submissions from certain countries.
- Enable keyword filter — Prevent entries that include specified words or phrases.
You can also set up your preferred CAPTCHA. Check out our complete guide to form spam prevention for more details.
Click Save.
Step 3: Configure Your Employee Information Form Notifications
Notifications are a great way to send an email whenever someone submits an employee information form on your website.

In fact, unless you disable this feature, whenever someone submits a form on your site, you’ll get a notification about it.
If you use Smart Tags, you can also send a notification to your new employee when they fill out your form, letting them know you received it and will be in contact shortly if needed. This assures people their entry has gone through properly.
For help with this step, check out our documentation on how to set up form notifications in WordPress.
You can send more than one notification when a new employee information form is submitted on your site. For instance, you can send a notification to yourself, your employee, and your HR department or other administrator.
For help doing this, check out our step-by-step tutorial on how to send multiple form notifications in WordPress.
Lastly, if you want to keep branding across your emails consistent, you can check out this guide on adding a custom header to your email template.

Step 4: Configure Your Employee Information Form Confirmations
Form confirmations are messages that display to employees once they submit their employee information form on your website. They let people know that their information has been collected and offer you the chance to let them know what the next steps are.
WPForms has three confirmation types:
- Message. This is the default confirmation type in WPForms. When someone submits an employee information form, a simple message confirmation will appear letting them know their form was processed.
- Show Page. This confirmation type will take site visitors to a specific web page on your site thanking them for their form entry. For help doing this, check out our tutorial on redirecting people to a thank you page.
- Go to URL (Redirect). This option is used when you want to send site visitors to a different website.
Let’s see how to set up a simple form confirmation in WPForms so you can customize the message site visitors will see when they fill out an employee information form on your website.
To start, click on the Confirmations tab under Settings.
Next, select the type of confirmation type you’d like to create. For this example, we’ll select Message.

Then, customize the confirmation message to your liking and click Save.
If you want to display different confirmations to site visitors based on their behavior, be sure to read up on how to create conditional form confirmations.
Step 5: Configure Employee Information Form Access Controls
WPForms comes with a Form Locker addon that gives website owners a way to configure form permissions and access controls.
To access these settings, go to Settings » Form Locker.

Here, you’ll see 4 different settings:
- Form Verification: Enable password protection so only those with the password, such as your employees, can fill out your form.
- Form Scheduling: Schedule start and end dates for your employee information form.
- Form Restrictions: Allow only those who have logged into your website to submit an employee information form.
- Entry Limits & Restrictions: Limit the number of form entries you’ll accept.
Of course, you won’t necessarily use all of these settings. However, if you’re looking to prevent spam form submissions, requiring employees to have a password to fill out a form or restricting form submissions to those who are logged in help.
Step 6: Add Your Employee Information Form to Your Website
After you’ve created an employee information form, you need to add it to your WordPress website.
WPForms allows you to add your forms to many locations on your website, including your blog posts, pages, and even sidebar widgets.
Let’s take a look at the most common post or page embed option.
First, create a new page or open an existing one in the editor. Then add a new block and select WPForms.

When the WPForms block appears, select your employee information form from the dropdown.

Then, Publish or Update your post or page so your form will appear on your website.

Now employees can fill out and submit your form to send you their information.
Next, Improve Your Remote Work Setup
And there you have it! You now know how to create an employee information form in WordPress.
If you’re looking to hire remote employees to work for your company, check out this roundup of the best remote working tools to help your business succeed.
Ready to build your form? Get started today with the easiest WordPress form builder plugin. WPForms Pro includes lots of free templates and offers a 14-day money-back guarantee.
If this article helped you out, please follow us on Facebook and Twitter for more free WordPress tutorials and guides.

