AI Summary
Do you want to use WPForms calculations to reflect the total amount of an order based on a user’s product selections?
When you manage an online store, you may want the customer to be able to select different products and instantly view the total price of their order.
In this article, we’ll show you how to add product options that change the calculated price for a product with WPForms.
Calculate Total Price with WPForms Now! :)w
How to Change the Total Price Calculations With WPForms
Calculating the total price with WPForms is super easy. All you need to do is follow these simple steps below:
Step 1: Install and Activate WPForms
WPForms is the best form builder plugin that lets you build any form, including a simple contact form and newsletter signup form. It also offers 2,000+ form templates that can be used to create order forms with customizable total fields.
Since we’ll be using the Calculations Addon for this guide, you must subscribe to WPForms Pro, which also provides you access to premium integrations, addons, and a ton of useful features like conditional logic, form reports, etc.

After purchasing the Pro license, install and activate the WPForms plugin on your site. To get started, read how to install a WordPress plugin.
Step 2: Get the Calculations Addon
Installing the Calculations addon is very simple on your WordPress website. From your WordPress dashboard, navigate to WPForms » Addons.
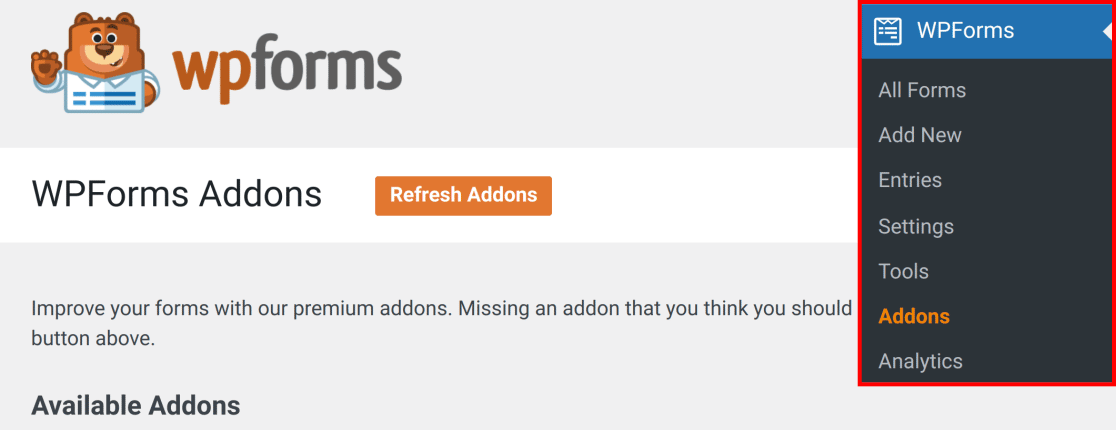
In the Seach Addons field, type in Calculations. Next, click on the Install Addon and then the Activate button.
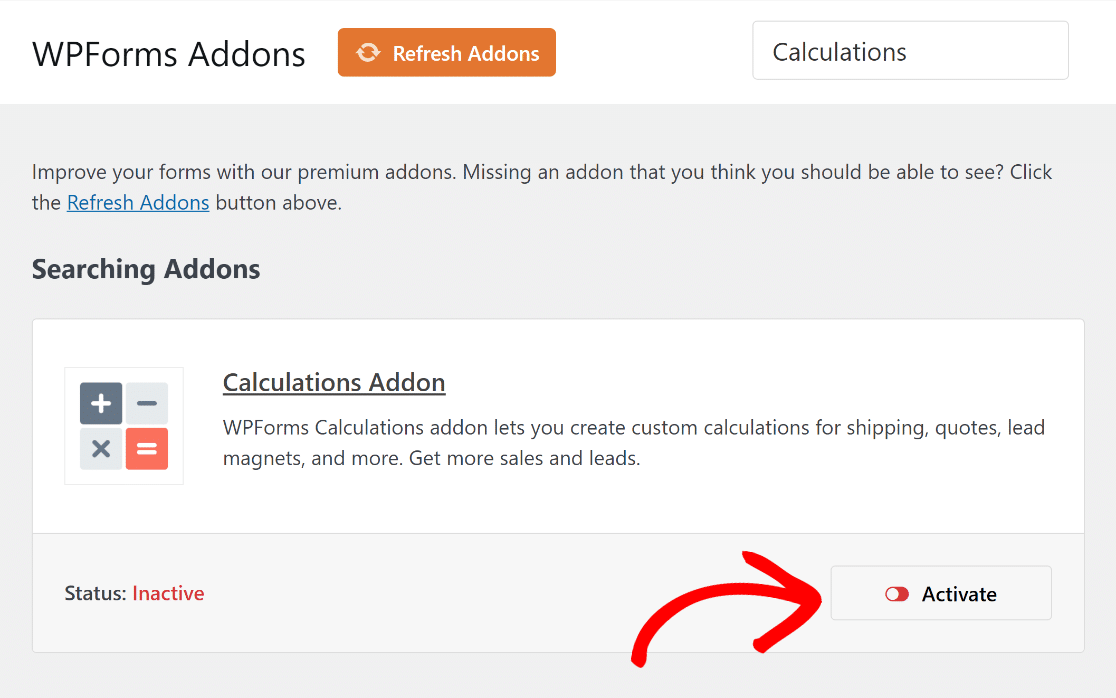
Great job! Next, connect WPForms with Stripe, so that when you create your order form, you’ll also be ready to receive payments.
Step 3: Select an Order Form Template
It’s now time to build your order form. From your WordPress dashboard, select WPForms, and then click the Add New button.

This will take you to the next screen. Here, you will have to give your form a name, and then choose a template.
WPForms comes with 2,000+ WordPress form templates, including order/billing forms. Use the search box to find it, and then click the Use Template button.
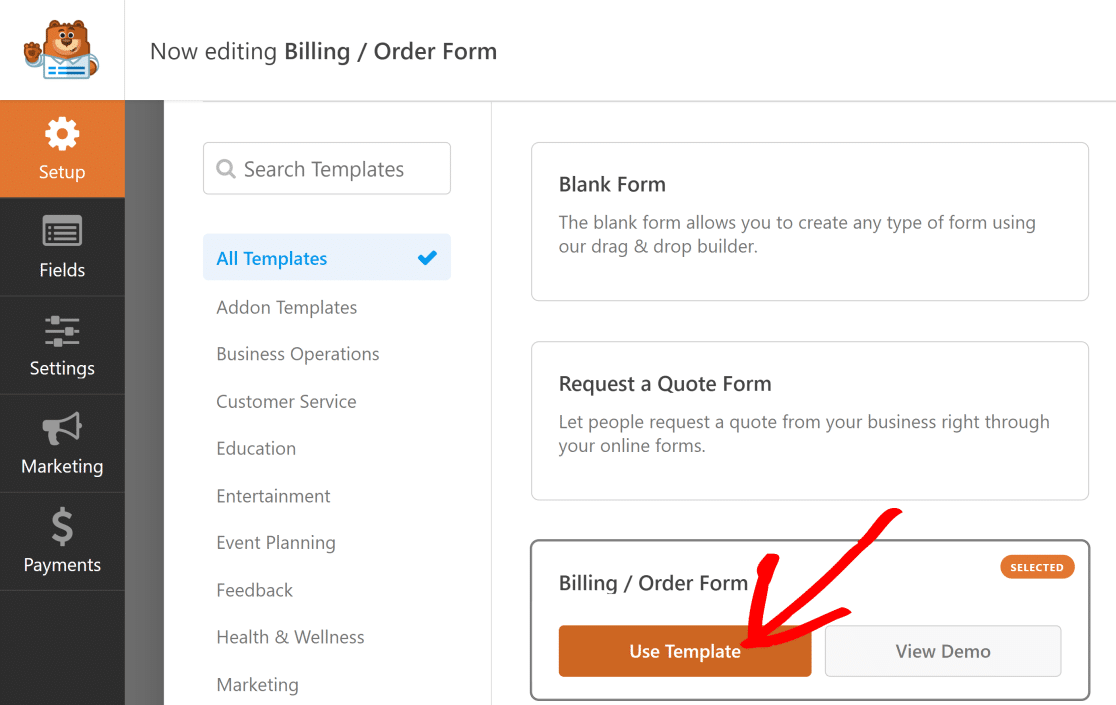
Next, we’ll edit the template to include different product option fields and include calculations to modify the Total Price field.
Step 4: Customize Form and Add Product Options
By default, the billing/order form template has a Name, a Multiple Items field, and a Total field that works as a WordPress price calculator for an order.
For this example, we took the default Multiple Items field and customized it to add some shirt types.
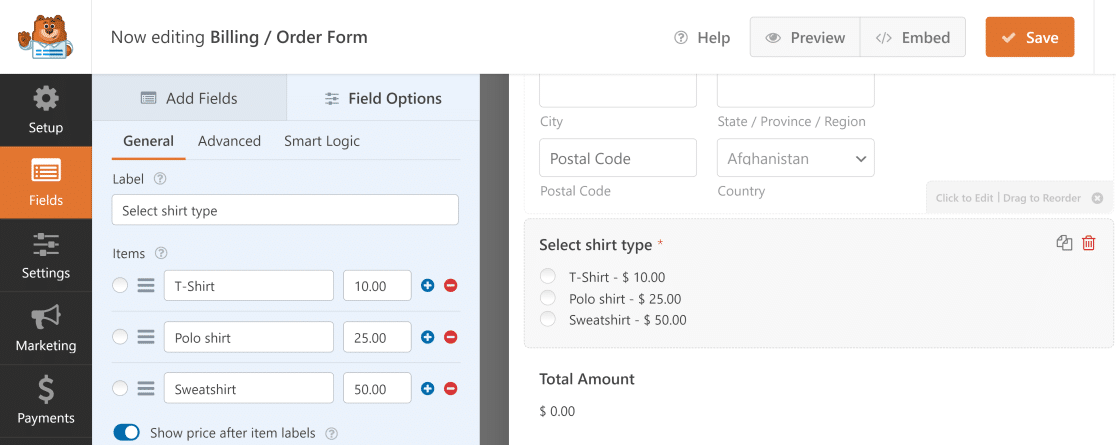
When you click the Multiple Items field, you can change its options as we did here. Here are some of the really useful options:
- Label: Use this field to specify what the options underneath are about.
- Items: These are the multiple choices and their price values.
- Show price after item labels: Check this option if you’d like to show the individual price for each product.
Now, when a user selects a shirt type from this form, the Total Amount field calculation automatically changes depending on the price of the selected item.

You might also want to give your users the option to choose multiple product options simultaneously.
For instance, if a user wants to order a T-shirt and sweatshirt, you can let them place an order for both items using the same form.
For this, you can use the Checkbox Items field under the Payment Fields menu and add your product options.
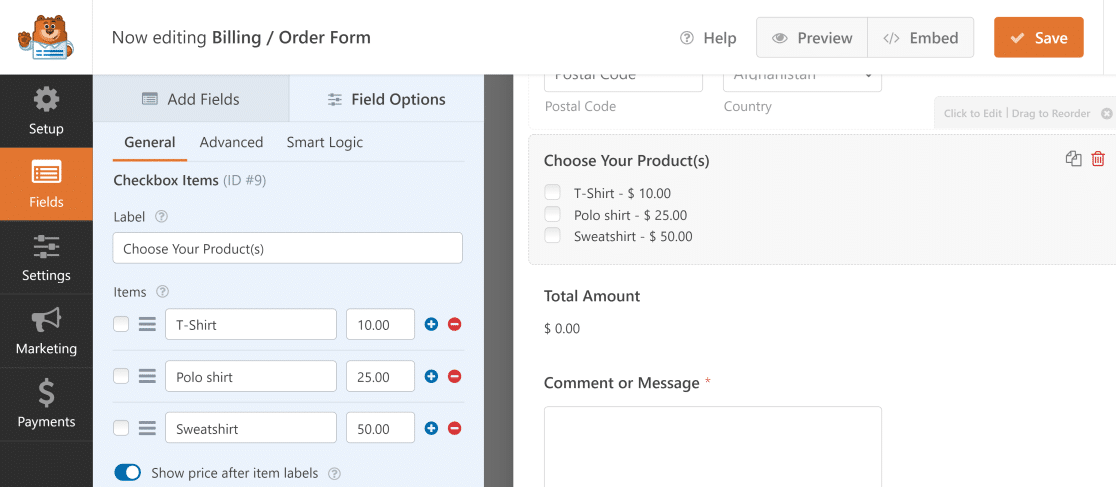
Now, if a user selects multiple products, the Total Amount field will automatically display the accumulated amount of the selected items.

This is a really convenient way of letting your customers buy different products and get the total price for their order from the same form.
Step 5: Use Calculations for Advanced Totals
The customization options of WPForms can make things even more interesting by allowing you to change total price calculations.
For instance, you can insert a quantity field or add a standard tax deduction. We’ve provided instructions on how to do both below:
Adding a Quantity Field
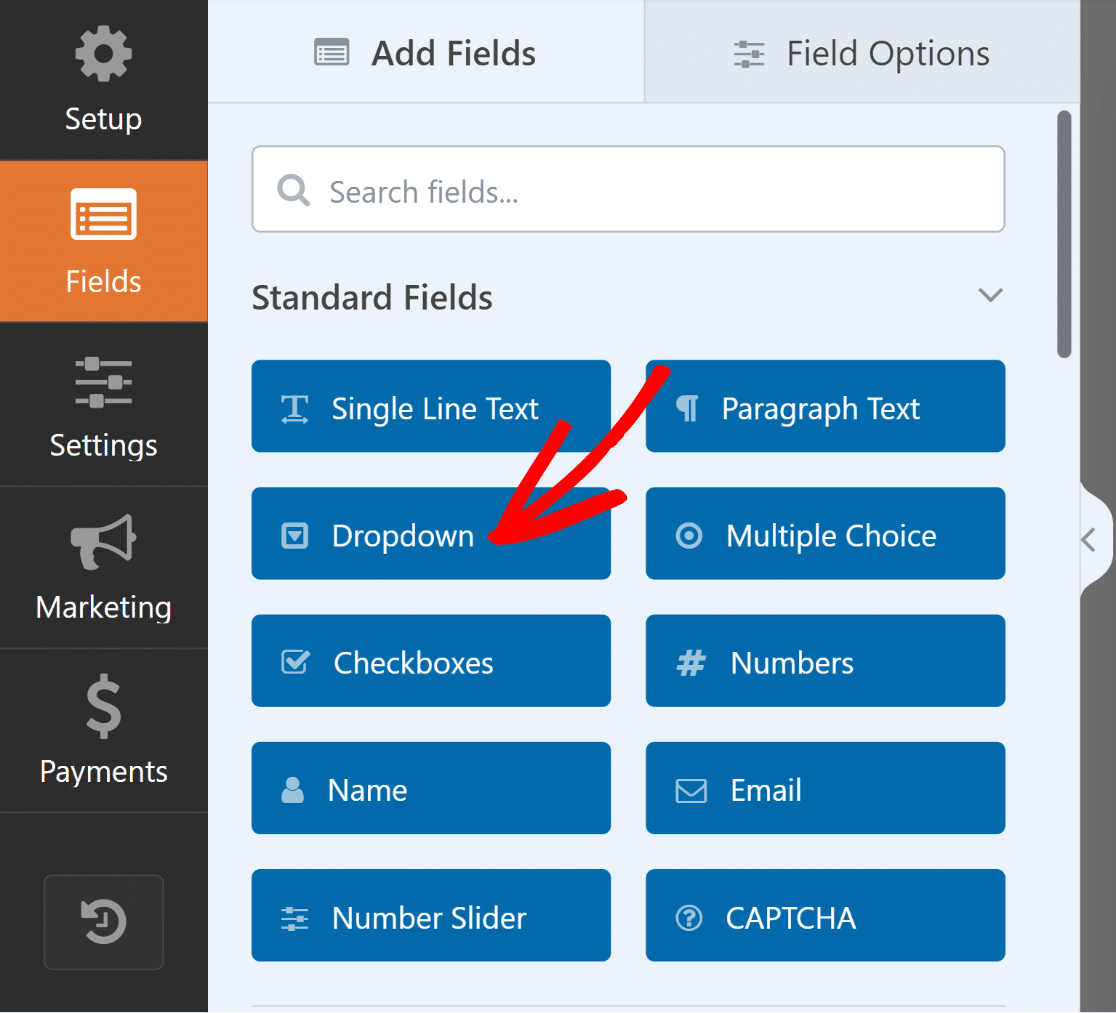
To create a quantity field in your form, drag and drop a Dropdown field to the form preview on the right.
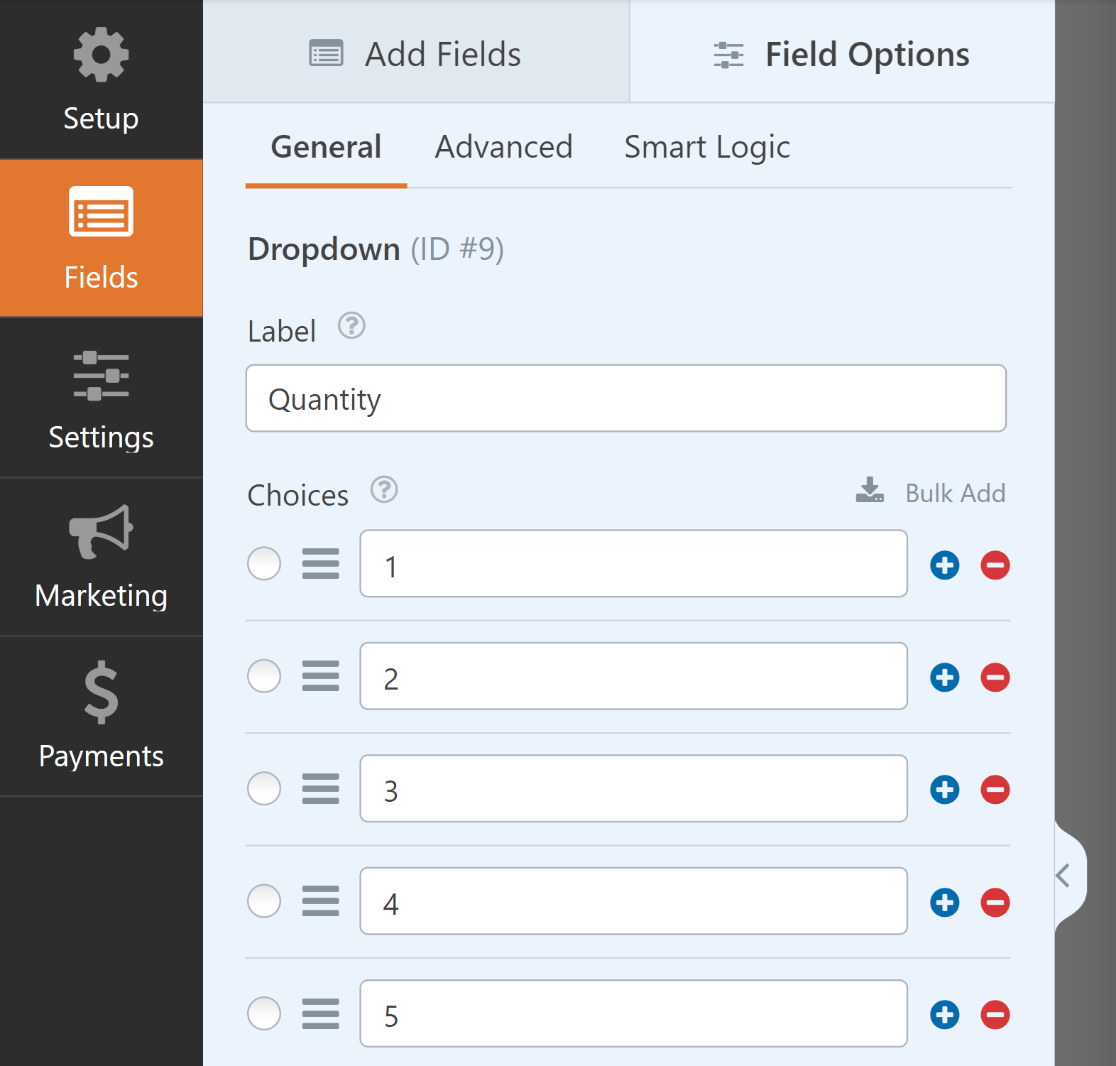
Next, open up its Field Options, change the Label to “Quantity,” insert available quantities in Choices, and mark the field as Required.
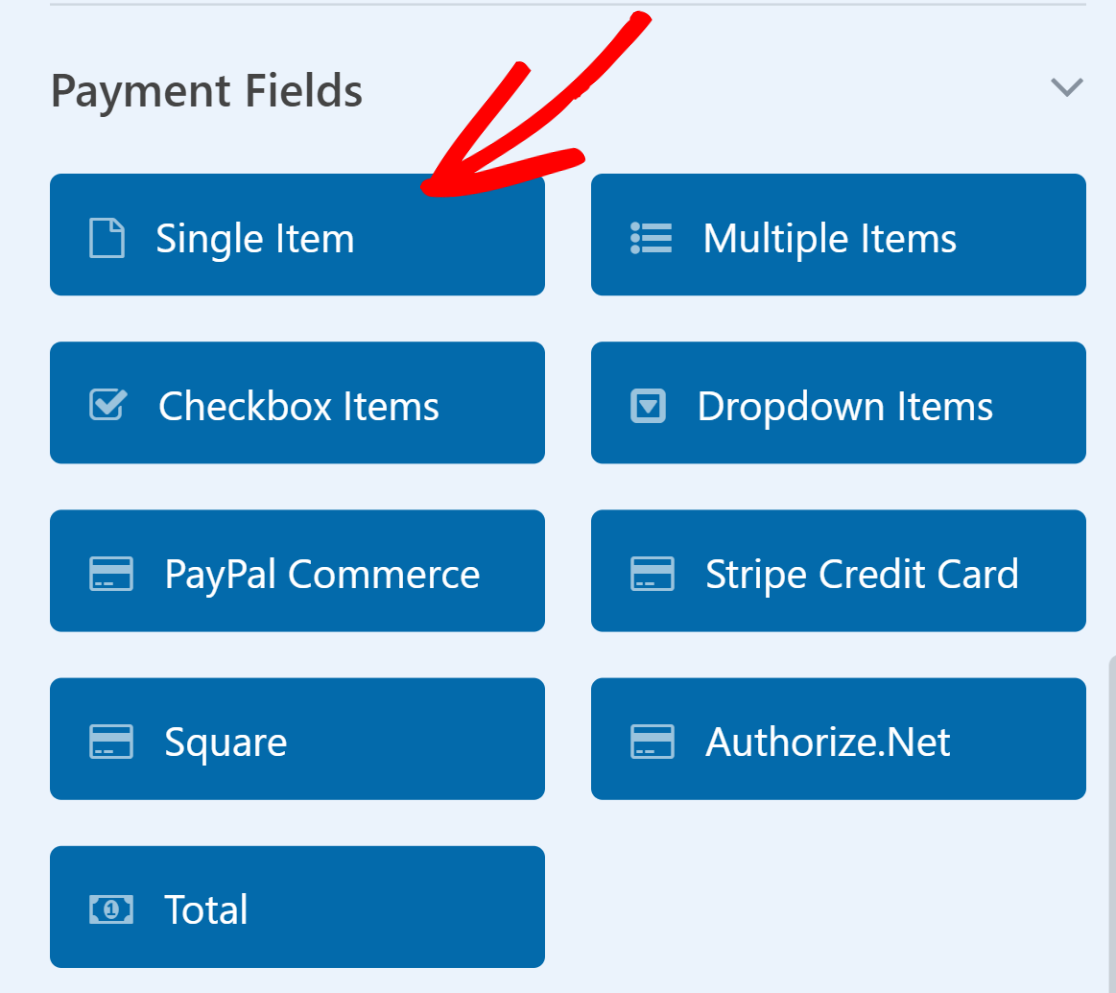
After that, select the Single Item field and add it to your form via drag-and-drop or by simply clicking on it.
Next, change the Single Item field Label to something like “Total Price,” and then navigate to the Advanced tab and toggle on Enable Calculations.
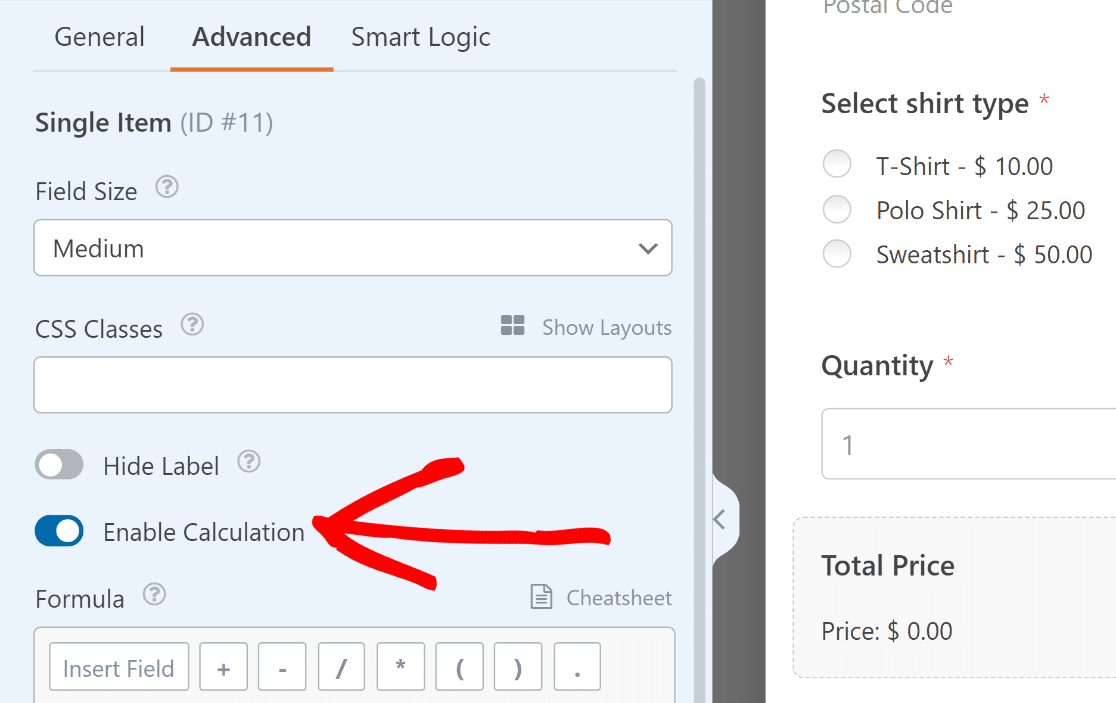
Once the Formula box opens up, you can connect the Multiple Items field with the quantity Dropdown field with a simple multiplication formula.
$FX * $FX_amount
- $FX: Value of the field with ID #X (#1).
- $FX_amount: The amount value of the payment field with ID #X.
Open the Multiple Items and field and note down the Field ID, located right underneath the General tab in their Field Options.
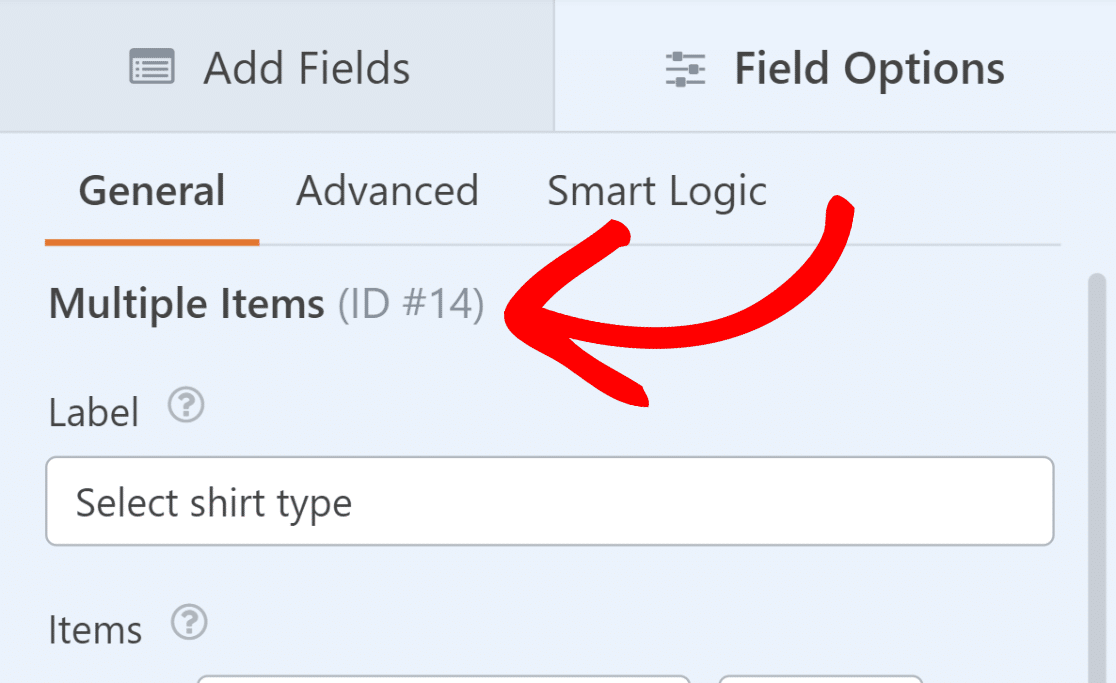
After that, do the same for the Dropdown field that we’ve labeled as “Quantity”. This is crucial for the next step.
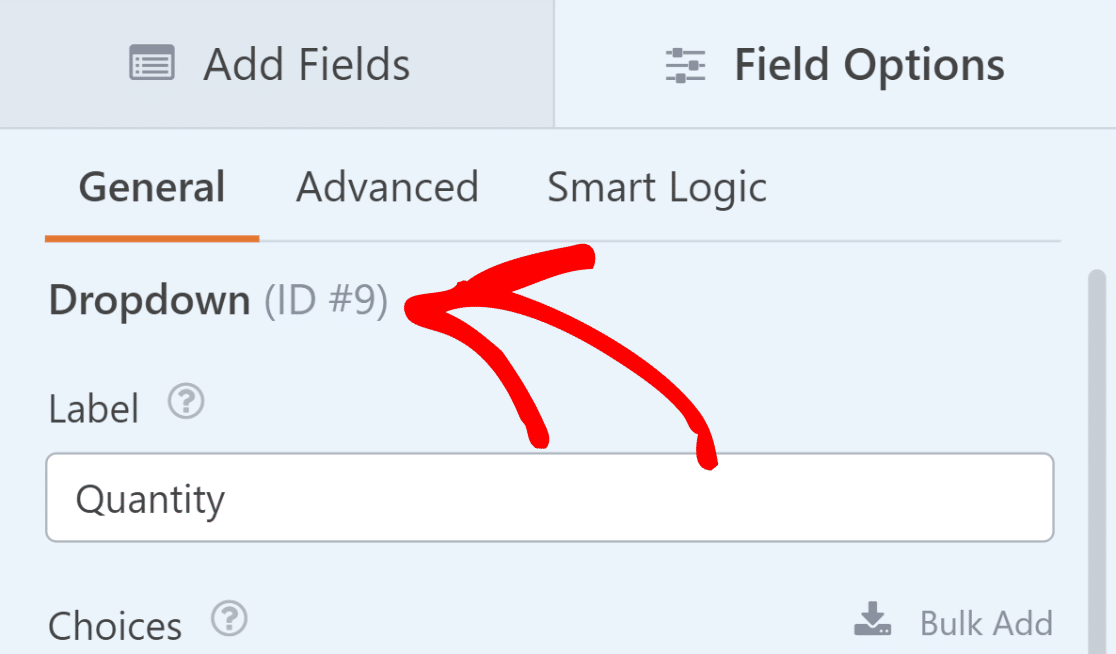
Now, we will combine the IDs and add them to our simple (product price times quantity) formula. $FX * $FX_amount will therefore become $F9 * $F14_amount
All you have to do now is enter the $F9 * $F14_amount calculation into the Formula box of the Single Item “Total Price” field and click Validate Formula.
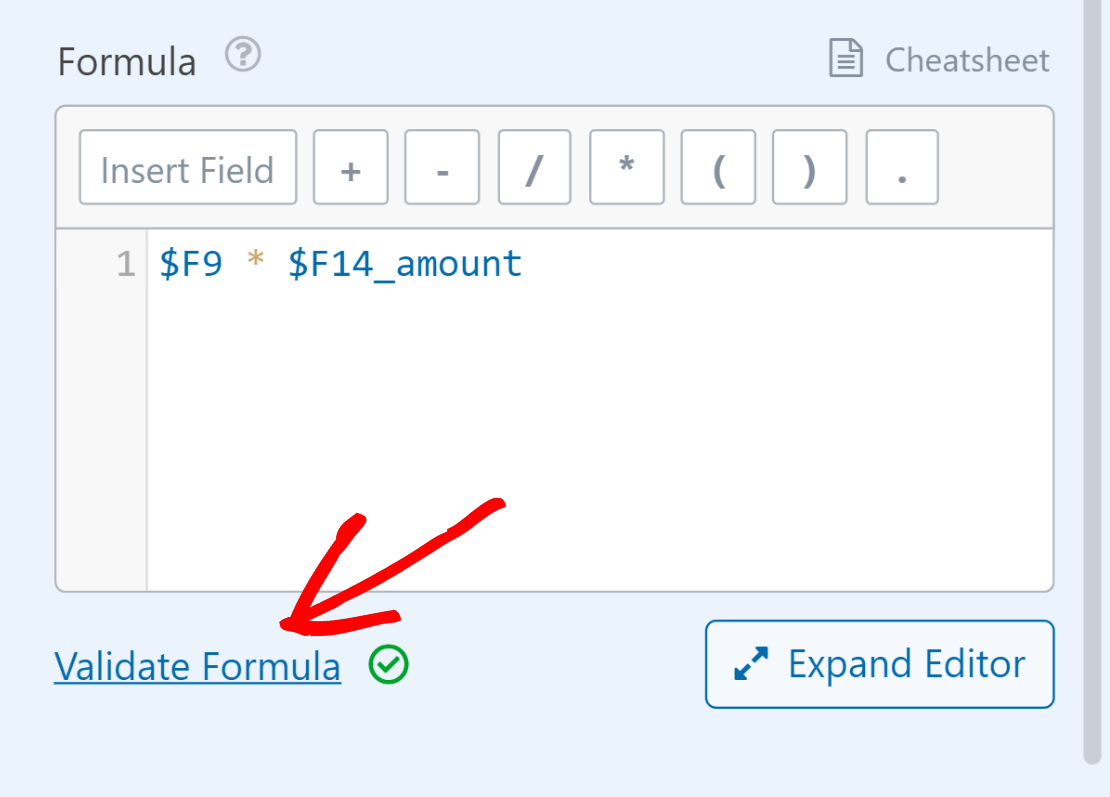
Now, whenever the user selects a product and adds a quantity, it will automatically calculate the Total Price.

Adding a Standard Tax Deduction
If you want to add taxes to the equation, you’ll typically calculate it based on the subtotal (product price multiplied by quantity).
As you’ve found out in the previous heading, the formula for the subtotal (product price times quantity) for our use case is:
$F9 * $F14_amount
Let’s assume the tax is 10% of the subtotal. Therefore, the formula for adding a standard tax would be:
0.10 * ($F9 * $F14_amount)
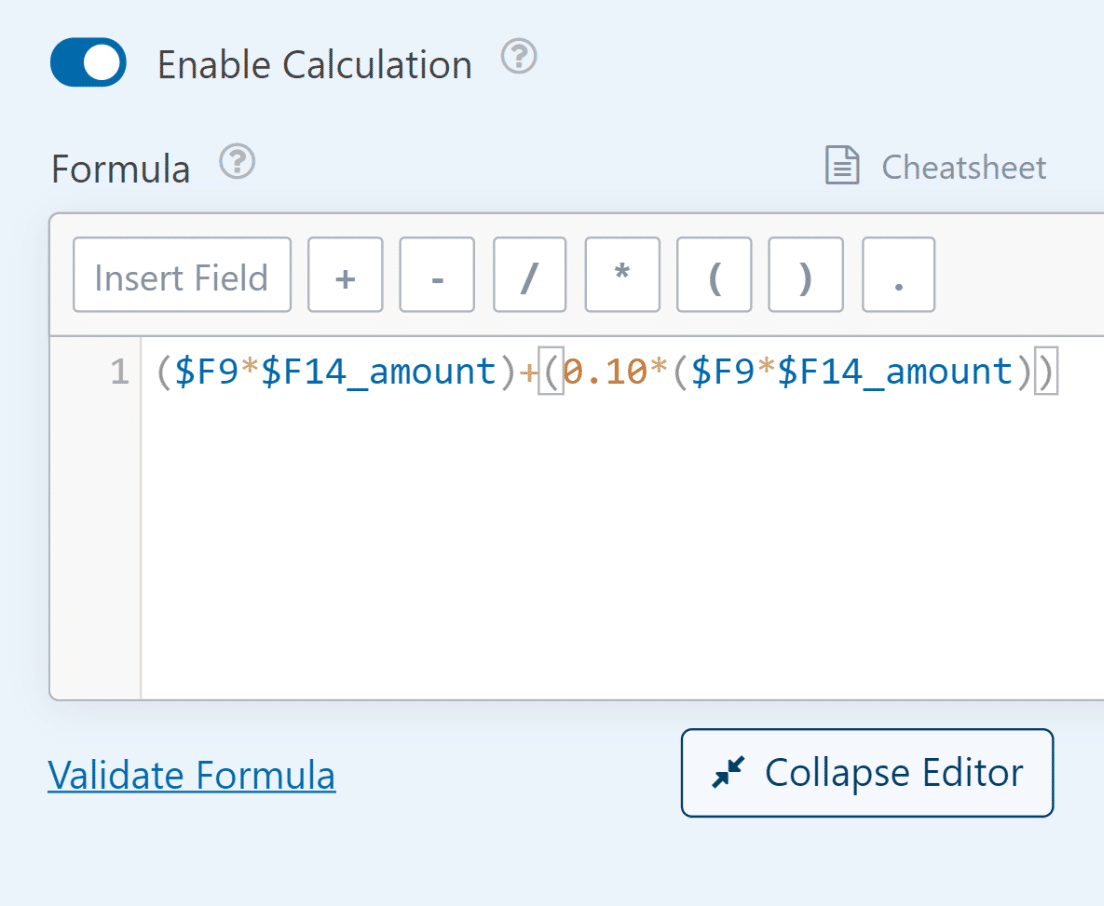
To get the grand total, including the tax, you’d sum up the subtotal and the tax, which will look like this:
($F9 * $F14_amount) + (0.10 * ($F9 * $F14_amount))
You can add this wherever you display the final total. For instance, we’ll apply the formula to the Single Item field we’ve named “Total Price + Tax.”
Step 6: Publish Your Order Form
One of the best things about WPForms is that you can embed your form directly onto a new page without touching a single line of code.
Once you’ve customized your order form to include different product options and automatic amount calculation, press the Save button.
Now, click on the Embed button next to Save. You’ll now see a dialog box with options for embedding the form on an existing page or creating a new one.

After that, you’ll be prompted to give a name to your page. When you’re done, click on Let’s Go.

Now, WPForms will take you to your WordPress editor with your form already embedded within the new page.
Click on Publish to take your order form with the WPForms calculations live. Your form is now embedded on a new page and ready for use on the frontend!
For more details on customizing your order form, its notifications, confirmations, and more, see this tutorial on how to create an order form.
More Questions about WPForms Calculations
Calculation forms are a popular topic of interest among our readers. Here are some quick answers to a few of the most commonly asked questions:
Can WordPress do calculations?
Wouldn’t it be super convenient if your form could calculate the total price based on user selections automatically?
While WordPress itself cannot perform calculations on forms, you can use a plugin like WPForms Pro. You can customize the way you sell your products to optimize your eCommerce store.
For instance, say you’re selling printed t-shirts and want the user to be able to select different types of shirts, each with a different price tag.
You can do that easily by using payment fields with Multiple Items or Checkbox Items along with the Total Amount field.
How to do calculations in WordPress?
In WordPress, the easiest way to perform calculations is by using a plugin.
WPForms, a leading form plugin, offers a Calculations Addon that lets you do the math directly within your forms.
Just design your form, set up the calculations, and you’re good to go!
How do you use calculated fields form?
With WPForms and its Calculations Addon, using calculated fields is straightforward.
After creating your form, you can select fields to be used in calculations and add your desired formulas, and WPForms handles the rest automatically.
For example, you can create a calculator that calculates the days between two dates.
How do I add math formulas in WordPress?
To add math formulas in WordPress, WPForms is a great choice. With its Calculations Addon, you can effortlessly input any math formula you need.
Whether you’re creating a custom online calculator or any other calculation-based feature, WPForms has got your back.
How do I export a calculated field form?
Within WPForms, you can easily export all fields, including those with calculations.
Just go to WPForms » Tools and click on the Export tab. From there, select a form and check the fields within the Export Entries menu.
How do I create a cost calculator in WordPress?
Creating a cost calculator in WordPress is super easy with WPForms.
With its Calculations Addon, you can design your cost calculator form, set up the necessary calculations, and present users with a dynamically generated cost based on their inputs.
The best part of all: if you don’t have want to use the form as a source for lead generation, you can customize it to act like a standalone calculator.
You can remove the submit button easily so that there’s no need to click on any button to calculate the cost.
Next, Improve Your Digital Product Sales
If you enjoyed this article, you might also want to read how to sell digital products on your site to get some extra passive income.
Also, we created a guide for creating a form with a repeater field. Check it out for some great tips on streamlining data collection.
Ready to build your form? Get started today with the easiest WordPress form builder plugin. WPForms Pro includes lots of free templates and offers a 14-day money-back guarantee.
If this article helped you out, please follow us on Facebook and Twitter for more free WordPress tutorials and guides.




How do I add a formula that cculates a % discount and make this the total to pay, leaving a line for the balance. Which will be paid later.
Hi Chris!
To set up a form to calculate discounts and split payments, first, create your standard order form with the total price calculation. Then add two Single Item fields – one for the discount calculation and another for the remaining balance.
For a 20% discount, your formulas would look like this:
$F1 * 0.20(where$F1is the ID of your total price field)$F1 - $F2(where$F2is the ID of your Discounted Amount field)For more details, check out our guide on building formulas to learn how to perform calculations in your forms. You can also get started quickly with one of our calculation templates.
Hope this helps!
For taking stripe payments, it sounds like I have to use the “total” field in the “payments” field categories. This blog is about using a “single item” to calculate totals. However, that doesn’t seem to translate to the “total” field that stripe payments use. I set up a “single field” renamed “total price” as this blog explains and I added a discount with a formula based on what check boxes are selected. But the “total” payment field now adds the two together to bill stripe. This blog is great but then it ends without discussing how to connect stripe payments to the new calcuated totals in the “single item” fields. Please help.
Hi Glenn,
One of our trusted advisors from the support team has reached out to you about this, and we hope they were able to help get everything sorted for you.