Would you like to learn how to build formulas to perform basic and advanced operations on your WordPress forms? With the Calculations addon, you’ll be able to convert your forms into calculators to solve specific user problems.
This tutorial will explain how to build formulas by covering all the rules, operations, and functions in the Calculations addon cheatsheet guide.
In This Article
- Accessing the Cheatsheet Documentation
- Understanding Calculations Addon Rules and Operators
- Using Field Variables
- Tips to Consider Before Building Formulas
- Building Formulas With Arithmetic Operators
- Buildings Formulas With Conditional Statements
- Building Formulas With Comparison Operators
- Buildings Formulas With Logical Operators
- Using Supported Functions in Calculation Formulas
- Frequently Asked Questions
Before getting started, you’ll first need to make sure WPForms is installed and activated on your WordPress site and that you’ve verified your license.
Accessing the Cheatsheet Documentation
Note: You’ll need to have the Calculations addon installed and activated on your WordPress site to follow along with this guide. See our Calculations addon documentation to get started.
After installing the Calculations addon, create a new form or edit an existing one to access the form builder.
In the form builder, you’ll need to add one of the supported fields to be able to enable calculation mode on the form field.
Once you’ve added a supported field, click on it to open the Field Options panel. Then, navigate to the Advanced tab. There, you’ll see the Enable Calculation toggle.
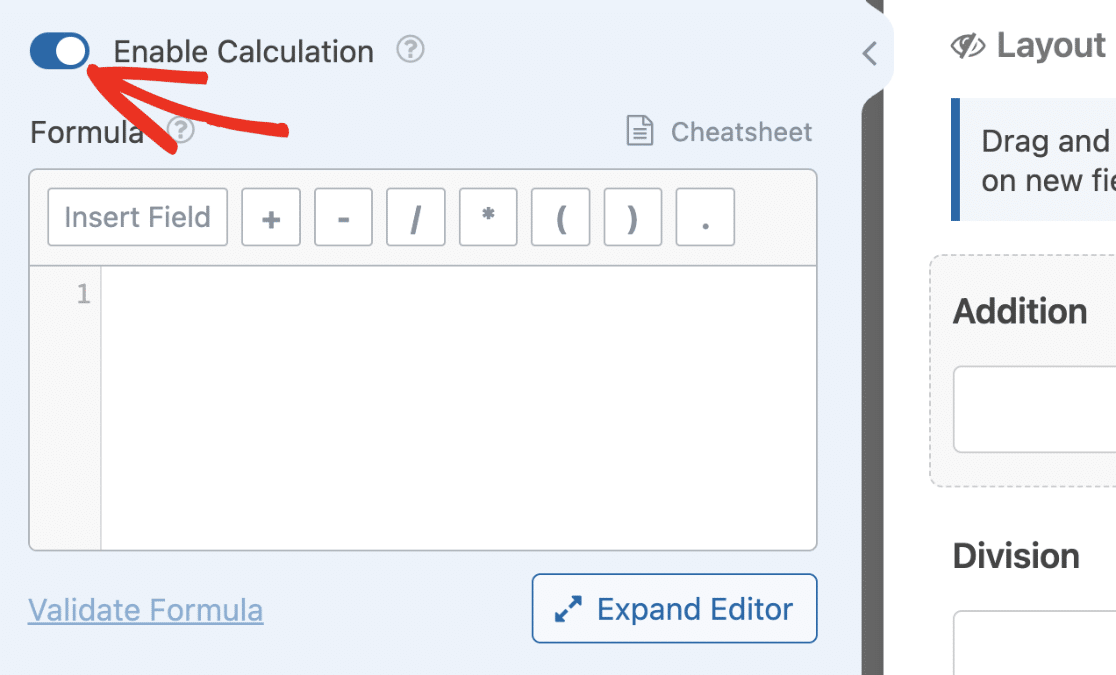
Enabling this option will open up the formula builder. Here, you can build formulas and perform calculations using other field values as variables.
You can access the Calculations addon cheatsheet documentation by clicking the Cheatsheet link above the formula builder.
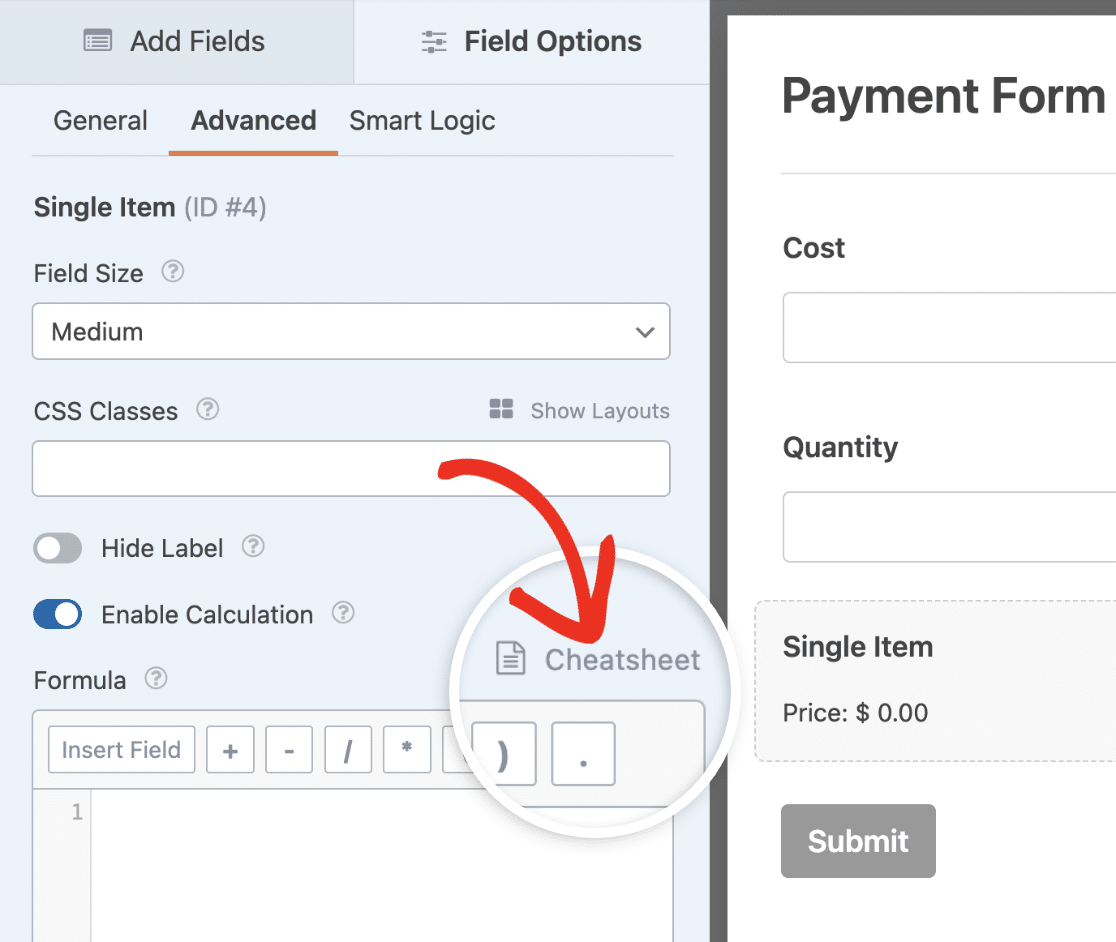
Alternatively, you can access this page using this link. The cheatsheet guide contains the various rules, operators, and functions currently supported with the Calculations addon.
Understanding Calculations Addon Rules and Operators
Similar to how programming languages have rules and syntax, the formula builder also has its own set of rules. Adhering to these rules ensures your formulas work as intended. Below, we’ve explained the most important ones to follow.
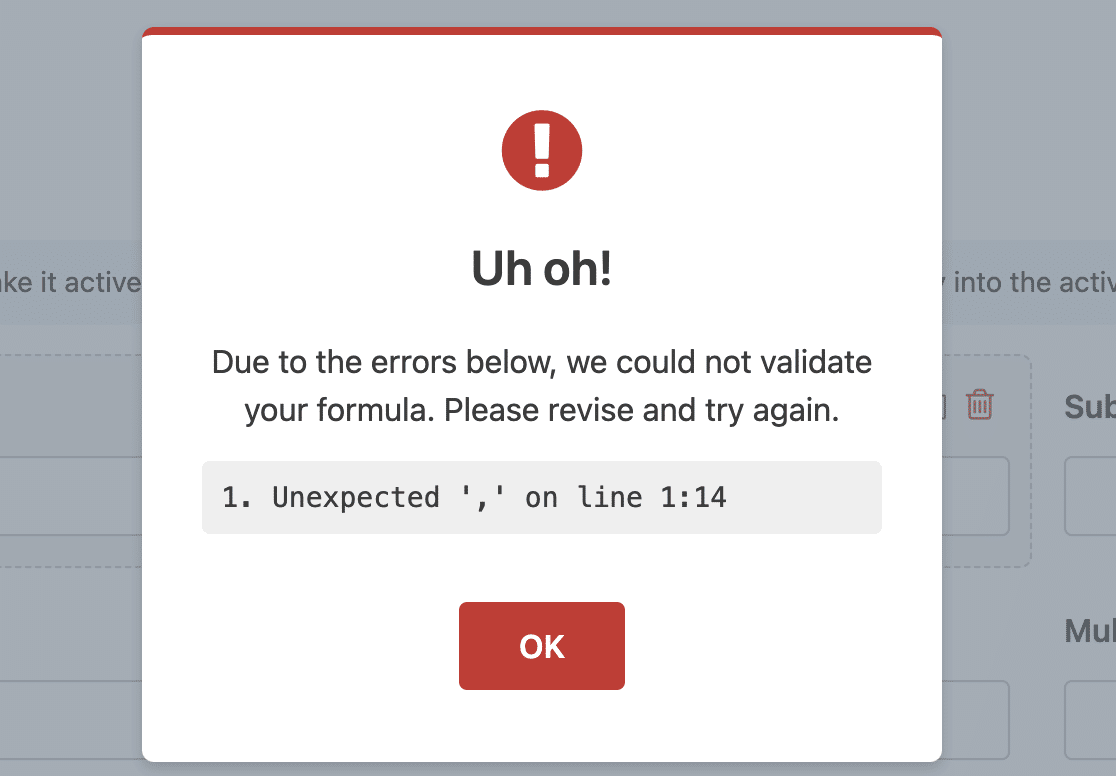
- When adding numbers, you can only use a dot (.) for decimal values (e.g., 59.99). Using commas to separate large numbers isn’t allowed and will return an error when you validate your formula.
- Enclose string text in single quotes (‘) or double quotation marks (“).
- You can only use your form fields as variables in the formula builder. The Calculations addon doesn’t allow declaring variables that aren’t field variables.
- Adding a semicolon after each line in the formula builder is optional. However, if you’re writing conditional statements, the
endifline should have a semicolon.
In the next sections, we’ll explain how variables work and show examples of supported operations in the formula builder.
Using Field Variables
Once calculation mode is enabled on a supported field, you can use other fields in the form as variables to build your formula. Below are the rules to follow when using field variables.
- Each field variable starts with the
$Fsymbol, followed by the field’s ID. So, the complete variable name will read$FX(whereXis the field ID). - Field variables for subfields are added using the syntax
$FX_subfield. WhereXis the field ID andsubfieldis the subfield identifier. For example,F1_firstrepresents the first name subfield of the Name field. - To access the value users select in a payment field, use the
$FX_amountformat. So if a Single Item field has an ID of 2 for instance, the field variable will be$F2. While the value selected amount will be$F2_amount. - Values in a Checkboxes or Checkbox Items field can be accessed using the
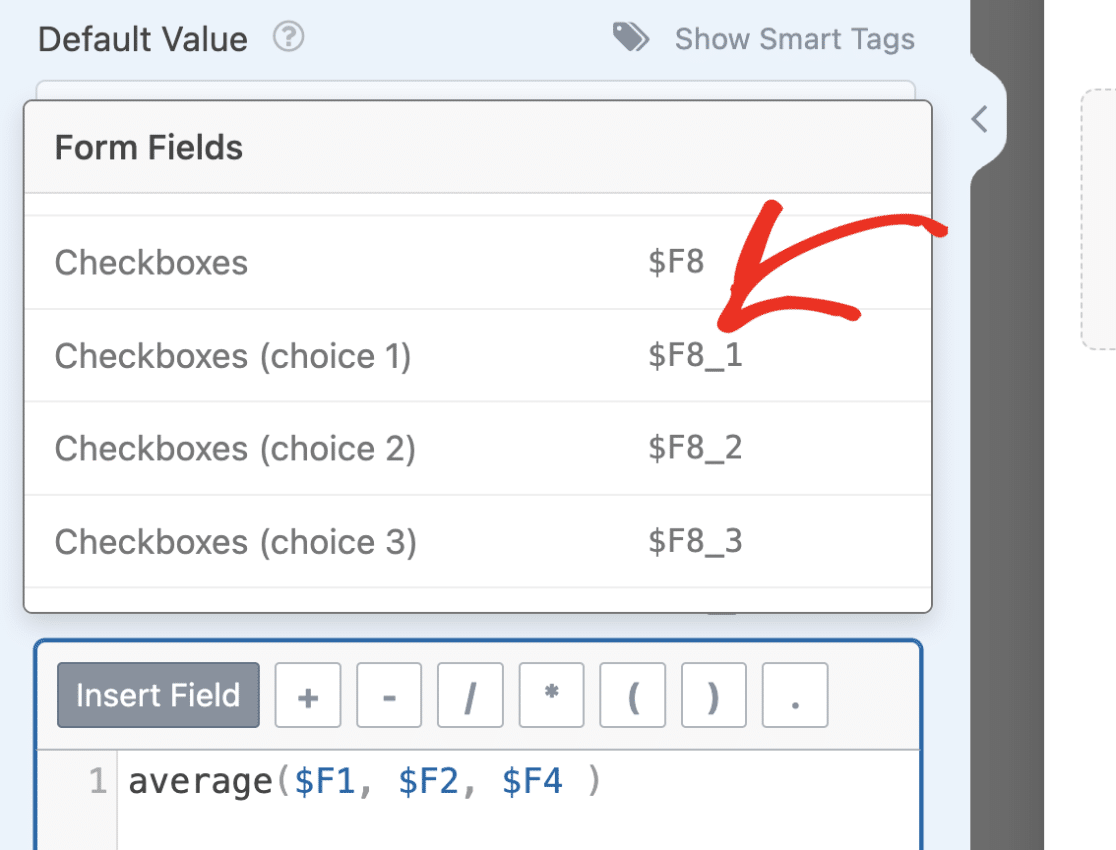
$FX_nsyntax. WhereXis the field’s ID andnis the Checkbox option. This essentially means the first choice in a Checkboxes field will be$FX_1, choice 2 will be$FX_2, and so on.
- Multiple Choice and Dropdown fields do not currently support targeting options using unique IDs. If you’d like to target the choice the user selected in an if statement, you’ll need to use an exact match to check the value in your condition. Here is an example:
if ($FX == 'first choice'):
   // formula to execute
endif;
Tips to Consider Before Building Formulas
Before building out your formulas, there are some tips to keep in mind to help you speed up the process and avoid encountering errors. Below we’ve explained our top recommendations:
- Ensure you know the formula you want to use for the calculation. Knowing the formula prior will enable you to know the fields to add to your form.
- Use the Hidden field if you’d like to store the result of a calculation in another field variable. The Calculations addon doesn’t support using custom variables. So if you require this functionality for your formula, consider using the Hidden field to store your calculation results.
- When concatenating a string and a number in your field, we suggest using the Single Line Text or Paragraph Text field.
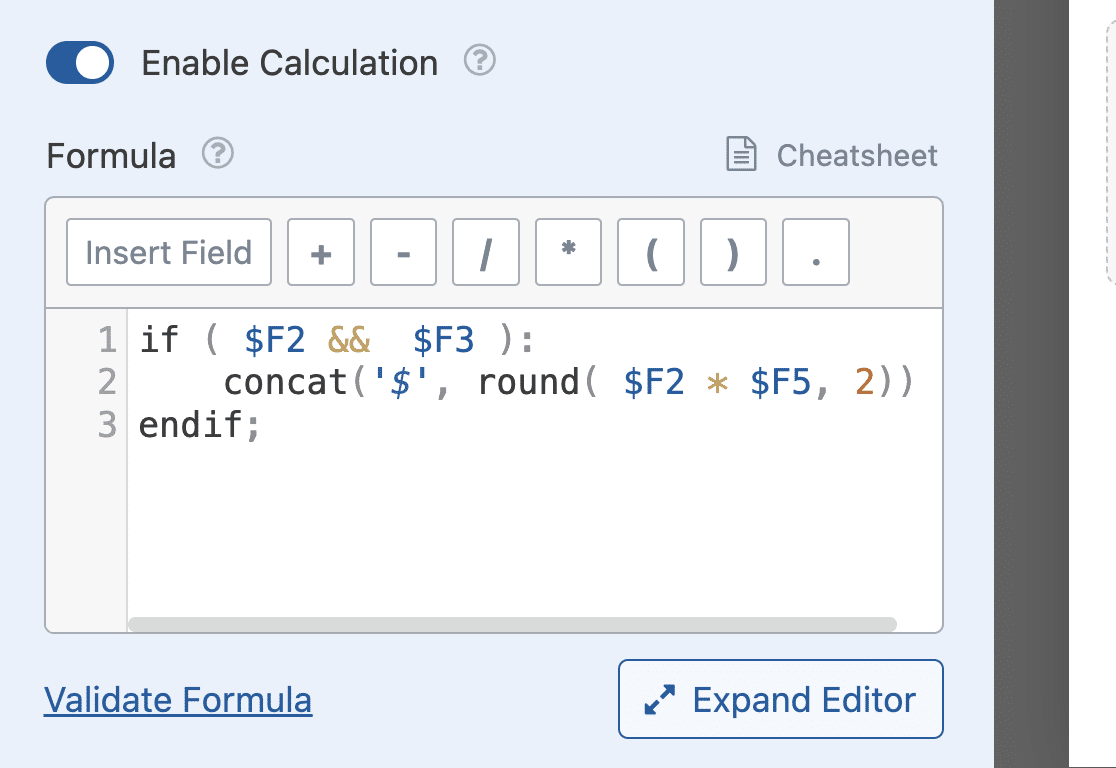
- If you’re combining a string and a number, enclose your formula in an if statement and set the condition to only show if the user has filled in the required field variables. This ensures the field doesn’t have an undefined value in the frontend.
Building Formulas With Arithmetic Operators
The Calculations addon lets you build basic formulas to perform actions like addition, subtraction, multiplication, and division.
For this example, we’ll create a calculator that performs arithmetic operations when given 2 numbers.
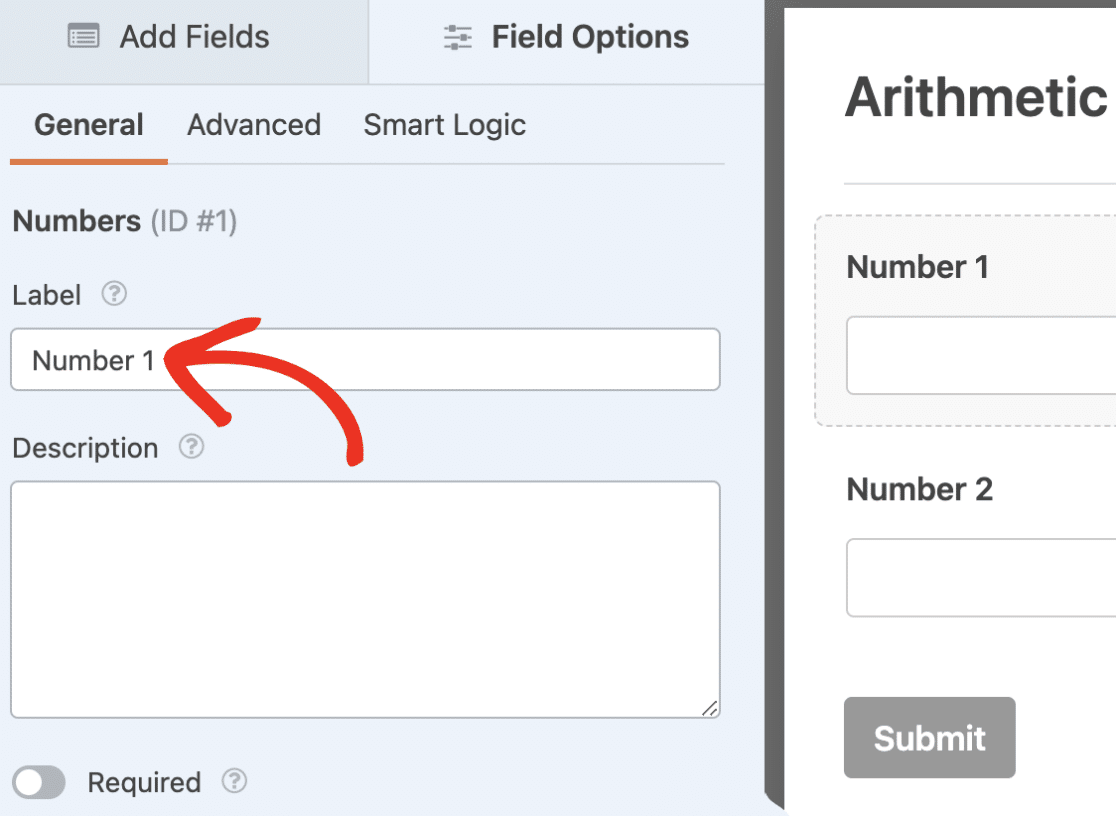
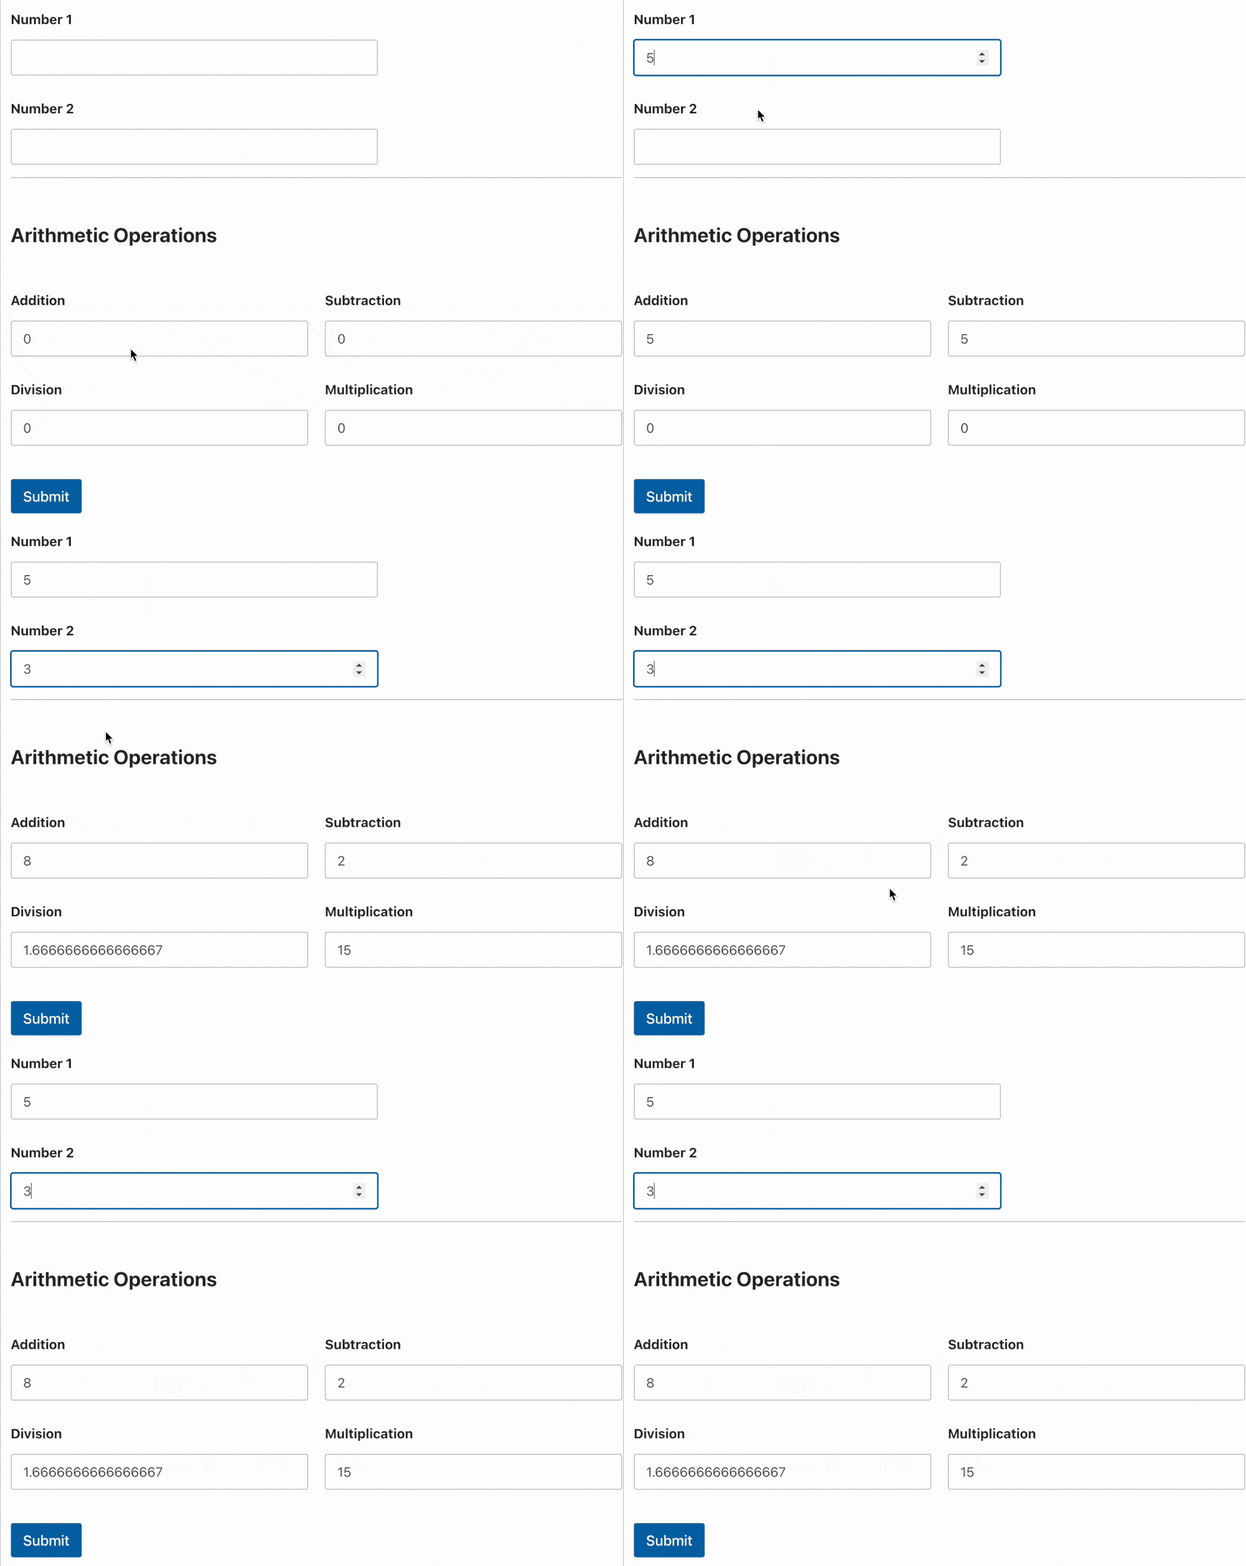
Start by opening the form builder and adding 2 Numbers fields. Click on each field and change the field Label to any name you like. For this example, we’ll use Number 1 and Number 2 as the Label for both fields.
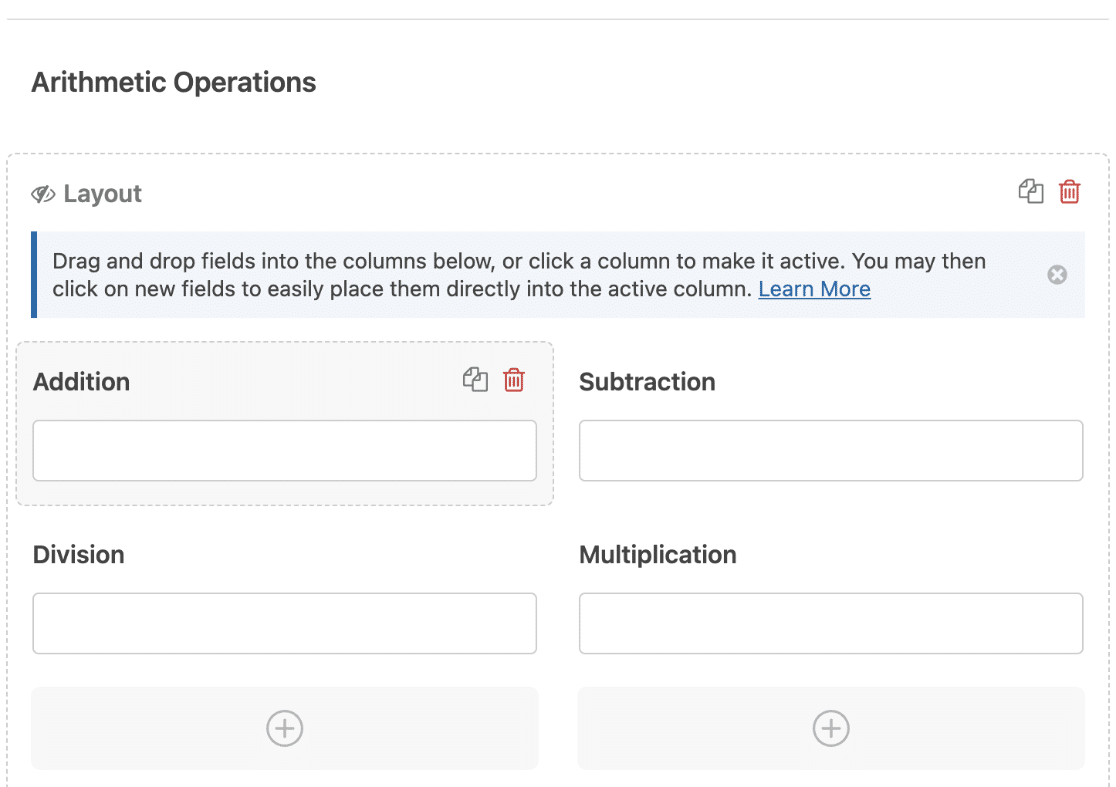
Next, let’s add a Section Divider and change the Label to Arithmetic Operations. Below that, we’ll add a Layout field and add 4 Numbers fields with Labels Addition, Subtraction, Multiplication, and Division.
Now, select the Addition field to open its Field Options. After that, navigate to the Advanced tab.
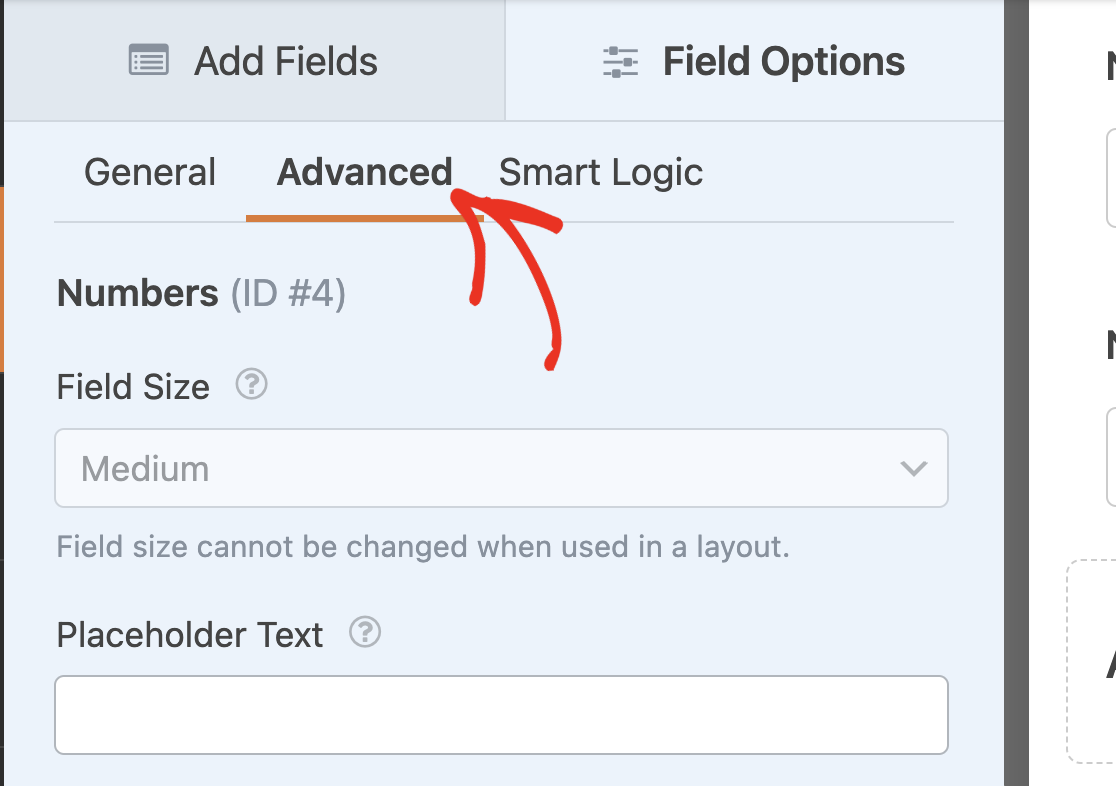
Once there, toggle the Enable Calculation option to the on position.

In the formula builder, we’ll write an equation to add the value from both Numbers fields ($F1 + $F2).
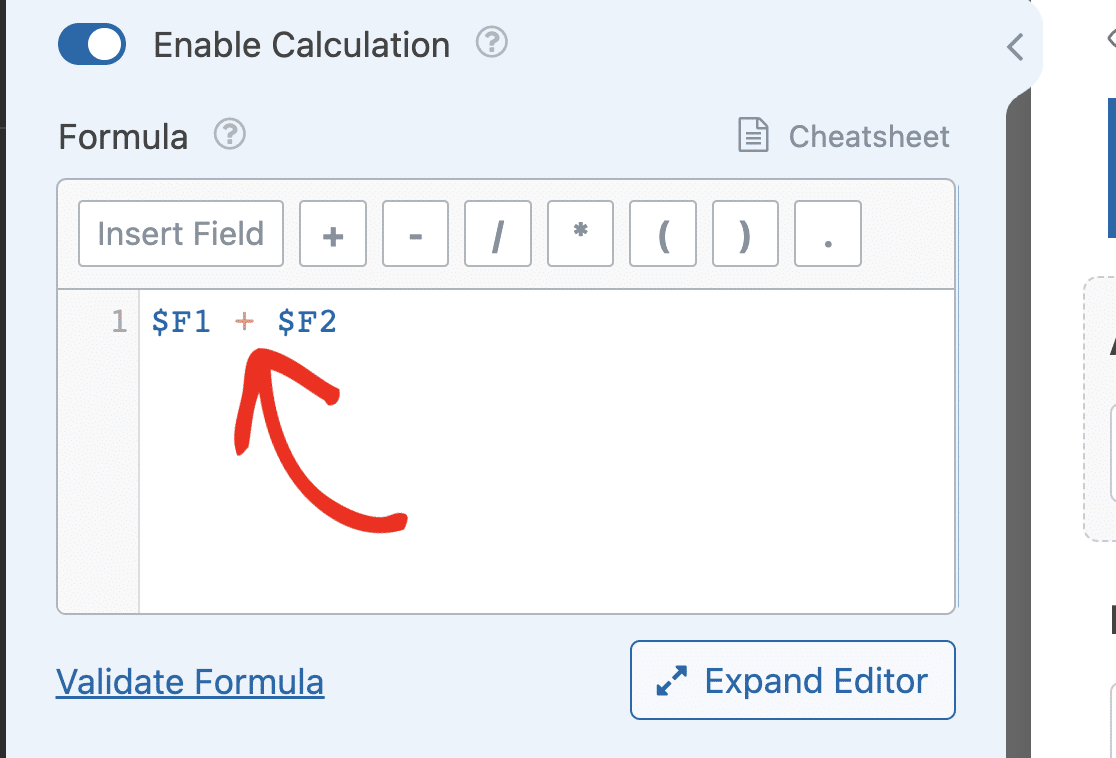
After adding the first formula, be sure to enable calculations on the remaining fields and update the formulas. The formula for each field should read:
- Addition:
$F1 + $F2 - Subtraction:
$F1 - $F2 - Multiplication:
$F1 * $F2 - Division:
$F1 / $F2
Note: Ensure that the field variables match the Numbers fields in your form.
Once you’ve added the formula for each field, save and preview your form to ensure the equations work as you expect.
Buildings Formulas With Conditional Statements
If/else statements allow you to build advanced formulas that will only work if the conditions specified are met. By default, the if statement has the following syntax:
if(condition):
   // formula to calculate on true
else:
   // formula to calculate on false
endif;
Within the parenthesis after the if statement, you’ll need to specify the condition(s) you want to check. Then within the if block, write the equation you want to perform if the condition is true.
The else block contains the equation that should run if the condition is false. Here is an example of how you’d likely use this conditional statement.
if($FX_amount > 50):
   ($FX_amount * 5/100)
else:
   7
endif;
Note: X in the equation above is used to denote the field ID. When writing your equations, be sure to replace X with the ID of the field you intend to use.
In the example above, we are enabling calculation mode on a Single Item field and checking if the amount the user selected is greater than 50. If true, the additional charge is 5% of the payment amount. Otherwise, in the else block, we set the charge to 7 for any amount lower than 50.
If you’d like to add multiple conditions to your equation, use the elseif() statement. Here is an updated version of the equation above.
if ($FX_amount > 50 && $FX_amount <= 200):
   $FX_amount * (5 / 100)
elseif($FX_amount > 200):
   $FX_amount * (2.5 / 100)
else:
   10
endif;
The Calculations addon lets you use an unlimited number of elseif statements in the formula builder. In the formula builder, you can also nest if statements within an if statement. Here is an example.
if ($FX_amount > 50 && $FX_amount <= 200):
   if($FX == 'shipping'):
      $FX_amount * (5 / 100)
   endif;
elseif($FX_amount > 200):
   $FX_amount * (2.5 / 100)
else:
   10
endif;
Note: Any if statement you add to the formula builder should have an endif; line. Otherwise, your formula will return an error when you validate it.
Building Formulas With Comparison Operators
Comparison operators let you compare a field variable to a number, string, or the value of another field variable. It is often used to write the conditions for if statements. Here is an example.
if ($FX < 25):
    $FX * (10 / 100)
elseif($FX >= 25 && $FX < 150):
    $FX * (5 / 100)
elseif($FX >= 150):
    $FX * (3 / 100)
else:
    10
endif;
In the formula above, we are using comparison operators to write the conditions for each if statement block. The first condition that returns true will be executed.
Notice that we used the logical AND (&&) operator in one of the elseif conditional. Logical operators let you chain 2 or more conditions. In the next section, we’ll explain how they work in detail.
Buildings Formulas With Logical Operators
The Calculations addon supports using logical operators like AND and OR operators. In the cheatsheet, you’ll find the available logical operators and how they are represented in the formula builder. Below we’ve highlighted the logical operators the Calculations addon supports.
- AND (
&&): The statement will return true when all conditions are true. - OR (
||): The statement will return true if any of the individual conditions is true. - NOT (
!): Also known as negation. It converts a true value to false and vice-versa.
These operators can be used in combination with conditional statements. They allow you to restrict your conditional statement by joining 2 or more conditions. Here is a basic use case for these operators.
Grade Calculator Using the AND Operator
For this example, we’ll build a calculator that returns the grade of the user based on their score. To start, add a Numbers field and a Single Line Text field and change the field Labels to Score and Grade Point respectively.
After that, enable calculation mode on the Grade Point field and add the formula below.
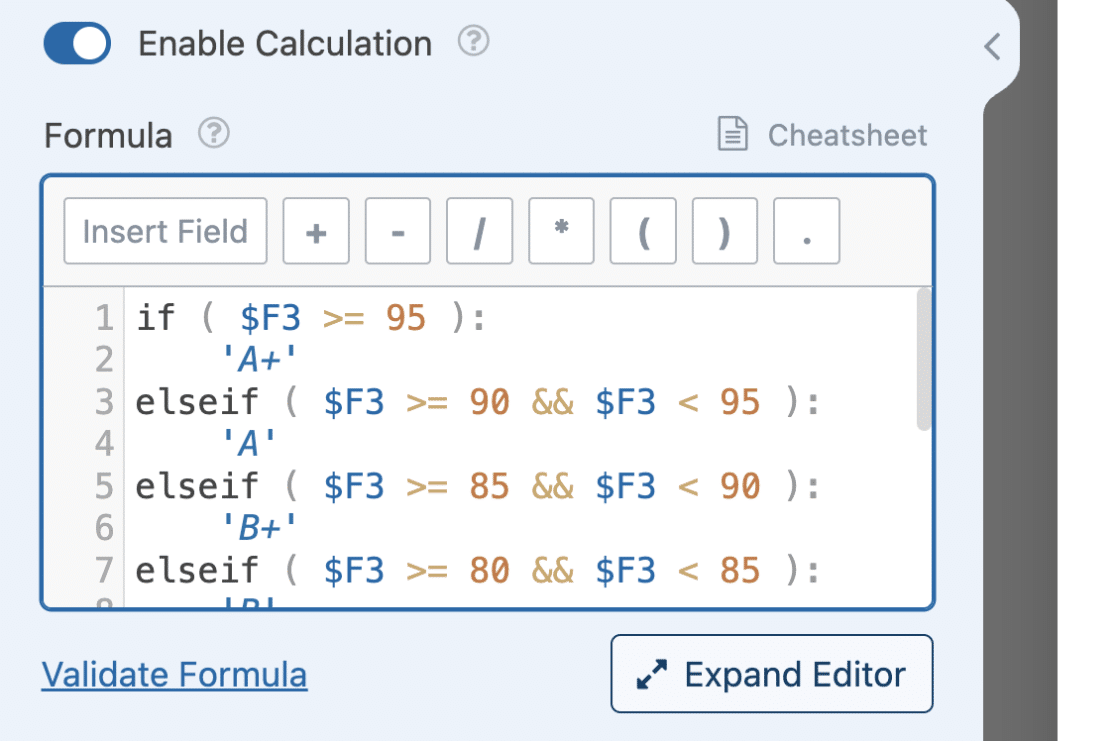
if ( $F3 >= 95 ):
    'A+'
elseif ( $F3 >= 90 && $F3 < 95 ):
    'A'
elseif ( $F3 >= 85 && $F3 < 90 ):
    'B+'
elseif ( $F3 >= 80 && $F3 < 85 ):
    'B'
elseif ( $F3 >= 75 &&  $F3 < 80 ):
    'C+'
elseif ( $F3 >= 70 &&  $F3 < 75 ):
    'C'
elseif ( $F3 >= 65 &&  $F3 < 70 ):
    'D+'
elseif ( $F3 >= 60 &&  $F3 < 65 ):
    'D'
elseif (  $F3 >=0 &&  $F3 < 60 ):
    'F'
endif;
Note: $F3 in the equation above is the field variable for the Score field. Make sure that the ID matches the one in your form builder.
If you use the && operator, the condition will be true if both comparisons return as true.
Cost Per Click Calculator
For this example, we are calculating the cost per click for a given campaign. This requires 2 field variables: Total amount charged and Number of clicks gotten. So, you’ll need to add 2 Numbers fields and update each field’s Label to Total amount charged and Number of clicks respectively.
We’ll also need to add a Single Item field to perform the calculation.
Once you’ve added these 3 fields, select the Single Item field and change the Label to Cost Per Click (CPC). Then navigate to the Advanced tab and enable calculation mode. After that, add the equation below to the formula builder.
if ( $F1 || $F2 ):
     $F1 / $F2
else:
     0
endif;
In the condition, we are checking if the user has entered a value in any of the fields. Once one of the conditions is true, the equation in the if statement will be executed.
Using Supported Functions in Calculation Formulas
The Calculations addon supports numerous functions to easily perform specific tasks. There are math functions, string functions, date/time functions, and a debug function. In the cheatsheet documentation, you’ll see a list of supported functions and how they work.
Math Functions
There are functions to perform basic and complex mathematical operations. These functions help to reduce the number of equations you’ll need in your formula.
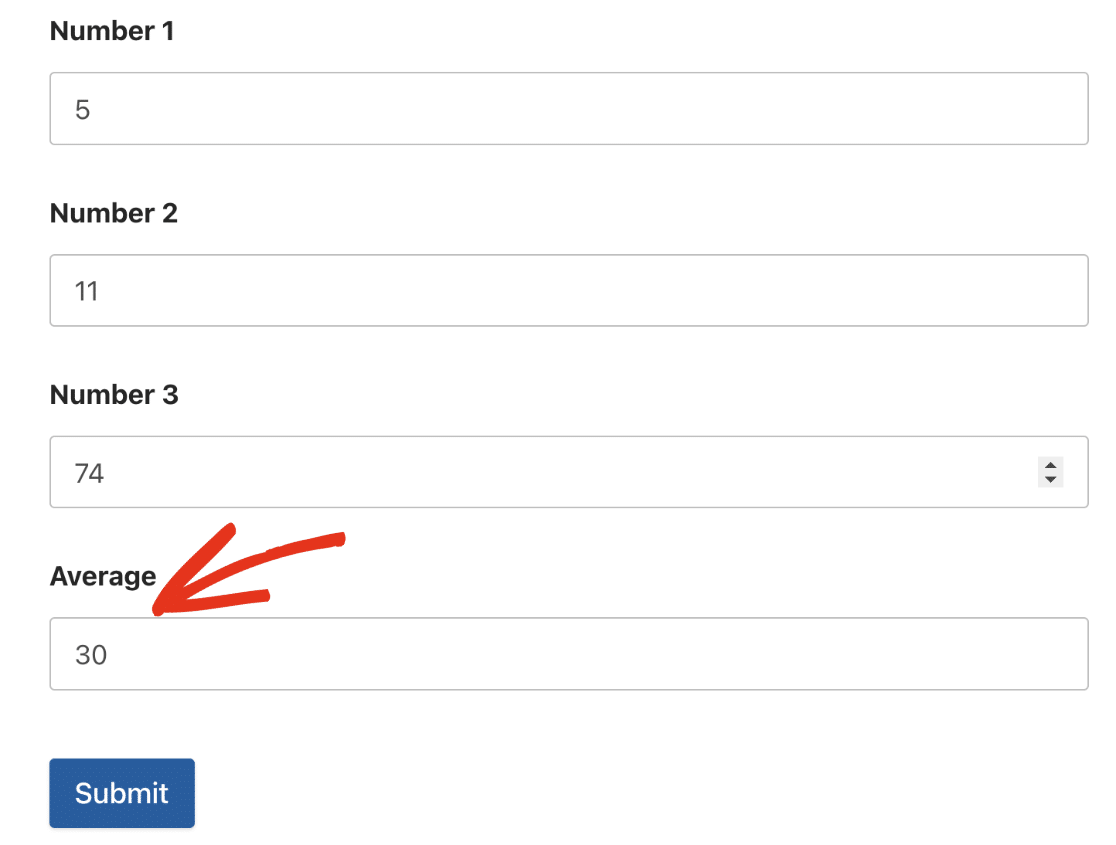
For instance, instead of manually writing an equation to find the average between 2 or more numbers, you can use the average() function to calculate the average value of a given set of numbers. Here is an example implementation.
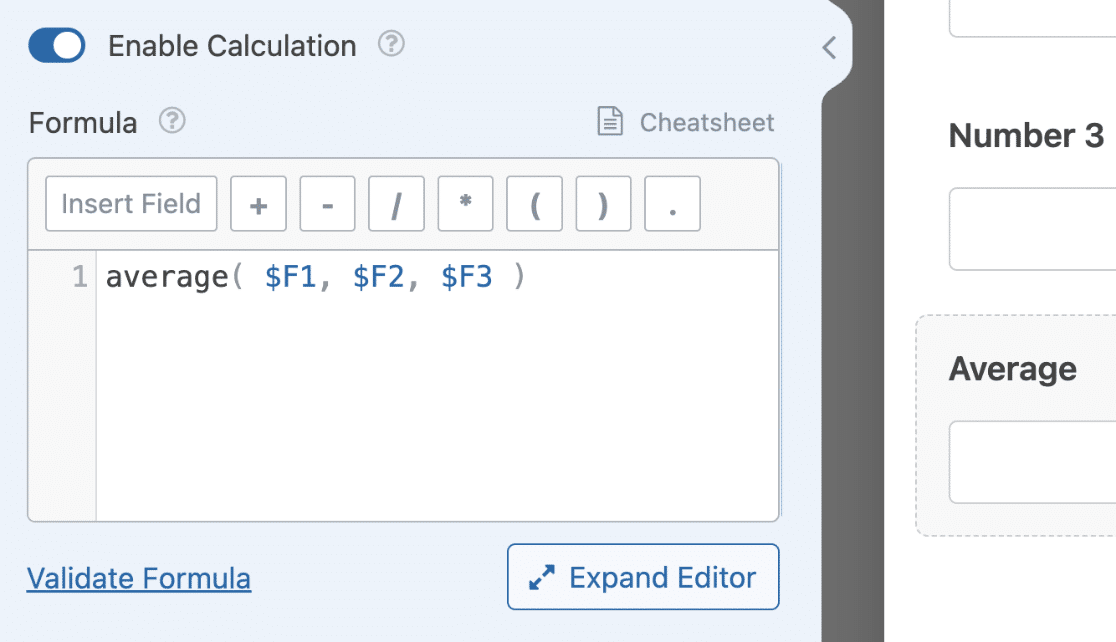
average($F1, $F2, $F3)
In the example above, we’re calculating the average of 3 Numbers fields. However, you can add an unlimited number of fields to the average() function.
Once the user enters a value for each Numbers field, the field with calculations enabled will return the average of these numbers.
Another function that you’ll likely use is the round() function. This function takes in 2 arguments:
- Value (field variable): The number you want to round up. This can be the result of a calculation in your form.
- Precision: The precision level indicates the number of decimal places you want to use. Entering 2 would round the number to the nearest 2 decimal places.
You can use another function as the parameter for your function. For example, we can wrap the average formula we used in the example above with the round function and set the precision level to 2.
round(average($F1, $F2, $F3), 2)
This equation will first execute the average of the numbers. After that, the round() function will round up the result to the nearest 2 decimal places.
There are other functions you can use when building your formulas. Some of them include power of exponent (pow(base, exponent)), square root (sqrt(value)), logarithm (log(value)), random number generator (rand(min, max)) among others.
We suggest reviewing the cheatsheet guide to see if there is a function for the formula you intend to build.
String Functions
There are many functions you can use to perform operations on strings in the formula builder. One of the most popular functions is the concat() function. This function lets you combine 2 or more strings or numbers together.
Within the parenthesis, you’ll add the strings and numbers you want to combine and separate each with a comma. Here is an example.
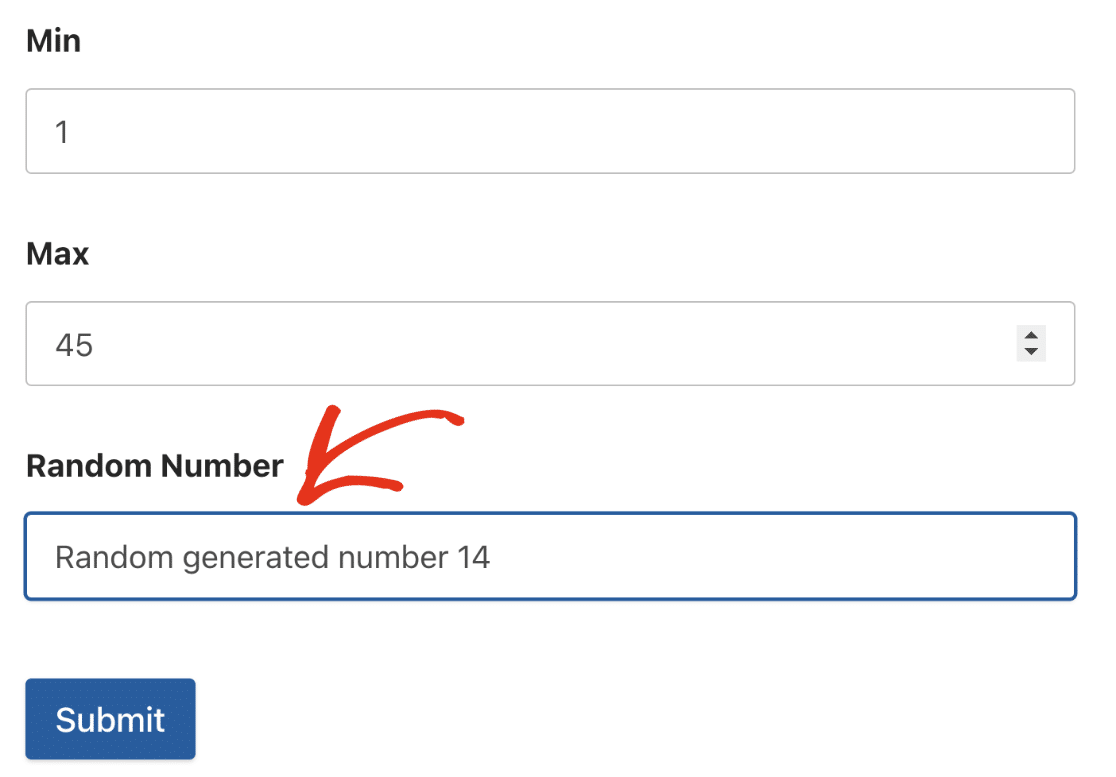
concat('Random generated number ', rand($F1, $F2))
Note: You can combine unlimited strings and numbers using the concat() function. Just be sure to separate each item with a comma.
In the frontend, the field will generate a random number and concatenate the string and result as the field’s value.
Another useful function is the truncate() function. This function accepts 2 parameters: The string text and the length to truncate.
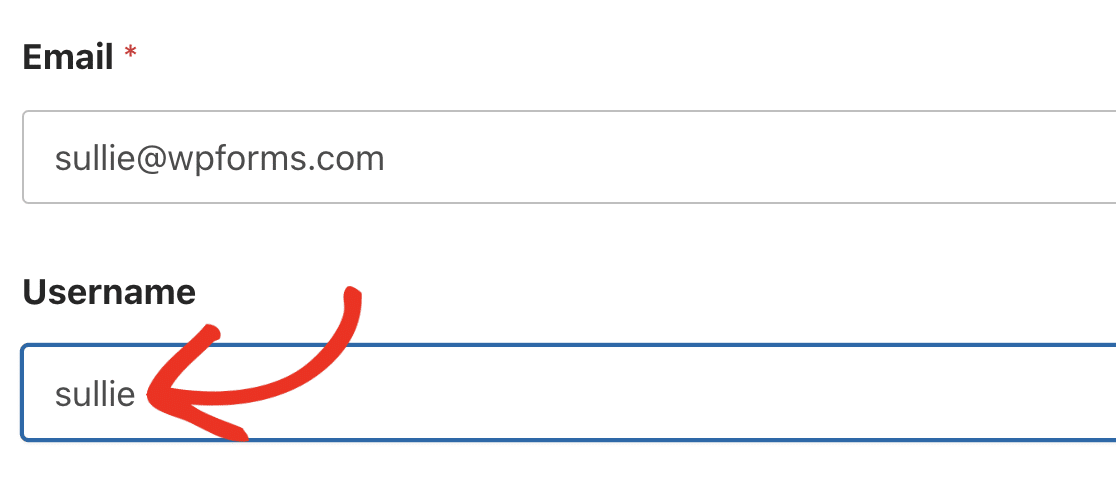
If you use this function, it will strip the string text and return characters up to the number you specified as the length. This can be useful if you want to automatically generate usernames for your users based on their email address. Here’s an example.
Username Generator
In the form builder, add an Email field and a Single Line Text field. After that, select the Single Line Text field, change the Label to Username, and enable calculation for the field.
Within the formula builder, add the equation below.
truncate($F1, 6)
$F1 in the formula above is the Email field which will be used as the string text. 6 is the length of the string to return. This means the formula will return the first 6 characters of the email field.
Date/Time Functions
The Calculations addon provides date and time functions to use when building your formulas. These functions have several use cases such as creating a basic clock on your site or making an age calculator.
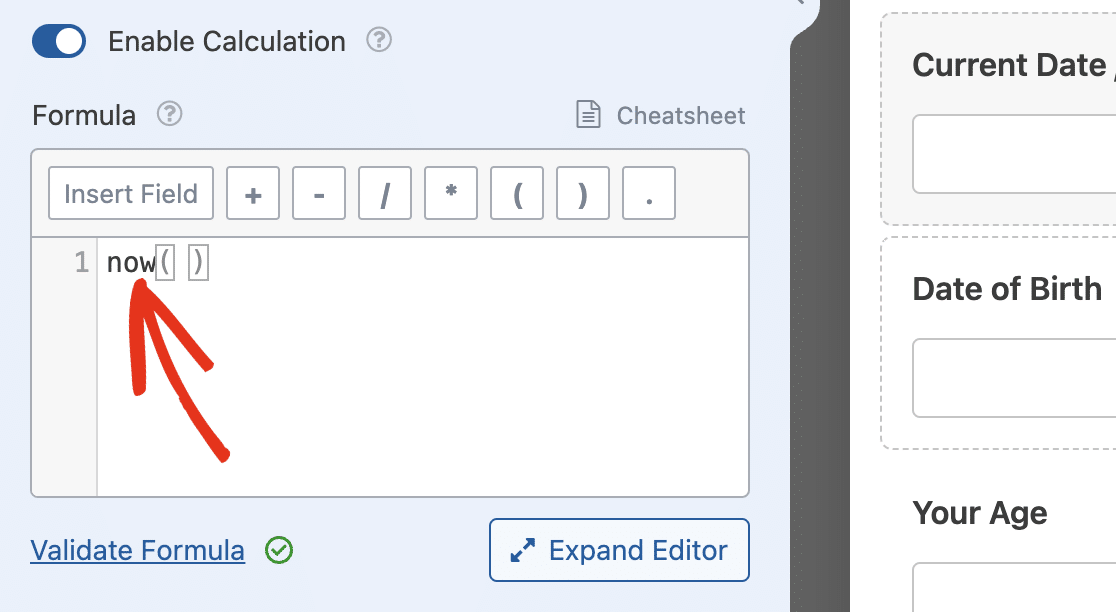
For example, the now() function returns the current date and time each time the user opens the form on your website’s frontend.

The image above shows the default format of the now() function. However, you can customize how the date is shown by specifying a format in the function.
Date format in the Calculations addon works the same as that of WordPress core. Below we’ve listed a few supported formats.
| Format | Example |
|---|---|
d-m-y |
19-10-23 |
F j, Y |
October 19, 2023 |
d/m/Y |
19/10/2023 |
Note: To learn more about supported date formats, be sure to check WordPress’ official documentation.
Another useful function is the date_diff() function. This function accepts 2 date fields and returns the difference between them. A third argument is required to specify the unit you’d like to return. Below are the available units currently supported:
- Years
- Months
- Weeks
- Days
- Hours
- Minutes
- Seconds
Let’s build an age calculator using the date_diff() function.
Age Calculator Using the Date Function
Start by adding a Date / Time field. After that, change the Format to Date and update the field’s Label to Date of Birth.
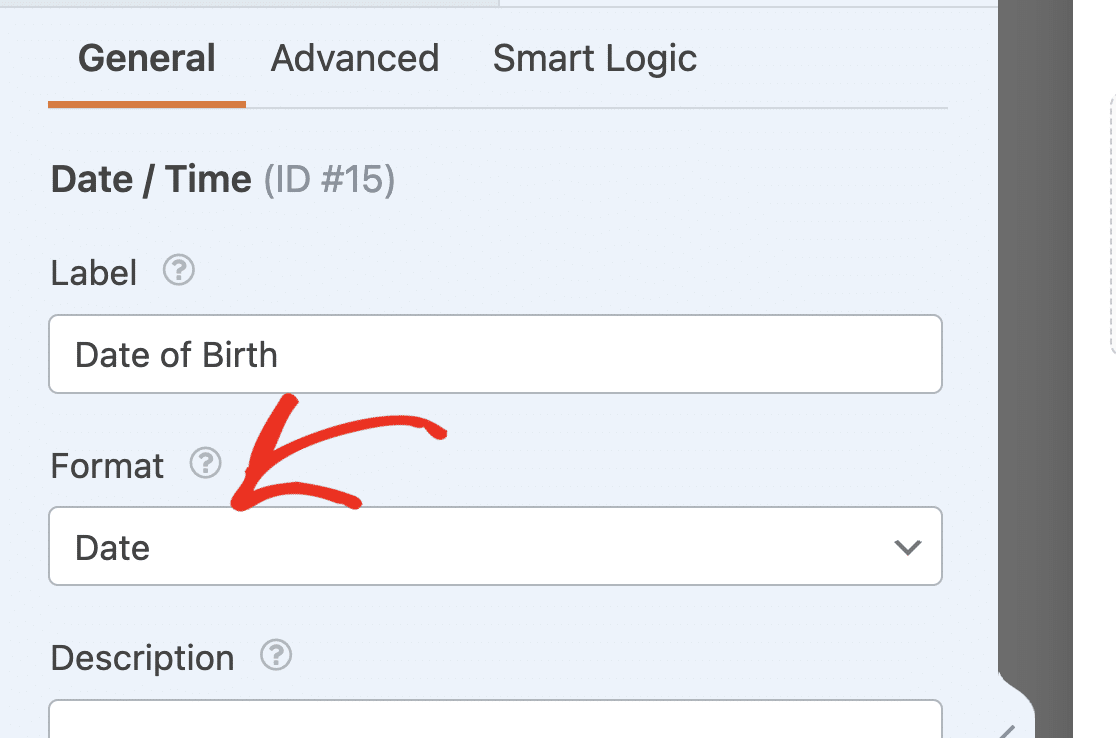
Note: If you’re using the Date Dropdown option, you won’t be able to select a future year from the Year dropdown. See our tutorial on customizing the Date Dropdown if you’d like to update the default behavior.
Next, add 2 Single Line Text fields. For the first field, change the Label to Current Date and then enable calculations for the field.
In the formula builder, simply add the now() function. This would return the current date and time.
For the second Single Line Text field, update the Label to Your Age and then enable calculation mode. In the formula builder, add the equation below.
date_diff($F1, $F2, 'years')
We are using the date_diff() function to return the difference between the Current Date field and the Date of Birth field.
In our example, $F1 is the Date of Birth field, while $F2 is the Current Date field. The 'years' argument we added will return the date difference in years. If we use 'months' instead, it will return the date difference in months.
When you save and preview your form, you’ll be able to estimate your current age after entering your date of birth.

If you’d like to calculate the time range between 2 Date / Time fields, you can use the years() function. It accepts 2 arguments (start and end date) and an optional format parameter. This function returns the difference between 2 dates in years format similar to the date_diff() function.
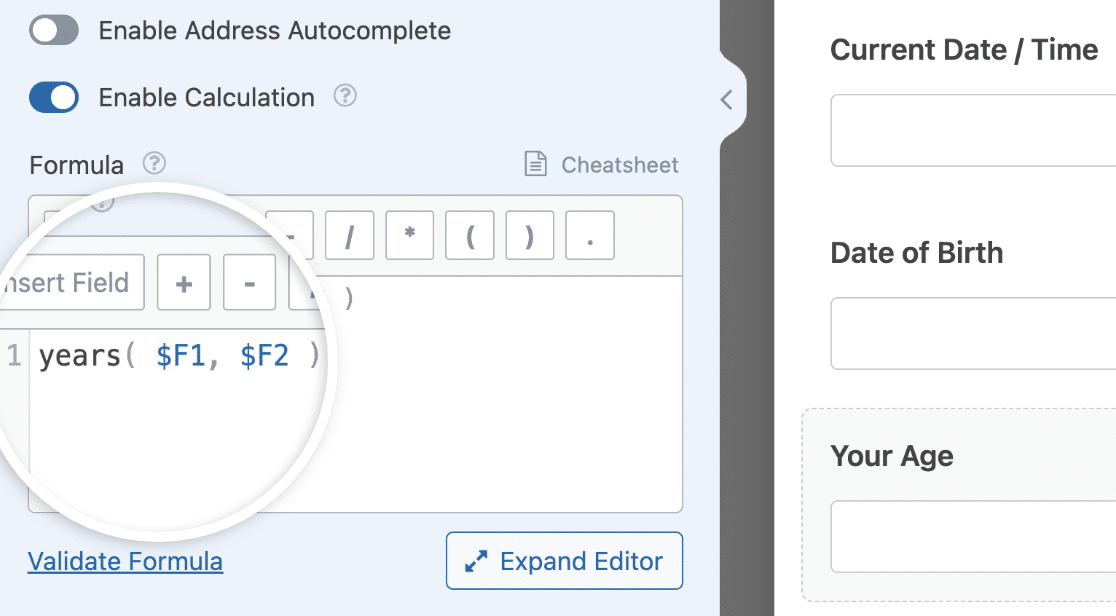
You can also use the months(), weeks(), or days() function if you’d like to return the date difference in months, weeks, or days respectively. Be sure to review the cheatsheet guide to see other date and time functions.
Accessing Date and Time Values in the Formula Builder
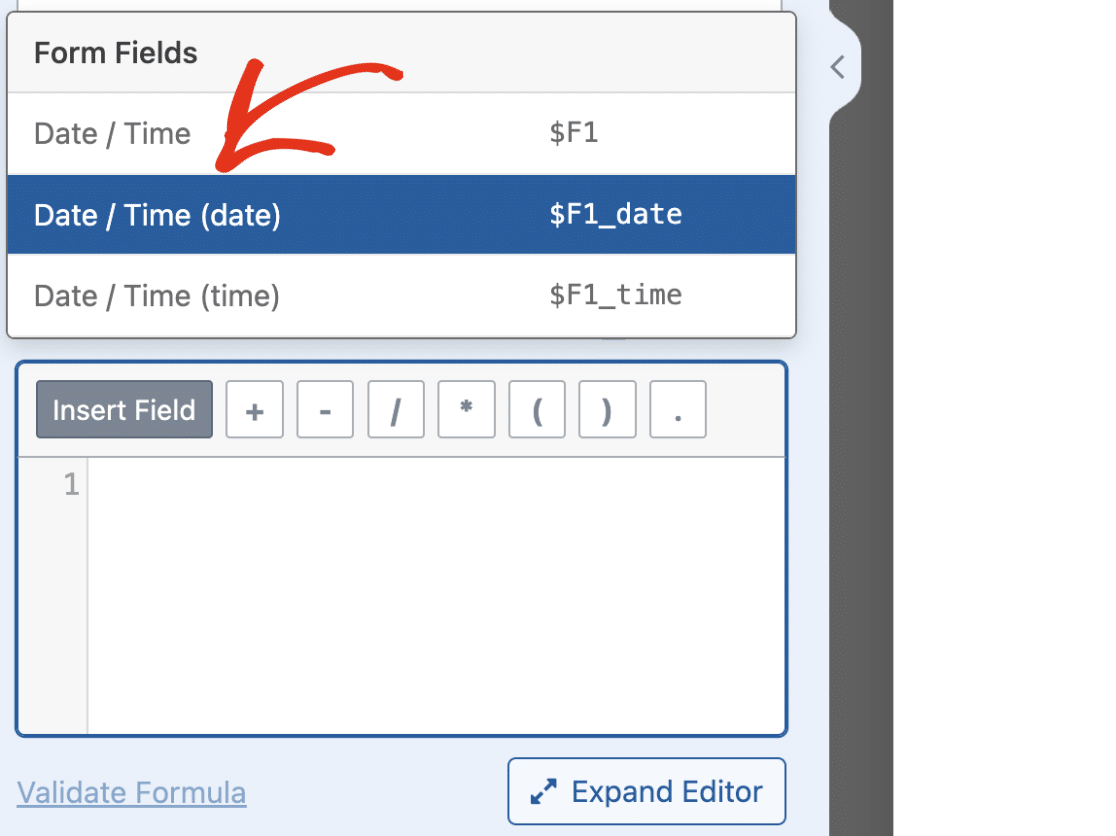
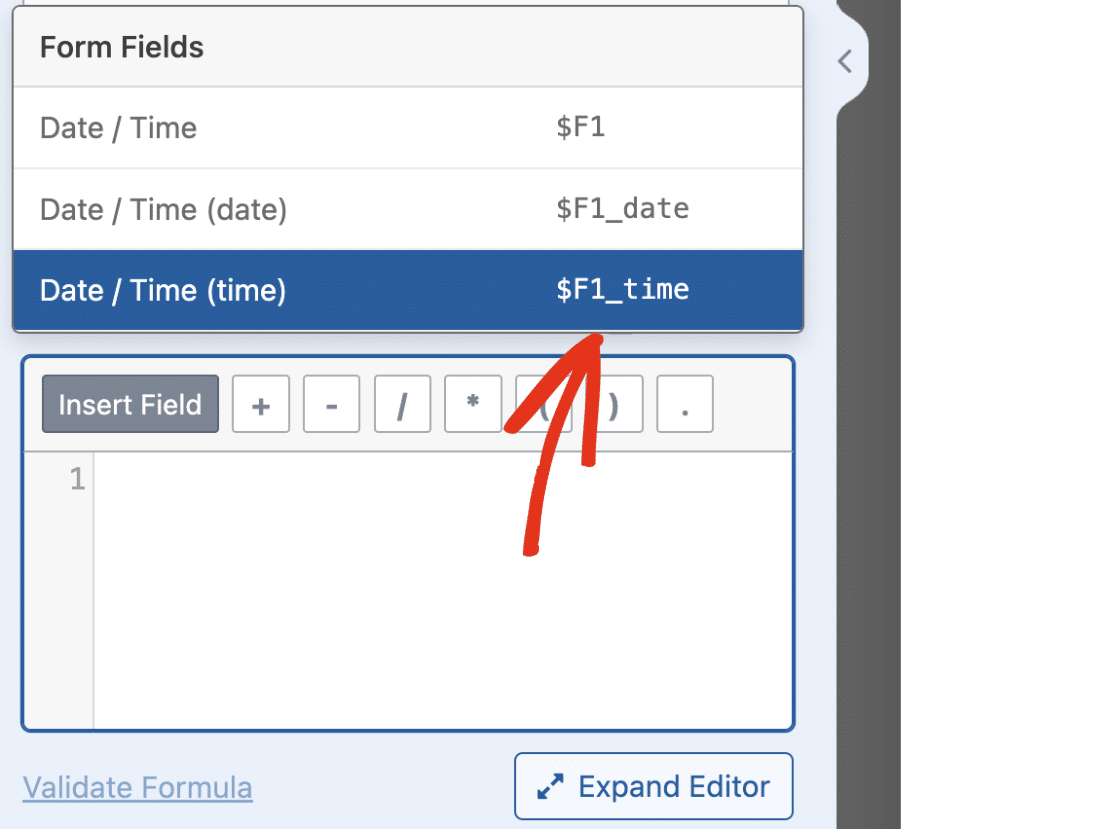
If you’re building a formula that requires targeting the individual values for the date and time subfields in a Date / Time field, you can use subfield syntax.
Note: You’ll need to be using the Date and Time format before you can access individual values for the date and time subfields.
To access the date subfield in the formula builder, use the syntax $FX_date. Be sure to replace X with the field’s ID. In our example, this value is 1.
Similarly, use the $FX_time syntax to access the value of the time subfield.
Frequently Asked Questions
These are answers to some top questions about building formulas with the Calculations addon.
Can I enable debug mode for calculations from the WPForms Tools menu?
The debug() function outputs debug data to the debug.log file on your server. This can be useful when troubleshooting errors in your formulas. Currently, you can only use this function within the formula builder. When added to the formula builder, it will log any debug data for the particular form in which you’ve enabled calculation mode.
That’s it! Now you know how to build formulas for your calculations forms.
Next, would you like to create a lead magnet form to capture leads on your website? See our guide to learn how to install and use the Lead Forms addon.
