AI Summary
Would you like to create an interactive form to capture leads on your WordPress website? With our Lead Forms addon, you’ll be able to create a form that allows users to progress one step at a time while filling out your form.
This tutorial will show you how to install and use the Lead Forms addon in WPForms.
Requirements:
- You’ll need the Pro license level or higher to access the Lead Forms addon
- Ensure that you’ve installed the latest version of WPForms to meet the minimum required version for the Lead Forms addon
What Are Lead Forms?
Lead Forms are online forms used to collect information from potential clients, also known as “leads.” They’re similar to conversational forms as they allow users to progress one step at a time when filling out the form.
Lead Forms provide a way to gather contact information about users interested in your products or services without overwhelming them with multiple fields at a time.
Installing the Lead Forms Addon
Before you get started, you’ll first need to ensure WPForms is installed and activated on your WordPress site and that you’ve verified your license.
After you’ve done that, you’ll be able to quickly install and activate the Lead Forms addon.
Enabling Lead Form Mode
The Lead Forms addon settings are located in the form builder. To proceed, you’ll need to create a new form or edit an existing one to access the form builder.
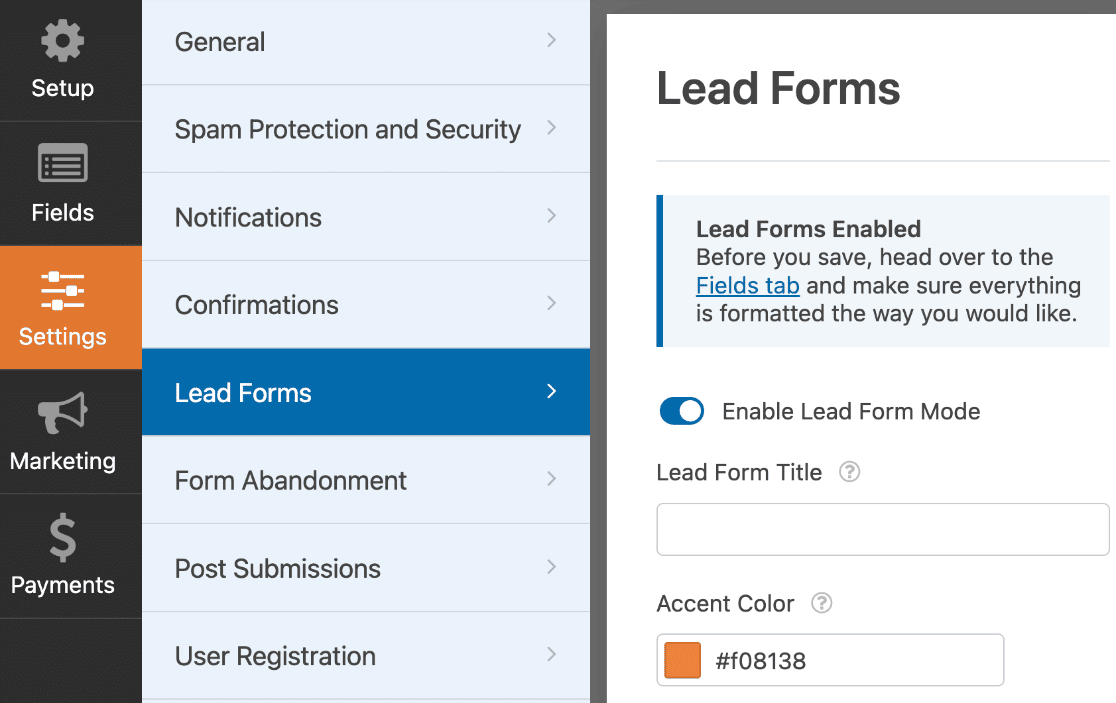
To convert your form into a Lead Form, go to Settings » Lead Forms. You’ll need to toggle on the Enable Lead Form Mode option.

You’ll see an overlay notifying you that your form will be restructured. To proceed, click on Enable Lead Forms.

Once you’ve enabled Lead Form mode, additional options will appear. We’ll go over these options when customizing the Lead Form.

You’ll also see a notice that urges you to preview the form in the form builder and ensure the fields are formatted properly before saving your changes. Click on the Fields tab link to access your fields.

On the Fields tab, you’ll notice that page breaks have been added next to each field. All the fields will also be aligned to the center and use a full-width display option.
Note: You won’t be able to add the Layout or Entry Preview fields to the form builder once Lead Form Mode is enabled.

With Lead Form Mode enabled, field sizes, layout, and colors will be disabled for each field. All customizations are handled on the Lead Form settings page.
You can quickly save and preview the form to see how the Lead Form looks on the frontend.

Customizing Your Lead Form
The Lead Forms addon comes with various options that allow you to customize the look and feel of your Lead Form. You’ll find all the customization options on the Lead Forms settings page.
Below we’ll go over the available customization options.
Lead Form Title
The Lead Form Title allows you to enter a title for your Lead Form. The title will be visible on the frontend when users fill out your form.

We recommend using a short but descriptive title so users know the purpose of your Lead Form before filling it out.
When you preview the form on the frontend, the title will show at the top of the Lead Form on the first page.

Accent Color
This setting allows you to change the default color for your buttons, progress bar, and icons. When you click on the dropdown, you’ll be able to use the color picker to choose an accent color.

Alternatively, you can enter the HEX code for your brand’s color in the Accent Color field.
Advanced Style Settings
There are advanced settings to further customize your Lead Form. To access these options, you’ll need to toggle the Advanced Style Settings to the on position.

Once enabled, you’ll find additional options. Below we’ll cover the available options.
Form Container
Below the Advanced Style Settings toggle, you’ll find the Form Container option. When enabled, it wraps the Lead Form in a container so it stands out among other elements on the page.
After enabling the Form Container option, additional styling options will appear.

- Drop Shadow: This option automatically adds a shadow to the Lead Form container when enabled. It is useful if you want your Lead Form to appear elevated from the background.
- Rounded Corners: This setting gives your Lead Form a modern design by adding rounded corners to the container when enabled.

Here’s how the form will look on the frontend with drop shadow and rounded corners enabled.

Below the container settings, you’ll find additional options to customize the colors of elements on the Lead Form.

- Container Background: This setting controls the color of the Lead Form container. You can use the color picker or manually enter a HEX value to update the color of the form container.
- Field Borders: This option is used to modify the border color of the fields on your Lead Form.
- Primary Text: This option allows you to change the color of primary texts, such as page titles and field labels.
- Secondary Text: With this option, you can update the color of secondary elements such as input texts or field descriptions.
Export / Import Style Settings
The Lead Forms addon allows importing and exporting style settings from one Lead Form to another. All the style settings you configure are stored as export strings in the Export Your Style Settings field.
To export your Lead Form style settings, click on the Copy icon next to the Export Your Style Settings field.

If you’ve copied style settings from another Lead Form, you’ll be able to quickly paste and import the styles into the Lead Form you’re editing.
To import styles from another Lead Form, you’ll need to paste the styles you copied into the Import New Style Settings field.

Once you’ve added the styles, click the Import Style Settings button to continue.

You’ll see an overlay notifying you that the import will update the style settings on your Lead Form. Go ahead and click Yes, Import to proceed.

Once you’ve imported the style settings, it’ll update the advanced styling settings with the values you entered during the import.
Note: When importing style settings, be sure to properly paste the styles you copied from the Export Your Style Settings field. Also, make sure not to add extra spaces to the import string.
You’ll get an invalid import string error if the import string you pasted doesn’t adhere to the expected format.

Lead Forms Best Practices
As we mentioned earlier, enabling Lead Forms restructures your form. Here are some best practices to improve the look and feel of your Lead Form.
1. Combine Related Fields
Related fields such as Name and Email can be grouped on one page of the Lead Form by dragging and dropping them to the appropriate page.

By convention, Lead Forms should have 1–3 related fields per page. It is recommended to keep each page short so users don’t feel intimidated when filling out your form.
2. Using Page Titles
By default, field labels are used as the page title on a Lead Form page. Once you’ve grouped related fields, each field will use its field label as a title.
Instead of having individual titles for each field on the page, you can create a generic title that describes what the page is about.
To add a page title, click on a Page Break field to open its field option. In the General tab, you’ll find a Page Title text box for adding a title to a Lead Form page.

Once you’ve added the page title, it’ll be added just above the fields on that page.
3. Use Placeholder Text
On Lead Forms, field labels are used as page titles by default. If you’ve added a page title to your form pages, you can disable field labels and use placeholder text to improve the Lead Form design.
To disable a field label, click on the field to open the Field Options menu. In the Advanced tab, you’ll find the option to add a Placeholder for the field.

After you’ve added the placeholder text, scroll down and toggle the Hide Label option to the on position.

4. Use Icon Choices For Radio Buttons and Checkboxes
If you’re using Checkboxes or Multiple Choice fields on your Lead Form, you’ll be able to add icons for each item. This will make your form visually appealing for users when filling out the Lead Form.
To use this feature, we’ll add a Page Break and a Multiple Choice field to our Lead Form. You can add a field by clicking on it or by dragging and dropping it into the form preview area.

Next, select the Multiple Choice field to open its field options. We’ll customize the field’s Label and Choices for our example.

Next, scroll down and toggle the Use icon choices option to the on position.
Once you’ve enabled Icon Choices, the icons will inherit the accent color you specified when customizing your Lead Form. You’ll be able to choose icons from the Font Awesome icon library.
You’ll also be able to update the size of the icons on your form.
Once you’re done customizing your Lead Form, click Save to update your changes.

Here’s an interactive form to give you an overview of how these forms would appear on your site.
Frequently Asked Questions
These are the answers to some top questions about using the Lead Forms addon with WPForms.
Can I use the Lead Forms addon with other WPForms addons?
Yes. The Lead Forms addon is compatible with most of our other addons. Once you enable Lead Forms, you can integrate it with any of our payment and marketing addons.
However, the Lead Forms addon is an alternative to the Forms Pages and Conversational Forms addons, designed to simplify lead capturing. So you won’t be able to use either of these addons when Lead Form Mode is enabled for a form.
That’s it! You now know how to install and customize the Lead Forms addon in WPForms.
Next, would you like to connect your Lead Form to a marketing service to easily follow up with leads? Be sure to check out our marketing integration tutorials for Mailchimp, Constant Contact, AWeber, Drip, Campaign Monitor, and GetResponse to learn more.