AI Summary
Would you like to connect your forms to your Drip account? With our Drip integration, you can automatically add users to your email marketing campaigns when they submit forms on your site. You’ll also be able to easily set up additional options like allowing subscribers to update their email addresses, recording custom events in Drip, and more.
This tutorial will show you how to use our Drip addon to integrate WPForms with your Drip account.
Requirements:
- You will need a Plus license level or higher to access the Drip addon
- Ensure that you’ve installed the latest version of WPForms to meet the minimum required version for the Drip addon
Before you get started, be sure to install and activate WPForms on your WordPress site. You will also need to sign up for a Drip account if you don’t already have one.
Installing and Configuring the Drip Addon
Once the core WPForms plugin is in place and your license is verified, you’ll be able to quickly install and activate the Drip addon.
The next step is to integrate WPForms with your Drip account. To do this, you’ll need to go to WPForms » Settings and click on the Integrations tab.

Then scroll down to the Drip section, click on it to expand it, and click the + Add New Account button.

This will show you two additional fields. In the Drip Account Name field, you can enter any name you’d like. This is for your internal use only and can be helpful if you add more than one Drip account to WPForms.

Below this, you’ll see the Drip API Token field. The API is what allows the WPForms plugin on your site to communicate with your Drip account.
Each Drip account has a unique API token. To access yours, you’ll need to log in to your Drip account in a new browser tab or window.
Once you’re signed into Drip, you need to access your User Info page. First, click on the person icon in the top right corner of your dashboard.

In the panel that opens, click on User Settings.

Towards the bottom of the User Settings page, you’ll be able to copy your API Token.

Return to the tab or window with your WPForms settings and paste the API Token into the relevant field.

Next, click the Connect to Drip button to save the connection.

You should see a green box that says Connected once the integration process is complete.

Creating a Campaign in Drip
Before you can add a Drip integration, you’ll need to create at least one campaign in Drip. To learn more, be sure to check out their guides on creating an email series campaign or creating a single campaign.
Adding Drip Integration to Forms
The next step is to add Drip integration to specific forms on your site. To do this, you’ll need to create a new form or edit an existing one.
After opening the form builder, go to Marketing » Drip and click the Add New Connection button.

After clicking this button, an overlay will appear. Here, you’ll need to enter a nickname for the connection you’re creating. It’s only for internal use and your users will never see it. This is helpful if you plan to connect this form to more than one mailing list.

Note: Drip maps the connection nickname to the connection_name Identifier in your Drip account. This means you won’t be able to edit/update the nickname after it’s created.
Once you create a connection, additional settings will appear.
First, use the Select Account dropdown to choose from any Drip accounts you connected to WPForms in the previous step.

Next, you’ll need to select an Action to Perform from the second dropdown.

The action you choose will determine which options appear next.
Actions to Add or Update a Drip Subscriber
In most cases, the goal of your form will be to add new subscribers to your mailing lists. Here are the available actions for adding or updating subscribers:
- Subscriber: Create or Update
- Campaign: Subscribe
- Record Event
Note: For more details on extra options available for each of these sections, please also see the Additional Options section.
Subscriber: Create or Update
This action will simply add a new subscriber to your Drip list, or update an existing subscriber. However, it will not automatically add the subscriber to any campaign.
You should use this action if you want to:
- Build a subscriber list, but don’t have a campaign ready yet.
- Let existing subscribers update their email addresses through your form.
Campaign: Subscribe
In addition to creating a new subscriber in Drip, this action will also allow you to immediately add the new subscriber to an existing email marketing campaign.
You should use this action if you’ve already created a Drip campaign and want to add subscribers to it immediately.
Record Event
Just like the above actions, this option will create a new subscriber in Drip. However, it will also add an event to your subscribers.
In Drip, events are used to track the activity of your subscribers. For example, you may want to create a specific event to indicate that subscribers were added to your list by submitting the form you’re building.
You should use this action if you already use or intend to use Drip events to segment your subscribers.
Note: For more details on what Drip events are and how to use them, please see Drip’s events tutorial.
Additional Options
Below is a list of additional options you can configure when adding or updating Drip subscribers via your form. Your selection from the Actions to Perform dropdown will determine which of these options are available:
- Subscriber Email: The email to use for a new subscriber. Or, if updating a user, the email they originally subscribed with.
- New Subscriber Email: The new email that should be added to your list when updating an existing subscriber. You can only use this option when updating subscribers.
- Send user ID to Drip (if the user was logged in): Drip assigns all users an ID number. Check this box if you’d like this ID number to match the user’s WordPress User ID.
- Send user IP address to Drip: This option will include users’ IP addresses in Drip. To learn about what an IP address is, please see WPBeginner’s glossary entry for this term.
- Mark user as a prospect: This will flag subscribers so you can easily target leads within Drip.
- Starting Lead Score Value: In Drip, a lead score indicates a subscriber’s engagement level. This option is only visible when Mark user as a prospect is checked. For more details, be sure to check out Drip’s tutorial on lead scoring.
- Tags to Add: Adds the specified tags to users in Drip. You can use tags in Drip to easily identify and segment users.
- Tags to Delete: Removes the specified tags from users in Drip.
Note: Lead scoring is not available if you joined Drip after June 2, 2020.
Mapping Custom Fields
If you select the Subscriber: Create or Update action, you’ll have the option of mapping fields in your form to custom fields you’ve set up in Drip.
First, you’ll need to create your custom field(s) in Drip if you haven’t already done so. Then you can enter the identifier for your custom field in the Field Name field under Custom Field Name.

Note: Your Field Name must match your custom field identifier in Drip. Custom field identifiers can only include letters, numbers, and underscores, so don’t use spaces when filling out the Field Name in the form builder.
Next, select the field from your form that corresponds to your Drip custom field from the Select Form Field dropdown under Form Field Value.

The value users enter in the form field you select will be imported into Drip as the value of the custom field you listed. For instance, in our example, users’ selections from the Birth Month field in our form will be mapped to the birth_month custom field in Drip.

To add multiple custom field mappings, click on the blue plus (+) button and repeat the process.

Actions to Delete or Unsubscribe a Drip Subscriber
In some cases, it may be useful to allow your subscribers to use a form to remove themselves from your mailing lists. Here are the available actions for removing subscribers:
- Subscriber: Delete
- Campaign: Unsubscribe
Subscriber: Delete
This action will allow your subscribers to remove themselves from your Drip mailing list entirely.
Once you select the Subscriber: Delete action, you’ll need to map the Subscriber Email to the Email field on your form.

Note: This action will remove all the details about the subscriber from your Drip account and is irreversible.
You should only use this action if your form is specifically intended to allow subscribers to delete themselves completely from your Drip account.
Campaign: Unsubscribe
This action will let your subscribers remove themselves from your Drip campaign(s). Unlike the Subscriber: Delete action, this option only allows subscribers to remove themselves from either one specific campaign, or all campaigns. However, the user will still exist within your Drip account.
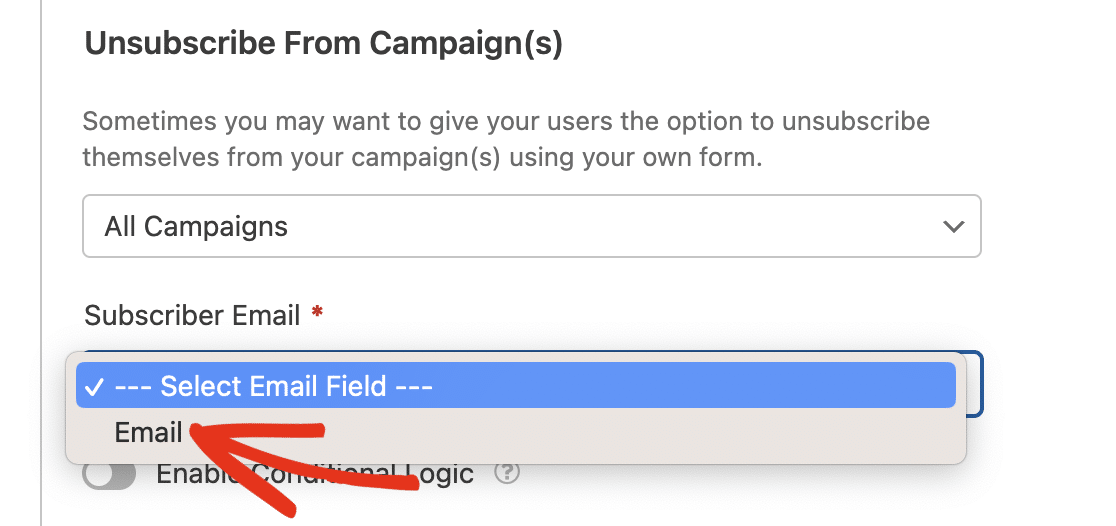
Once you select the Campaign: Unsubscribe action, a dropdown will appear listing all the Campaigns on your Drip account. You’ll need to specify the campaign users will unsubscribe from. Selecting the All Campaigns option will unsubscribe the user from all the emails on your Drip account.
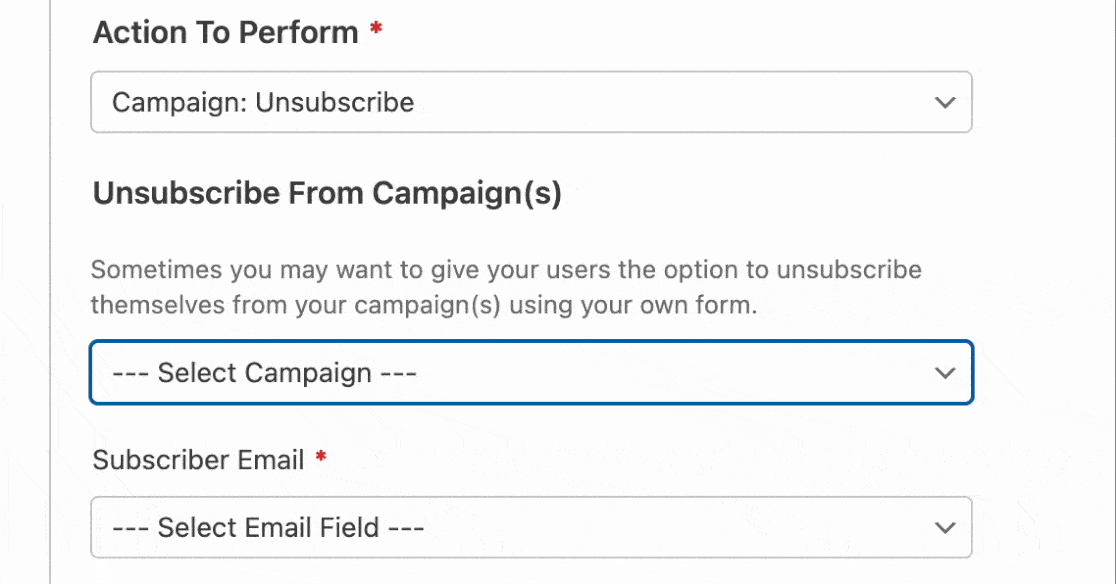
After choosing the Campaign(s) to unsubscribe the user, you’ll need to map the Email field on your form to the Subscriber Email dropdown.
You should use this action if you’d like to let users unsubscribe from campaigns but not remove themselves from your Drip account altogether.
Note: Using this action only removes the subscriber from the Campaign(s) you selected. However, they’ll still be visible as subscribers on your Drip mailing list.
Setting Up Conditional Logic for Drip (Optional)
Conditional logic allows you to set rules for events based on users’ selections or input in their form entries, creating a “smart” form.
For example, you can use conditional logic to allow users to choose whether they’d like to be added to your mailing list(s).
To do so, start by adding a Checkboxes field to your form. Click on this option on the left side of the form builder, or drag and drop it into the preview area.

Then click on your Checkboxes field in the preview area to open its field options. For our example, we only need a single checkbox, so we’ll remove the extra items from the field by clicking the minus (-) icon next to each of them.

Then we’ll adjust the text. For our example, the checkbox text will read “Please keep me updated with weekly newsletters.”

Next, go to Marketing » Drip and toggle on the Enable Conditional Logic option.

Then set up your conditional rule. For our example, it will read “Process this connection if Subscribe is Please keep me updated with weekly newsletters.”

Note: Need help configuring your conditional logic rule? See our tutorial on using conditional logic in WPForms for more guidance.
Remember to always save your forms by clicking on the Save button at the top of the builder after making changes.

Frequently Asked Questions
These are the top questions we see about the Drip addon.
How do I enable double opt-in for Drip in WPForms?
Double opt-in settings are handled in Drip, which is why you won’t find them in WPForms.
You can enable double opt-in for a Drip campaign in its dashboard. For help with this process, please contact the Drip support team.
That’s it! You can now set up Drip integration with any form on your site.
For a practical walkthrough of how to use this integration, be sure to check out our guide on adding new subscribers and creating tags in Drip.