


AI Summary
When I first started using WordPress, I was blown away by how much it could do. But at the same time, I found myself constantly looking for ways to make things easier, faster, and more effective.
WordPress has so many features and options that it’s easy to miss things that can save you time or improve your site. From choosing the right hosting provider to optimizing images and securing your site, there’s a lot to learn.
In this post, I’m sharing my best WordPress tips, based on years of hands-on experience. These tips will help you get the most out of your site, regardless of whether you’re just starting out, or you’ve been using WordPress for a while!
Must-Know WordPress Tips & Tricks
Over the years, I’ve picked up many tips and tricks that have made managing my WordPress sites a lot smoother, and I still come across new ones all the time.
I’ve tried my best to organize the tips in a way that makes sense, starting with the foundational steps you need when setting up a site to making important decisions later on.
Each tip naturally builds on the others to help you create a well-rounded and fully functional site, but feel free to share your suggestions in the comment box at the end of the guide.
Setting the Foundation for Your WordPress Site
From my experience, getting the basics right when setting up your WordPress site can save you a lot of time and trouble later. A solid foundation ensures your site runs smoothly, stays secure, and performs well as it grows.
1. Choose the Right Hosting Provider
When I initially started with WordPress, I didn’t think much about hosting and opted for something very basic. But over time, I realized how important it is to choose a good hosting provider.
Your hosting affects literally everything; how fast your site loads, how secure it is, and even how often it stays online without downtime, security, or other issues.
For beginners, managed WordPress hosting is a great option. It takes care of a lot of technical stuff, like updates and backups, so you can focus on your site.
If you’re looking for reliability and speed, providers like SiteGround or Bluehost are great places to start. For more recommendations, check out our guide on the best hosting services or the table below:
| Plugin | Cost | 1-Click WP | Free SSL | Free Domain | Traffic |
|---|---|---|---|---|---|
| Bluehost | $2.75/mo | ✅ | ✅ | ✅ | Unmetered |
| SiteGround | $3.99/mo | ✅ | ✅ | ✅ | 10,000+/mo |
| Hostinger | $2.19/mo | ✅ | ✅ | ✅ | 10,000+/mo |
| DreamHost | $2.59/mo | ✅ | ✅ | ✅ | Unlimited |
| HostGator | $2.64/mo | ✅ | ✅ | ✅ | Unmetered |
| A2 Hosting | $11.99/mo | ✅ | ✅ | ✅ | Unlimited |
Trust me, investing in a good hosting provider is one of the best decisions you can make for your site. It gives you peace of mind and sets you up for success from the start.
2. Secure Your Site with an SSL Certificate
One of the first things I learned when building WordPress sites was how important it is to have an SSL certificate. It’s not just about security but how search engines and visitors see your site.
I’ve observed that visitors trust a site more when they see the little padlock icon in the browser address bar. It’s a simple way to show your site is safe to use, and Google also tends to favor secure sites in search results.

An SSL certificate ensures that any data shared between your site and its users is encrypted. This means things like passwords, payment details, or contact form entries are protected from being intercepted.
The good news is that many hosting providers now include SSL certificates for free. Providers like Bluehost, SiteGround, or WP Engine make it really easy to set one up with just a few clicks.
If your host doesn’t include it, you can still get one from services like Let’s Encrypt. Setting this up early is one of the best steps you can take to protect your site.
3. Select a Theme That Fits Your Needs
If you’re building a WordPress site, it’s very important that you choose the right theme, as it directly affects how fast your site loads and how easy it is to use on different devices.
Through trial and error, I’ve learned that a good theme should be both responsive (work well on all screen sizes) and fast. It’s also crucial to consider the purpose of your site.
For example, if I’m creating a blog, I look for a theme designed for readability. If it’s an online store, I go for something built with eCommerce in mind. The choices are endless, but you can check out these best free WordPress themes (my personal favorites) to point you in the right direction.
Once I have a few options in mind, I try their demos. Most themes offer demos you can play around with, and they’ve saved me from picking themes that look great in screenshots but don’t work as well in practice.
Compatibility with plugins is another big factor I consider. I’ve run into issues before where a theme didn’t play nicely with the plugins I wanted to use. Now, I check reviews or documentation to make sure the theme works with popular tools like SEO plugins, caching plugins, and any other features I plan to add.
Related Guides:
- Best WordPress Theme Builders
- How to Customize Your WordPress Theme Colors
- How to Change Your WordPress Theme
Correctly Configuring Your WordPress Website
Getting your WordPress site up and running the right way can save you a lot of headaches later. One of the best things I’ve learned is to focus on tools that help me understand how visitors use my site.
4. Set Up Google Analytics & Google Search Console
It doesn’t matter what kind of site you set up or what platform you use (Shopify, Wix, or WordPress). It’s extremely important that you set up the relevant tracking to know what’s happening on your site.
Setting up Google Analytics was one of the best decisions I ever made. It let me see how many people were visiting, where they were coming from, and what pages they spent the most time on.
This kind of data helped me make smarter decisions about my content, design, and the conversion rate of my forms.

Google Search Console is another tool I always recommend. It shows how your site is performing in search results, lets you check for issues, and even gives tips for improving visibility.
For example, I’ve used it to fix broken links, submit sitemaps, and track which queries bring traffic to my site.

At first, setting these up seemed intimidating, but tools like MonsterInsights make the process much easier.
It’s a WordPress plugin that connects Google Analytics and Google Search Console to your WordPress dashboard, so you can see all your data in one place without having to jump between tabs.
5. Customize Your Permalinks in WordPress
Permalinks are the URLs for your pages and posts, and the default WordPress settings don’t always create the most user-friendly links.
Clean, simple URLs are easier for visitors to read and remember, and they can also help your site rank better in search engines.
For example, instead of a URL like this:
yourwebsite.com/?p=123

You can have something like this:
yourwebsite.com/about-us
Making this change is easy. Go to your WordPress dashboard, click on Settings » Permalinks, and choose the Post Name option.
Alternatively, if your website has different directories, you can create a custom structure that includes a category and post name tag.

This will make your URL look like this:
yourwebsite.com/blog/how-to-customize-your-permalinks/I’ve also learned that using clear keywords in your permalinks can improve your site’s visibility in search results.
For instance, if you’re writing a blog post about baking bread, your URL should include words like “baking-bread” instead of random numbers or characters.
6. Set a Static Homepage
When you first install WordPress, it shows your latest blog posts on the homepage. That works for a personal blog, but for a business site or portfolio, you usually want a proper welcome page.
In your dashboard, open Settings » Reading, choose A static page under Your homepage displays, then select your new homepage from the dropdown.

I do this on nearly every site I build, since it gives you control over the first thing visitors see instead of leaving your newest post to make that impression for you.
7. Add a Contact Form to Your Site
One of the first things I always add to a WordPress site is a contact form. It’s such a simple feature, but it makes a huge difference in how easily visitors can reach out.
Whether someone wants to ask a question, make a business inquiry, or provide feedback, a contact form makes the process smooth and professional.
Not to mention, having a contact form is not just about communication, but it’s also a great way to collect leads or other important information.
For example, I’ve used WPForms to gather emails for newsletters, request detailed project proposals, and even set up event registrations. It has a ton of powerful and hidden features.
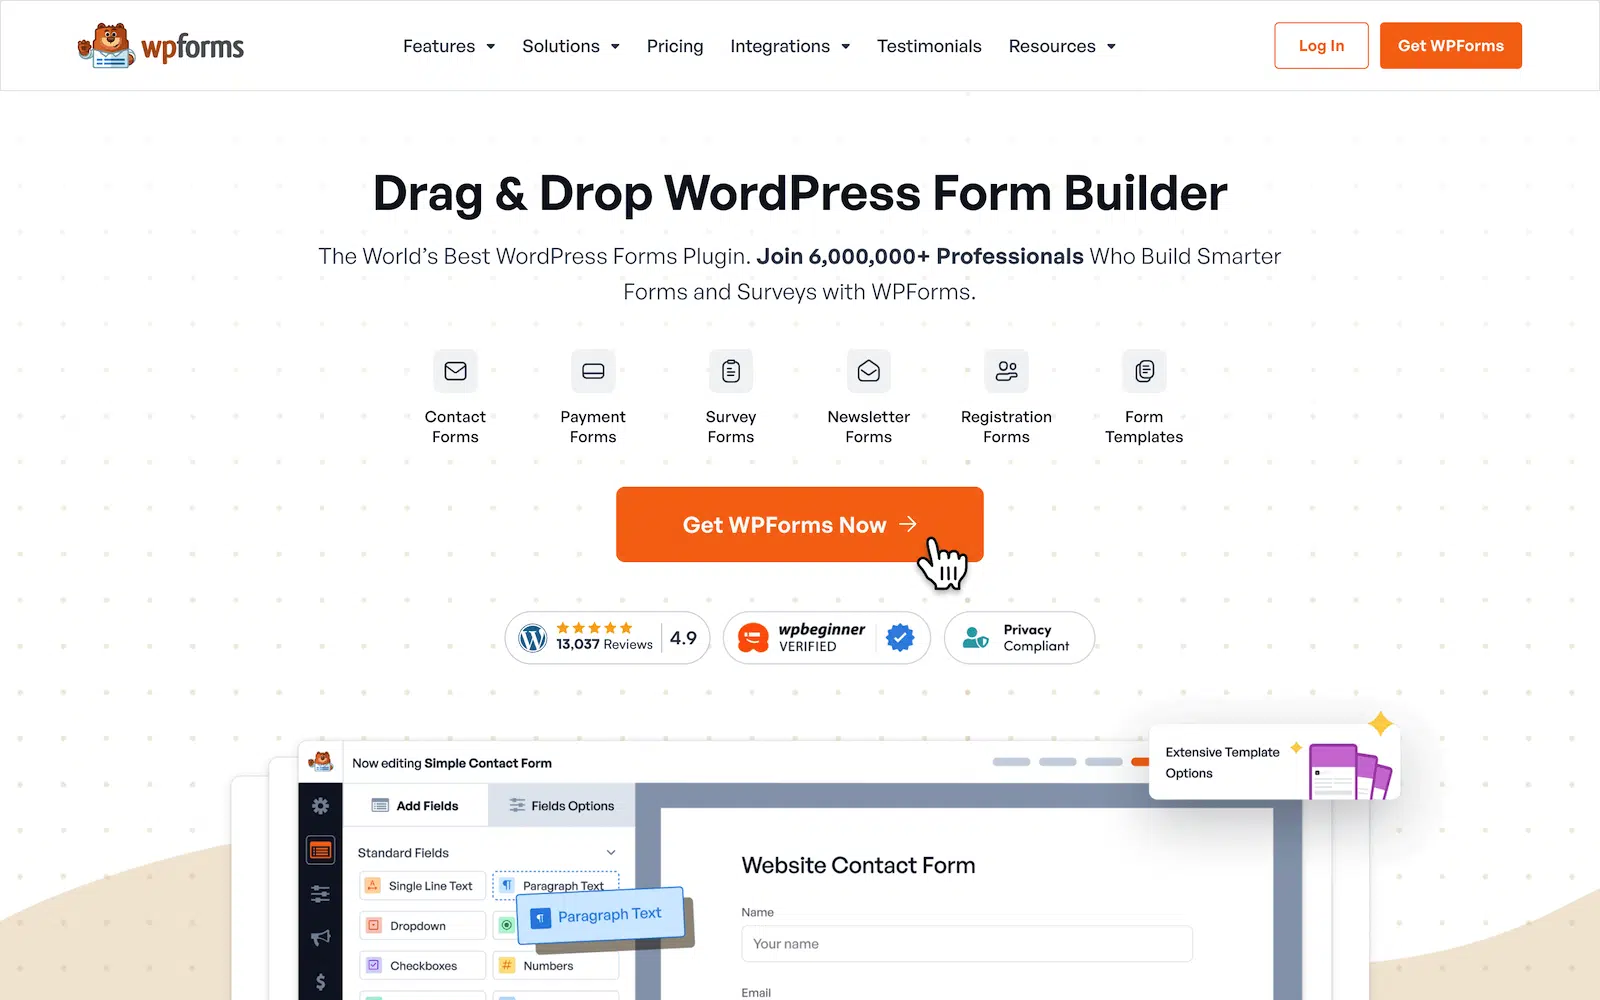
With just a few clicks, I can set up basic forms or even more advanced ones, like surveys or multi-step forms, while taking advantage of a huge list of features and even the help of AI.
8. Change the Default Admin URL
By default, WordPress uses the same login page for every site, which hackers know about. Leaving it as is makes it easier for bots or attackers to try brute-force attacks to access your site.
I found that using a plugin like WPForms is one of the easiest ways to create a custom login form and change the admin URL, thanks to the User Registration Addon.
To get started, you’ll first need to install WPForms and the User Registration Addon. Once it’s set up, you can create a custom login form through the drag-and-drop builder.

After that, you can embed the form on a page with a unique URL, like yourwebsite.com/login, instead of the default /wp-admin or /wp-login.php.
If you’re ready to do the same, check out this step-by-step guide from WPForms to create your own custom login form and secure your admin area.
9. Utilize WordPress Roles Effectively
Being in the WordPress industry for almost a decade, I’ve had talks with a lot of new website owners. Surprisingly, most, if not all, don’t know how to utilize WordPress roles effectively.
When multiple people are working on your site, assigning the right roles can make everything run much more smoothly. It keeps tasks organized and ensures that no one accidentally makes changes they shouldn’t.
There have been cases where users have mistakenly blown up an entire site just because they had access to certain settings and configurations that they shouldn’t have had access to.
To assign roles, go to the Users section in your WordPress dashboard and either edit an existing user or add a new one.

From there, you can select the appropriate roles like:
- Administrator: This role has full access to everything on your site. I use it sparingly and only for myself or someone I fully trust to manage the site.
- Editor: Editors can publish, edit, and delete any posts or pages, even ones they didn’t create. This is great for someone overseeing all content.
- Author: Authors can create, edit, and publish their own posts, but they can’t touch others’ work or site settings. I usually assign this role to writers.
- Contributor: Contributors can write and edit their own posts but can’t publish them. I’ve used this role for guest writers who need their work approved before going live.
- Subscriber: Subscribers can only read content and manage their profiles. This role works best for membership sites or newsletters.
If you’re not sure which role to use or want to learn more about what each role can do, you can check out the official WordPress guide on roles and capabilities. It’s a great resource to help you make the best decisions for your team.
Optimizing Your Site for SEO and Performance
Making sure your WordPress site is optimized for search engines and runs smoothly is one of the best things you can do to grow your audience.
Over the years, I’ve learned that small steps, like installing the right plugins and tweaking settings, can make a big difference in both performance and visibility.
10. Install an SEO Plugin
One of the first tools I always set up on a new WordPress site is AIOSEO (All in One SEO). It’s simple to use, even if you’re just starting out, and it has all the features you need to improve your site’s ranking on search engines.
With AIOSEO, I can easily optimize and use AI to generate my meta titles and descriptions for every post and page. I’ve found that using clear and descriptive titles with targeted keywords helps me get more clicks.

Another feature I rely on is the built-in sitemap generator. A sitemap is like a map of your site that helps search engines find and index your content. AIOSEO creates one for you automatically and updates it whenever you add new content.
I also appreciate how AIOSEO guides you step by step with its setup wizard. It’s especially helpful if you’re new to SEO because it makes everything easy to understand.
If you’re looking for an SEO plugin, I highly recommend starting with AIOSEO. You can check out more about its features in our AIOSEO review. It’s been a huge help for my WordPress sites, and I wouldn’t manage one without it.
11. Add Alt Tags to Your Images
Alt tags improve your site in two big ways: they make it accessible for people using screen readers and help search engines understand your images, which can boost your SEO.
Adding alt tags is very simple too. Whenever you upload an image on WordPress, you can edit the alt text, title, caption, description, and file URL in the Attachment Details section.

I’ve found that writing alt tags with relevant keywords helps my images rank in search results, too. But it’s important to keep them natural and focus on describing the image, not stuffing keywords.
12. Optimize Images with Compression Tools
If you’re regularly adding blog posts to your website with a ton of images, it’s a good idea to take a step back and think about your page load times.
One of the factors that make a huge difference to how fast your pages load is the size of your images. Large image files can really slow down your website.
Therefore, I always compress images to reduce their file size without losing quality, and it makes a huge difference in both speed and user experience.
I’ve tried a few tools over the years, but my favorite is TinyPNG. It’s easy to use and does a great job of shrinking file sizes while keeping the images looking sharp.

The best part of all is that after connecting the plugin to your TinyPNG account, every image I upload to my Media Library is automatically compressed. I can also choose to compress images individually if needed.
13. Use a Caching Plugin for Faster Loading
When visitors access your site, WordPress usually generates the page on the fly, which can take a bit of time. One of the easiest ways I’ve improved my WordPress site’s loading speed is by using a caching plugin.
Caching plugins solve this by creating static versions of your pages and serving them to users. This reduces the work your server has to do and makes your site load much faster.
If you’re looking for a way to improve your site’s performance, I highly recommend starting with a caching plugin. I’ve had great success with WP Super Cache, which is simple to set up and does exactly what I need.

14. Speed Up Your Site with a CDN
Caching speeds up your site for repeat visitors, but if your audience is spread across different countries, a content delivery network (CDN) adds another layer of speed.
A CDN stores copies of your site’s files on servers around the world, so when someone visits, those files load from the server closest to them instead of traveling all the way from your main host.
Static files like images, CSS, and JavaScript get served from that network too, which takes real pressure off your hosting. Once my sites started getting visitors from outside my own region, this was the change that helped those far-away readers most.
Cloudflare is a popular starting point with a free plan that covers smaller sites well. If you want to weigh a few options, take a look at the best CDN providers we recommend.
| Provider 🌐 | Best For ⚡ | Free Plan? | Starting Price 💵 |
|---|---|---|---|
| Cloudflare | Best free tier and built-in security | Yes (generous) | Pro plan starts at approximately $20-$25 per month |
| Akamai Ion | Best for enterprise scale and SLAs | Free trial available | Custom pricing (contact sales) |
| Amazon CloudFront | Best for AWS-native stacks | 1 TB/month free for one year | $0.085 per GB (US) |
| Fastly | Best for developer control and dynamic content | $50 trial credit | Paid plans from $50/month + usage |
| Bunny.net | Best price-to-performance overall | 14-day free trial | $0.01 per GB (North America and Europe) |
15. Avoid Using Excessive Plugins
During my early days of exploring WordPress, I made the mistake of installing every plugin that looked useful. I thought adding more features would improve my site, but it ended up doing more harm than good.
With time passing on, I’ve learned to be more selective about the plugins I use. Now, I only install plugins that are essential for my site’s functionality.

I’ve found that keeping my plugin list short and purposeful has made my site faster, more secure, and easier to manage. Remember, quality is better than quantity when it comes to plugins.
A few well-chosen tools can do wonders without overloading your site. Check out this guide for more information on how many WordPress plugins are too many.
Managing and Maintaining Your WordPress Site
Keeping your WordPress site running smoothly takes regular care and attention. Now, I’ve learned that consistent maintenance is key to avoiding problems and ensuring your site performs well for visitors.
Simple tasks like updating plugins, monitoring site performance, and reviewing security settings can make a big difference. Here’s how it helps:
16. Backup Your Website Regularly
I make it a point to back up my sites regularly, and the plugin I trust most for this is Duplicator. It’s easy to use and does a great job of creating full backups of your site, including all files, themes, plugins, and databases.
Unlike some plugins that leave you tangled in a web of complex settings, Duplicator Pro reduces the process into a few easy clicks. It’s like taking a snapshot of your website at a specific moment, ready to be restored whenever needed.
If you’re like most website owners, remembering to back up your site manually is probably not on top of your to-do list. That’s where Duplicator Pro’s scheduled backups come into play.

Backing up regularly has saved me more than once. Whether it’s fixing a broken update or restoring a site after a server issue, having a recent backup has made the process so much easier.
17. Keep Your Plugins and Themes Updated
One of the simplest yet most important tasks I’ve learned for managing a WordPress site is keeping plugins and themes updated.
Updates aren’t just about adding new features. They often include fixes for security issues and bugs that could affect how your site runs.
I make it a habit to check for updates regularly. Here’s how I do it:
- Check for Updates in the Dashboard: Log in to your WordPress dashboard and go to the Updates section under the Home tab. This will show you any plugins or themes that need updating.
- Update Plugins First: I always update plugins first by clicking Update Now next to each one. If it’s a major update, I read the changelog to see what’s new or if anything requires extra attention.
- Update Themes: Once plugins are updated, I move on to themes. If I’ve made customizations, I use a child theme to ensure updates don’t overwrite my changes.
- Test After Updating: After updates, I test the site to make sure everything still works as expected. This step has saved me from missing any issues that could affect the user experience.
From better security to improved compatibility, staying on top of updates has been one of the most reliable ways to keep my WordPress sites in great shape.
18. Test Big Changes on a Staging Site First
Some of the most stressful moments I’ve had with WordPress came from making a change directly on a live site and watching something break while real visitors were on the page. A staging site is how you avoid that situation entirely.
A staging site is a private copy of your website where you can test updates, new plugins, theme changes, or design tweaks without anyone seeing them.

Many managed WordPress hosts, like the ones I mentioned earlier, include one-click staging right in the dashboard. If yours doesn’t, you can create a local copy of your site on your own computer and test there instead.
I now treat staging as non-negotiable for anything bigger than a small text edit. It only takes a few minutes to set up, and it has saved me from pushing a broken change more than once.
19. Create a Custom 404 Page
Initially, when working on WordPress sites, I didn’t think much about 404 pages. But with time, I realized that a generic “Page Not Found” message can confuse or frustrate visitors.
Creating a custom 404 page is a simple way to make your site more helpful and user-friendly. It’s also a chance to guide visitors back to useful content instead of letting them leave your site entirely.
I use a casual tone to let visitors know the page they’re looking for doesn’t exist. Something like, “Oops! It looks like this page isn’t here anymore” works well. It’s better than a plain error message.
To create a custom 404 page in WordPress, I usually edit my theme’s 404.php file or use a page builder plugin like SeedProd. It’s a quick task, and the difference it makes is huge.

20. Limit Login Attempts
By default, WordPress doesn’t restrict how many times someone can try to log in, which means anyone could keep guessing your password until they get it right.
This makes your site vulnerable to brute-force attacks, where bots or hackers try thousands of password combinations. Therefore, in addition to changing the default WordPress admin URL, it’s important to limit login attempts too.

To protect my site, I always use a plugin like Limit Login Attempts Reloaded. This plugin let you control how many login attempts are allowed before locking out the user for a set amount of time.

If you’re not already limiting login attempts, I highly recommend setting it up. It’s quick, easy, and could save you a lot of trouble down the road.
21. Strengthen Login Security with 2FA and a Security Plugin
Limiting login attempts is a great start, but I don’t stop there. Two of the easiest ways to lock down your login are two-factor authentication and a dedicated security plugin.
Two-factor authentication (2FA) adds a second step to your login, usually a code from an app on your phone. Even if someone gets hold of your password, they can’t get in without that code.
A good security plugin does more than logins, though. It can scan for malware, set up a firewall, monitor file changes, and alert you when something looks off. I always install one early on a new site so protection is in place before there’s anything to lose.
If you’re not sure which one to pick, we put together a rundown of the best WordPress security plugins that covers the main options and what each one does well.
22. Keep Spam Off Your Site and Forms
Spam has a way of piling up once your site gets going, whether it’s junk comments on your posts or bot submissions through your forms. Left alone, it clutters your dashboard and can slow things down.
For comments, WordPress has built-in controls under Settings » Discussion, where you can hold comments for moderation and flag ones with suspicious links.
For forms, this is where I lean on WPForms, as it comes with built-in anti-spam protection, and you can add a CAPTCHA, hCaptcha, or Cloudflare Turnstile when you want an extra layer.
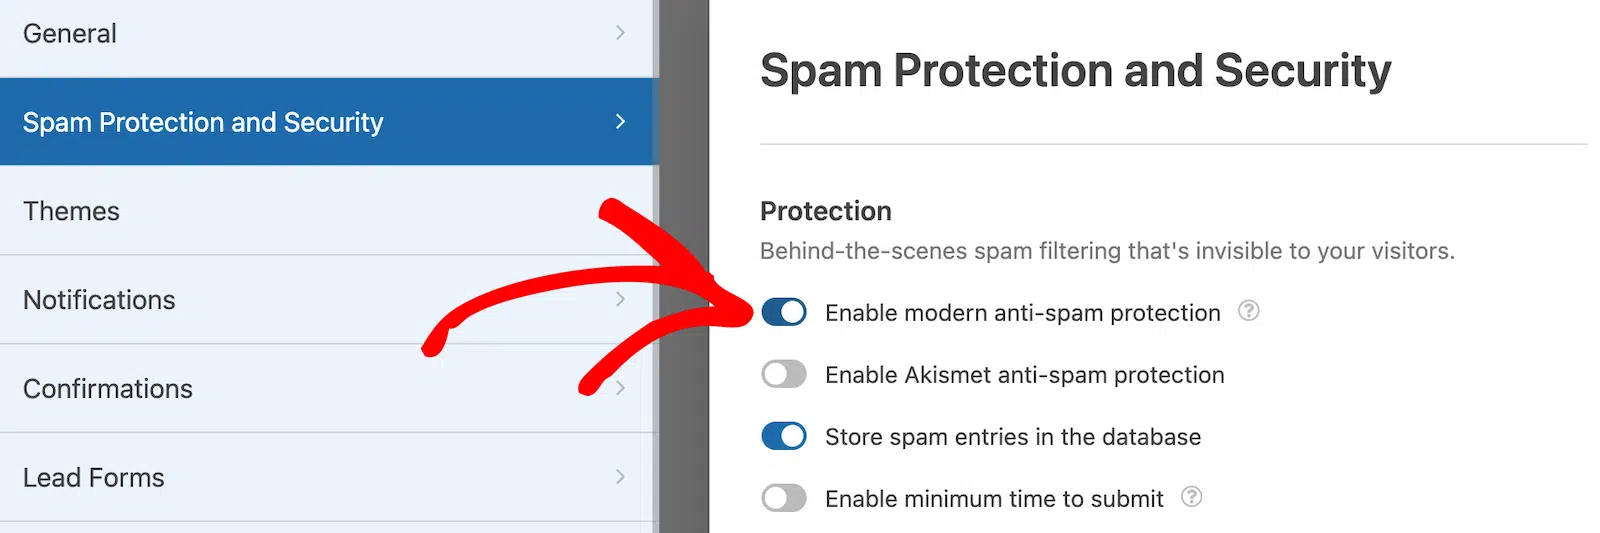
If you are looking for stronger spam protection that uses AI, then I’d also recommend checking out ActiveLayer.
Cleaning up spam protects your data and keeps your entries genuinely useful. If forms are a weak spot for you, our guide on spam-free contact forms walks through every option.
23. Easily Set Up Redirects
Over time, I’ve had to change URLs or merge content on my WordPress sites for various reasons. Maybe I wanted to improve an old URL for SEO or combine two similar blog posts.
But without redirects, visitors trying to access the old URLs end up on a “404 Page Not Found” message, which can be frustrating for them and bad for my site.
One of the easiest ways I’ve found to handle redirects is by using the SEO plugin I asked you to install earlier, AIOSEO. The plugin has a built-in Redirects feature that makes the process quick and simple.
When I change a URL or delete a page, I enter the old URL (Source URL) and the new one (Target URL) in the Redirects settings. AIOSEO handles the rest, ensuring visitors are automatically sent to the correct page.

I’ve found this feature especially helpful when cleaning up older posts or fixing broken links. It keeps visitors happy and ensures my site doesn’t lose valuable traffic.
Enhancing User Experience and Design
A clean layout, intuitive menus, and thoughtful use of colors all work together to create a site that feels professional and welcoming. Focusing on user experience ensures that visitors can quickly find what they’re looking for, while good design makes your content stand out.
24. Be Smart with Font Selection
When it comes to making your content stand out and readable to your audience, it’s incredibly important to be smart with your font selection, When I write long blog posts, I always think about the reader’s experience. Scrolling through a long article can feel overwhelming, especially on mobile devices.
You can change your fonts in WordPress by using a plugin like the Fonts Plugin or directly from the dashboard by navigating to Appearance » Themes » Customize.

I avoid overly decorative fonts, especially for body text. Fonts like Arial, Roboto, or Open Sans are clean and easy to read, which works well for most websites.
Moreover, I usually pick two fonts, One for headings and another for body text. This keeps the design consistent and avoids a cluttered look.
25. Add Featured Images to Your Posts
One thing I always make sure to include in my WordPress posts is a featured image. These images grab attention and give readers an idea of what the content is about before they even start reading.
I make sure the image relates directly to the topic of the post. For example, take a look at this featured image example below for a topic related to speeding up WordPress websites.

The text “How to Speed Up Your WordPress Website” is clear, large, and easy to read. Meanwhile, the illustration of a speedometer and a person adjusting it perfectly aligns with the topic of website speed.
This combination of a clear title, relevant illustration, subtle branding, and clean background design makes the featured image engaging and effective.
26. Split Long Posts into Pages
When I write long blog posts, I always think about the reader’s experience. Scrolling through a long article can feel overwhelming, especially on mobile devices.
That’s why I sometimes split lengthy posts into multiple pages. This not only makes the content easier to navigate but also encourages readers to stay engaged.
WordPress has a special tool for this. Just use the Page Break block in your post where you want to start a new section. This way, your website stays quick and easy for everyone to use.

Once you publish or update the post, readers will see numbered navigation links at the bottom of each page, letting them easily click through to the next section.
27. Display Last Updated Date of Your Posts
Keeping content updated is just as important as creating new posts. If you regularly refresh old articles, showing the “Last Updated” date can be really helpful for your readers.
It lets them know the information is current and builds trust in your content. I’ve found that this small detail makes a big difference, especially for posts like tutorials, reviews, or guides that need to stay relevant.
This can be achieved by adding the following code to add the following custom code snippet using the WPCode plugin or your theme’s functions.php file:
$u_time          = get_the_time( 'U' );
$u_modified_time = get_the_modified_time( 'U' );
// Only display modified date if 24hrs have passed since the post was published.
if ( $u_modified_time >= $u_time + 86400 ) {

	$updated_date = get_the_modified_time( 'F jS, Y' );
	$updated_time = get_the_modified_time( 'h:i a' );

	$updated = '<p class="last-updated">';

	$updated .= sprintf(
	// Translators: Placeholders get replaced with the date and time when the post was modified.
		esc_html__( 'Last updated on %1$s at %2$s' ),
		$updated_date,
		$updated_time
	);
	$updated .= '</p>';

	echo wp_kses_post( $updated );
}
FAQs — Must Know WordPress Tips and Tricks
Learning about WordPress tips is a popular topic of interest among our readers. Here are answers to some common queries about it:
How can I make my WordPress site better?
Focus on improving speed, navigation, and design. Use caching plugins, optimize images, and choose a clean, responsive theme. Regularly update your content and test the site on different devices for usability.
How do I increase SEO on my WordPress site?
Install an SEO plugin like AIOSEO, use descriptive meta titles and alt text for images, and optimize your site speed. Create high-quality content, use internal links, and ensure your site is mobile-friendly.
How do I make my WordPress site pretty?
Choose a professional theme and use consistent colors and fonts. Add high-quality images, edit the header, clean up cluttered layouts, and ensure good spacing. Plugins like SeedProd can help you design custom pages easily.
Is Wix better than WordPress?
Wix is easier for beginners, but WordPress offers more flexibility and control. WordPress is a better choice for scalability, while Wix may work for smaller, less complex sites.
What is the fastest way to learn WordPress?
Start with tutorials and practice on a test site. Use resources like WordPress.org documentation, wp101, video guides, and beginner-friendly plugins like WPForms to get hands-on experience.
What is the easiest website builder for WordPress?
Page builder plugins like Elementor or SeedProd are some of the easiest tools. They use drag-and-drop functionality, letting you design pages without coding.
How long does it take to make a simple WordPress website?
Building a simple site can take a few hours to a day, depending on your content and experience. Setting up hosting, installing WordPress, and customizing a theme are straightforward steps.
Next, Check Out These Related WordPress Guides
That’s it! We hope this list helped you boost the functionality, security, appearance, and management of your WordPress site. Check out these related WordPress guides to further boost the capabilities of your website:
- How to Personalize WordPress Forms With WPForms
- How to Brand WordPress With Custom Logos
- What’s the Best Logo Size for WordPress Sites
- How to Block a Country in WordPress
- Ways to Use OpenAI on Your WordPress Site
Ready to build your form? Get started today with the easiest WordPress form builder plugin. WPForms Pro includes lots of free templates and offers a 14-day money-back guarantee.
If this article helped you out, please follow us on Facebook and X (Twitter) for more free WordPress tutorials and guides.





