
AI Summary
Do you want to easily send an online invite with an RSVP for a birthday party from WordPress? Using an RSVP form is fun, easy, and can simplify your party planning process.
In this tutorial, we’ll show you how to make an online RSVP for a birthday party on your website.
Click Here to Start Making Your RSVP Birthday Party Invite Now
Why Use an Online RSVP for a Birthday Party?
Whether you’re planning a birthday party for yourself, a friend, or your little one, birthday parties should be fun. But planning a birthday party is a lot of work, and can sometimes be stressful.
So why not try an online RSVP? Using an online RSVP can make it a lot easier on you for a ton of reasons including:
- Higher Response Rates — Because the process is easy for guests, you’ll get more people to respond to your birthday party RSVP invite at a faster rate.
- Get More Info — There’s room to ask for more details from people like meal preferences, allergies, a nice note about the guest of honor, etc.
- Save Time — Avoid waiting for snail mail RSVPs to arrive and get instant responses from party attendees with WPForms Pro’s free online RSVP form template.
- Invite Guests to Your Site — If you’re throwing a party for your child, this could be a great excuse to let other parents know about your small business by hosting the RSVP form on your website.
- Better Organization — By ditching paper and using an online evite RSVP for a birthday party and guest list instead, you and your guests can stay more organized by keeping all the guest information in one place.
- Limit Responses — You can automatically close your RSVP form when you get the maximum number of responses. It’s also really easy to set a form expiry date so you get all of your responses by your deadline.
So now that you know why to use an online RSVP for a birthday party, let’s dive into exactly how it’s done.
How to Make an Online RSVP for a Birthday Party on Your Website
Asking yourself, “How do I set up an online RSVP on my WordPress website?” Here’s a step-by-step tutorial that shows you how.
Step 1: Create Birthday Party Invitation RSVP Form
Using WPForms is the easiest way to create an online RSVP for a birthday party. WPForms Pros has a huge variety of pre-built templates for every niche and industry, including tons of different online RSVP form templates.
The first thing you’ll want to do is install and activate the WPForms plugin. For more details, check out this step-by-step guide on how to install a plugin in WordPress.
Now that the plugin is active, you’ll need to create a new form.
To do this, go to WPForms » Add New and name your form. Then, scroll down to the section labeled Select a Template. Apart from a library of various entertainment form templates, you can also find a Birthday Party Invitation RSVP Form. Hover your cursor over this template after finding it via the search bar, and then click Use Template.

Once the pre-built form template loads, most of the work is already done for you. In fact, you’ll find the following fields are already in the form:
- Name
- Will you be able to make it? (Yeah, Maybe, I can’t)
- How many people are you going to bring?
- Comments or Questions
If you’d like, you can add additional fields to your form by dragging them from the left-hand panel to the right-hand panel.

Then, click on the field to make any changes. You can also click on a form field and drag it to rearrange the order on your RSVP form.
Need to collect money from the friends who attend the birthday party you’re throwing? Maybe you’re all splitting the cost of the big celebration for a shared close friend, or you want people to give donations for your favorite charity instead of gifts. It’s easy to accept payments right on your online RSVP birthday party invite.
WPForms allows you to accept payments on your forms using Stripe, Square, Authorize.Net, or PayPal. You can read our documentation on how to allow users to choose a payment method if you want to use more than one integration on your form, or check out how to accept payments with Stripe.
When your form looks the way you want it to, click Save.
Step 2: Configure Your Form Settings
To start, go to Settings » General.

Here you can configure the following:
- Form Name — Change the name of your form here if you’d like.
- Form Description — Give your form a description.
- Tags — Use tags to label and organize the forms on your site.
- Submit Button Text — Customize the copy on the submit button.
- Submit Button Processing Text — Edit the text that shows when someone submits your form.
At the bottom of the page, there are also advanced settings, which include:
- CSS Classes — Add CSS classes to your form or submit button.
- Enable Prefill by URL — Fill out some fields automatically based on a custom URL.
- Enable AJAX form submissions — Enable AJAX settings with no page reload.
- Disable storing entry information in WordPress — You can disable the storing of entry information and user details, such as IP addresses and user agents, in an effort to comply with GDPR requirements. Check out our step-by-step instructions on adding a GDPR agreement field to your simple contact form.
Next, move down to the Spam Protection and Security settings.
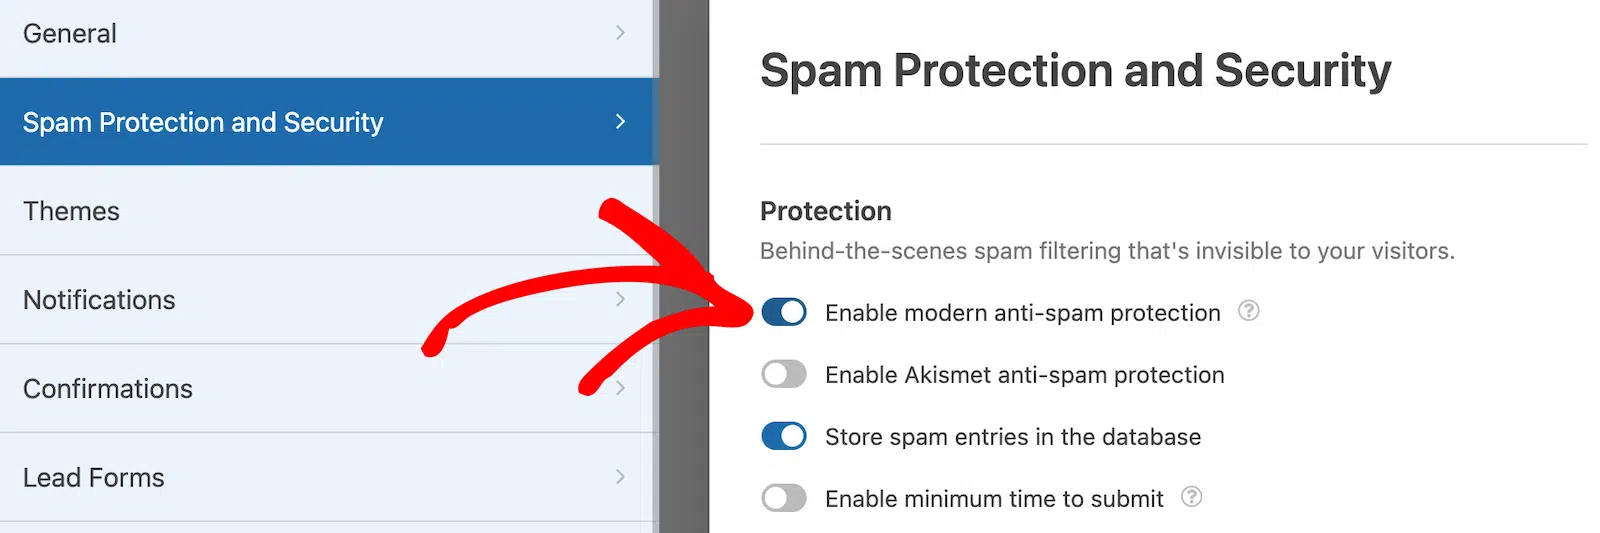
- Enable modern anti-spam protection — Stop contact form spam with the WPForms modern anti-spam protection. It’s automatically enabled by default on new forms, but you can choose whether you want to toggle it off on a form-by-form basis. This built-in spam protection runs seamlessly in the background to keep your forms safe. You can also pair it with another layer of security, such as a CAPTCHA.
- Enable Akismet anti-spam protection — If you use the Akismet anti-spam plugin, you can connect it to your form to block fake submissions.
- Enable country filter — Prevent submissions from certain countries.
- Enable keyword filter — Block entries that include certain words or phrases.
When you’re done, click Save.
Step 3: Configure Your Form Notifications
Notifications are a great way to send an email when an RSVP is submitted on your website.

In fact, unless you disable this feature, whenever someone submits an RSVP to your birthday party on your site, you’ll get a notification about it.
If you use Smart Tags, you can also send a notification to the site visitor when they RSVP to your party, letting them know you received their RSVP and will be in contact shortly. This assures your guests that their form has gone through.
For help with this step, check out our documentation on how to set up form notifications in WordPress.
WPForms also lets you notify more than one person when an RSVP form is submitted for your party. For instance, you can send a notification to yourself, your attendee, the guest of honor, and another friend who is helping plan the party.
For help doing this, check out our step by step tutorial on how to send multiple form notifications in WordPress.
Lastly, if you want to keep branding across your emails consistent, you can check out this guide on adding a custom header to your email template.

Step 4: Configure Your Form Confirmations
Form confirmations are messages that display to guests once they submit your birthday party invitation RSVP form. They let people know that their form has been processed and offer you the chance to let them know what the next steps are, if any.
WPForms has 3 confirmation types to choose from:
- Message — This is the default confirmation type in WPForms. When a site visitor submits your form, a simple message will appear letting them know their RSVP was processed. Check out some great success messages to help boost user happiness.
- Show Page — This confirmation type will take site visitors to a specific web page on your site thanking them for RSVPing to your party. For help doing this, check out our tutorial on redirecting users to a Thank You page. In addition, be sure to check out our article on creating effective Thank You pages.
- Go to URL (Redirect) — This option is for when you want to send site visitors to a different website.
Let’s see how to set up a simple form confirmation in WPForms so you can customize the message site visitors will see when they RSVP for the birthday party you’re hosting.
To start, click on Settings » Confirmations in the form builder.

Then, customize the confirmation message to your liking and click Save.
For help with other confirmation types, see our documentation on setting up form confirmations.
Now, you’re ready to add your online RSVP birthday party invite to your website.
Step 5: Add Your Online RSVP Birthday Party Form to Your Website
Now that you’ve built your online RSVP birthday party invite, you need to add it to your WordPress website. WPForms allows you to add your forms to many locations on your website, including your blog posts, pages, and even sidebar widgets.
To begin, create a new page or post in WordPress, or go to the update settings on an existing one.
After that, click on the plus (+) button to add a new block to your post or page. Choose the WPForms block.

The handy WPForms widget will appear inside of your block. Click on the WPForms dropdown and pick which one of the forms you’ve already created that you want to insert into your page. Select your Birthday Party Invitation RSVP form.

Now, publish your post or page so your birthday party invitation RSVP appears on your website.

To view RSVP form entries after they’ve been submitted, check out this complete guide to form entries. For example, you can view, search for, filter, print, and delete any RSVP form entries, making the event planning process that much easier.
Click Here to Start Making Your RSVP Birthday Party Invite Now
Next, Find the Best WordPress Popup Plugin
And there it is! You now know exactly how to make an online RSVP for a birthday party on your WordPress website. Make sure to also check out our post on the best WordPress popup plugins.
If you’re planning a surprise party, you’ll want to keep the site private until you’re ready to share the details. Check out our guide on how to hide your WordPress site until it’s ready to learn how!
Ready to build your form? Get started today with the easiest WordPress form builder plugin. WPForms Pro includes lots of free templates and offers a 14-day money-back guarantee.
If this article helped you out, please follow us on Facebook and Twitter for more free WordPress tutorials and guides.

