AI Summary
Tracking form submissions as conversions in Google Ads can be a powerful way to measure the effectiveness of your campaigns. When someone fills out a form on your site, like a contact or lead form, it shows they’re interested in your business.
By setting up conversion tracking, you can link these actions directly to your Google Ads, giving you clear insights into which ads drive results and helping you make more informed decisions.
In this guide, I’ll walk you through the steps you need to take, from setting up your form to configuring Google Ads conversion tracking, so you can start measuring the impact of your ad campaigns accurately.
Track Form Submissions as Ads Conversions! 🙂
How to Add WPForms Google Ads Conversion Tracking
Setting up tracking for WordPress form submissions in Google Ads can feel challenging, especially when dealing with Google Tag Manager.
It’s common to feel overwhelmed, as WPForms conversion tracking involves multiple platforms and intricate configurations, which may not be everyone’s piece of cake.
If you encounter any problems or anything seems unclear, feel free to comment at the end of the guide, and I’ll respond to your queries as quickly as possible.
Step 1: Use WPForms to Create Your Form
The first step for the Google ads form set up is to get the WPForms plugin up and running on your WordPress site. For more details, check out this guide on installing a plugin in WordPress.
Once you have WPForms installed, it’s time to create a WordPress form. Follow our easy tutorial to start with a basic contact form.
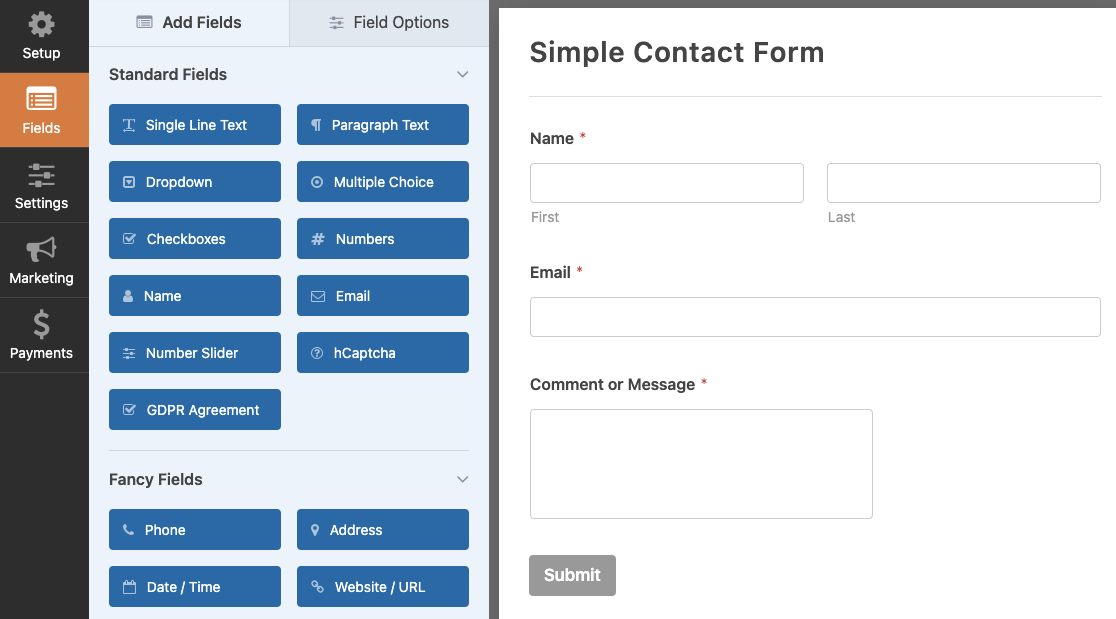
Use a Template to Kick Off Your Form Creation
Here, I’m showing you how to set up a basic contact form. But remember, WPForms lets you design a variety of forms using its ready-made templates:
- Lead forms to get new clients interested in your services.
- Simple order forms that let customers pay directly.
- File upload forms for collecting extra information.
- Job application forms for available positions.
- Survey forms to gather feedback about your services.
- And much more.
With over WPForms comes with 2,100+ WordPress form templates, you’re all set to create just about any form your website might need.
Step 2: Create a Thank You Page for Form Submissions
The simplest way to track form submissions as Google Ads conversions is to set up a thank you page that acknowledges user submissions.
This method is straightforward because it lets tools like GA4, Google Ads, and Tag Manager see when a lead completes a form directly on your website.
Set Up a New Thank You Page
To get started, go to your WordPress dashboard. From there, click on Pages and then on the Add New Page option.

Next, build your thank you page by adding a personal confirmation message, image, or any other elements you wish to include.
When your page looks good, navigate to the Page tab on the right side of the screen, click on URL, and use a simple PERMALINK like yoursitename.com/thank-you/
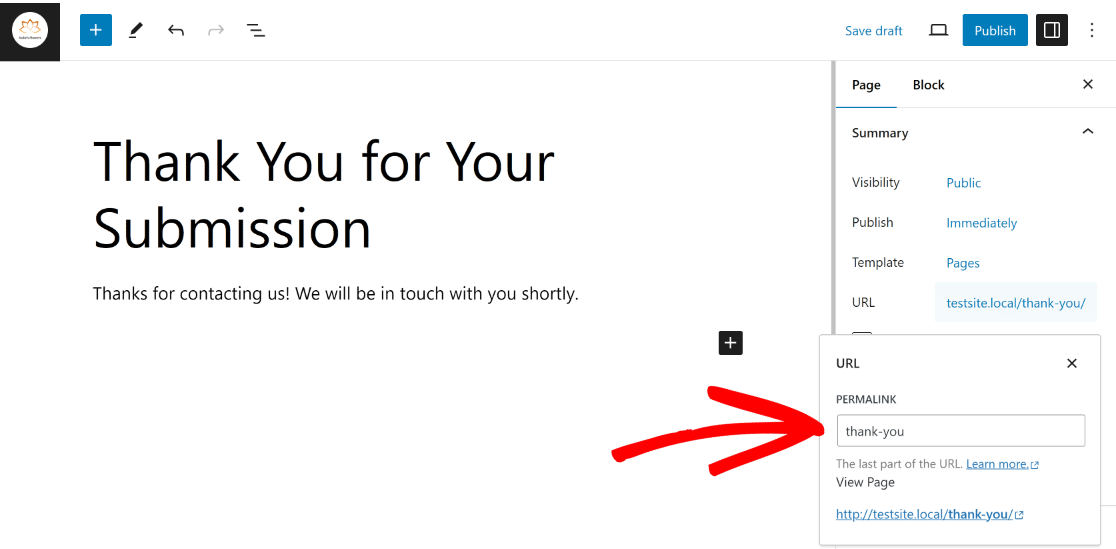
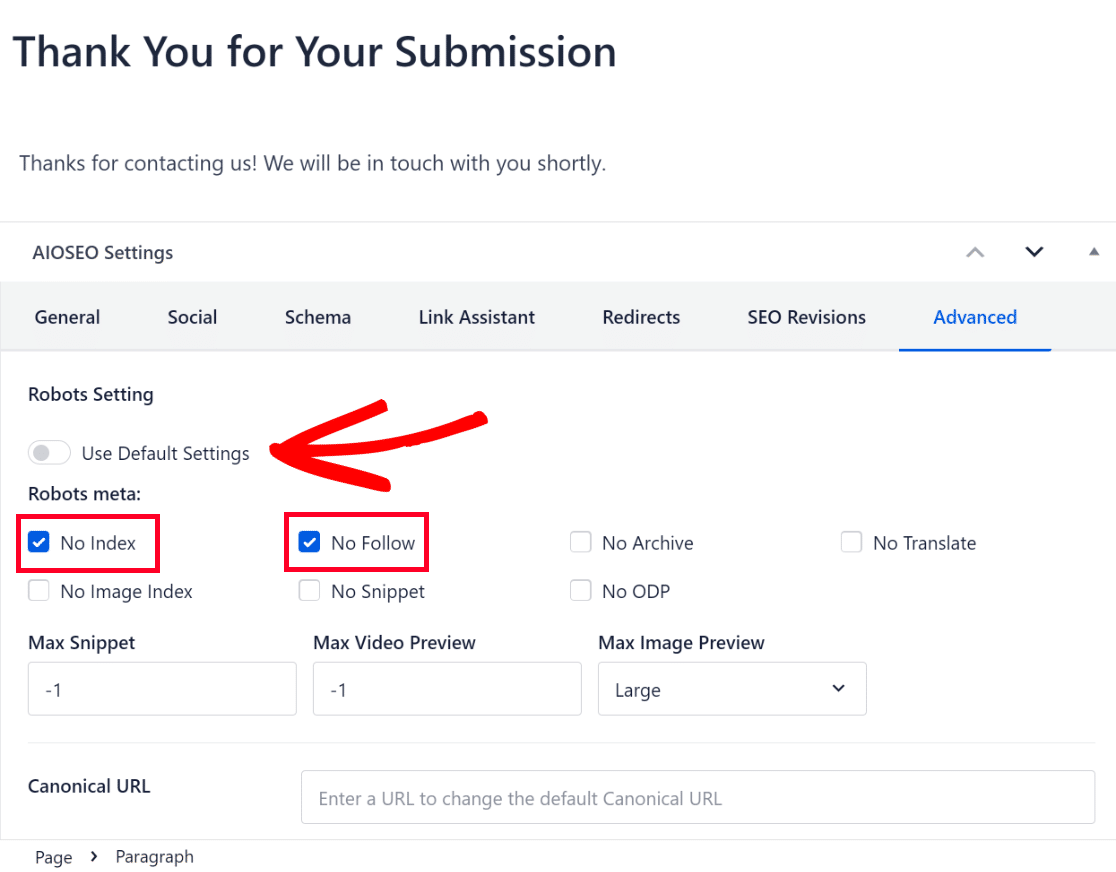
(Optional) While this isn’t necessary, deindexing your Thank You Page is always a good idea. You can use a tool like AIOSEO for this.
In AIOSEO Settings in the page builder, navigate to the Advanced tab and Toggle OFF Use Default Settings and check the No Index and No Follow options.
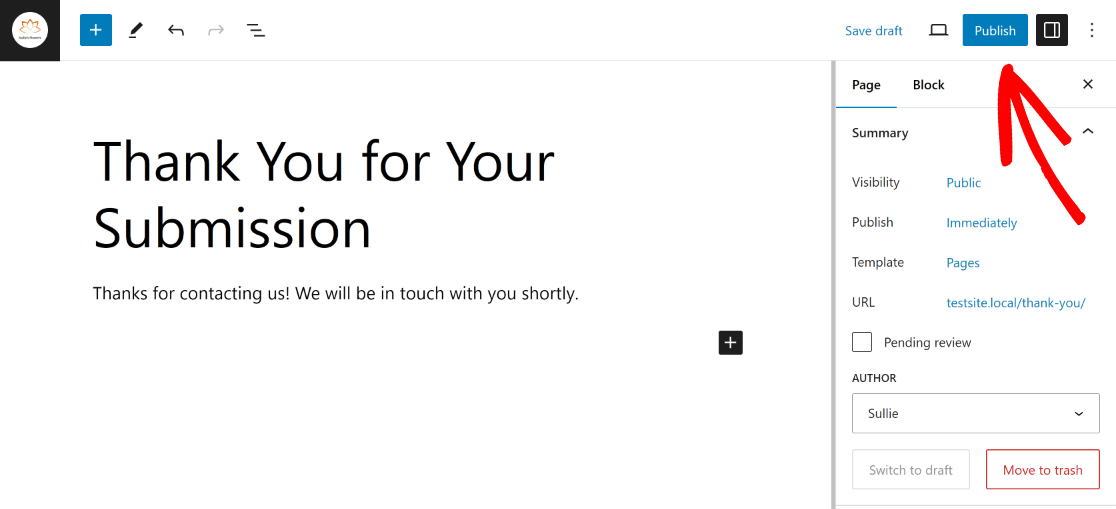
Once you’re done making these changes to your thank you page, simply click on the Publish button on the top right corner of the screen.
Connect the Thank You Page to Your Form
WPForms gives you a lot of flexibility when it comes to configuring form redirect and confirmation settings on your form.
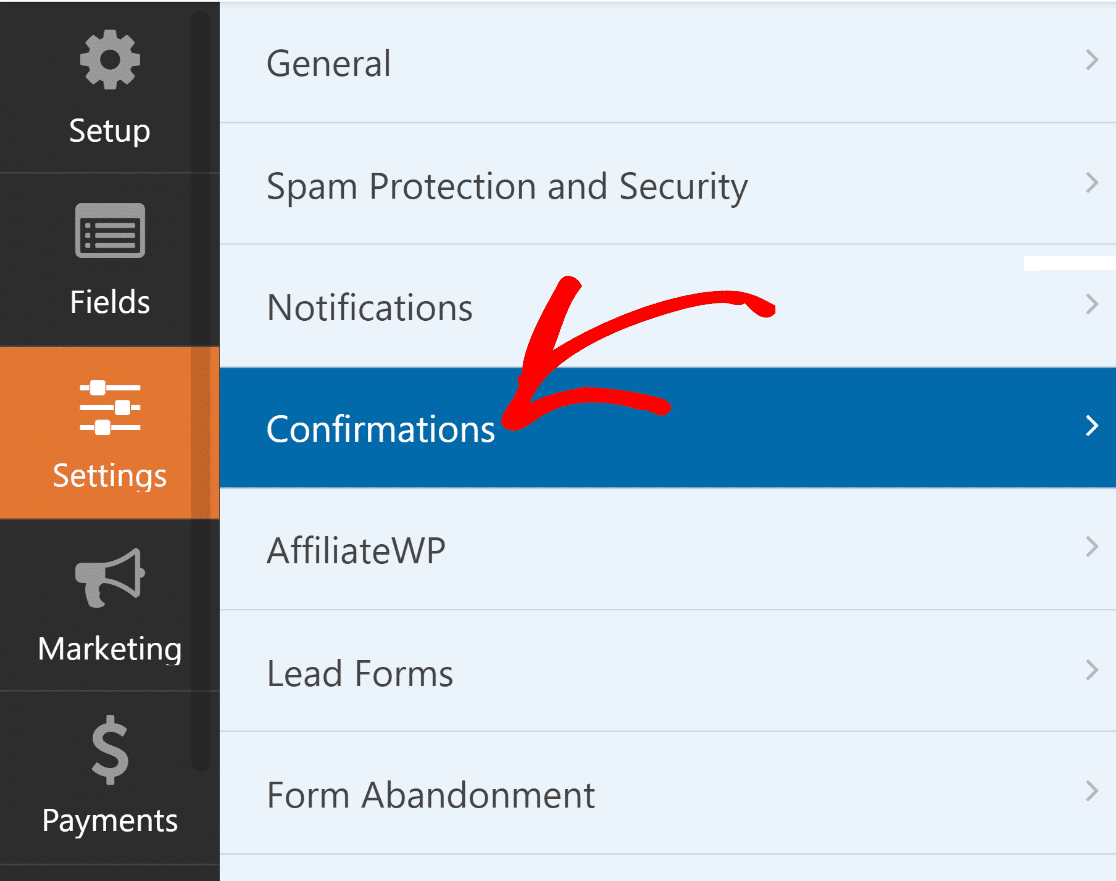
If you want to redirect visitors to a specific page on your site, select Settings » Confirmations from the form builder.
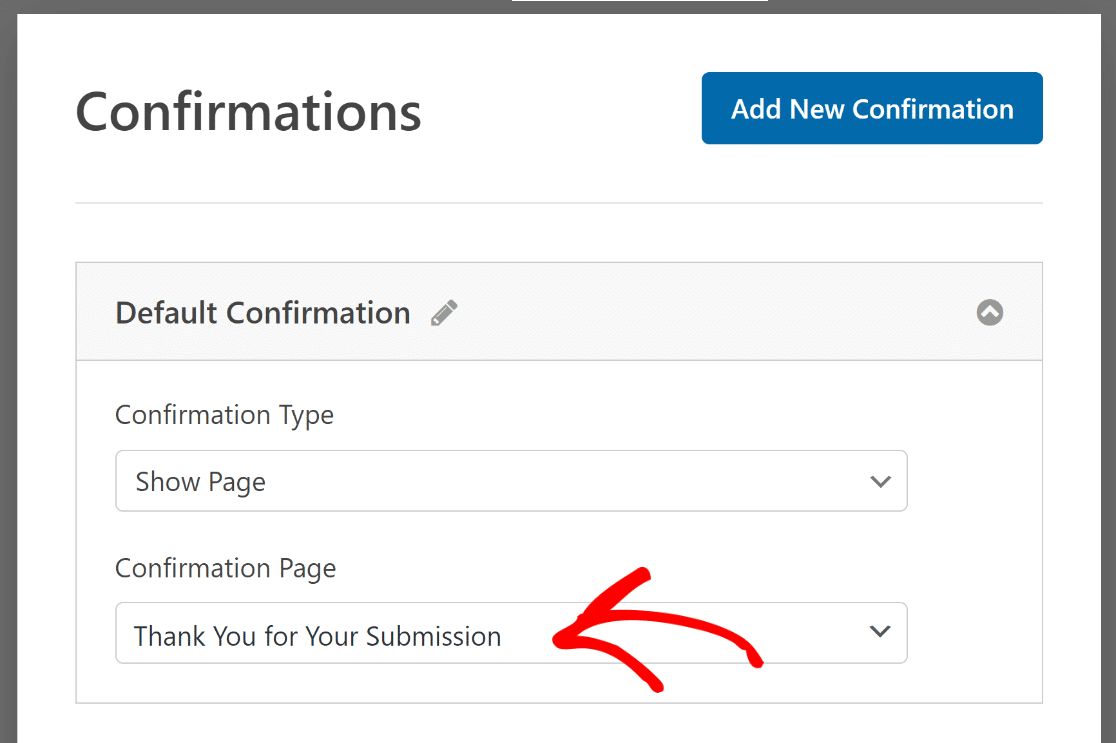
After this, choose Show Page from the Confirmation Type dropdown menu. A new dropdown menu called Confirmation Page will appear below.
Use the Confirmation Page dropdown to select the Thank You page you created earlier on your site to redirect visitors to after form submission.
Step 3: Create a Conversion Action in Google Ads
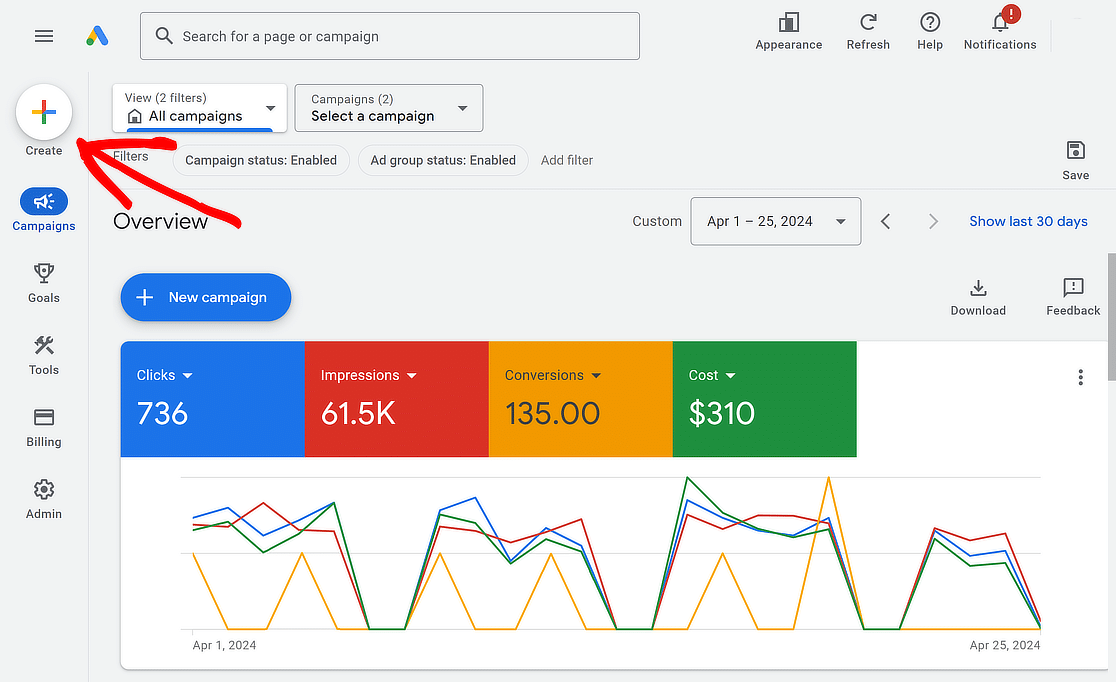
Great job so far! Now, you need to make a conversion action in Google Ads. To start, go to Google Ads, sign in, and click the ‘+’ sign in the left column.
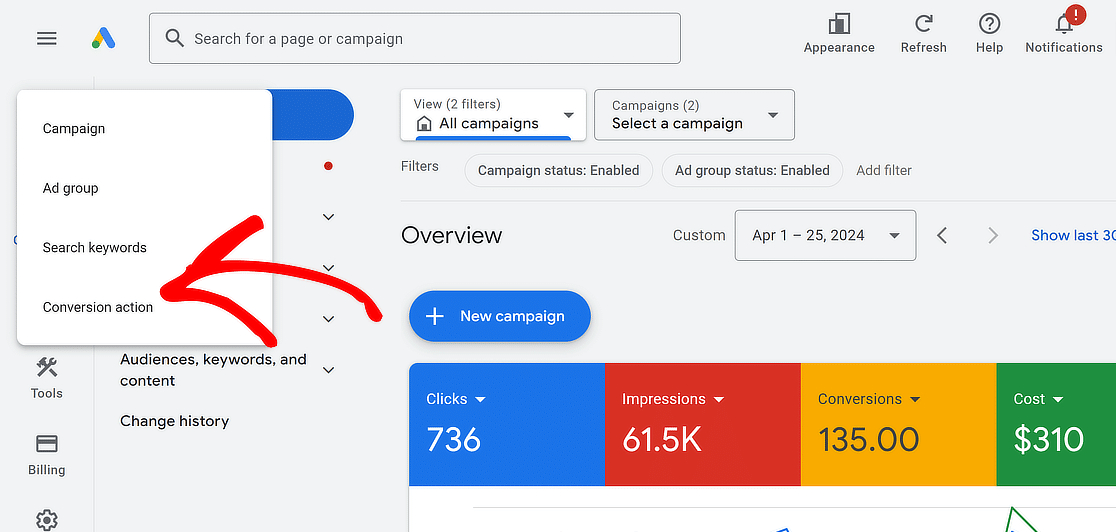
Next, you will be presented with a variety of options to create. Just select the Conversion action option from the dropdown menu.
Create a Conversion Action Manually
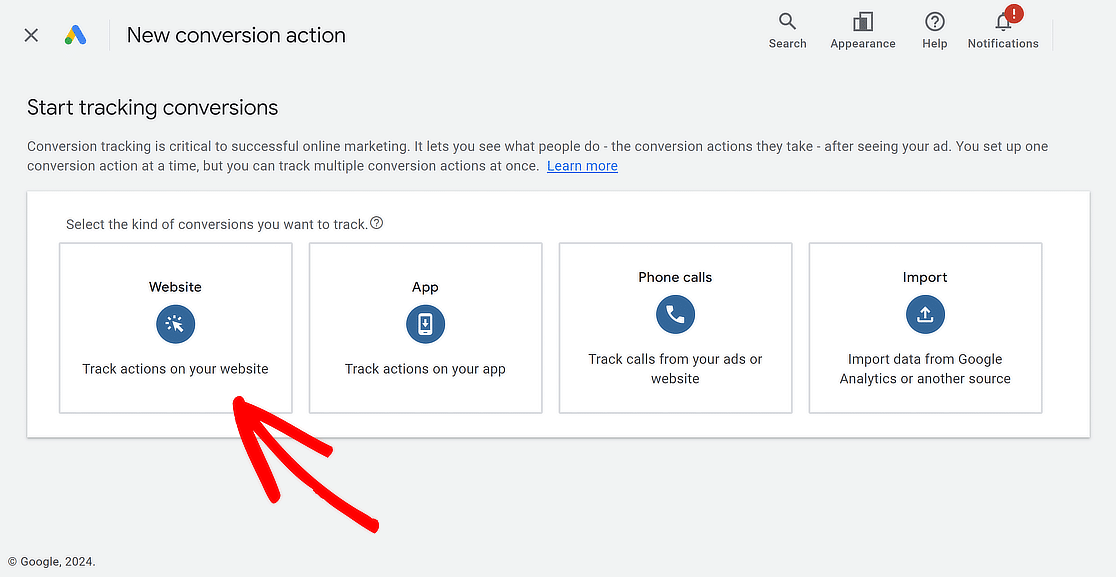
Google Ads will now ask you to select the type of conversions you want to track. You have four choices: a website, an app, a phone call, or an import.
For the purpose of this tutorial, we will select the Website option to track conversions through form submissions.
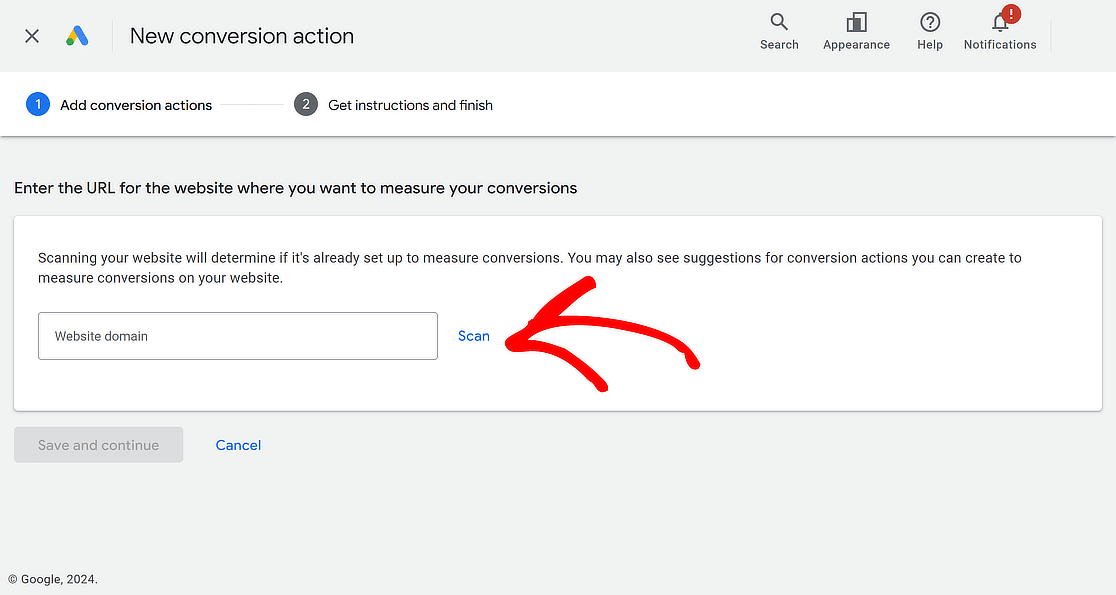
After that, you’ll need to enter the URL of the site where you want to track conversions. Just click the Scan button when you’re done.
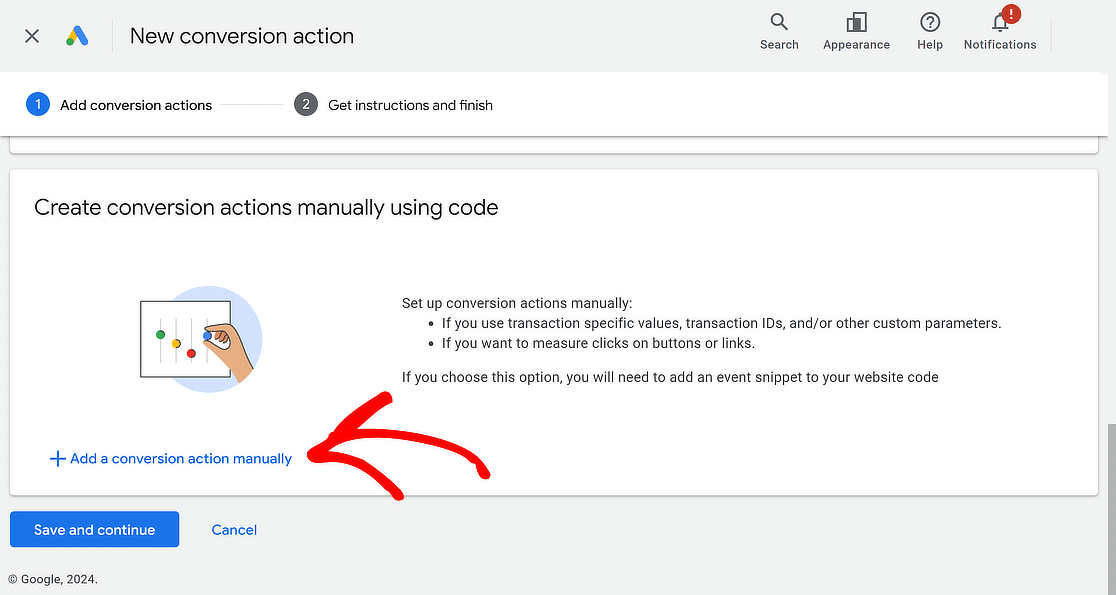
Once your website is scanned successfully, Google Ads gives you two ways to set up conversion actions: automatic and manual.
With the automatic option, you pick a goal, choose a match type, and provide the URL. This method works well if you know which events to track as conversions.
I suggest using the manual option for more control. Just scroll down and click + Add a conversion action manually.
Configure Your Manual Conversion Action
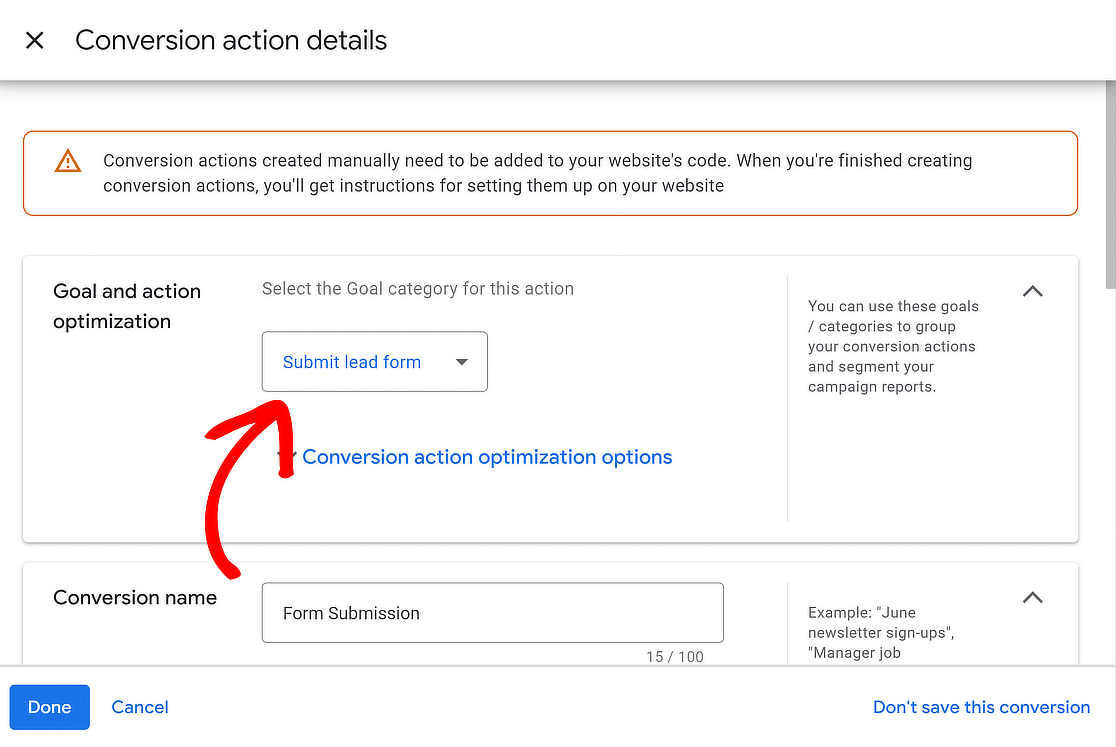
You’ll now see a form to fill in your conversion action details. First, select Goal and action optimization to specify what action you want to monitor.
Since we want to track form submissions, select the Submit lead form option and name the conversion “Form Submission.”
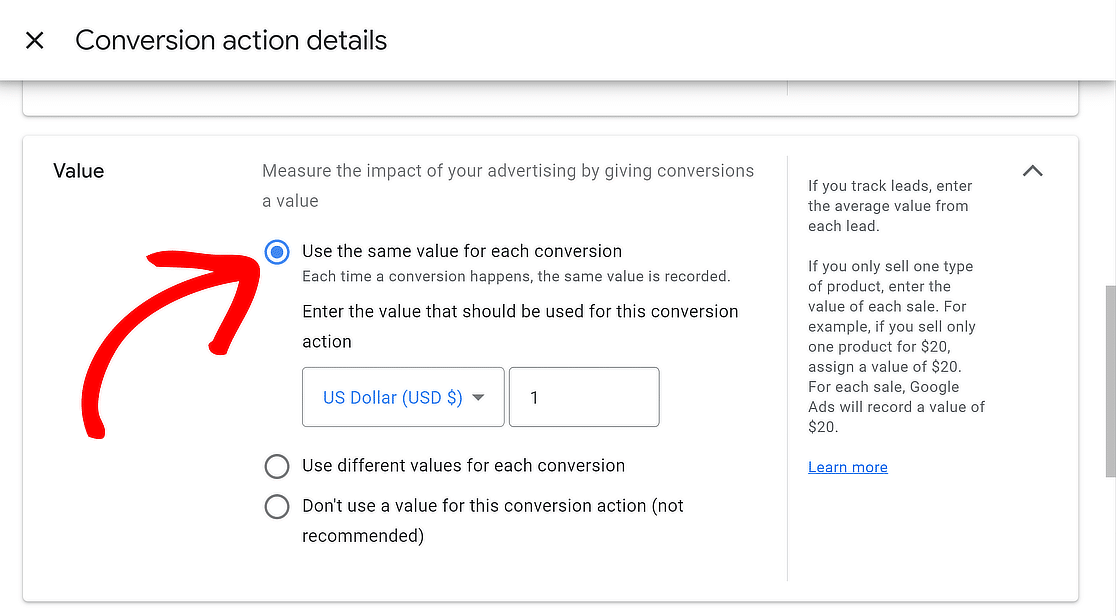
Now, set a value for your conversion. Google Ads allows you to assign the same value to each conversion, different values, or no value at all.
This action aims to track form submissions. Google recommends, “If you track leads, enter the average value from each lead.”
Once you’re ready, choose the Use the same for each conversion option, pick the currency, and set a specific value.
Next, decide how many conversions to count per click. If you’re tracking form submissions, choosing One makes sense as each user is counted once.
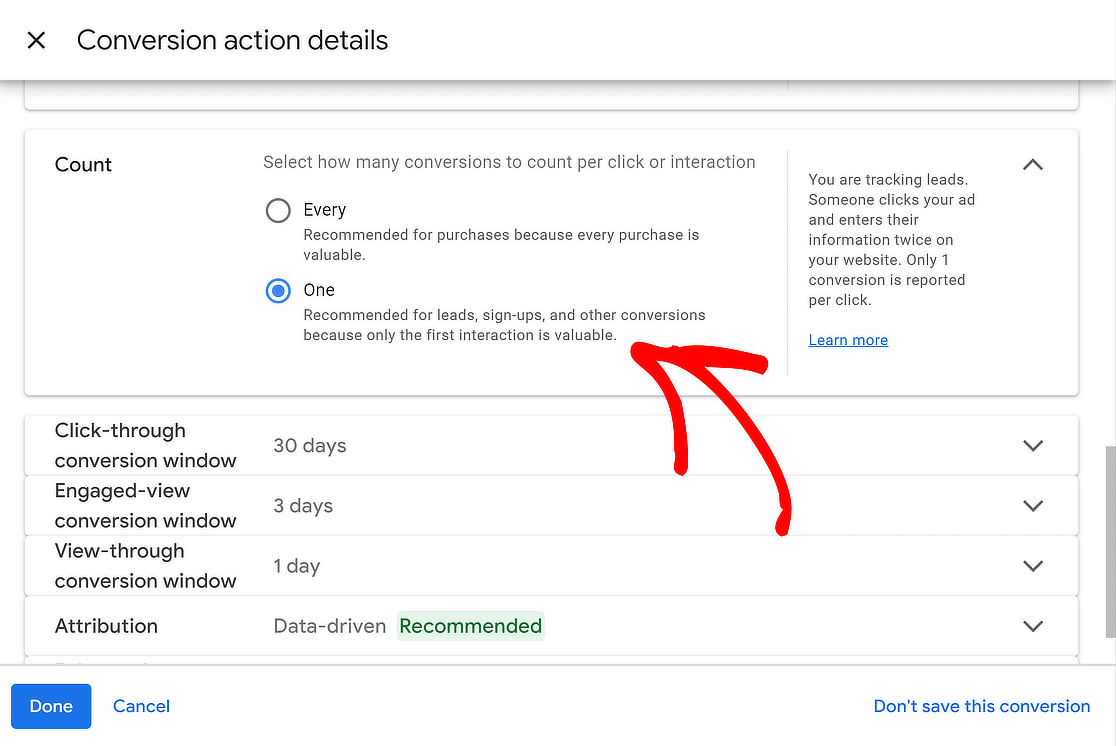
Once you’ve made your choices, hit the Done button. You’ll see your new conversion action listed under Create conversion actions manually using code.
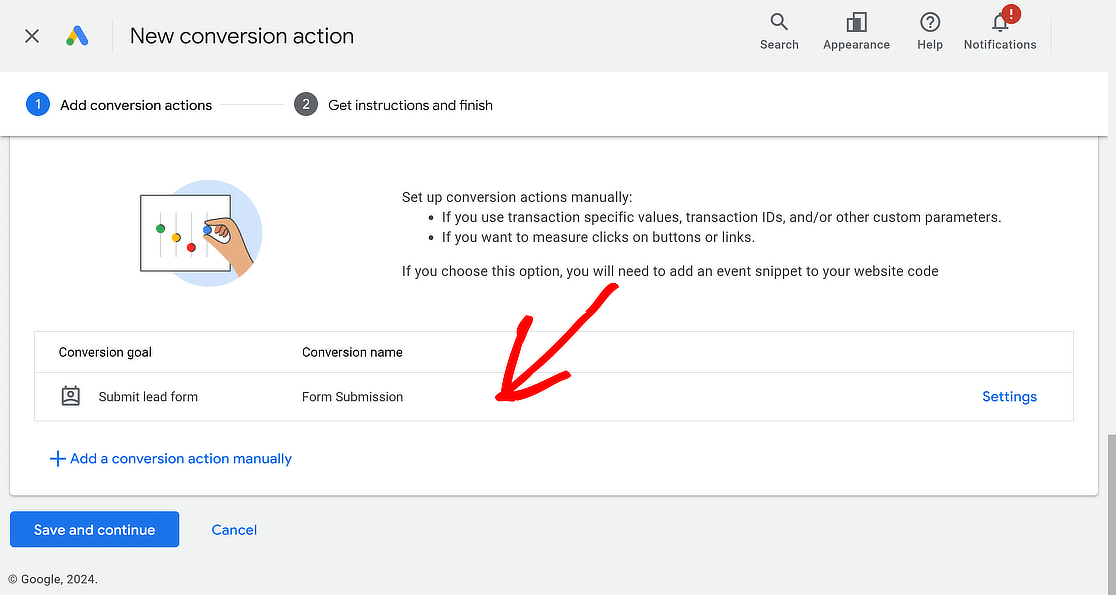
You’re doing a great job! To proceed with the process of adding tracking tags to your website, click the Save and continue button.
Step 4: Implement Your Conversion Tracking
On the next page, you’ll find three options for implementing your conversion tracking. Choose Use Google Tag Manager.
You’ll see your Conversion ID and Conversion Label. Make sure to copy these details or keep your browser tab open for reference.
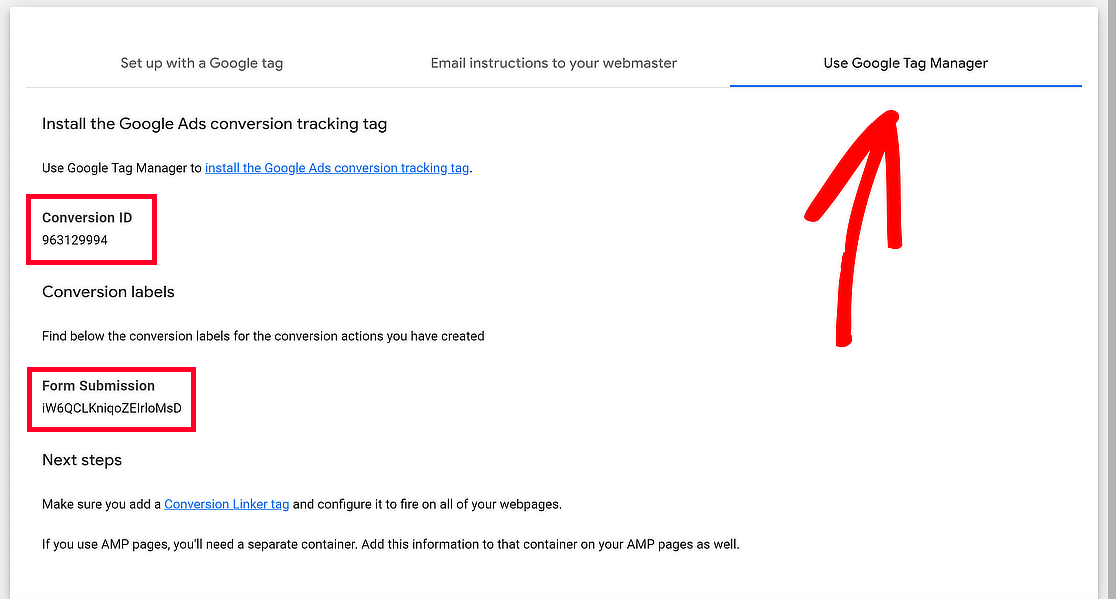
If you’re already using Google Ads and Google Analytics for your website, you might have connected these tools to Google Tag Manager.
If you haven’t connected them yet, or if this is your first time setting it up, don’t worry—I’ve got you covered! Check out this guide to connect everything.
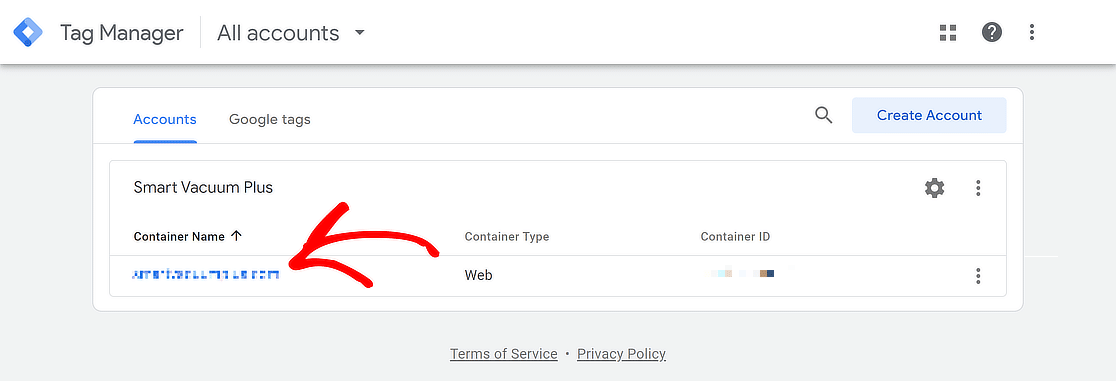
Open a new browser tab and head to your Google Tag Manager account. Then, click the container with your website name.
Create a New Tag in GTM
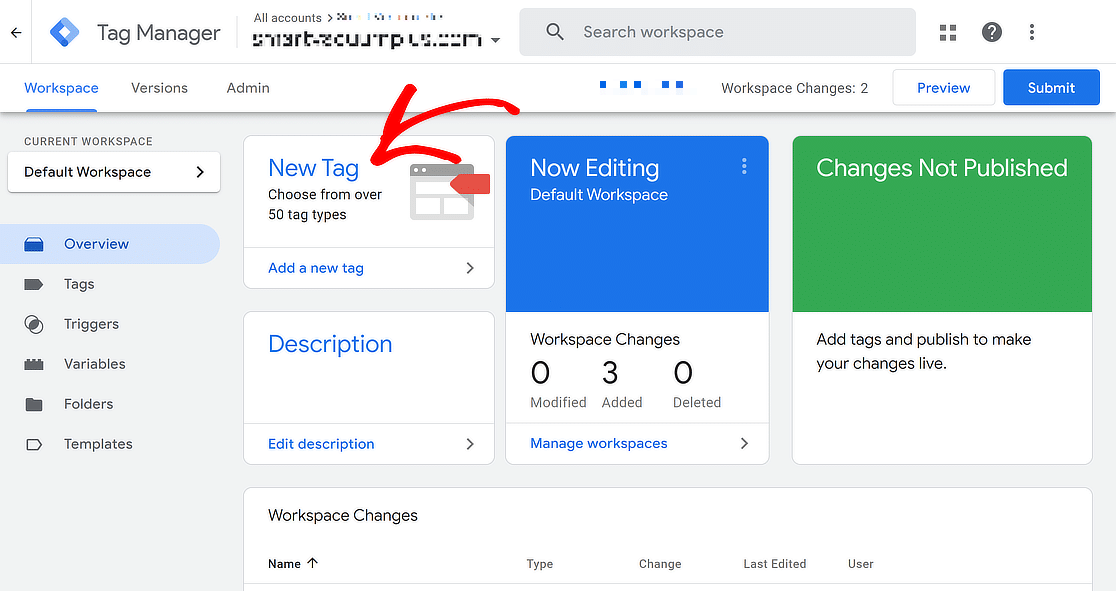
Once you’re in the Google Tag Manager dashboard and can access the Workspace tab, click on the New Tag button.
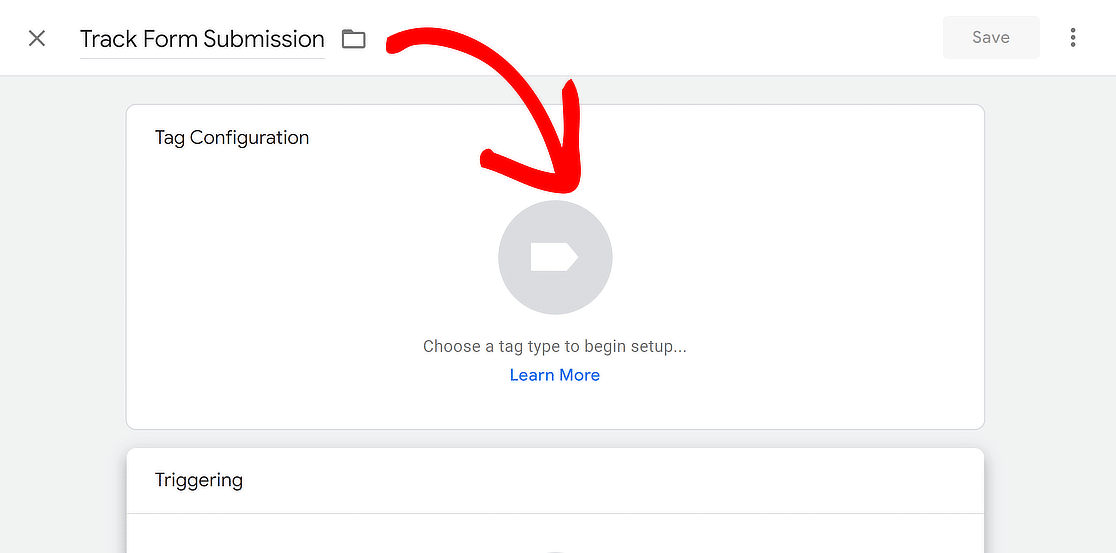
In the next screen, name your new tag and then click on Tag Configuration to choose a tag type to begin the setup.
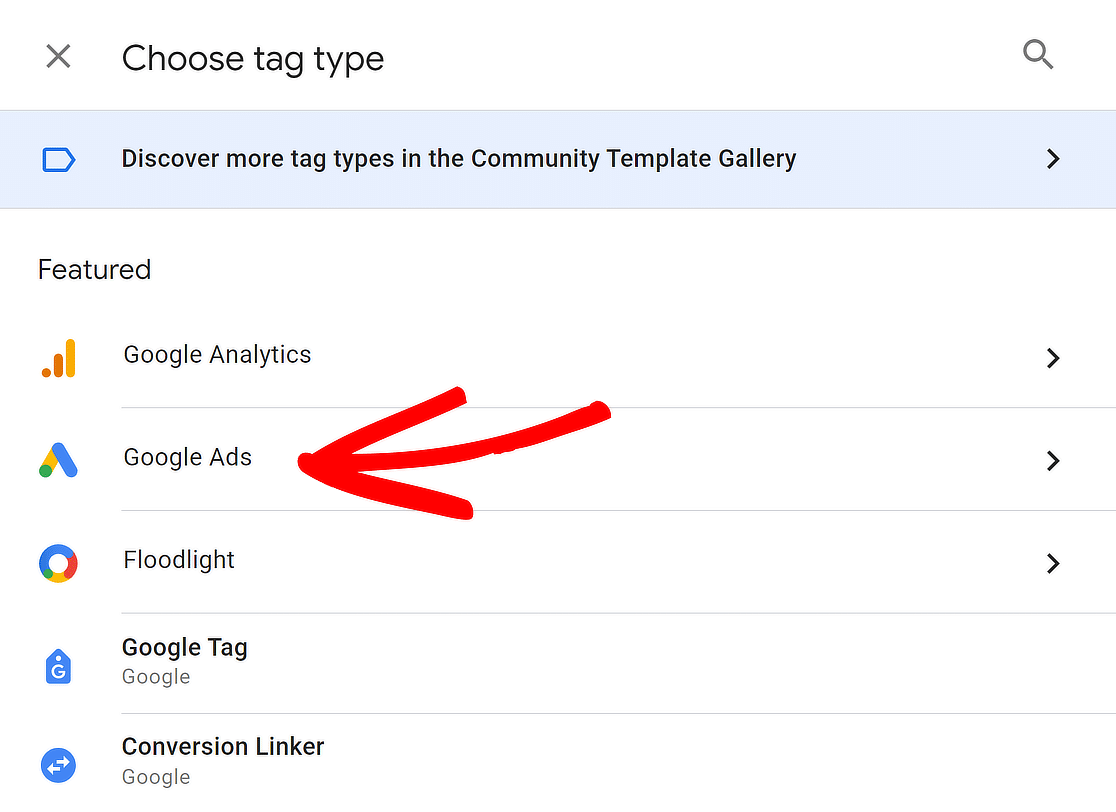
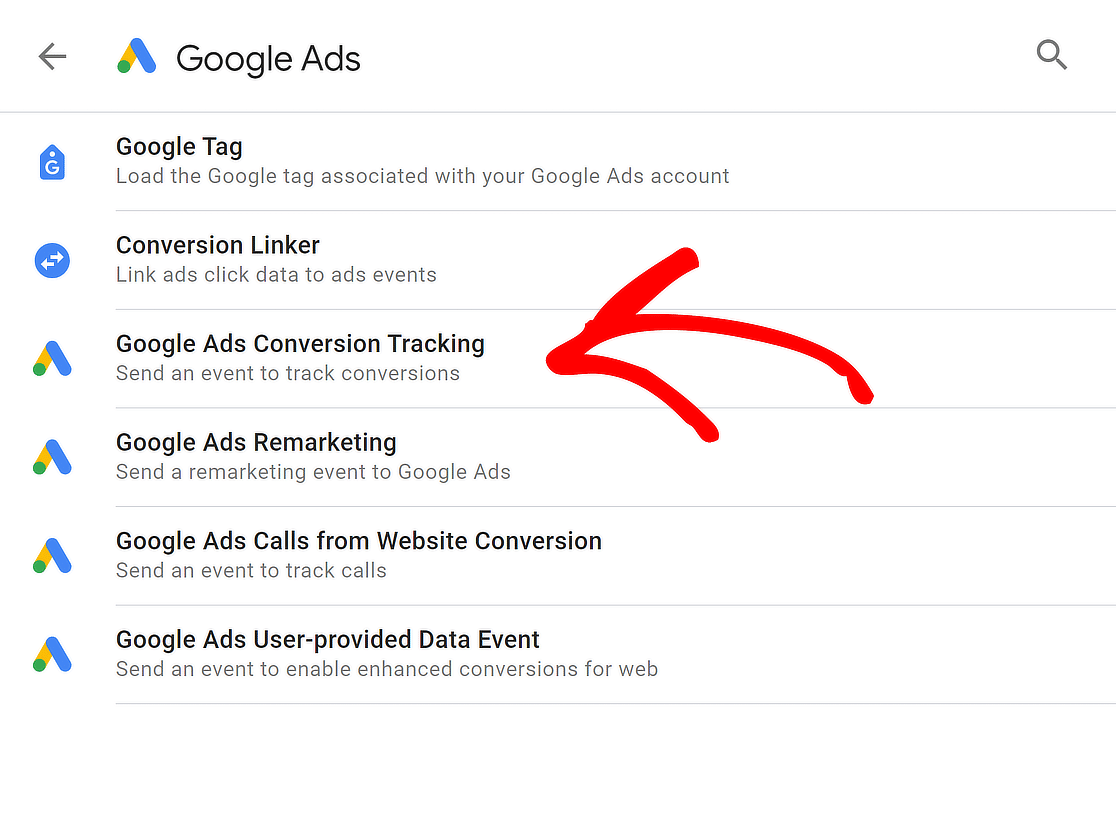
This will make a new menu slide out from the left side of the screen. Choose the Google Ads option from here.
After that, click on the Google Ads Conversion Tracking option. This will basically create the event that will track form submissions.
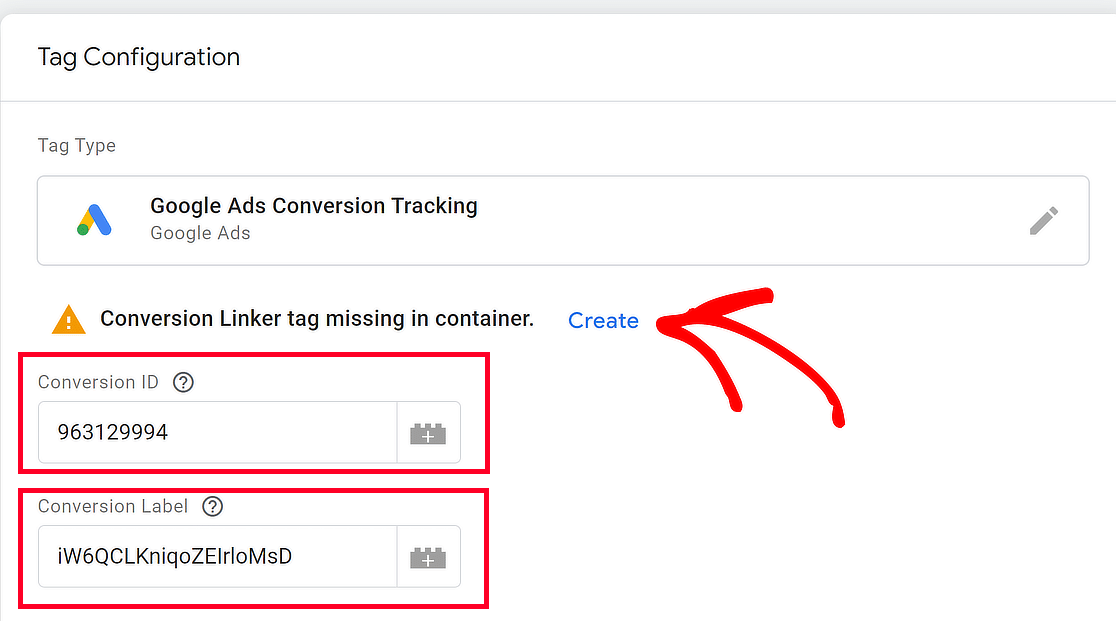
Paste the Conversion ID and Conversion Label from the Google Ads Conversion Action and click Create next to Conversion Linker tag missing in container.
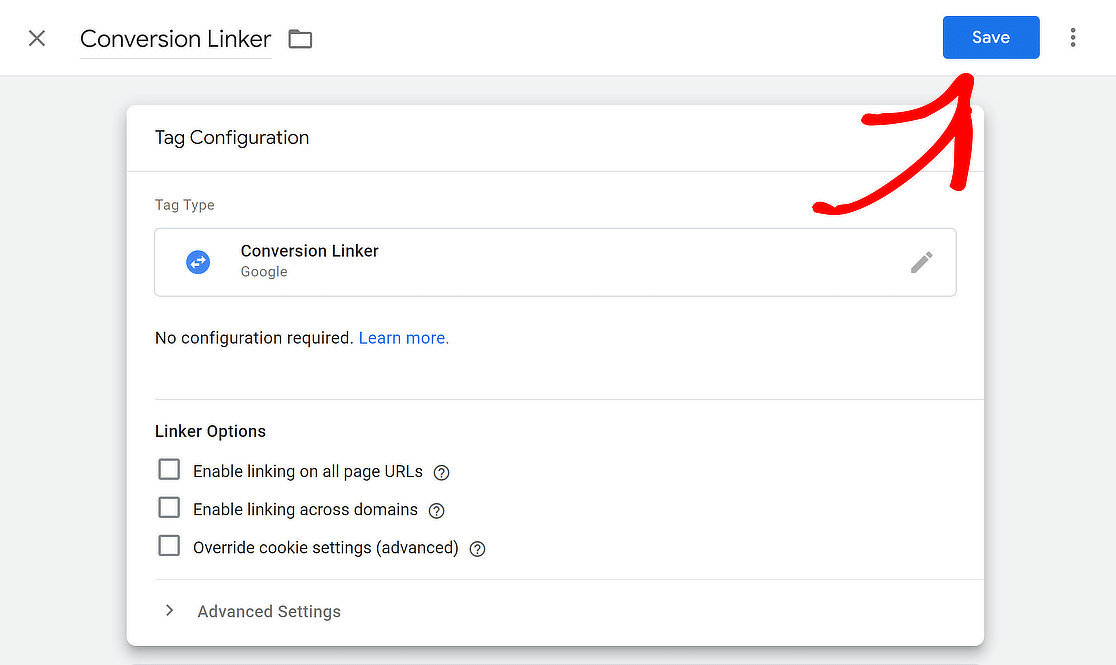
A new menu slide out from the left side of the screen. You don’t have to do anything as Conversion Linker will be configured automatically. Click Save.
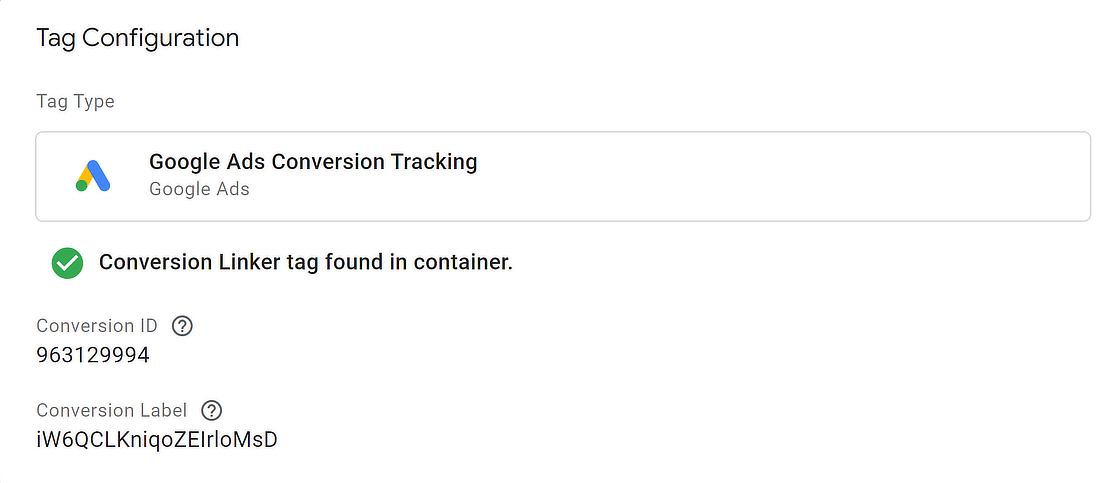
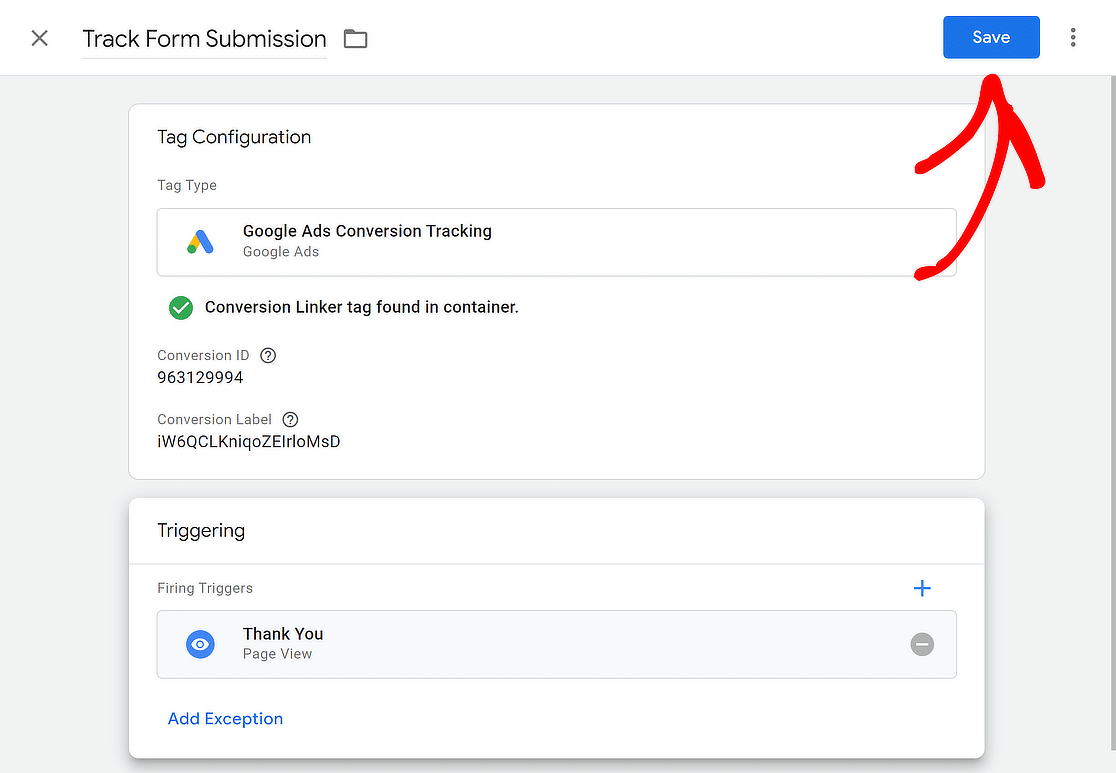
This is how your new tag configuration should look. Make sure there is a green check that says Conversion Linker tag found in container.
Configure Trigger Destination for Tag
Once your new tag configuration for Google Ads Conversion Tracking is complete, you need to choose where you want this tag to fire.

You can choose any of the existing options that would be relevant for a different use case, but for this tutorial we’ll create a new trigger.

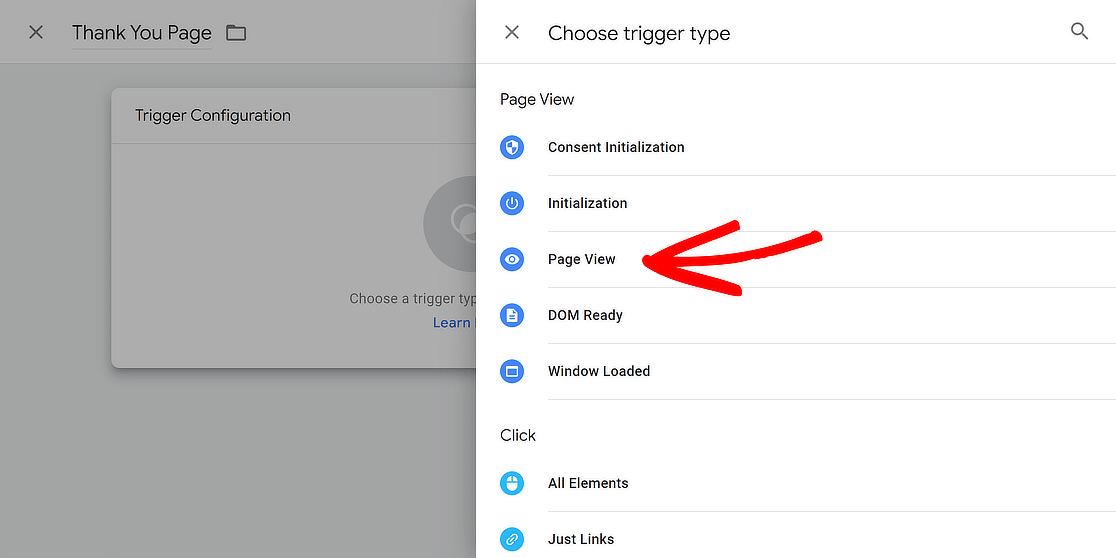
Click on the + icon, name your custom trigger, and choose a trigger type. I recommend selecting the Page View option here.
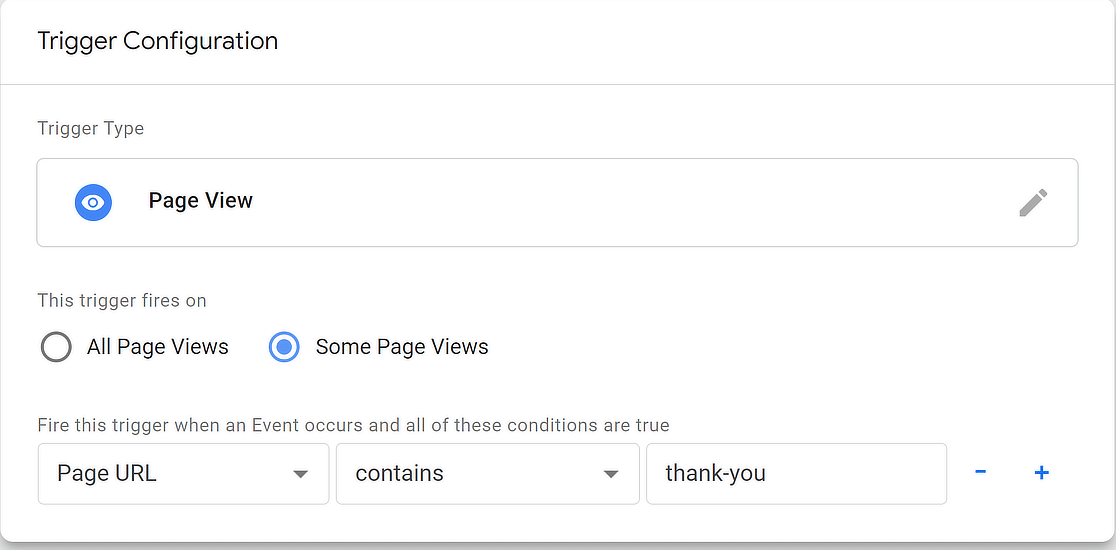
Next, select Some Page Views for the This trigger fires on option, use the dropdown to select Page URL, contains, and enter thank-you.
Now that your Tag Configuration and Triggering settings are set up, simply click on the Save button on the top right corner of the screen.
Step 5: View Form Submissions as Google Ads Conversions
In the Conversion Goals page in Google Ads, your conversion action will show an inactive sign, but this should change to active in three hours.

Once the status changes to active, click on the Edit goal button and check the option that says Use “Submit lead form” as an account-default goal.
On the same page, change the conversion action optimization from Primary Action to Secondary Action (observe only).
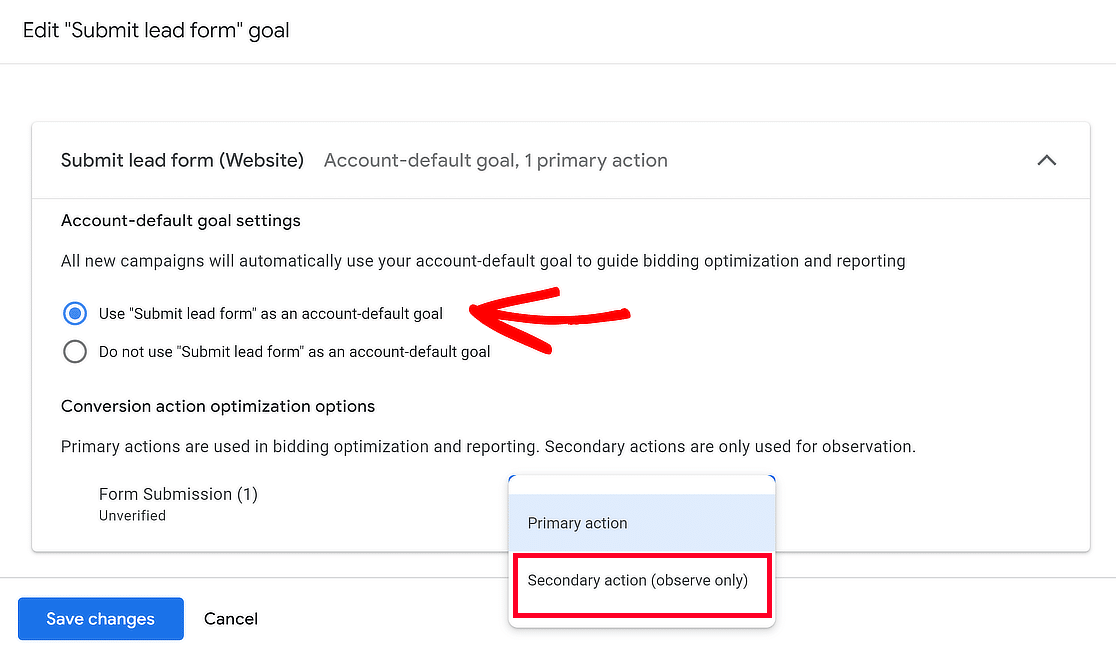
This change lets you watch and analyze your new conversion action without directly affecting your ad performance.
After saving your changes and getting a few form entries, go to Campaigns in your Google Ads account and click on the Segment option.
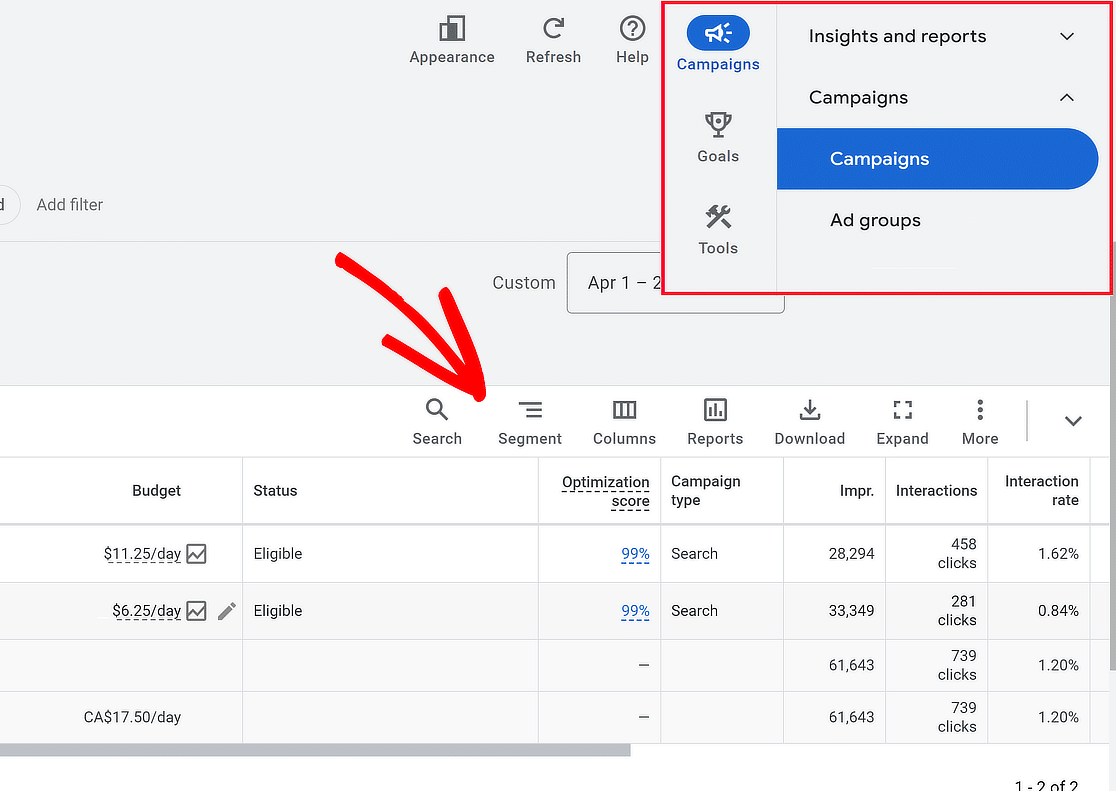
From the popup menu, select Conversions and then choose the Conversion action option to track your form submissions.
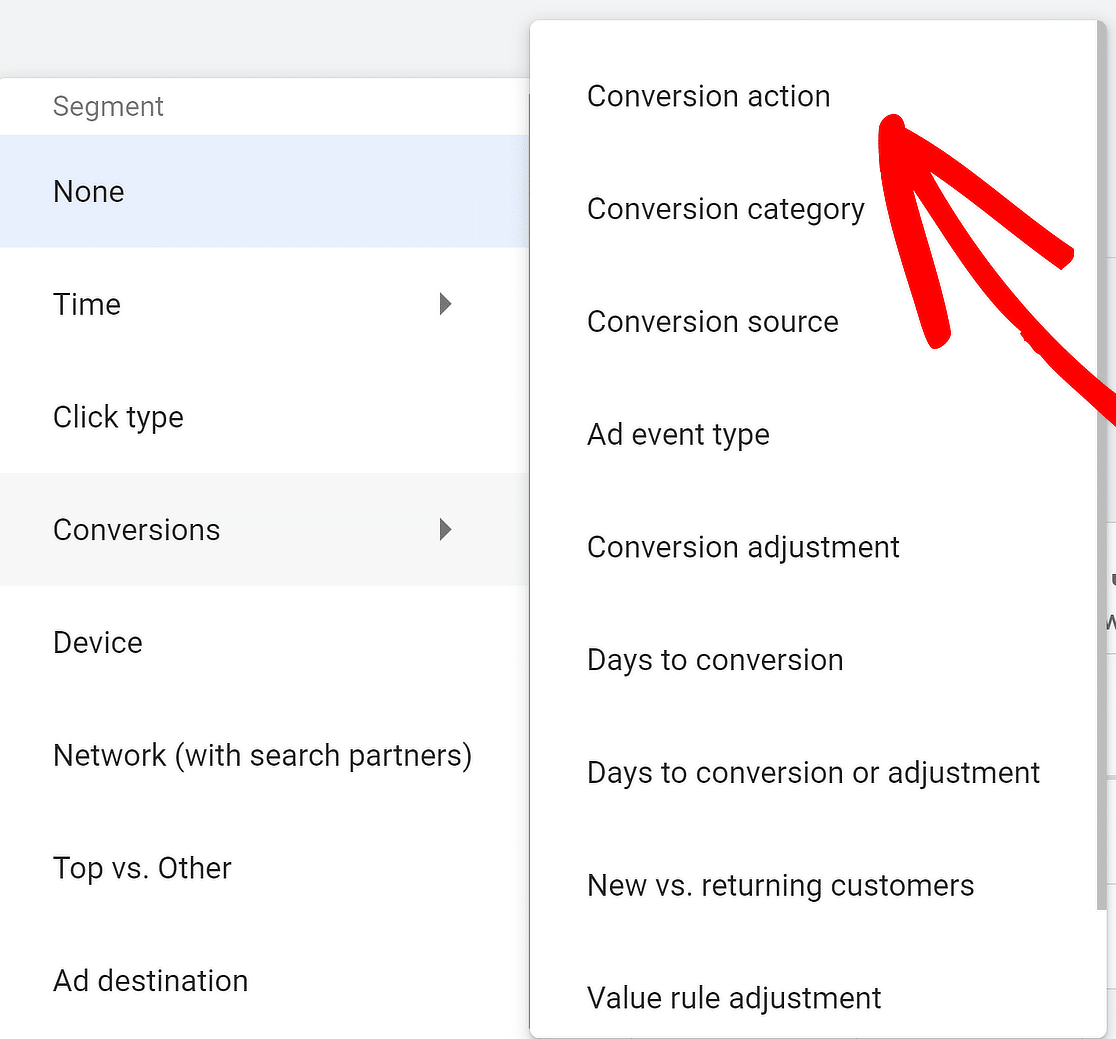
And there you have it! You have successfully set up Google Ads conversion tracking from a form created through WPForms!
Now, whenever a site visitor signs up after clicking on an ad and entering your site, you can see the data in your Google Ads account.
Track Form Submissions as Ads Conversions! 🙂
While on the topic of Google, did you know that by June of 2024, Google will shut down its Business Profiles? Find out what it means for users.
FAQs about Tracking Form Submissions as Conversions
Tracking WordPress form submissions as Google Ads conversions is a popular topic among our readers. Here are answers to some common queries about it:
How do I track Google Ads conversions on WordPress?
To track Google Ads conversions on your WordPress site, you need to add the Google Ads conversion tracking code to your website.
This can usually be done by inserting the code in the header or footer section of your WordPress theme, or by using a plugin that simplifies the integration process.
How do I integrate Google AdWords with WordPress?
Integrating Google AdWords with WordPress can be achieved by using plugins like Site Kit that connect your site to Google AdWords.
These plugins help in inserting the necessary tracking codes and managing your ad campaigns directly from your WordPress dashboard.
Can Google form submissions be tracked?
Yes, submissions made through Google Forms can be tracked. You can use Google Analytics to monitor form submissions by setting up event tracking on the form’s submit button.
Does Google Ads automatically track conversions?
Google Ads does not automatically track conversions. You need to set up conversion tracking by adding a conversion tracking tag to your website or using Google Tag Manager to manage the tracking efficiently.
How do I set up conversion tracking in WordPress?
To set up conversion tracking in WordPress, install a plugin that supports conversion tracking for Google Ads, like MonsterInsights.
This plugin will help you insert the necessary tracking tags on your website without editing the code manually. This is essential for accurately measuring the effectiveness of your advertising campaigns.
How to track Google Ads Enhanced Conversions?
To track Google Ads Enhanced Conversions on your WordPress form, make sure to first turn on enhanced conversions for leads in Google Ads » Goals » Settings. Once enabled, create a custom code snippet that fires when a form is submitted.
You can insert this in your WPForms’ thank you page or use a snippet in the form itself to ensure the tag fires only after submission. This process is feasible with WPForms but needs extra configuration in GTM.
It may also require help from a developer if custom scripts aren’t familiar territory.
How do I track WPForms submissions as Google Ads conversions?
Create a “Lead” conversion in Google Ads, copy the conversion ID and label, and add your global site tag to your site header.
Set your form confirmation to redirect to a thank-you page that contains the event snippet. Each time someone submits the form and lands on that page, Google Ads records a conversion.
Where do I place the Google Ads conversion ID in WordPress?
Put the full global site tag, which includes the conversion ID, in your site’s section. The quickest way is to paste it into a header plugin such as WPCode or Insert Headers and Footers.
Can I set up Google Ads form tracking without Google Tag Manager?
Yes. You can add the global site tag and event snippet by hand, with no need for Tag Manager. A header plugin lets you do this in minutes.
What’s the easiest way to add the Google Ads event snippet to a thank-you page?
Edit the thank-you page, add a Custom HTML block, and paste the event snippet there. Save the page, then test the form to make sure the page fires after each submission.
How do I test if my Google Ads conversion tracking is working?
Use Google Tag Assistant (or the Google Ads tag preview) and submit the form yourself. If the tool shows the conversion tag firing, the setup is correct. The action will also appear in Google Ads after a short delay.
Does WPForms work with Google Ads enhanced conversions?
Yes. If you place the enhanced conversion script on your thank-you page, WPForms can pass the needed first-party data when the user lands there.
Can I track form conversions with Google Tag Manager instead of code snippets?
Absolutely. In Tag Manager, set a page-view or form-submission trigger, then add a Google Ads conversion tag that uses your conversion ID and label.
Why are my Google Ads conversions not showing after a form submission?
Common causes include a missing or wrong conversion ID, the event snippet placed on the wrong page, or caching that blocks the script. Check the tag with Tag Assistant and clear any caching plugin.
Do I need a separate conversion action for each WPForms form?
Only if you want to see separate counts. A single conversion action can track many forms, but making different actions helps you measure each form on its own.
How do I track phone number or email clicks as Google Ads conversions in WordPress?
Add an event trigger in Google Tag Manager for clicks on the phone or email link, then link that trigger to a Google Ads conversion tag. This records each click as a conversion without extra code in WPForms.
Next, Track User Activity On Your Site
WPForms lets you track activity in several ways, and PRO versions of the plugin even offer numerous features to track entries, payments, and more. You can also check out these guides for tracking:
- Button clicks in WordPress
- Form submissions in GA4
- Form submissions with a Facebook Pixel
- User’s journey on your site
Ready to build your form? Get started today with the easiest WordPress form builder plugin. WPForms Pro includes lots of free templates and offers a 14-day money-back guarantee.
If this article helped you out, please follow us on Facebook and Twitter for more free WordPress tutorials and guides.



How would you track Google Ads Enhanced Conversions? Not just leads from Google who fill out the form and are presented with the thank you page? So far, it’s proving to be quite difficult. I’m actually using Forminator but looking to switch but if the process is virtually identical and WPForms doesn’t make this easy, then I won’t switch.
Hi Kenny,
The implementation actually isn’t dependent on your form plugin choice – it’s handled entirely through Google’s tools. You’ll need to enable Enhanced Conversions in Google Ads Goals and then configure data collection in Google Tag Manager. The process would be the same whether using WPForms or Forminator since it’s more about GTM configuration than the form plugin itself.
For personalized advice on any specific tracking challenge, you can get in touch with our Trusted Advisors in the support team if you have a WPForms license. Please submit a support ticket and they will get back to you as soon as possible (usually within 1 working day).