


AI Summary
You’ve built your WordPress forms, and now you want to know how they’re actually performing. Which forms get the most views, how many people start one and give up, and where your best leads come from.
Google Analytics is the classic way to get there, as It records each form submission as an event, works out your conversion rate, and ties every lead back to the traffic source that sent it.
Setting it up used to mean getting deep into Google Tag Manager, custom events, and triggers, which is enough to put most people off. The good news is you don’t have to do it the hard way anymore.
In this guide I’ll walk you through three routes. First is WPForms’ built-in Form Analytics, which tracks your forms automatically without a Google Analytics account at all.
After that I’ll cover the Google Analytics methods, from a beginner-friendly plugin to a full manual GA4 setup, so you can go as deep as you want.
Track WordPress Form Conversions Now! 🙂
Can Google Analytics Track Form Submissions?
Yes, Google Analytics can track form submissions by recording each successful submit as an event. Once that event is in place, GA4 can tell you how many times a form was submitted, what percentage of viewers converted, and which pages and traffic sources produced the most leads.
GA4 even has a head start here, since its Enhanced Measurement setting automatically watches for form interactions and fires form_start and form_submit events with no setup from you.
That sounds ideal, but there’s a limitation worth knowing before you rely on it. Enhanced Measurement often misses forms that submit without reloading the page, which covers most modern WordPress form plugins including WPForms, and it can sometimes log a submission that never really completed.
So while GA4 can track form submissions on its own, you usually get cleaner, more reliable data by letting a plugin handle the event tracking for you, which is exactly what the Google Analytics methods below do. If you’d rather skip Google Analytics altogether, WPForms now tracks all of this natively, and that’s where we’ll start.
How to Set Up WordPress Form Tracking in GA4
Every method here starts from the same place, a working form built with WPForms. So before we get into any analytics, let’s make sure you have a form to track.
Step 1: Install the WPForms Pro Plugin
Before you do anything else, you’ll need a form to track! WPForms is the best form plugin for WordPress as it’s powerful yet so simple to use, you can get your first form live and working within a few minutes.
What I like most about WPForms for this particular job is that the tracking is already built in. The moment your form goes live, WPForms starts recording views, interactions, and conversions on its own.
Every WPForms user gets a live view count on the All Forms page for free. To unlock the full analytics dashboard, the field-level data, and the User Journey addon we’ll use later, you’ll want WPForms Pro.

To get started, buy the Pro license. Then install WPForms on your website. If you need help, follow these instructions on how to add a plugin to WordPress.
Step 2: Create and Publish Your Form
With WPForms active, create the form you want to measure, or open one you’ve already published.
If you’re starting fresh, our guide on how to create a simple contact form is the quickest way in, and analytics works the same on any form you build:
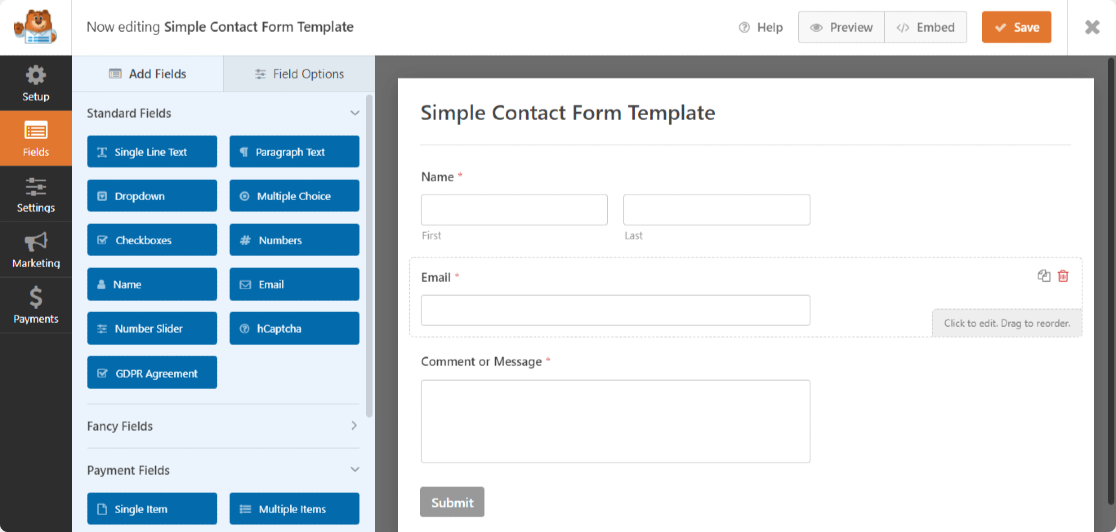
Here we’re using a simple contact form; however, you can create many types of forms with the WPForms plugin templates:
- Simple order forms that accept payments directly from customers
- File upload forms to gather additional information from site visitors
- Job application forms to fill an open position that’s available
- Survey forms to gather customer feedback about your business
- And many more.
WPForms comes with 2,100+ WordPress form templates that you can use to create any type of form for your website.
You can also instantly create entire forms using WPForms AI, edit existing ones with Smart Edit, or connect assistants like Claude, ChatGPT, or Cursor to build and edit forms for you.

Method 1: Track Submissions With Built-In Form Analytics
This is the option I reach for first, and it’s the one most people should start with. WPForms 2.0 added built-in Form Analytics that tracks every published form automatically.
There’s nothing to connect and no script to paste. As soon as you’re running WPForms 2.0 or later, it starts recording how your forms perform, and all of that data stays in your own WordPress database.
Where to Find Your Form Analytics
Go to WPForms » All Forms and you’ll see Views, Interactions, and Conversion columns right in the forms table. To open the full report for a single form, hover over its name and click Analytics, or click any number in those columns.

Every WPForms user sees the Views count here, while the Interactions and Conversion Rate columns, along with the dedicated analytics dashboard I’ll describe next, are part of Pro and Elite.
Open the Full Form Analytics Report
The analytics dashboard opens with five cards across the top, and each one answers a specific question about your form:
- Views: how many times the form actually appeared on a visitor’s screen. It only counts once the form scrolls into view, so this reflects real visibility rather than raw page loads.
- Interactions: how many people engaged with a field, like clicking into it or typing.
- Conversion Rate: the percentage of views that ended in a submission. Fourteen views and three submissions works out to a 21.4% conversion rate.
- Abandonments: how many visitors started the form and left without finishing. An abandonment gets counted after an hour of inactivity.
- Errors: how many submissions failed validation, like a required field left blank or an email address in the wrong format.

Those last two are the ones I find most useful, because they point straight at the friction. A high abandonment or error count is usually a sign that something on the form is tripping people up before they finish.
Pinpoint Where Visitors Drop Off
Below the cards sits the Form Fields table, and this is where the built-in analytics really earns its place.
It breaks your form down field by field and shows views, interactions, abandonments, errors, and the average time spent on each one. Multi-part fields like First Name and Last Name even get their own rows.
I usually sort by Avg. Time to spot the field people are stalling on, since a field that eats up far more time than the rest is often the reason visitors give up. Click Reset Order to put the fields back in their original sequence.

That field-level view is the thing Google Analytics can’t easily hand you. GA can tell you a form was abandoned, while WPForms tells you which field the visitor was stuck on when they left.
Set a Conversion Rate Goal
If you want to hold a form to a target, you can set a conversion goal. On the Conversion Rate card, click Set Goal, enter the percentage you’re aiming for, and click Save Changes.

A green arrow pointing up means you’re beating it, and a red arrow pointing down means you’re below it. That turns a passive number into a target you can actively manage toward.
Ask WPForms AI About your Forms
Click the sparkle icon in the bottom-right corner and you can ask questions in plain language, like how this week’s conversion rate compares to last week, or which fields have the most drop-offs.
It answers with small charts and comparison tables inside the reply, and it suggests specific changes to try.

When you want the raw numbers in a spreadsheet, click Export CSV in the top-right corner and you’ll get a file you can open in any spreadsheet app.
Form Analytics collects all of this with no cookies, no third-party scripts, and nothing sent to an outside service. Form previews and views from logged-in admins are left out, so your own testing doesn’t skew the numbers.
For a full tour of the dashboard, our complete guide to Form Analytics covers every metric, and this walkthrough on using your form analytics to improve conversions shows you how to act on what you find.
Method 2: Track Form Submissions in Google Analytics With MonsterInsights
Google Analytics is powerful, but setting up form tracking manually means using Google Tag Manager to create events and triggers, which is more than most people bargained for.
MonsterInsights takes that manual work off your plate, connecting your site to GA4 for you without any code. It’s the most popular Google Analytics plugin for WordPress.
It shows your form data in a friendly report right inside your WordPress dashboard. If you want to weigh a few options first, take a look at the best Google Analytics plugins for WordPress.
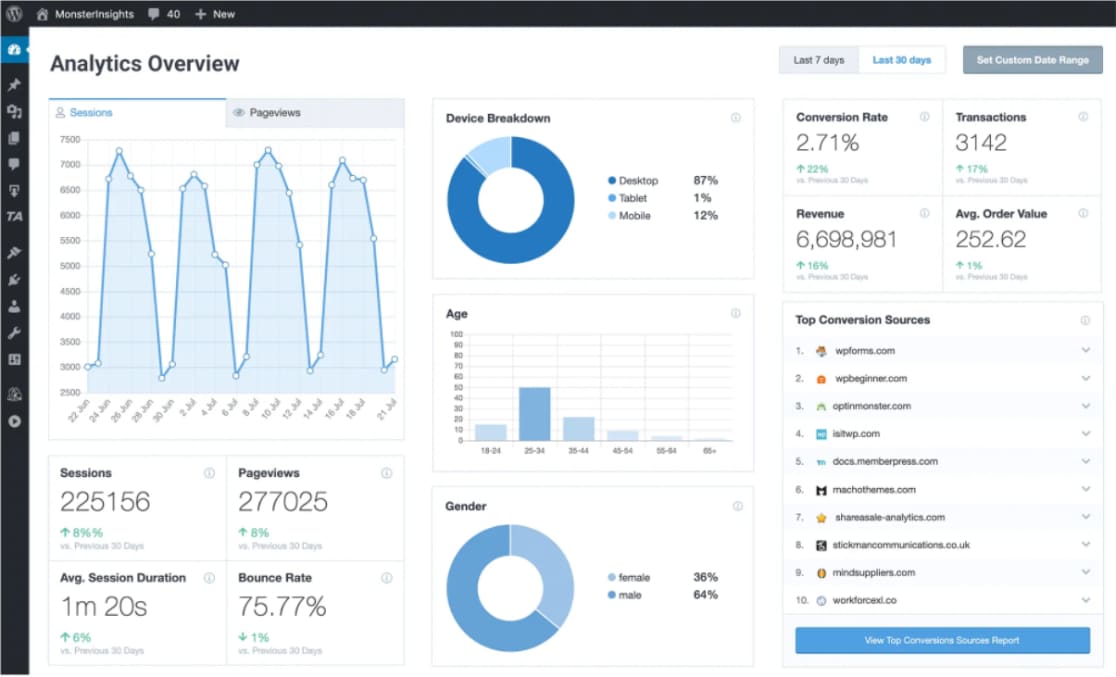
With MonsterInsights handling the connection, you can set up event tracking, custom dimensions, and outbound link tracking without editing code. A few things it does especially well for form owners:
- Ecommerce tracking: You can easily set up WooCommerce tracking in MonsterInsights to optimize your online store.
- Engagement metrics: Monitor form conversions, average session duration, new vs. returning customers, and other key engagement metrics.
- No thank you page needed: With manual form tracking, you need to set up a thank you page or custom GA4 event to track form submissions, but this is not necessary with MonsterInsights.
- One-time setup: Once you’ve configured MonsterInsights to track your forms, it will automatically track all the different forms on your site.
- Events tracking: You can set the form submission event in GA4 as a conversion to measure your ROI and site performance over time.
MonsterInsights isn’t the only way to bridge WPForms and Google Analytics, but it’s the easiest. If you’re curious about the connection points, the WPForms Google Analytics integration page lays them out.
Download and install MonsterInsights
MonsterInsights Pro comes with a Forms addon that handles all your form submission tracking and displays the data for you in WordPress. So head over to MonsterInsights and sign up for a Pro license.
Once you’ve completed checkout, click the Download Now button to get the plugin. Don’t close the browser window yet, since you’ll need to copy your license key in a moment.

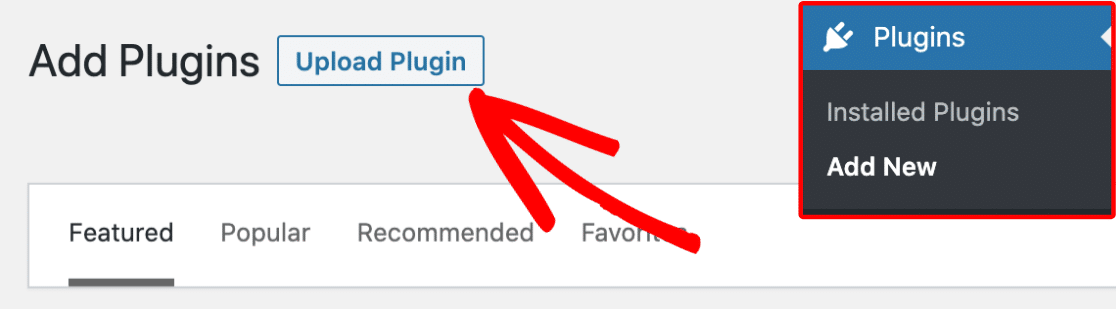
Go to your WordPress dashboard in another tab and navigate to Plugins » Add New. Click the Upload Plugin button at the top of the Plugins page.
Click the Choose File button and find the zip file you just downloaded from MonsterInsights. Then click the Install Now button to install the plugin.
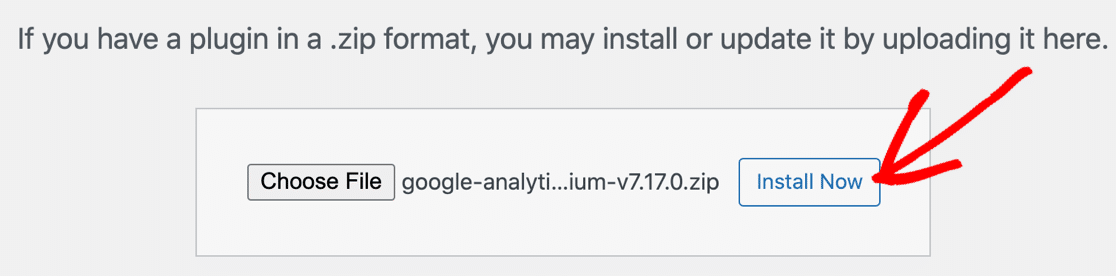
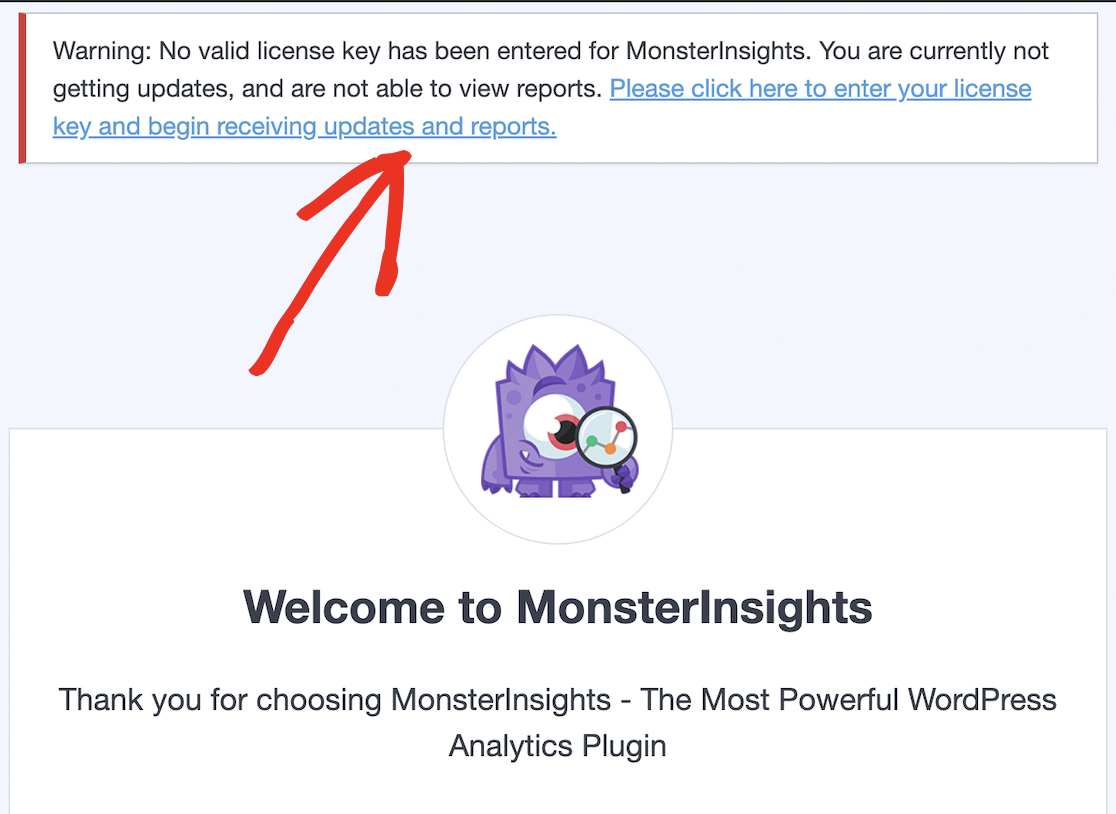
When the plugin finishes installing, click Activate Plugin. This takes you to a MonsterInsights welcome screen with a warning at the top that you haven’t entered your license key yet.
Click the link that says, “Please click here to enter your license key and begin receiving updates and reports.”
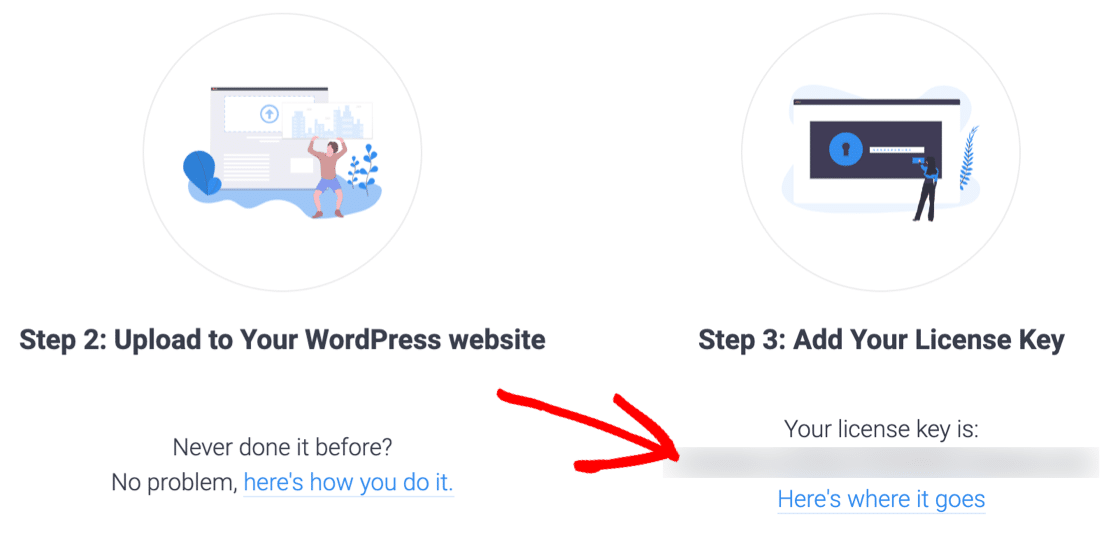
That takes you to the general settings page for the plugin. Go back to the browser tab you left on the MonsterInsights page and copy your license key.
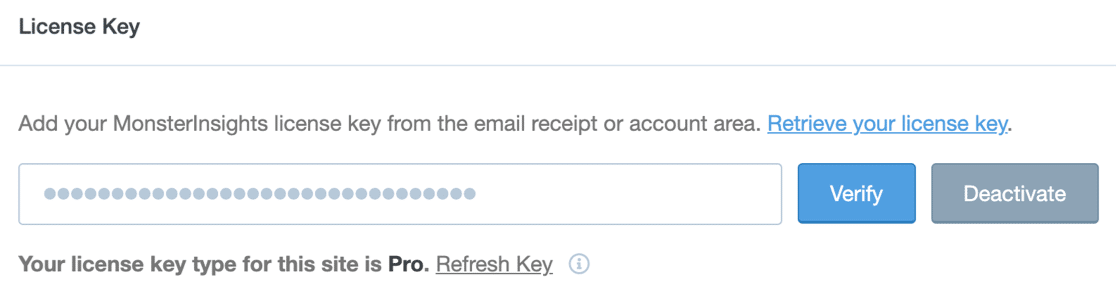
Return to your WordPress site and paste your license key in the License Key field.
MonsterInsights is installed now, but it won’t start collecting data until you link it to your Google Analytics account. If you already have a Google Analytics account, scroll down and click Connect MonsterInsights.

You can then skip ahead to the next step. If you don’t have a Google Analytics account yet, head over to the Google Analytics website first.

Click Start measuring to sign up, then fill out some information including your account name, which can be the name of your website or anything you like.
The default settings on the rest of the page are fine to leave as they are, so scroll down and click Next.
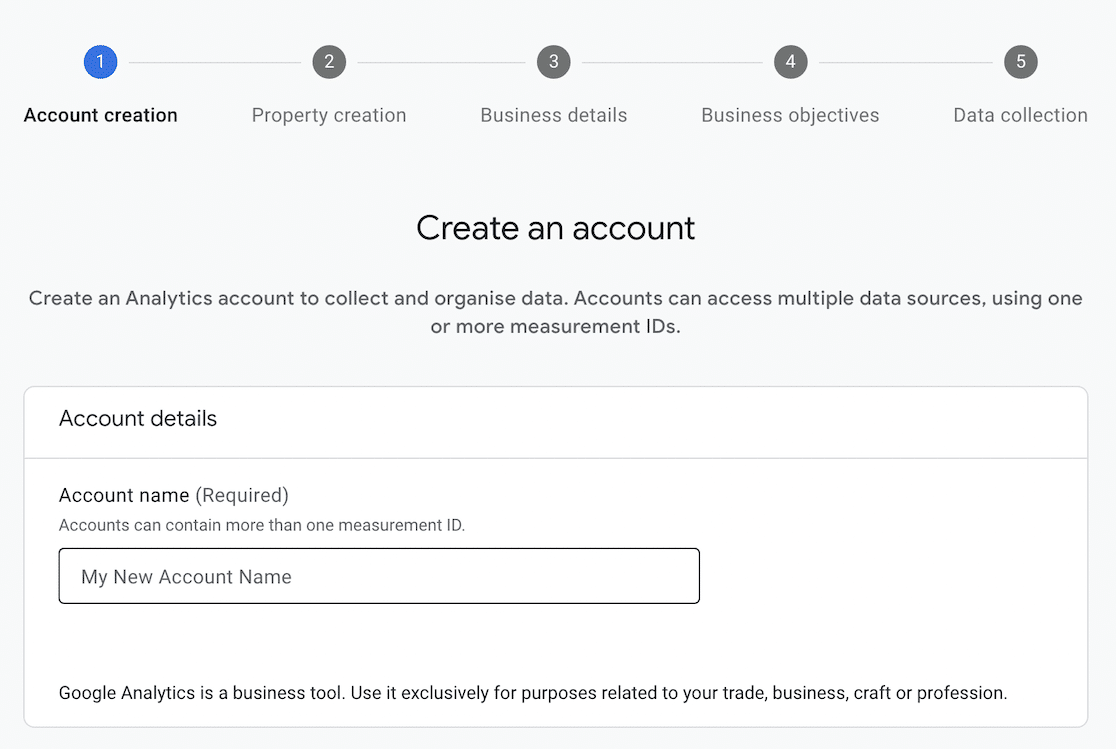
You’ll also set up a Google Analytics 4 property, which is what you connect to later to access your forms data.
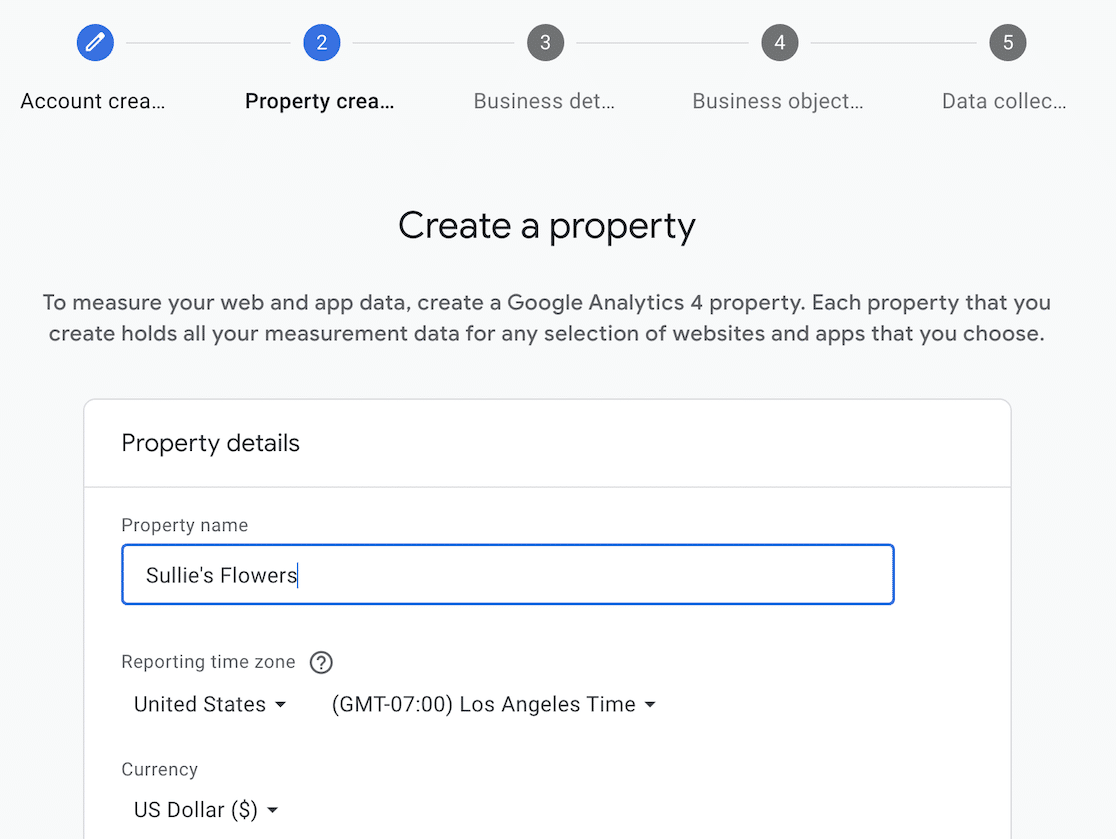
Choose your time zone and currency, scroll down, and click Next. Continue through each step of the wizard, filling in your business details and accepting the Google Analytics terms.
The final step asks where you want to collect data from. Since you’re connecting Google Analytics to your WordPress website, click Web.
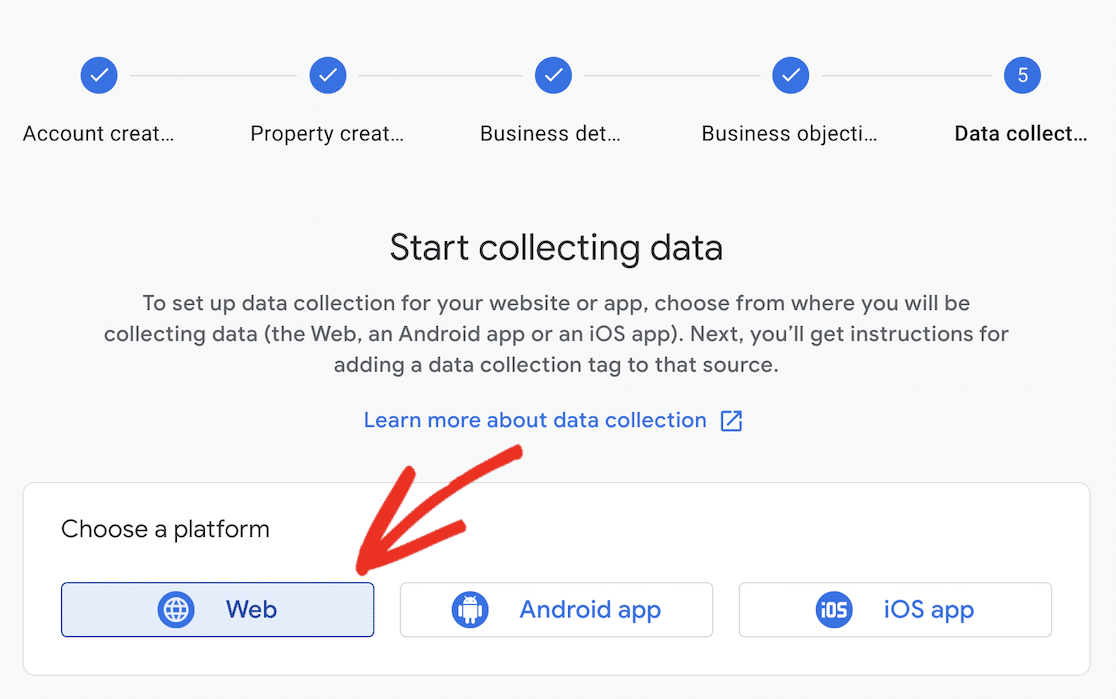
A pop-up appears for you to set up a data stream, which is new in GA4 and replaces the views you may remember from Universal Analytics. Fill out your website URL and give the stream a name.
You can leave Enhanced measurement on, since it captures useful page and interaction data by default, then click Create stream to continue.
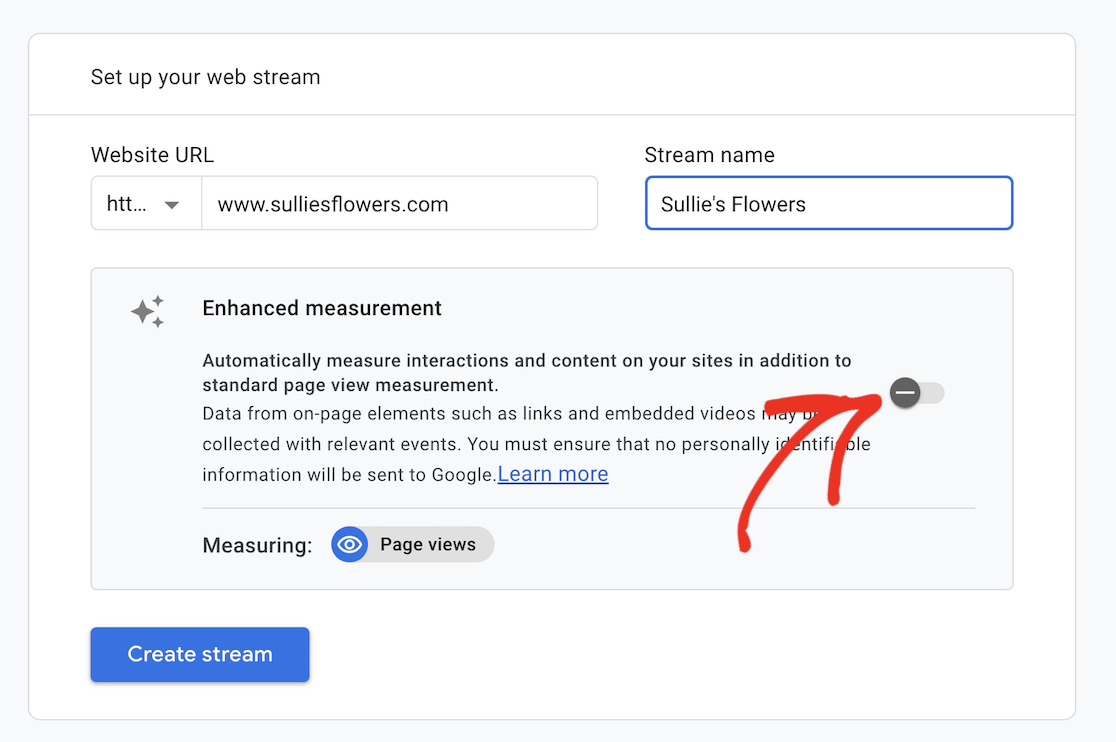
Once you finish the wizard, you’re ready to start collecting data. Keep in mind it can take up to 48 hours before a new account starts displaying data in Google Analytics.
Connect MonsterInsights to Google Analytics
Back in WordPress, after you click Connect MonsterInsights, you’ll be asked to choose an account to connect to. Pick the same account you used to set up Google Analytics.

Grant MonsterInsights permission to connect to your Google Analytics account by scrolling down and clicking Allow.

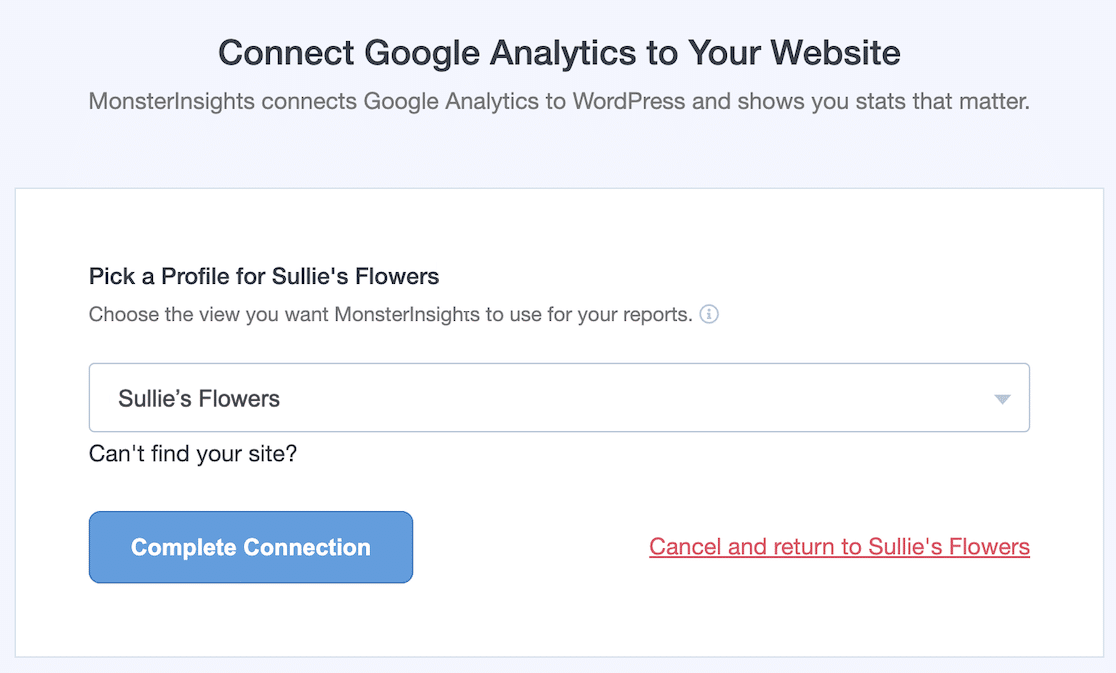
Once your account is connected, choose your data stream from the dropdown and click Complete Connection.
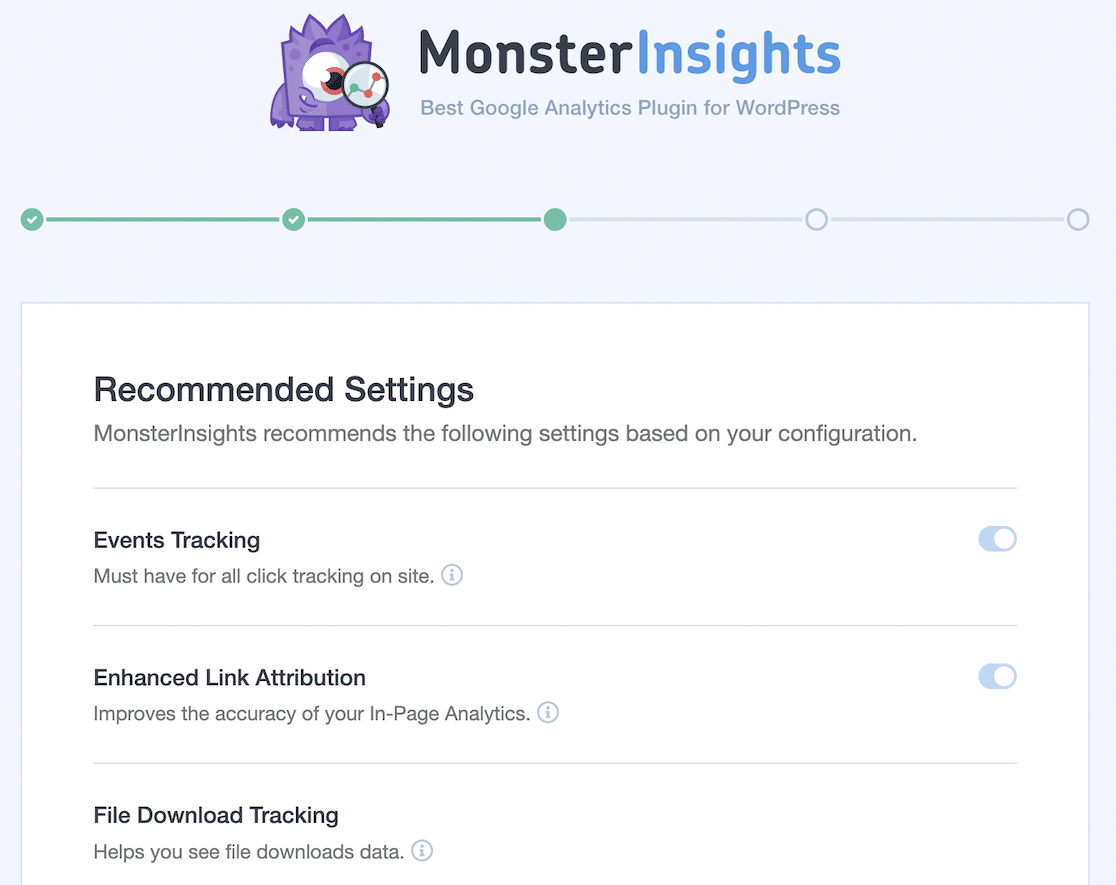
MonsterInsights continues with its recommended settings, which you can leave as they are unless there’s something you want to change.
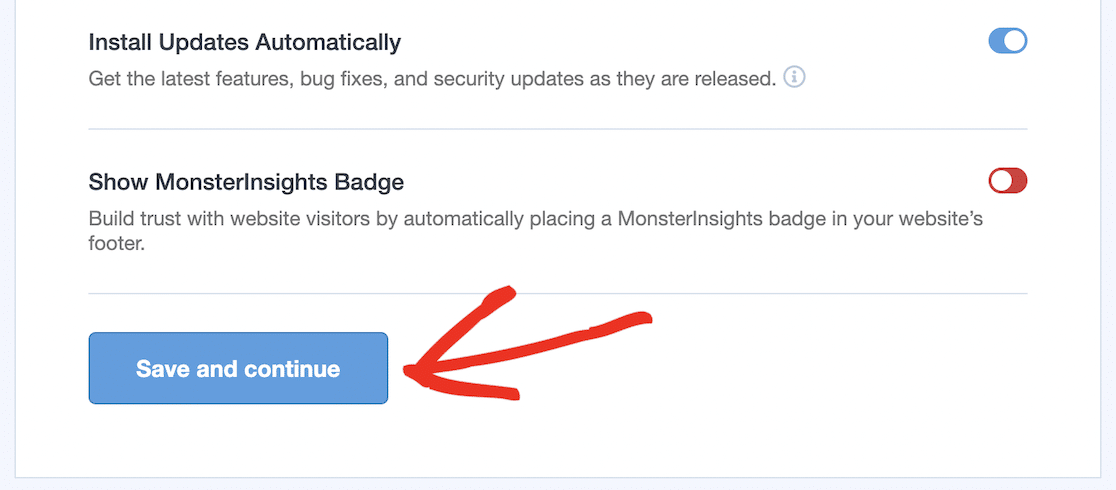
Scroll to the bottom of the page and click Save and Continue.
Choose the website features you want to enable, scroll down, and click Continue. If you’re not sure, leave the defaults and click Skip for Now.

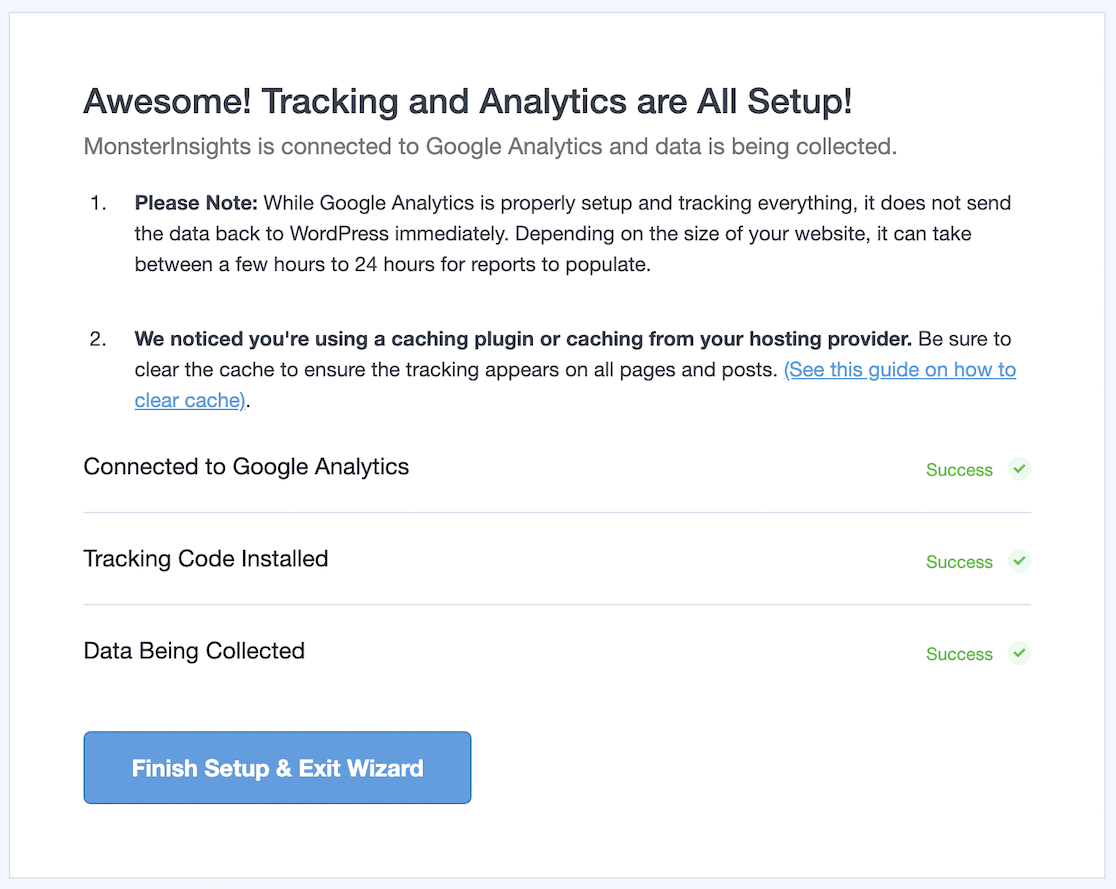
If everything went smoothly, you’ll see a confirmation screen showing that MonsterInsights connected to Google Analytics, the tracking code is installed, and data is being collected.
Click Finish Setup & Exit Wizard to return to your dashboard.
Turn on Form Tracking
To activate form tracking in MonsterInsights, you first need to install the Forms addon. In your WordPress dashboard, go to Insights » Forms, scroll down until you see the Forms addon, and click the Install button.
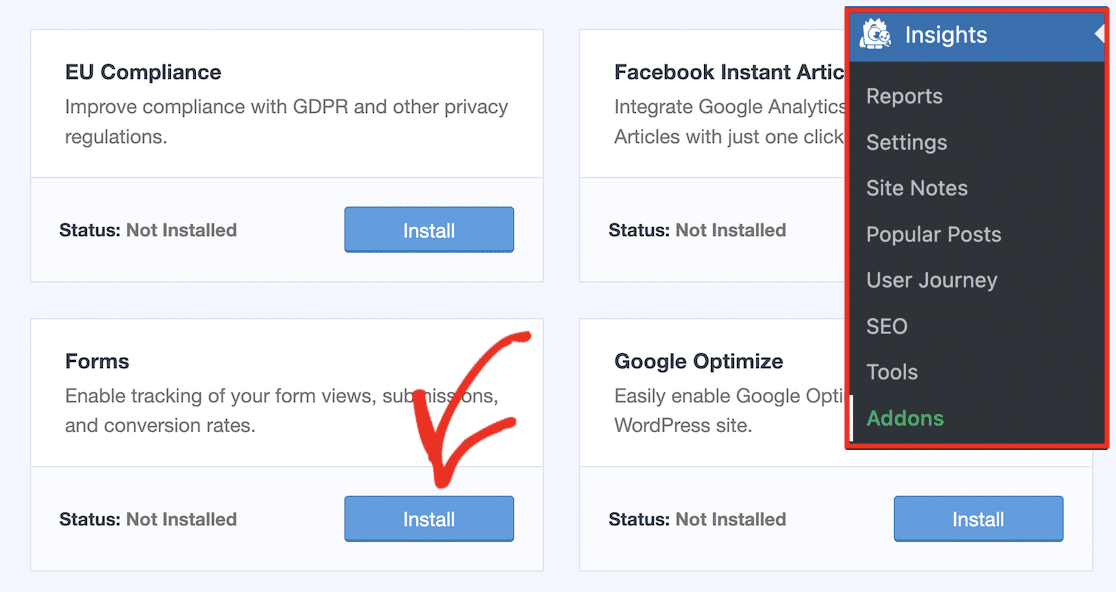
Wait a few moments while it installs. Once it’s done, the addon status changes to Active.
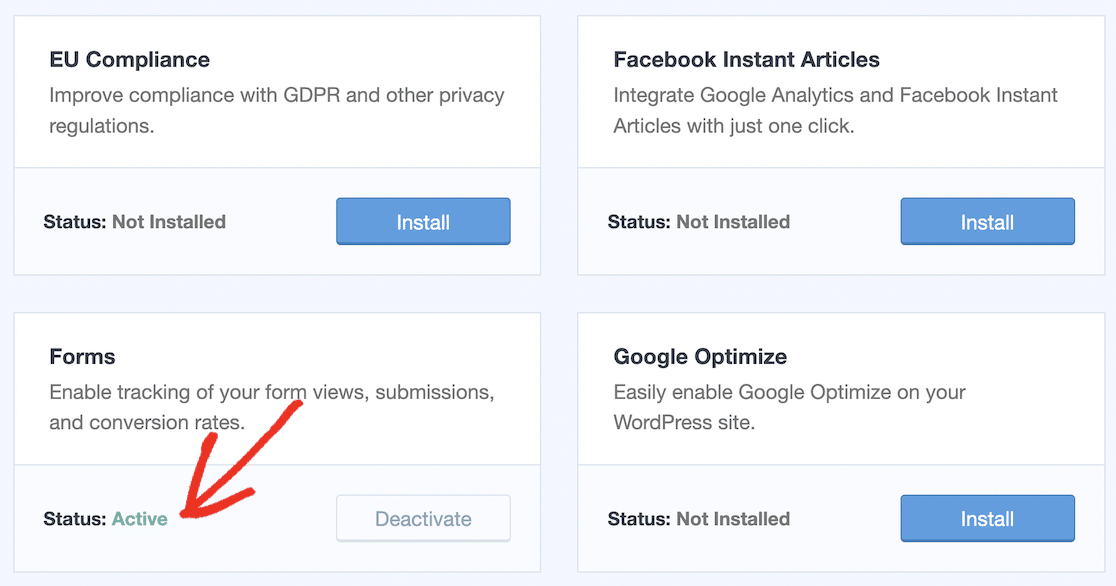
That’s the hard work done. From here, MonsterInsights tracks all of your forms for you.
View your Form Submissions in WordPress
When you want to see how your forms are doing, there’s no need to open Google Analytics at all. Go to Insights » Reports and click the Forms tab.
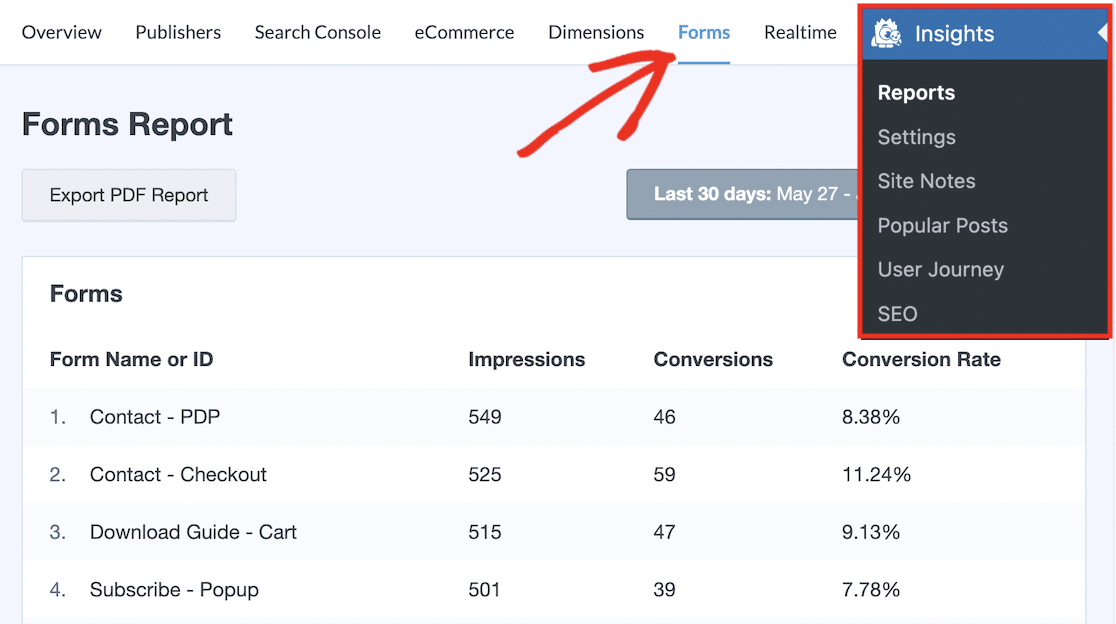
This report shows the number of impressions, conversions, and the conversion rate for each form on your site over the date range you choose.
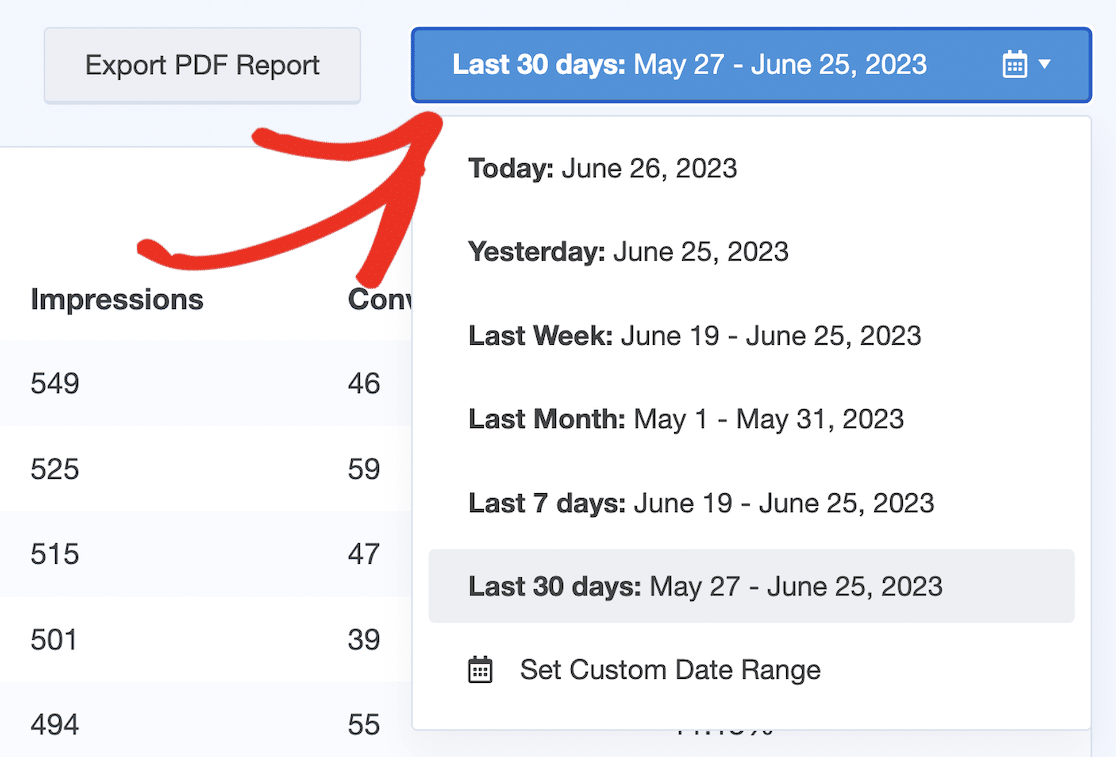
You can change that range by clicking the date button and picking a preset like Today, Yesterday, Last Week, Last Month, Last 7 Days, or Last 30 Days, or by setting a custom range.
You can also download everything by clicking the Export PDF Report button.
Method 3 (Advanced): Set Up GA4 Form Tracking Manually
Everything so far has kept you inside WordPress. If you want to dig into the raw numbers, though, you can build a custom report in GA4 itself.
This gives you similar information to the User Journey addon we’ll cover next, with even more detail about where your submissions come from.
Before you build the report, it helps to know how the submission event reaches GA4. If you’re relying on GA4’s Enhanced Measurement, form submits arrive as the form_submit event.
MonsterInsights maps WPForms conversions to the generate_lead event, which is the one we’ll filter for below. Check which event name your own setup uses and swap it in if it differs.
Create a Blank Exploration
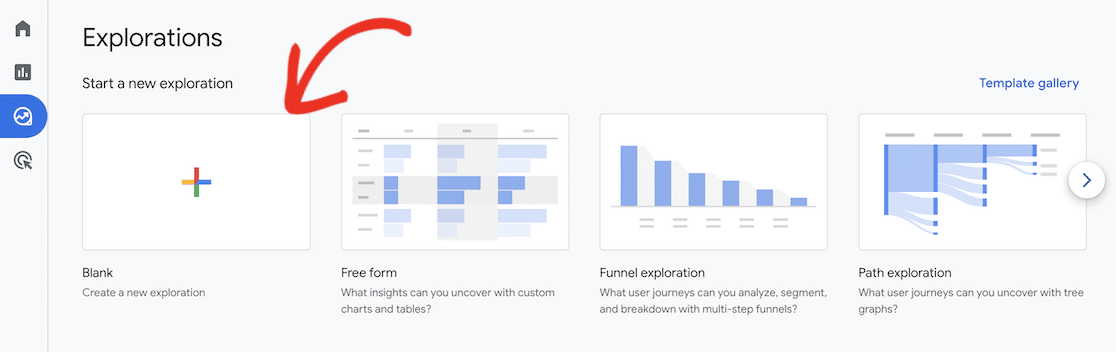
Log into your Google Analytics account, click the Explore tab, and choose the Blank report option to create a custom report.
Add Your Dimensions
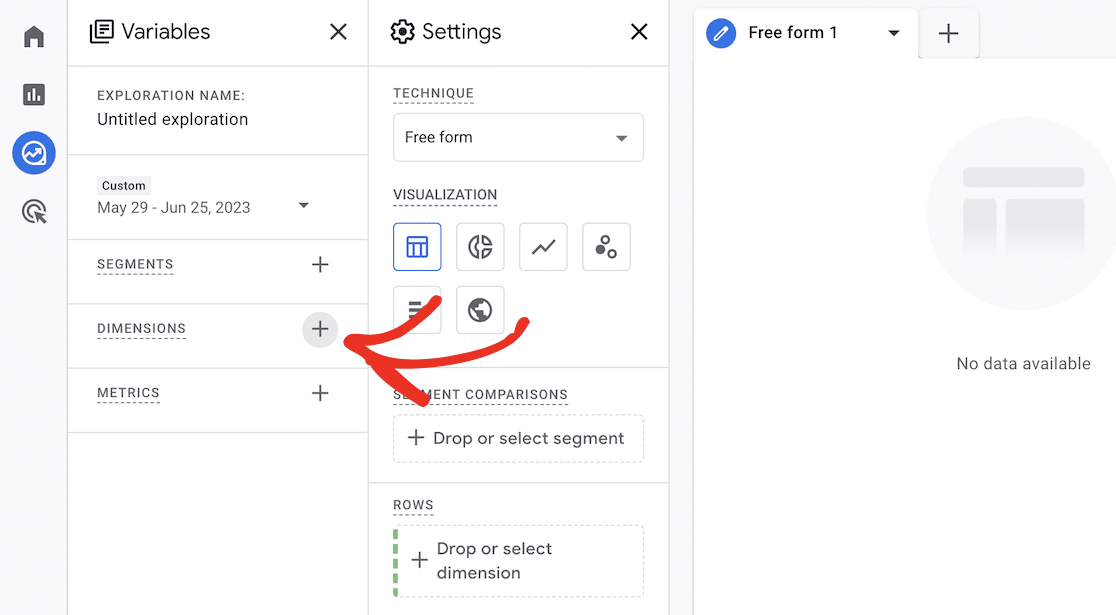
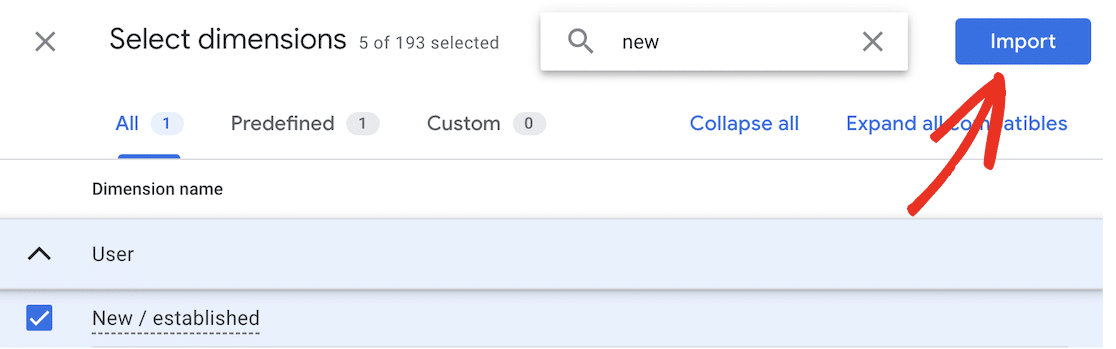
Dimensions are the attributes of your data you want to measure. Click the plus (+) icon next to Dimensions to bring up the list. Search for and tick the checkbox next to each of these:
- Event name
- Form ID
- Session source / medium
- Page path + query string
- New / established
Once they’re all selected, click the Import button to add them to your report.
Add the Event Count Metric
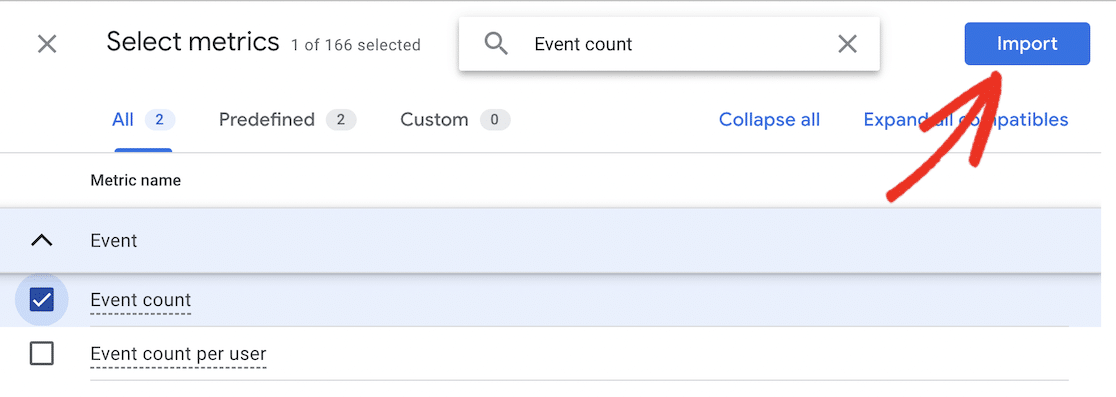
Next, add the Event count metric, which measures how many times users triggered an event, like submitting a form, in the date range you set.
Click the plus (+) icon next to Metrics, search for Event count, select it, and click Import again.
Build the report
Now you have everything you need, so to create a report, drag the dimensions you want to display from the Dimensions box into the Rows box. To start, drag Form ID and Session source / medium into Rows.
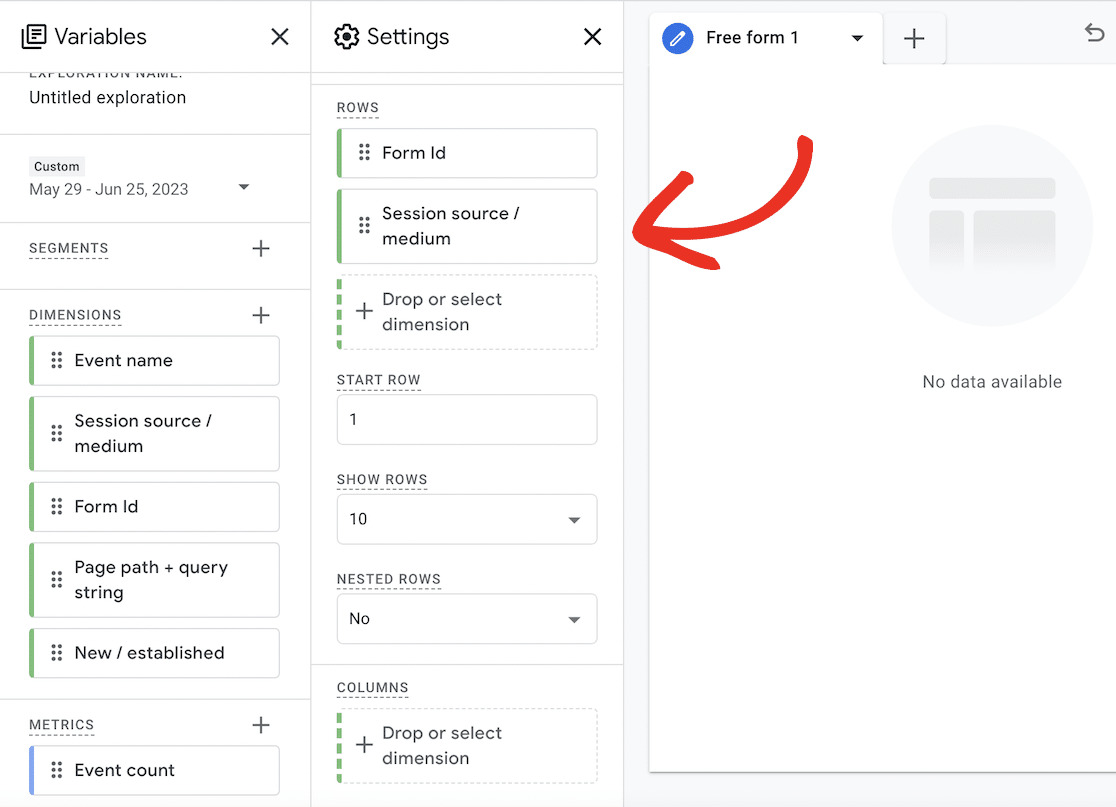
With your rows in place, you need values so GA4 can fill the report with data. Scroll down in the Settings column to the Values box and drag the Event count metric there.
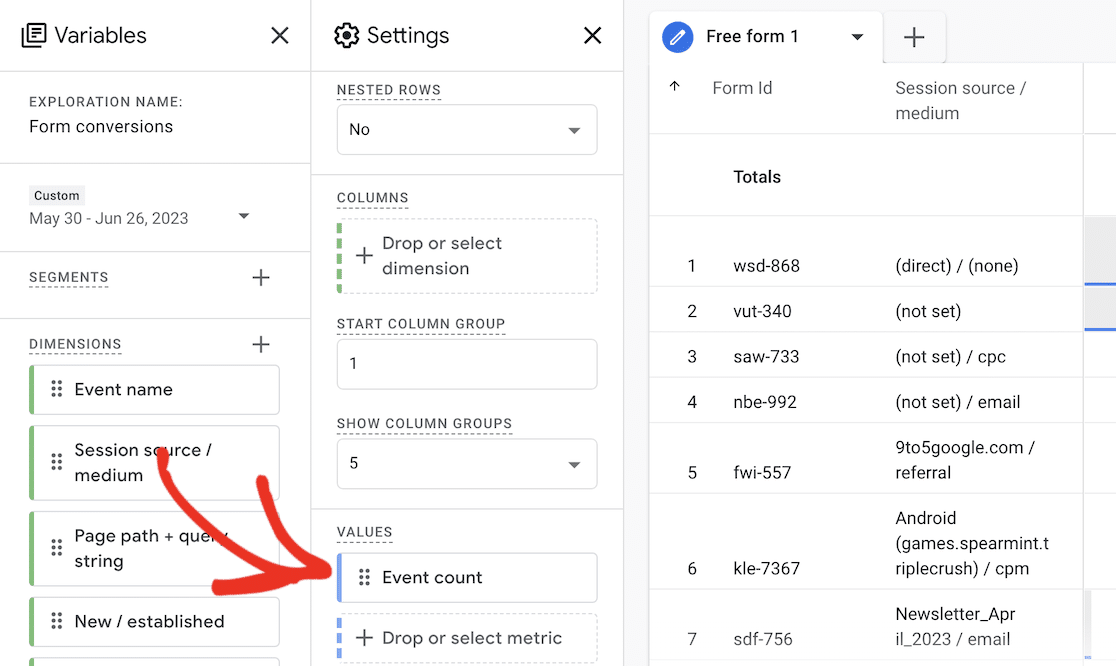
Your report populates with data, but right now it shows every event on your website, not just form submissions. You’ll fix that with a filter.
Filter to Form Submissions Only
Scroll down to the Filters box and drag Event name from the Dimensions box into it.
Choose exactly matches from the dropdown, type your form event name in the field (generate_lead for MonsterInsights, or form_submit if you’re using Enhanced Measurement), and click Apply.
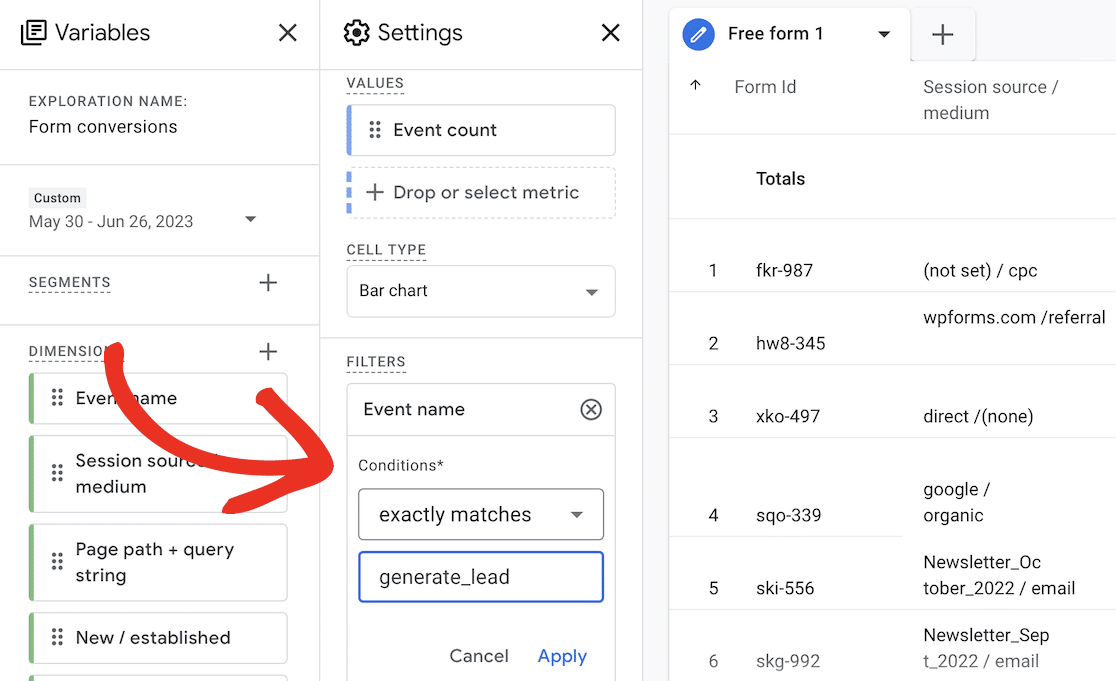
Now your report shows only submitted forms as a bar chart, along with where each visitor came from, whether that’s another website, a search, an ad, or an email.
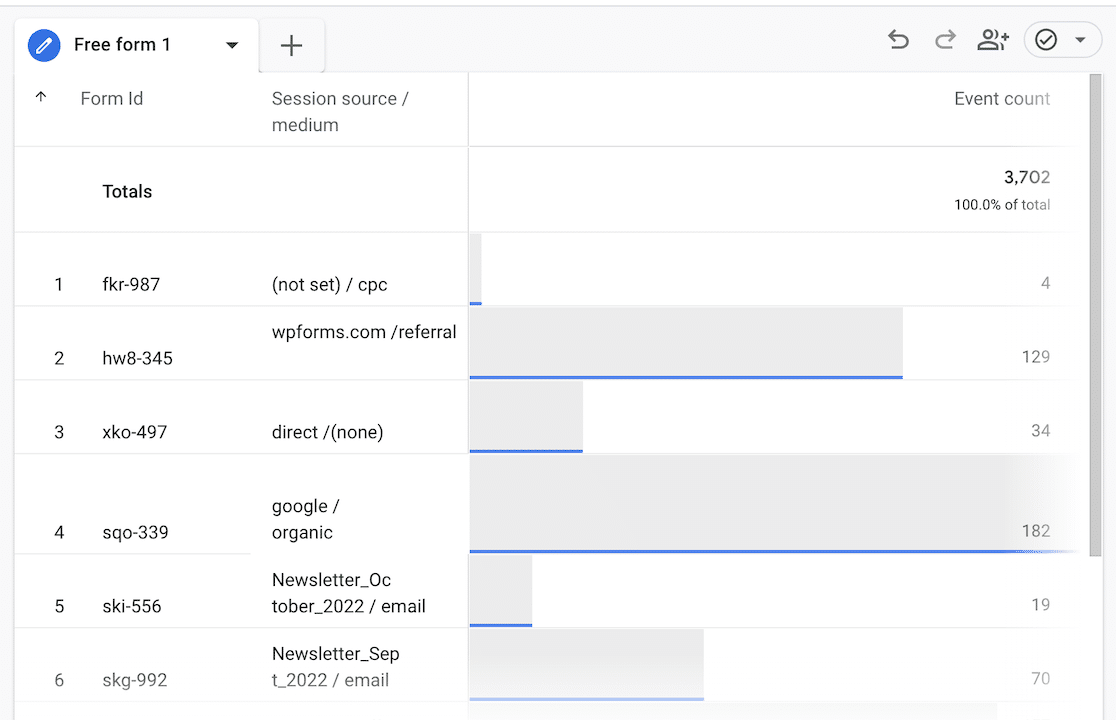
From here you can experiment by swapping Session source / medium out of Rows for Page path + query string, which shows which pages drive the most submissions.
You can also leave only Form ID in Rows and drag New / established into Columns to split submitters into new versus returning visitors. GA4 can feel fiddly at first, but a few minutes of dragging dimensions around shows you what’s possible.
Track User Activity Before Form Submission
Seeing what visitors did before they filled out and submitted your form is genuinely useful, and it’s a nice complement to your conversion numbers.
The WPForms User Journey Addon shows you the exact path a visitor took through your site, including:
- The URL that sent them to your site
- The search they made to find you
- Any UTM tags from a marketing campaign
- How long they spent on your site
- The pages and posts they visited before submitting
The User Journey Addon is available to all WPForms Pro license holders. To set it up, go to WPForms » Addons in your dashboard, search for “user journey,” and click the Install Addon button.
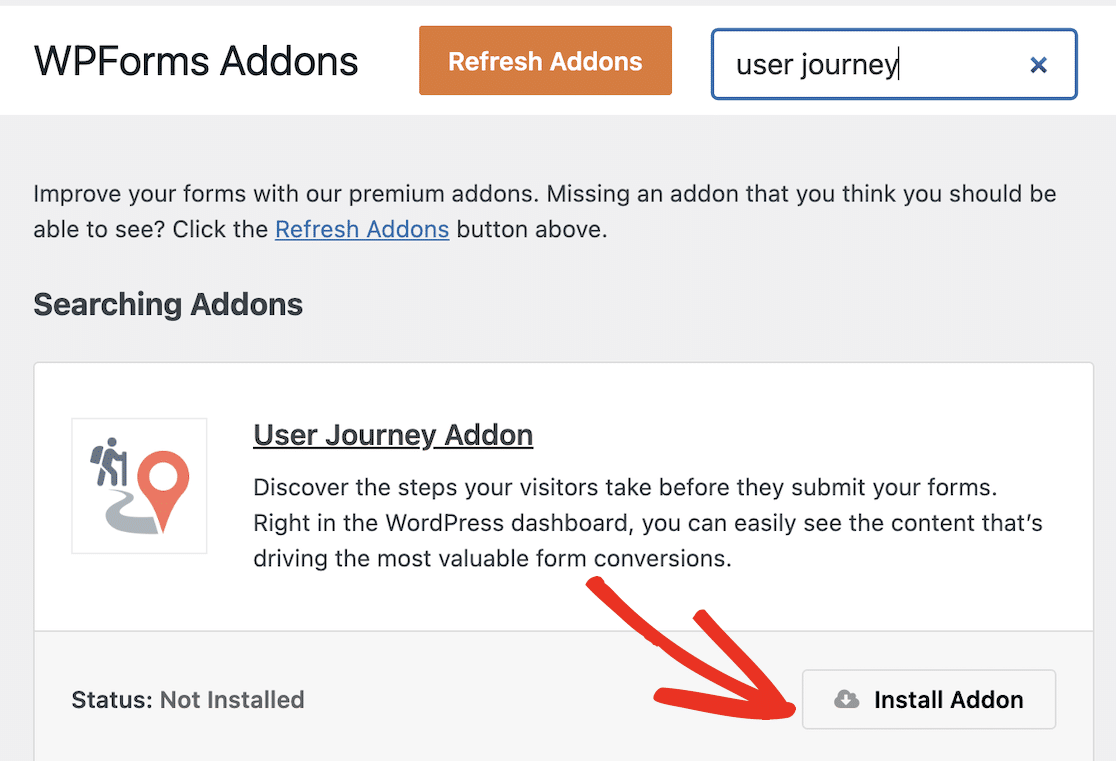
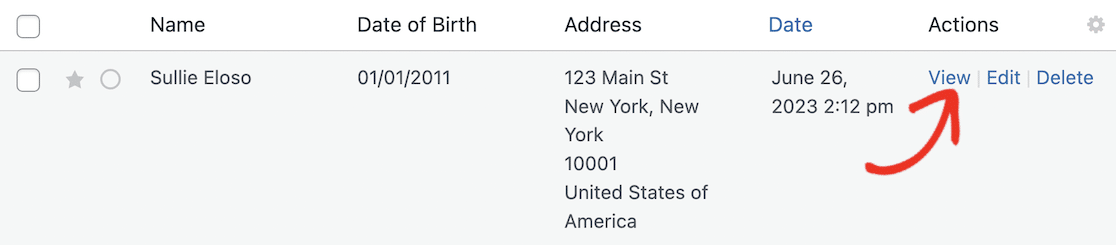
After a few moments the addon installs and activates. To see a journey, go to WPForms » Entries, click the form you want, and click View on any submission.
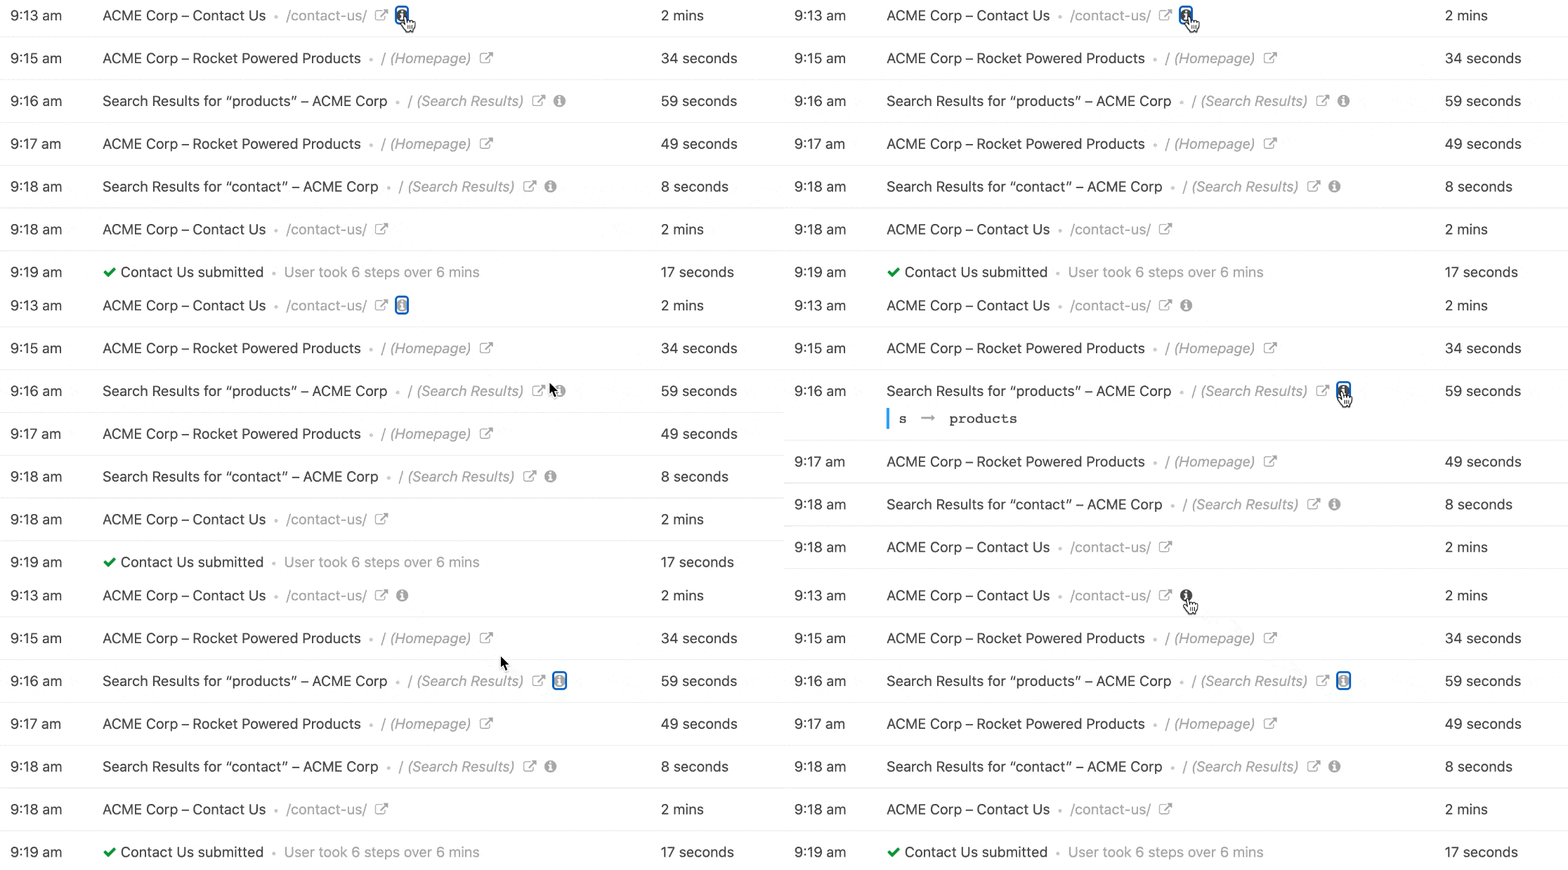
On the View Entry page, scroll down to the User Journey box. It lists everything the visitor did before submitting, with time stamps and extra detail, so you can adjust your content and layout to drive more submissions.
FAQs on Tracking Form Submissions in Google Analytics
Tracking form submissions in Google Analytics comes up a lot among WordPress users. Here are answers to the questions I get asked most often.
How do I track a form submission in WordPress?
You have two main options. WPForms tracks submissions natively through its built-in Form Analytics, so you get views, conversion rates, and field-level data with no setup. If you specifically want the data in Google Analytics, connect your site to GA4 with MonsterInsights, which records each submission as an event automatically.
How do I see form submissions in WordPress?
Log into your WordPress dashboard and go to WPForms » Entries. Every submission is listed there in a clear, organized view, and you can search, star, and export entries. For performance data rather than the entries themselves, open WPForms » All Forms and view a form’s analytics.
Does GA4 track form submissions automatically?
GA4 can, through its Enhanced Measurement setting, which fires form_start and form_submit events. It’s not fully reliable on its own, though, because it often misses forms that submit without reloading the page, which includes most WordPress form plugins. Using WPForms with MonsterInsights or the built-in analytics gives you dependable tracking without that gap.
Do I need Google Analytics to track form submissions?
No. Google Analytics is great for tying submissions back to traffic sources, but WPForms’ built-in Form Analytics tracks views, interactions, conversion rates, abandonments, and errors entirely within WordPress. Many site owners find that’s all they need, and they only add Google Analytics when they want deeper traffic-source detail.
Next, Learn More About Your Form Visitors
Now that you can see how your forms perform and where your submissions come from, the natural next step is understanding the people behind them.
If you want to know where your visitors are based, our guide to tracking user locations with WordPress form submissions adds location data to every entry using the Geolocation addon.
You can go further with the source data too like setting up a Facebook pixel to track form submissions to see which visitors converted after clicking a social ad.
Additionally, you can follow the steps in our guide to tracking form submissions as Google Ads conversions to find out which ads actually drive leads.
Start Tracking Your Forms With WPForms
Ready to build your form? Get started today with the easiest WordPress form builder plugin. WPForms Pro includes lots of free templates and offers a 14-day money-back guarantee.
If this article helped you out, please follow us on Facebook and X (Twitter) for more free WordPress tutorials and guides.





Have you got on article that shows you how to do this with Google Tag Manager and GA4?
Hey Peter – We currently don’t have a native feature to connect WPForms with Google Tag Manager. I do agree this would be helpful, and I’ll add this into our feature request tracker so that it’s on the radar of our developers.
Thanks 🙂