
Are you looking for a way to create an upload form that automatically sends WordPress file uploads to your Dropbox? You probably want to easily manage those files or create a backup copy for safekeeping.
In this guide, we’ll show you how to add Dropbox to your WordPress website. That way, you can make contact forms that send a copy of your WordPress form file uploads to Dropbox.
If you’d prefer to read the tutorial, we’ve written how it’s done below.
Create Your Dropbox Upload Form in WordPress
How to Add a Dropbox Upload Form to Your WordPress Website
In This Article
Step 1: Create a File Upload Form
The first thing you need to do is to install and activate the WPForms plugin. For help with this step, learn how to install a WordPress plugin.
If you don’t have a form on your website with a file upload function yet, you can follow this guide on creating a file upload form.

Or, if you’d prefer a written tutorial, You can also read about how to create a WordPress upload widget, or check out any of these more specific tutorials:
Once you’ve created an upload form, you can connect Dropbox with it to send a copy of all uploaded files as backups.
Step 2: Submit a Test Entry for Your Upload Form
As soon as you publish your file upload form after creating it, you can fill out a test entry yourself. This is important for establishing a connection between your form and Zapier, which we’ll need to create the integration with Dropbox later.
You can immediately submit an entry once you visit the page where your form is embedded after publishing it.
Once you’re done, click Submit to submit your form entry with an uploaded file.

With the entry now created, it’s time to start building the WPForms-Dropbox integration.
Step 3: Install the Zapier Addon
Before you can connect the WPForms plugin with Dropbox to store uploads from your website, you’ll have to connect the plugin with Zapier.
To make this work, you’ll need the WPForms Zapier addon available with the WPForms Pro license.
Open your WordPress dashboard, and go to WPForms » Addons. You’ll find all available WPForms addons here, including Zapier.
Click on the Install Addon button under Zapier Addon.

The installation will take only a few seconds. After it’s finished installing, navigate to WPForms » Settings. Find Integrations on the horizontal menu bar and click on it.

Once inside this screen, you’ll find existing integrations with popular marketing and automation tools listed here. Click on the Zapier section to expand it. Here you’ll find your Zapier API key.

You’ll need this later to connect your site to Zapier, so keep this page open in a separate browser tab as you move forward.
Step 4: Choose WPForms as Your Zapier Trigger App
Now you’re ready to connect WPForms to Zapier. In a new tab, log in to your Zapier account and click on the Create button.

On the next page, click on the Trigger step to start configuring the first step of your integration.

Next, search for WPForms and choose it as the trigger app.

Select New Form Entry as the trigger event and proceed to the next step. This will make form submission the event that starts your automation in Zapier.

Zapier will now ask you to connect your website with your Zapier account. Click on Sign in.

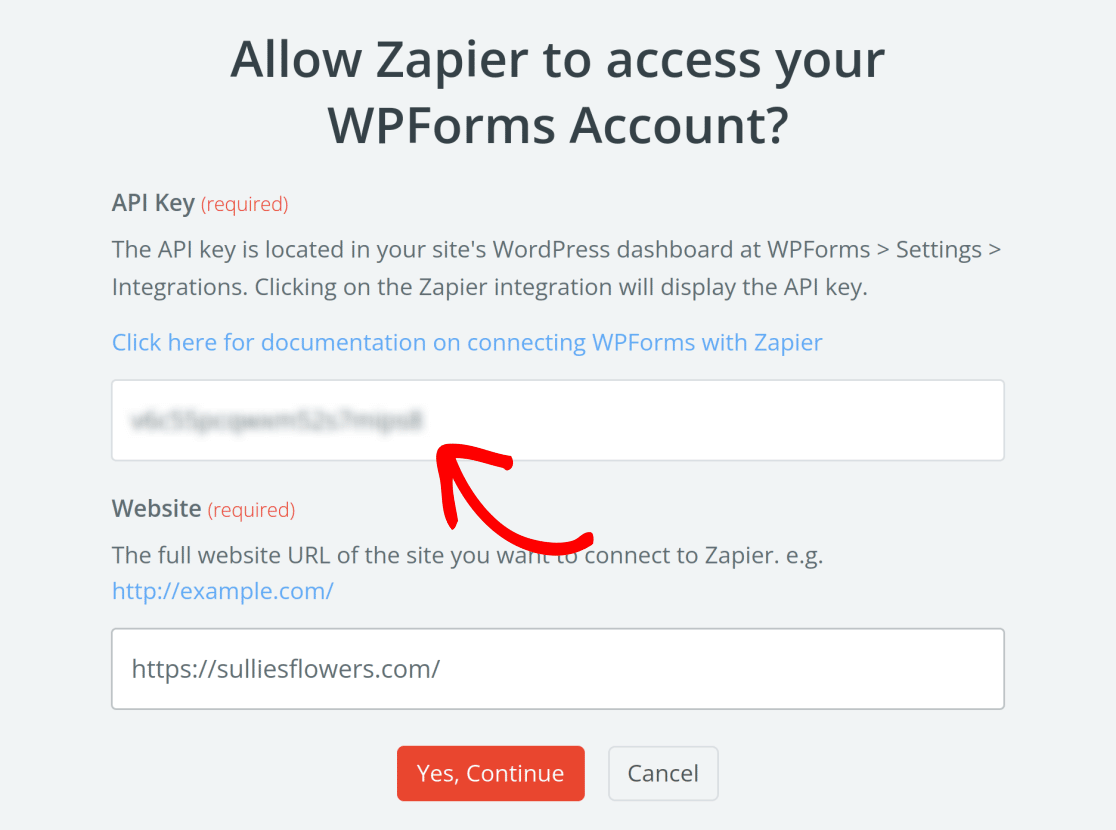
In the connect account window, enter your website URL and the WPForms Zapier API key, which you can copy from the browser tab you left open. Then, click on Yes, Continue.
Great! With Zapier now connected to your WPForms account, it can pull data from your existing forms. Click the Continue button at the bottom to proceed.

In the next step, choose the upload form you’ve just created in WPForms and press Continue. For me, this form is called “File Upload Form”, so I’ll pick this one from the dropdown.

Zapier will then test your connection to make sure everything is set up correctly. Click Test trigger to begin.

If the test is successful, you’ll see the test entry you submitted earlier. Press the Continue with selected record button to proceed.

Well-done! That takes care of the trigger setup. Let’s now set up Dropbox as the action app for this automation.
Step 5: Set Up Dropbox as Your Zapier Action App
After setting up the trigger, Zapier will now ask you to choose your action app. Since we want to save the uploaded files in Dropbox, search and select Dropbox as the Action app.

Next, choose Upload File as the Action and click Continue. This means that whenever someone adds a file to your form, it will get uploaded to your Dropbox account (and inside your WordPress as well, as usual).

On the next screen, select Sign in to connect your Dropbox account with Zapier.

This will open a popup window where you’ll need to log in to Dropbox. Enter your email address and password, then click Sign in.

Zapier will now require your permission to access your Dropbox files and folders. Click the Allow button to proceed.

You’ll then be taken back to the Zap setup wizard where your Dropbox account should now appear as connected. Click Continue to move on to the next step.

In the next step, you’ll need to select your Dropbox folder to which the files from your form should be uploaded. You’ll also need to select the file upload field from your form itself, so Dropbox knows exactly where to look for the files to save.
You can also edit other settings here such as the file overwrite behavior, but these are optional.
Click on Continue after setting up the required fields for the Action to complete properly.

Now Zapier will test your Dropbox connection just like it did for WPForms. Click Test step to begin.

If everything’s working correctly, you’ll see a success message. The file you uploaded for your test entry should also now be in the Dropbox folder you selected in the previous step.
Don’t forget to publish your Zap before you close Zapier.

I’ll just log into my Dropbox account and check if the file was correctly uploaded to my specified folder. And here it is!

Pretty slick, right?
Create Your Dropbox Upload Form in WordPress
You can now save a substantial amount of time and effort with every new file submission you collect getting automatically backed up in your Dropbox account.
Next, Check Out More WPForms Integrations
Bravo! You’ve just finished creating an awesome upload form that also sends a copy of the file uploads to Dropbox. You now know how to add Dropbox to your website through your form plugin.
Want to send form entries to Google Sheets so you can view all your entry information in a spreadsheet? The WPForms Google Sheets addon lets you connect any form directly to Google Sheets.
Or, for more awesome ways to use WPForms and Zapier together, check out these posts:
- How to create a Google Drive upload form
- How to connect your WordPress contact form to Discord
- How to create a custom Airtable form for WordPress
- How to sign users up for webinars in GoToWebinar
And these are only some of the many superpowers you get when using WPForms. Check out dozens of amazing features of our WordPress plugin and explore the blog for more tutorials like this one.
Also, follow us on Facebook and Twitter for more WordPress guides and tutorials.


Is there a way to just send the photos to Dropbox? So they don’t take space within wordpress?
Hi Gabriela,
While you can send a copy of all uploaded files to Dropbox, as described in this tutorial, we don’t currently have a way to avoid also uploading the file to your site. This is because our Dropbox integration isn’t direct, but rather uses Zapier as a middle man. But we’ve noted direct Dropbox integration on our feature request list, and will keep that on our radar as a potential option down the road.
If you have any additional questions, please get in touch 🙂
Any way to bypass Zapier?
Hi David,
Unfortunately we don’t have a built-in integration with DropBox so you won’t be able to send form data from WPForms to DropBox without the Zapier addon. I apologize for the inconvenience! 🙁
Is there an upload limit? I need to be able to upload up to 1gb.
Hi Hemal!
The file upload size limitation in your forms defaults to the maximum that your web host allows. For most web hosts this is 8 or 16MB, though some are much lower or higher.
While we provide the option for you to decrease the upload size limit in your forms, we have no control over the upper limits imposed by your host’s server. To get this increased (or find out if an increase is possible), you’ll need to get in touch with your hosting provider.
I hope this helps.
Have a good one 🙂
Is it possible to send files to different folders within Dropbox? For example, can I create two forms with WPForms and have one send files to http://www.dropbox.com/home/Folder1 and the other form send files to http://www.dropbox.com/home/Folder2?
Thanks.
Hi Chris!
Yes, when you create a Zap for a form you are choosing a Dropbox folder where your files will be saved to. This way if you have two forms then you can create two different Zaps and choose different folders for them.
I hope this helps.
Have a good one 🙂
Is there a reason why when using the modern version of the upload field (where you can upload multiple files), it uploads a .txt file to my Dropbox? When I force the .PDF on zapier, it pops out a corrupted PDF file. Any way to move around this issue?
Hi Ernesto!
If you have a WPForms license, you have access to our email support, so please submit a support ticket.
Otherwise, we provide limited complimentary support in the WPForms Lite WordPress.org support forum.
Have a good one 🙂
When using the new upload field that allows for multiple documents to be uploaded at once, it ends up uploading a .txt file. When I force the file extension to .pdf, it comes out as corrupted.
I believe this issue doesn’t happen when it’s done by separate “classic upload fields”.
So, 4 years laters and you still don’t have a direct upload to dropbox? I don’t want a copy of the file, or to use Zapier, can’t you just upload to dropbox like Ninja Forms?
Hi there- We apologize for the frustration you are facing here! This is still under the review of our development team. I have added your vote and email address to the feature-request list and you’ll be notified once this integration is added!
Thanks, and sorry!
After I click add new account, it kept displaying error sentence below:
“some error occured please try again after some time or use manual connect method”
Hello there, sorry to hear you’re facing that error!
For a smoother experience, we recommend using the built-in integration available through our Dropbox addon instead. It’s more reliable and should help you connect without issues.
You can check out our Dropbox addon documentation here for step-by-step instructions.
Please submit a support ticket for any help in setting this up!