
AI Summary
If you run a WordPress site and want to take payments, you might assume you need a full online store or a developer to set it up.
In reality, you can build a Stripe payment form in WordPress with WPForms and start accepting credit cards straight from a page on your site, no code needed.
The whole setup takes about 10 minutes. You’ll connect your Stripe account, add a payment field to your form, set up your billing options, run a quick test payment, and switch to live mode when you’re ready.
Create Your Stripe Payment Form
Why Accept Online Payments with Stripe?
Stripe is an online payment processor for online business. PayPal lets people pay for things online with or without credit card numbers, but everyone has to have a PayPal account to do this.
With Stripe, your customers won’t need to have a Stripe account to checkout on your website from one of your order forms.
And Stripe is fantastic because it allows people to check out using their credit card or bank account. This lets more people spend money on your website, since some people don’t have a PayPal account.

While they’re both great options for payment platforms, there are some other big differences.
Be sure to check out our post on Stripe vs PayPal to get an in-depth comparison of these PCI compliant and Strong Customer Authentication (SCA) payment options.
You can collect Stripe, Square, Authorize.Net, and PayPal payments on WPForms to maximize your income potential!
How to Accept Payments with Stripe
If you’re ready to start receiving online payments by credit card, follow these easy steps to start accepting them with Stripe on your website:
Step 1: Connect Stripe to Your WordPress Site
Before we get started, be sure to install WPForms on your WordPress site. WPForms is the best WordPress payment plugins as it integrates with Stripe and offers various sale-boosting options like coupons and interactive calculated fields.
I recommend using WPForms Pro. This removes the 3% transaction fee that WPForms charges on the Lite (free) tier. Stripe itself charges 2.9% + 30¢ per transaction regardless of WPForms plan.
Plus, you also get access to the Stripe Pro addon that lets you add conditional logic to your payment forms to offer multiple types of payments in the same form.

Once you’ve installed WPForms Pro on your website, you’ll need to go to WPForms » Settings in the left menu of your WordPress dashboard. From there, click on the Payments tab.
If you’d like to adjust the currency, go ahead and select the option you need from the Currency dropdown before proceeding.

When you’re ready, scroll down to the Stripe section. Here, you should see a field labeled Connection Status. You’ll need to click the blue Connect with Stripe button.

When you connect with Stripe, webhooks are automatically set up. Stripe webhooks make it super easy and convenient for you to manage subscriptions and refunds, in addition to payments, all in one place in your WPForms account.
Next, you’ll be asked to authorize the connection between your forms and Stripe. The exact content you see on this Stripe dashboard page will vary based on whether your Stripe account is already activated.

Once you’ve agreed to the requirements, you’ll be redirected back to your WordPress admin area. Here, the Connection Status should now have a green checkmark confirming the connection looks good and you’re that much closer to being able to accept payments with Stripe.

By default, you should have the Enable Webhooks option toggled on. This will automatically sync additional payment details with your Stripe dashboard such as refund status for each transaction.

Step 2: Add Stripe to Your Forms
Now that you’ve connected Stripe to your WordPress site, you can start adding Stripe to your forms.
First, you’ll need to create a new form or edit an existing one.
In order for your form to work with Stripe, you’ll need at least these 2 fields:
- An items field (Single Item, Multiple Items, Checkbox Items, or Dropdown Items)
- A Stripe Credit Card field
For our example, we’ll create a simple order form that includes:
- Name
- Dropdown Items
- Total
- Stripe Credit Card

The Total field is not required for Stripe to work, however, it can be helpful for users to easily see how much they’ll be paying.
And while you’re adding fields to your Stripe form, keep in mind that you can even add a coupon field to offer discounts to your website users and customers.
Once you’ve added all the fields you want to your form, go to Payments » Stripe. From the Stripe panel, check the box labeled Enable Stripe payments.

Now, you’ll be able to enter a short Payment Description, which will appear on the user’s bank or card statement.
Last, under Stripe Payment Receipt you can choose an Email field where Stripe can send a receipt.

If you’re just going to be receiving one-time payments, you’re all set! If you’d like to set up a recurring Stripe payment, we’ll walk you through that next.
Step 3: Set Up Recurring or Subscription Payments (Optional)
Great news if you want to make more money online by using a recurring business model. Stripe supports subscription payments.
And you can easily set up a subscription payment within this same settings panel as the last step.
Under the section titled Subscriptions, go ahead and check the box labeled Enable recurring subscription payments.

Once you’ve checked this box, additional settings will appear.
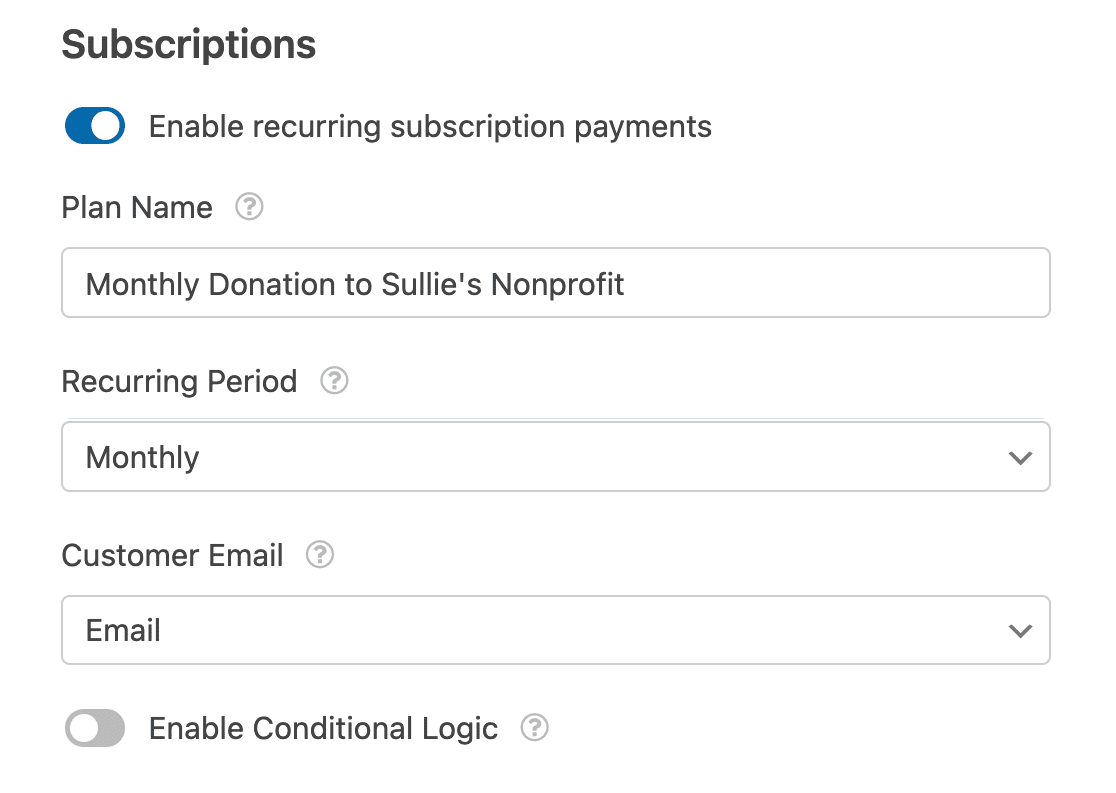
Here are the fields you’ll need to complete:
- Plan Name — You’ll need to enter a title for the subscription, such as “Donation to Example Organization”. This will appear within the Stripe transaction.
- Recurring Period — You can choose how often the recurring payments should occur: Daily, Weekly, Monthly, Quarterly, Semi-Yearly, or Yearly.
- Customer Email (Required) — Within this dropdown, select an Email field from your form where the customer can be contacted.
Step 4: Setting Up Conditional Logic for Payments (Optional)
If you choose to upgrade to WPForms Pro, the Stripe Pro addon gives you the option to set up conditional logic to accept payments with Stripe. Conditional logic lets you create “smart forms” that automatically change the form fields based on a user’s selections.
There are tons of ways you can use conditional logic with Stripe payments like:
- Let your users choose whether to pay with Stripe or PayPal
- Making payment optional
- Let your users choose whether to submit a one-time payment or start the recurring payment
For example, we’ll set up the last option from that list and let users choose whether to submit a one-time or recurring donation.
To get started, we’ll create a simple donation form. This will need to include either a Dropdown or Multiple Choice field that will let users pick whether they’d like to submit a one-time donation or set up a recurring donation.
In our form, we’ll let users choose between 2 payment options: Once or Monthly.

Next, go back to the Stripe settings under Payments » Stripe. We’ve already followed the steps in the previous section to set up the basic settings. So now we need to set up the logic for our recurring payment methods options.
First, we’ll set up the monthly recurring payment option. Set the Recurring Period to Monthly.
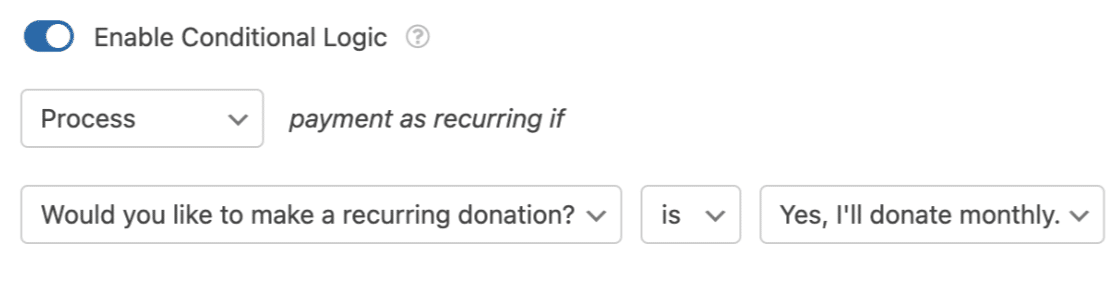
Then, scroll to the bottom of the settings (under the Subscriptions section) and check the box labeled Enable conditional logic.
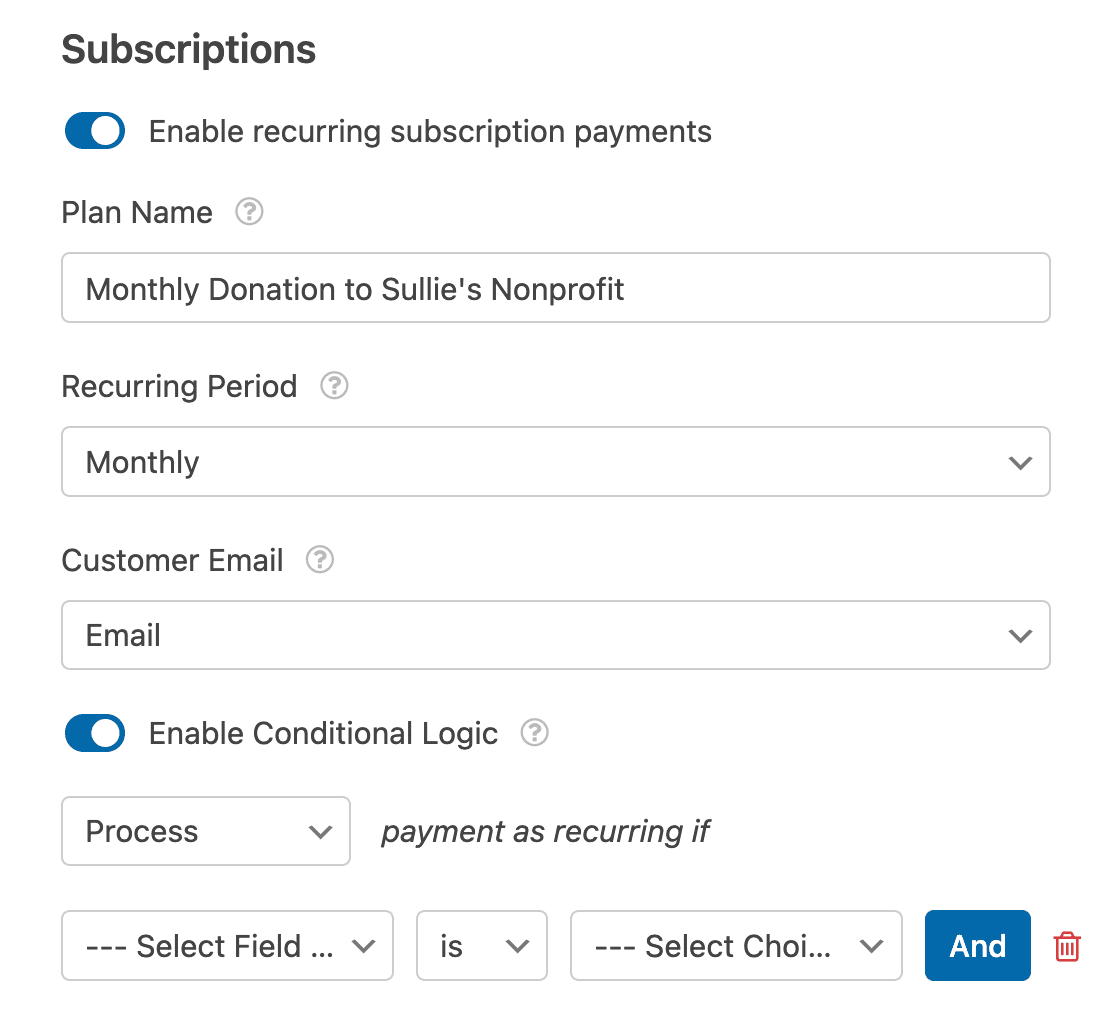
This setting will display additional fields where you can set up any conditional rules. For our example, we’ll set up a conditional rule that states:
Process payment as recurring if the answer to the “Would you like to make a recurring donation?” Dropdown field is “Yes, I’ll donate monthly”.
Then, Save your form and you can go ahead with these steps to embed your form on any WordPress page.
Before launching your payment form, we recommend testing Stripe payments. You can also check out this article on common complaints about online payment forms to make sure you aren’t making the same mistakes.
Great job, you’ve set up a conditional recurring payment!
Boost Sales With Stripe Payments Now
Step 5: Track Transactions and Payment Status
As you start making sales or collecting donations with your Stripe form, you’ll also need a way to track the revenue you’ve generated.
You’ve got a few options here. For instance, you can log into your Stripe account to find all transactions made through the forms on your site.
But it’s more convenient to view your payments directly inside your WordPress dashboard. WPForms includes payment tracking right out of the box. To access it, go to WPForms » Payments.
This will open a summary of your payment history with a helpful chart that you can filter by:
- Total Payments
- Total Sales
- Total Refunded
- New Subscriptions
- Subscription Renewals
- Coupons Redeemed

WPForms syncs with your Stripe dashboard to show the status of each payment as well. And if you’re wondering if a specific payment was refunded, you can check its status in the table underneath.

There are additional details available for every payment. Click on the payer’s name in the table to open a detailed view.

Here, you can learn more about the transaction such as subscription details and the payer’s payment history.

Need to initiate a refund? Just click the Refund button. You don’t have to open your Stripe account; WPForms can directly trigger a refund from this same window.

Or if you just want to cancel an active subscription, you can do that too. Click the Cancel button under the Subscription Details section.

Since WPForms syncs with Stripe for payment tracking, it will automatically update the status of each payment in the table.

These options can save you a lot of time by eliminating the need to access your Stripe account when you need to track, analyze, or manage payments for your WordPress site.
Step 6: Switch from Test Mode to Live
While you’re building and testing, it’s smart to run WPForms in test mode so no real money changes hands. When you’re confident the form works the way you want, here’s how to flip it over to live payments.
First, head to WPForms » Settings » Payments, scroll down to the Stripe section, and toggle Test Mode to the off position.

Stripe connects to test mode and live mode separately, so you’ll then need to click Connect with Stripe again to authorize the live connection.
Once you’re connected in live mode, process one real low-value transaction (a $1 payment works well) to confirm everything runs end to end.
Then check that the payment shows up in your live Stripe dashboard rather than the test one. If something doesn’t look right, switch Test Mode back on, sort out the issue, and test again before you go live.
FAQs About Stripe Payment Forms in WordPress
Stripe is one of the most popular ways to take payments on a WordPress site. Here are answers to the questions that come up most often when you set up a Stripe payment form with WPForms.
Do my customers need a Stripe account to pay?
No. Your customers pay with their credit or debit card right on your form, and they never have to create a Stripe account. Only you, the site owner, need a Stripe account to receive the money.
How much does it cost to accept Stripe payments in WordPress?
Stripe charges 2.9% + 30¢ per successful card transaction in the US. On WPForms Lite and Basic, WPForms adds a 3% fee on top of that. WPForms Pro and Elite remove the WPForms fee, so you only pay Stripe’s processing rate.
Can I accept recurring or subscription payments?
Yes. On any paid WPForms plan, you can turn on recurring subscription payments inside the Stripe settings and choose how often to bill, from daily up to yearly. It’s a good fit for memberships, donations, and payment plans.
Do I need WooCommerce to accept Stripe payments?
No. WPForms connects directly to Stripe, so you can take payments through a single form without installing WooCommerce or building a full online store. That makes it a lighter option when you just need to sell one product, take a booking, or collect a payment.
Is it safe to accept Stripe payments on my site?
Yes. Stripe is PCI compliant and supports Strong Customer Authentication (SCA), and your customers’ card details are handled by Stripe rather than stored on your site. That keeps the security burden off your WordPress install.
Can I accept Apple Pay and Google Pay?
Yes. The Stripe Credit Card field supports digital wallets like Apple Pay and Google Pay, so customers on a supported device or browser can check out in a couple of taps. The wallet options appear automatically when the customer’s device supports them.
Next, Add More Ways to Get Paid on Your Forms
Now that your Stripe payment form is live, you can give customers even more flexibility.
If you want to bill on a schedule, take a look at how to accept recurring payments for memberships and subscriptions.
And if some of your customers prefer a different processor, you can also add Square payments to your WordPress forms.
Start Accepting Stripe Payments Now
Ready to build your form? Get started today with the easiest WordPress form builder plugin. WPForms Pro includes lots of free templates and offers a 14-day money-back guarantee.
If this article helped you out, please follow us on Facebook and Twitter for more free WordPress tutorials and guides.


Hi,
I am using stripe payment in a school Enrolment Application form. The customer will be paying $50 application fee with a reference name (Child’s name to be entered by the customer). How do I capture that information in my Stripe Account?
Hi Vaishnavi — We’d be happy to help! When you get a chance, please drop us a line in support so we can assist.
If you have a WPForms license, you have access to our email support, so please submit a support ticket. Otherwise, we provide limited complimentary support in the WPForms Lite WordPress.org support forum.
Thanks 🙂
Is it possible to have a form with both monthly and yearly recurring payments? I can not find any option for this.
Hey Wayne – I’m sorry it’s currently not possible to have both monthly and yearly recurring payments on the same form. I do agree it would be super helpful, though, and I’ve gone ahead and added a vote on your behalf on the feature request list.
If you have other questions, please always feel welcome to contact our support team.
I apologize for the inconvenience.
how do I add quantity?
Hey Dan,
Our forms do not have the ability to run the calculations required for product quantities. I do agree it would be super helpful, though, and it’s certainly on our radar as we plan out our roadmap for the future. I’ll add your request to that, as well.
In the meantime, you might consider leveraging the Dropdown Items field to do what you’re asking for in a slightly different way. Please refer to this guide
I apologize that this solution may be less than ideal, but I hope it helps! 🙂
Hi, I have a pro licence, can / will WPForms use Apple / Google Pay with Stripe?
Hi Mick! I apologize, at the moment, our Stripe addon does not support Apple Pay, Google, and other digital wallet payment. I do agree it would be super helpful, though. I’ve made a note of the feature request and we’ll keep it on our radar as we plan out our roadmap for the future.
I’m that we can’t provide what you’re looking for right now, but I appreciate the suggestion! It’s always helpful to get insights from our users.
I hope this helps to clarify 🙂 If you have any further questions about this, please contact us if you have an active subscription. If you do not, don’t hesitate to drop us some questions in our support forums.
I can create different form, each one connected with different Stripe accounts? Or I can let user to select which Stripe account the user want to pay to?
Hey Henry, currently we do not have a built-in way to support multiple/different Stripe accounts. I understand that it would be super helpful. I have gone ahead and added your vote to consider this as a feature request for future enhancements.
Thanks.
I see the earlier answer that multiple recurring periods were not available in 2020. Is that still the case now in 2023? I was able to set the fields up to select monthly, quarterly, and annually. And, the conditional logic seemed to allow it. However I am not going to leave it in there if it can’t be processed properly.
Hey Doug – with Stripe Pro version 3.1.0, now you can create different recurring plans within Stripe settings in your form. You can see the details about this new feature in our guide here.
Thanks 🙂
Is it possible to have the card element with Card number, Expiry & CVC fields on the same line… as well as the country dropdown in the same form
Hi Mohit – because of the integration with Stripe, by default, there’s no way to have the card element in the same line.
However, this should be possible with custom development and in case you’d like to look into custom development options, we highly recommend using Seahawk. Seahawk screens all developers for you to make sure that they’re highly skilled and communicative, and then also helps guide the entire process of connecting and communicating with a best-fit developer.
You can book a free consultation with their team here.
In case you’d like to check other custom development options, please go through the following guide.
Hope this helps. Thanks 🙂
Hi, mike, I currently have this project requirement. According to different donation types, donations will be credited to different accounts. Is it supported now? I have already opened different connect accounts on stripe,but it is not found where setting?
Hi there, currently we do not have a built-in way to support multiple/different Stripe accounts. I understand that it would be super helpful. I have gone ahead and added your vote to consider this as a feature request for future enhancements.
I’d recommend reaching out to our Trusted Advisors in the support team if you have a WPForms license. Please submit a support ticket and they’ll be happy to take a closer look and help explore any possible custom solutions.