
Riassunto AI
Se gestisci un sito WordPress e vuoi accettare pagamenti, potresti pensare di aver bisogno di un negozio online completo o di uno sviluppatore per configurarlo.
In realtà, puoi creare un modulo di pagamento Stripe su WordPress con WPForms e iniziare ad accettare carte di credito direttamente da una pagina del tuo sito, senza bisogno di codice.
L'intera configurazione richiede circa 10 minuti. Collegherai il tuo account Stripe, aggiungerai un campo di pagamento al tuo modulo, imposterai le opzioni di fatturazione, effettuerai un rapido pagamento di prova e passerai alla modalità live quando sarai pronto.
Crea il tuo modulo di pagamento Stripe
Perché accettare pagamenti online con Stripe?
Stripe è un processore di pagamenti online per aziende online. PayPal consente alle persone di pagare beni e servizi online con o senza numeri di carta di credito, ma tutti devono avere un account PayPal per farlo.
Con Stripe, i tuoi clienti non avranno bisogno di un account Stripe per completare l'acquisto sul tuo sito web da uno dei tuoi moduli d'ordine.
E Stripe è fantastico perché consente alle persone di pagare utilizzando la propria carta di credito o conto bancario. Ciò consente a più persone di spendere denaro sul tuo sito web, poiché alcune persone non hanno un account PayPal.

Sebbene siano entrambe ottime opzioni per le piattaforme di pagamento, ci sono alcune altre grandi differenze.
Assicurati di consultare il nostro post su Stripe vs PayPal per un confronto approfondito di queste opzioni di pagamento conformi PCI e con Strong Customer Authentication (SCA).
Puoi riscuotere pagamenti Stripe, Square, Authorize.Net e PayPal su WPForms per massimizzare il tuo potenziale di guadagno!
Come accettare pagamenti con Stripe
Se sei pronto per iniziare a ricevere pagamenti online con carta di credito, segui questi semplici passaggi per iniziare ad accettarli con Stripe sul tuo sito web:
- Passaggio 1: Collega Stripe al tuo sito WordPress
- Passaggio 2: Aggiungi Stripe ai tuoi moduli
- Passaggio 3: Imposta pagamenti ricorrenti o in abbonamento (facoltativo)
- Passaggio 4: Impostazione della logica condizionale per i pagamenti (facoltativo)
- Passaggio 5: Traccia transazioni e stato dei pagamenti
- Passaggio 6: Passa dalla modalità di prova alla modalità live
Passaggio 1: Collega Stripe al tuo sito WordPress
Prima di iniziare, assicurati di installare WPForms sul tuo sito WordPress. WPForms è il miglior plugin per pagamenti WordPress in quanto si integra con Stripe e offre varie opzioni per aumentare le vendite come coupon e campi calcolati interattivi.
Raccomando di utilizzare WPForms Pro. Questo rimuove la commissione di transazione del 3% che WPForms addebita sul livello Lite (gratuito). Stripe stesso addebita 2,9% + 30 centesimi per transazione indipendentemente dal piano WPForms.
Inoltre, ottieni anche l'accesso all'addon Stripe Pro che ti consente di aggiungere logica condizionale ai tuoi moduli di pagamento per offrire diversi tipi di pagamenti nello stesso modulo.

Una volta installato WPForms Pro sul tuo sito web, dovrai andare su WPForms » Impostazioni nel menu a sinistra della tua bacheca di WordPress. Da lì, fai clic sulla scheda Pagamenti.
Se desideri modificare la valuta, procedi e seleziona l'opzione di cui hai bisogno dal menu a discesa Valuta prima di continuare.

Quando sei pronto, scorri verso il basso fino alla sezione Stripe. Qui dovresti vedere un campo etichettato Stato della connessione. Dovrai fare clic sul pulsante blu Connetti con Stripe.

Quando ti connetti con Stripe, i webhook vengono impostati automaticamente. I webhook di Stripe ti rendono molto facile e conveniente gestire abbonamenti e rimborsi, oltre ai pagamenti, tutto in un unico posto nel tuo account WPForms.
Successivamente, ti verrà chiesto di autorizzare la connessione tra i tuoi moduli e Stripe. Il contenuto esatto che vedi in questa pagina della dashboard di Stripe varierà a seconda che il tuo account Stripe sia già attivato.

Una volta accettati i requisiti, verrai reindirizzato alla tua area di amministrazione di WordPress. Qui, lo Stato della connessione dovrebbe ora mostrare un segno di spunta verde che conferma che la connessione è buona e sei un passo più vicino a poter accettare pagamenti con Stripe.

Per impostazione predefinita, dovresti avere l'opzione Abilita Webhook attivata. Questo sincronizzerà automaticamente dettagli di pagamento aggiuntivi con la tua dashboard Stripe, come lo stato del rimborso per ogni transazione.

Passaggio 2: Aggiungi Stripe ai tuoi moduli
Ora che hai collegato Stripe al tuo sito WordPress, puoi iniziare ad aggiungere Stripe ai tuoi moduli.
Innanzitutto, dovrai creare un nuovo modulo o modificare uno esistente.
Affinché il tuo modulo funzioni con Stripe, avrai bisogno almeno di questi 2 campi:
- Un campo articoli (Articolo singolo, Articoli multipli, Articoli checkbox o Articoli a discesa)
- Un campo Carta di Credito Stripe
Per il nostro esempio, creeremo un semplice modulo d'ordine che include:
- Nome
- Articoli a discesa
- Totale
- Carta di credito Stripe

Il campo Totale non è obbligatorio per il funzionamento di Stripe, tuttavia, può essere utile per gli utenti per vedere facilmente quanto pagheranno.
E mentre aggiungi campi al tuo modulo Stripe, tieni presente che puoi persino aggiungere un campo coupon per offrire sconti ai tuoi utenti e clienti.
Una volta aggiunti tutti i campi desiderati al tuo modulo, vai su Pagamenti » Stripe. Dal pannello Stripe, seleziona la casella etichettata Abilita pagamenti Stripe.

Ora potrai inserire una breve Descrizione del pagamento, che apparirà sull'estratto conto bancario o della carta dell'utente.
Infine, sotto Ricevuta di pagamento Stripe puoi scegliere un campo Email dove Stripe può inviare una ricevuta.

Se riceverai solo pagamenti una tantum, sei a posto! Se desideri impostare un pagamento Stripe ricorrente, ti guideremo attraverso questo passaggio.
Passaggio 3: Imposta pagamenti ricorrenti o in abbonamento (facoltativo)
Ottime notizie se vuoi guadagnare di più online utilizzando un modello di business ricorrente. Stripe supporta i pagamenti in abbonamento.
E puoi facilmente impostare un pagamento in abbonamento all'interno di questo stesso pannello delle impostazioni come nell'ultimo passaggio.
Nella sezione intitolata Abbonamenti, procedi e seleziona la casella etichettata Abilita pagamenti ricorrenti in abbonamento.

Una volta selezionata questa casella, appariranno impostazioni aggiuntive.
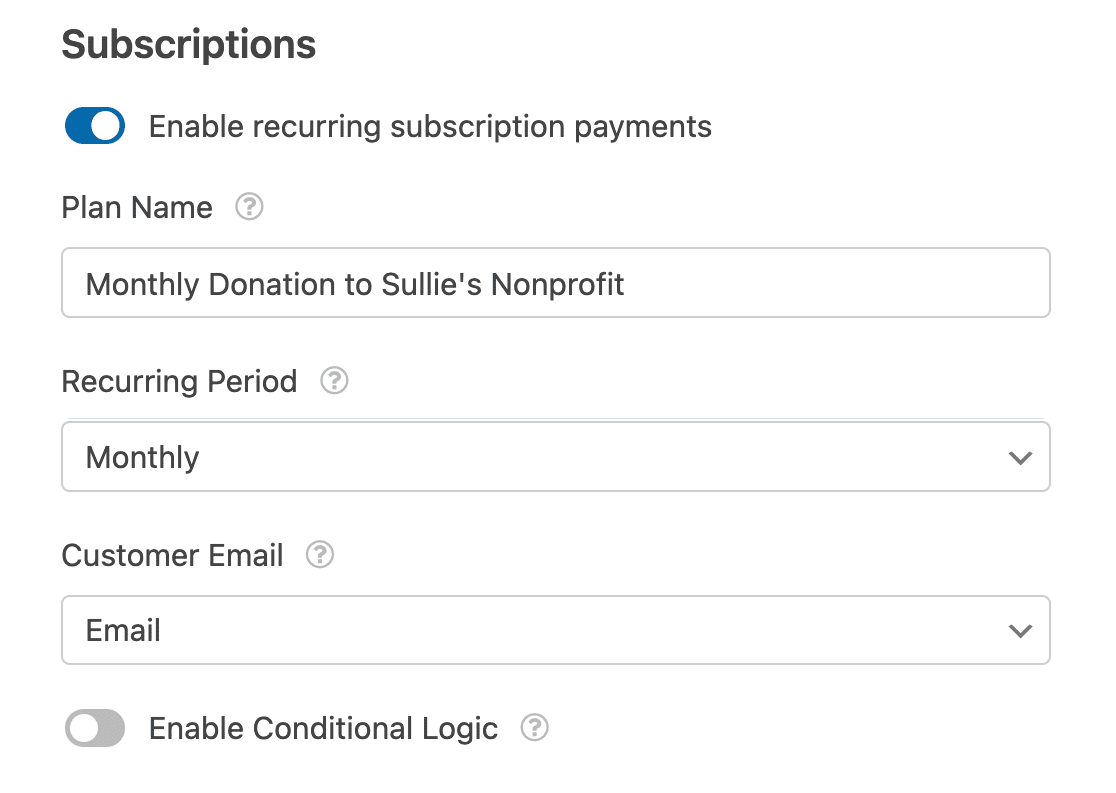
Ecco i campi che dovrai completare:
- Nome del piano — Dovrai inserire un titolo per l'abbonamento, ad esempio "Donazione all'organizzazione di esempio". Questo apparirà all'interno della transazione Stripe.
- Periodo ricorrente — Puoi scegliere la frequenza con cui devono avvenire i pagamenti ricorrenti: Giornaliero, Settimanale, Mensile, Trimestrale, Semestrale o Annuale.
- Email del cliente (Obbligatorio) — All'interno di questo menu a discesa, seleziona un campo Email dal tuo modulo a cui il cliente può essere contattato.
Passaggio 4: Impostazione della logica condizionale per i pagamenti (facoltativo)
Se scegli di eseguire l'aggiornamento a WPForms Pro, il componente aggiuntivo Stripe Pro ti offre la possibilità di impostare la logica condizionale per accettare pagamenti con Stripe. La logica condizionale ti consente di creare "moduli intelligenti" che modificano automaticamente i campi del modulo in base alle selezioni di un utente.
Ci sono tantissimi modi in cui puoi utilizzare la logica condizionale con i pagamenti Stripe, ad esempio:
- Consenti ai tuoi utenti di scegliere se pagare con Stripe o PayPal
- Rendere il pagamento facoltativo
- Consenti ai tuoi utenti di scegliere se inviare un pagamento una tantum o avviare il pagamento ricorrente
Ad esempio, imposteremo l'ultima opzione di quell'elenco e consentiremo agli utenti di scegliere se inviare una donazione una tantum o ricorrente.
Per iniziare, creeremo un semplice modulo di donazione. Questo dovrà includere un campo a scelta multipla o a discesa che consentirà agli utenti di scegliere se desiderano inviare una donazione una tantum o impostare una donazione ricorrente.
Nel nostro modulo, consentiremo agli utenti di scegliere tra 2 opzioni di pagamento: Una volta o Mensile.

Successivamente, torna alle impostazioni di Stripe sotto Pagamenti » Stripe. Abbiamo già seguito i passaggi nella sezione precedente per impostare le impostazioni di base. Ora dobbiamo impostare la logica per le nostre opzioni di pagamento ricorrente.
Innanzitutto, imposteremo l'opzione di pagamento ricorrente mensile. Imposta il Periodo ricorrente su Mensile.
Quindi, scorri fino in fondo alle impostazioni (sotto la sezione Abbonamenti) e seleziona la casella etichettata Abilita logica condizionale.
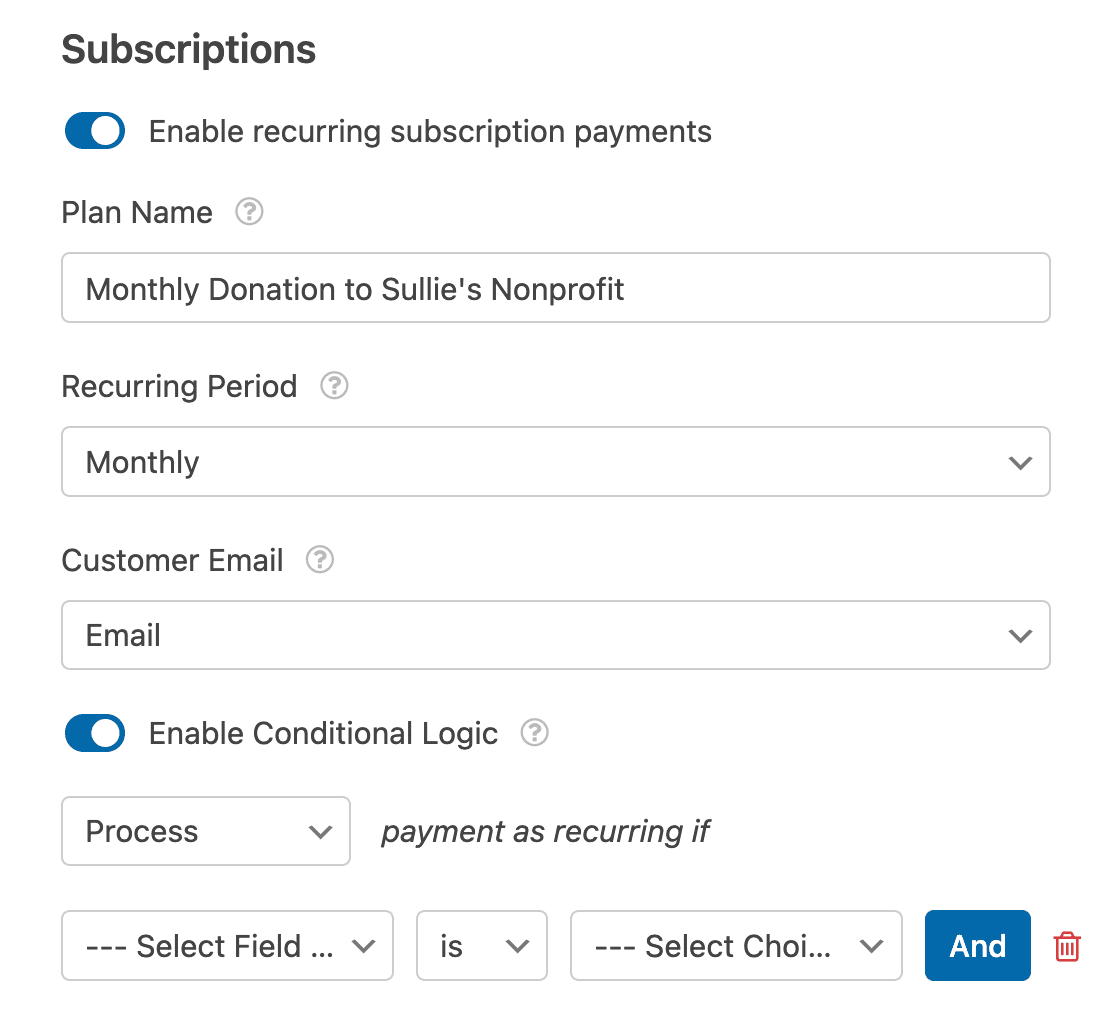
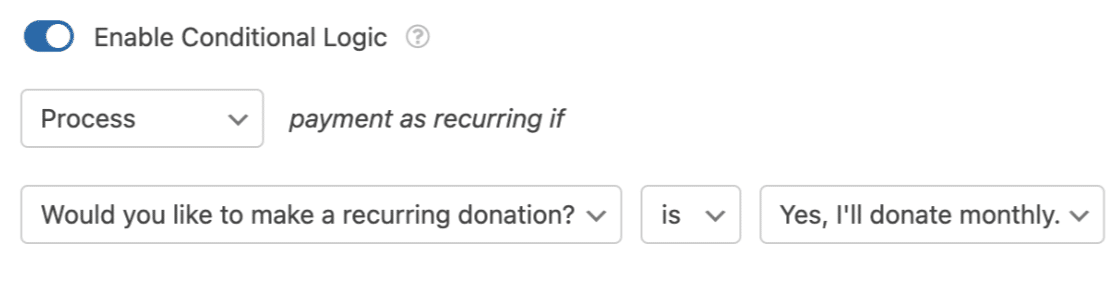
Questa impostazione visualizzerà campi aggiuntivi in cui puoi impostare eventuali regole condizionali. Per il nostro esempio, imposteremo una regola condizionale che afferma:
Elabora il pagamento come ricorrente se la risposta al campo a discesa "Desideri effettuare una donazione ricorrente?" è "Sì, donerò mensilmente".
Quindi, Salva il tuo modulo e puoi procedere con questi passaggi per incorporare il tuo modulo in qualsiasi pagina WordPress.
Prima di lanciare il tuo modulo di pagamento, ti consigliamo di testare i pagamenti Stripe. Puoi anche consultare questo articolo sui reclami comuni sui moduli di pagamento online per assicurarti di non commettere gli stessi errori.
Ottimo lavoro, hai impostato un pagamento ricorrente condizionale!
Aumenta le vendite con i pagamenti Stripe ora
Passaggio 5: Traccia transazioni e stato dei pagamenti
Man mano che inizi a effettuare vendite o a raccogliere donazioni con il tuo modulo Stripe, avrai anche bisogno di un modo per monitorare le entrate che hai generato.
Hai alcune opzioni qui. Ad esempio, puoi accedere al tuo account Stripe per trovare tutte le transazioni effettuate tramite i moduli sul tuo sito.
Oppure, se vuoi semplicemente annullare un abbonamento attivo, puoi farlo anche tu. Fai clic sul pulsante Annulla nella sezione Dettagli abbonamento.
Questo aprirà un riepilogo della tua cronologia dei pagamenti con un grafico utile che puoi filtrare per:
- Pagamenti totali
- Vendite totali
- Totale rimborsato
- Nuovi abbonamenti
- Rinnovi abbonamento
- Coupon riscattati

WPForms si sincronizza con la tua bacheca Stripe per mostrare anche lo stato di ogni pagamento. E se ti stai chiedendo se un pagamento specifico è stato rimborsato, puoi verificarne lo stato nella tabella sottostante.

Ci sono dettagli aggiuntivi disponibili per ogni pagamento. Fai clic sul nome del pagatore nella tabella per aprire una vista dettagliata.

Qui puoi saperne di più sulla transazione, come i dettagli dell'abbonamento e la cronologia dei pagamenti del pagatore.

Hai bisogno di avviare un rimborso? Fai semplicemente clic sul pulsante Rimborsa. Non devi aprire il tuo account Stripe; WPForms può attivare direttamente un rimborso da questa stessa finestra.

Oppure se vuoi semplicemente annullare un abbonamento attivo, puoi farlo anche tu. Fai clic sul pulsante Annulla nella sezione Dettagli abbonamento.

Poiché WPForms si sincronizza con Stripe per il monitoraggio dei pagamenti, aggiornerà automaticamente lo stato di ogni pagamento nella tabella.

Queste opzioni possono farti risparmiare molto tempo eliminando la necessità di accedere al tuo account Stripe quando devi monitorare, analizzare o gestire i pagamenti per il tuo sito WordPress.
Passaggio 6: Passa dalla modalità di prova alla modalità live
Mentre stai creando e testando, è saggio eseguire WPForms in modalità di prova in modo che non vengano scambiati soldi reali. Quando sei sicuro che il modulo funzioni come desideri, ecco come passare ai pagamenti live.
Innanzitutto, vai su WPForms » Impostazioni » Pagamenti, scorri verso il basso fino alla sezione Stripe e disattiva Modalità di prova.

Stripe si collega separatamente alla modalità di prova e alla modalità live, quindi dovrai fare clic di nuovo su Connetti con Stripe per autorizzare la connessione live.
Una volta connesso in modalità live, elabora una transazione reale di basso valore (un pagamento di $1 va bene) per confermare che tutto funzioni dall'inizio alla fine.
Quindi verifica che il pagamento venga visualizzato nella dashboard Stripe live anziché in quella di prova. Se qualcosa non sembra corretto, riattiva la Modalità di prova, risolvi il problema e testa di nuovo prima di andare live.
Domande frequenti sui moduli di pagamento Stripe in WordPress
Stripe è uno dei modi più popolari per accettare pagamenti su un sito WordPress. Ecco le risposte alle domande che sorgono più spesso quando imposti un modulo di pagamento Stripe con WPForms.
I miei clienti hanno bisogno di un account Stripe per pagare?
No. I tuoi clienti pagano con la loro carta di credito o debito direttamente sul tuo modulo e non devono mai creare un account Stripe. Solo tu, il proprietario del sito, hai bisogno di un account Stripe per ricevere il denaro.
Quanto costa accettare pagamenti Stripe in WordPress?
Stripe addebita il 2,9% + 30 centesimi per ogni transazione con carta andata a buon fine negli Stati Uniti. Su WPForms Lite e Basic, WPForms aggiunge una commissione del 3% in aggiunta. WPForms Pro ed Elite rimuovono la commissione di WPForms, quindi paghi solo la tariffa di elaborazione di Stripe.
Posso accettare pagamenti ricorrenti o in abbonamento?
Sì. Su qualsiasi piano a pagamento di WPForms, puoi attivare i pagamenti ricorrenti in abbonamento all'interno delle impostazioni di Stripe e scegliere la frequenza di fatturazione, da giornaliera a annuale. È ideale per abbonamenti, donazioni e piani di pagamento.
Ho bisogno di WooCommerce per accettare pagamenti Stripe?
No. WPForms si collega direttamente a Stripe, quindi puoi accettare pagamenti tramite un singolo modulo senza installare WooCommerce o creare un negozio online completo. Questo lo rende un'opzione più leggera quando hai solo bisogno di vendere un prodotto, accettare una prenotazione o riscuotere un pagamento.
È sicuro accettare pagamenti Stripe sul mio sito?
Sì. Stripe è conforme al PCI e supporta l'autenticazione forte del cliente (SCA), e i dettagli della carta dei tuoi clienti sono gestiti da Stripe anziché essere archiviati sul tuo sito. Questo solleva il tuo sito WordPress dall'onere della sicurezza.
Posso accettare Apple Pay e Google Pay?
Sì. Il campo Carta di credito di Stripe supporta portafogli digitali come Apple Pay e Google Pay, quindi i clienti su un dispositivo o browser supportato possono completare l'acquisto in un paio di tocchi. Le opzioni del portafoglio appaiono automaticamente quando il dispositivo del cliente le supporta.
Successivamente, aggiungi altri modi per ricevere pagamenti sui tuoi moduli
Ora che il tuo modulo di pagamento Stripe è attivo, puoi offrire ai clienti ancora più flessibilità.
Se desideri fatturare secondo una pianificazione, dai un'occhiata a come accettare pagamenti ricorrenti per abbonamenti e iscrizioni.
E se alcuni dei tuoi clienti preferissero un altro processore, puoi anche aggiungere pagamenti Square ai tuoi moduli WordPress.
Inizia subito ad accettare pagamenti Stripe
Pronto a creare il tuo modulo? Inizia oggi stesso con il plugin per la creazione di moduli WordPress più semplice. WPForms Pro include molti modelli gratuiti e offre una garanzia di rimborso di 14 giorni.
Se questo articolo ti è stato utile, seguici su Facebook e Twitter per altri tutorial e guide gratuite su WordPress.


Ciao,
Sto usando il pagamento Stripe in un modulo di domanda di iscrizione scolastica. Il cliente pagherà una quota di iscrizione di $50 con un nome di riferimento (nome del bambino da inserire dal cliente). Come posso catturare tali informazioni nel mio account Stripe?
Ciao Vaishnavi — Saremo felici di aiutarti! Quando hai un momento, scrivici all'assistenza in modo che possiamo aiutarti.
Se hai una licenza WPForms, hai accesso al nostro supporto via email, quindi per favore invia un ticket di supporto. Altrimenti, forniamo un supporto gratuito limitato nel forum di supporto di WPForms Lite su WordPress.org.
Grazie :)
È possibile avere un modulo con pagamenti ricorrenti mensili e annuali? Non riesco a trovare alcuna opzione per questo.
Ciao Wayne – Mi dispiace, al momento non è possibile avere pagamenti ricorrenti mensili e annuali sullo stesso modulo. Concordo sul fatto che sarebbe molto utile, e ho aggiunto un voto a tuo nome alla lista delle richieste di funzionalità.
Se hai altre domande, non esitare a contattare il nostro team di supporto.
Mi scuso per l'inconveniente.
come aggiungo la quantità?
Ciao Dan,
I nostri moduli non hanno la capacità di eseguire i calcoli richiesti per le quantità dei prodotti. Concordo sul fatto che sarebbe molto utile, ed è sicuramente nel nostro mirino mentre pianifichiamo la nostra roadmap per il futuro. Aggiungerò anche la tua richiesta.
Nel frattempo, potresti considerare di utilizzare il campo "Elementi a discesa" per fare ciò che stai chiedendo in un modo leggermente diverso. Ti preghiamo di fare riferimento a questa guida
Mi scuso se questa soluzione potrebbe essere meno che ideale, ma spero che aiuti! 🙂
Ciao, ho una licenza pro, WPForms può/utilizzerà Apple/Google Pay con Stripe?
Ciao Mick! Mi scuso, al momento, il nostro componente aggiuntivo Stripe non supporta Apple Pay, Google e altri pagamenti tramite portafoglio digitale. Concordo sul fatto che sarebbe molto utile. Ho preso nota della richiesta di funzionalità e la terremo in considerazione mentre pianifichiamo la nostra roadmap per il futuro.
Mi dispiace di non poterti fornire ciò che stai cercando al momento, ma apprezzo il suggerimento! È sempre utile ricevere spunti dai nostri utenti.
Spero che questo aiuti a chiarire 🙂 Se hai ulteriori domande in merito, ti preghiamo di contattarci se hai un abbonamento attivo. In caso contrario, non esitare a porci alcune domande nei nostri forum di supporto.
Posso creare moduli diversi, ognuno collegato a diversi account Stripe? O posso lasciare che l'utente scelga a quale account Stripe vuole pagare?
Ciao Henry, attualmente non abbiamo un modo integrato per supportare account Stripe multipli/diversi. Capisco che sarebbe molto utile. Ho aggiunto il tuo voto per considerare questa come una richiesta di funzionalità per futuri miglioramenti.
Grazie.
Ho visto la risposta precedente che più periodi ricorrenti non erano disponibili nel 2020. È ancora così ora nel 2023? Sono stato in grado di impostare i campi per selezionare mensile, trimestrale e annuale. E la logica condizionale sembrava permetterlo. Tuttavia, non lo lascerò attivo se non può essere elaborato correttamente.
Ciao Doug – con la versione Pro 3.1.0 di Stripe, ora puoi creare diversi piani ricorrenti nelle impostazioni di Stripe nel tuo modulo. Puoi vedere i dettagli di questa nuova funzionalità nella nostra guida qui.
Grazie :)
È possibile avere l'elemento della carta con i campi Numero carta, Scadenza e CVC sulla stessa riga… così come il menu a discesa del paese nello stesso modulo?
Ciao Mohit – a causa dell'integrazione con Stripe, per impostazione predefinita, non c'è modo di avere l'elemento della carta sulla stessa riga.
Tuttavia, questo dovrebbe essere possibile con uno sviluppo personalizzato e nel caso in cui desideri esplorare opzioni di sviluppo personalizzato, ti consigliamo vivamente di utilizzare Seahawk. Seahawk esamina tutti gli sviluppatori per te per assicurarsi che siano altamente qualificati e comunicativi, e poi aiuta anche a guidare l'intero processo di connessione e comunicazione con uno sviluppatore più adatto.
Puoi prenotare una consulenza gratuita con il loro team qui.
Nel caso in cui desideri verificare altre opzioni di sviluppo personalizzato, consulta la seguente guida.
Spero questo aiuti. Grazie 🙂
Ciao Mike, attualmente ho questo requisito di progetto. In base ai diversi tipi di donazione, le donazioni verranno accreditate su conti diversi. È supportato ora? Ho già aperto diversi account di connessione su Stripe, ma non si trova dove impostare?
Ciao, al momento non disponiamo di un modo integrato per supportare account Stripe multipli/diversi. Capisco che sarebbe molto utile. Ho provveduto ad aggiungere il tuo voto per considerare questa richiesta di funzionalità per futuri miglioramenti.
Ti consiglio di rivolgerti ai nostri Consulenti di fiducia nel team di supporto se hai una licenza WPForms. Ti preghiamo di inviare una richiesta di supporto e saranno felici di esaminare più da vicino ed esplorare eventuali soluzioni personalizzate possibili.