

Do you want to sell digital downloads on WordPress? Selling digital products is a great way to monetize your website and get extra passive income.
In this article, I’ll show you the easy way to sell downloads on WordPress. You can start selling your downloads today without writing a single line of code.
Create Your WordPress Download Form Now
How to Sell Downloads on WordPress
Let’s look at the steps we need to work through to get your download form up and running.
- Step 1: Install the WPForms Plugin
- Step 2: Set Up Your Payment Provider
- Step 3: Create Your WordPress Download Form
- Step 4: Customize Your Download Form
- Step 5: Add the Stripe Credit Card Field
- Step 6: Customize Your Download Form Settings
- Step 7: Add Your Digital Download Links
- Step 8: Publish Your Download Form in WordPress
- FAQs on Selling WordPress Downloads
Step 1: Install the WPForms Plugin
The first thing you’ll need to do is install and activate the WPForms plugin. WPForms makes it easy to sell digital products. And you can set it up a lot faster than WooCommerce.
We recommend getting the WPForms Pro license so you can access over 2,000 ready-made templates and tons of advanced features for added convenience.

If you’re not sure how to install the plugin, see this step-by-step guide on how to install a plugin in WordPress.
Step 2: Set Up Your Payment Provider
In order to accept payments for downloads, you need to connect your forms with a payment gateway.
You can use Stripe with any WPForms license, including Lite. However, Pro users also have access to other payment gateways like PayPal and Square.
We’ll be using Stripe for this tutorial. To do that, open up WPForms » Settings.

Now click the Payments tab at the top.

This screen lets you easily customize the currency for your payment form.
Just underneath the currency field, you’ll see the connection settings for Stripe. Click on the Connect with Stripe button to continue.

At this stage, you’ll find yourself on the Stripe login page. You can enter the login details of your existing Stripe account here to connect or even create a new account.

Did you notice that we’re using Stripe Test Mode? This will let us test all of the functionality in our form without making real payments.
You can also turn on test mode for PayPal, Square, or Authorize.Net if you need to.
Save your settings when everything’s set up the way you want it.

Great! Now that Stripe is connected with your WordPress site, let’s start making a download form next.
Step 3: Create Your WordPress Download Form
In this step, we’ll make a form from a template and customize it to sell ebooks.
We don’t need a checkout page because we’ll have the items and payment fields on a single form. This is ideal if you don’t need to set up an entire shopping cart and simply make a quick buck with your download sales available through a simple form.
To start, click WPForms » Add New.

You’ll see the form builder open in a fullscreen window.
Type in a name for your new form at the top.

Next, scroll down to the Select a Template section.
Let’s search for “content download form template.” Click on Use Template to select the content download form.

Great! Now we can start to customize your form.
Step 4: Customize Your Download Form
The Content Download Form template has 4 fields to get you started:
- Name
- Business Email
- Company
- A field for questions or comments.
You can see them on the right-hand side.

However, we still need to add a field containing the items we want to sell.
To achieve this, we’re going to add a Dropdown Items field and sell 2 different downloads.
If you want, you can use dynamic field choices here. We’ll show you how to set up the fields manually for now.
Scroll all the way down to the Payment Fields section.

Drag a Dropdown Items field from the left-hand panel over to the right. Then click on the dropdown field to edit it.

First, we’ll change the label to “Choose your ebook.”

You can also see 3 answer choices. These are created by default, so let’s customize them now.
On each line, type in the name of the download that you want to sell.

We’ve also edited the price for each item right next to their names. You can click the minus (-) icon to remove items and the plus (+) icon to add more.
Next, we’re going to turn on the Show price after item labels option here. This will automatically show the pricing in the dropdown.

This makes it easy for your customer to see how much they’ll pay.
On this form, we don’t need to add a Total field because the visitor can only buy 1 item at a time.
Step 5: Add the Stripe Credit Card Field
The last field we need is the Stripe Credit Card field. Let’s drag that onto the form now.

The credit card field works out of the box, so you don’t need to edit anything here. But if you do want to change the label or description, you can click on it to open Field Options and then make changes.

You’ll also see an Email subfield included in your Stripe Credit Card field. This field will enable customers to check out faster in the future via Stripe’s one-click checkout feature (Link).
This form now has all the fields it needs to allow customers to download files. But the Stripe Credit Card field will only take payments after you enable Stripe, as we show in the next step.
Want to offer coupon discounts on your downloads? You can update this form by creating a coupon and inserting a coupon field to accept your created coupon codes. For details, see this guide on adding coupon fields to Stripe forms.
Next, on Payments » Stripe. After that, use the toggle switch to Enable Stripe Payments.
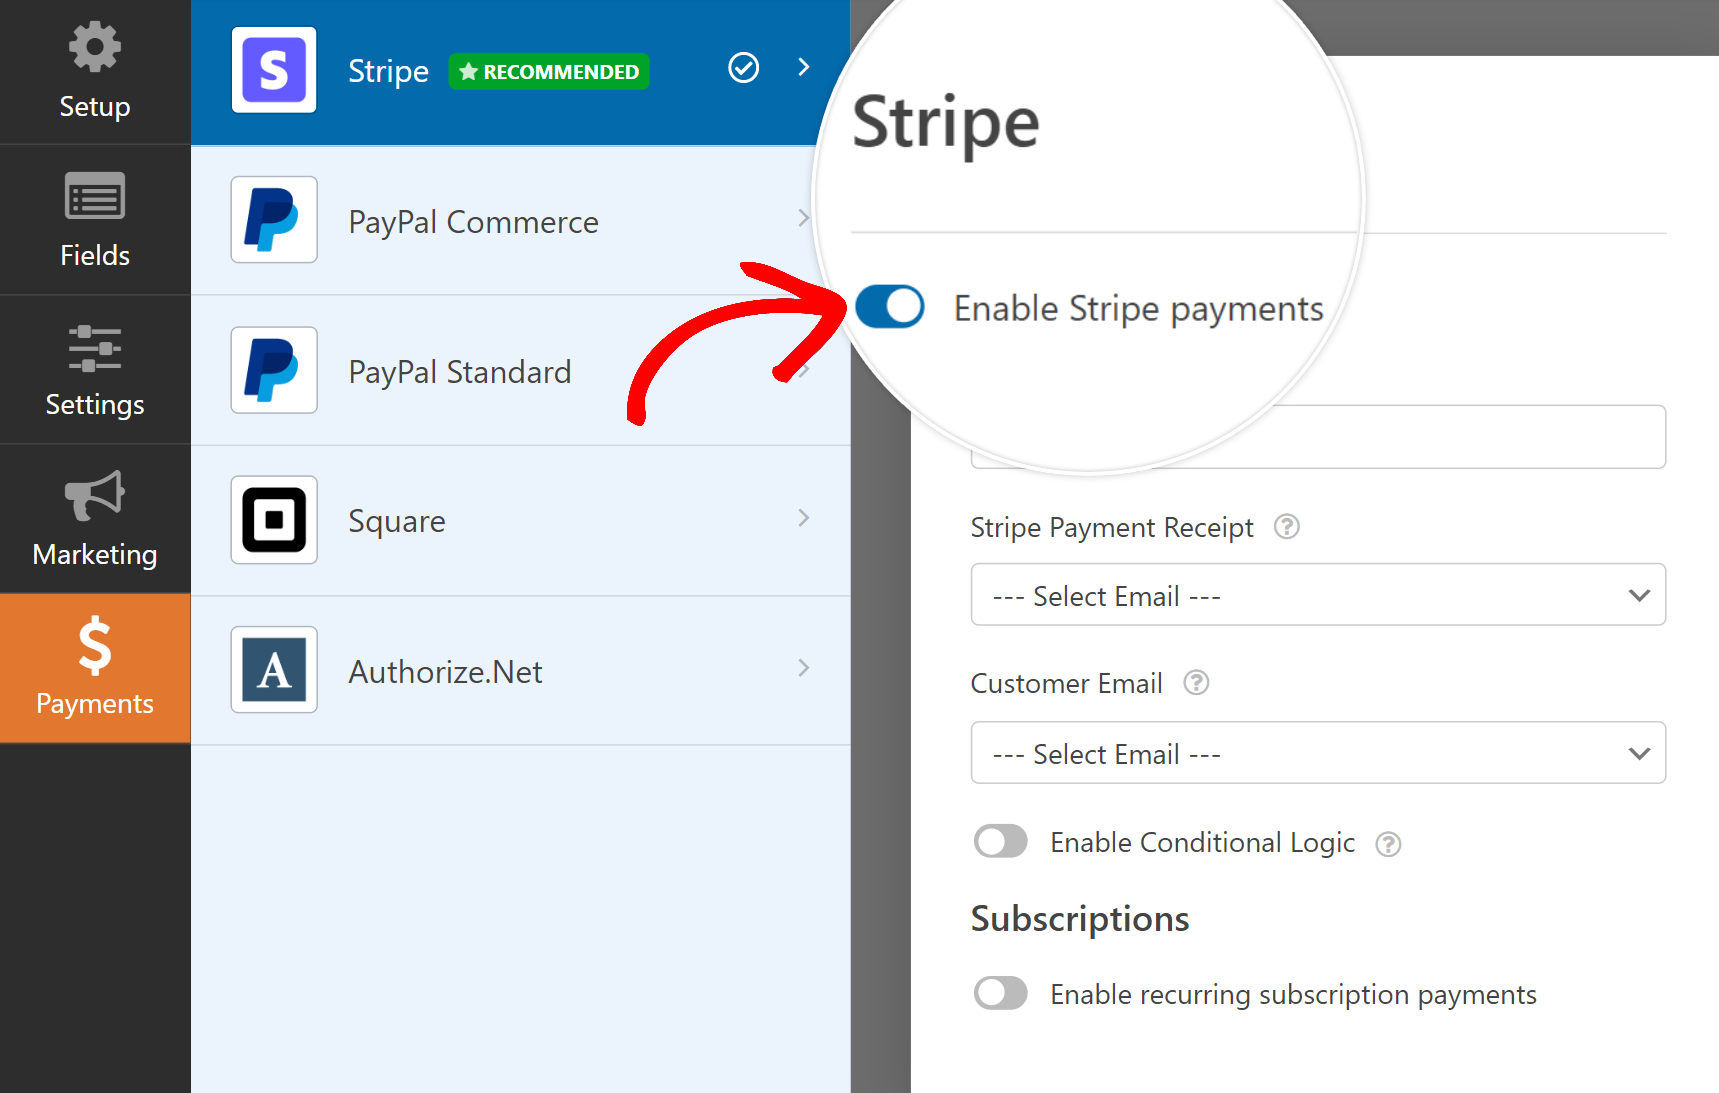
After you’ve enabled Stripe payments, you’ll see additional options appear below. Here’s what these options mean:
- Payment Description: This text will appear on your customer’s credit card statement.
- Stripe Payment Receipt: Choose where to send the payment receipt for the purchase. You’ll normally want to choose Email here so that the receipt goes to the customer’s email address.

Click Save at the top to save all of these settings.
Step 6: Customize Your Download Form Settings
In this step, we’ll edit the form settings. You can have different payment settings for every form in your online store.
On the left-hand side of the form builder window, click Settings. The General settings page for the form will open up.

You can change several settings here:
- Form Name — Change the name of your form here if you’d like.
- Form Description — Give your form a description.
- Tags — Add form tags to organize your WordPress forms.
- Submit Button Text — Customize the copy on the submit button.
- Submit Button Processing Text — Customize the text that will show while your form is submitting.
There are also some advanced settings, which include:
- CSS Classes — Here you can enter any custom CSS classes you want to apply to your form or Submit button.
- Enable Prefill by URL — Automatically fill in certain fields using information from a custom URL.
- Enable AJAX form submission — This option is turned on by default. It lets users submit your form without reloading the page.
- Disable storing entry information in WordPress — Disable the storing of entry information and user details, such as IP addresses and user-agent info. Check out our step-by-step instructions on how to add a GDPR agreement field to your form.
Next, move down to the Spam Protection and Security settings.

These options include:
- Enable modern anti-spam protection — Stop contact form spam with the WPForms modern anti-spam protection. It’s automatically enabled by default on new forms, but you can choose whether you want to toggle it off on a form-by-form basis. This built-in spam protection runs seamlessly in the background to keep your forms safe. You can also pair it with another layer of security, such as a CAPTCHA.
- Enable Akismet anti-spam protection — If you use the Akismet anti-spam plugin, you can connect it to your form.
- Enable country filter — Block entries from certain countries.
- Enable keyword filter — Prevent submissions that include certain words or phrases.
You can also enable your preferred CAPTCHA option. Check out our complete spam prevention guide for more details.
All set? Click Save.
Next, let’s set up the way Stripe works on this form.
Step 7: Add Your Digital Download Links
The form is ready to accept payments from customers who want to buy your digital file. But how are the customers going to receive the link to their purchased download?
One way to do that in WPFroms is by setting up an email to send automatically as soon as a customer submits the form, so they can instantly download their file.
You can set up form notifications by going to Settings » Notifications.

WPForms automatically creates 1 notification here. This one will email you to let you know the form has been submitted.
We’re going to add a separate notification that sends the email with your download link to the customer.
Start by clicking on the Add New Notification button in the Notifications section.

Type in a name for your notification. You’ll want to type in a name that matches the file so it’s easy to identify later.

Now we have a new notification ready to customize. You’ll see that it’s added right at the top of the Notifications window.
We want this email to go to the person who bought the download. So delete {admin_email} from the Send to Email Address, then click Show Smart Tags.

And now, let’s select Email from the available fields.

Now the email notification will be sent to the email that was typed in on the download form.
Next, scroll down to the Email Message section and enter the message you’d like your customers to see when they receive the email from you.
We’re going to delete the {all_fields} Smart Tag and replace it with a custom message and a link to the file.

Perfect! Your form will now automatically send the download link to your customers after they’ve filled out the form and made the payment.
If there are multiple download files that people can choose from, we can use conditional logic to send different emails depending on the item that was purchased.
This makes it easy to send the right links without using a full shopping cart.
Creating Multiple File Download Notifications (Optional)
After creating your notification by following the steps above, click on the Enable Conditional Logic button at the bottom.

Then, we need to tell WPForms to send this email only if the customer bought a specific email book.
Here’s how the conditional logic is set up for sending emails when a specific book is selected:

To add your other download email, retrace the steps above by creating a new notification and using conditional logic to define when this email with a link to a different file should be sent.
That’s it! Now the customer will automatically be sent the right download link to the file they paid for.
Be sure to click Save to save your form. Now let’s publish it on your website.
Step 8: Publish Your Download Form in WordPress
After you’ve created your digital download order form, you need to add it to your WordPress website.
WPForms allows you to add your forms to many locations on your website, including your blog posts, pages, and sidebar widgets.
You can use a shortcode, but it’s a lot easier to use the Embed wizard.
At the top of the form builder window, click the Embed button to get started.

When the popup window opens, click Create New Page.

And then type in a name for the page. When you’re happy with it, click Let’s Go.

Check that everything looks good, and add content or blocks here if you need to. You can also set up your SEO for the page.
When the page is ready to publish, click Publish at the top.

It’s a good idea to make a test purchase for both items before you start to advertise your new page. Don’t forget to turn off test mode when you go live!
Once you’ve started collecting orders, you can track your payments and see how well your items are selling by going to WPForms » Payments.

And that’s it! You can go ahead and sell digital downloads on your WordPress site and take payments right away.
FAQs on Selling WordPress Downloads
Here are some of the common questions customers interested in selling downloads often ask us:
What types of files can I sell as downloads on WordPress?
WordPress gives you the freedom to sell any kind of digital download, the most popular of which include:
- PDFs (books, whitepapers, reports, checklists)
- Audio (music, audiobooks, courses, podcasts)
- Video (courses, films, documentaries)
- Software programs
Can I offer my customers instant downloads after their purchase?
Yes, you can easily offer instant downloads after purchase by including your download link in your form confirmation page or email. With WPForms, this can be easily done by sending customers to your download page as soon as they complete the payment. Or if you want a more personal and private interaction, you can also create a customized form notification email containing the download link.
Which payment gateways are the best for selling digital downloads?
I recommend Stripe because it’s one of the easiest payment gateway to set up for your WordPress site. With WPForms Lite, you can integrate your download forms with Stripe for free (this will charge 3% + other Stripe fees per transaction). If you upgrade to a paid WPForms license, you eliminate the 3% charge and only pay a small fraction of the total processing fees.
You can also use PayPal to sell digital downloads, which is available in WPForms Pro and above plans.
Can I offer different pricing options for my digital downloads?
Absolutely! You can combine one-time payment and subscription payment models in a single form to offer more flexibility to your customers. The Stripe and PayPal integrations in WPForms allow you to create both pricing options. You can also create multiple subscription plans so customers can pay according to their budget.
Can I offer discounts or coupons for my digital products?
Yes, you can offer coupon discounts for the digital products you’re selling. This can be a great way to boost your sales and offer seasonal promotions. WPForms lets you create coupons with an expiry date, so it’s easy to manage seasonal campaigns and generate more profits from higher download sales.
Next, Expand and Customize Your Payment Form
Did you know that you can use images in your forms?
WPForms lets you embed images using the Content field, or add images as choices to the Multiple Choice or Checkboxes fields. Check out this guide to adding images to your forms to find out how to give digital downloads an image instead of just using text.
You can also customize your Stripe payments if you want to accept Google Pay or Apple Pay in WordPress.
Create Your WordPress Download Form Now
Ready to build your form? Get started today with the easiest WordPress form builder plugin. WPForms Pro includes lots of free templates and offers a 14-day money-back guarantee.
If this article helped you out, please follow us on Facebook and Twitter for more free WordPress tutorials and guides.


Thanks for the wonderful step by step wp form set up for digital downloads. Is it possible to add a discount coupon if you are offering to your buyers. Is there a way to add it to the payment page?
Hey Mani- Currently we do not have a coupon code field integrated with WPForms. I do agree it would be super helpful, though, and it’s certainly on our radar as we plan out our roadmap for the future.
A possible workaround might be to use conditional logic to display the correct payment field depending on the user’s input in another field. Please see the guide here
I hope this helps! If you need any further help on this please feel welcome to reach out to our support team.
Have a good one. 🙂
hey can i use this plugin to sell serial keys, if a user buys a product then he will get that product aka serial key via instant email delivery and every key will be diffrent
Hey Mohammed- Currently we do not have an inbuilt feature of License Management integrated with WPForms. Here’s a great article by WPBeginner on Best Platforms to sell digital products.
I hope this helps! 🙂
The sale of purchase of digital assets are on rise, since there are embedded legla rights and obligations, sale and buyer should clear all legal points, , I appreciate you sharing this good post. you write it in such a way that it makes even a common man to understand it.
Hi Shahid! Thanks for reading our articles and letting us know you’re enjoying them 🙂 We really appreciate the kind words as well! Please come back often as we’re always adding new content and updating old ones.
Thanks!
Where is the best place to host the digital content to be downloaded?
Hey MJ, to host the digital content, you would need a Web host. In case it helps, here is a great guide from WPBeginner on how to choose the Best WordPress Hosting in 2022.
I hope this helps!