As someone who relies on WordPress for managing my website, I know how crucial it is to ensure emails from my site actually reach my audience.
Sending WordPress emails through Gmail SMTP is a great idea to improve deliverability and avoid emails going to the spam folder.
In this guide, I’ll walk you through the steps on how to configure the Google Workspace / Gmail mailer in WP Mail SMTP via 2 different methods.
How Do I Connect My WordPress Email to Gmail?
WP Mail SMTP makes it incredibly easy to configure a Google Workspace / Gmail SMTP via 2 different methods:
If you are using the WP Mail SMTP Pro version, I highly recommend that you use the One-Click Setup process because:
- You don’t need to generate an app password in your Google account.
- You don’t need to share passwords in WordPress to improve email delivery.
With the One-Click Setup feature, you can fix your website’s email delivery problems quickly and safely, without having to do any complicated setup.
WP Mail SMTP fixes all email deliverability issues for your WordPress website and will also work for you if:
- SMTP (Simple Mail Transfer Protocol) ports are blocked, which is a common problem on some WordPress hosting providers and Amazon EC2.
- You’re using localhost and you want to send outgoing emails from your site through a simple setup process and SMTP port.
- Your hosting provider isn’t configured to use the PHP mail function for some other reason.
You’ll find more details in our WP Mail SMTP review. It’s one of the best G-Suite plugins for WordPress!
Let’s go ahead and take a look at how to set up WP Mail SMTP to send emails through the Gmail SMTP.
How to Set Up WP Mail SMTP With Gmail
Setting up WP Mail SMTP with Gmail email server is easy. I recommend keeping this guide open in a tab so you can follow the steps as you work through it.
Method #1: Using the One-Click-Setup Feature
With the one-click setup option in WP Mail SMTP Pro, it’s now easy to connect your WordPress site to Google’s email service and use the Gmail API to send emails from your site right away.
Step 1: Install the WP Mail SMTP Pro Plugin
Since the One-Click-Setup feature can only be used with the WP Mail SMTP Pro license, make sure to upgrade your account.
Once done, get ready to install the WP Mail SMTP plugin. For step-by-step instructions, you can check out this guide on how to install a WordPress plugin.
Step 2: Select Google / Gmail As Your Mailer
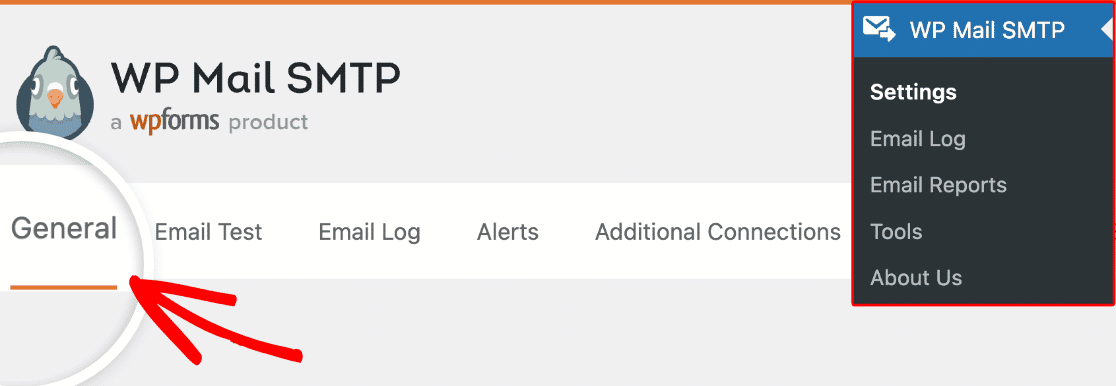
We’ll now connect WP Mail SMTP with Gmail. To do this, go to WP Mail SMTP » Settings and click on the General tab.
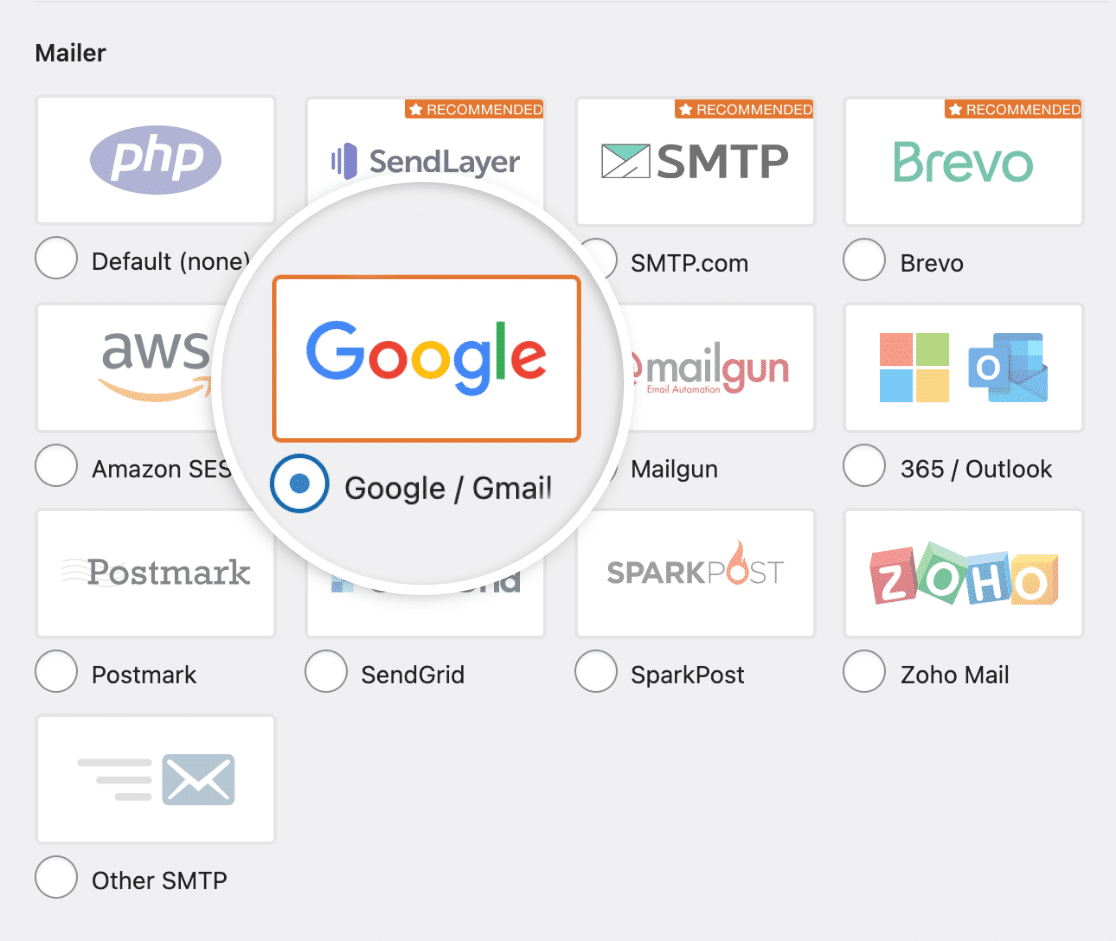
Now, scroll down from the Primary Connection section until you reach the Mailer heading. Then, choose the Google / Gmail option.
When you choose the mailer for your WordPress site, you will see a new section called Google / Gmail with more authorization options.
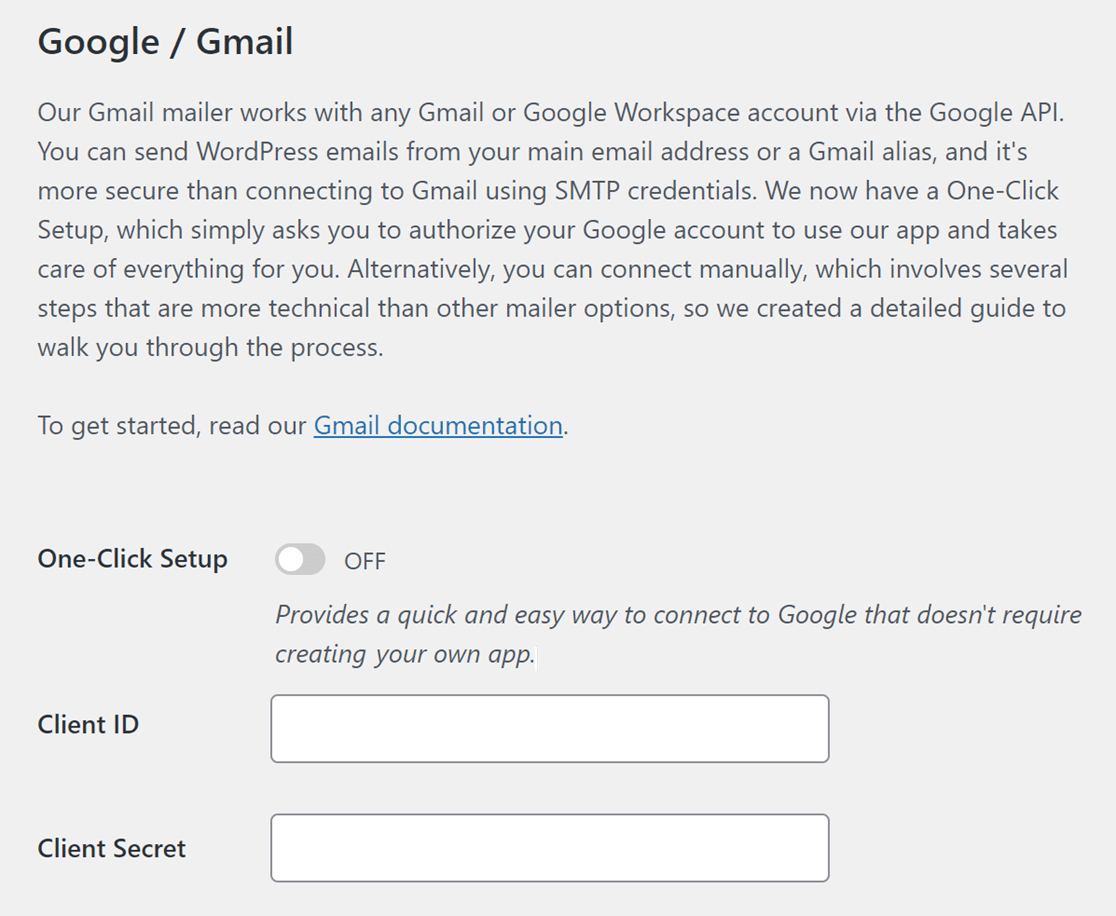
There should now be two choices available: use the One-Click Setup process or generate your Client ID and Client Secret.
Because we want to keep things simple, let’s move the toggle to the ON position for the One-Click Setup option.
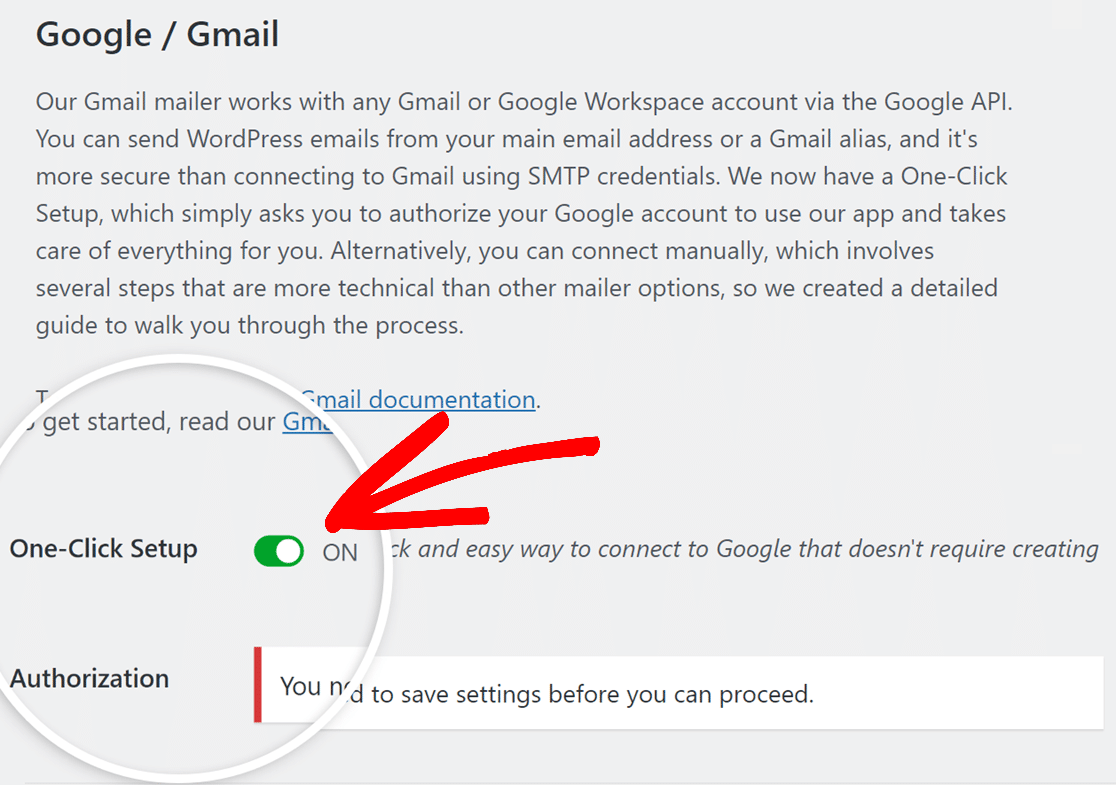
After turning on One-Click Setup, all you have to do is click the Save Settings button at the bottom of the page.
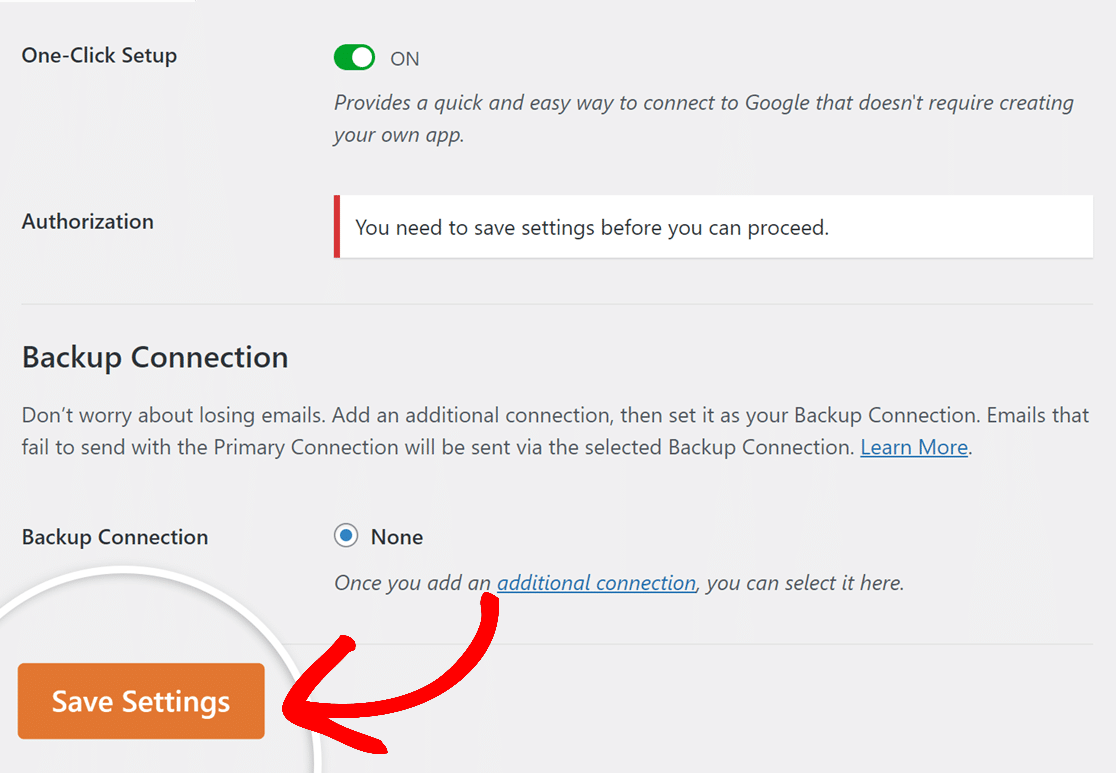
Just be patient for a moment and the page will reload, allowing you to access the authorization settings.
Step 3: Authorize Your Google Account with WP Mail SMTP
After the page reloads, scroll down until you find the Authentication section. From there, click on the Sign in with Google button.

You’ll now be redirected to the Gmail login screen. Enter the details for the Gmail account you want to use for sending emails in WordPress.
Once done, you’ll be asked to provide WP Mail SMTP authorization to your Gmail account. Click on the Allow button to proceed.
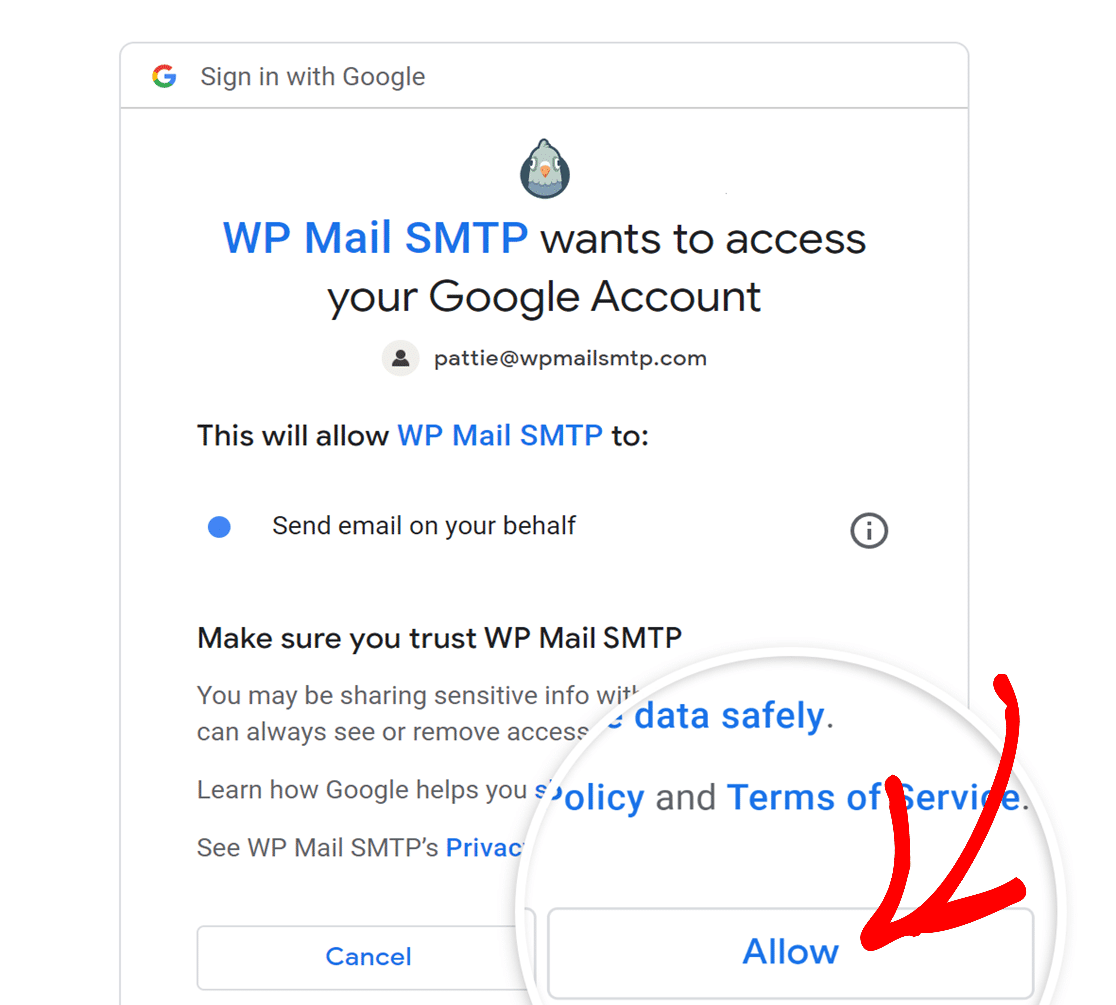
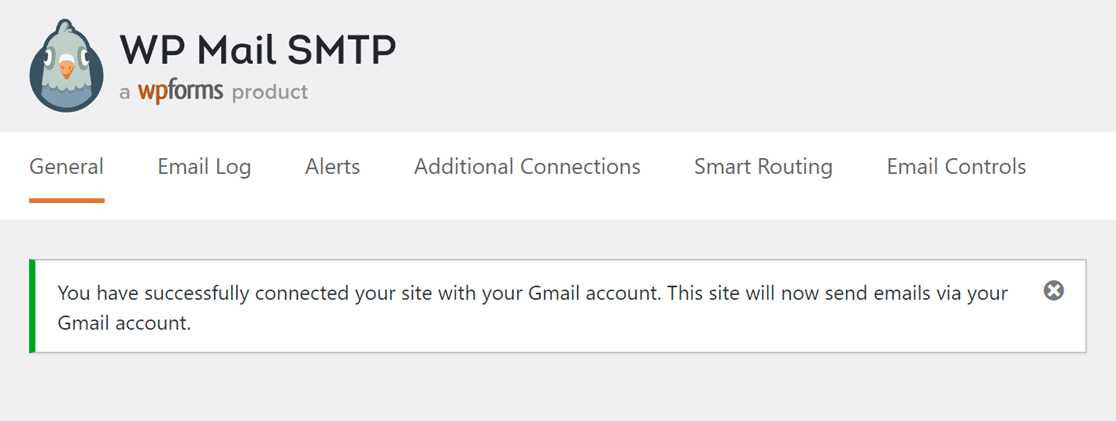
Once the authorization process is complete, you’ll be redirected to the WP Mail SMTP settings page, where you’ll be able to see a success message.
Upon scrolling down a bit, you’ll also notice that the Gmail account you set up can be seen in the Authorization section.

And there you have it! You’ve successfully connected your Gmail account with WP Mail SMTP via the One-Click-Setup method!
Method #2: Using the Manual Gmail API Connection
If you are using WP Mail SMTP Lite (the free version of the plugin), you can still use the Gmail SMTP to send all WordPress emails. This process requires that you use your Google account to create a web application.
Step 1: Create a Web App in Your Google Account
After installing the WP Mail SMTP Lite plugin and selecting Google / Gmail as your mailer, WP Mail SMTP will ask you for 2 things: Client Secret and Client ID.

To get this information, open a new tab in your browser, log into your Gmail account, and open your Google Cloud Console dashboard.
Make sure you’re not logged into any other Google accounts besides the one you’ll be using for setting up SMTP before going any further.
Remember that if you use Google Workspace, the Google account you use must be able to send emails and have access to its own inbox.
If it’s your first time using Google Cloud, you’ll be asked to agree to the Terms of Service. Then, click on AGREE AND CONTINUE.
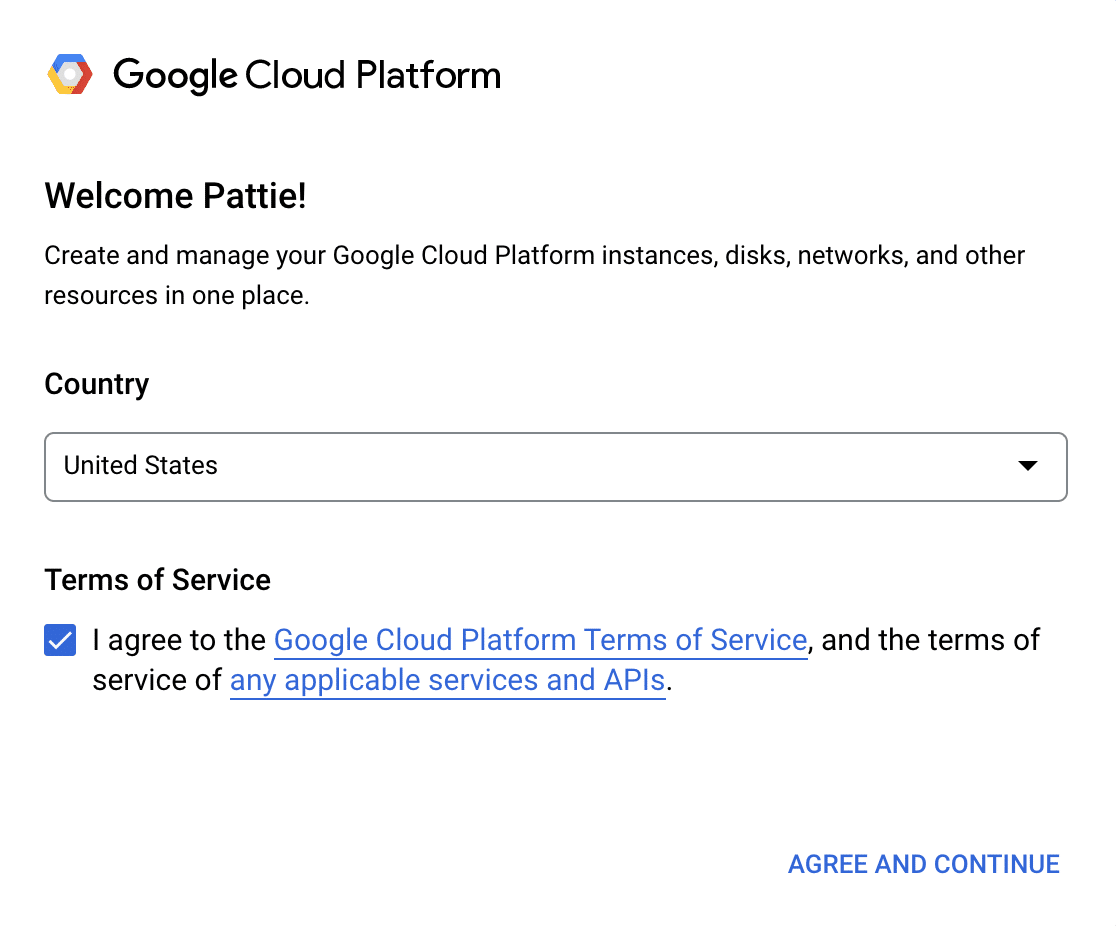
If you already have a Google Cloud project, make sure it’s selected from the Select a project dropdown at the top of your dashboard.

On the other hand, if you’re new to Google Cloud, you’ll need to set up a new project. Click Create Project.

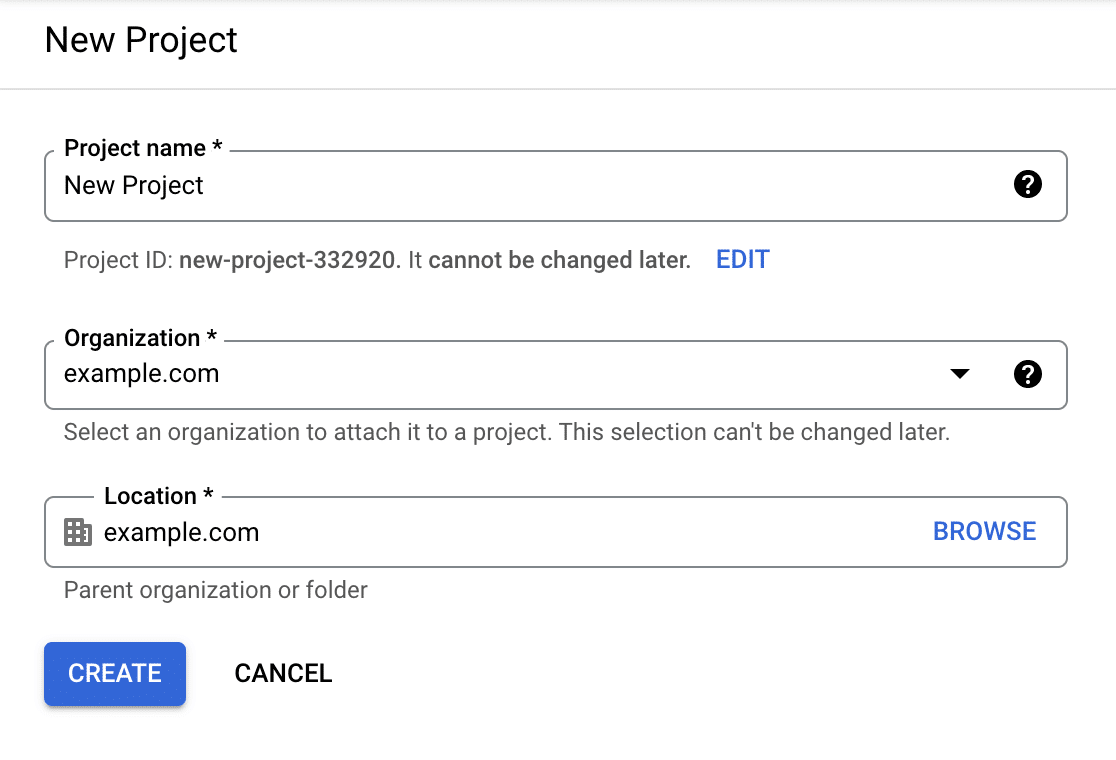
For a new project, enter a project name and select an organization and location from the dropdowns. Then, click on the CREATE button.
Enable the Gmail API
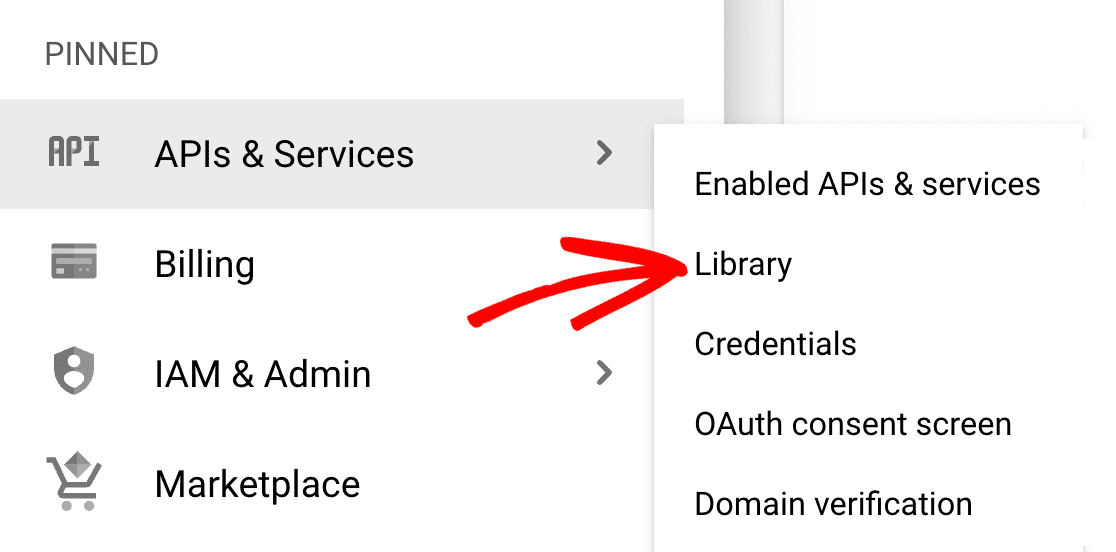
Next, you need to enable the Gmail API. Open the navigation menu from the top left corner of the screen. Then, go to APIs & Services » Library.
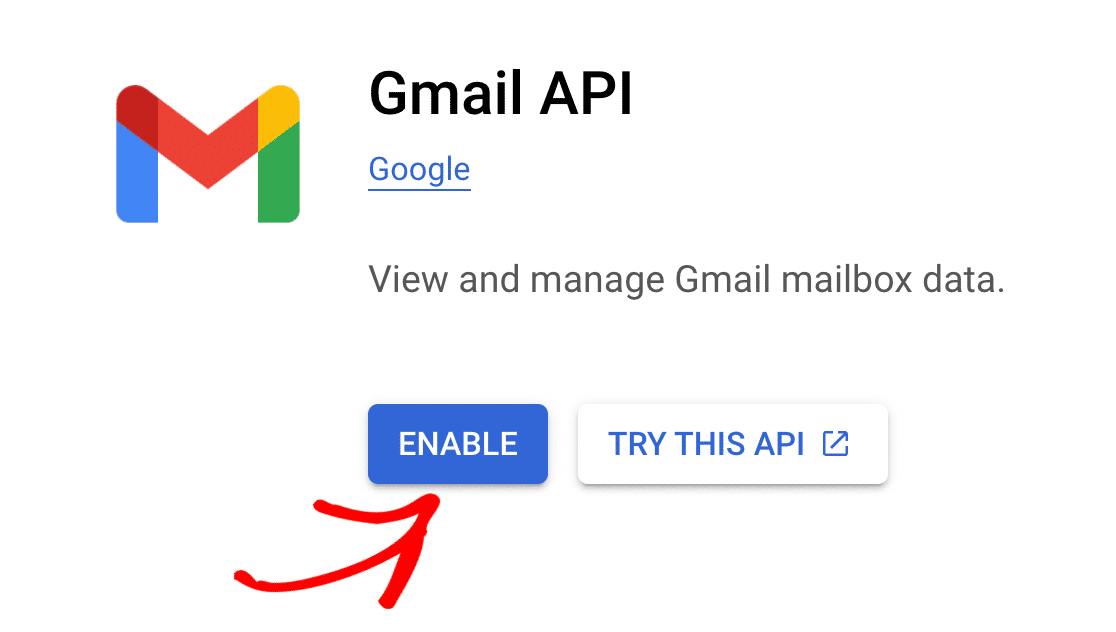
On the API Library page, now all you have to do is search for “Gmail API.” Then click on the Gmail API result and then the blue Enable button.
Create Application Credentials
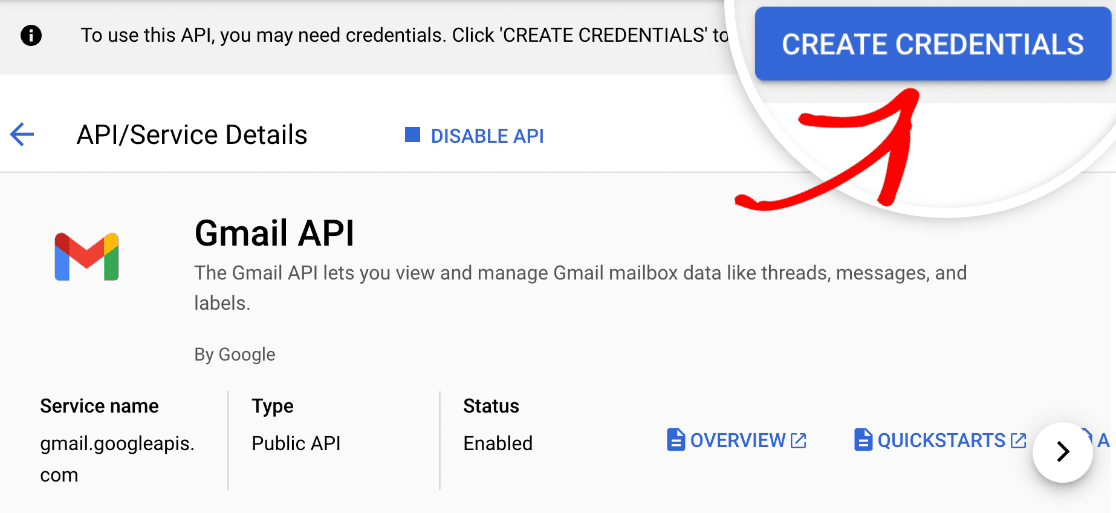
Once the Gmail API is enabled, you’ll be taken to its Overview page. Here, simply click on the CREATE CREDENTIALS button.
Google will now ask you a few questions to determine your Credential Type. Under Which API are you using? select Gmail API.

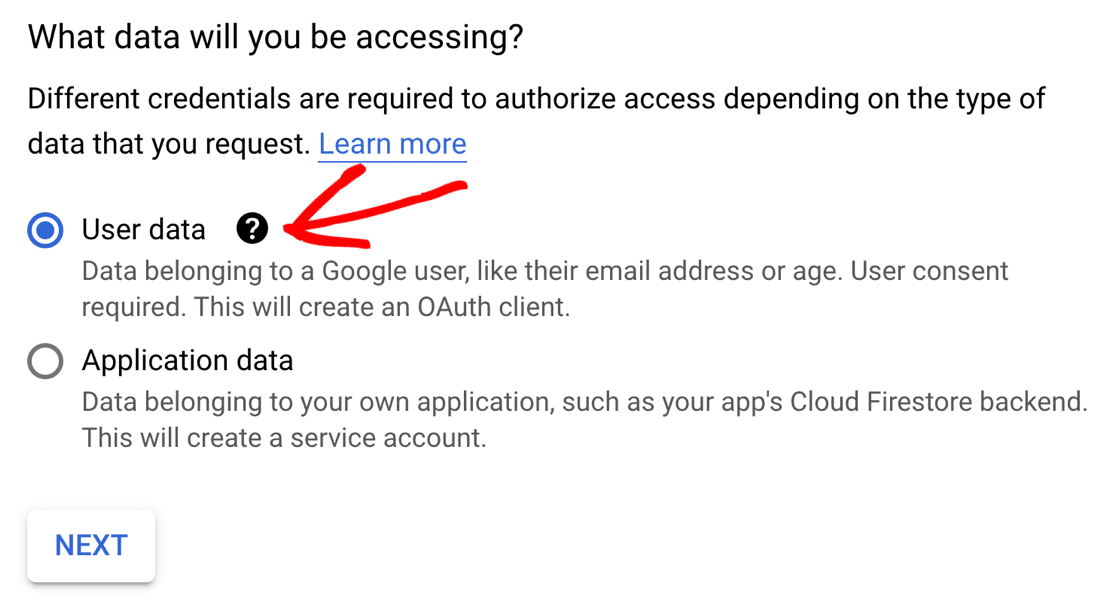
Then scroll down a little to What data will you be accessing? heading. Go ahead and select User data and hit the Next button.
Configure OAuth Consent Screen
Next, we need to set up a consent screen. Nobody will ever see this, but we need to do it before publishing your app.
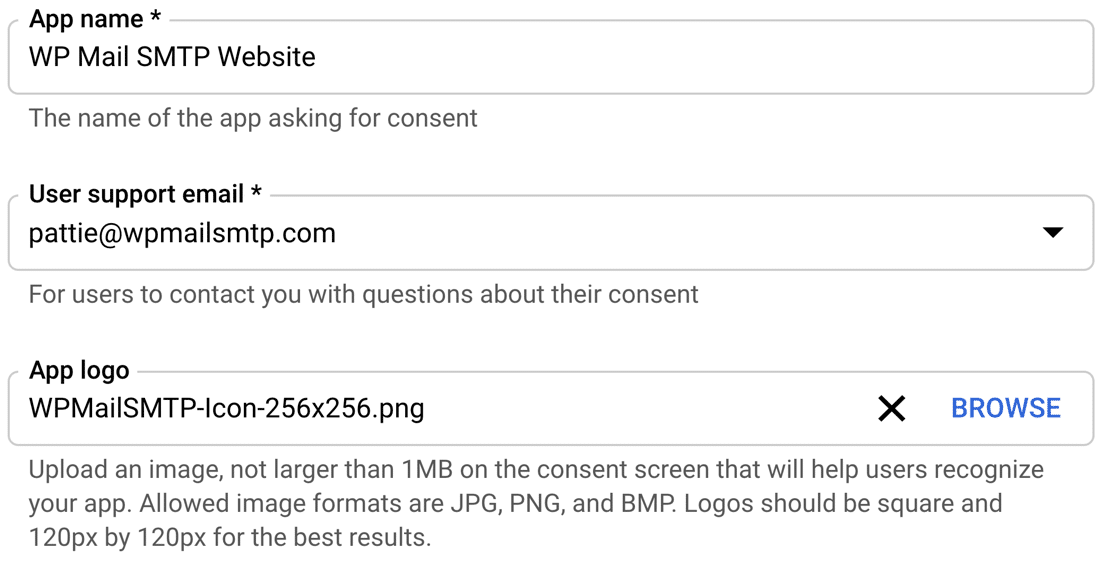
The details in this form aren’t super important because nobody else will be using your app. It’s private to you. Here’s what I suggest:
- Type in an App name that makes sense to you.
- Pick your email from the User support email dropdown.
- If you’d like, you can upload a logo for your app. This is optional.
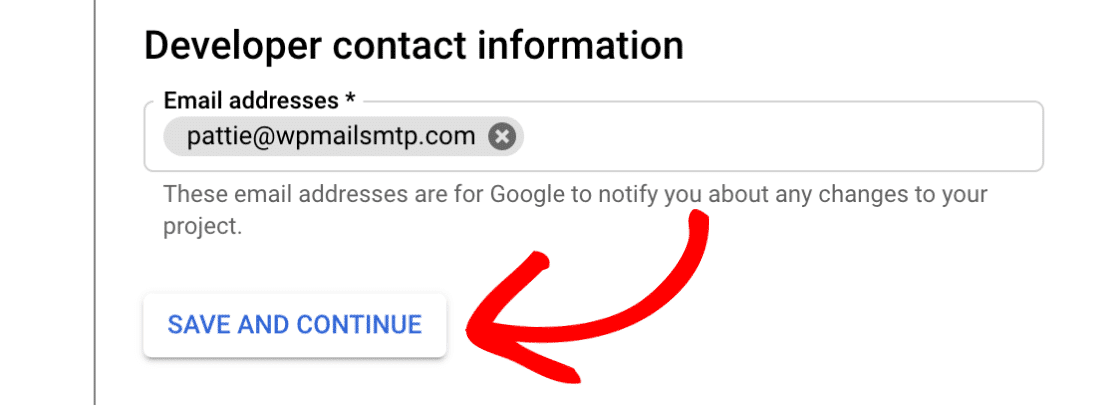
In the Developer contact information section, type your own email address. Now hit Save and Continue to save settings and move on to Scopes.
Configure Scopes (Optional)
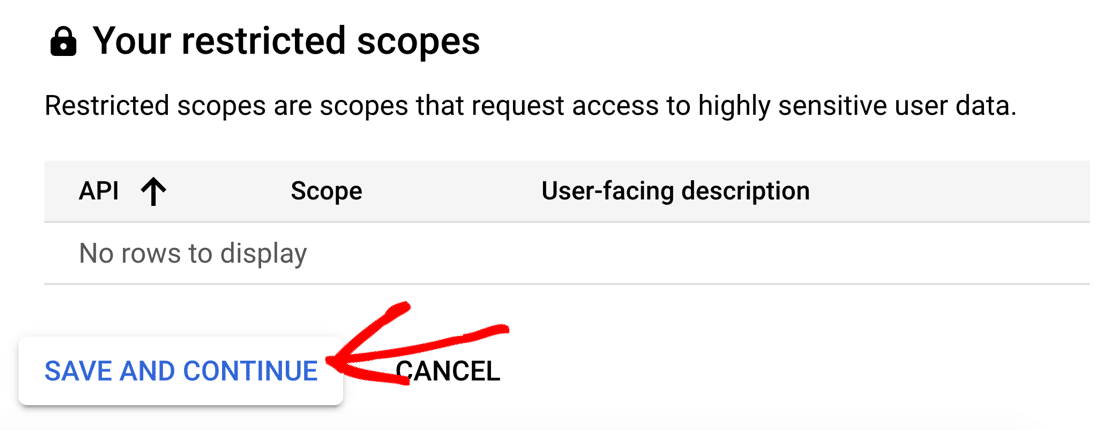
Scopes aren’t required for your app, so we don’t need to use this section. Scroll past the entire section and hit SAVE AND CONTINUE again.
Configure the OAuth Client ID
Now we’re ready to set up the Client ID. In the OAuth Client ID dropdown, select Web application. This will automatically populate some new fields.
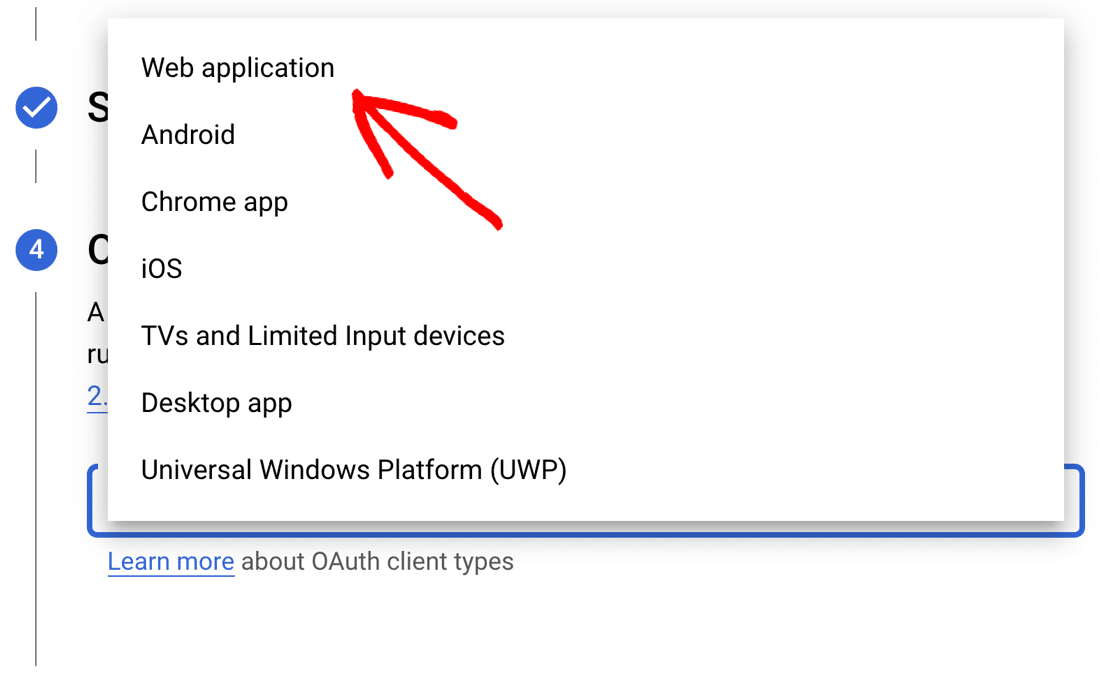
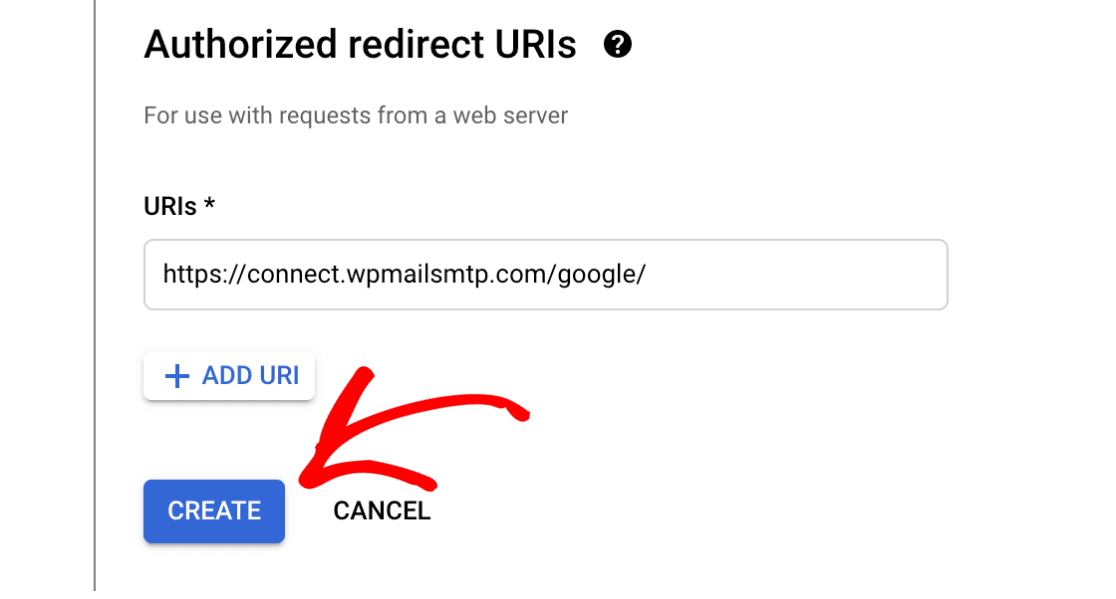
You can change the Name if you want, but it’s fine to keep the default. Then, scroll down to the Authorized redirect URIs section.
Click Add URI and paste in: https://connect.wpmailsmtp.com/google/ from the WP Mail SMTP Setup Wizard. Hit Create to complete this step.
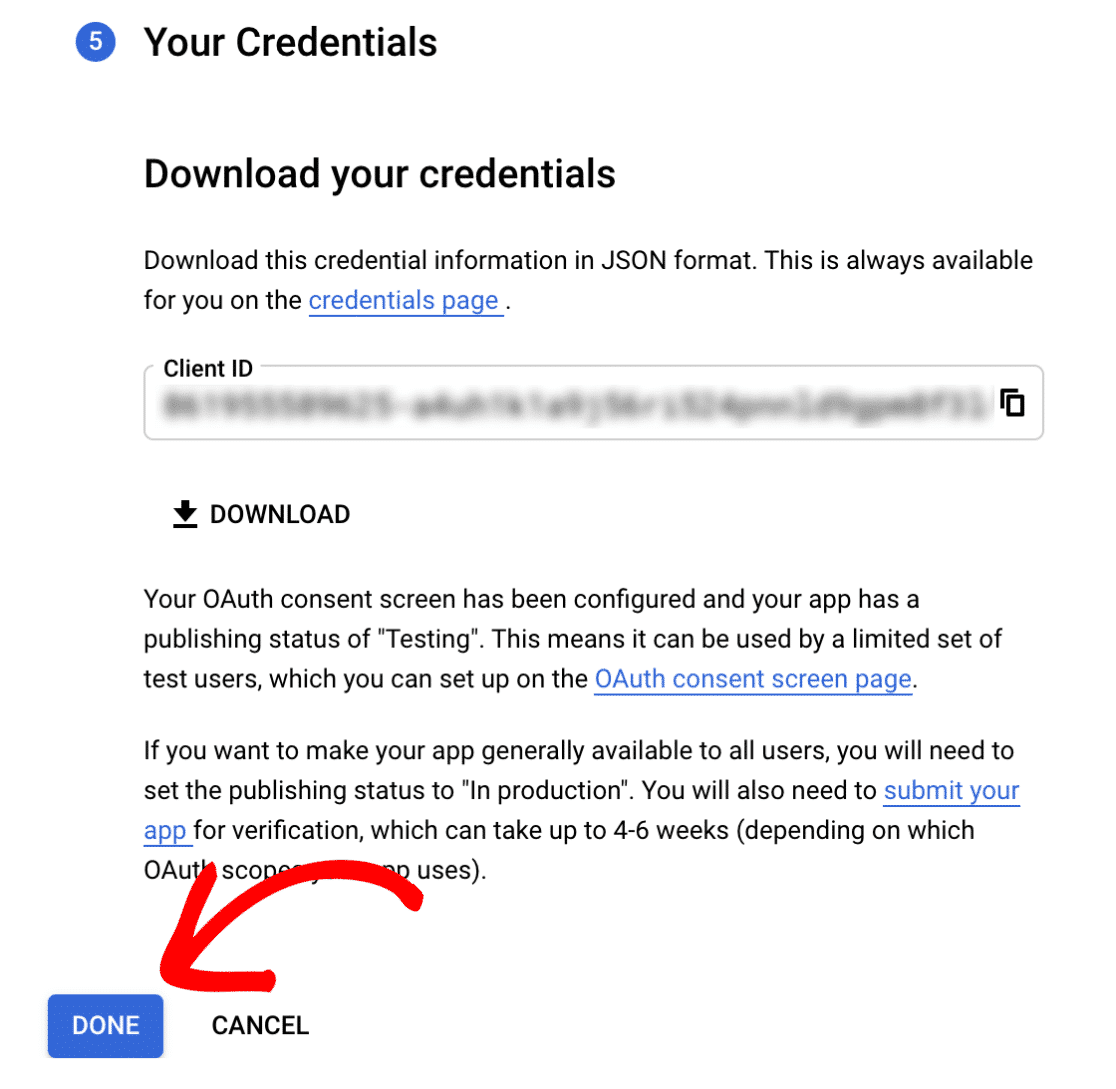
When Google prompts you to download your credentials, copy the Client ID or wait till the 3rd step. Then, click the DONE button at the bottom of the page.
Step 2: Update the Publishing Status
If you have a free Gmail account, Google will have published your app in Testing mode. It’s super important to change this setting.
We’re now going to edit your app to put it into Production. Follow the simple steps for both Google Workspace and Gmail Users below:
Google Workspace
Go to the APIs & Services » OAuth consent screen from the Google Cloud Console sidebar. Then, click on MAKE EXTERNAL under User type.
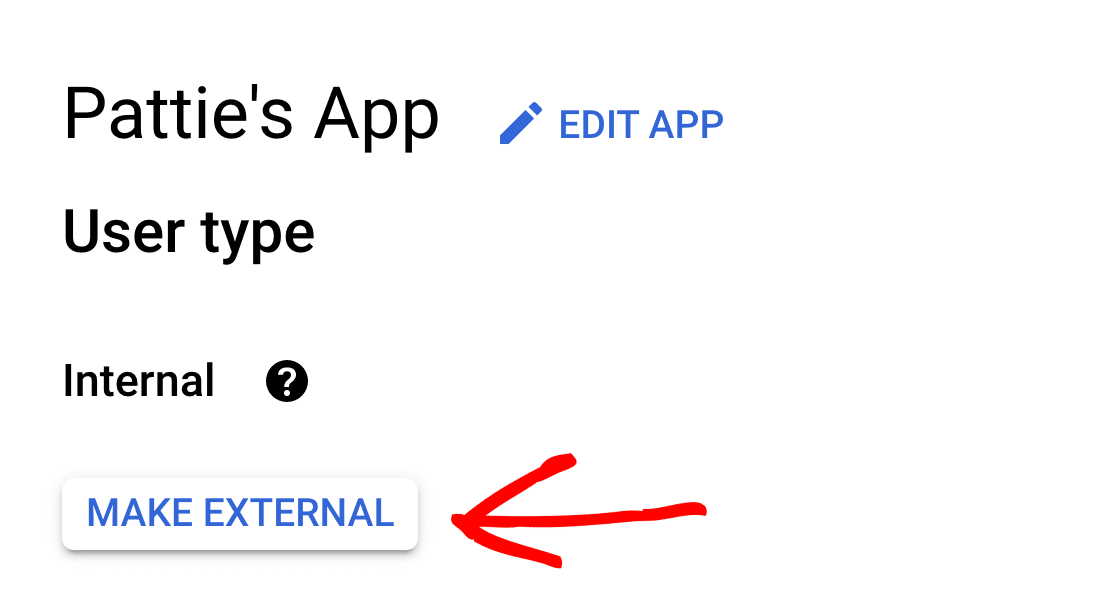
If the User type is set to Internal, only people in your company can use your app. This means, if you’re Workspace domain is @example.com, only those with an @example.com can access the app.
In the event that you enable WP Mail SMTP access to your application, any external email addresses used will be shown an error message that says Error 403: org_internal.
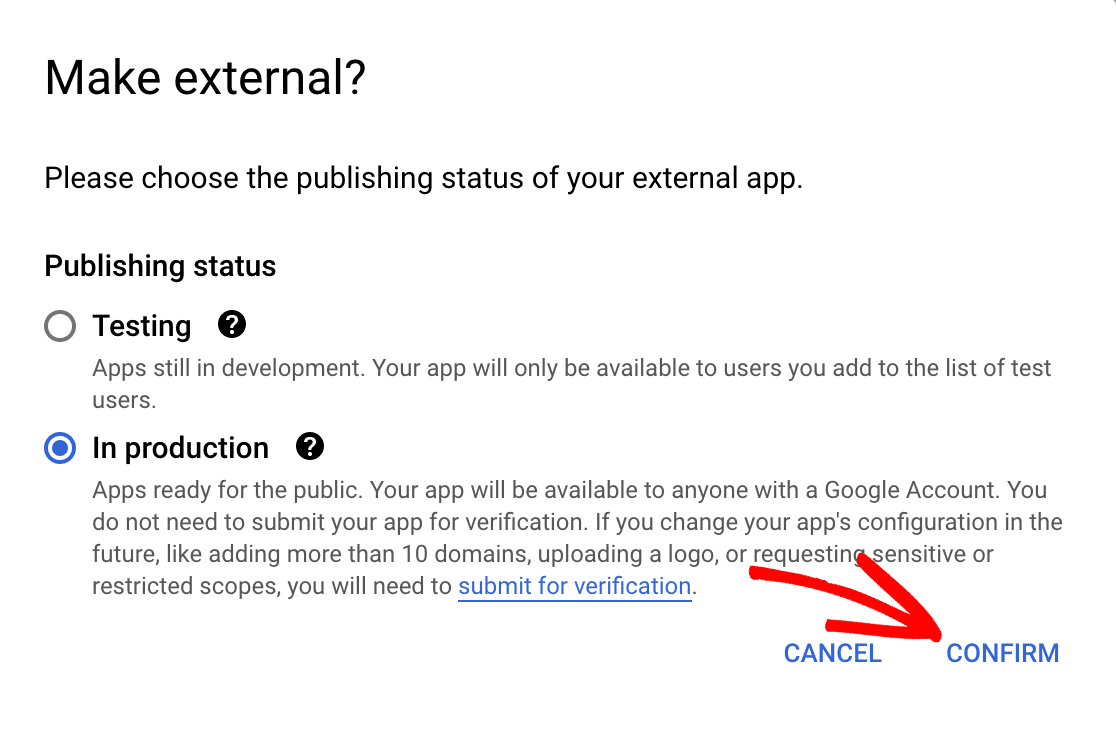
After you click on the MAKE EXTERNAL button, a new popup window will appear. Select the In production option here and then click on CONFIRM.
Gmail Users
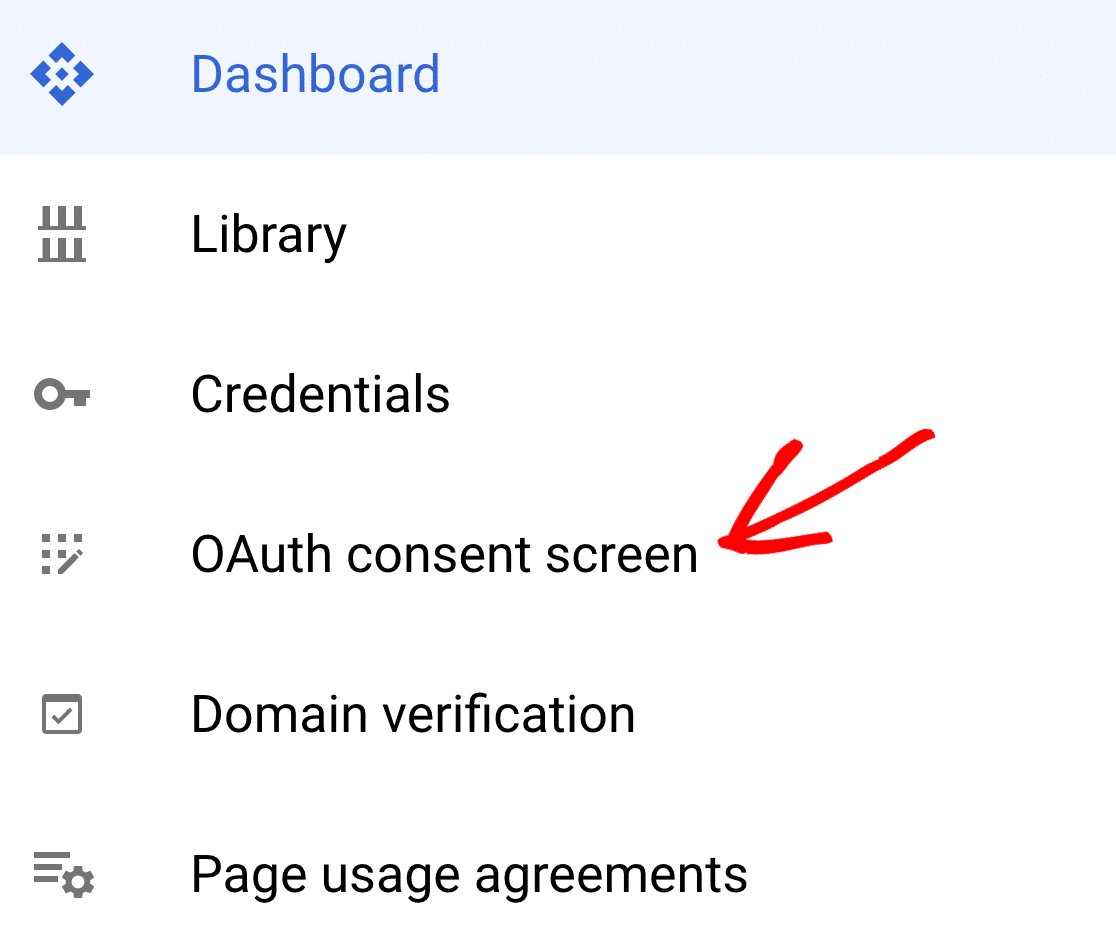
If you’re using Gmail instead of a Google Workspace account, click APIs & Services » OAuth Consent Screen in the left-hand navigation pane.
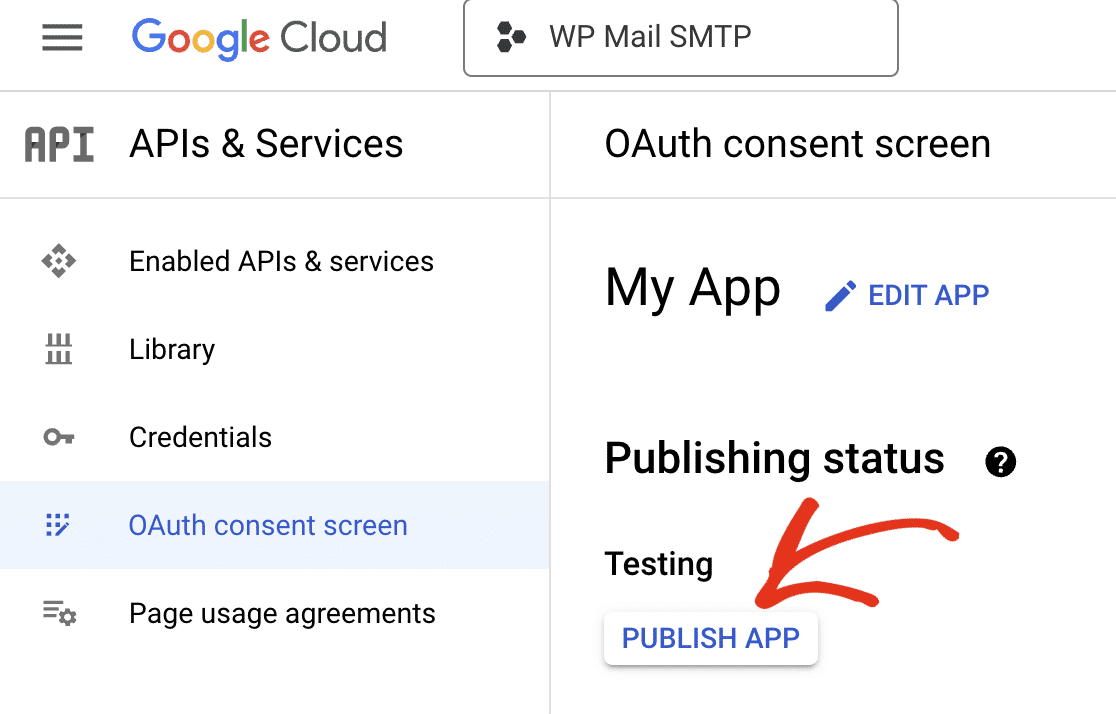
Under Publishing status, you’ll see the app status is set to Testing. Go ahead and click the PUBLISH APP button to update your app status.
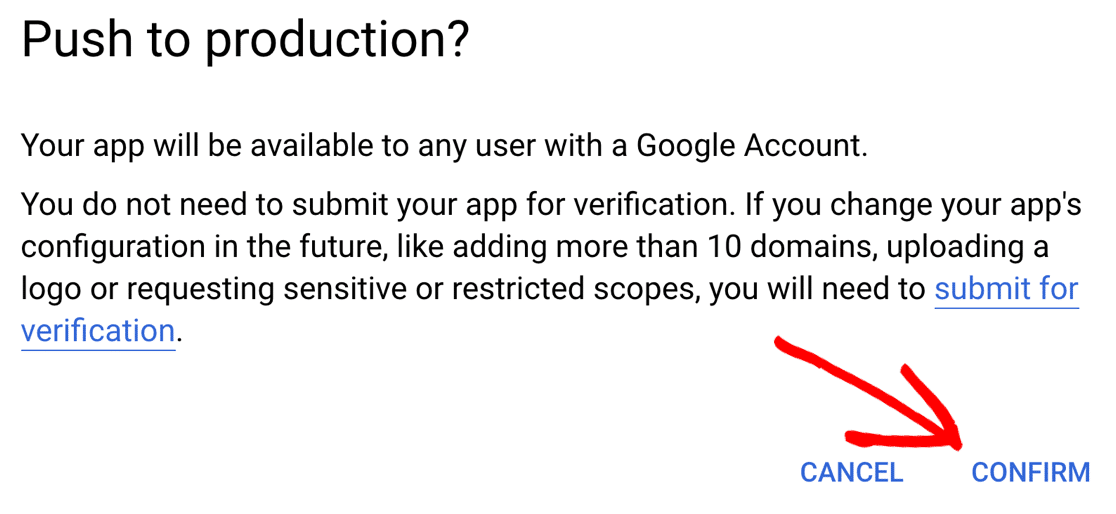
You’ll see the message Your app will be available to any user with a Google Account. Click CONFIRM to publish your app.
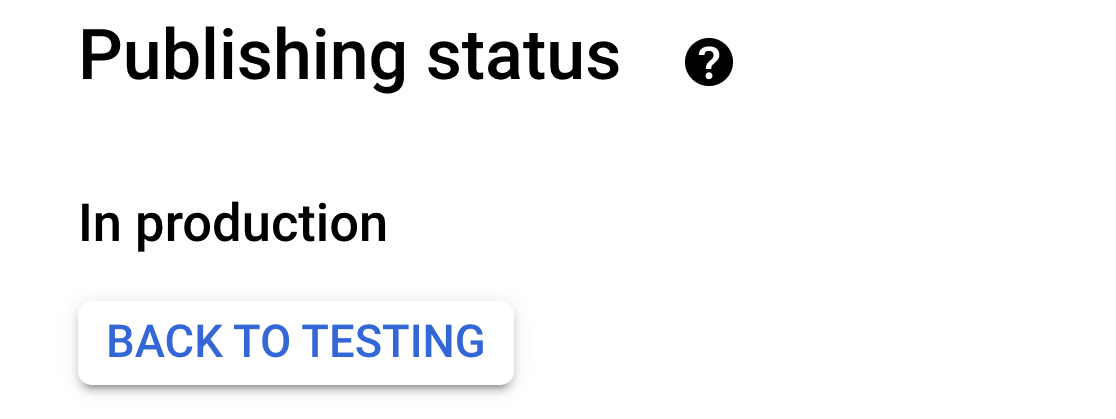
After the confirmation process is finished, you will notice that the Publishing status of your app has been changed to In production.
Step 3: Grant Your Site Google / Gmail Permissions
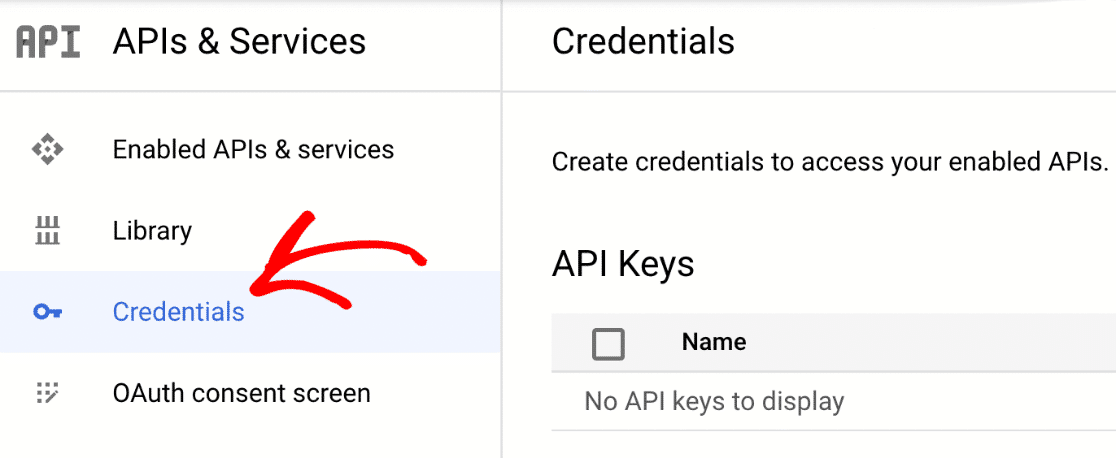
Now, we’re going to copy and paste the Client ID and Client Secret into WP Mail SMTP. To do this, click on Credentials in the left-side menu.
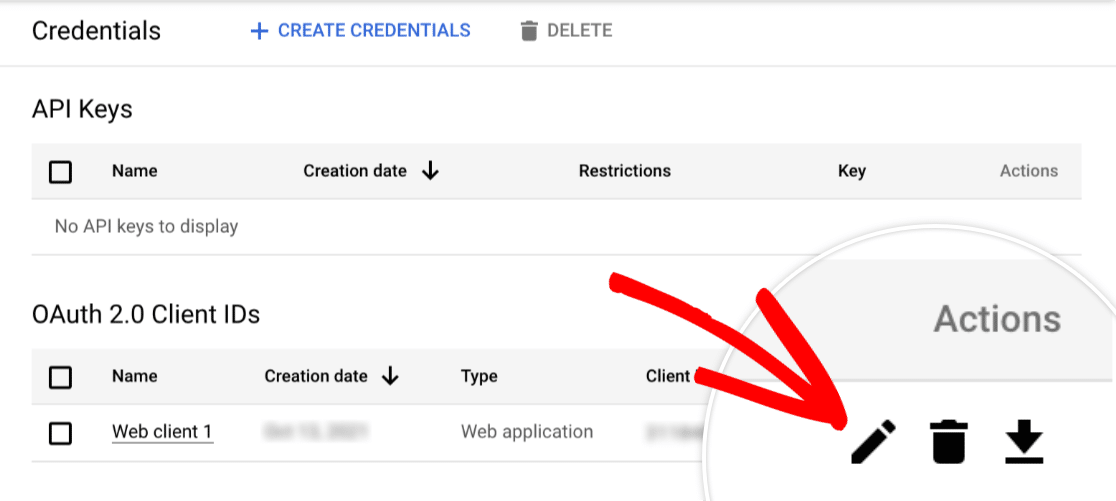
You can see information about the web app you just made in the OAuth 2.0 Client IDs section. Click the pencil button to see the Client ID and Client Secret.
This will show you everything about your app. The Client ID and Client secret are shown on the right side of this page.

Great job! Please copy both of these values into the corresponding fields in your WP Mail SMTP settings to configure the Gmail SMTP server.
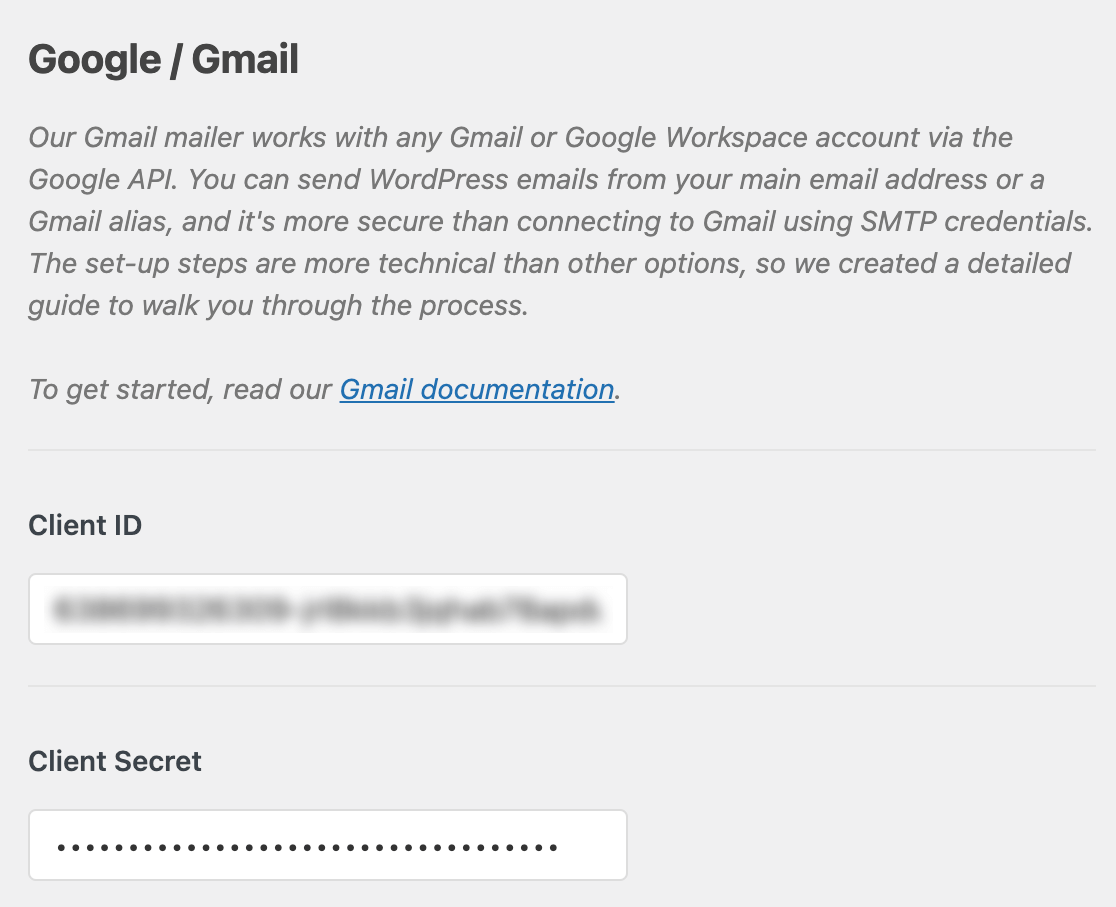
When you have finished adding these values, you should then click on the Save Settings button at the bottom of the page.
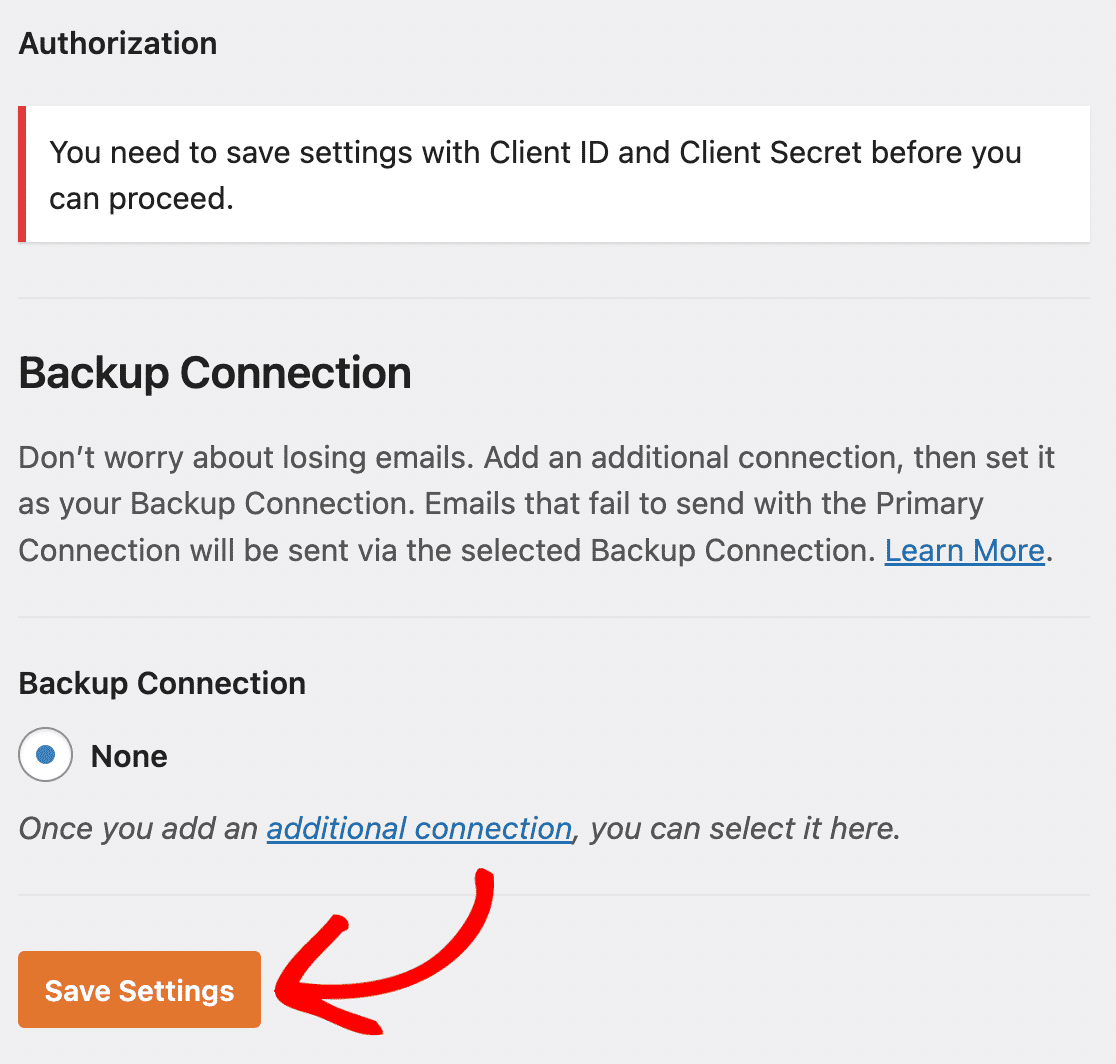
Next, on the WP Mail SMTP settings page, click the button labeled Allow plugin to send emails using your Google account.

This will open a login screen for Google. Go ahead and log in, then click the Allow button to grant permission for your site to send emails.
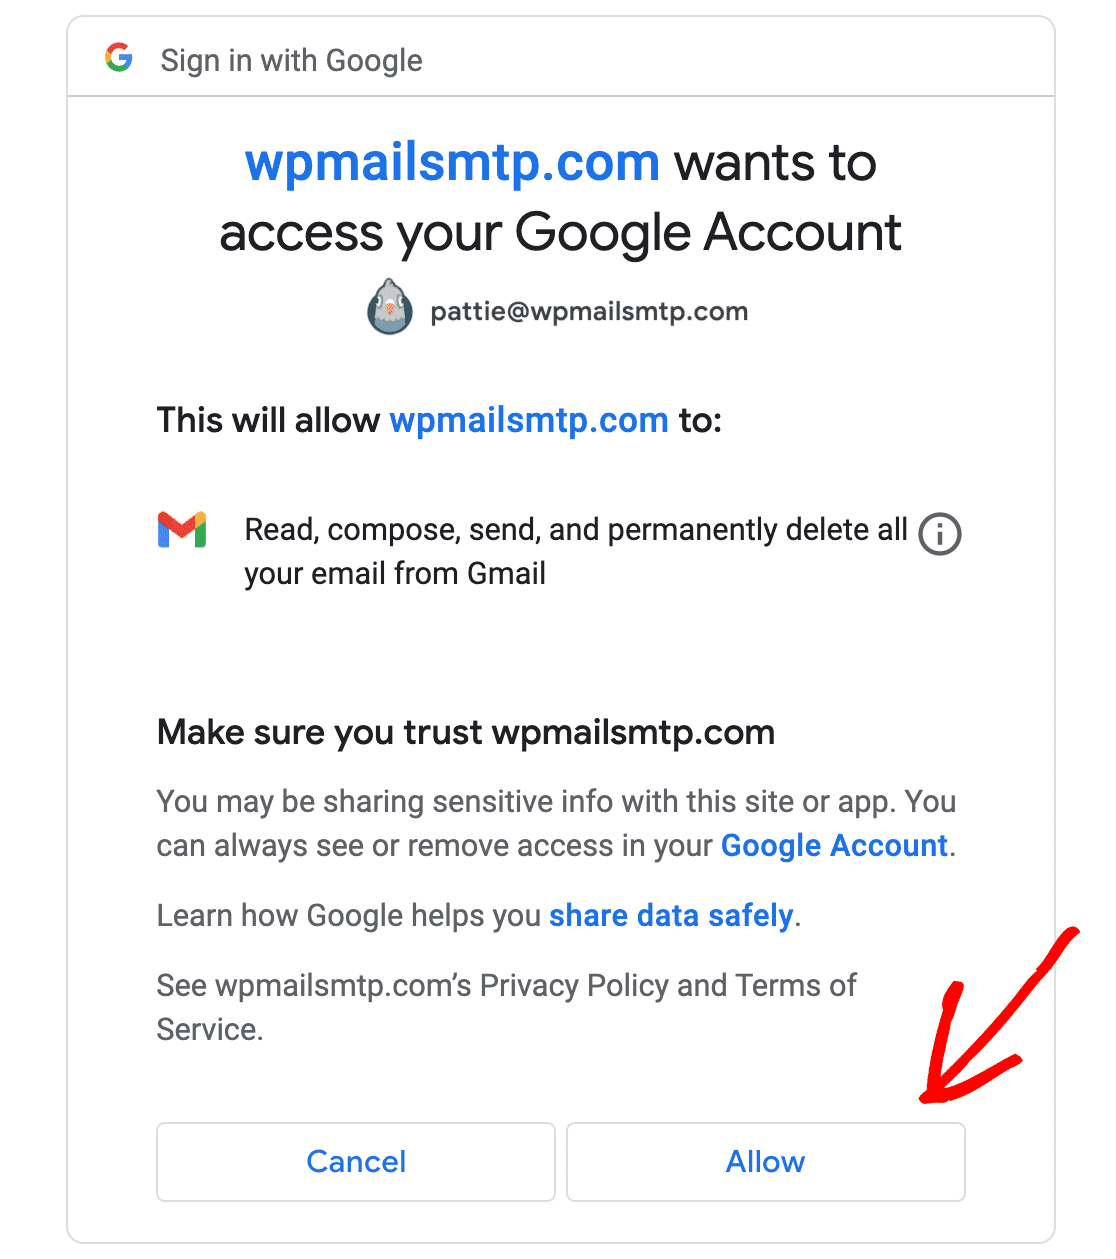
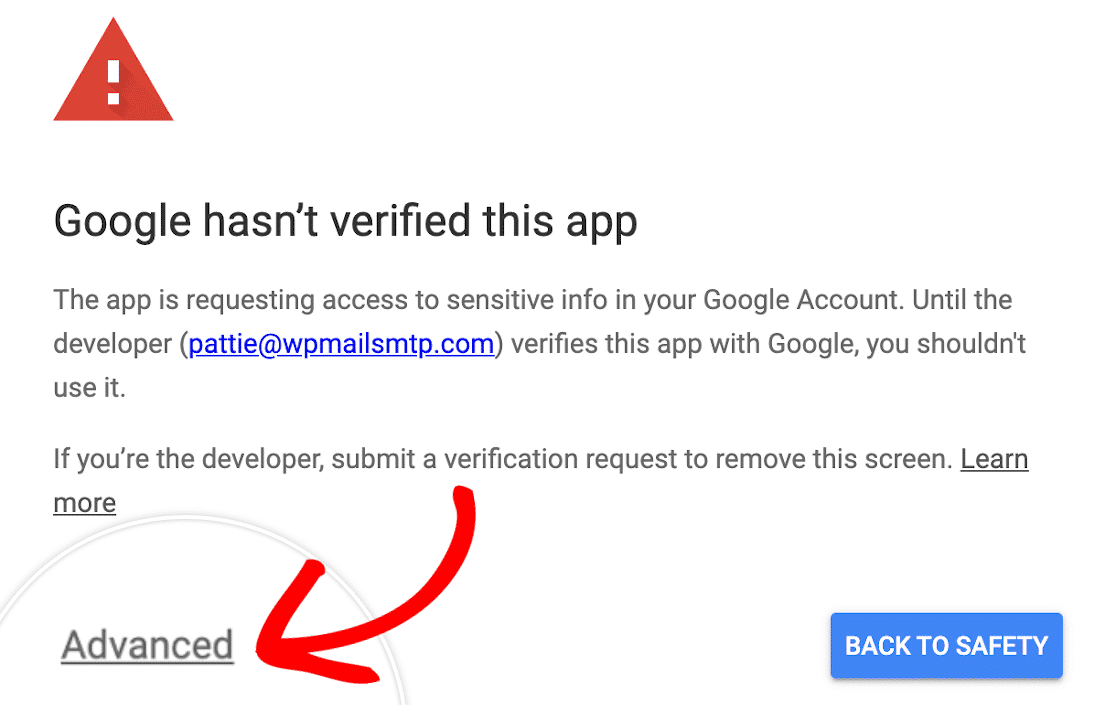
If you see a warning that your app is not verified, don’t worry. Free Gmail users will see this because Google hasn’t checked the app.
We don’t need Google to check it; anyone else won’t use the app. Go ahead and click on the Advanced link in the bottom left corner.
In the expanded section, click on Go to wpmailsmtp.com (unsafe). Then, click on the Allow button, as shown below.
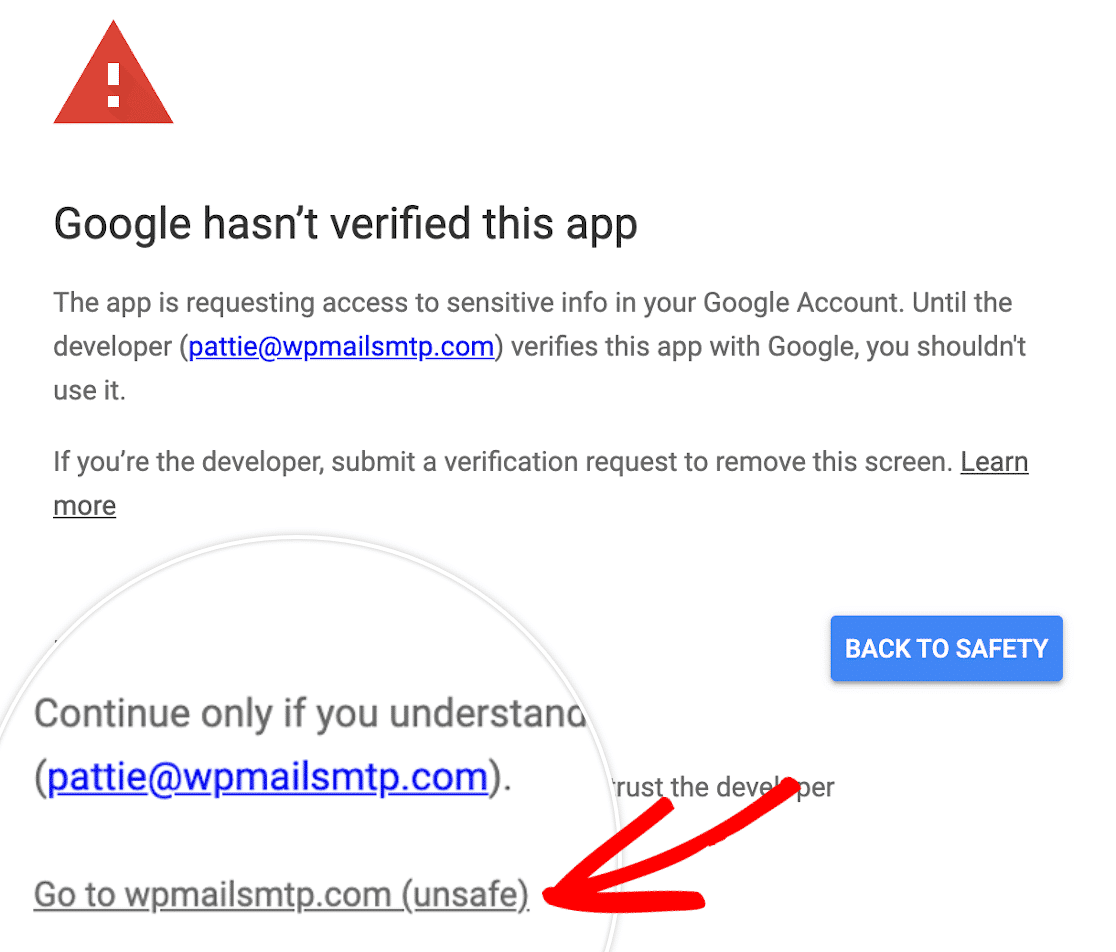
Awesome job! You’ve now successfully connected WP Mail SMTP with the Gmail SMTP settings using the manual API method!
Set Up Your From Email and From Name in WP Mail SMTP
WP Mail SMTP gives you the option of forcing all plugins and contact forms to use the same From Name if you want to.
This is a quick and easy way to make sure your customers and visitors always see the same Name in the sender field of every email.
You don’t have to force this setting. You can choose to enable it here in the plugin settings if you want to.
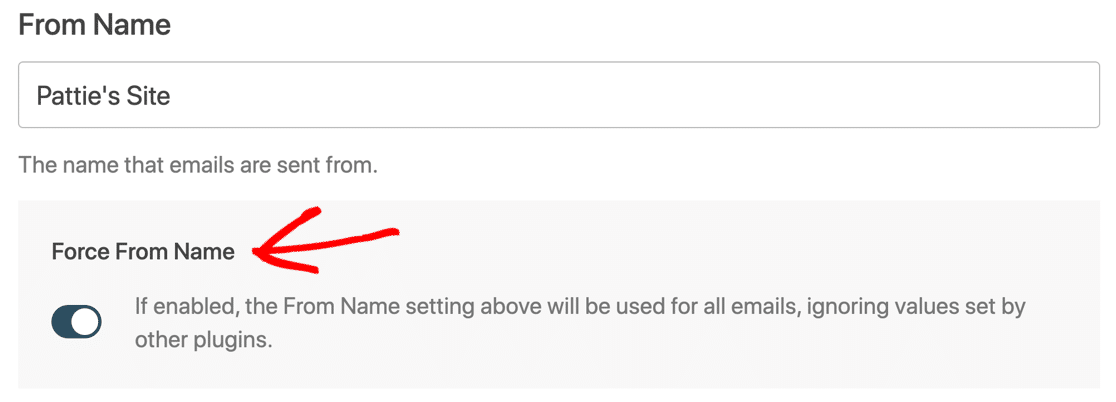
Below that, there’s a From Email setting, and WP Mail SMTP will automatically show you all of the aliases set up on your Google Workspace or Gmail account.
The email address you pick in the dropdown here will be the default From Email in WordPress that all your emails will be sent from!

You can use any email listed in this dropdown to send email from WordPress. Just type it in as the From Email in your plugin or contact form settings.
WP Mail SMTP will authenticate the email for you. The “primary” email address that you select will be used as the default sender.
Want to add more Gmail aliases here? Check out how to send WordPress emails from a Gmail alias for a complete guide to setting them up.
If you want to check whether everything is working smoothly, also learn how to send a test email from WP Mail SMTP.
Gmail SMTP / Mailer Error Messages and Solutions
Now, let’s talk about some common error messages and solutions in case you run into a different problem when you set up Gmail.
| Error Message | Solution |
|---|---|
| Your Google app is likely still in Testing mode. While this will work, your connection will break every 7 days.
To fix this, it’s easy to put your app into Production mode. |
| Head to WP Mail SMTP » Settings and click the Launch Setup Wizard button. Copy the Client ID in again.
Check that there’s no whitespace or extra text at the start or end of the Client ID. |
| cURL error 60: SSL certificate problem | Contact your site’s hosting provider to ask them to install this certificate. It’s most likely the cacert.pem certificate, though it’s best to ask your host to check. |
| 401 Login Required | Head to WP Mail SMTP » Settings and click the Launch Setup Wizard button. Run through the Setup Wizard again and be sure to connect your Google Account to WP Mail SMTP. |
| Request is missing required authentication credential. Expected OAuth 2 access token, login cookie or other valid authentication credential. | This means your Gmail setup is not complete. Head to WP Mail SMTP » Settings and click the Launch Setup Wizard button to check your settings. |
| Google hasn’t verified this app The app is requesting access to sensitive info in your Google Account. | To bypass this message, you’ll need to click Advanced and then Proceed.
Don’t worry – your app does not need to be verified by Google to work. |
| Action Needed: It doesn’t look like the SPF record required by Google has been added to your domain. Please check out Google’s SPF guide for details on how to add this record to your domain’s DNS. | WP Mail SMTP can’t find an SPF record in your DNS. Adding an SPF record could help improve email deliverability.
If you’re using Google Workspace or a Gmail account with a custom domain, follow Google’s tutorial to solve this. If you’re using a free Gmail account without a custom domain, you can ignore this warning. |
| Action Needed: It doesn’t look like the DKIM record required by Google has been added to your domain. Please check out Google’s DKIM guide for details on how to add this record to your domain’s DNS. | WP Mail SMTP can’t find a DKIM record in your DNS. Adding a DKIM record could help improve email deliverability.
If you’re using Google Workspace or a Gmail account with a custom domain, follow Google’s tutorial to solve this. If you’re using a free Gmail account without a custom domain, you can ignore this warning. |
| Action Recommended: It doesn’t look like DMARC has been set up on your domain (example.com). We recommend using the DMARC protocol because it helps protect your domain from unauthorized use. Please check out our step by step guide for details on how to add this record to your domain’s DNS. | WP Mail SMTP can’t find a DMARC record in your DNS. Adding a DMARC record could help improve email deliverability.
If you’re using Google Workspace or a Gmail account with a custom domain, read how to add a DMARC record to your domain. This article includes a generic DMARC example you can copy and paste. If you’re using a free Gmail account without a custom domain, you can ignore this warning. |
If your error message isn’t listed here, you can contact WP Mail SMTP support:
- Lite Users: Ask a question on the support forum at WordPress.org.
- If you have a paid license: Open a support ticket in your WP Mail SMTP account.
FAQs on How to Setup Gmail SMTP in WordPress
Occasionally, our users run into issues with Gmail SMTP mail server in WordPress. Here’s a quick collection of FAQs that will help resolve any issues you have.
What do testing and production mean in Google Cloud Console?
In Google Cloud Console, Production means that your app is live. This is the default setting for Google Workspace users. Testing is the default setting for free Gmail accounts.While Testing mode will work, it has a 7-day timeout. So every week, your emails will stop working and you’ll have to reconnect the app. To fix this, put your app into Production mode.
Does the Google / Gmail mailer have any sending limits?
Gmail and Google Workspace both have account-wide email-sending limits. These limits apply across your entire Google account.
Google Account Type:
- Google (free): 500 per day
- Google Workspace: 2000 per day
So, any emails sent from Google products (like Google Forms notifications) will count. The emails you send from your regular mailbox count toward it, too.
What do the options “Internal” and “External” mean?
In Google Cloud Console, Internal means that the app will be available to your organization. This is the default setting for Google Workspace users.
External means that the app will be available to any Google account. This is the default setting for free Gmail accounts because they aren’t part of an organization.
You don’t need to worry about this setting. You can go ahead and use the default that Google selects for your account.
Why can’t I use my Domain for the “Authorized Redirect URI”?
The Authorized Redirect URI is only used when you connect your site to Gmail the first time. We provide our own URL for this initial connection so that you don’t experience any issues with security plugins or mod_security on your server.
Why do I see a DMARC, SPF, or DKIM warning?
WP Mail SMTP has a built-in Domain Checker. It automatically scans your domain’s DNS records for rules called DMARC, SPF, and DKIM and will warn you if they are missing.
If you’re using Google Workspace or a custom domain with Gmail, I recommend adding these to your DNS. Jump down to our table of common Gmail errors for instructions.
Free Gmail users (without a custom domain) can ignore these warnings. As a free Gmail user, you don’t have control over the sending domain’s DNS, so you can’t add these records.
Why do emails from WordPress appear in the sent folder in Gmail?
When you use WP Mail SMTP to send mail using the Google API, it’s essentially the same as you sending them yourself from your ordinary mailbox.
So every email that’s sent from your site will appear in your Sent Mail folder in your mailbox as well.
If you don’t want this to happen, I recommend that you choose a different mailer like SendLayer.
How do I switch Gmail accounts in WP Mail SMTP?
If you want to send email from a different Gmail address in WordPress, you have 2 options with WP Mail SMTP.
Use a Gmail Alias
WP Mail SMTP lets you send emails from multiple Gmail or Google Workspace aliases. So if you want to use a different From Email address, you can easily add it as an alias in your Google account.
To learn how to add an alias and use it in WordPress, check out how to send WordPress emails from a Gmail alias.
Switch Google Accounts
If you’d like to change to a different Gmail or Google Workspace email account, you’ll need go to WP Mail SMTP » Settings and click the Remove Connection button.
After disconnecting your account, scroll up to the Mail section and click Launch Setup Wizard to create a new Gmail SMTP connection.

Remember: clicking Launch Setup Wizard will erase your existing settings, so it’s best not to click it unless you’re ready to switch.
Next, Grow Your Business with WordPress
Now that your emails are sending perfectly, it’s time to check out our roundup of the best email plugins for WordPress. If you’d like, check out other roundups for different use cases related to your WordPress website:
- Best Login Page Plugins
- Best Calendar Plugins
- Best Website Visitor Tracking Tools
- Best eCommerce Plugins
- Best Notification Bar Plugins
- Best WooCommerce Plugins
Ready to build custom WordPress forms? Get started today with the easiest WordPress form builder plugin.
Create Your WordPress Form Now
WPForms Pro includes 2,000+ free templates and offers a 14-day money-back guarantee. And you can collect payments through Stripe, Square, and PayPal for your business.
If this article helped you out, please follow us on Facebook and Twitter for more free WordPress tutorials and guides.

