
AI Summary
Do you want to create a lead magnet optin form in WordPress? Offering a lead magnet like a free ebook in exchange for your visitors’ email addresses is a great strategy for capturing new leads.
With a short form and the right message, you can turn more visitors into subscribers without sounding pushy. In this guide, we’ll walk through how to set up a lead magnet form in WordPress that actually works.
Create Your Lead Magnet Optin Form Now! 🧲
What Are Lead Magnets?
A lead magnet is a marketing tool that incentivizes people to share their contact information in exchange for access to a valuable resource. The goal is to convert interested visitors into subscribers so you can grow your list.
Usually, lead magnets are downloadable resources like an ebook, workbook, whitepaper, or something similar. Offering a lead magnet for email subscriptions is an effective way to encourage your visitors to submit their email addresses.
How to Create a Lead Magnet Optin Form
Follow these simple steps to make your own lead magnet optin form on WordPress using WPForms, along with a marketing integration like Mailerlite.
- What kind of lead magnets get the most signups?
- Step 1: Upload Your Lead Magnet to WordPress
- Step 2: Hide Your Lead Magnet From Google
- Step 3: Load the Newsletter Signup Form Template
- Step 4: Install and Connect the MailerLite Addon
- Step 5: Set Up Lead Magnet Access
- Step 6: Add Lead Magnet Optin Form to Your WordPress Website
Step 1: Upload Your Lead Magnet to WordPress
Before we get started building your lead magnet optin form, you’ll have to decide on what lead magnet you’re going to offer to your subscribers.
It could be a PDF ebook or any other digital resource. For more lead magnet ideas, check out this post with irresistible lead magnet ideas.
Once you’ve decided on what you’re doing for a lead magnet, simply create it and upload it to your WordPress website. You can do this by visiting Media » Add New.

Alternatively, you can upload it to a cloud storage service like Google Drive or Dropbox. After uploading the file, make sure to copy its URL.
You can find the URL of the uploaded file by clicking on Edit on the far right of the image upload bar. Now copy the file URL and keep it safe. You’ll need this later.

Since you’re offering this digital resource in exchange for an email address, you’ll want to block search engines from finding it. This is called ‘no indexing’ and we’ll show you how to do it next.
Step 2: Hide Your Lead Magnet From Google
You can hide your uploaded lead magnet from search engines easily. I recommend using the AIOSEO plugin for this.
Not only is it the best SEO plugin for WordPress, but the free version gives you instant access to hide your webpages from Google and other search engines.

For more details, you can read how to hide a page from Google.
Step 3: Load the Newsletter Signup Form Template
Now, you’ll need to create a newsletter signup. This form will take users to your lead magnet. To do this, install and activate the WPForms plugin. You can learn how to install a plugin here.
You usually don’t need a ton of info from people on your lead magnet optin form. In fact, keeping it short and sweet can help reduce form abandonment.
For this example, I’ll show you how to create newsletter signup form that automatically sends new contacts to your subscriber list in MailerLite. To do this, head over to WPForms » Add New from your WordPress dashboard.

Give a name to your form (this can be anything you like) and select a template. We’ll use the MailerLite Newsletter Signup Form template to make things easy and quick.
Alternatively, you can also use the simple Opt-in Form Template to collect the email addresses of your website visitors so that you can add them to your mailing list.

Once it loads, you can easily customize your form using the drag-and-drop builder and add or remove any fields based on your website’s needs.

But let’s keep it the way it is for this example since we’re building a lead magnet form and need to be brief.
Step 4: Install and Connect the MailerLite Addon
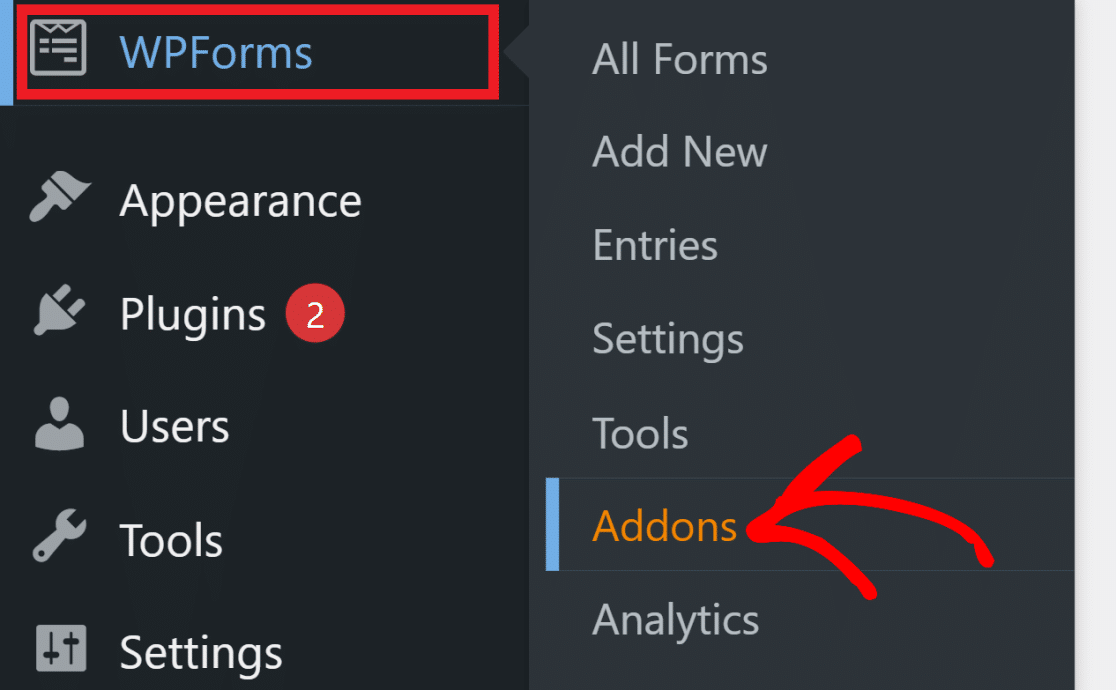
In order to integrate your newsletter signup form with a MailerLite account, you’ll need to install WPForm’s MailerLite addon. Navigate to WPForms» Addons.
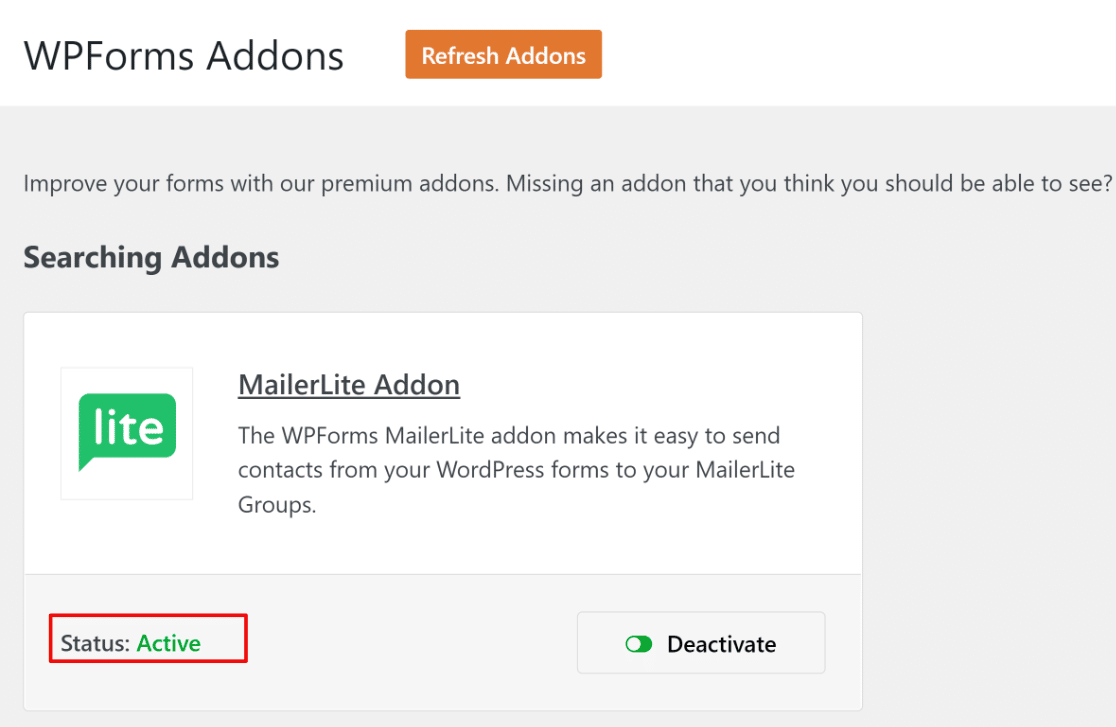
Find the MailerLite addon on this screen and click Install Addon. When the installation reads “Active”, you’re free to integrate WPForms with MailerLite.
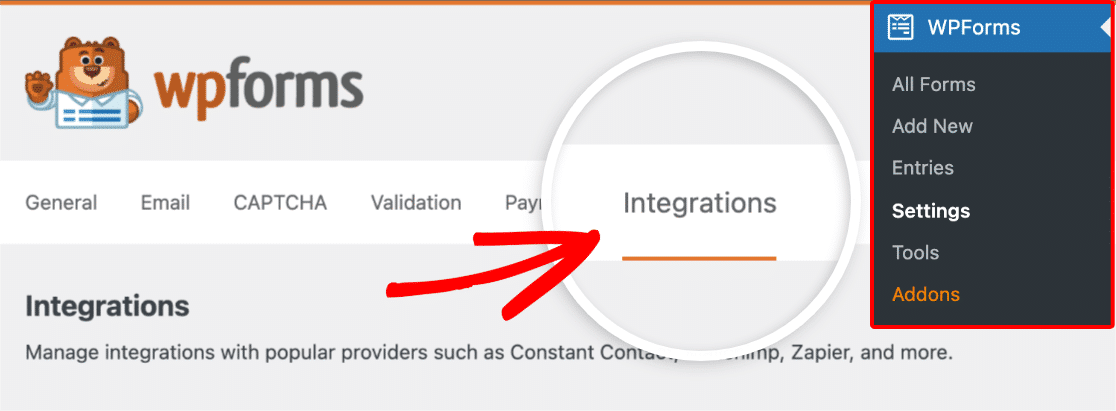
Now, we can configure a connection between your form and MailerLite so that these tools can communicate with each other. Navigate to WPFoms » Settings. Then click on the Integrations tab.
Scroll down to find the MailerLite integrations settings and then click on Add New Account. You’ll need to insert your MailerLite API key here.

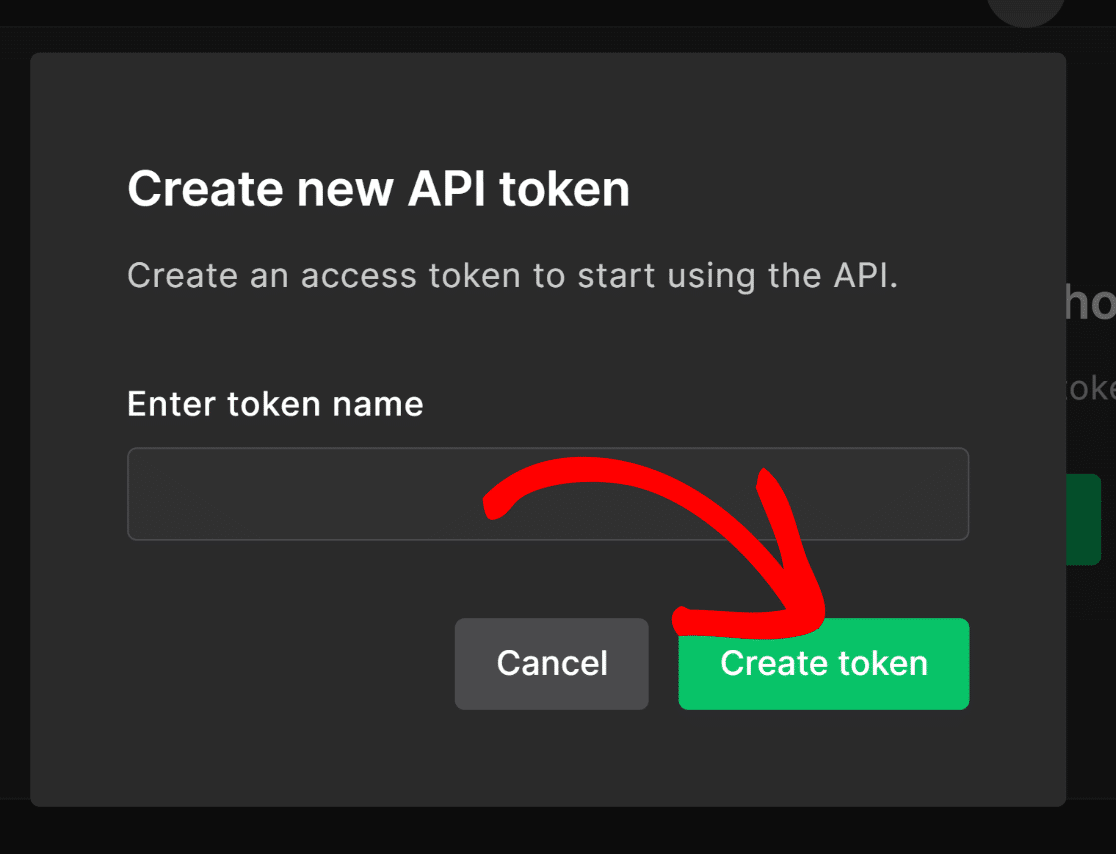
To find the key, head over to your MailerLite account. Click on the Integrations. Then click on the Use button next to API.

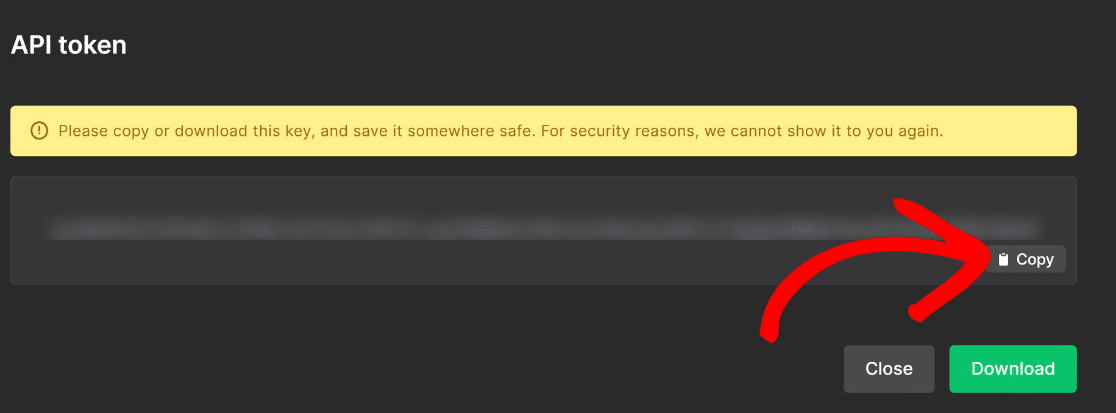
To create your API key, click Generate New Token. Input a name for your token and press the Create Token button.
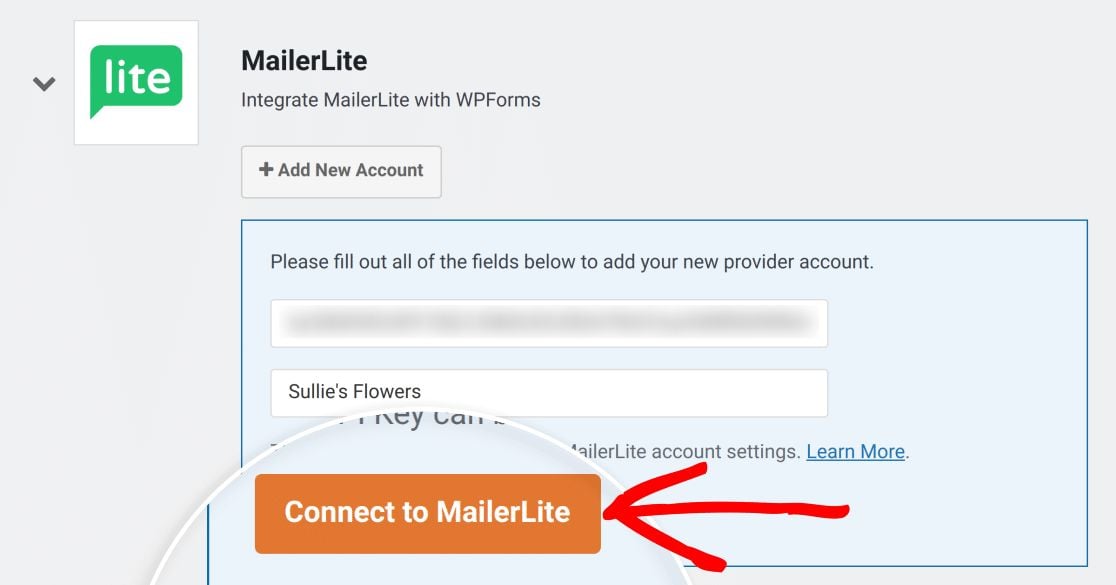
On the next screen, you’ll find your token key. Copy it. Now go back to WPForms’ Integrations page
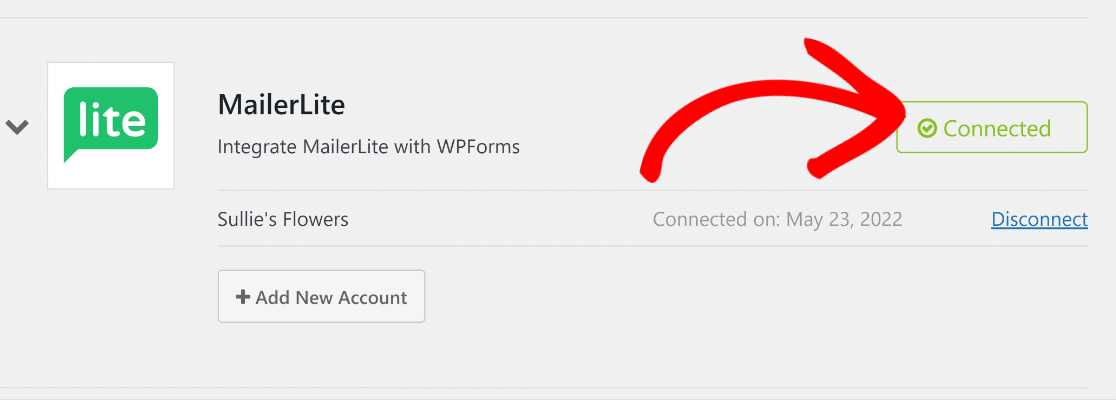
Enter your token along with a nickname for your connection. When you’ve filled out the required fields, click on Connect to MailerLite.
When you do this, you should see a Connected status appear.
💡 Pro Tip: In your MailerLite account, you can enable double optin for new lead signups. If you’re not sure which signup method is right for you, check out this guide on single optin vs double optin.
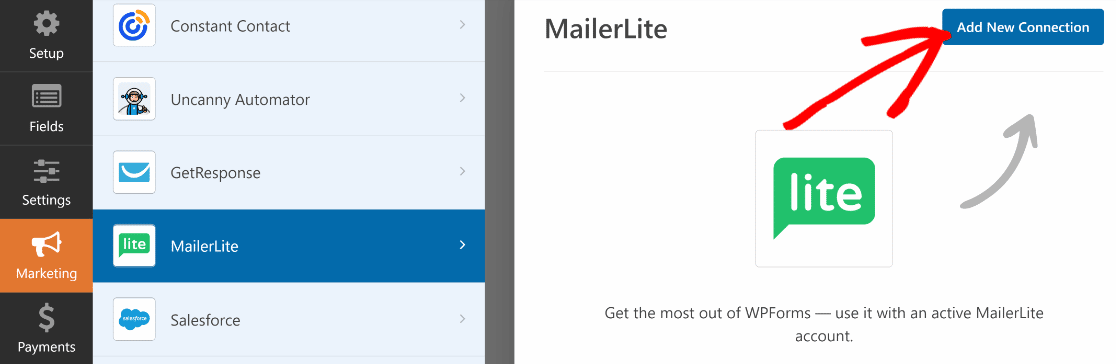
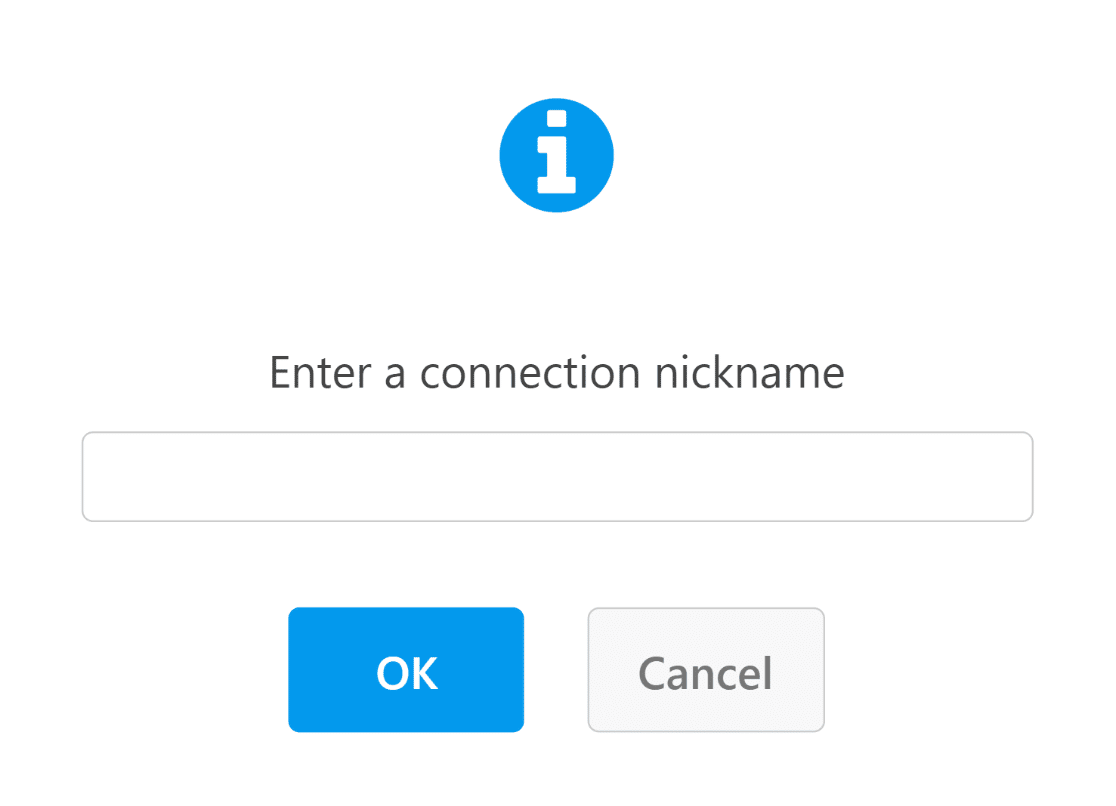
Return to your lead magnet form and click on Marketing on the left-hand menu. Select MailerLite from the list of available integrations and then press Add New Connection.
WPForms will now ask you to input a nickname for your connection. Enter a name and then press OK. Now, use the dropdown fields to configure your WPForms-MailerLite connection.
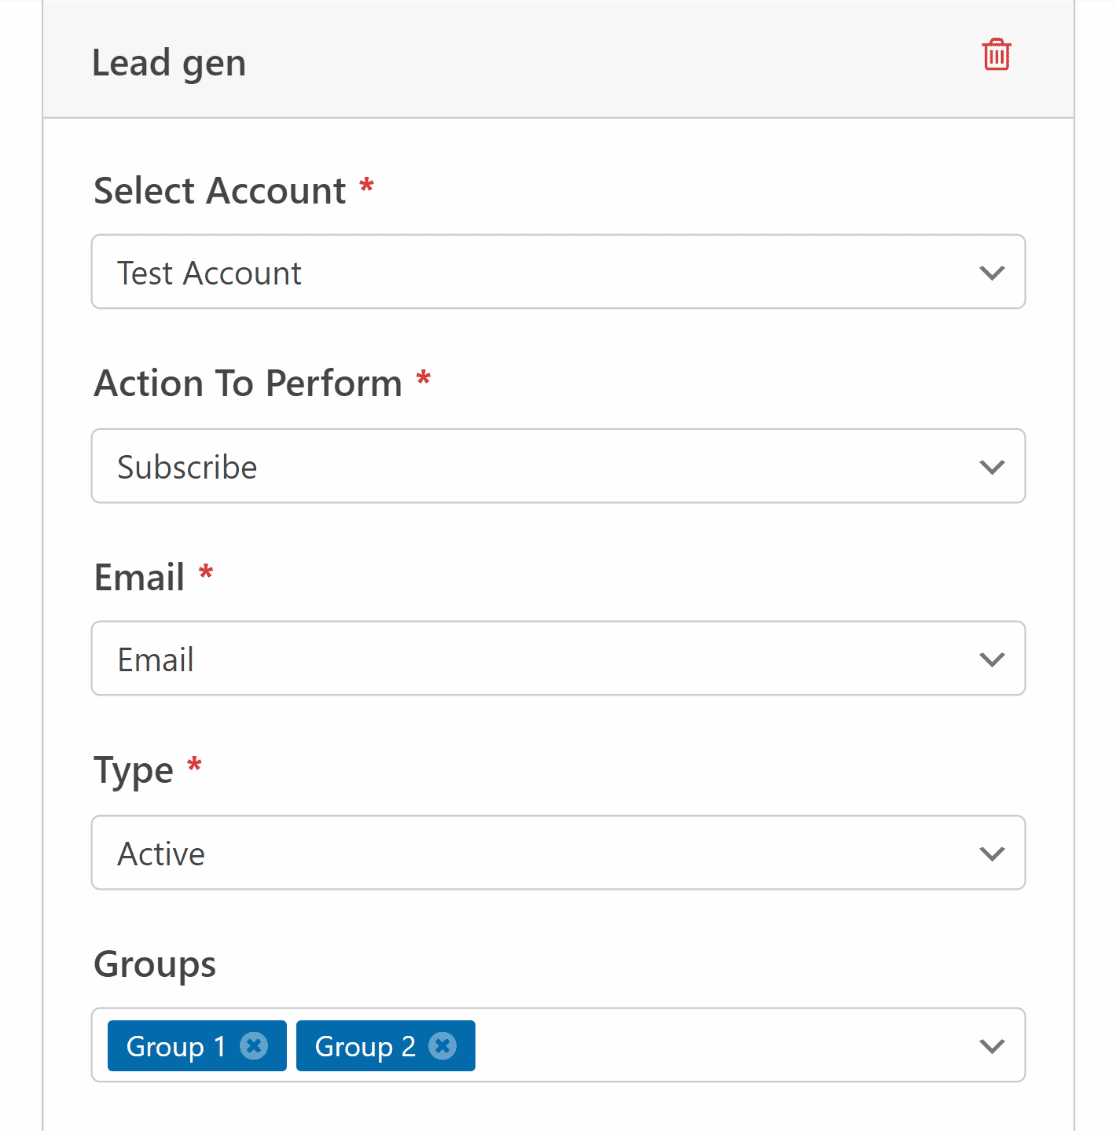
Since we want to add new contacts to our email list in this example, we’ve selected Susbcribe as the Action to Perform. You’ll also need to specify the email form field that should map to your MailerLite email field.
Also, you have to mention the Type of the lead, which will usually be Active if your goal is to add new subscribers to your list.
For more information about configuring a connection between MailerLite and WPForms, see creating a MailerLite form in WordPress. You’re almost done! We just need to set up a lead magnet delivery method now.
Step 5: Set Up Lead Magnet Access
Users will expect to receive access to your lead magnet as soon as they submit your form. With WPForms, there are a few different ways you can provide access to your lead magnet:
Reveal Lead Magnet Link in Confirmation Message
One of the ways you can give access to your lead magnet resource is by simply offering the link to it in the confirmation message upon form submission. To set this up, click on Settings » Confirmations on the left of the WPForms interface.

From here, it’s super easy to customize the confirmation message and add a link to your lead magnet. If you remember copying your lead magnet file URL earlier, this is the link you’ll need to add to the message.

This message will display immediately after form submissions, allowing visitors to easily access your lead magnet via the link.
Redirect to the Lead Magnet URL
WPForms also lets you set up a redirection that takes place immediately when a user presses the Submit button.
To do this, select the Go to URL (Redirect) option from Confirmation Type. Then, enter your lead magnet link in the Confirmation Redirect URL field.

This way, you can instantly take your visitors to your lead magnet item upon form submission.
Send Lead Magnet Link via Email
You can also send the lead magnet link to your users via email.
By default, notifications to the site admin are already enabled in WPForms. This is to make sure you get email for all form entries.
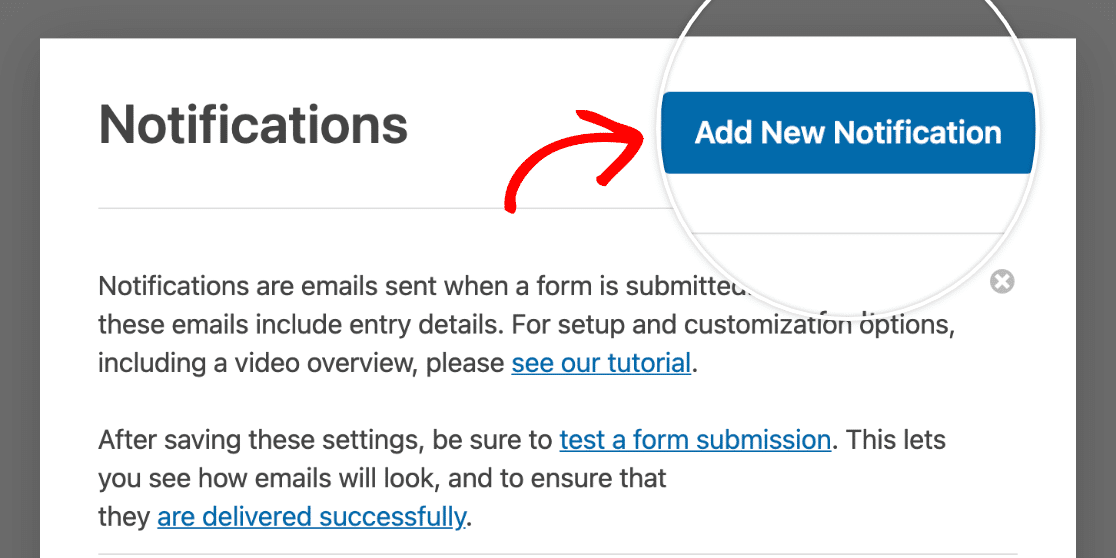
But you can also set up a separate email notification for the visitor filling out your form. To enable this, click on Settings » Notifications.

Now, press the Add New Notification button on the top right.
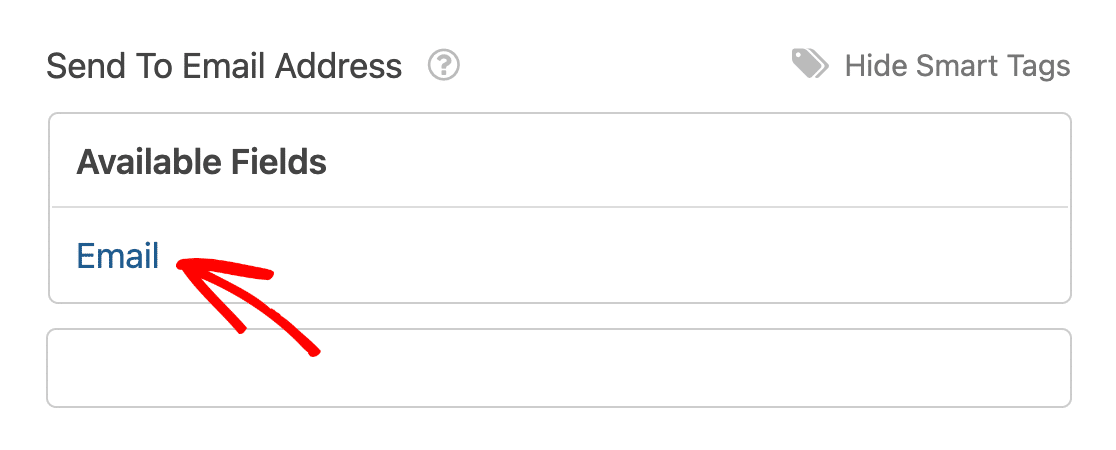
In the Send to Email Address field, select Email from the list of Smart Tags. This tag will automatically retrieve the email address provided by the user filling out your form.
Scroll down to the Email Message field and add your lead magnet link here.

Great job! Now, whenever a user submits your newsletter form, they’ll receive a direct link to your lead magnet in an email.
Make sure to press the orange Save button on the top-right of the interface to save your changes up til now.
Step 6: Add Lead Magnet Optin Form to Your WordPress Website
It’s time to publish the form on your site and start generating leads! Click on the Embed button at the top of the form builder.

This will popup a widget giving you two embed options. For this example, we’ll embed the form on a new page. Go ahead and click on Create New Page.

Name your page and then press Let’s Go.

This will take you to your WordPress block editor for your new page. You’ll already find the block for your lead magnet optin form embedded within the page.
It’s advisable to add a brief description to this page to create more interest about the free access you’re offering to visitors in exchange for their information.
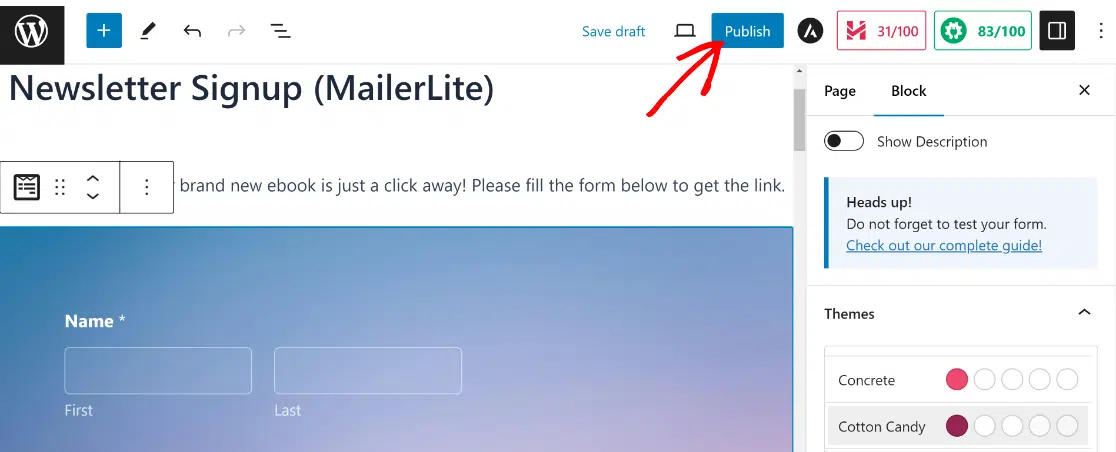
At the same time, you can add a theme to your form with just a click to give it a more aesthetically impressive look. Just click on the area around the form.
Then, scroll down the Themes section on the right-hand pane and select one of the available themes. When you’re ready to take your form live and start collecting subscribers, press Publish.
Awesome! Let’s now make sure that the confirmation message is working correctly. You can fill out a test entry for this.
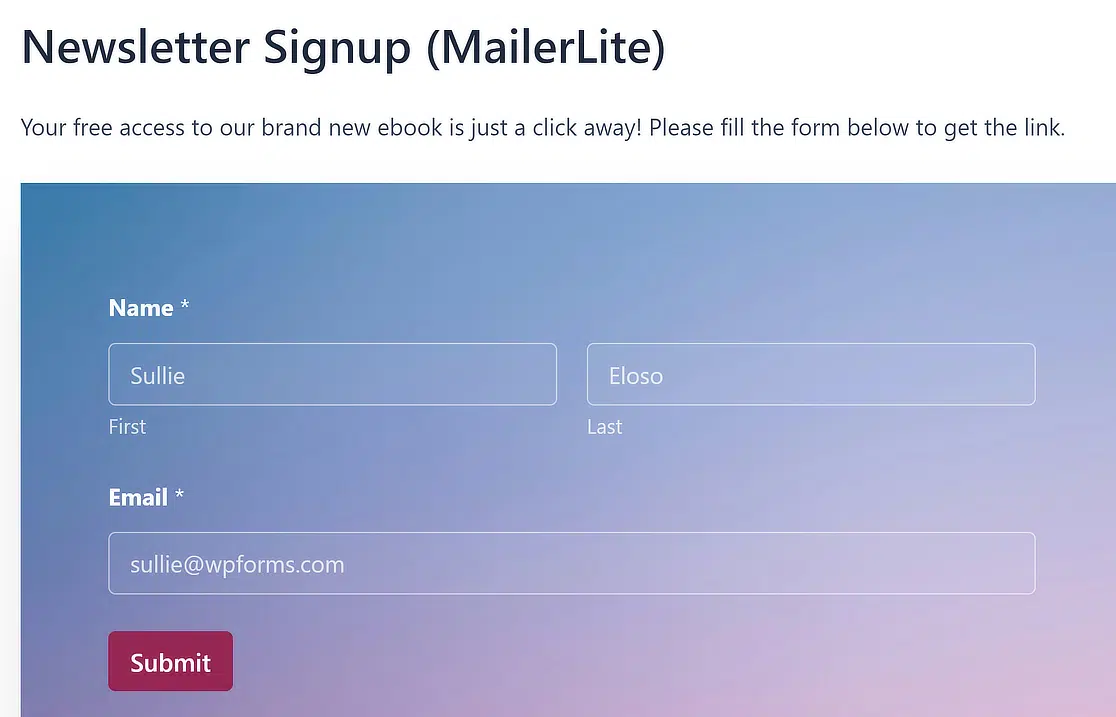
As you can see below, the confirmation message with a lead magnet link is showing up as intended!

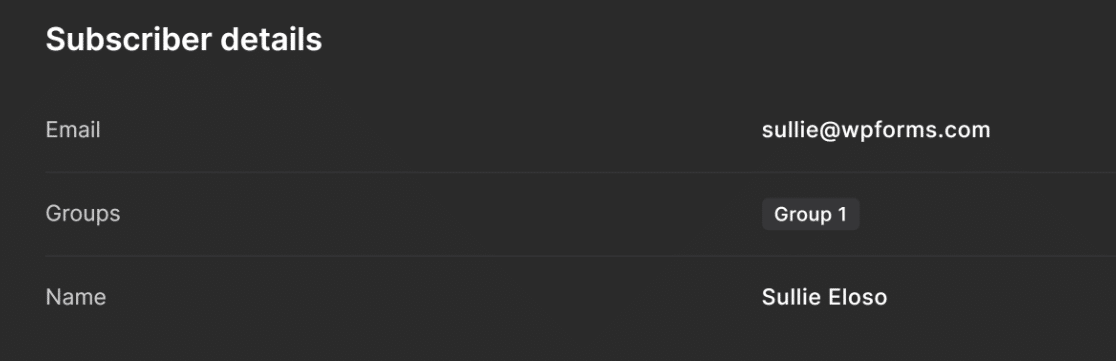
But wait! Remember that we set up an integration so that all new entries are automatically sent to your MailerLite account?
Let’s see if the test entry was added to our MailerLite subscriber list. If you set up the connection correctly, the new subscriber should appear within a few seconds in your MailerLite list.
And there you have it! You now know how to make your own lead magnet optin form with a WordPress plugin.
FAQs on How to Create a Lead Magnet Optin Form in WordPress
Learning how to create a lead magnet optin form in WordPress is a popular topic of interest among our readers. Here are answers to some common queries about it.
What is a lead magnet and how does it work?
A lead magnet is something free you offer in return for someone’s email. It could be a guide, checklist, or file. The person fills out a form, and you send them the item.
How do I create a lead magnet in WordPress without coding?
Just upload your lead magnet i.e., guide, checklist, or any other file to WordPress, and then use a plugin like WPForms.
It lets you build a form with drag and drop. Add a name and email field, then connect it to your freebie download or email tool.
Can I deliver a lead magnet automatically after someone signs up?
Yes. With WPForms, you can send an email right after the form is submitted. Add your file link to that email so users get it instantly.
What’s the best way to collect emails with a lead magnet form?
Keep the form short. Just name and email. Place it in spots people will see, like your homepage or blog. Use a clear title that explains what they’ll get.
Which plugin should I use to create an optin form in WordPress?
WPForms is a great option. It’s easy to use, supports file links, and works well with email services like Mailchimp or Constant Contact.
How do I add a file download to my WordPress form?
After someone fills out the form, show a message with a download link or send the file in the email. WPForms lets you do both.
Can I use WPForms to send a freebie after form submission?
Yes. Set up a confirmation email in your form settings and paste the file link inside. The email sends right after they hit submit.
How do I create a popup lead magnet form in WordPress?
You’ll need a popup plugin like OptinMonster. You can build your form in WPForms and place it inside the popup box.
What kind of lead magnets get the most signups?
Quick wins work best like checklists, cheat sheets, or short guides. Make sure it solves one clear problem your readers care about.
Next, Build Optimized Lead Forms With WPForms
Want to collect more leads on your website? The WPForms Lead Forms addon helps you build optimized lead generation forms that you can embed anywhere on your site.
If you liked this article, you might also want to read our guide on stopping form spam so you can keep your email list as high quality as possible.
If you want to make forms more user-friendly, you can explore how you can create multi step lead forms. Curious about options other than WPForms? Check out our roundup of the best WPForms alternatives.
Ready to build your form? Get started today with the easiest WordPress form builder plugin. WPForms Pro includes lots of free templates and offers a 14-day money-back guarantee.
If this article helped you out, please follow us on Facebook and Twitter for more free WordPress tutorials and guides.

