
AI Summary
Running a contest on your website is a great way to engage people actively with your brand and expand your reach to a wider audience.
In other words, running a contest is a win-win strategy—your audience wins something for free, and you capture more leads for your business.
In this guide, I’ll share my experience with creating a contest entry form in WordPress with 2 easy methods.
Create Your Contest Entry Form Now
How to Create a WordPress Contest Entry Form
You can start building a contest entry form right away by following the instructions in the video below:
Or, if you prefer written instructions, follow the step-by-step details below for creating your contest entry form easily:
In This Article
Method#1: Create a Contest Entry Form Using WPForms
First, we’ll show you how you can run an online contest using a form. To do this, you’ll need WPForms Pro activated on your WordPress site.

Once you’ve acquired your WPForms Pro license, install the plugin on your site. If you’re unsure how, refer to this guide for help installing plugins.
When it’s installed on your site, you can immediately start building your contest entry form.
Step 1: Use the Contest Entry Form Template
WPForms comes with a vast library of 2,100+ form templates for marketing, business operations, and various other purposes.
There’s a built-in contest entry form template that’s just perfect if you’re looking to run an online contest.
To start creating your form, open your WordPress admin area and click through WPForms » Add New.

Once you’ve done that, you’ll see the form builder screen open. You can give a name to your form here.

Then scroll down and search for the contest entry form. Click on Use Template under Contest Entry Form to immediately load your template.

Here’s what the template will look like once it’s loaded for you. You can also add additional fields to your form easily.

The bottom of this template includes the rules of entry, which are added using the Content field. These rules probably won’t apply in your case, but you can easily edit them.

To edit these rules, click the Rules of Entry field to open its Field Options. Then, you can use the text editor of the Content field on the left to edit your rules and format them any way you like. It’s as simple as that!

When your contest form looks the way you want it to, click Save. Great! Let’s proceed to the next step and configure our form’s settings.
Step 2: Configure Your Contest Entry Form Settings
To start, go to Settings » General.

Here, you can configure the following:
- Form Name — Change the name of your form here if you’d like.
- Form Description — Give your form a description.
- Tags — Assign a tag to your form to find it faster.
- Submit Button Text — Customize the copy on the submit button.
- Submit Button Processing Text — Edit the text that appears after pressing submit button.
You can find additional settings by expanding the Advanced menu.

Also, activating spam protection on your form is a good idea to prevent bots from making fake entries in your contest.
WPForms has various spam filtering tools, including a built-in spam protection tool and popular services like Akismet, Google reCAPTCHA, and more.
You can access spam prevention settings from Settings » Spam Protection and Security.

Once again, you should press Save to save your settings.
Step 3: Edit Notifications and Confirmations
WPForms automatically sends you notifications every time users submit your form. You can edit your notifications by going to WPForms » Notifications.

You can also set up notifications for the people submitting your contest forms. This will let them know that their entry has been received.
For help in doing this, check out our step-by-step tutorial on how to send multiple form notifications in WordPress.
In addition to notifications, every form shows a confirmation message or takes people to a confirmation page after they submit it.
By default, the Contest Entry Form template has a confirmation message configured. But you can edit your confirmations by going to Settings » Confirmations from the form builder.

For detailed instructions, check out our tutorial on setting up a simple form confirmation in WPForms so you can customize the message site visitors will see when they enter a contest on your website.
Step 4: Set Up the Form Locker Addon
WPForms has flexible access controls that enable you to manage contests very easily. But you’ll need to get the Form Locker addon before using these access controls.
From the Settings menu, click on the Form Locker option.

If it hasn’t been installed already, a modal window will open. Press Yes, Install, and Activate to continue.

Once it’s finished installing, you’ll see another modal popup with a success message. Click on Yes, Save and Refresh, to

Excellent! The Form Locker addon is now ready to use.
Step 5: Configure Contest Form Access Controls
You can now click on the Form Locker option to configure its settings.

One of the most useful settings you’ll find here is Form Scheduling. Click the toggle button next to Form Scheduling to expand more options.
Using these options, you can control when your contest form should become available for entries and when it should be closed automatically.
Just enter the Start Date and Start time along with End Date and End Time as you see fit.
You can also change the Closed Message that will appear to users accessing your form after it’s been closed.

It may also be helpful to cap the number of entries you want to accept for your form. To do this, click the Enable Total Entry Limit toggle button.

After you’ve done that, you’ll be able to access additional options. Use the Limit field to define the maximum number of entries you want to allow.
As before, the Closed Message text box will enable you to write a message to display once the entry limit is reached.

It’s also possible to limit entries by specific users. You can restrict the number of entries a user can make by IP address, email, or both.
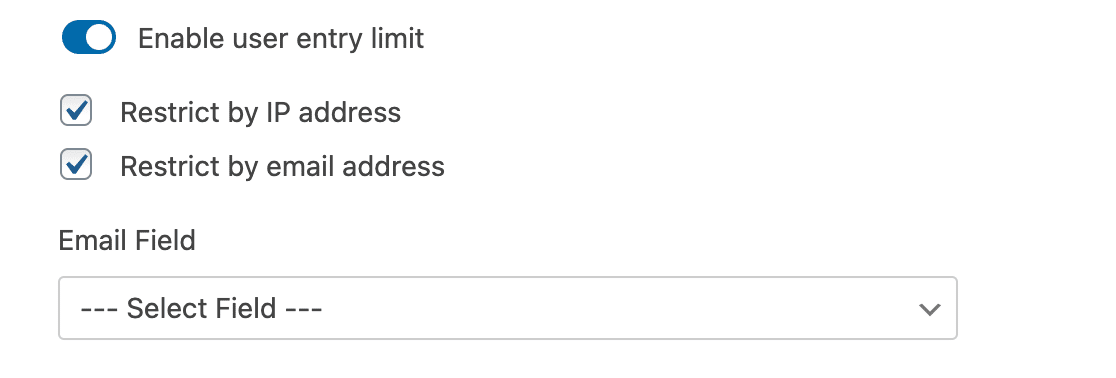
Scroll down to specify the entry limits for each user and how long they should apply for.

You can also prevent users from making multiple entries by requiring a unique answer for certain fields.
For instance, you can require unique answers for your Email or Phone fields so that the same person cannot make multiple entries.
You can access these settings by going to the Field Options of your desired field.

After that, scroll to the bottom of the settings and click on the toggle button next to Require Unique Answer.

Once you’ve set up the conditions for your contest, press the Save button on the top.
Step 6: Publish Your Contest Entry Form
Now that your contest entry form is all set up, you can embed it on your site. To do so, press the Embed button at the top-right corner of the form builder.

When you’ve done that, a new modal will pop up. In this example, we’ll click the Create New Page in this modal to embed our form in a new page.

Next, enter a name for your page and press Let’s Go!

After this, you’ll find your WordPress page editor window open. Here, you should see your form embedded within the page.
When you’re ready to launch your contest, click the Publish button at the top.

Fantastic! Your contest entry form is now ready and will start accepting entries based on the schedule and conditions (if any) you set up earlier.
Next, let’s look at another way to add a contest entry form to your WordPress site. This time, we’ll use RafflePress.
Method#2: Host a Contest Using RafflePress
RafflePress is a giveaway plugin to easily create a WordPress contest form on your site. Here’s how:
Step 1: Install The RafflePress Plugin
RafflePress is one of the best WordPress plugins to host a giveaway online. There’s a free version and a powerful premium version, and it has a user-friendly drag-and-drop builder that makes using either version a breeze.
And if you really want to use the power of giveaways to grow your business online, you’ll want to check out the perks of upgrading to RafflePress Pro.
It offers some great features like design options, email marketing and social media integration, and more. To learn more, jump over to our RafflePress review.

For this tutorial, we’ll show you how to create a WordPress contest form with RafflePress’ free version.
To install the plugin, go to your WordPress dashboard and click on Plugins » Add New. Type RafflePress in the search bar and click Install Now.

So now that you’ve activated the plugin, you’re ready to create your simple giveaway.
Step 2: Create Your First Giveaway
Scroll down the page and click on the orange Create Your First Giveaway button.

Next, name your giveaway and select the pre-built giveaway template you’d like to use. For this tutorial, we’ll pick a classic giveaway.

If you’d like to focus on a specific goal as you host a giveaway, the pro version of RafflePress lets you choose from many additional (and highly effective) pre-built giveaway templates like:
- Grow Your Email List
- Pre-launch Campaign
- Grow Your Facebook Page
- Grow Your Instagram Following
- Refer-a-Friend Viral Giveaway
- Grow Your Twitter Following
- Grow Your YouTube Channel
These are all fantastic ways to grow your audience.
Step 3: Add Details to Your Giveaway
Now that you’ve picked your template, you need to add all the details of your online contest.
First, click on the box with the pencil on the left-hand panel to provide a title and description for your prize.
Read the post on proven contest prize ideas if you need a little help coming up with something to give away!

In this Giveaway Prize Details section you can also:
- Add additional prizes by clicking on the +Add Another Prize button
- Set the start and end dates of your contest
- Set your time zone
Step 4: Add Actions & Entry Options to Your Giveaway
RafflePress is wonderful for WordPress contests because it has a ton of actions and entry methods for you to offer your users.
So you can customize your giveaway to match your goals and your website’s goals. To add an action and edit its entry options, click on the Actions tab on the left-hand panel.

Some possible online growth goals and the suggested entry option actions are to:
- Get more email subscribers — Add the Join an Email Newsletter action (Pro).
- Get more social media followers — Add a Facebook, Twitter, Instagram, Pinterest or YouTube action. An Instagram giveaway is a great way to encourage others to tag a friend right now (Pro).
- Increase social engagement — Add a Refer-a-Friend (Viral Sharing) action or a Watch a Video action (Pro).
- Grow your website traffic — Add a Tweet a Message or Visit a Page action.
- Get user-generated content like from a video contest — Add an Invent Your Own action.
There are many other actions you can take when you host your giveaway, but those are some solid ideas to get you started.
The Pro version of the software will give you a ton more options. Each action has entry options that can be customized once you click on the + symbol for that action.
You can change the action’s title, choose the value of points someone will earn by completing it, make the action mandatory for entry, allow daily entries, enter a related URL, and more.

If you have the Pro version, you can customize the design to match your brand’s colors on the Design tab on the left-hand side to make your giveaway look even slicker.
Step 5: Adjust Your Giveaway Settings
RafflePress gives you many options to tweak your giveaway even more in the settings panel. First, enter your contest rules. Let’s do that before we adjust any other settings.
To get started, click on the Settings tab with the gear icon. Then, select Giveaway Rules and click the orange + Generate Rules button.

Next, enter your giveaway’s details on the page that popped up and click on the Generate Rules button at the bottom of the generator.

RafflePress will then use the information you entered to generate basic giveaway guidelines and rules.

Also, on this setting page, you can do many other things like:
- Enable email verification
- Success tracking
- Social logins
- Display your giveaway winners
- Success redirection
- and more…
Step 6: Save Your Giveaway
Once you have customized your giveaway’s details, actions, design, and settings, remember to click the Save button at the top right corner.

Step 7: Publish Your Giveaway to Your WordPress Site
The final step is to publish your giveaway on your website. To do this, RafflePress offers 3 options:
- RafflePress WordPress Block – Embed the giveaway in your post or page in the WordPress block editor
- WordPress Shortcode – Use the Classic WordPress editor and embed the giveaway using a shortcode
- Giveaway Landing Page – Build a standalone landing page for your giveaway
In this example, we’re using a WordPress block. Create a new page or post and click the + icon to locate the RafflePress widget.

Select the giveaway you want to embed into your WordPress site from the list. Now click on the Publish button in the top right corner.

And there you have it. You’ve now created your giveaway in just a few clicks, without knowing any code.

And there you have it! You can now create a contest entry form in WordPress in two ways. Choose the method that’s the easiest for you, and you’re good to go!
FAQs about Contest Entry Forms
Contests are a popular topic of interest among our readers. Here are answers to some common queries about them:
How to collect contest entries?
To collect contest entries, use a form builder like WPForms. Create a contest entry form with fields for participant details such as name, email, and other required information. Publish the form on your WordPress site and promote it to gather entries.
How do I create my own contest?
To create your contest, define the contest rules and prizes. Then, use a form builder like WPForms to create a contest entry form. Embed the form on your website and promote the contest through social media and email to encourage participation.
How do you make a giveaway entry?
To make a giveaway entry, use a tool like WPForms or RafflePress to create a simple entry form. Include fields for name, email, and any other necessary information. Share the form on your website and social media to attract participants.
What is the difference between a giveaway and a contest?
A giveaway usually involves a random drawing to pick a winner, while a contest requires participants to perform a task or meet certain criteria to win. In a contest, entries are often judged based on quality or creativity.
How do you pick a winner for a giveaway?
To pick a winner for a giveaway, collect all entries and use a random selection tool or software to choose a winner fairly. Ensure that the selection process is transparent to maintain trust among participants.
Next, Check Out Giveaway Plugins
WordPress contest plugins can help you run social media contests, video contests, and more. Check out our post about creating free giveaways and contests to find tons of options.
You may also want to explore our list of form builders with conditional logic to create a contest entry form that only accepts entries after certain criteria or rules are met.
Create Your Contest Entry Form Now
Ready to build your form? Get started today with the easiest WordPress form builder plugin. WPForms Pro includes lots of free templates and offers a 14-day money-back guarantee.
If this article helped you out, please follow us on Facebook and Twitter for more free WordPress tutorials and guides.

