Do you want to learn how to run a WordPress giveaway online? Hosting a contest is a fantastic and super fun way to explode your online growth.
In this step-by-step tutorial, we’ll show you exactly how to easily host a giveaway on your WordPress website.
In This Article
- What Are the Benefits of Hosting a Giveaway on Your WordPress Site?
- Is It Illegal to Host a Giveaway?
- 1. Select a Platform
- 2. Set Your Goals
- 3. Seek Collaborations and Partnerships
- 4. Create Your Giveaway
- 5. Choose a Prize
- 6. Add Actions & Entry Options to Your Giveaway
- 7. Customize the Design of Your Giveaway & Adjust Your Giveaway Settings
- 8. Save & Publish Your Giveaway to Your WordPress Site
- 9. Promote Your Giveaway
- 10. Pick & Announce Your Giveaway Winner
What Are the Benefits of Hosting a Giveaway on Your WordPress Site?
There are tons of great reasons to host a giveaway online. They’re used in many different types of marketing campaigns to grow small businesses online. If it’s executed properly, a giveaway can be an excellent way to:
- Promote a new product or service — You can drive excitement among your email subscribers and followers for something you’re selling, even before it’s released.
- Grow your email list — Growing your email list happens quickly with successful online sweepstakes, giveaways, and contests. People can increase their number of entries by subscribing to your newsletter and providing their email addresses.
- Get more website traffic — Successful blog giveaways are a natural way to drive traffic to your site, especially if you have a giveaways page on your site or success redirection where you redirect entrants to another page.
- Generate more leads and new customers — Grow revenue through lead generation and additional sales as more readers mean more conversions. A giveaway is a perfect way to increase brand awareness, especially if you offer prizes like coupons or gift cards for your products or services.
- Skyrocket your social media following — Gain brand recognition like those powerful influencers you see, and use the power of social proof when the number of your social media followers increases. Your audience can get extra entries through referrals and bring you new followers with the right hashtags.
- Increase engagement — Build trust with your target audience by keeping them active with your brand, even after your giveaway ends.
Now that you know all the powerful things you can do by running a successful giveaway on WordPress, let’s dive into exactly how to host a giveaway on your website with a giveaway plugin for WordPress.
Is It Illegal to Host a Giveaway?
Giveaways are not illegal, but to host a legal giveaway, you’ll have to follow certain laws. Also, if you’re running a social media contest as part of your giveaway, you’ll need to follow the rules of the platform you’re using.
If you’re not sure whether your WordPress giveaway is legal, we recommend getting professional legal advice.
Create Your WordPress Form Now
How to Host A Giveaway in WordPress
Check out how to easily host a giveaway on your WordPress site below.
1. Select a Platform
First, you’ll need to decide on the platform where you’ll host your giveaway.
Many giveaways are hosted on social media, but today we’ll focus on hosting on your WordPress website. That said, we’ll show you how to use your social media to share, promote, and announce your giveaway results in conjunction with your website, so that you’re covering the most ground possible.
In terms of your WordPress platform, RafflePress is the best giveaway plugin and one of the most useful giveaway tools available. RafflePress makes it easy to host a giveaway on your blog, eCommerce store, or small business website. There’s a free version as well as paid plans, so anyone can use it. Plus, it’s a great Gleam, Wishpond, or Rafflecopter alternative.
While the free version is great, you’ll definitely want to check out the perks of upgrading to RafflePress Pro, the premium version of the plugin. This version offers some fantastic features like pre-built giveaway templates, viral sharing (refer-a-friend), email marketing and CRM integrations, and more.
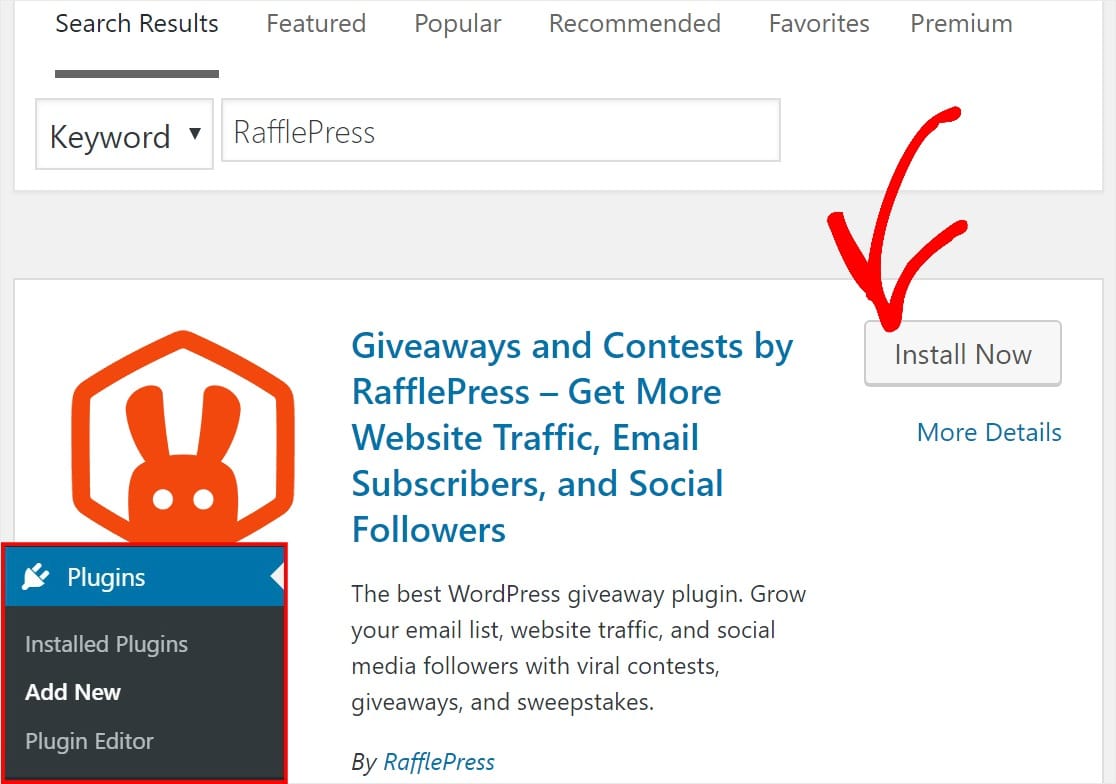
To install the plugin, go to your WordPress dashboard and click on Plugins » Add New.
Type RafflePress in the search bar and click Install Now.
Now that you’ve activated the plugin, you’re ready to think about the goals of your online giveaway.
2. Set Your Goals
When setting the goals of your WordPress giveaway, consider the specifics of what you’d like to accomplish.

Are you looking to increase your brand awareness? Your online giveaway is a great way to introduce your brand to a wider audience, and often results in more subscribers and social media followers.
Or, perhaps you’re hoping to increase engagement with your brand. Use your WordPress giveaway as a means to generate more comments on your website and shares of your posts.
Another goal you may consider with your giveaway is to generate more customer leads and sales. Creating, promoting, and announcing your WordPress giveaway can help you convert more site visitors into customers, and make more sales on your site.
If you’d like to focus on an even more specific goal with your WordPress giveaway, the pro version of RafflePress lets you choose from many highly effective pre-built giveaway templates to help you:
- Grow Your Email List
- Pre-launch a Campaign
- Grow Your Facebook Page
- Grow Your Instagram Following
- Grow Your Twitter Following
- Grow Your YouTube Channel
- Host a Refer-a-Friend Viral Giveaway
We’ll cover more about these RafflePress templates later on this post.
3. Seek Collaborations and Partnerships
Another aspect to consider with the goals of your WordPress giveaway is how to reach the largest audience possible when hosting and promoting your giveaway.
If your goal is to increase your brand awareness or engagement, for example, then you might reach out to a social media influencer who has a large following. Or, if you’re looking to generate leads and customer sales, consider collaborating with influencers who may have a smaller audience but high conversion rates.

Additionally, you could reach out to specific brands and businesses that are similar to yours and offer a partnership as a means for sponsorships and donations of prizes. Again, think about the goals of your WordPress giveaway, and consider what sort of influencers, brands, and partnerships can help you be successful.
Keep reading, because we’ll talk more about collaborations later, too.
4. Create Your Giveaway
Now that you have your goals in mind, it’s time to create your giveaway!
For this tutorial, we’ll continue using the RafflePress plugin to create and host our Wordpress giveaway.
First, navigate to the RafflePress plugin that you’ve installed and activated in your WordPress dashboard.
Scroll down the page and click on the orange Create Your First Giveaway button.

Next, name your new giveaway and select the pre-built giveaway template you’d like to use. For this tutorial, we’ll pick a classic giveaway.
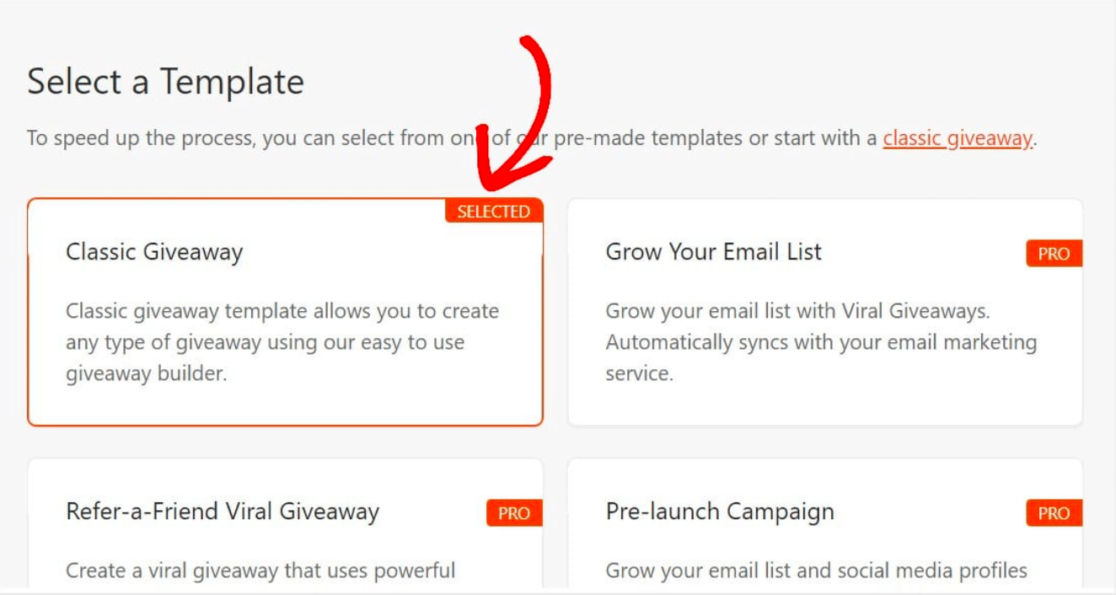
Browsing the templates should help you generate lots of giveaway ideas.
And remember, many of these templates are made specifically with your giveaway goals in mind. Any one of them would be a fantastic way to grow your audience, generate leads, or convert website visitors into customers.
5. Choose a Prize
Next, you need to choose a prize for your giveaway. Be sure to offer a prize that your audience will actually be interested in so that you have a good chance for higher participation.
So, what will you give away? A new product from your collection? A specific type of service?
We suggest choosing a prize that is closely aligned with your brand and that will give your participants a broader idea of what your website offers. Perhaps you’ll offer a limited-edition product from your site, or a prize provided by a brand you’re partnered with.
Back in Rafflepress, it’s time to add the details of your prize to the template you’ve selected.
First, click on the box with the pencil on the left-hand panel to provide a title, description, and image (Pro) for your prize.
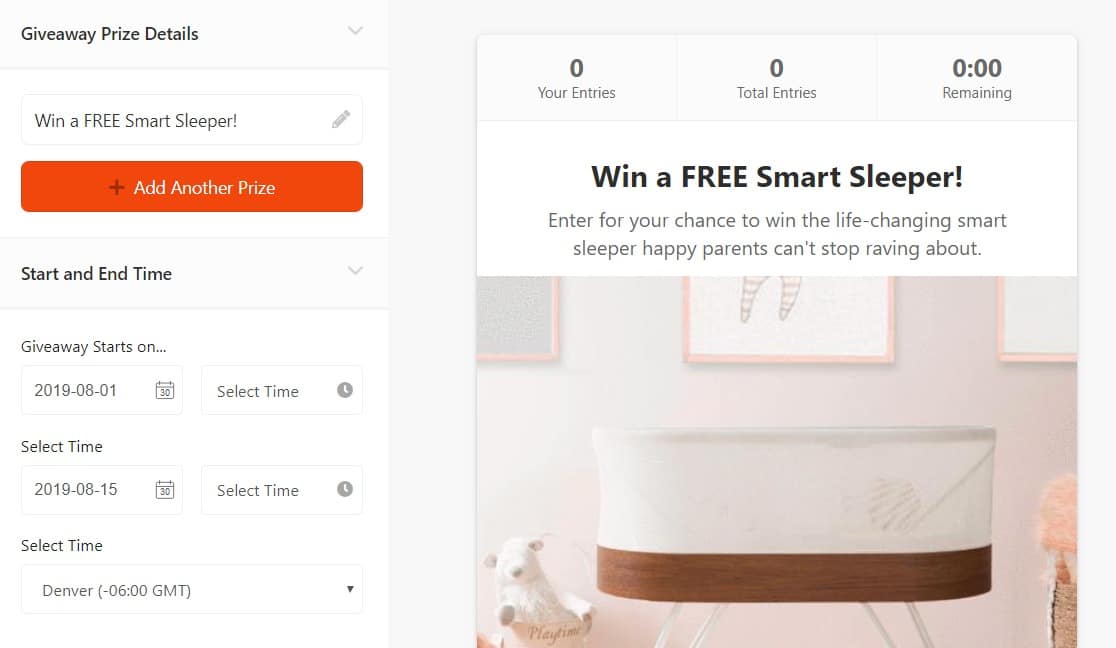
In this Giveaway Prize Details section you can also:
- Add additional prizes by clicking on the +Add Another Prize button
- Set the start and end dates of your contest
- Set your time zone.
Want to host a giveaway but can’t think of a prize? It’s easy to offer a digital gift card or a coupon instead of a physical prize.
6. Add Actions & Entry Options to Your Giveaway
Next, you’ll add more details to your giveaway. How are you going to get your audience involved? Oftentimes, online giveaways encourage participants to follow, subscribe, share, or engage with your brand.
One of the most useful things about RafflePress is that it has tons of actions and entry methods for you to add to your online contest. That way, you can completely customize your giveaway to fit your goals by setting your custom entry requirements.
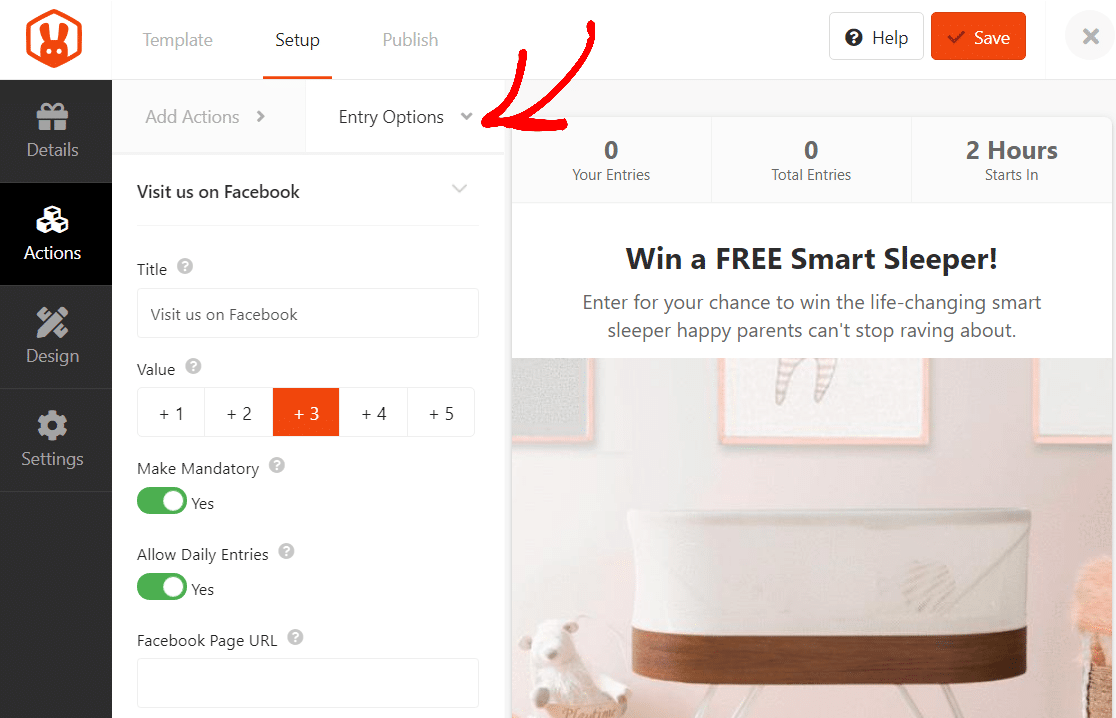
To add an action and edit its entry options, click on the Actions tab on the left-hand panel.
![]()
Some possible online growth goals and the suggested entry option actions are to:
- Get more email subscribers — Add the Join an Email Newsletter action.
- Get more social media followers — Add social media platforms Facebook, Twitter, Instagram, Pinterest, or YouTube action (An Instagram giveaway or Instagram contest is a great way to encourage others to tag a friend. This skyrockets your Instagram followers).
- Increase social engagement — Add a Refer-a-Friend (Viral Sharing) action or a Watch a Video action.
- Grow your website traffic — Add a Tweet a Message or Visit a Page action.
- Get user-generated content like from a video contest — Add an Invent Your Own action.
There are a lot of other actions to choose from when you host your giveaway, but those are some solid ideas to get you started.
And, each action has entry options that can be customized once you click on the plus (+) symbol on that action.
Here you can change:
- The title of the action
- The value of points a contestant will earn by completing that action
- Whether the action is mandatory or not
- Whether you’ll allow daily entries
- The page you want them to visit, like your Instagram account URL
- And more.
But don’t stop here, because we have even more customization options available with RafflePress.
7. Customize the Design of Your Giveaway & Adjust Your Giveaway Settings
To make your giveaway look even more slick, you can customize the design to match your brand’s colors.
To start, click on the Design tab on the left-hand side.
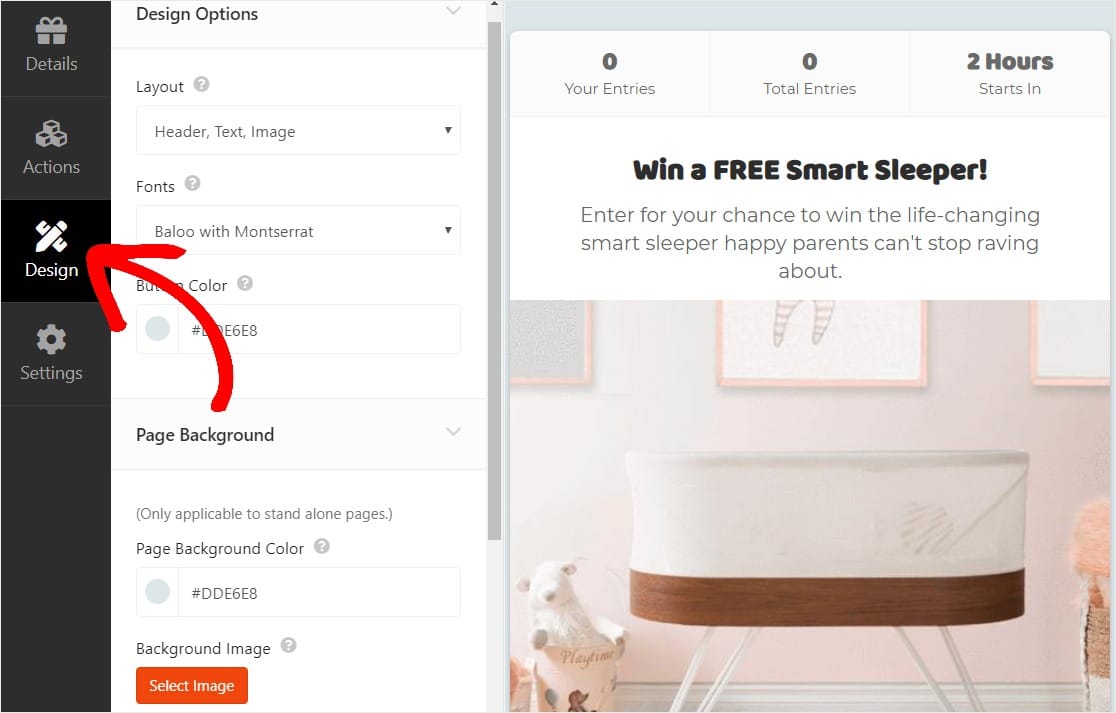
On this page, you can customize your giveaway’s:
- Layout
- Fonts
- Button Color
- Background (Color or Image)
- Custom CSS
Once you feel good about the style and look of your giveaway, you’re ready to adjust the settings. RafflePress gives you tons of options to customize your giveaway even more in the settings panel.
First, you should enter your contest rules. Do that before adjusting any other settings.
To get started, click on the Settings tab with the gear icon. Then, select Giveaway Rules and click on the orange + Generate Rules button.

Next, enter all the details of your WordPress giveaway on the page that pops up, and click on the Generate Rules button at the bottom of the generator.
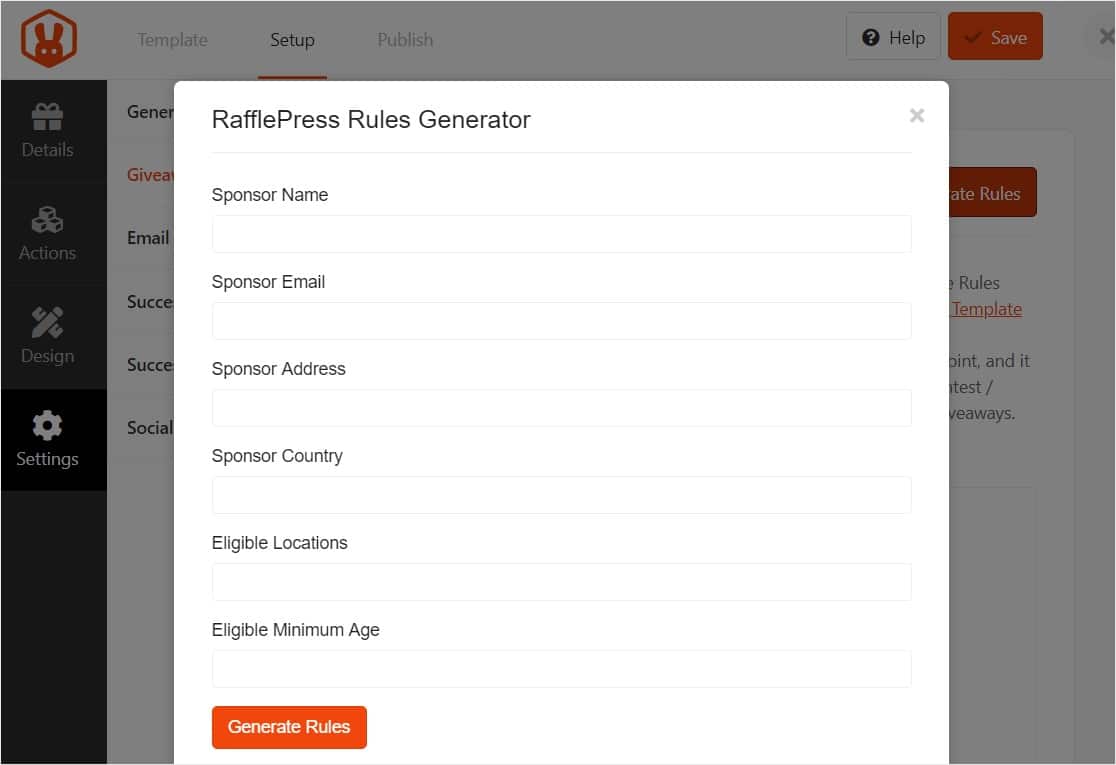
RafflePress will then use the information you entered and generate basic giveaway disclaimers, guidelines, or rules.
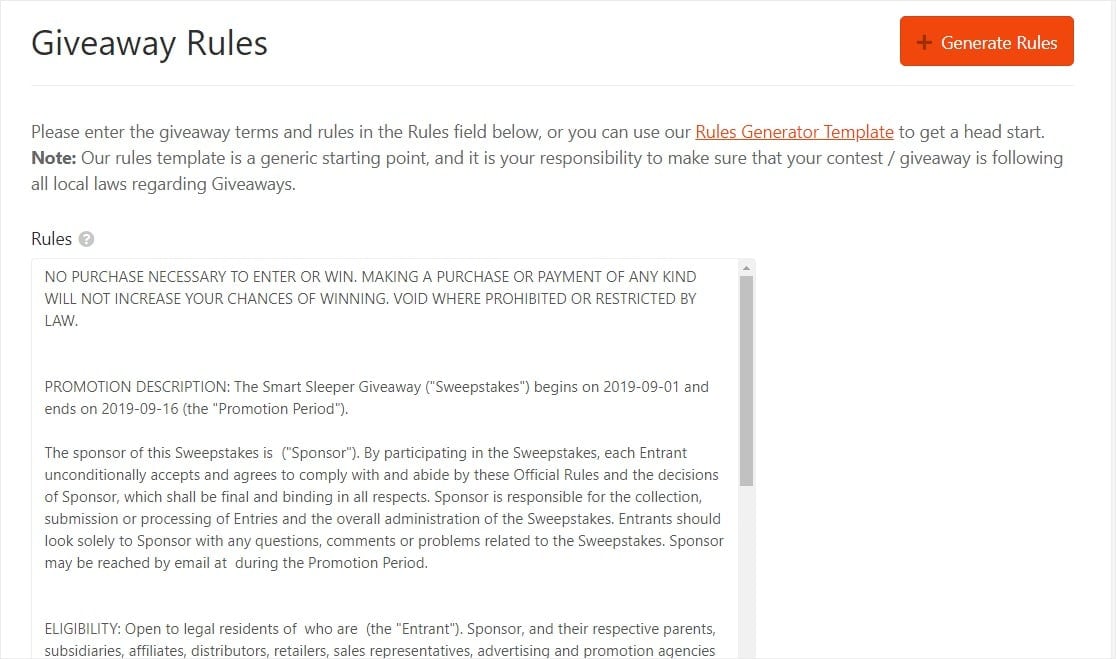
On this setting page, you can do many other things like:
- Enable email verification
- Success tracking
- Social logins
- Display your giveaway winners
- Success redirection
- and more…
From here, you’re almost done!
8. Save & Publish Your Giveaway to Your WordPress Site
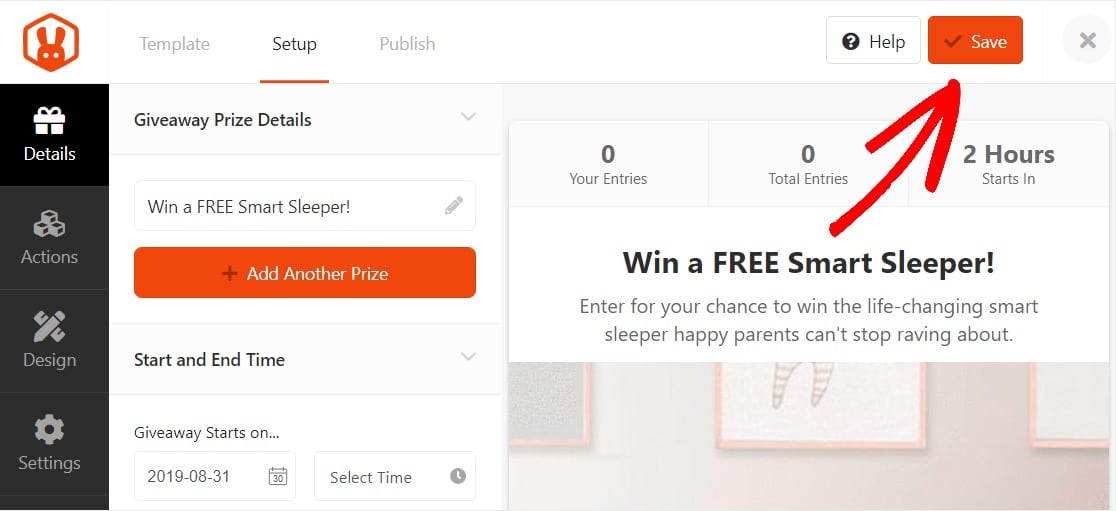
Once the details, actions, design, and settings of your giveaway are customized to your liking, be sure to click the Save button in the top right corner.
Then, the final step is to publish your giveaway on your website. To do this, RafflePress offers 3 options:
- RafflePress WordPress Block — Embed the giveaway in your post or page in the WordPress block editor
- WordPress Shortcode — Use the Classic WordPress editor and embed the giveaway using a shortcode
- Giveaway Landing Page — Build a standalone landing page for your giveaway
In this example, we’re using a WordPress block.
To use a WordPress block, create a new page or post and then click on the plus (+) icon to locate the RafflePress widget.
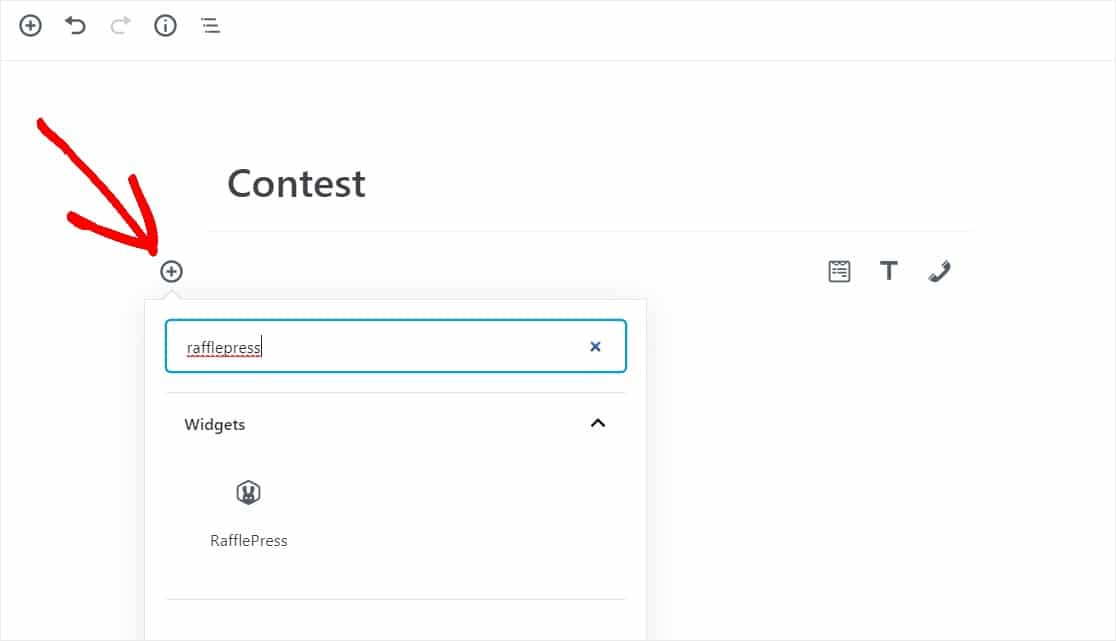
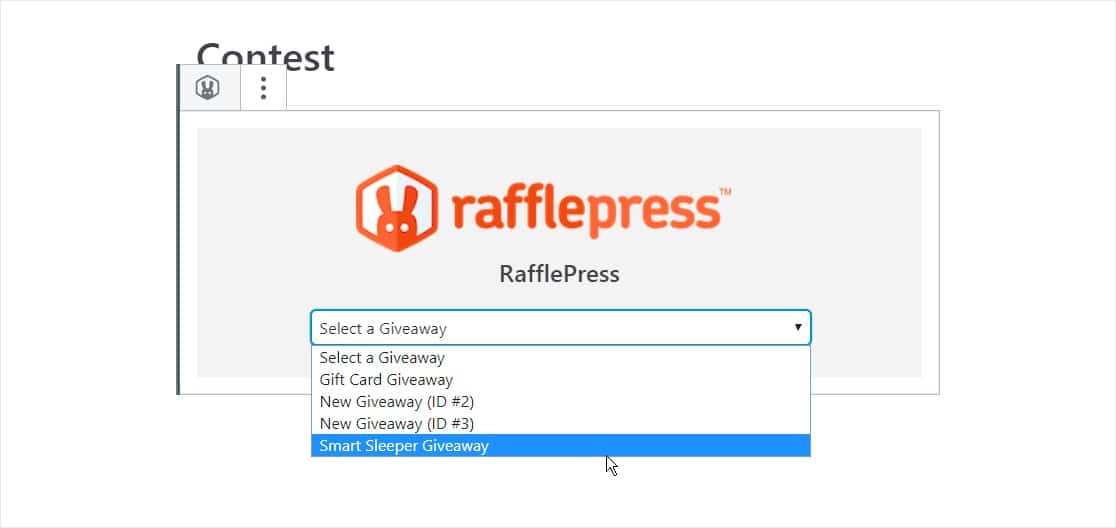
Select the giveaway you want to embed into your WordPress site from the list.
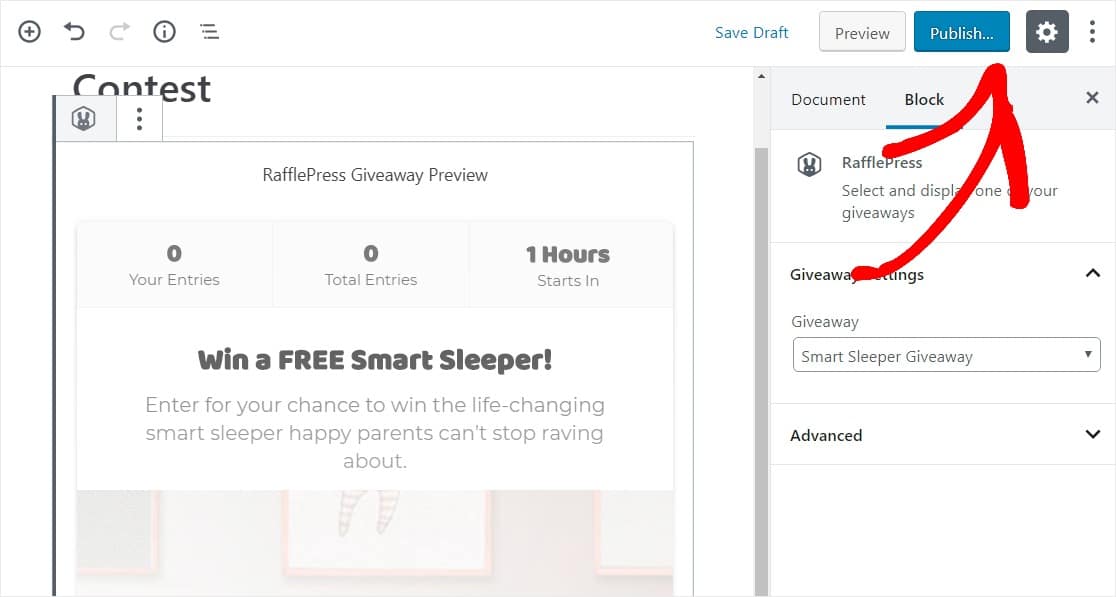
Now click on the Publish button in the top right corner to embed the giveaway onto your site.
You may also want to try a landing page for a distraction-free experience:

And there you have it. You’ve now created your WordPress giveaway in just a few clicks, without knowing any code — great job!
9. Promote Your Giveaway
Make sure to share your giveaway on all of your social networks, your email newsletter, and through other online communities, forms, friends, and influencers.

Why not create a hashtag for your giveaway to use all over your favorite social media sites? Don’t forget to invite the influencers and brands you’re collaborating with to use this hashtag, too. And while you’re at it, go ahead and create an Instagram post for your giveaway after putting the link in your bio.
You’ll also want to create a giveaway post on your WordPress blog to promote your new competition. Another great addition to your WordPress site would be a popup on your homepage to direct visitors to your giveaway.
There are lots of ways to share information about your giveaway, and you should invite your participants and website audience to share it, too.
10. Pick & Announce Your Giveaway Winner
Finally, it’s time to pick and announce your winner.

And RafflePress makes it incredibly easy for you to fairly choose the winner of your giveaway.
When your contest closes, a Pick Winner button appears. You can choose the number of prizes and get RafflePress to pick a random winner for each of them.
Now all you need to do is get in touch with your winner and send them the prize! You can send them an email or notification through your WordPress website to them know what steps to take in order to claim their prize.
Be sure to also make an announcement on your social media, too. After privately contacting your giveaway winner, boost your credibility by publicly announcing the results of your giveaway. That way, participants who didn’t win will know that the giveaway has ended and that you’ve followed through with your prize.
Then, you can move on to your next giveaway and focus on your future digital marketing giveaway campaigns.
Next, Host a Giveaway with a Contest Form
It’s really that simple! You now know exactly how to host a giveaway with a WordPress giveaway plugin to get more followers and traffic. Get started and create a giveaway for free with RafflePress today.
Did you know that you can also use WPForms to run giveaways? To find out how, check out this article on creating a WordPress contest form.
Also, an important part of any contest or giveaway is managing who can enter and how many entries you’ll accept. The WPForms Form Locker addon gives you the ability to restrict form submissions by age, login status, and more. Plus you can limit the number of entries and set a date to close your contest form.
If you’re looking for more ways to delight your customers in addition to giveaways, sales, discounts, and free shipping can be very effective. Check out our tutorial on how to add a coupon code to your form to learn how.
Create Your WordPress Form Now
Ready to build a contest form? Get started today with the easiest WordPress form builder plugin. WPForms Pro includes lots of free templates and offers a 14-day money-back guarantee.
If this article helped you out, please follow us on Facebook and Twitter for more free WordPress tutorials and guides.


Muchos Gracias for your blog post. Keep writing.