
AI Summary
Do you want to make a GetResponse WordPress form? If you make it easy for your visitors to subscribe, you’ll grow your list a lot faster.
The challenge is that GetResponse’s native signup forms are limited in customization and lack advanced features like conditional logic, multi-step forms, or GDPR compliance tools.
Most WordPress users struggle with the technical setup of connecting the two platforms. WPForms solves this by offering a drag-and-drop form builder with native GetResponse integration.
In this article, I’ll show you how to create a GetResponse subscribe form in WordPress so you can automatically sync subscribers and build your email list.
Build Your GetResponse Form Now! 🙂
How Do I Integrate GetResponse With WordPress?
You can easily integrate GetResponse with WordPress using the WPForms plugin. WPForms is the best form builder for WordPress.
It lets you build any kind of form for your website without writing any code. WPForms also has a GetResponse addon that makes it super easy to build your form. Using WPForms, you can:
- Easily drag and drop fields onto your form
- Use conditional logic to make smart forms
- Add a GDPR agreement to your forms
- Make multi-step forms
- Add payment fields and file upload fields.

All of the forms you make with WPForms are mobile responsive, which means they’ll adapt to the size of the screen they’re viewed on.
Having a mobile responsive form is super important when you want to capture as many leads as possible. One of the top complaints we see about forms is that they’re difficult to use, and you definitely don’t want to lose leads because your forms can’t be viewed easily.
So if you want the easiest and most flexible GetResponse WordPress forms, you need WPForms. Keep reading to see how easy it is to integrate GetResponse with your WordPress site.
How to Create a GetResponse Subscribe Form in WordPress
If you haven’t signed up for GetResponse, it’s a good idea to do that before you start working through this tutorial.
Let’s start by setting up the WordPress GetResponse integration.
Step 1: Install the WPForms Plugin
The first thing you’ll need to do is install and activate the WPForms plugin. To use the GetResponse addon, you’ll need the Pro license or higher.
If you need help installing the plugin on your site, see this step-by-step guide on how to install a plugin in WordPress. Next, go to WPForms » Addons

Scroll down until you see the GetResponse addon. Click on the button to install it. WPForms will download and activate the addon automatically.

Once you see Active status, the GetResponse integration is ready to use. Now we’re set up, let’s go ahead and make your GetResponse WordPress form.
Step 2: Create Your GetResponse WordPress Form
To make it easy to set up the email marketing form, we’re going to use a template. WPForms comes with 2,100+ WordPress form templates. Start by clicking WPForms » Add New.

The WPForms builder will open up on the setup screen. At the top, give your form a descriptive name like “GetResponse Newsletter Signup” or “Email List Registration.”

Next, scroll down and click on the Newsletter Signup Form template. The form already has a name and email field, so you can go ahead and use it without changing anything if you’re happy with it.
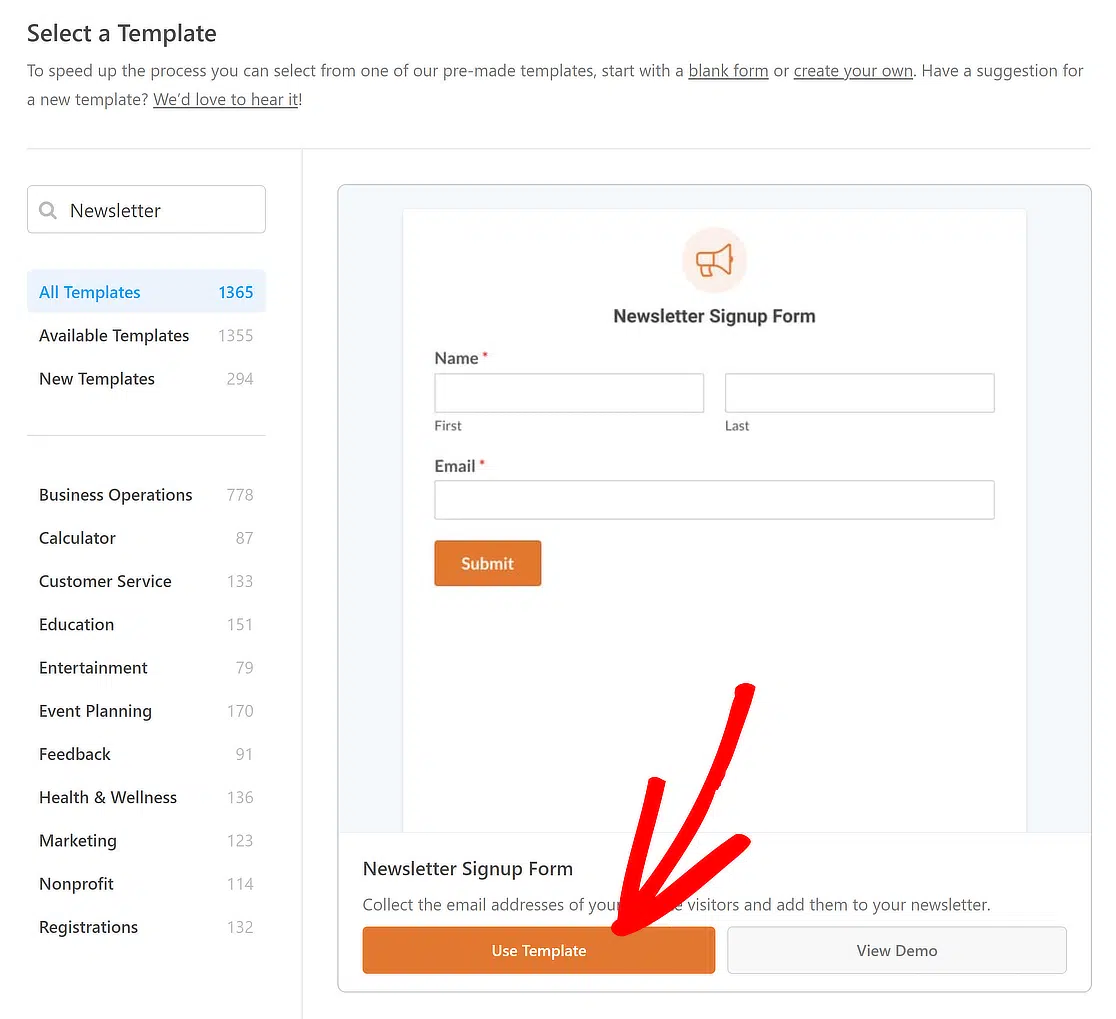
If you do want to edit the template, you can add additional fields by dragging them from the left-hand panel to the right-hand panel. Then, click on the field to make any changes.

WPForms lets you map fields to your custom fields in GetResponse, so you could also capture data like:
- Birthday
- City
- Company
- Gender
- Postal code
- And more.
Keep in mind that you’ll get more conversions if your form has 3 or fewer fields. Check out this list of email marketing statistics for more details. Before we move on, let’s talk about making your form GDPR compliant.
Adding a GDPR Field
If you have visitors from the European Union or the UK, you’ll definitely want to add a GDPR agreement. WPForms is one of the best GDPR plugins for WordPress because it makes it easy to control the way personal data is stored.
Before you add a GDPR field to your form, you’ll want to turn on GDPR settings in WPForms. You’ll be able to:
- Disable user cookies
- Disable user details, which includes IP addresses and User Agent data
- Turn off entry storage.

If you haven’t already turned on GDPR enhancements, check out our full guide to adding a GDPR agreement to your forms and follow the easy steps.
Then all you need to do is drag the GDPR agreement field onto your form. You can click on the field if you want to change the words in the agreement.

When you’re happy with your form, click Save at the top of the form builder. Now, we’ll take a look at how to configure the GetResponse settings so you can connect your signup form to your newsletter service.
Step 3: Connect Your Form to GetResponse
Next, we’re going to set up the connection to GetResponse. WPForms makes this easy.
You’ll just need to paste in a couple of keys from your GetResponse account to set up the integration.
Look to the left-hand side of the form builder and click Marketing.

Now click GetResponse to open up the connection settings.

Next, click Add New Account. A box will pop up asking you to name the connection. Before you do that, click the link in the popup to open up GetResponse.

The GetResponse site open in a new tab, so you don’t need to worry about losing the progress on your form.

Keep the WPForms tab open and switch over to the GetResponse tab. Log in to your GetResponse account if you’re asked to.
If you’ve created any API keys already, you’ll see them listed now. We’re going to create a new one for the connection with WPForms, so let’s click the blue Generate API key button.

Type in a name for the new API key and click Generate.

And now copy the new key.

Now switch back to the WPForms tab we were working on earlier.
Paste in the key and type in any name for your connection. The name you type here doesn’t have to match the name you typed in GetResponse. When both fields have been filled in, click Add.

Now WPForms will ask you to give the connection a nickname. This nickname will be used to identify the connection in the form builder.

We’re all set. In the next section, we’re going to walk through the rest of the options to configure the connection.
If you want to tag your contacts, go back to GetResponse now and set up your tags so they’re ready to use in the next step. Click Save to save your form before we move on.
Step 4: Configure Your GetResponse Connection
Now you’ve made the connection to GetResponse, WPForms will ask you to fill in some more settings. There’s quite a bit to look at, so we’ll split this into a few steps.
First, you’ll want to select your GetResponse account. This is where all your subscriber information will go when site visitors subscribe. To do this, just choose the list from the dropdown menu labeled Select Account.

Now use the second dropdown to select Action to Perform. You have 2 choices here:
- Create or Update subscriber
- Unsubscribe the visitor from the list.

You’ll see another set of options dropdown underneath. We chose to subscribe a new contact, so let’s look at the options you’ll see for that:
- Select List – Choose the GetResponse list you want to add your subscriber to.
- Subscriber Email – Use the dropdown to select the email field on your form.
- Subscriber Name – Choose the Name field from the dropdown.
- Tags to Add – If you have any tags set up in your GetResponse account, use this dropdown to select them.
- New Tags to Add – If you want to tag the contacts from your WordPress form, type in your new tags here separated by a comma.
- Day of Cycle – This field lets you add your contact to an autoresponder sequence, which is similar to a drip campaign. To learn more about drip email sequences, read our beginner’s guide to email automation.
- Custom Field Name – Use this if you want to map any more fields from your WordPress form to GetResponse.
Click Save. Now let’s take a look at what’ll happen once the form’s been submitted.
Step 5: Configure Your GetResponse Form Confirmation
Form confirmations are messages that are displayed to site visitors once they subscribe to your email list.
They let people know that their form has been processed and offer you the chance to let them know what the next steps are.
To edit the confirmation message for your GetResponse form, click Confirmations.

WPForms has three confirmation types to choose from:
- Message. This is the default confirmation type in WPForms. When a site visitor subscribes, a simple message confirmation will appear letting them know their form was processed.
- Show Page. This confirmation type will take site visitors to a specific web page on your site thanking them for subscribing. For help doing this, check out our tutorial on redirecting customers to a thank you page.
- Go to URL (Redirect). This option is used when you want to send site visitors to a different website.
Go ahead and use the dropdown to change the confirmation type.

All set? Click Save when you’re done. Now you’re ready to add your GetResponse form to your website.
Step 6: Publish Your WordPress GetResponse Form
Now let’s publish your GetResponse form in WordPress. WPForms allows you to add your forms to many locations on your website, including:
- Blog posts
- Pages
- Sidebar widgets
- The footer area of your template.
Let’s take a look at the most common option: adding your GetResponse form to a WordPress page. To start, click Embed at the top of the form builder.

And then click Create New Page.

And finally, name your new page and click Let’s Go.

WPForms will create a new signup page and embed your GetResponse form. All you have to do is hit Publish.

And that’s it! Now you’ve integrated GetResponse and WordPress using WPForms. Your brand new newsletter signup form is ready to use.

FAQs on How to Create a GetReponse WordPress Form
Creating a GetResponse form in WordPress is a popular topic of interest among our readers. Here are answers to some common queries about it:
How do I integrate GetResponse with WordPress?
Install the WPForms plugin (Pro license or higher), activate the GetResponse addon from WPForms » Addons, then create a form and connect it using your GetResponse API key.
The API key is found in your GetResponse account under Settings » API & OAuth. Copy the key, paste it into WPForms under Marketing » GetResponse, and your integration is complete.
Can I use GetResponse forms directly in WordPress without WPForms?
Yes, GetResponse provides embeddable HTML forms you can paste into WordPress pages. However, these forms lack customization options, aren’t mobile-responsive by default, don’t include GDPR compliance features, and require manually copying HTML code for each form.
WPForms creates native WordPress forms that match your site’s design, load faster, offer drag-and-drop editing, and include advanced features like conditional logic and multi-step functionality that GetResponse’s native forms don’t support.
Is GetResponse GDPR compliant for WordPress forms?
GetResponse is GDPR compliant on their end, but you must add a consent checkbox to your signup forms to legally collect emails from EU/UK visitors.
WPForms includes a dedicated GDPR Agreement field that requires explicit consent before form submission. Enable GDPR settings in WPForms » Settings » GDPR to disable IP tracking and user cookies.
Simply having GetResponse as your email provider isn’t enough. The consent must be captured at the point of collection (your form).
How do I create a popup form for GetResponse in WordPress?
WPForms doesn’t include popup functionality, but you can use it with popup plugins like OptinMonster or Popup Maker. Create your GetResponse form in WPForms, copy the form shortcode, then paste it into your popup plugin’s content area.
The form will still sync to GetResponse automatically. Alternatively, GetResponse offers its own popup builder in their platform under Forms » Create Form » Popup, though this has the same limitations as their embedded forms.
Can I add custom fields to my GetResponse WordPress form?
Yes. First, create custom fields in your GetResponse account under Contacts » Custom Fields. Then add matching fields to your WPForms signup form (like Phone, Company, or Birthday).
In the WPForms GetResponse settings under Marketing » GetResponse, scroll to “Custom Field Name” and map your form fields to the corresponding GetResponse custom fields.
How do I unsubscribe people using a WordPress form?
Create a form in WPForms with just an Email field. In Marketing » GetResponse settings, select “Unsubscribe” from the “Action to Perform” dropdown instead of “Create or Update subscriber.”
When someone submits this form, WPForms removes them from your selected GetResponse list automatically. This is useful for preference centers or unsubscribe pages.
How do I add tags to GetResponse subscribers from WordPress?
In your WPForms GetResponse settings under Marketing » GetResponse, you’ll see two tag options. “Tags to Add” lets you select existing tags from your GetResponse account via dropdown.
“New Tags to Add” lets you create new tags by typing them separated by commas (example: “Blog Signup, 2026 Subscribers”).
Anyone who submits that specific form receives those tags automatically in GetResponse, making it easy to segment subscribers by signup source.
Next, Measure Your Email Marketing Campaigns
Now you’re getting more subscribers in GetResponse, you’ll want to measure the success of your list. Check out the top email marketing metrics that matter most.
You can also set up extra alerts. Check out this guide to sending an SMS notification when you get a new form entry.
Ready to build your form? Get started today with the easiest WordPress form builder plugin. WPForms Pro includes lots of free templates and offers a 14-day money-back guarantee.
If this article helped you out, please follow us on Facebook and Twitter for more free WordPress tutorials and guides.

