AI Summary
Managing online payments is crucial for any business, and adding coupon fields to your Stripe forms can make a big difference in offering discounts and boosting sales.
But you might wonder if it’s complicated or time-consuming to set up. I’ve been there too, unsure if it’s worth the effort. After working through the process, I found it’s actually straightforward with the right tools.
In this guide, I’ll show you exactly how to add coupon fields to your Stripe forms using WPForms. It’s simpler than you might think, and by the end, you’ll have a powerful tool to offer discounts directly on your forms.
Create Your Coupon Form Now! 🙂
How to Add Coupon Fields to Your Stripe Forms Easily
To add coupon fields to your Stripe forms, you can rely on the functionality of WPForms. Follow the steps below to get started:
- Step 1: Install and Activate the WPForms Plugin
- Step 2: Create Your Stripe Payment Form
- Step 3: Install and Activate the Coupons Addon
- Step 4: Create a New Coupon for Your Stripe Form
- Step 5: Add the Coupon Field to Your Form
- Step 6: Publish and Promote New Coupon Form
- Bonus Tip: Track Form Entries and Coupon Usage
Step 1: Install and Activate the WPForms Plugin
WPForms is a powerful form builder plugin that allows you to create payment forms with coupons easily to increase the potential of your online company.
To get started, you’ll need access to the WPForms Pro License. This will give you access to the Coupons Addon, which is essential for adding coupon fields to your Stripe forms.

Once you’ve opted to purchase a WPForms Pro license to create your coupon form, you’ll need to install and activate the plugin on your WordPress website.
Step 2: Create Your Stripe Payment Form
With WPForms installed, the next step is to create your Stripe form. From your dashboard, go to WPForms and click the Add New button.
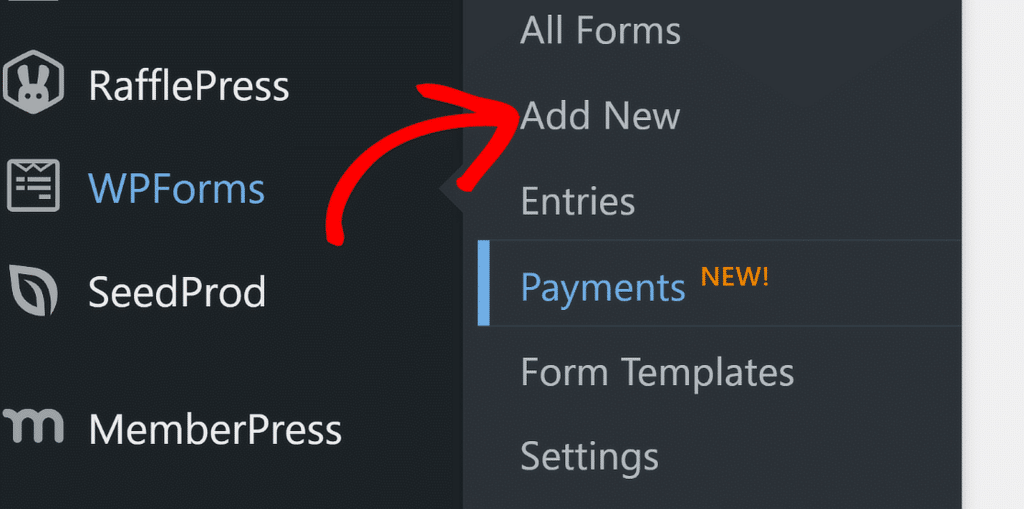
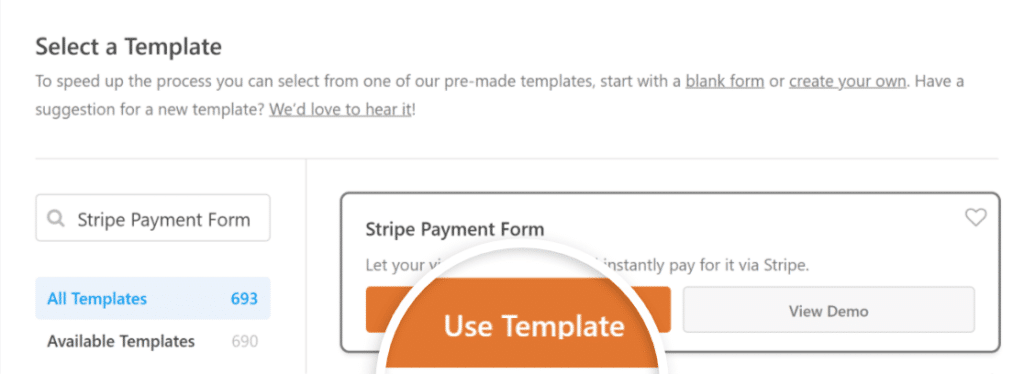
After that, give your form a name and locate the Stripe Payment Form template by using the search bar. When you find it, just click on the Use Template button to proceed.
If it’s your first time setting up a payment form in WPForms, you’ll see a message asking you to enable Stripe payments.
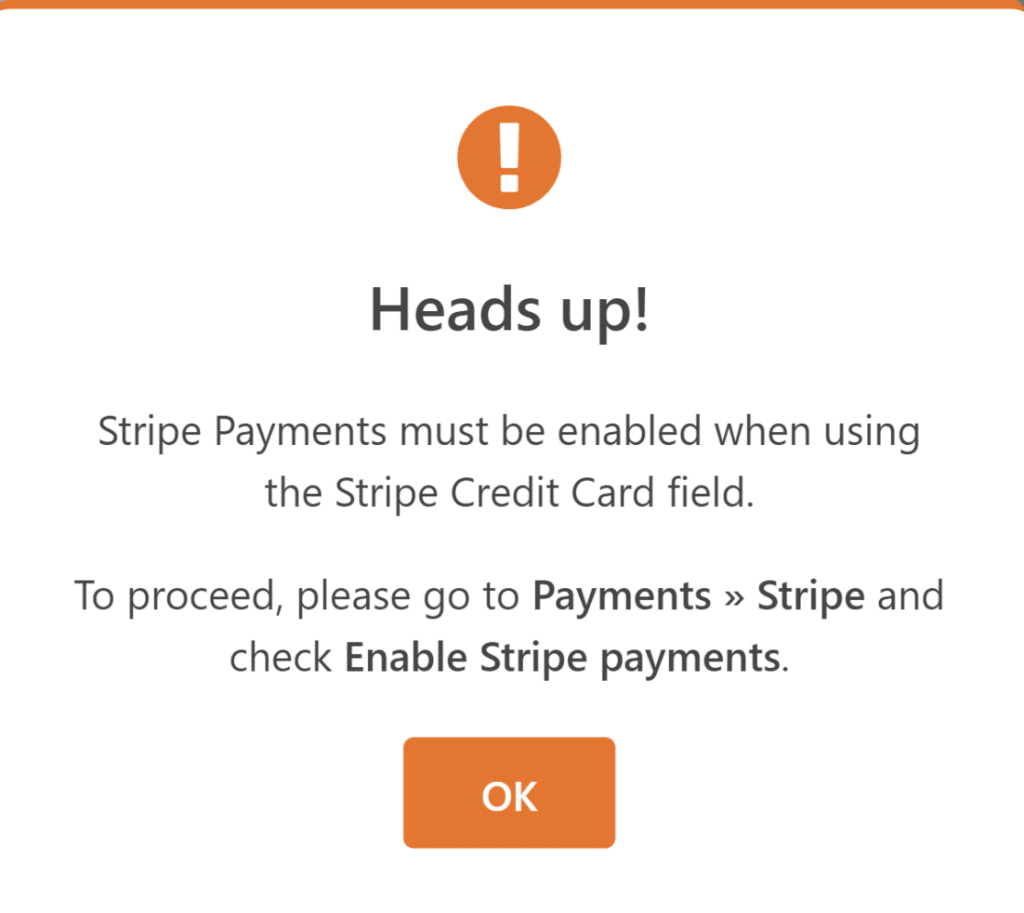
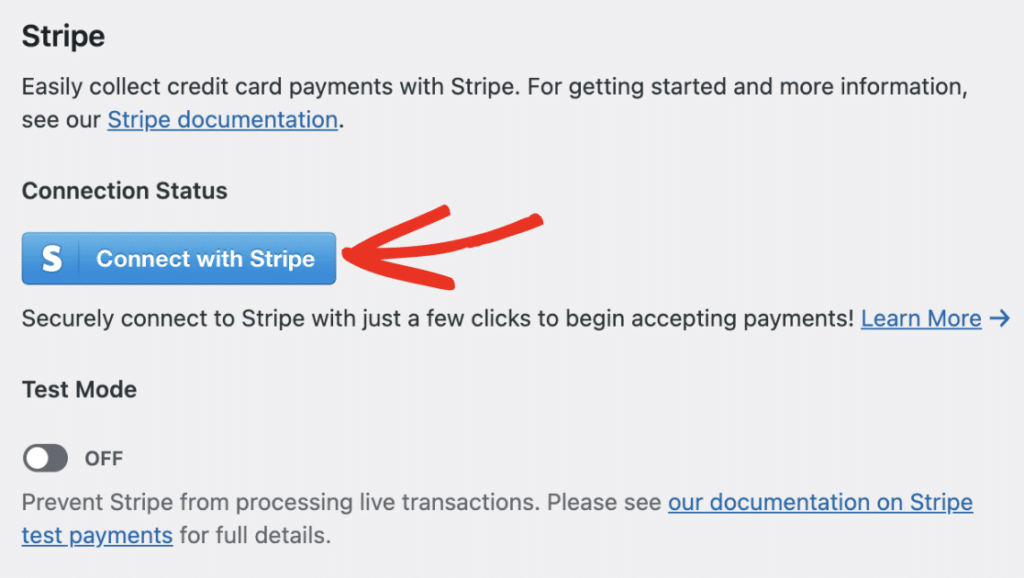
Go ahead and follow the instructions to connect WPForms with Stripe and set up your payment preferences.
After you’ve completed the integration, the form template will load, allowing you to make adjustments. You can add, remove, or edit fields based on what you need.
For now, the default fields should cover the basics, so you can leave them as they are. In the next step, we’ll move on to setting up the Coupons Addon.
Step 3: Install and Activate the Coupons Addon
To get the Coupons Addon up and running, start by heading to your WordPress dashboard. From there, go to the WPForms section and click on Addons.
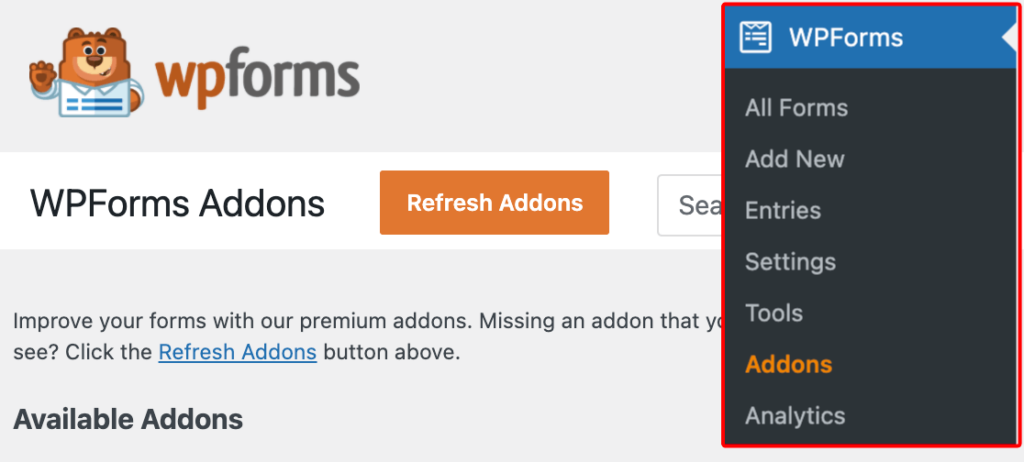
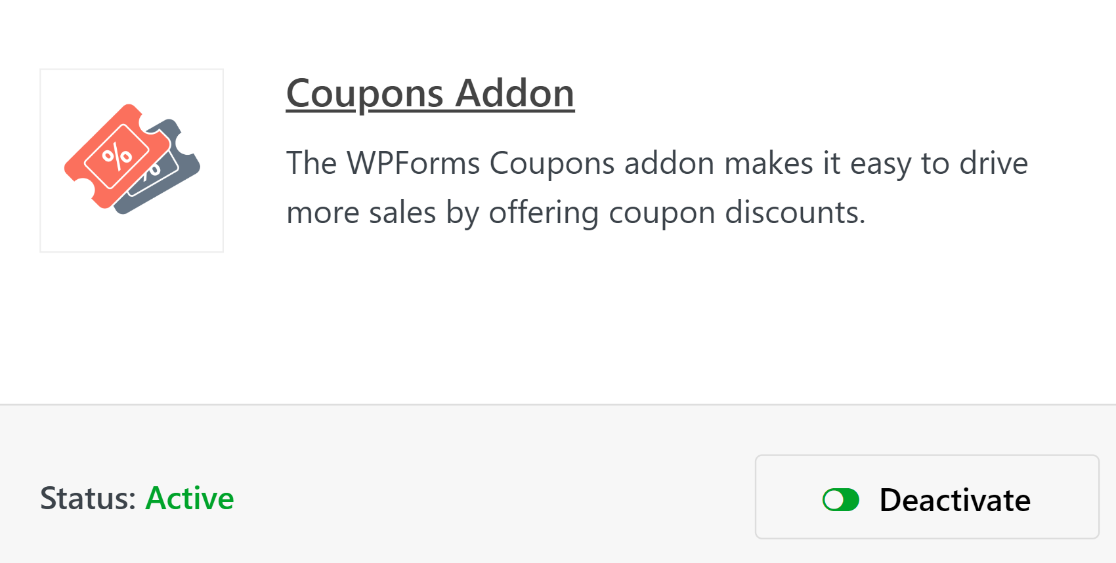
In the search bar, type in “Coupons addon” to find it. Once you see it listed, just hit the Install Addon button, and then click Activate to turn it on.
While we’re covering plugins, you might wonder if the Stripe Pro Addon is required for this tutorial. Well, that depends.
Since WPForms introduced Stripe for all customers, the Stripe credit card field has been included in the form builder with every licensing level offered.
So, if you plan on simply adding the Coupon field to order forms you already have on your site, you might be using Stripe now. That said, there are some conditions that would still warrant the need for the Stripe addon.
However, it’s not necessarily required for all of the order forms where you’d want to use the Coupons field. But remember, you need the Pro license for the Coupons field anyway.
Step 4: Create a New Coupon for Your Stripe Form
After activating the Coupons addon, you can create your coupons! Configure your coupons by going to WPForms » Payments and selecting the Coupons tab.
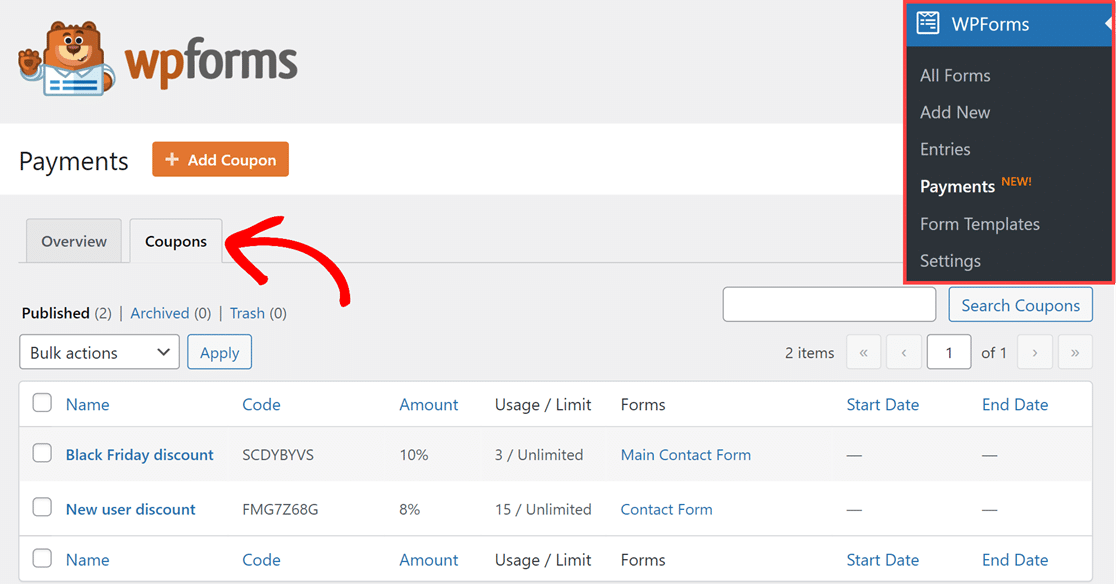
Then, simply click on the + Add Coupon button above the Coupons tab to get started. You’ll be taken to the Add New Coupon page where you can customize all kinds of fields for your coupon.
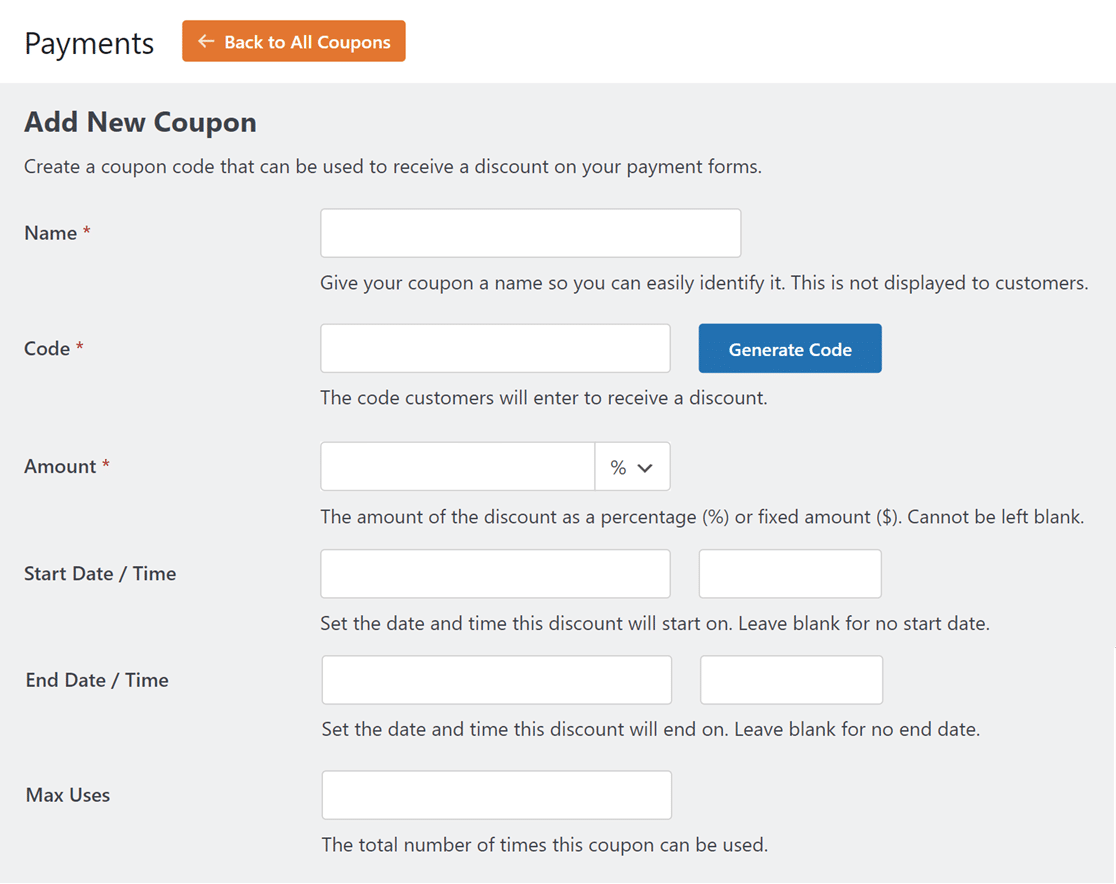
Here’s a breakdown of these customizable fields:
- Name: First, you give your coupon a title for easy identification. But don’t worry, this name won’t be visible to customers.
- Code: Next you’ll set the coupon code for customers to use for the discounts you offer. You can create your own code or click the Generate Code button to get a random coupon code.
- Amount: With this field, you’ll choose the amount type of discount your coupon offers. This discount could be a percentage or a fixed amount. Use the dropdown next to the field to select the one you’d like to use.
- Start Date / Time: Use this field to determine when the coupon starts being active. You can leave this blank if you’d like.
- End Date / Time: Choose when the coupon will no longer be valid. You can also leave this field blank if you don’t want to set an end date.
- Max Uses: Set the maximum number of times the coupon can be used before it’s invalid, or leave it blank.
Keep in mind that you can’t change the Code or Amount after saving the coupon, so be sure to double-check these fields. Now, you can repeat this step to create however many coupons you’d like.
Why would you want varying coupon codes? For different seasons, events, and promotions! You might be running a Valentine’s Day sale, for example, and want a coupon that is valid for one day only.
Or, you might want a coupon that runs through a New Year flash sale. You can create both of these coupons to be used on your site alongside each other and additional coupons.
Step 5: Add the Coupon Field to Your Form
Now that your coupon is ready, you’ll select the form or forms that you want it to work with. There are a couple of ways to go about this step.
If you already have the form created that you plan to use the coupon with, then you can select this form on the Add New Coupon page from the step above.
You just need to scroll down to the Allowed Forms section and toggle the form or forms where you want to use the coupon. If you want to use the coupon on all your forms, simply toggle Form.
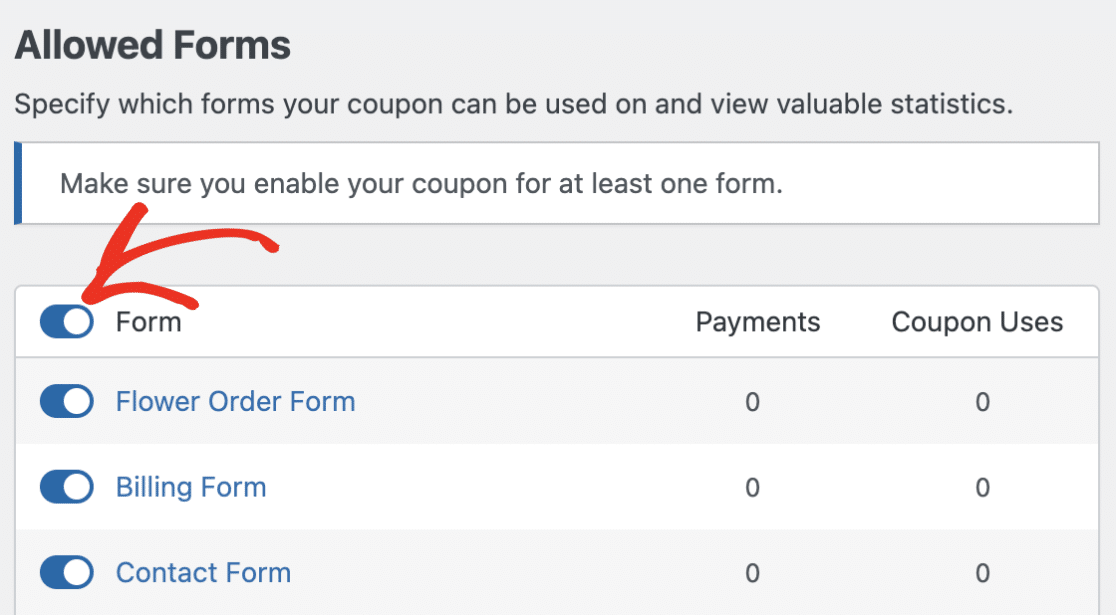
Another way to add your coupon to your desired form is through the form builder, by opening the form first.
So, you could open up the form builder in a blank form, a form you already made yourself, or a form you selected from our gallery of templates.

We should add here, too, that we have lots of order form templates in our gallery that already have the Coupon field, Stripe Credit Card field, and other necessary fields in place, ready to be customized by you.
Once you’ve decided on the form where you plan to use these fields, open the form builder and navigate to the Payment Fields section.
Now, you’ll add the Coupon field to your form by dragging it over and dropping it where you want it. We suggest placing it somewhere above the user’s credit card information.
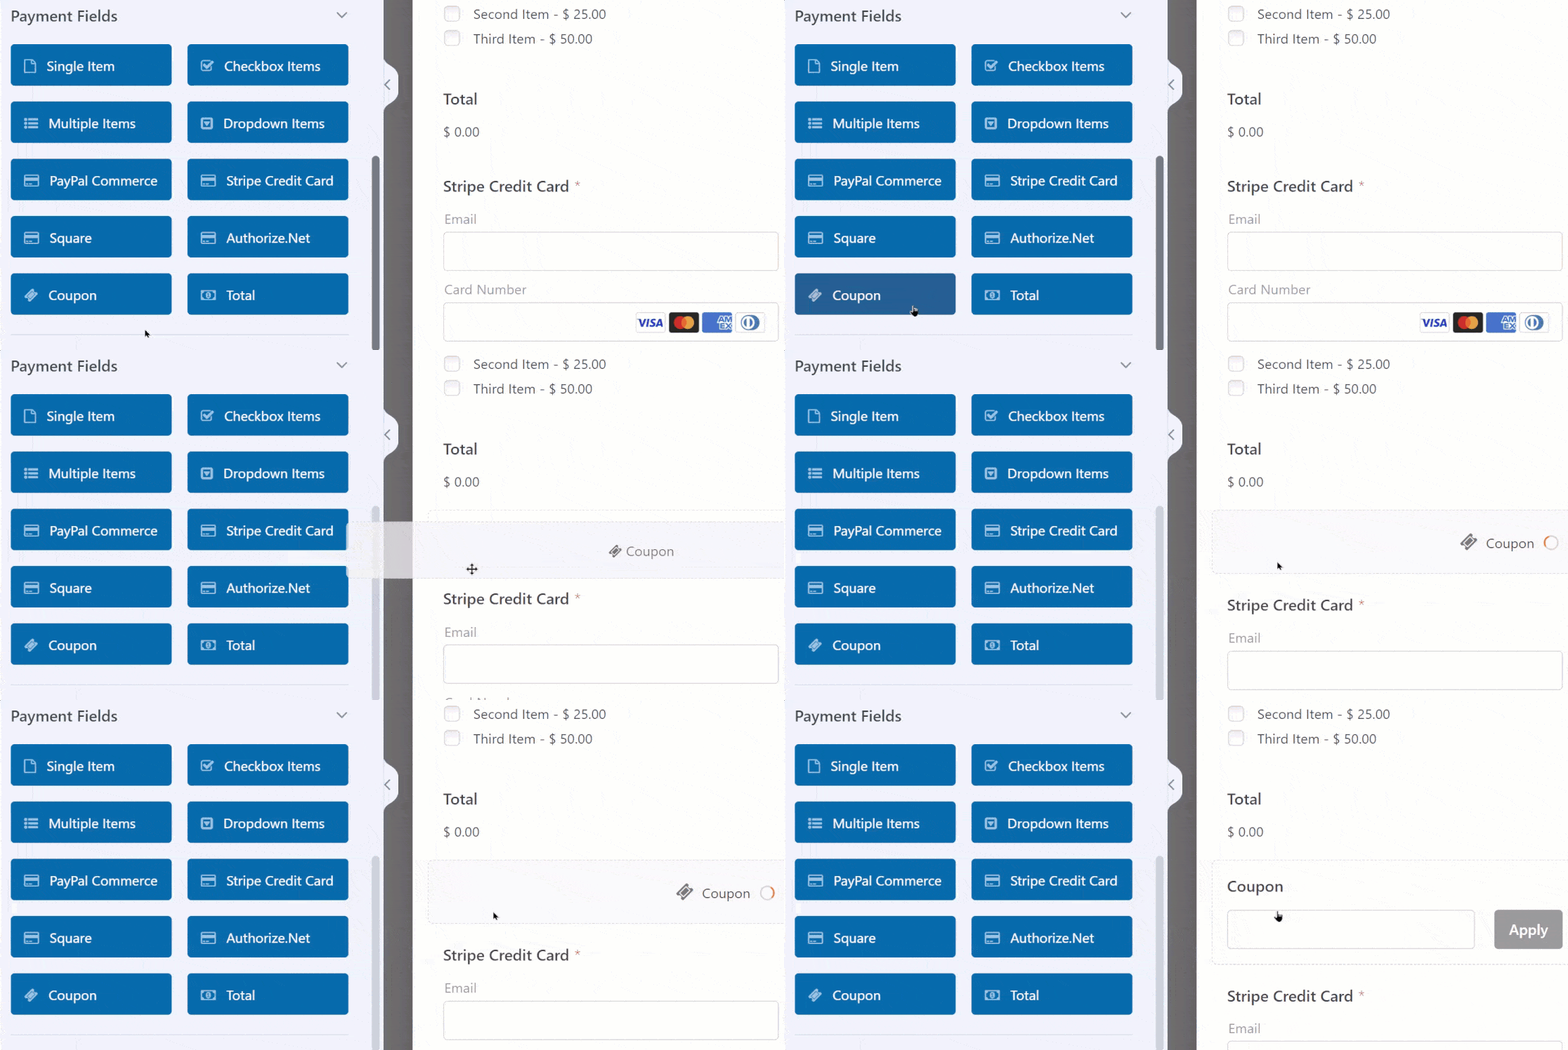
Then, click on the Coupon field to open up its Field Options. Here, you can customize the wording if you’d like, to let your customer know they can enter their coupon code.
Most importantly, you’ll choose the coupon you created earlier from the Allowed Coupons dropdown.
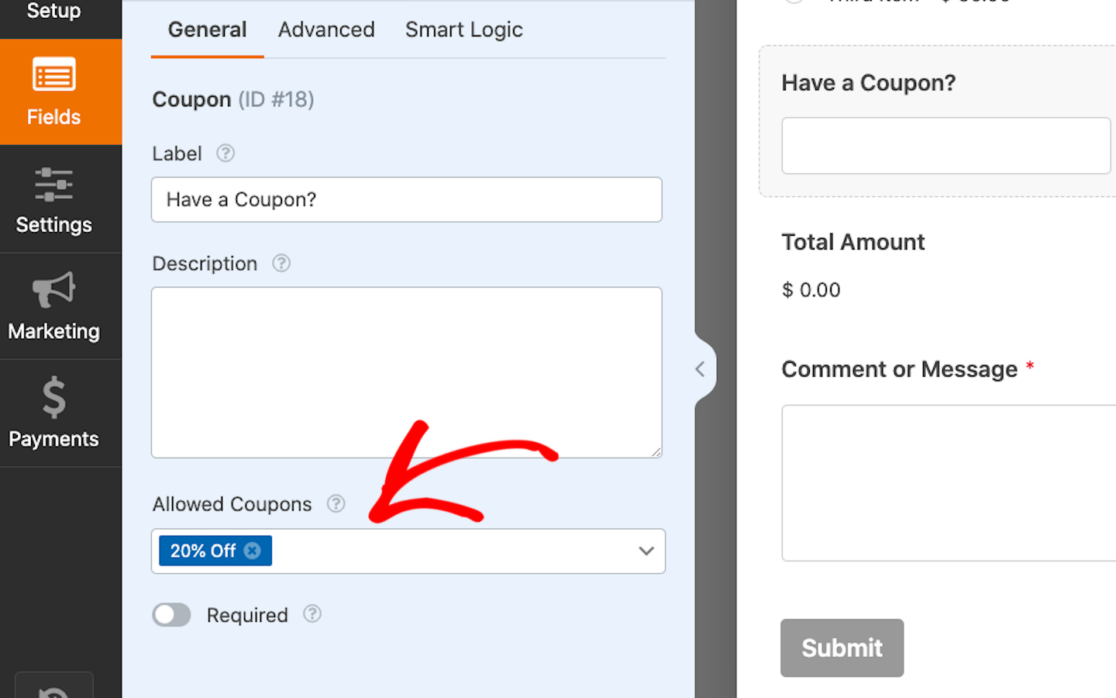
You can even select multiple coupons to be allowed on a single form! You should know, though, that users can only apply one of the allowed coupons for a discount when filling out your form.
Then, for even more customization, click on the Advanced tab of the Coupon field. Here, you can change the text of the Apply button to read whatever you want!
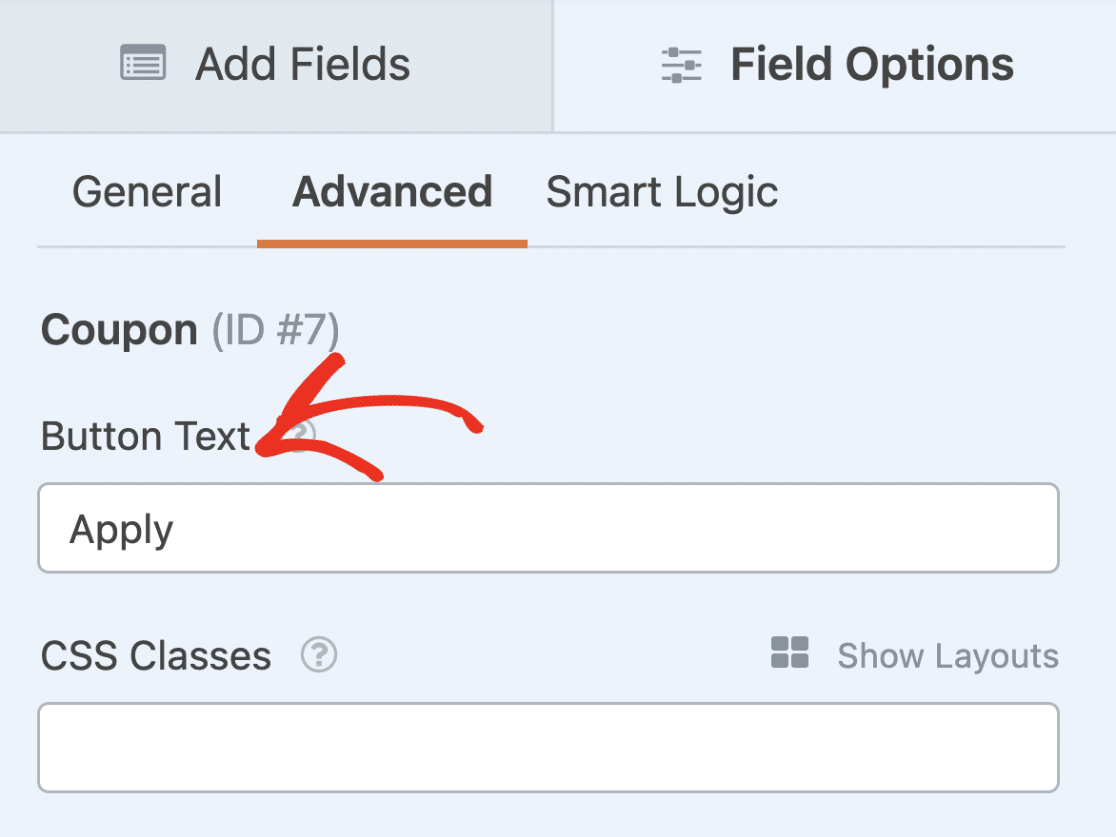
As always, be sure to save your form when you’ve finished customizing it.
Step 6: Publish and Promote New Coupon Form
All that’s left for you to do is publish and promote your new coupon forms! And with WPForms, it’s incredibly easy to do.
You can place your new forms in multiple locations throughout your WordPress site, such as your posts, pages, and sidebar widgets.
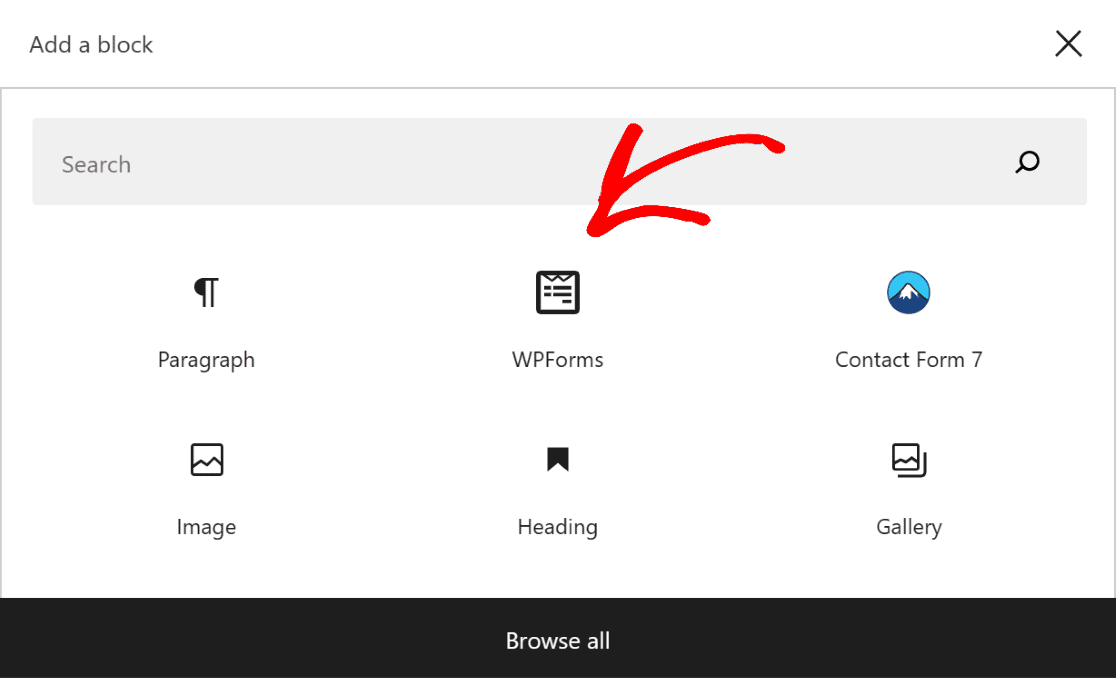
To add your form, create a new post or page in WordPress, or update the settings on an existing one. Then, click the black plus (+) button to add a new block. From the pop-up selections, choose WPForms.
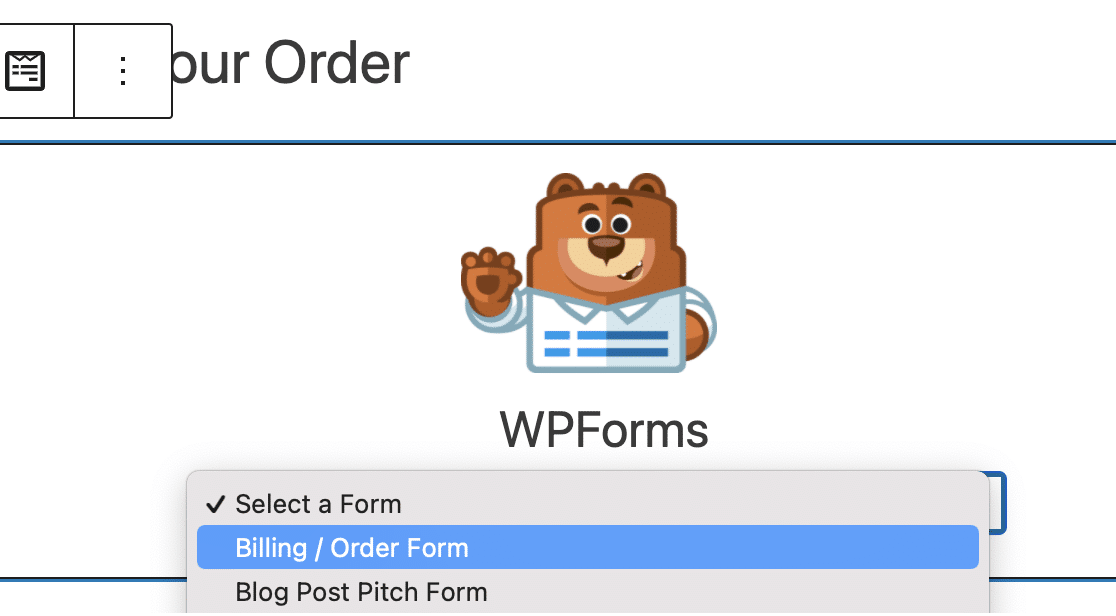
The WPForms widget will now appear inside the block. From here, click on the WPForms dropdown and pick the Stripe form with the Coupon field that you want to display.
Your new form is now ready to be saved or published on your site! When you do publish, just make sure that your website visitors and customers have access to the coupon codes you created, so they can enter them into the Coupon fields on your Stripe forms.
You can share these codes throughout your site, or in promotional emails and other places. Be sure to check out our full article on holiday promo code ideas for a bit of inspiration. You can also configure your form to automatically apply the coupon code when a link to this form is clicked.
Bonus Tip: Track Form Entries and Coupon Usage
If you’re curious about how WPForms keeps track of form submissions, payments, and coupon usage, you’ll be pleased to hear that both Lite and Pro users can easily view all these details.
Start by navigating to WPForms in your WordPress dashboard and then selecting Payments. Once there, click on the Coupons tab to see a quick summary of all the coupon transactions that have taken place.
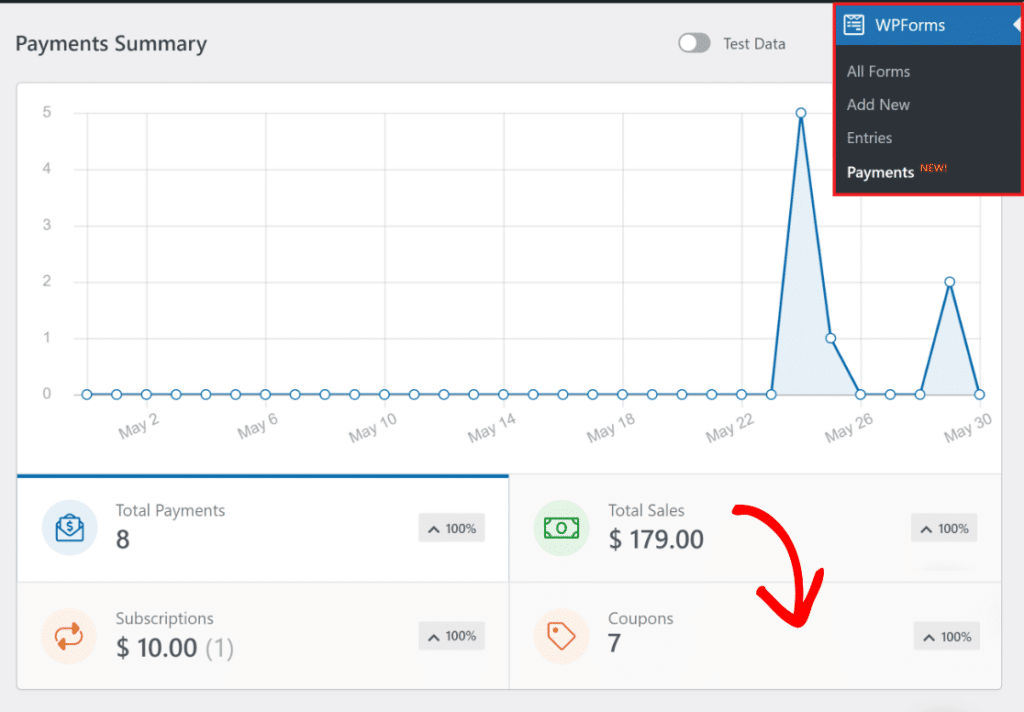
You’ll find a table listing each transaction completed through your form. If you need more information on a specific entry, just click on it for detailed payment and coupon data.

Now, you have everything set up with your payment form, along with coupon tracking, and an organized dashboard to view each sale and coupon usage.
FAQs about How to Add Coupon Fields to Stripe Forms
Why should I add coupon fields to my Stripe forms?
Adding Coupon fields to your Stripe forms comes with lots of benefits to your website! Here are just a few of them:
- Coupons provide a powerful incentive for potential customers to complete their transactions.
- Offering discounts fosters a sense of value.
- Coupons allow you to run targeted promotions and campaigns.
- Coupons encourage customer loyalty because users appreciate the opportunity to save money, which increases the likelihood of repeat business.
- The visibility of a coupon field on your forms can attract new customers who are actively searching for discounts.
In fact, a whole psychology exists behind offering coupons and discounts! Take a look at our full article on the topic to learn more.
How to add coupons in Stripe?
To add coupons in Stripe, you need to create a coupon in the Stripe Dashboard under the “Coupons” section. Once created, you can apply this coupon to subscriptions or invoices manually or through your integration.
However, if you’ve created a form using WPForms, you can always take advantage of the Coupons Addon to to apply these coupons directly in your forms.
Can you add custom fields to Stripe?
Stripe itself doesn’t directly support adding custom fields to its payment forms. However, if you use WPForms with Stripe integration, you can easily add custom fields to your forms, such as name, email, or any other details you need to collect.
How do I add a coupon to WPForms?
To add a coupon to WPForms, you need WPForms Pro along with the Coupons Addon. Once activated, you can easily create and apply coupon codes to your Stripe payment forms, allowing users to receive discounts during the checkout process.
How to create a coupon code?
Creating a coupon code is straightforward with WPForms Pro. After installing the Coupons Addon, navigate to the Coupons section in your WPForms settings.
From there, you can create a new coupon, set the discount amount, and define any usage restrictions. This code can then be applied to your Stripe forms, giving users the option to enter it during checkout.
Next, Add Calculations to Your Forms
No matter the sort of forms you utilize on your site, offering calculation capabilities to your form users is a game-changer. From mortgages to 401Ks and lots of calculations in between, the Calculator addon from WPForms can do it all.
Ready to build your form? Get started today with the easiest WordPress form builder plugin. WPForms Pro includes lots of free templates and offers a 14-day money-back guarantee.
If this article helped you out, please follow us on Facebook and Twitter for more free WordPress tutorials and guides.




Unfortunately coupon doesn’t allow to be proceeded by stripe if the coupon code is 100%. Stripe doesn’t allow to proceed a transaction that is “0”. This is a huge problem at the moment we are struggling with. Maybe you can assist.
Hello Hubertus – I am sorry to hear about the trouble. When you get a chance, please drop us a line with a screenshot in support so we can assist.
If you have a WPForms license, you have access to our email support, so please submit a support ticket.
Otherwise, we provide limited complimentary support in the WPForms Lite WordPress.org support forum.
Thanks 🙂